Entertainment Systems
AUDIO SYSTEMS
AM/FM stereo / single CD/MP3 sound system (if equipped)
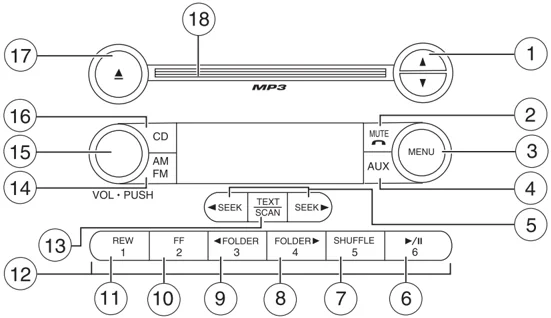
Accessory delay: Your vehicle is equipped with accessory delay. With this feature, the window switches and radio may be used for up to ten minutes after the ignition switch is turned to the OFF position or until any door or trunk is opened.
-
▲ / ▼ Tuner: Press to manually go up or down the radio frequency. Also use in menu mode to select various settings.
-
Phone/mute: Press to mute the playing media. Press again to return to the playing media.
-
Menu: Press to toggle through the following modes:
Bass: Press ▲ / ▼ to adjust the bass setting. Treble: Press ▲ / ▼ to adjust the treble setting. Balance: Press ▲ / ▼ to adjust the audio between the left and right speakers. Fade: Press ▲ / ▼ to adjust the audio between the front and rear speakers.
19
REVIEW COPY — 2007 (com), Owners Guide (post-2002-fmt) (own2002), Market: USA (fus)
Entertainment Systems
Speed sensitive volume: Radio volume changes automatically and slightly with vehicle speed to compensate for road and wind noise. Recommended level is 1–3. Level 0 turns the feature off and level 7 is the maximum setting.
Press MENU to access and use ▲ / ▼ to adjust the volume setting. The level will appear in the display.
Setting the clock: Press MENU until SELECT HOUR or SELECT MINUTE is displayed. Use ▲ / ▼ to manually increase/decrease Press MENU again to disengage clock mode.
Autoset: Allows you to set the strongest local radio stations without losing your original manually set preset stations for AM/FM1/FM2. Press MENU to access. Use ▲ / ▼ to set or turn on/off.
When the six strongest stations are filled, the station stored in preset 1 will begin playing. If there are less than six strong stations, the system will store the last one in the remaining presets. You can then access the stations by pressing the memory presets. To disengage, press MENU to access and press ▲ / ▼ to turn the feature off.
Track/Folder mode: Available only on MP3 discs in CD mode. In track mode, press ◀ SEEK, SEEK ▶ to scroll through all tracks on the disc In folder mode, press ◀ SEEK, SEEK ▶ to scroll through tracks within the selected folder. Press ◀ FOLDER, FOLDER ▶ to access the previous/next folder (if available).
Compress (Compression): Available only in CD/MP3 mode. Press MENU until COMPRESS ON/OFF appears in the display. Use ▲ / ▼ to toggle ON/OFF. When COMPRESS is ON, the system will bring the soft and loud CD passages together for a more consistent listening level.
- Aux: Press to access LINE IN (Auxiliary audio mode). To return to radio mode, press AM/FM. For further information on Auxiliary audio mode, refer to Auxiliary Input Jack later in this chapter.

- Seek: Press to access the previous/next strong radio station or the previous/next track on the compact disc.

20
REVIEW COPY — 2007 (com), Owners Guide (post-2002-fmt) (own2002), Market: USA (fus)
Entertainment Systems
-
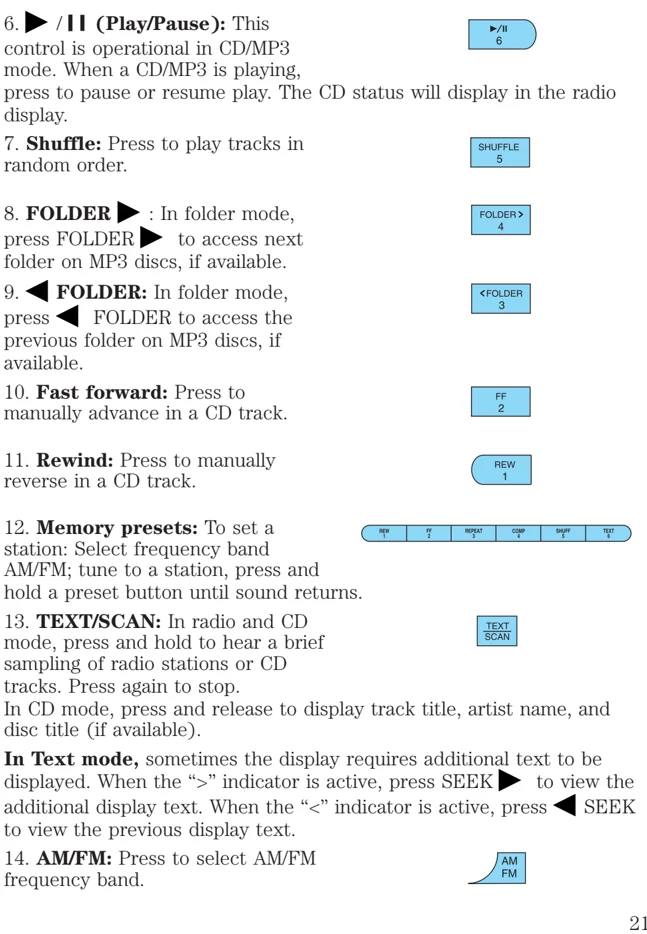
▶ / || (Play/Pause): This control is operational in CD/MP3 mode. When a CD/MP3 is playing, press to pause or resume play. The CD status will display in the radio display.
-
Shuffle: Press to play tracks in random order.
-
FOLDER ▶ : In folder mode, press FOLDER ▶ to access next folder on MP3 discs, if available.
-
◀ FOLDER: In folder mode, press ◀ FOLDER to access the previous folder on MP3 discs, if available.
-
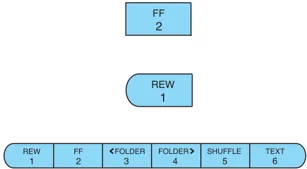
Fast forward: Press to manually advance in a CD track.
-
Rewind: Press to manually reverse in a CD track.
-
Memory presets: To set a station: Select frequency band AM/FM; tune to a station, press and hold a preset button until sound returns.
-
TEXT/SCAN: In radio and CD mode, press and hold to hear a brief sampling of radio stations or CD tracks. Press again to stop.
In CD mode, press and release to display track title, artist name, and disc title (if available).
In Text mode, sometimes the display requires additional text to be displayed. When the “>” indicator is active, press SEEK ▶ to view the additional display text. When the “<” indicator is active, press ◀ SEEK to view the previous display text.
-
AM/FM: Press to select AM/FM frequency band.
21
REVIEW COPY —— 2007 (com), Owners Guide (post-2002-fmt) (own2002), Market: USA (fus)
Entertainment Systems
- ON/OFF/Volume: Press to turn ON/OFF. Turn to increase/decrease volume. If the volume is set above a certain level and the ignition is turned off, the volume will come back on at a "nominal" listening level when the ignition switch is turned back on.

-
CD: Press to enter CD mode. If a CD is already loaded into the system, CD play will begin where it ended last.
-
CD eject: Press to eject a CD.
-
CD slot: Insert a CD label side up.
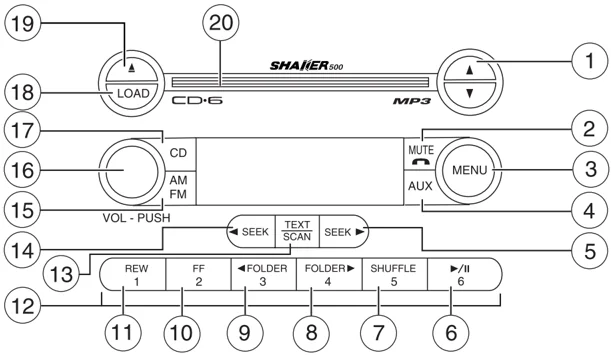
SHAKER 500 — Audiophile In-Dash Six CD/MP3 Sound System (if equipped)
22
REVIEW COPY — 2007 (com), Owners Guide (post-2002-fmt) (own2002), Market: USA (fus)

Entertainment Systems
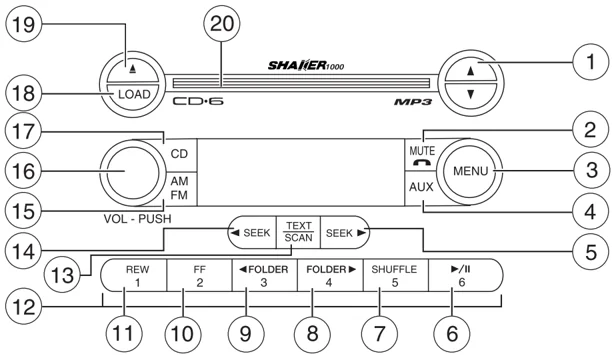
SHAKER 1000 — Audiophile In-dash Six CD/MP3 Sound System (if equipped)
Accessory delay: Your vehicle is equipped with accessory delay. With this feature, the window switches and radio may be used for up to ten minutes after the ignition switch is turned to the OFF position or until either door or the trunk is opened.
Your vehicle may be equipped with the SHAKER 1000® audio system. This system is equipped with a rack of amplifiers and subwoofers in the trunk of the vehicle.
The SHAKER 1000® audio system is capable of producing very high sound pressure levels. For your listening comfort and protection, it is not recommended to listen to the SHAKER 1000® audio system at high volume levels for extended periods of time.
- ▲ / ▼ Tune/Disc selector: Press and release to manually advance up/down the radio frequency or to select a desired disc. Press and hold for a fast advance through radio frequencies or all loaded discs. Also use in menu mode to select various settings.
23
REVIEW COPY —— 2007 (com), Owners Guide (post-2002-fmt) (own2002), Market: USA (fus)
Entertainment Systems
In CATEGORY MODE, press ▲ / ▼ to scroll through the list of available Sirius channel Categories (Pop, Rock, News, etc.). Refer to Category Mode under Menu for further information. Satellite radio is available only with a valid SIRIUS subscription. Check with your authorized dealer for availability.
-
Phone/mute: Press to mute the playing media. Press again to return to the playing media.
-
MENU: Press repeatedly to cycle through the following modes:

Setting the clock: Press until SELECT HOUR or SELECT MINS is displayed. Press ▲ / ▼ /◀ SEEK ▶ to adjust the hours/minutes.
SHAKER (Available with the SHAKER 1000 only): Select to engage SHAKER 1000 mode. SHAKER 1000 mode enhances acoustic sound for all seating locations and increases the signal to the trunk mounted speakers and amplifiers for enhanced bass performance. Use ▲ /▼ or ◀ SEEK ▶ to toggle SHAKER mode on/off.
CATEGORY (Satellite Radio if equipped): Press MENU until the currently active category appears in the display (CATEGORY MODE). In CATEGORY MODE, press ▲ / ▼ to scroll through the list of available SIRIUS channel Categories (POP, ROCK, COUNTRY, INFORM, etc.) Press and release ◀ SEEK▶ or press and hold SCAN to initiate a search of that category (i.e. COUNTRY). To select a different category, press MENU until the category appears in the display. Press ▲ / ▼ to select a different category. You may also select CATEGORY ALL to seek all available SIRIUS categories and channels. Satellite radio is available only with a valid SIRIUS subscription. Check with your authorized dealer for availability.
Track/Folder Mode: Available only on MP3 discs in CD mode. In Track Mode, pressing ◀ SEEK ▶ will scroll through all tracks on the disc. In Folder mode, pressing ◀ SEEK ▶ will scroll only through tracks within the selected folder.
Compression: Available only in CD mode, brings soft and loud CD passages together for a more consistent listening level.
24
Entertainment Systems
Autoset: Allows you to set the strongest local radio stations without losing your original manually set preset stations for AM/FM1/FM2. Press MENU to access. Use ▲ / ▼ / ◀ SEEK ▶ to set or turn on/off.
When the six strongest stations are filled, the station stored in preset 1 will begin playing. If there are less than six strong stations, the system will store the last one in the remaining presets. You can then access the stations by pressing the memory presets. To disengage, press MENU to access and press ▲ / ▼ / ◀ SEEK ▶ to turn the feature off.
Bass: Press to adjust the bass setting. Use ▲ / ▼ / ◀ SEEK ▶ .
Treble: Press to adjust the treble setting. Use ▲ / ▼ / ◀ SEEK ▶ .
Balance: Press to adjust the audio between the left and right speakers. Use ▲ / ▼ / ◀ SEEK ▶ .
Fade: Press to adjust the audio between the front and rear speakers. Use ▲ / ▼ / ◀ SEEK ▶ .
Occupancy mode: Use ▲ / ▼ / ◀ SEEK ▶ select and optimize sound for ALL SEATS, DRIVERS SEAT, REAR SEATS or CONVERTIBLE (if equipped).
SPEEDVOL (Speed sensitive volume): Radio volume changes automatically and slightly with vehicle speed to compensate for road and wind noise. Recommended level is 1–3. Level 0 turns the feature off and level 7 is the maximum setting.
Press MENU to access and use ▲ / ▼ / ◀ SEEK ▶ to adjust the volume setting. The level will appear in the display.
RBDS: Available only in FM mode. This feature allows you to search RBDS-equipped stations for a certain category of music format: CLASSIC, COUNTRY, INFORM, JAZZ/RB, ROCK, etc.
To activate, press MENU repeatedly until RBDS (ON/OFF) appears in the display. Use ▲ / ▼ / ◀ SEEK ▶ to toggle RBDS ON/OFF. When RBDS is OFF, you will not be able to search for RBDS equipped stations or view the station name or type.
To search for specific RBDS music categories: When the desired category appears in the display, press ▲ / ▼ to find the desired type, then press and release ◀ SEEK ▶ or press and hold SCAN to begin the search.
25




Entertainment Systems
To view the station name or type: When the desired category appears in the display, press TEXT/SCAN to toggle between displaying the station type (COUNTRY, ROCK, etc.) or the station name (WYCD, WXYZ, etc.).
- AUX: Press to cycle through toggle between SAT1, SAT2 and SAT3 (Satellite Radio mode, if equipped) and LINE IN (Auxiliary audio mode). For more information on Auxiliary audio mode, refer to Auxiliary Input Jack later in this chapter.

To return to radio mode, press AM/FM. Satellite radio is available only with a valid SIRIUS subscription. Check with your authorized dealer for availability..
- Seek: Press to access the next (► ) strong station or CD track.
In Satellite Radio mode (if equipped), press ► to seek to the previous/next channel. If a specific category is selected, (Jazz, Rock, News, etc.), press ► to seek to the next channel in the selected category. Press and hold ► to fast seek through the previous /next channels.
In TEXT MODE, press ► to view the additional display text.
In CATEGORY MODE, press ► to select a category.
Satellite radio is available only with a valid SIRIUS subscription. Check with your authorized dealer for availability.
- Play/pause: This control is operational in CD/MP3 mode. When a CD/MP3 is playing, press to pause or resume play. The CD status will display in the radio display.

- SHUFFLE: Press to play the tracks in random order.

- FOLDER: Press to access next folder on MP3 discs, if folders are available.

- FOLDER: Press to access the previous folder on MP3 discs, if folders are available.

26
Entertainment Systems
-
Fast forward: Press to manually advance in a CD/MP3 track.
-
Rewind: Press to manually reverse in a CD/MP3 track.
-
Memory presets: To set a station, select the desired frequency band, AM, FM1 or FM2. Tune to the desired station. Press and hold a preset button until sound returns and PRESET # SAVED appears in the display. You can save up to 18 stations, six in AM, six in FM1 and FM2.
In Satellite Radio mode (if equipped), there are 18 available presets, six each for SAT1, SAT2 and SAT3. To save satellite channels in your memory presets, tune to the desired channel then press and hold a preset control until sound returns.
Satellite radio is available only with a valid SIRIUS subscription. Check with your authorized dealer for availability.
- TEXT/SCAN: In radio and CD/MP3 mode, press and hold to hear a brief sampling of radio stations or CD tracks. Press again to stop.


In CD/MP3 mode, press and release to display track title, artist name, and disc title and file name (if available).
In Satellite radio mode (if equipped), press and release to enter TEXT MODE and display the current song title. While in TEXT MODE, press again to scroll through the current song title, artist, channel category and the SIRIUS long channel name.
In TEXT MODE, sometimes the display requires additional text to be displayed. When the “>” indicator is active, press SEEK ▶ to view the additional display text. When the “>” indicator is active, press ◀ SEEK to view the previous display text.
In Satellite Radio mode (if equipped), press and hold to hear a brief sampling of the next channels. Press again to stop.
- Seek: Press to access the previous (◀ ) or strong station or CD track.


27
Entertainment Systems
In Satellite Radio mode (if equipped), press ◀ SEEK to seek to the previous channel. If a specific category is selected, (Jazz, Rock, News, etc.), press ◀ SEEK to seek to the previous channel in the selected category. Press and hold ◀ SEEK to fast seek through the previous channels.
In TEXT MODE, press ◀ SEEK to view the previous display text.
In CATEGORY MODE, press ◀ SEEK to select a category.
Satellite radio is available only with a valid SIRIUS subscription. Check with your authorized dealer for availability.
-
AM/FM: Press to select AM/FM1/FM2 frequency band.

-
ON/OFF/Volume: Press to turn ON/OFF. Turn to increase/decrease volume. If the volume is set above a certain level and the ignition is turned off, the volume will come back on at a “nominal” listening level when the ignition switch is turned back on.

-
CD: Press to enter CD/MP3 mode. If a CD/MP3 is already loaded into the system, CD play will begin where it ended last.

-
LOAD: Press to begin the CD load sequence. When the radio prompts to select a slot, use the presets to select the desired slot to load the CD. If the selected slot already contains a CD, the display will read SLOT FULL. Press and hold to autoload up to 6 CDs. Load CDs one at a time when the radio prompts to load a CD.

-
CD eject: Press to begin the CD eject sequence When the radio prompts to select a CD, use the presets to select the desired CD to eject. Press and hold to auto eject all CDs present in the system. If there is no CD present, the display will read NO CD.


28
Entertainment Systems
- CD slot: Insert one CD/MP3 at a time, label side up, when the system prompts to load a CD.
 MP3 track and folder structure
 MP3 track and folder structure
Your MP3 system recognizes MP3 individual tracks and a folder structure as follows:
- There are two different modes for MP3 disc playback: MP3 track mode (system default) and MP3 folder mode.
- MP3 track mode ignores any folder structure present on the MP3 disc. The player sequentially numbers each MP3 track on the disc (denoted by the .mp3 file extension) from T001 to T255.
- MP3 folder mode represents a folder structure consisting of one level of folders. The CD player sequentially numbers all MP3 tracks on the disc (denoted by the .mp3 extension) and all folders containing MP3 files, from 01–01 to 99–99. The first two digits denote the folder number and the last two digits denote the track number within that folder.
- Creating discs with only one level of folders will help with navigation through the disc files.
Auxiliary input jack
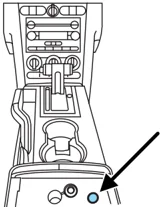
Your vehicle is equipped with an Auxiliary Input Jack (AIJ). The Auxiliary Input Jack provides a way to connect your portable music player to the in-vehicle audio system. This allows the audio from a portable music player to be played through the vehicle speakers with high fidelity. To achieve optimal performance, please observe the following instructions when attaching your portable music device to the audio system.
 Required equipment:
- Any portable music player designed to be used with headphones
- An audio extension cable with stereo male 1/8 in. (3.5 mm) connectors at each end
29
Entertainment Systems
To play your portable music player using the auxiliary input jack:
- Begin with the vehicle parked and the radio turned off.
- Ensure that the battery in your portable music player is new or fully charged and that the device is turned off.
- Attach one end of the audio extension cable to the headphone output of your player and the other end of the audio extension cable to the AIJ in your vehicle.
- Turn the radio on, using either a tuned FM station or a CD loaded into the system. Adjust the volume to a comfortable listening level.
- Turn the portable music player on and adjust the volume to 1/2 the volume.
- Press AUX on the vehicle radio repeatedly until LINE IN appears in the display. You should hear audio from your portable music player although it may be low.
- Adjust the sound on your portable music player until it reaches the level of the FM station or CD by switching back and forth between the AUX and FM or CD controls.
Troubleshooting:
- Do not connect the audio input jack to a line level output. Line level outputs are intended for connection to a home stereo and are not compatible with the AIJ. The AIJ will only work correctly with devices that have a headphone output with a volume control.
- Do not set the portable music player's volume level higher than is necessary to match the volume of the CD or FM radio in your audio system as this will cause distortion and will reduce sound quality. Many portable music players have different output levels, so not all players should be set at the same levels. Some players will sound best at full volume and others will need to be set at a lower volume.
- If the music sounds distorted at lower listening levels, turn the portable music player volume down. If the problems persists, replace or recharge the batteries in the portable music player.
- The portable music player must be controlled in the same manner when it is used with headphones as the AIJ does not provide control (play, pause, etc.) over the attached portable music player.
- For safety reasons, connecting or adjusting the settings on your portable music player should not be attempted while the vehicle is moving. Also, the portable music player should be stored in a secure location, such as the center console or the glove box, when the vehicle is in motion. The audio extension cable must be long enough to allow the portable music player to be safely stored while the vehicle is in motion.
30
Entertainment Systems
GENERAL AUDIO INFORMATION
Radio frequencies: AM and FM frequencies are established by the Federal Communications Commission (FCC) and the Canadian Radio and Telecommunications Commission (CRTC). Those frequencies are: AM - 530, 540–1600, 1710 kHz FM- 87.7, 87.9–107.7, 107.9 MHz
Radio reception factors: There are three factors that can affect radio reception:
- Distance/strength: The further you travel from a station, the weaker the signal and the weaker the reception.
- Terrain: Hills, mountains, tall buildings, power lines, electric fences, traffic lights and thunderstorms can interfere with your reception.
- Station overload: When you pass a broadcast tower, a stronger signal may overtake a weaker one and play while the weak station frequency is displayed.
CD player care: Do:
- Handle discs by their edges only. Never touch the playing surface.
- Inspect discs before playing. Clean only with an approved CD cleaner and wipe from the center out.
Don't:
- Expose discs to direct sunlight or heat sources for extended periods of time.
- Insert more than one disc into each slot of the CD changer magazine.
- Clean using a circular motion.
CD units are designed to play commercially pressed 4.75 in (12 cm) audio compact discs only. Due to technical incompatibility, certain recordable and re-recordable compact discs may not function correctly when used in Ford CD players. Irregular shaped CDs, CDs with a scratch protection film attached, and CDs with homemade paper (adhesive) labels should not be inserted into the CD player. The label may peel and cause the CD to become jammed. It is recommended that homemade CDs be identified with permanent felt tip marker rather than adhesive labels. Ball point pens may damage CDs. Please contact your authorized dealer for further information.
31
Entertainment Systems
Audio system warranty and service: Refer to the Warranty Guide for audio system warranty information. If service is necessary, see your dealer or qualified technician.
Satellite radio information (if equipped) Satellite radio channels: SIRIUS broadcasts a variety of music, news, sports, weather, traffic and entertainment satellite radio channels. For more information and a complete list of SIRIUS satellite radio channels, visit www.sirius.com in the United States, www.sirius-canada.ca in Canada, or call SIRIUS at 1-888-539-7474.
Satellite radio reception factors: To receive the satellite signal, your vehicle has been equipped with a satellite radio antenna. Like AM/FM, there are several factors that can affect satellite radio reception performance:
- Antenna Obstructions: For optimal reception performance, keep the antenna clear of snow and ice build-up and keep luggage and any material as far away from the antenna as possible.
- Terrain: Hills, mountains, tall buildings, bridges, tunnels, freeway overpasses, parking garages, dense tree foliage and thunderstorms can interfere with your reception.
- Station overload: When you pass a ground based broadcast repeating tower, a stronger signal may overtake a weaker one and result in an audio mute.
Unlike AM/FM audible static, you will hear an audio mute when there is a satellite radio signal interference. Your radio display may display NO SIGNAL to indicate the interference.
SIRIUS satellite radio service: SIRIUS Satellite Radio is a subscription based satellite radio service that broadcasts music, sports, news and entertainment programming. A service fee is required in order to receive SIRIUS service. Vehicles that are equipped with a factory installed SIRIUS Satellite Radio system include:
- Hardware and limited subscription term, which begins on the date or sale or lease of the vehicle.
- Online media player providing access to all 65 SIRIUS music channels over the internet (U.S. customers only).
32
Entertainment Systems
For information on extended subscription terms, contact SIRIUS at 1-888-539-7474.
Note: SIRIUS reserves the unrestricted right to change, rearrange, add or delete programming including canceling, moving or adding particular channels, and its prices, at any time, with or without notice to you. Ford Motor Company shall not be responsible for any such programming changes.
Satellite Radio Electronic Serial Number (ESN): This 12 digit Satellite Serial Number is needed to activate, modify or track your satellite radio account. You will need this number when communicating with SIRIUS. While in Satellite Radio mode, you can view this number on the radio display by pressing AUX and Preset 1 control simultaneously.
| Radio Display | Condition | Action Required |
|---|---|---|
| ACQUIRING | Radio requires more than two seconds to produce audio for the selected channel. | No action required. This message should disappear shortly. |
| SAT FAULT | Internal module or system failure present. | If this message does not clear within a short period of time, or with an ignition key cycle, your receiver may have a fault. See your authorized dealer for service. |
| INVALID CHNL | Channel no longer available. | This previously available channel is no longer available. Tune to another channel. If the channel was one of your presets, you may choose another channel for that preset button. |
| UNSUBSCRIBED | Subscription not available for this channel. | Contact SIRIUS at 1-888-539-7474 to subscribe to the channel, or tune to another channel. |
33
Entertainment Systems
| Radio Display | Condition | Action Required |
|---|---|---|
| NO TEXT | Artist information not available. | Artist information not available at this time on this channel. The system is working properly. |
| NO TEXT | Song title information not available. | Song title information not available at this time on this channel. The system is working properly. |
| NO TEXT | Category information not available. | Category information not available at this time on this channel. The system is working properly. |
| NO SIGNAL | Loss of signal from the SIRIUS satellite or SIRIUS tower to the vehicle antenna. | You are in a location that is blocking the SIRIUS signal (i.e., tunnel, under an overpass, dense foliage, etc). The system is working properly. When you move into an open area, the signal should return. |
| UPDATING | Update of channel programming in progress. | No action required. The process could take up to three minutes. |
| CALL SIRIUS 1-888-539-7474 | Satellite service has been deactivated by SIRIUS Satellite Radio. | Call SIRIUS at 1-888-539-7474 to re-activate or resolve subscription issues. |
34