 P82-0003-B13A
Exterior Lamp Switch
Canada only: When the engine is running and the selector lever is in a driving position, the low beam (includes parking lamps, side marker lamps, taillamps and license plate lamps) are automatically switched on.
When shifting from a driving position to position "N" or "P", the low beam switches off (2 seconds delay).
For nighttime driving the exterior lamp switch should be turned to position to permit activation of the high beam headlamps.
Off
Parking lamps (includes side marker lamps, tail-lamps, license plate lamps, instrument panel lamps) Canada only: When the engine is running, the low beam is additionally switched on.
Parking lamps plus low beam or high beam headlamps (combination, switch pushed forward)
Standing lamps, right (turn left one stop)
Standing lamps, left (turn left two stops)
Fog lamps (pull out one stop) with parking and/or headlamps on
Rear fog lamp (pull out to 2nd detent) In addition to fog lamps. Indicator lamp in lamp switch comes on
Standing Lamps
When the vehicle is parked on the street the standing lamps (right or left side parking lamps) can be turned on, making the vehicle more visible to passing vehicles.
The standing lamps can only be operated with the key in steering lock position 0 or 1.
Note: With the key removed and a door open, a warning sounds if the vehicle's exterior lamps (except standing lamps) are not switched off.
Fog lamps will operate with the parking lamps and the low or high beam headlamps. Fog lamps should only be used in conjunction with low beam headlamps. Consult your state Motor Vehicle Regulations regarding allowable lamp operation.
Fog lamps are automatically switched off when the exterior lamp switch is turned to position .
51
Combination Switch
1 Low beam (exterior lamp switch position ) 2 High beam (exterior lamp switch position ) 3 High beam flasher (high beam available independent of exterior lamp switch position) 4 Turn signals, right 5 Turn signals, left
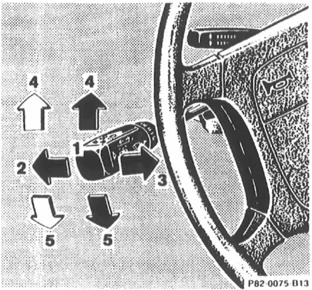
To signal minor directional changes, such as changing lanes on a highway, move combination switch to the point of resistance only and hold it there.
To operate the turn signals continuously, move the combination switch past the point of resistance (up or down). The switch is automatically canceled when the steering wheel is turned to a large enough degree.
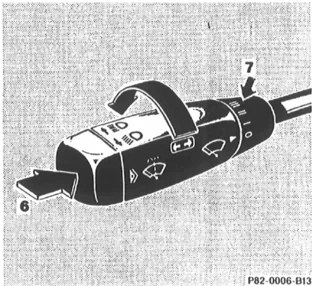
6 Press switch briefly: One wipe without washer water (select only if window is wet) Press switch past resistance point: Windshield washer, windshield wiper; headlamp cleaning system (only in exterior lamp switch positions or Canada only: also in position when the engine is running)
7 Windshield wiper 0 Wiper off I Intermittent wiping II Normal wiper speed III Fast wiper speed
Note: The windshield washer reservoir, hoses and nozzles are automatically heated.
52
Windshield Washer Fluid Mixing Ratio
For temperatures above freezing: MB Windshield Washer Concentrate "S" and water 1 part "S" to 100 parts water (40 ml "S" to 1 gallon water).
For temperature below freezing: MB Windshield Washer Concentrate "S" and commercially available premixed windshield washer solvent/antifreeze 1 part "S" to 100 parts solvent (40 ml "S" to 1 gallon solvent).
Windshield Wiper Smears
If the windshield wiper smears the windshield, even during rain, activate the washer system as often as necessary. The fluid in the washer reservoir should be mixed in the correct ratio
Blocked Windshield Wiper
If the windshield wiper becomes blocked (for example, due to snow), switch off the wiper motor.
For safety reasons before removing ice or snow, remove key from steering lock. Remove blockage.
Activate combination switch again (key in steering lock position 1).
Emergency Operation of Windshield Wiper
In case of windshield wiper malfunction, turn combination switch to wiper setting II.
Have the system checked at your authorized Mercedes-Benz dealer as soon as possible.
Signaling Turns with Hazard Warning Flasher in Use
For example, when the vehicle is being towed (key in steering lock turned to position 2): With hazard warning flasher on, activate combination switch for left or right turn signal - only the selected turn signal will blink.
Upon canceling the turn signal, the hazard warning flasher will operate again.
Turn Signal Failure
If one of the turn signals fails, the turn signal indicator system flashes and sounds at a faster than normal rate. In addition, the exterior lamp failure indicator will come on.
53
 PA1-0002-B13E
Exterior Rear View Mirrors The switch is located in the center console.
Turn key in steering lock to position 2. First select the mirror to be adjusted - turn switch:
1 Left mirror 2 Right mirror
To adjust, move the switch forward, backward or to either side.
Warning! Exercise care when using the passenger-side mirror. The passenger-side exterior mirror is convex (outwardly curved surface for a wider field of view). Objects in mirror are closer than they appear. Check your inside rear view mirror or glance over your shoulder before changing lanes.
Note: The exterior mirrors have electrically heated glass. The heater switches on automatically, depending on outside temperature. If the mirror housing is forcibly pivoted from its normal position, it must be repositioned by applying firm pressure until it snaps into place.
Storing Mirror Positions in Memory The exterior rear view mirror positions are stored in memory with the seat/head restraint/ steering column position and can be recalled when necessary, see Index.
 PB1-0007-B13A
Inside Rear View Mirror, Electrically Adjustable The switch is located in the center console.
Turn key in steering lock to position 2.
Turn the switch for the exterior rear view mirror adjustment to its center position and adjust by moving the switch forward, backward or to either side.
54
Antiglare Night Position
With the key in steering lock position 2, the mirror reflection brightness responds to changes in light sensitivity.
Storing Mirror Positions In Memory
The interior rear view mirror positions are stored in memory with the seat/head restraint/ steering column position and can be recalled when necessary, see Index.
Note:
If the inside rear view mirror was adjusted separately, the originally stored position remains in memory. To recall position, press the desired position button.
 P81-0005-B13
Sun Visors
Swing sun visors down to protect against sun glare.
If sunlight enters through a side window, disengage visor from inner mounting and pivot to the side.
 P81-0008-B13
I lluminated Vanity Mirrors
With the visor engaged in its inner mounting, the lamp can be switched on by opening the cover.
Warning!
Do not use the vanity mirror while driving.
55
 P54-0178-013
1 Adjusting knob
Instrument Lamps
Rotate adjusting knob (1) to vary intensity of instrument lamps.
Display Illumination
Press adjusting knob to briefly illuminate the display (with key removed or in steering lock position 0 or 1).
With exterior lamps switched on the display illumination becomes automatically dim.
Rotate adjusting knob clockwise to its stop to override the dimmed illumination.
Trip odometer
To reset:
- Press adjusting knob (1) once (with key in steering lock position 2). Press adjusting knob (1) twice (with key removed or in steering lock position 0 or 1)
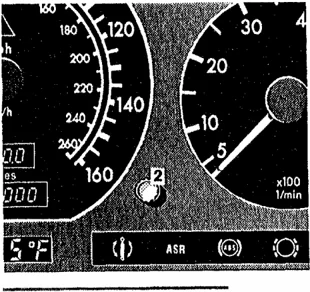
Setting Clock
Adjusting clock one minute ahead or back: Pull out adjustment knob (2), briefly turn to the right respectively left and release knob. Adjusting clock more than one minute ahead or back: Pull out adjustment knob (2), turn to the right respectively left and hold until the desired time is set. Within the first 2 seconds, the minute hand advances 8 minutes and advances another 8 minutes every additional second thereafter.
56
 P88-0022-B13
Storage Compartment (Eyeglasses Compartment) in the Dashboard 1 Storage compartment (eyeglasses compartment) 2 Button for storage compartment 3 Lock
Opening compartment (1): Press button (2).
Note: The storage compartments and door pockets may be locked and unlocked by using the master key in lock (3). For interior central locking system see Index.
Locking: Turn master key in lock (3) to the right and remove.
Unlocking: Turn master key back to vertical position.
Caution! Keep compartment lids closed. This will prevent stored objects from being thrown about and injuring vehicle occupants during an accident.
 P97-0005-B13
Console Storage Compartments
To open front compartment (cassette storage): Slide cover (1) back.
Opening rear compartment: Press button (2).
The compartments can be locked and unlocked with the central locking system.
57
Door Pockets
To open: Lift cover.
 P72-0002-B13A
Rear Storage Compartments
To open compartment: Press button (1) and lift cover.
 P81-0001-B13
Lighter
1 Cover 2 Lighter
Turn key in steering lock to position 1 or 2.
Slide cover (1) forward.
Push in lighter (2); it will pop out automatically when hot.
Warning! Never touch the heating element or sides of the lighter, hold at knob only.
 P81-0003-B13
58
 PB2-0045-013
I nterior Lighting
The switch is located above the inside rear view mirror.
I nterior Lamp
1 Interior lamps are switched on, and off delayed, when unlocking or locking the vehicle, or when opening either door. However, there will be no delay when the key is in steering lock position 2. 2 Interior lamps switched off. 3 Interior lamps switched on continuously.
 PB2-0044-R15
Reading Lamps
4 Left reading lamp switched on, 5 Reading lamps switched off. 6 Right reading lamp switched on.
Entrance Lamps, Exit Lamps
Entrance lamps are located in the footwells under the dashboard. Exit lamps are located in the door pockets. These lamps are switched on and off by the door contact switches.
Note: To prevent the vehicle battery from being discharged, do not leave doors open for a long period of time.
59
 184
Rear Window Defroster The switch is located in the center console. Turn key in steering lock to position 1 or 2. When activating the rear window defroster, the indicator lamp in the switch will come on.
Note: The rear window defroster uses a large amount of power. To keep the battery drain to a minimum, turn off the defroster as soon as the window is clear. The defroster is automatically turned off after a maximum of 20 minutes of operation. Heavy accumulation of snow and ice should be removed before activating the defroster.
If several power consumers are turned on simultaneously, or the battery is only partially charged, it is possible that the defroster will automatically turn itself off. When this happens, the indicator lamp inside the switch starts blinking. As soon as the battery has sufficient voltage, the defroster automatically turns itself back on.
 P67-0001-D13
Power Windows The switch is located in the center console. Turn key in steering lock to position 2. Press switch up to resistance point: to close to open Release switch when window is in desired position.
60
Press switch [icon: down arrow] past resistance point and release - window lowers to fully open position. To interrupt procedure, briefly press [icon: down arrow] or [icon: up arrow].
Warning! When leaving the vehicle, always remove the key from the steering lock. Do not leave children unattended in the vehicle. Unsupervised use of vehicle equipment may cause serious personal injury.
Note: The power windows can also be closed with the key or infrared remote control while locking the vehicle doors or trunk (see Central Locking System in Index
Synchronizing Power Windows
With ignition key in steering lock position 2, press [icon: up arrow] side of power window switch until the window is completely closed and hold for additional 2 seconds. Repeat procedure for each window.
Important! Do not close a door with the windows fully closed while the power supply is interrupted (battery disconnected or empty). Doing so could damage the window frame.
The power windows should first be resynchronized.
 P85-0001-B13
Roll Bar The switch is located in the center console. Turn key in steering lock to position 2. Press switch Upper half = to raise Lower half = to lower The lowering or raising procedure is immediately interrupted by releasing the roll bar switch.
61
If the roll bar was raised using the switch, it will be automatically lowered when activating the soft top switch.
The roll bar will be automatically raised in an accident or in a potentially dangerous driving situation. A ratchet noise can be heard when the roll bar is automatically raised.
The roll bar can be lowered again after an automatic deployment by pressing the upper half of the roll bar switch (for at least 5 seconds) until the roll bar drive mechanism audibly engages. Then press the lower half of the switch to lower the roll bar.
Warning! This vehicle is a two occupant vehicle. The rear storage area should never be used by any persons. Raising or lowering of the roll bar could injure rear seated occupants.
Before operating the roll bar switch make sure that the roll bar's path is clear and no persons due to inattention are injured by the moving roll bar.
For your own safety we recommend to drive with the roll bar raised, if
- the outside temperature is below -15°C (5°F)
- the soft top is closed and pets are placed in the rear storage area.
Items being transported in the area behind the seats should be placed in such a manner as not to affect the movement of the roll bar when being raised.
Note: If the indicator lamps in the switch are blinking or if the warning lamp in the instrument cluster comes on, then a malfunction has been detected. In this case, drive only with the roll bar raised until the defect has been repaired. Raise the roll bar by pressing the upper half of the roll bar switch. The indicator lamps in the switch will go out, however, the warning lamp in the instrument cluster will stay on. Have the system checked at your authorized MERCEDES-BENZ dealer as soon as possible.
Important!
The roll bar is intended to be a safety enhancement to the other features designed into the vehicle. No system in any vehicle can eliminate the possibility of serious injury or fatality in an accident. Properly fastened seat belts and child restraints must be used!
Hardtop
The removal or attachment of the hardtop can be carried out by 2 persons.
Warning! Do not place your hands between the hardtop and the car body while the hardtop is being locked or unlocked. Serious personal injury may occur.
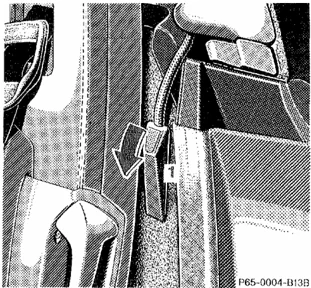
P65-0004-B13B
Removing Hardtop
- Engage parking brake.
- Open doors.
- Disconnect plug (1) for rear window defroster.
- Within 10 seconds of turning key in steering lock to position 2 (engine not running), slide soft top switch (2) back and hold.
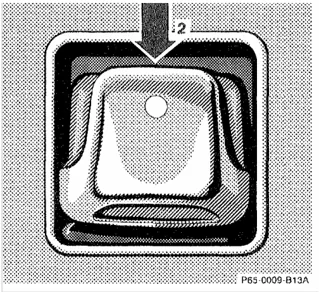
P65-0009-B13A
Please note, if soft top switch is activated after 10 sec. have expired, turn the key back to position 0 first before the hardtop removing procedure can be started again at step 4.
The unlocking procedure begins after approx. 2 seconds:
- The roll bar lowers.
- The indicator lamp in the soft top switch lights up.
- The hardtop unlocks.
63
5. After the hardtop has unlocked remove the key from the steering lock and turn radio off to lower antenna. The indicator lamp in the soft top switch should go out.
Important! Removal of the key from the steering lock is a safety measure ensuring that the key cannot be turned to position 2 and the soft top switch is without function should anybody push the switch forward causing the roof locking mechanism to work. If hands are at that moment between roof and car body they can be badly injured.
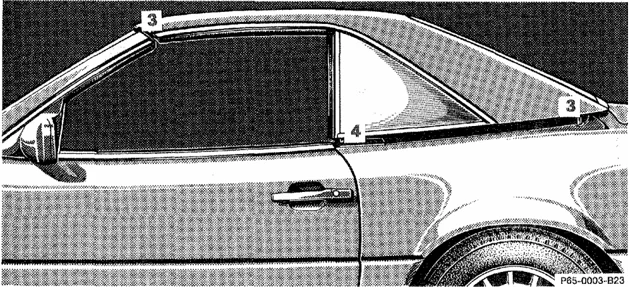
6. Lift the hardtop vertically from its attachment points (3) and locating points (4) and carefully remove to the rear. Exercise caution when maneuvering the top. To avoid paint damage, the top's mounting pins must not be allowed to contact the body.
64
 P65-0003-B23A
Attaching Hardtop
- Engage parking brake and turn key in steering lock to position 2,
- Lower roll bar,
- Open doors or windows.
- Turn radio off to lower power antenna, turn key in steering lock to position 0 and remove.
- From the rear of the vehicle, lift the hardtop carefully over the attachment points (1) and locating points (2). First guide the rear pins of the top vertically into the rear attachment points, then lower the roof onto the vehicle and locate the front locking pins. Exercise caution when maneuvering the top. To avoid paint damage, the top's mounting pins must not be allowed to contact the body.
- Turn key in steering lock to position 2. The indicator lamp in the soft top switch lights up.
- Slide soft top switch (3) forward - the hardtop should lock and the indicator lamp in the switch should go out.
 P65-0009-B13B
65
 P65-0004-B13C
8. Connect plug (4) for rear window defroster.
Warning! The raising or lowering procedure of the soft top is not completed if the indicator lamp in the soft top switch:
- does not go out (with key in steering lock position 2),
- blinks when starting to drive and an alarm sounds.
When safe to do so, immediately stop the vehicle and lock the soft top:
- Turn key in steering lock to position 2,
- Slide soft/hardtop switch forward. Do not drive the car with the hardtop not locked, as that could cause personal injury to you or your passenger, or personal injury or property damage to others
Notes: For safety reasons, the hardtop can only be unlocked while the vehicle is standing still, and within 10 seconds after turning the key to steering lock position 2 or beyond.
If the indicator lamp in the soft top switch blinks while activating the switch, the battery voltage may be insufficient - start engine to charge battery before shutting engine off and attempting to unlock the roof again.
If the indicator lamp continues to blink, remove the hardtop (see Index), and have the system checked at your authorized Mercedes-Benz dealer as soon as possible.
66
Soft Top
A minimum height clearance of 2 meters (6.5 ft) is required to lower or raise the soft top.
Do not lower a frozen soft top until thawed and dry.
The soft top must be dry before lowering it into the storage compartment.
The soft top should not be lowered or raised at outside temperatures below + 5°F (-15°C )
The lowering or raising procedure is immediately interrupted by releasing the soft top switch.
Warning! Before operating the soft top switch make sure that no persons due to inattention are injured by the moving parts (roll bar, soft top frame and soft top lid).
Hands must never be placed near the roll bar, soft top frame, upper windshield area or soft top storage
compartment while the soft top is being locked or unlocked. Serious personal injury may occur.
Lowering Soft Top
- Engage parking brake.
- Turn key in steering lock to position 2.
- Slide soft top switch (1) back and hold.
• The side windows lower. • The roll bar lowers. • The indicator lamp in the soft top switch lights up. • The soft top is lowered into the soft top storage compartment. • The storage compartment cover closes and locks. • The indicator lamp in the switch goes out - the lowering procedure is completed.
If the soft top switch is held or is released and slid back again within approx. 2 seconds, the side windows will close. If the roll bar was previously in the upright position, it will return to that position.
However, the side windows and the roll bar can also be activated using their respective switches.
Note: A wet or frozen soft top must not be folded until thawed and dry.
67
 P77-0008-B13A
Raising Soft Top
-
Engage parking brake.
-
Turn key in steering lock to position 2.
-
Fold down sun visors.
-
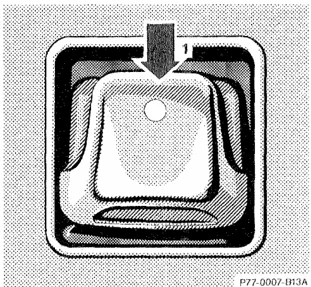
Slide soft top switch (2) forward and hold:
- The side windows lower.
- The roll bar lowers.
- The indicator lamp in the soft top switch lights up.
- The soft top closes and locks.
Note: If the soft top does not engage in the windshield header attachment points, then release the soft top switch. Reach into the grip (3) and guide the pins into their respective locks while pulling down, slide soft top switch (2) forward again.
- The indicator lamp in the soft top switch goes out -the closing procedure is completed.
 P77-0006-B13A
If the soft top switch is held or is released and slid forward again within approx. 2 seconds, the side windows will close. If the roll bar was previously in the upright position, it will return to that position.
However, the side windows and the roll bar can also be activated using their respective switches.
68
Warning!
The soft top is not locked:
- if the indicator lamp in the soft top switch does not go out (key in steering lock position 2),
- if the indicator lamp blinks when starting to drive and an audible warning sounds simultaneously.
Stop the vehicle and before continuing to drive, lock the soft top: The key should be in steering lock position 2.
Slide soft top switch forward. If the soft top is not locked, it may fold back or forward when driving. During soft top operation, do not place your hands near the soft top frame, upper windshield area or soft top storage compartment. Serious personal injury may occur.
For safety reasons, the soft top cannot be unlocked while driving. However, if the soft top is not completely locked, it can be locked while driving by pushing the soft/hardtop switch forward.
If the indicator lamp in the soft top switch blinks while activating the switch,
- the battery voltage may be insufficient - start engine and let run while activating switch,
- the system may be overloaded (for example after lowering or raising the soft top approx. 5 consecutive times) - after approx. 2 minutes the soft top switch may be activated again,
- and the power supply was interrupted (battery disconnected or empty), the soft top cannot be fully raised or lowered.
To raise the soft top, for safety reasons, first remove key from steering lock. Lower soft top by hand into compartment, and resynchronize the power windows. See Index.
To lower the soft top, first resynchronize the power windows. See Index
If the indicator lamp continues to blink, lock the soft top manually. See Index.
Have the system checked at your authorized Mercedes-Benz dealer as soon as possible.
Note:
If the roll bar was raised automatically, the process of raising or lowering the soft top will take somewhat longer, as the roll bar must first be lowered.
Whenever possible, park vehicle in the shade as continuous exposure to sun rays can prematurely deteriorate the soft top material.
Permanent creases in the plastic window, caused by storage of the soft top in the storage compartment, cannot be avoided.
The soft top may become moldy if it is kept in the storage compartment for an extended period.
Therefore, we recommend raising and airing it thoroughly with the side windows open (do not expose it to the sun) at regular intervals during the wet and cold seasons
69
 P65-0001-B13
 P65-0013-B13
 P65-0014-B13
Wind Screen
Installation
- Raise roll bar partially using switch on center console.
- Position top end of wind screen at bottom of roll bar. The hooks at bottom of wind screen must point rearward.
- Slide wind screen up into roll bar (1), using care not to get the attachment straps (2) caught.
- Raise roll bar completely.
- Wrap attachment straps around roll bar and insert tabs into latches (3).
- Tighten straps (4).
- Lower roll bar.
70
 P65-0015-B13
Setting up Push top of wind screen fully forward against internal stop
Warning! The rear storage area should never be occupied by passengers since the vehicle is a 2 seater. Furthermore, with the wind screen in place there is a risk of injury, should the roll bar be deployed.
 P65-0017-B13
Removal
- Fold down top of wind screen.
- Raise roll bar using switch on center console.
- Disconnect attachment strap latches by squeezing latch.
- Lower roll bar partially
 P65-0016-B13
5. Pull wind screen down out of roll bar (5) and lift wind screen out on one side and remove.
Storage The wind screen can be stored in a trunk mounted container, obtainable at your authorized Mercedes-Benz dealer.
71
Antenna
The antenna extends when switching on the radio and/or telephone.
Note: To retract the antenna (e.g. when entering a car wash) both radio and telephone must be switched off.
Cellular Telephone
The vehicle is prepared for the installation of a cellular telephone. For further information and installation contact your authorized Mercedes-Benz dealer.
Warning!
Some jurisdictions prohibit the driver from using a cellular telephone while driving a vehicle. Therefore, for safety reasons, the driver should not use the cellular telephone while the vehicle is in motion. Stop the vehicle in a safe location before answering or placing a call
72
Driving
73
Drinking and Driving
Warning! Drinking and driving can be a very dangerous combination. Even a small amount of alcohol or drugs can affect your reflexes, perceptions and judgment.
The possibility of a serious or even fatal accident is sharply increased when you drink and drive.
Please don't drink and drive or allow anyone to drive after drinking.
 P42-0002-B13
Parking Brake
To engage, firmly depress parking brake pedal. When the key is in steering lock position 2, the brake warning lamp in the instrument cluster should come on brightly.
To release the parking brake, pull handle on instrument panel. The brake warning lamp in the instrument cluster should go out.
A warning sounds, if you start to drive without having released the parking brake.
Also see Brake Warning Lamp Test in Index.
Driving Off
Test the brakes briefly after driving off. Perform this procedure only when the road is clear of other traffic.
Warm up the engine smoothly. Do not place full load on the engine until the operating temperature has been reached.
Warning! Keep driver's foot area clear at all times. Objects stored in this area may impair pedal movement.
74
Automatic Transmission
The automatic transmission selects individual gears automatically, dependent upon
- Selector lever position
- Accelerator position
- Vehicle speed
I mportant!
When parking the car or before working on the vehicle with the engine running, firmly depress the parking brake pedal and shift the selector lever into "P".
Driving
The selector lever is automatically locked while in position "P". To move the selector lever out of position "P", the service brake pedal must be firmly depressed before the shift lock will release.
Shift selector lever to the desired driving position only when the engine is idling and the service brake is applied. Do not release the brake until ready to drive. The vehicle may otherwise start creeping when the selector lever is in drive or reverse position.
Warning!
It is dangerous to shift the selector lever out of "P" or "N" if the engine speed is higher than idle speed. If your foot is not on the brake pedal, the car could accelerate quickly forward or in reverse. You could lose control of the car and hit someone or something. Only shift info gear when the engine is idling normally and when your right foot is firmly on the brake pedal.
I mportant!
After selecting any driving position from "N" or "P", wait a moment to allow the gear to fully engage before accelerating, especially when the engine is cold
Accelerator position
Partial throttle = early upshifting = normal acceleration Full throttle = later upshifting = rapid acceleration Kickdown (depressing the accelerator beyond full throttle) = downshifting to next lowest gear = maximum acceleration. Once the desired speed is attained, ease up on the accelerator - the transmission shifts up again