 P82-0007-B13A
Trunk Lamp
To switch off: Using car key, slide switch to the left. This prevents the battery from being discharged if the trunk is to remain open for an extended period.
When the trunk lid is closed, the switch will reset and turn on the lamp the next time the lid is opened.
 P89-0010-B13
Spare Wheel
1 Trunk floor 2 Strap
Roll back the floor mat, lift the trunk floor (1) and engage strap (2) in the hooks on the upper edge of the trunk lid.
First remove the vehicle jack, then the spare wheel; reinstall in reverse order.
First Aid Kit
The first aid kit is located in the left trunk well.
Stowing Things in the Vehicle
Warning! To help avoid personal injury during a collision or sudden maneuver, exercise care when stowing things. Put luggage or cargo in the trunk if possible. Do not pile luggage or cargo higher than the seat backs.
100
 P89-0004-B13A
Vehicle Jack
1 Jack arm 2 Jack base 3 Tool kit
See illustration for proper storage of jack.
Before storing the jack, the jack arm (1) must be lowered almost to the base (2) of the jack.
Note: First remove the vehicle jack, then the spare wheel; reinstall in reverse order.
Warning! The jack is designed exclusively for jacking up the vehicle at the jack tubes built into either side of the vehicle. Use the jack only to lift the vehicle during a wheel change. Never get beneath the vehicle while it is supported by the jack. Keep hands and feet away from the area under the lifted vehicle. Always firmly set parking brake and block wheels before raising vehicle with jack.
Do not disengage parking brake while the vehicle is raised. Be certain that the jack is always vertical when in use, especially on hills. Lower the vehicle onto sufficient capacity jackstands before working under the vehicle.
Vehicle Tools
The vehicle tools (3) are located below the jack.
Wheels
Replace rims or tires with the same designation, manufacturer and type as shown on the original part. See your authorized MERCEDES-BENZ dealer for further information.
Warning! Do not mix different tire construction types (i.e. radial, bias, and bias-belted) on your car because handling may be adversely affected and may result in loss of control.
See your authorized MERCEDES-BENZ dealer for information on tested and recommended rims and tires for summer and winter operation. They can also offer advice concerning tire service and purchase.
101
Tire Replacement
Front tires should be replaced in sets. Furthermore - in the event of tire replacement - the spare wheel, if possible, should be used on the rear axle. Rims and tires must be of the same size. For dimensions, see "Technical Data".
We recommend that you break in new tires for approx. 100 km (60 miles) at moderate speed. It is imperative that the wheel mounting bolts be retightened after approx. 60 -300 miles (100 to 500 km).
On new vehicles retightening is carried out during the 1st inspection. Retightening is also necessary whenever wheels are fitted, e.g. when the spare wheel is used for the first time or when a set of wheels with M + 8 tires is installed. Tightening torque: 80 ft. lb (110 Nm).
For rim and tire specifications, refer to "Technical Data".
Warning!
Worn, old tires can cause accidents. If the tire tread is badly worn, or if the tires have sustained damage, replace them.
When replacing rims, use only genuine MERCEDES-BENZ wheel bolts (identified by Mercedes star) specified for the rim type. Failure to do so can result in the bolts loosening and possibly an accident
Rotating Wheels
The wheels can be rotated according to the degree of tire wear while retaining the same direction of travel.
Rotating, however, should be carried out at a mileage of 3000-6000 miles (5000-10000) km, before the characteristic tire wear pattern (shoulder wear on front wheels and tread center wear on rear wheels) becomes visible, as otherwise the driving properties deteriorate.
Important!
Unidirectional snow tires must always be mounted with arrow on tire sidewall pointing in direction of vehicle forward movement.
Thoroughly clean the inner side of the wheels any time you rotate the wheels or wash the vehicle underside.
The use of retread tires is not recommended. Retread tires may adversely affect the handling characteristics and safety of the vehicle.
Dented or bent rims cause tire pressure loss and damage to the tire beads. For this reason, check rims for damage at regular intervals.
The rim flanges must be checked for wear before a tire is mounted. Remove burrs, if any.
Check and correct tire inflation pressure after rotating the wheels.
For Tire Inflation Pressure refer to Index.
102
Warning!
The jack is designed exclusively for jacking up the vehicle at the jack tubes built into either side of the vehicle. Use the jack only to lift the vehicle during a wheel change. Never get beneath the vehicle while it is supported by the jack. Keep hands and feet away from the area under the lifted vehicle. Always firmly set parking brake and block wheels before raising vehicle with jack.
Do not disengage parking brake while the vehicle is raised. Be certain that the jack is always vertical when in use, especially on hills. Lower the vehicle onto sufficient capacity jackstands before working under the vehicle.
Changing Wheels
Move vehicle to a level area which is a safe distance from the roadway.
-
Set parking brake and turn on hazard warning flasher.
-
Select 1st or reverse gear in vehicles with manual transmission or position "P" in vehicles equipped with automatic transmission.
-
Prevent vehicle from rolling away by blocking wheels with wheel chocks or sizable wood block or stone (not supplied with, vehicle). When changing a wheel on a hill, place chocks on the downhill side blocking both wheels of the other axle. On a level road, place one chock in front of and one behind the wheel that is diagonally opposite to the wheel being changed.
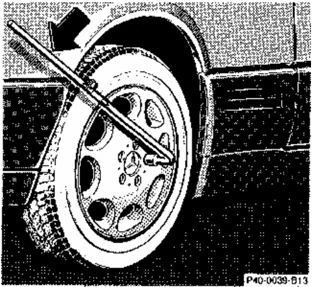
- Unfold wrench, loosen but do not remove the wheel bolts yet.
103
 2222
-
Remove the protective cover from the jack support tube opening by inserting a screw-driver in the opening and prying it out. The tube openings are located directly behind the front wheel housings and in front of the rear wheel housings.
-
Insert jack arm fully into the tube hole up to the stop. Place jack on firm ground. Position the jack so that it is always vertical (plumb-line) as seen from the side (see arrow), even if the vehicle is parked on an incline.
 P40-0005-B13
-
Jack up the vehicle until the wheel is clear of the ground. Never start engine while vehicle is raised.
-
Unscrew wheel bolts completely. Keep bolt threads protected from dirt and sand. While removing the last bolt, hold wheel against hub to avoid paint damage on rim.
-
Remove wheel. Grip wheel from the sides. Keep hands from beneath the wheels
 P40-0002-B13
- Screw the alignment bolt (1) supplied in the tool kit into the upper-most threaded hole.
Warning!
Always replace wheel bolts that are damaged or rusted.
Never apply oil or grease to wheel bolts threads.
Damaged wheel hub threads should be repaired immediately
104
 P40-0003-B13
- Clean contact surfaces of wheel and wheel hub. Install spare wheel on wheel hub. Insert wheel bolts and tighten them slightly.
To avoid paint damage, place wheel flat against hub and hold it there while installing first wheel bolt.
Unscrew the alignment bolt to install the last wheel bolt.
- Lower car. Remove jack and insert jack tube cover
 P40-0005-B13
- Fold wrench together and tighten the five bolts evenly, following the sequence illustrated above, until all bolts are tight.
Observe a tightening torque of 80 ft. lb. (110 Mm).
- Correct tire pressure.
Important!
When installing new wheels the mounting bolts must be retightened after approx. 60 - 300 miles (100-500 km).
 P40-0004-B13
Before storing the jack, the jack arm must be lowered almost to the base of the jack. Store the spare wheel first and then the vehicle jack.
Warning!
Incorrect mounting bolts or improperly tightened mounting bolts can cause the wheel to come off. This could cause an accident. Be sure to use the correct mounting bolts.
105
Tire Inflation Pressure
A table (see fuel filler flap) lists the tire inflation pressures specified for Mercedes Benz recommended tires as well as for the varying operating conditions.
I mportant!
Tire pressure differs by approx. 1.5 psi (0.1 bar) per 18°F (10°C) of air temperature change. Keep this in mind when checking tire pressure inside a garage - especially in the winter.
Example: If garage temperature = approx. + 68 ° F (+ 20 ° C) and ambient temperature = approx. + 32° F (0°C) then the adjusted air pressure = specified air pressure + 3 psi (+ 0.2 bar).
Tire pressures listed for light loads are minimum values offering high driving comfort.
Increased inflation pressures for heavy loads produce favorable handling characteristics with lighter loads and are perfectly permissible. The ride of the vehicle, however, will become somewhat harder.
Tire temperature and pressure increase with the vehicle speed. Tire pressure should therefore only be corrected on cold tires. Correct tire pressure in warm tires only if pressure has dropped below the pressure listed in the table and the respective operating conditions are taken into consideration.
An underinflated tire due to a slow leak (e.g. due to a nail in the tire) may cause damage such as tread separation, bulging etc.. Regular tire pressure checks (including the spare tire) at intervals of no more than 14 days are therefore essential.
If a tire constantly loses air, it should be inspected for damage
Warning!
Do not overinflate tires, Overinflating tires can result in sudden deflation (blowout) because they are more likely to become punctured or damaged by road debris, potholes etc.. Follow recommended inflation pressures. Do not overload the tires by exceeding the specified vehicle capacity weight (as indicated by the label on the driver's door latch post). Overloading the tires can overheat them, possibly causing a blowout
106
Battery
The maintenance free battery is located in the trunk behind the right-hand cover panel.
The service life of the battery is also dependent on its condition of charge. The battery should always be kept sufficiently charged, in order to last an optimum length of time.
Therefore, we strongly recommend that you have the battery charge checked frequently, and corrected if necessary, especially if you use the vehicle less than approximately 200 miles (300 km) per month, mostly for short distance trips, or if it is not used for long periods of time.
Only charge a battery with a battery charger after it has been disconnected from the vehicle electrical circuit.
When removing and connecting the battery, always make sure that all electrical consumers are off and the key is in steering lock position 0.
While the engine is running the battery terminal clamps must not be loosened or detached, otherwise the generator and other electronic components would be damaged.
Always disconnect the battery negative lead first and connect last.
I mportant!
Do not close a door with the windows fully closed while the power supply is interrupted (battery disconnected or empty). Doing so could damage the window frame.
Note: After reconnecting the battery also resynchronize the Adaptive Damping System (ADS) (see ADS in Index).
Battery Recycling
Batteries contain materials that can harm the environment with improper disposal.
Large 12 Volt storage batteries contain lead, and smaller watch type batteries (such as in the Infrared Remote Control Unit) may contain mercury.
Recycling of batteries is the preferred method of disposal.
Many states require sellers of batteries to accept old batteries for recycling.
Warning!
Never lean over batteries while connecting, you might get injured.
Battery fluid contains sulfuric acid. Do not allow this fluid to come in contact with eyes, skin or clothing. In case it does, immediately flush affected area with water and seek medical help.
A battery will also produce hydrogen gas, which is flammable and explosive. Keep flames or sparks away from battery, avoid improper connection of jumper cables, smoking etc..
107
 2208
Fuses
In engine compartment:
1 Main fuse box
2 Auxiliary fuse box
 P54-0009-H13A
In trunk on rear wall:
3 Auxiliary fuse box
Before replacing a blown fuse, determine the cause of the short circuit. Spare fuses are supplied inside the fuse box. Observe amperage and color of fuse.
Always use a new fuse for replacement. Never attempt to repair or bridge a blown fuse.
After replacing a blown fuse, close fuse box cover.
108
Exterior Lamps
Headlamp Adjustment
Correct headlamp adjustment is extremely important. Check and readjust headlamps at regular intervals and when a bulb has been replaced.
Replacing Bulbs
Do not touch glass portion of bulb with bare hands. Use plain paper or a clean cloth.
Install only 12 volt bulbs with the specified watt rating.
 P54-0014-B22
P54-0015-B22
Headlamp Assembly
- Headlamp horizontal adjustment screw
- Headlamp vertical adjustment screw
- High and low beam headlamp cover
- Squeeze latches for high and low beam headlamp cover
- Turn signal, parking, side marker and standing lamp bulb
- Electrical connector for high and low beam headlamp bulb
- Clamping ring for high and low beam headlamp bulb
Warning! Halogen lamps contain pressurized gas. A bulb can explode if you
- touch or move it when hot,
- drop the bulb,
- scratch the bulb.
109
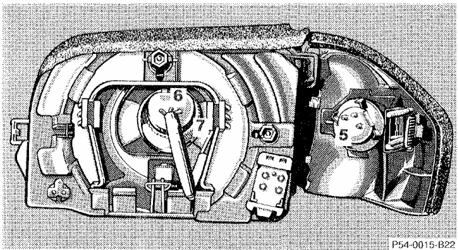
Replacing bulbs:
Bulb for turn signal, parking, side marker and standing lamp' (21/5 W/32/3cp):
Turn bulb socket (5) with bulb counterclockwise and pull out. Push bulb into socket, turn counterclockwise and remove.
Bulb for high and low beam (Halogen type 9004):
Squeeze latches (4) and remove cover (3) upwards. Pull off electrical connector (6). Turn clamping ring (7) counterclockwise and pull out bulb together with clamping ring. Remove bulb.
Insert new bulb (flat side facing up), mount clamping ring (7) (with tab facing down) and turn clock-wise. Push electrical connector on securely.
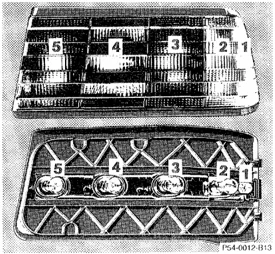
Taillamp Assemblies 1 Side marker lamp (10W/6 cp bulb) 2 Turn signal lamp (21 W/32 cp bulb) 3 Tail, parking and standing lamp (21/4W/35/1.2cpbulb) Driver's side: Tail, parking, standing and rear fog lamp (21/4W/35/1.2cp bulb) 4 Backup lamp (21 W/32 cp bulb) 5 Stop lamp (21 W/32 cp bulb)
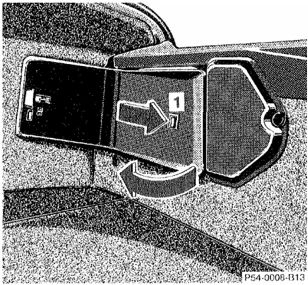
To replace bulbs:
Push the locking button (1) on the rear of the lamp support inward and swing open lamp support. Push down the bulb to be changed, turn to the left and remove.
110
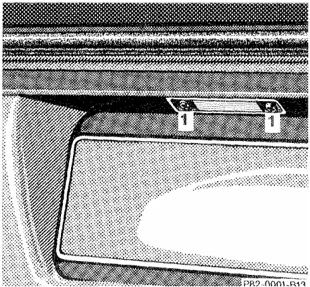
License Plate Lamps (5 W bulb)
Loosen both securing screws (1), remove lamp and take out bulb.
Jump Starting
If the battery is discharged, the engine can be started with jumper cables and the (12V) battery of another vehicle. The battery is located in the trunk behind the right-hand cover panel. Follow these steps exactly to avoid injury:
Warning! Failure to follow these directions can lead to a battery explosion and personal injury. Read, all instructions before proceeding.
-
Position the vehicle with the charged battery so that the jumper cables will reach, but never let the vehicles touch. Make sure the jumper cables do not have loose or missing insulation.
-
On both vehicles:
- Turn off engine and all lights and accessories, except hazard flashers or work lights.
- Apply parking brake and shift selector lever to position "P" (neutral for manual transmission).
Important!
-
Clamp one end of the first jumper cable to the positive ( + ) terminal of the discharged battery and the other end to the positive (+) terminal of the charged battery. Make sure the cable clamps do not touch any other metal parts.
-
Clamp one end of the second jumper cable to the grounded negative (-) terminal of the charged battery and the final connection to a grounded heavy metal bracket in the engine compartment or on the engine of the disabled vehicle. Make sure the cables are not on or near pulleys, fans, or other parts that will move when the vehicle with the charged battery is started.
111
-
Start engine of the vehicle with the charged battery and run at high idle. Then start engine of the disabled vehicle in the usual manner.
-
After the engine has started, remove jumper cables by reversing the above installation sequence exactly, starting with the jumper cable connected to a heavy metal bracket in the disabled vehicle's engine compartment. When removing each clamp, make sure that it does not touch any other metal while the other end is still attached.
Warning!
Never lean over batteries while connecting or jump starting, you might get injured.
Battery fluid contains sulfuric acid. Do not allow this fluid to come in contact with eyes, skin or clothing. In case it does, immediately flush affected area with water, and seek medical help.
A battery will also produce hydrogen gas, which is flammable and very explosive. Keep flames or sparks away from battery, avoid improper connection of jumper cables, smoking, etc..
I mportant!
A discharged battery can freeze at approx. + 14°F (-10°C). In that case, it must be thawed out before jumper cables are used.
Jumper cable specifications:
• Minimum cable cross-section of 25 mm² or approx. 2 AWG
- Maximum length of 11.5 ft (3.5 m).
 P31-0001-B13
Towing of Vehicle
The rear towing eye is located at the right, below the bumper. The front towing eye is located on the passenger side behind a flap in the bumper panel. Flap removal: Insert finger in recess of flap and pull flap out.
Flap installation: Engage flap at bottom and press in top securely. We recommend that the vehicle be transported using flat bed equipment. This method is preferable to other types of towing.
The vehicle may be towed with all of the wheels on the ground and the selector lever in position "N" for distances up to 30 miles (50 km) (or gearshift lever in neutral position for distances up to 75 miles [120 km]) and at a speed not to exceed 30 mph (50 km/h).
To positively avoid a possibility of damage to the transmission, however, we recommend to disconnect the drive shaft at the rear axle drive flange on any towing beyond a short tow to a nearby garage.
Do not tow with sling-type equipment. Towing with sling-type equipment over bumpy roads will damage radiator and supports.
The use of wheel lift equipment will damage engine oil pan.
Important! When transporting vehicle on flat bed equipment, the front end of the vehicle must be loaded first. Additional ramping may be required for loading to protect bumper fascia.
Warning! With the engine not running, there is no power assistance for the braking and steering systems. In this case, it is important to keep in mind that a considerably higher degree of effort is necessary to brake and steer the vehicle.
Note: To signal turns while being towed with hazard flasher in use, turn key in steering lock to position 2 and activate combination switch for left or right turn signal in usual manner - only the selected turn signal.
Upon canceling the turn signal, all four turn signals will operate again.
113
Cleaning and Care of the Vehicle
Warning!
Many cleaning products can be hazardous. Some are poisonous, others are flammable. Always follow the instructions on the particular container. Always open your car's doors or windows when cleaning the inside.
Never use fluids or solvents that are not designed for cleaning your car.
In operation, your vehicle is subjected to varying external influences which, if gone unchecked, can attack the paintwork as well as the underbody and cause lasting damage.
Such damage is caused not only by extreme and varying climatic conditions, but also by air pollution, road salt, tar, gravel and stone chipping. Grease and oil, fuel, coolant, brake fluid, bird droppings, tree resins, etc. should be removed immediately to avoid paint damage. Frequent washing, however, reduces and/or eliminates the aggressiveness and potency of the above adverse influences.
More frequent washings are necessary to deal with unfavorable conditions; for example, near the ocean, in industrial areas (smoke, exhaust emissions), or during winter operation.
You should check your vehicle from time to time for stone chipping or other damage. Any damage should be repaired as soon as possible to prevent the start of corrosion.
In doing so, do not neglect the underside of the car. A prerequisite for a thorough check is a washing of the underbody followed by a thorough inspection. Damaged areas need to be reundercoated.
Your vehicle has been treated at the factory with a wax-base rustproofing in the body cavities which will fast for the lifetime of the vehicle. Post-production treatment is neither necessary nor recommended by MERCEDES-BENZ because of the possibility of incompatibility between materials used in the production process and others applied later.
We have selected car-care products and compiled recommendations which are specially matched to our vehicles and which always reflect the latest technology. You can obtain MB car-care products at your authorized MERCEDES-BENZ dealer.
Scratches, corrosive deposits, corrosion or damage due to negligent or incorrect care cannot always be removed or repaired with the car-care products recommended here. In such cases it is best to seek aid at your authorized MERCEDES-BENZ dealer.
The following topics deal with the cleaning and care of your vehicle and give important "how-to" information as well as references to recommended MB car-care products.
Engine Cleaning Corrosion protection, such as MB Anticorrosion Wax should be applied to the engine compartment after every engine cleaning. Before applying, all control linkage bushing should be lubricated. The V-belt and all pulleys should be protected from any wax.
Car Washing Before washing your vehicle, remove insect residues, MB Insect Remover is recommended. Do not use hot water or wash your car in direct sunlight. Use only a mild car wash detergent, such as MB Autoshampoo.
Thoroughly spray the car with a diffused jet of water. Direct only a very weak spray towards the ventilation intake. Use plenty of water and rinse the sponge and chamois frequently.
Rinse with clear water and thoroughly wipe dry with a chamois. Do not allow cleaning agents to dry on the finish. If the vehicle has been run through an automatic car wash - in particular one of the older installations - rewipe the recessed sections in the taillamps
If the vehicle has been run through an automatic car wash -in particular one of the older installations - rewipe the recessed sections in the taillamps (designed to prevent soiling) if necessary. No solvents (fuels, thinners etc.) must be used.
In the winter, thoroughly remove all traces of road salt as soon as possible. When washing the underbody, do not forget to clean the inner sides of the wheels.
Tar Stains Quickly remove tar stains before they dry and become more difficult to remove. MB Tar Remover is recommended.
Window Cleaning Use a window cleaning solution on very dirty or oil-stained windows.
Wiper Blade Clean the wiper blade rubber with a clean cloth and detergent solution. Replace blade twice a year; once before and once after winter.
Headlamp Cleaning System The condition of the wiper blades is important for satisfactory cleaning of the headlamp lenses. We therefore recommend that the blades be inspected regularly.
Replace damaged wiper blades.
Seat Belts The webbing must not be treated with chemical cleaning agents. Use only clear, lukewarm water and soap. Do not dry the webbing at temperatures above 176°F (80°C) or in direct sunlight.
Warning! Do not bleach or dye seat belts as this may severely weaken them. In a crash they may not be able to provide adequate protection.
115
Instrument Cluster Use a gentle dish-washing detergent or mild detergent for delicate fabrics as a washing solution. Wipe with a cloth moistened in lukewarm solution. Do not use scouring agents.
Steering Wheel and Gear Shift Lever Wipe with a damp cloth and dry thoroughly or clean with MB Leather Cleaner.
Upholstery Using aftermarket seat covers or wearing clothing that have the tendency to give off coloring (e.g. when wet etc.) may cause the upholstery to become permanently discolored. By lining the seats with a proper intermediate cover, contact-discoloration will be prevented. Leather Upholstery Wipe leather upholstery with a damp cloth and dry thoroughly or clean with MB Leather Cleaner. Exercise particular care when cleaning perforated leather as its underside should not become wet.
Plastic Parts, Headliner and Rubber Parts Do not use oil or wax on these parts.
Paintwork, Painted Body Components MB-Paint Protector and Sealer should be applied when water drops on the paint surface do not "bead up"; normally in 3 to 5 months depending on climate and washing detergent used. MB-Paint-Polish should be applied if paint surface shows signs of dirt embedding (i.e. loss of gloss). MB-Fine Polishing Paste must be used when the paint surface shows signs of excessive fading/ chalking due to lack of care etc.. Do not apply any of these products or wax if your car is parked in the sun or if the hood is still hot. Use the appropriate MB-Touch-Up Stick for quick and provisional repairs of minor paint damage (i.e. chips from stones, car doors etc.).
Automatic Antenna For trouble-free operation of the automatic antenna, we recommend to clean the antenna mast periodically.
Light Alloy Wheels MB-Autoshampoo should be used for regular cleaning of the light alloy wheels. If possible, clean wheels once a week with MB-Autoshampoo, using a soft sponge and an ample supply of lukewarm water. If the MB-Autoshampoo does not satisfactorily clean the wheels, use MB Protective Agent for Light Alloy Wheels for normal cleaning and MB-Cleaner for Light Alloy Wheels for heavier dirt accumulation. Follow instructions on container.
116
Soft Top Clean soft top with soft top raised and locked. Lower the soft top into the storage compartment only if the top is completely dry. If the top is kept in the storage compartment for a lengthy period, raise it and air it out with the windows down about every 4 months.
Dry cleaning: Brush top (always from front to rear) with a soft-bristled brush.
Wet cleaning: Brush the dry top. Wash with a mild detergent and an ample supply of lukewarm water by wiping with a soft-bristled brush or sponge from front to rear. Then rinse thoroughly with clear water.
If only parts of the top have been washed, wet the entire top and allow it to air-dry before lowering it into the storage compartment. Wipe the rear window with a cloth soaked with a mild, non-abrasive detergent, rinse and rub dry. Do not use sharp-edged instruments for the removal of ice and snow.
Note: Never run the vehicle through an automatic car wash with the soft top in place as you may damage the soft top material.
Remove bird droppings immediately. The organic acid damages the material and causes the soft top to leak.
In general, regular spraying or cleansing with clear water is sufficient to keep the top clean.
Wash the top only when heavily soiled, not every time the car is washed.
Caution! Never use any gasoline, thinner, tar and stain removers or similar organic solvents to clean the soft top or plastic windows.
Ornamental Moldings For regular cleaning and care of very dirty chrome-plated parts, use a chrome cleaner.
Wind Screen Use only water or mild detergent to clean the wind screen.
Hard Plastic Trim Items Pour MB Plastic Cleaner onto soft lint-free cloth and apply with light pressure.
Headliner Soft top: Clean with soft bristle brush, or use a dry-shampoo cleaner in case of excessive dirt.
Hardtop: Pour MB Plastic Cleaner onto soft lint-free cloth and apply with light pressure.
117
 P/6 0074-B13
Testing Infrared Remote Control
Checking Batteries: If the transmit button (1) is pressed longer than 1 second, the battery indicator lamp in the transmitter eye (2) briefly illuminates -indicating that the batteries are in order.
Change batteries if the indicator lamp does not come on.
Changing Batteries: Unfold key from holder by pressing lock button (3). Pull off battery cover (4).
 P/6 0071-B13
Change batteries, inserting new ones under contact spring (5) with plus (+) side facing up.
Press battery cover onto housing until locked in place.
Important! Batteries contain materials that can harm the environment if disposed of improperly. Recycling of batteries is the preferred method of disposal. For disposal, please follow manufacturer's recommendation on battery package.
Replacement battery: Lithium, type CR 2025 or equivalent.
 P/6 0072-B13
Synchronizing System: The system may have to be re-synchronized, if the transmitter is without voltage for several minutes.
To synchronize system, aim transmitter eye (2) at door or trunk receiver and briefly press transmit button (1). Within approx. 80 seconds, insert key in steering lock and turn it to position 2.
The infrared remote control should once again be operational
118
Raising Soft Top Manually
In case of malfunction, the power soft top can also be raised manually. This procedure should be performed with great care by 2 persons.
A combination open-end/Allen-head wrench in the vehicle tool kit is required for this job.
- Open doors or lower windows.
- Lower roll bar with roll bar switch. If the roll bar cannot be lowered, the soft top can be carefully guided over the roll bar.
- For safety reasons, remove key from steering lock.
Warning! Do not place your hands near the roll bar, soft top frame, upper windshield area or soft top storage compartment while the soft top is being locked. Serious personal injury may occur.
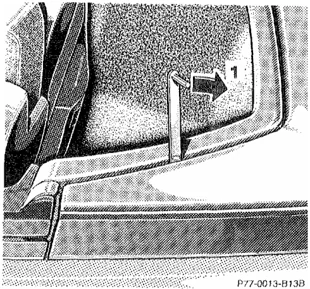
P77-0013-B13B
- Unlock left and right soft top storage compartment locks: Place open-end wrench on bolt between roll bar and storage compartment cover. Turn wrench towards rear of car (1).
Open storage compartment cover and place in upright position (2).
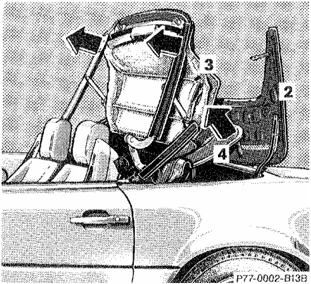
P77-0002-B13B
- Pull soft top (3) out of compartment and place it in its vertical position.
- Pull soft top bow (4) out of compartment.
119
 P77-0003-B13A
- Place soft top frame (5) onto windshield header.
- Place soft top bow (4) in its vertical position.
 P77-0011-B13A
- Pivot sun visors to side. Remove left and right caps (6).
 P77-0004-B13B
- Using Allen-head wrench, lock left and right of soft top frame (5) to windshield header - turn wrench in 3 stages towards center of car:
- Left lock to first notch
- Flight lock to second notch
- Left lock to second notch.
120
-
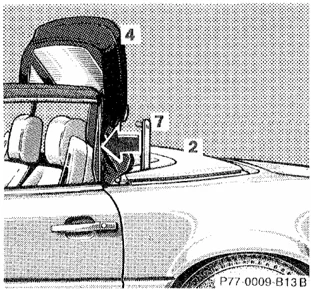
Close storage compartment cover (2). - Lock left and right storage compartment locks: Place open-end wrench on bolt between roll bar and storage compartment cover. Turn wrench towards front of car (7).
-
Lower soft top bow (4). The rear section of the soft top cannot be locked during manual operation.
Note: Have the soft top operation checked at your authorized Mercedes-Benz dealer as soon as possible.
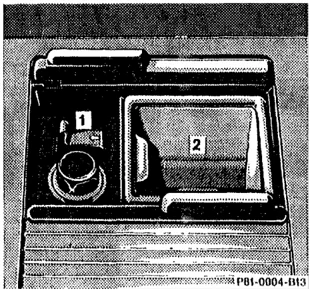
Ashtray Removal: Slide open cover, push the sliding knob (1) to the left to eject the insert (2).
Installation: Install insert into ashtray frame and push down to engage.
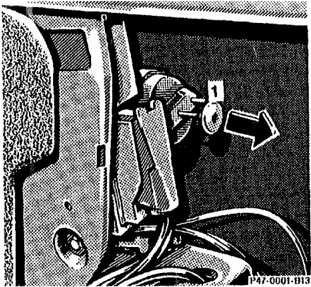
Manual Release of Fuel Filler Flap In case of malfunction, the fuel filler flap can be opened manually. Pull the manual release knob (1) behind the right trunk panel while simultaneously opening the fuel filler flap.
Ski Rack Use only our approved ski rack to avoid damage to the vehicle. Follow manufacturer's installation instructions.
121
Replacing Wiper Blades
For safety reasons, remove key from steering lock before replacing wiper blade, otherwise the motor can suddenly turn on and cause injury.
Windshield Wiper Blade
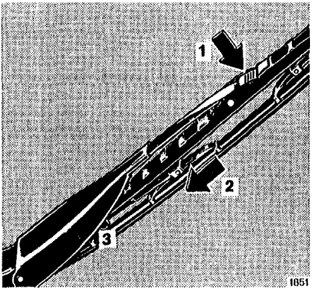
Removal: Fold wiper arm forward. Press safety tab down (1), push wiper blade downward (2) and remove.
Installation: Press down safety tab of new wiper blade. Insert wiper blade between the tabs (3) on the wiper arm. Then press safety tab upward until it locks in place.
Notes: Do not open engine hood with wiper arm folded forward. Do not allow the wiper arm to contact the windshield glass without a wiper blade inserted. The glass may be scratched or broken. Make certain that the wiper blade is properly installed. An improperly installed blade may cause windshield damage.
Headlamp Wiper Blades
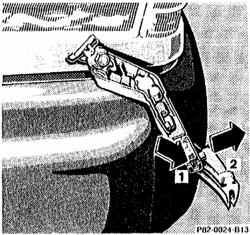
Removal: Fold wiper arm forward. Press safety tab (1) down and remove wiper blade at guide pin (2, arrow).
Installation: Press safety tab (1) down and insert the guide pin (2) into the wiper arm. Release safety tab, the wiper blade engages.
122
 P13-0001-013
SL 320, SL 600
Layout of Poly-V-Belt Drive 1 Automatic belt tensioner 2 Crankshaft 3 Air conditioning compressor 4 Fan 5 Air pump 6 Generator (alternator)
 P13-0003-013
SL 500
7 Idler pulley 8 Power steering pump 9 Coolant pump
For dimensions of the poly-V-belt, see Technical Data in Index.
Spare Parts Service All authorized Mercedes-Benz dealers maintain a stock of original spare parts required for maintenance and repair work. In addition, strategically located parts distribution centers provide quick and reliable parts service.
More than 300,000 different spare parts, even for older models, are available.
Mercedes-Benz original spare parts are subjected to the most stringent quality inspections. Each part has been specifically developed, manufactured or selected for and adapted to Mercedes-Benz vehicles.
Therefore, Mercedes-Benz original spare parts should be installed
123
124
Technical Data
125
1 Certification Tag (left door pillar) 2 Identification Tag 3 Vehicle Identification No. 4 Engine No. (SL 320 right front, SL 600 right rear) 5 Body No. and Paint No. 6 Emission Control Tag 7 Information Tag California version Vacuum line routing for emission control system
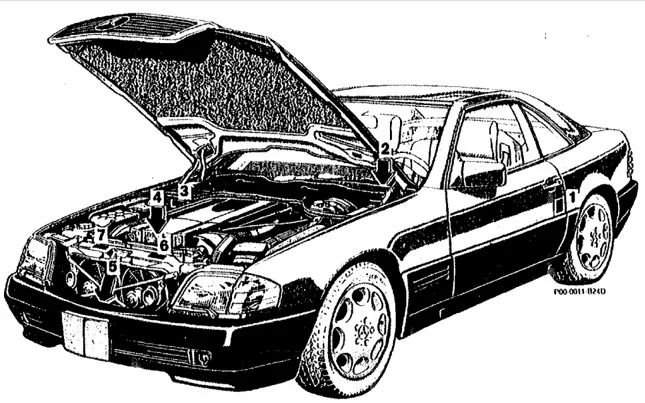
P00-0011-024D
I dentification Plates
When ordering spare parts, please specify vehicle Identification and engine numbers.
126
 P98-0001-B12
Vehicle Data Card
The vehicle data card contains all important data pertaining to the vehicle. It should be kept in the maintenance booklet where indicated, and it is needed when obtaining replacement or additional keys at your authorized Mercedes-Benz dealer.
Warranty Coverage
Your car is covered under the terms of the "warranties" printed in the Owner's Service and Warranty Policy Booklet and your authorized Mercedes-Benz dealer will exchange or repair any defective parts in accordance with the terms of the following warranties:
- New vehicle limited warranty
- Emission systems warranty
- Emission performance warranty
- California emission control systems warranty.
Loss of Owner's Service and Warranty Policy
Should you lose your Owner's Service and Warranty Policy Booklet, have your authorized Mercedes-Benz dealer arrange for a replacement. It will be mailed to you.
127