4 Function Selection Buttons
Normal Setting AUTOMATIC
Air volume and distribution are controlled automatically.
To select: Press AUTOMATIC button (indicator lamp lights up)
To change selection:
- Press 0, EC or [Defrost Icon] button (indicator lamp of selected button lights up). The indicator lamp for AUTOMATIC button goes out.
- Press button 6 (indicator lamp lights up). The indicator lamp for AUTOMATIC button goes out.
Defrost [Defrost Icon]
Maximum heated and automatically controlled amount of air is directed to the windshield and side windows.
As the engine coolant temperature increases, a higher blower stage is automatically engaged, thereby defrosting as quickly as possible.
Turn air volume controls 11 and 13 left to open air outlets 12 and 14. Direct airlets towards the side windows.
The center air outlets and the foot area ducts are closed.
To select: Press [Defrost Icon] button (indicator lamp lights up).
Defogging Windows
Switch on AUTOMATIC Switch off [Car with Air Icon]
Economy EC
The function of this setting corresponds to the normal setting. However, because the air conditioning compressor will not engage (fuel savings), it is not possible to air condition in this setting.
Residual Engine Heat Utilization [REST]
With the engine switched off, it is possible to continue heating the interior for a short while.
Air volume and distribution are controlled automatically.
To select: Turn key in steering lock to position 1 or 0 or remove key. Press [REST] button (indicator lamp lights up). This function selection will not activate if the engine coolant temperature is below 105°F (40°) or if the battery charge is insufficient.
To cancel:
- Press [REST] button. (indicator lamp goes out).
- Turn key in steering lock to position 2.
The system will automatically shut off:
- after approx. 30 minutes,
- if the engine coolant temperature drops below 122°F (50°C),
- if the battery voltage drops.
Air Recirculation [icon of car with circular arrow]
Outside air is not supplied to the car's interior.
This mode can be selected to prevent annoying odors or dust from entering the car's interior.
To select: Press [icon of car with circular arrow] button (indicator lamp lights up).
To cancel: Press [icon of car with circular arrow] button (indicator lamp goes out).
The system will automatically switch from recirculated air to fresh air if button [AUTOMATIC] is pressed:
- after approx. 5 minutes at outside temperatures below approx. 40°F(5°C),
- after approx. 20 minutes, at outside temperatures above approx. 40°F (5°C).
If button [EC] is pressed:
- after approx. 5 minutes.
Notes: If the windows should fog up from the inside, switch from recirculated air back to fresh air.
At high outside temperatures, the system automatically engages the recirculated air mode thereby increasing the cooling capacity performance.
Off [0] The fresh air supply to the car interior is shut off. While driving, use this setting only temporarily, otherwise the windows could fog up.
25
Car Keys
Included with your vehicle are
- 2 Infrared remote controls
- with folding master key
- 1 Master key
- 1 Valet key
- 1 Flat key
Infrared Remote Control with Folding Master Key
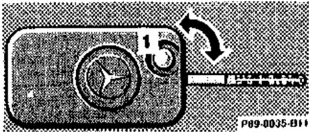
The master key fits all locks on the car. To release the key, press button (1). The key unfolds from the holder by itself.
The transmitter for the infrared remote control is located in the key holder, the receivers are located next to the door locks and below the trunk lock.
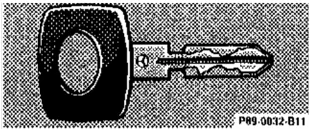
The master key fits all locks on the car.
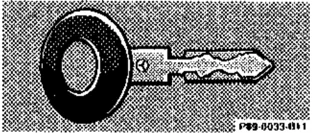
The valet key works only in the door locks and the steering lock.
The valet key will not work in the trunk lock or storage compartment/eyeglasses compartment lock in the dashboard.
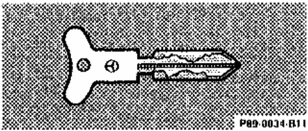
The flat key fits all locks on the car.
Notes:
Do not give the master key to an unauthorized person.
We recommend that you carry the flat key with you and keep it in a safe place (e.g. your wallet) so that it is always handy. Never leave the flat key in the vehicle.
Warning! When leaving the vehicle always remove the key from the steering lock. Do not leave children unattended in the vehicle. Unsupervised use of vehicle equipment may cause serious personal injury.
Obtaining Replacement Keys
Your vehicle is equipped with a theft deterrent locking system requiring a special key manufacturing process. For security reasons, replacement keys can only be obtained from your authorized Mercedes-Benz dealer.
26
Infrared Remote Control
Starter Lock-Out important!
Locking the vehicle activates the starter lock-out.
The engine can only be started, if the vehicle was unlocked from the outside.
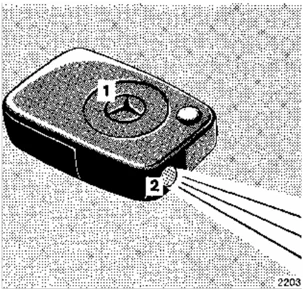
1 Transmit button 2 Transmitter eye and battery check
The vehicle can be centrally locked and unlocked with infrared remote control.
The transmitter is located in the key holder, the receivers are located next to the door locks and below the trunk lock.
3 Receiver in door handle
Unlocking:
Aim transmitter eye (2) at a receiver (3) and press transmit button (1). Distance to receiver max. 20 ft (6 m).
The green indicator lamps on the receivers should blink. They stop blinking when the vehicle is unlocked.
Note:
If the trunk was previously locked separately, it will remain locked (see Index).
27
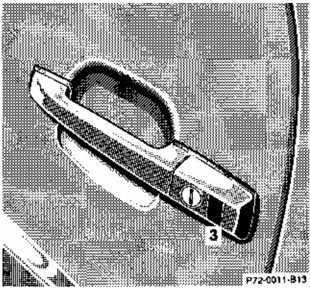
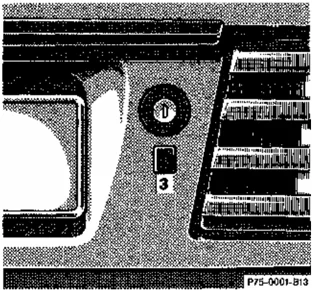
3 Receiver under trunk lock
Locking: Aim transmitter eye (2) at a receiver (3) and press transmit button (1). Distance to receiver max. 20 ft (6 m).
The red indicator lamps on the receivers should blink. They stop blinking when the vehicle is locked.
Notes: If a door or the trunk is not properly closed after you attempt to lock the vehicle by remote control, the red indicator lamps will continue to blink (max. 10 seconds). Open the door or trunk lid, close it properly, and lock the car again.
If the vehicle cannot be locked or unlocked by pressing the transmit button (1), then it may be necessary to change the batteries in the transmitter (if ok, battery indicator lamp in transmitter will light when transmitting) or to synchronize the system, see Testing Infrared Remote Control in Index.
Closing Windows from Outside Continue to press transmit button (1) after locking car. Distance to receiver max. 10 ft (3 m).
The windows begin to close after approx. 1 second.
Warning! Never close the windows if there is the possibility of anyone being harmed by the raising window. In case the closing procedure causes potential danger, the closing procedure can be immediately interrupted by releasing the transmit button. However, the windows can only be lowered using the power window buttons inside the car.
28
 2208
Central Locking System
The entire vehicle may be locked or unlocked by using the master key in either door or in the trunk lock. The central locking system also locks or unlocks the fuel filler flap.
Starter Lock-Out Important! Locking the vehicle activates the starter lock-out.
The engine can only be started, if the vehicle was unlocked from the outside.
 P76-0011-B13A
Doors
1 Opening - pull handle 2 Unlocking 3 Locking 4 Opening - pull handle 5 Locking 6 Unlocking
When opening a door, the window lowers slightly. After closing the door, the window closes again.
Important! Do not close a door with the windows fully closed while the power supply is interrupted (battery disconnected or empty). Doing so could damage the window frame.
The power windows should first be resynchronized. See Index.
Locking - from outside
- With driver's door closed - turn key to the right (3).
- With passenger's door closed -turn key to the left.
Locking - from inside
- With the door closed - push the lock lever down (5).
Unlocking - from outside
- At the driver's door - turn key to the left (2).
- At the passenger's door - turn key to the right.
Unlocking - from inside
- Push the lock lever up (6). The doors and the trunk are unlocked if previously locked from inside. If previously locked from outside, only that door will be unlocked (theft deterrence):
29
Note:
The central locking system can only be engaged at the passenger door if the key is removed from the steering lock or is inserted in the steering lock without having been turned.
If a door is not properly closed, unlock the car, open and reclose this door, and lock the car again.
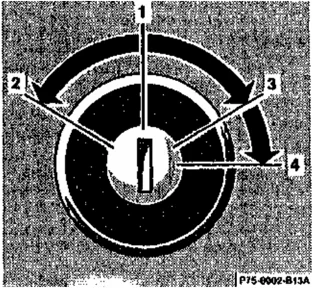
Trunk 1 Neutral position - push to open 2 Unlocking 3 Locking (detent) 4 Separate locking of trunk - remove key in this position.
Locking Turn master key to position 3, turn back to position 1 and remove.
Unlocking Turn master key to position 2, turn back to position 1 and remove
Separate Locking and Unlocking of Trunk
If the trunk is to remain locked (e.g. when leaving the car at a parking garage or workshop), lock the trunk separately. Turn master key to position 4 and remove in this position. Leave only the valet key with the vehicle.
The trunk (and fuel filler flap) remain locked - even if the central locking system was engaged from outside and a door is opened from inside of car (theft deterrence).
To unlock turn master key to position 2, then back to position 1 and remove.
If the trunk is unlocked, the doors and fuel filler flap will also be unlocked. After closing the trunk, the central locking system must again be engaged to relock the doors and fuel filler flap.
30
Important! Separately locking the trunk with a key will activate the starter lockout, even if a door is left ajar. To be able to start the engine, first close the door. Next insert the key and turn it to the unlocking position.
Note: If the fuel filler flap cannot be opened, refer to Manual Release of Fuel Filler Flap in Index
Closing Windows from Outside Turn key in door lock or trunk lock to the locking position 3 and hold. The windows begin to close after approx. 1 second.
Note: If the closing procedure is interrupted, it can only be continued by first turning the key to the unlocked position (2) and then again to the locking position (3).
Warning! Never close the windows if there is the possibility of anyone being harmed by the raising window.
In case the closing procedure causes potential danger, the closing procedure can be immediately interrupted by turning the key back to the vertical position. However, the windows can only be lowered using the power window buttons inside the car.
Emergency Unlocking in Case of Accident The doors unlock automatically a short time after the roll bar is deployed in an accident (this is intended to aid rescue and exit). However, the key in the steering lock must be in steering lock positions 1, 2 or returned to position 0, but not removed.
31
 P76-0026-B13
Interior Central Locking System 1 Initial position (integrated with vehicle central locking system) 2 Separate locking of storage compartments 3 Emergency operation
The following storage compartments are part of the interior central locking system:
- eyeglasses compartment in the dashboard,
- console storage compartments,
- rear storage compartments,
- door pockets.
Integration with Vehicle Central Locking System
When locking or unlocking the vehicle from the outside by using the master key, the interior storage compartments and door pockets are also locked or unlocked (with lock in position 1).
Separate Locking of Storage Compartments
Locking: Turn master key to position 2 and remove from lock. The storage compartments remain locked-even if the vehicle is unlocked from the outside.
Unlocking: Turn master key to position 1 and remove from lock.
If the vehicle was locked from the outside, the storage compartments remain in the locked mode until the vehicle is unlocked again from the outside.
Note: If the interior storage compartments are to remain locked (for example while in a repair shop), leave only the valet key with the vehicle.
When unlocking a door from the inside, on a vehicle previously locked from the outside, the storage compartments still remain locked.
In case of a malfunction the eyeglasses compartment can still be opened. To do so, turn the master key to position 3, return it to position 1, remove it from the lock and press button [icon].
32
 1 Indicator lamp in center console
Anti-Theft Alarm System
The anti-theft alarm is automatically armed or disarmed with any of your vehicle's keys or infrared remote control by locking or unlocking either door or the trunk.
A blinking lamp (1) indicates that the alarm is armed.
The anti-theft alarm is disarmed when unlocking either door or the trunk with any of your vehicle's keys or infrared remote control.
Operation: Once the alarm system has been armed, the exterior vehicle lamps will flash and the horn will sound intermittently when someone:
- opens a door,
- opens the trunk,
- opens the hood,
- removes the radio,
- switches on or bridges the ignition circuit,
- steps on the brake pedal, opens the storage compartment between the front seats
The alarm will last approximately 150 seconds in the form of blinking exterior lamps. At the same time an alarm horn will sound intermittently for 60 seconds, pause for 30 seconds, and repeat for another 60 seconds.
The alarm will stay on even if the activating element (a door, for example) is immediately closed.
Note: We recommend that you carry the flat key safely with you so that it is always handy. This key has the same function as the master key.
33
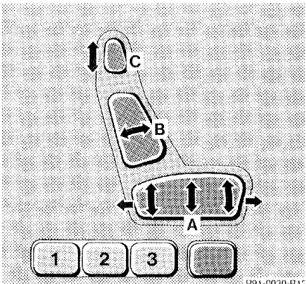
Power Seats
The switches are located in each door. Turn key in steering lock to position 1 or 2 (with either door open, the power seats can also be operated with the key removed or in steering lock position 0).
Adjusting
A Seat cushion B Backrest C Head restraint (with shoulder belt height adjustment)
Adjust the head restraint so that the upper portion of the shoulder belt is located as close as possible to the middle of the shoulder. The head restraint can be tilted forward by hand.
Note:
To prevent the backrest from touching the soft top storage compartment cover when the seat cushion is moved back, the backrest will automatically move to a more upright position.
When reclining the backrest, the seat cushion will automatically move forward to prevent the backrest from touching the soft top storage compartment cover.
Warning!
When leaving the vehicle always remove the key from the steering lock.
The power seats can also be operated with the driver's or passenger door open. Do not leave children unattended in the vehicle. Unsupervised use of vehicle equipment may cause serious personal injury.
Do not adjust the driver's seat while driving. Adjusting the seat while driving could cause the driver to lose control of the vehicle.
Never ride in a moving vehicle with the seat back reclined. Sitting in an excessively reclined position can be dangerous. You could slide under the seat belt in a collision. If you slide under it, the belt would apply force at the abdomen or neck. That could cause serious or even fatal injuries. The seat back and seat belts provide the best restraint when the wearer is in an upright position and belts are properly positioned on the body.
The rear storage area should never be occupied by passengers since the vehicle is a 2 seater. Furthermore, there is a risk of injury in the rear by adjusting the power assisted front seats.
Never place hands under seat or near any moving parts while a seat is being adjusted.
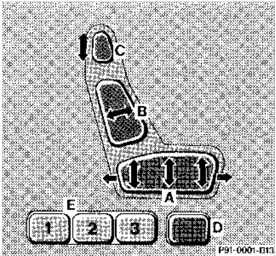
Storing Position in Memory
D Memory button
E Position buttons "1", "2" and "3"
After the seat and head restraint are positioned, push memory button D, release, and within 3 seconds push position button "1". Two additional sets of positions may be stored into memory using position buttons "2" and "3".
Adjusting
Using the same position button, the steering column position and rear view mirror position will also be stored together with the seat position. A Seat position B Backrest C Head restraint (With shoulder belt height adjustment)
Adjusting steering column and mirrors see Index.
Adjust the head restraint so that the upper portion of the shoulder belt is located as close as possible to the middle of the shoulder. The head restraint can be tilted forward by hand.
Note: To prevent the backrest from touching the soft top storage compartment cover when the seat cushion is moved back, the backrest will automatically move to a more upright position. When reclining the backrest, the seat cushion will automatically move forward to prevent the backrest from touching the soft top storage compartment cover.
Recalling Stored Positions
Press position button 1, 2 or 3 and the seat/backrest/head restraint/steering wheel/mirror movement has stopped.
Note: For safety reasons, the seat/head restraint/steering wheel/mirror movement stops after releasing the position button. In a normal seated position the belts wearer, as they are only then properly located on the body.
The rear storage area should never be occupied by passengers since the vehicle is a 2 seater.
Furthermore, there is a risk of injury in the rear by adjusting the power assisted front seats.
35
 P91-0003-B13
Backrest
Folding forward: Lift lever and fold forwards.
Folding back: Fold backrest back until it audibly locks in place.
Warning! The seat belts provide protection only with the backrest locked in place and, therefore, must be locked in place with the vehicle in motion. Do not drive the car when the seat-back is not locked in place.
Note: If the backrest and seat belt warning lamp does not go out, but is instead lit continuously, then a backrest is not engaged in its lock.
Always provide sufficient room behind the backrest and fold the backrest all the way back until it can be heard locking in place.
The warning lamp goes out as soon as both backrests are locked in place.
If both backrests are locked in place and the warning lamp does not go out, have the system checked at your authorized Mercedes-Benz dealer immediately.
36
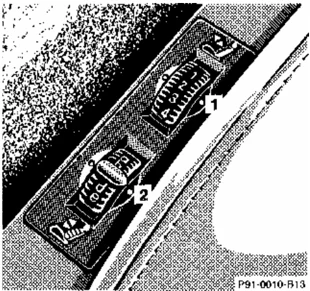
P91-0010-B13 Orthopedic Seat Backrest
1 Pressure regulator 2 Height regulator
Backrest Some models may be equipped with orthopedic seats. These seats have an inflatable air cushion built into the backrest to provide additional lumbar support.
Folding forward: Lift lever and fold forward.
Folding back: The pressure and height regulators are located on the driver's seat on the left, on the passenger's seat on the right.
The amount of cushion height and curvature may be adjusted after turning the key to steering lock position 2.
Warning! The seat belts provide protection in place and, therefore, must be locked in place with the vehicle in motion. Do not drive the car when the seat-back is not locked in place.
Note The inflation pressure of the air cushion can be continuously varied between position "0" = without pressure, and position "4" = maximum pressure, by changing the pressure regulator (1) setting.
Always provide sufficient room behind the backrest and fold the backrest all the way back until it can be heard locking in place.
In addition, the cushion height may be changed to five different settings between position "a" = lowest setting, and "e" = highest setting, by varying the height regulator (2) adjustment.
The warning lamp goes out as soon as both backrests are locked in place.
If the engine is turned off, the last cushion setting is retained in memory, and the warning lamp does not go out, have the system checked at your authorized MERCEDES-BENZ dealer immediately.
37
 PB2-0012-013
Heated Seats The seat heaters can be switched on with the key in steering lock turned to position 1 or 2.
Press switch to turn on heater: 1 Normal heating mode. One indicator lamp in the switch lights up. 2 Rapid heating mode. Both indicator lamps in the switch light up. After approximately 5 minutes in the rapid heating mode, the heater automatically switches to normal operation and only one indicator lamp will stay on.
Turning off heater: If one indicator lamp is on, press upper half of switch. If both indicator lamps are on, press lower half of switch. If left on, the heater automatically turns off after approximately 30 minutes of operation.
Note: When in operation, the seat heater consumes a large amount of power. It is advisable not to use the seat heater longer than necessary. The seat heaters may automatically switch off if too many power consumers are switched on at the same time, or if the battery charge is low. When this occurs, the indicator lamp in the switch will blink (both indicator lamps blink during rapid seat heating). The seat heaters will switch on again automatically as soon as sufficient voltage is available. If the blinking of the indicator lamps is distracting to you, the seat heaters can be switched off.
38
 P97-0006-B13
Armrest To adjust: Press button (1) and slide armrest forward or backward.
 P48-0003-B13
Adjusting Steering Column Turn key in steering lock to position 1 or 2 (with either door open, the steering column can be operated with the key removed or in steering lock position 0). To extend or retract: Move switch (1) in desired direction. To raise or lower: Move switch (1) in desired direction.
Storing Steering Column Position in Memory The steering column position is stored in memory together with the seat/head restraint/mirror position and can be recalled when necessary, see Index.
Warning! Do not adjust the steering wheel while driving. Adjusting the steering wheel while driving could cause the driver to lose control of the vehicle.
39
Seat Belts and Supplemental Restraint System (SRS)
Your vehicle is equipped with lap-shoulder seat belts, emergency tensioning retractors for the seat belts, driver airbag and knee bolster and passenger airbag and knee bolster.
Seat Belts
I mportant!
Laws in most states and all Canadian provinces require seat belt use.
All states and provinces require use of child restraints that comply with U.S. Federal Motor Vehicle Safety Standard 213 and Canadian Motor Vehicle Safety Standard 213.1. We strongly recommend their use.
Seat Belt Warning System
With the key in steering lock position 2, an audible warning sounds for a short time if the driver's seat belt is not fastened.
Warning!
If you are ever in an accident, your injuries can be considerably more severe without your seat belt properly buckled. Without your seat belt buckled, you can hit the interior of the vehicle or be ejected from it. You can be seriously injured or killed.
In the same crash, the possibility for injury or death is lessened with your seat belt buckled.
The seat belts provide protection only with the backrest locked in place. If the seat belt warning lamp does not go out, but is instead lit continuously, then a backrest is not engaged in its lock.
Never ride in a moving vehicle with the seat back reclined. Sitting in an excessively reclined position can be dangerous. You could slide under the seat belt in a collision. If you slide under it, the belt would apply force at the abdomen or neck. That could cause serious or even fatal injuries. The seat back and seat belts provide the best restraint when the wearer is in an upright position and belts are properly positioned on the body.
40
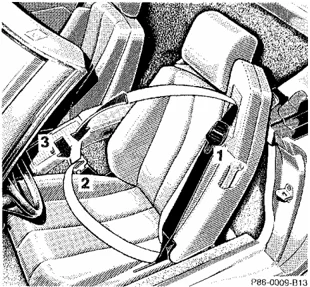
P86-0009-B13
1 Latch plate 2 Buckle 3 Release button
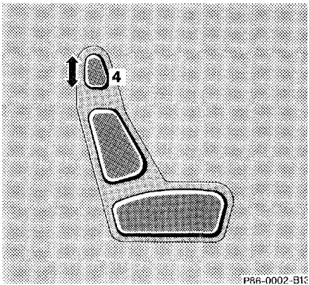
P86-0007-B13
Fastening of Seat Belts Pull belt with latch plate (1) across shoulder and lap. Push latch plate (1) into buckle (2) until it clicks. The lap belt should be positioned as low as possible on your hips and not across the abdomen. Do not twist the belt.
For safety reasons, avoid adjusting the seat or seat back into positions which could affect the correct seat belt position
Press switch (4) to adjust seat belt so that the shoulder portion is located as close as possible to the middle of your shoulder.
The shoulder portion of the seat belt must be pulled snug and checked for snugness immediately after engaging it and during driving. Tighten the lap portion to a snug fit by pulling shoulder portion up.
41
 P86-0003-B13
Unfastening of Seat Belts
Push in the red button (3) in the belt buckle (2). Allow the retractor to completely rewind the seat belt by guiding the latch plate (1).
Operation: The inertia reel stops the belt from unwinding during sudden vehicle stops or when quickly pulling on the belt. The locking function of the reel may be checked by quickly pulling on the belt. The emergency tensioning retract ors tighten the fastened seat belts during frontal and front-angled impacts exceeding the first threshold of the SRS (see Index).
Note: For cleaning and care of the seat belts, see Upholstery in Index.
42
Warning!
USE SEAT BELTS PROPERLY,
- Each occupant should wear their seat belt at all times. Together with the "SRS", the seat belt offers the best conditions for protection of the body in case of major frontal impact.
- Improperly positioned seat belts do not provide maximum protection and may cause serious injuries in case of an accident.
- Never wear the shoulder belt under your arm, against your neck or off your shoulder. In a crash, your body would move too far forward. That would increase the chance of head and neck injuries. The belt would also apply top much force to the ribs, which could severely injure internal organs such as your liver or spleen.
- Position the lap belt as low as possible on your hips and not across the abdomen. If the belt is positioned across your abdomen, it could cause serious injuries in a crash.
- Each seat belt should never be used for more than one person at a time. Do not fasten a seat belt around a person and objects.
- Belts should not be worn twisted. In a crash, you wouldn't have the full width of the belt to take impact forces. The twisted belt against your body could cause injuries.
- Pregnant women should also use a lap-shoulder belt. The lap belt portion should be positioned as low as possible on the hips to avoid any possible pressure on the abdomen.
USE CHILD RESTRAINTS PROPERLY.
- Infants and small children must be seated in an infant or child restraint system, which is properly secured by a lap belt or lap belt portion of a lap-shoulder belt. Children could be endangered in an accident if their child restraints are not properly secured in the vehicle.
- Rear-facing child restraints must not be used in the front seat. They could be struck by the airbag when it inflates in a crash. If this happens, a child in the restraint could be seriously injured.
- Children too big for child restraint systems should use regular seat belts. Position shoulder belt across chest and shoulder, not face or neck. A booster seat may be necessary to achieve proper belt positioning.
43
Supplemental Restraint System (SRS)
The SRS uses two crash severity levels (thresholds) to activate either the ETR or airbag or both. Activation depends on the direction and severity of the impact, exceeding the thresholds and fastening of the seat belt.
Seat belt fastened
• first threshold exceeded: ETR activates
• second threshold exceeded: airbag also activates
Seat belt not fastened
• first threshold exceeded: airbag activates, but not ETR
Driver and front passenger systems operate independently from each other.
Emergency Tensioning Retractor (ETR)
The seat belts are equipped with emergency tensioning retractors. These tensioning retractors are located in each belt's inertia reel and become operationally ready with the key in steering lock position 1 or 2.
The emergency tensioning retractors are designed to activate only when the seat belts are fastened during frontal and front-angled impacts exceeding the first threshold of the SRS. They remove slack from the belts in such a way that the seat belts fit more snugly against the body, restricting its forward movement as much as possible.
In cases of other frontal impacts, roll-overs, certain side impacts, rear collisions, or other accidents without frontal forces, the emergency tensioning retractors will not be activated. The driver and passenger will then be protected by the fastened seat belts and inertia reel in the usual manner.
For seat belt and emergency tensioning retractor safety guidelines, see Safety Guidelines in Index.
44
Airbags
The most effective occupant restraint system yet developed for use in production vehicles is the seat belt. In some cases, however, the protective effect of a seat belt can be further enhanced by an airbag.
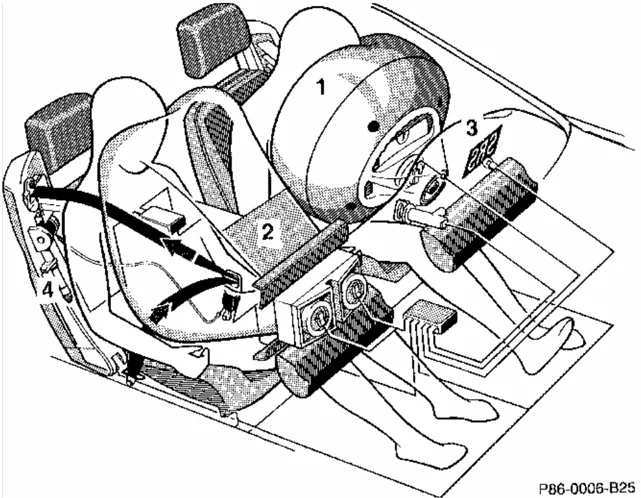
The driver airbag (1) is located in the steering wheel hub. The passenger airbag (2) is located in the dashboard ahead of the passenger. In conjunction with wearing the seat belts with emergency tensioning retractors (4), they provide increased protection for the driver and passenger. The operational readiness of the airbag system is verified by the indicator lamp "SRS" (3) in the instrument cluster. If no fault is detected, the lamp will go out after approximately 4 seconds; after the lamp goes out, the system continues to monitor the components and circuitry of the airbag system and will indicate a malfunction by coming on again.
P86-0006-B25
45
The following system components are monitored or undergo a self-check: crash-sensor, airbag ignition circuits, driver and passenger seat belt buckles. Initially, when the key is turned from steering lock position 0 to positions 1 or 2, malfunctions in the crash-sensor are detected and indicated (the "SRS" indicator lamp stays on longer than 4 seconds).
In the operational mode, after the indicator lamp has gone out following the initial check, interruptions and short circuits in the airbag ignition circuit and in the driver and passenger seat belt buckle harnesses, and low voltage in the entire system are detected and indicated.
In the event a malfunction of the "SRS" is indicated as outlined above, the "SRS" may not be operational. We strongly recommend that you visit an authorized Mercedes-Benz dealer immediately to have the system checked; otherwise the "SRS" may not be activated when needed.
Important! The airbags are designed to activate only in certain frontal and front-angled impacts. Only during these types of impacts will they provide their supplemental protection. The driver and passenger should always wear the seat belts, otherwise it is not possible for the airbags to provide their intended supplemental protection.
In cases of other frontal impacts, roll-overs, certain side impacts, rear collisions, or other accidents without frontal forces, the airbags will not be activated. The driver and passenger will then be protected by the fastened seat belts.
Important! The "SRS" is designed to reduce the potential of injury in certain frontal and front-angled impacts which may cause injuries, however, no system available today can totally eliminate injuries and fatalities.
The activation of the "SRS" temporarily releases a small amount of dust from the air-bags. This dust, however, is neither injurious to your health, nor does it indicate a fire in the vehicle.
The service life of the airbags extends to the date indicated on the label located on the driver-side door latch post. To provide continued reliability after that date, they should be inspected by an authorized Mercedes-Benz dealer at that time and replaced when necessary.
46
Warning!
It is very important for your safety to always be in a properly seated position and to wear your seat belt.
For maximum protection in the event of a collision always be in normal seated position with your back against the seat back. Fasten your seat belt and ensure that it is properly positioned on the body.
Since the airbag inflates with considerable speed and force, a proper seating position will keep you in a safe distance from the airbag:
-
Sit properly belted in an upright position with your back against the seat back.
-
Do not lean with your head or chest close to the steering wheel or dashboard.
-
Adjust the passenger seat as far as possible rearward from the dashboard, especially when a child restraint is installed.
-
Infants and small children should only be seated in an infant or child restraint which is properly secured by the seat belt.
-
Rear-facing child restraints must not be used in a front seat.
Failure to follow these instructions can result in severe injuries to you or other occupants.
47
Safety Guidelines for the Seat Belt, Emergency Tensioning Retractor and Airbag
Warning!
- Damaged belts or belts that were highly stressed in an accident must be replaced and their anchoring points must also be checked. Use only belts installed or supplied by an authorized Mercedes-Benz, dealer.
- Do not pass belts over sharp edges.
- Do not make any modification that could change the effectiveness of the" belts,,
- The "SRS" is designed to function on a one-time-only basis. An airbag or emergency tensioning retractor (ETR) that was activated must be replaced.
- No modifications of any kind may be made to any components or wiring of the "SRS". This includes the installation of additional trim material, badges etc. over the steering wheel hub or front passenger airbag cover and installation of additional electrical/electronic equipment on or near "SRS" components and wiring.
- Several airbag system components at the steering wheel get hot after the air-bag has inflated. Don't try to touch them.
- Improper work on the system, including incorrect installation and removal, can lead to possible injury through an uncontrolled activation of the "SRS".
- In addition, through improper work there is the risk of rendering the "SRS" inoperative. Work on the "SRS" must therefore only be performed by an authorized Mercedes-Benz dealer.
- When scrapping the airbag unit or emergency tensioning retractor, it is mandatory to follow our safety instructions. These instructions are available at your authorized Mercedes-Benz dealer.
When you sell the vehicle we strongly urge you to give notice to the subsequent owner that it is equipped with an "SRS" by alerting him to the applicable section in the Owner's Manual.
48
Infants and Child Restraint Systems
We recommend that all infants and children be restrained at all times while the vehicle is in motion.
Important!
The use of infant or child restraints is required by law in all 50 states and all Canadian provinces.
Infants and small children should be seated in an infant or child restraint system, which is properly secured by the lap belt portion of the lap-shoulder belt, and that complies with U.S. Federal Motor Safety Standard 213 and Canadian Motor Vehicle Safety Standard 213.1.
A statement by the child restraint manufacturer of compliance with this standard can be found on the instruction label on the restraint and in the instruction manual provided with the restraint.
When using any infant or child restraint system, be sure to carefully read and follow all manufacturer's instructions for installation and use
Warning!
Rear-facing child restraints must not be used in a front seat They could be struck by the airbag when it inflates in a crash. If this happens, a child in the restraint could be seriously injured.
Infants and small children should never be held on the lap while the vehicle is in motion. During an accident they would be almost impossible to hold, and could be crushed between the adult and the dashboard.
Infants and small children should never share a seat belt with another occupant. During an accident, they could be crushed between the occupant and seat belt.
Children too big for child restraint systems should use regular seats belts. Position the shoulder belt across the chest and shoulder, not the face or neck. A booster seat may be necessary to achieve proper belt positioning.
When the child restraint is not in use, remove it from the car or secure it with the seat belt to prevent the child restraint from becoming a projectile in the event of an accident.
U.S.A. Models only
Since 1986 all U.S. child restraints comply with U.S. regulations without the use of a tether strap.
Canada Models only
This vehicle can be equipped with tether anchorages for a top tether strap. Consult your authorized Mercedes-Benz dealer for installation of these anchorages.
49
 P46-0002-f13
Steering Lock
0 The key can be withdrawn in this position only. The steering is locked with the key removed from the steering lock. The key can be removed only with the selector lever in position "P". After removing the key or with the key in steering lock position 0, the selector lever is locked in position "P".
1 Steering is unlocked. (If necessary, move steering wheel slightly to allow the key to be turned clockwise to position 1.) Most electrical consumers can be operated. For detailed information see respective subjects.
2 Driving position.
3 Starting position. Refer to Index for Starting and turning off engine.
Warning! When leaving the vehicle always remove the key from the steering lock. Do not leave children unattended in the vehicle. Unsupervised use of vehicle equipment may cause serious personal injury.
Notes: A warning sounds when the driver's door is opened with the key in steering lock positions 1 or 0. With the engine at idle speed, the charging rate of the alternator (output) is limited. It is therefore recommended to turn off unnecessary electrical consumers while driving in stop-and-go traffic. This precaution helps to avoid draining of the battery. Unnecessary drain on the battery and charging system may be minimized by turning off the following power consumers, for example: heated seats, rear window defroster. In addition, the automatic climate control blower speed should be set to stage "1".
Caution! To prevent accelerated battery discharge and a possible dead battery, always remove the key from the steering lock. Do not leave the key in steering lock position 0.
50