AUDIO
(b) Manual program selection
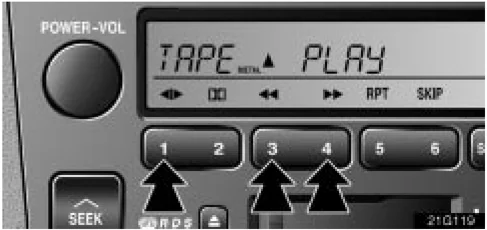
"Program" button: Push the "◀|▶" button to select the other side of a cassette tape. The display indicates which side is currently selected (▲ indicates top side, ▼ indicates bottom side).
"Rewind" button: Push the "◀◀" button to rewind a tape. "REW" appears on the display.
To stop rewinding, push the same button or "TAPE" button.
"Fast forward" button: Push the "▶▶" button to fast forward a cassette tape. "FF" appears on the display.
To stop fast forwarding, push the same button or "TAPE" button.
(c) Automatic program selection
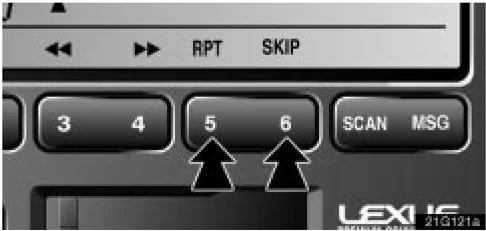
"RPT" button: The repeat feature automatically replays the current program.
Push the "RPT" button while the program is playing. When the program ends, it will automatically be rewound and replayed. Push the button again to turn off the repeat feature.
There must be at least 4 seconds of blank space between programs for the repeat feature to work correctly.
"SKIP" button: The skip feature allows you to fast forward past long stretches of blank tape. This is especially useful at the end of cassettes.
Push the "SKIP" button. The player will automatically skip any blank portions of 15 seconds or more and play the next program. To cancel it, push the button once again.
162
AUDIO
 "Automatic program selection" button: The automatic program selection feature allows you to program your cassette player to skip forward or backward to locate the song you want to hear. You can skip up to 9 programs at a time.
Push this button on the upper side to skip forward. "FF" and the number will appear on the display. Push the button until the number you want to skip appears on the display. After that, the player will automatically skip forward.
When the end of the tape is reached, the player automatically reverses sides and resumes normal play.
Push this button on the lower side to skip backward. Push the button until "REW" and the number you want to skip appear on the display.
- If you set "REW 1", the player will rewind to the beginning of the current program.
- When counting the number of programs you want to rewind, remember to count the current program as well. For example, if you want to rewind to a song that is two before the song you are listening to, push this button until "REW 3" appears on the display.
When the beginning of the tape is reached, the player automatically resumes normal play.
There must be at least 3 seconds of blank space between programs for this feature to work correctly.
"RPT", "SKIP" or "Automatic program selection" features: These features may not work well with some spoken word, live or classical recordings.
163
AUDIO
Compact disc player operation
The compact disc player is an optional accessory that your vehicle is pre-wired to accept. Although your audio system has a DISC button, your vehicle may or may not be equipped with a CD player. Please contact your dealer for additional details if you would like to have the optional CD player installed.
(a) Inserting compact discs
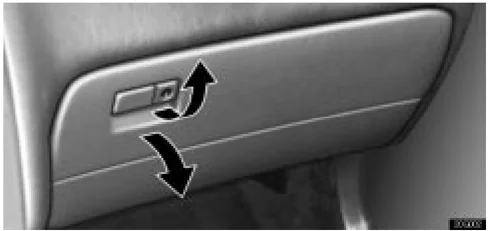
- Pull the lever and open the glove box door.
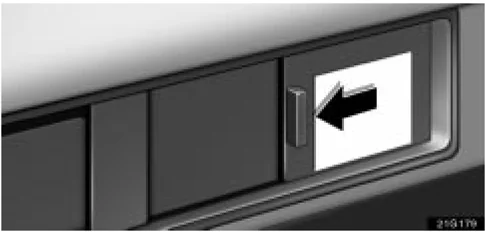
- Slide and open the cover. The magazine is automatically ejected.
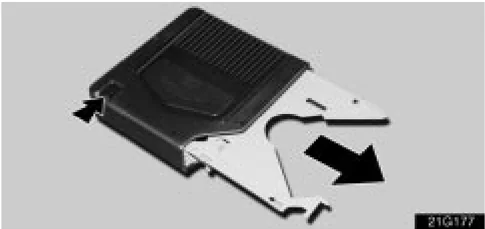
- Pull out the tray while pushing the lock release button.
164
AUDIO
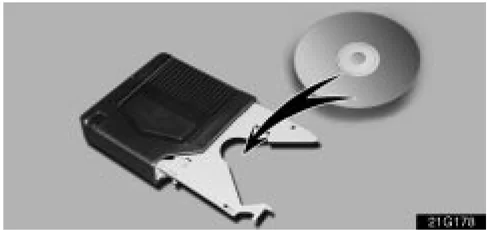
- Put a disc on the tray with its label face up and push the tray back into the magazine.
If the label faces down, the disc cannot be played. In this case, "ERROR" and the disc number appears on the display.
When the magazine is set completely, the system will be in a "Load" cycle for approximately 10 seconds while the system searches for discs in the magazine. Upon completion of this cycle, the CD unit will be ready to play. If the "DISC" button is pushed during the "Load" cycle, "LOAD" appears on the display until the system has completed the load cycle, after which the system will begin normal play.
CAUTION
To reduce the chance of injury in case of an accident or a sudden stop, always keep the glove box door closed while driving.
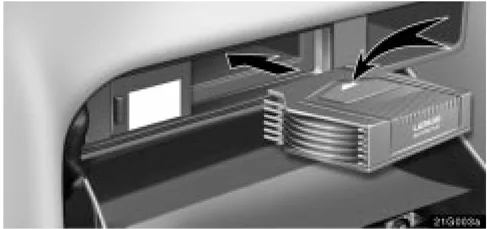
- Insert the magazine into the player as indicated by the arrow head on the magazine, and close the cover and glove box door.
165
AUDIO
(b) Playing a compact disc
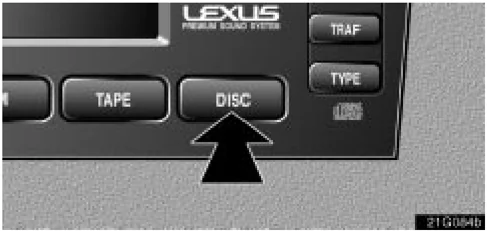
Push the "DISC" button if the magazine is already loaded in the player.
"CD" appears on the display.
The discs set in the magazine are played continuously, starting with disc number 1. The disc number of the disc currently being played, the track number and the time from the beginning of the program appear on the display.
When play of one disc ends, the first track of the following disc starts. When play of the final disc ends, play of the first disc starts again.
The player will skip any empty disc trays.
(c) Selecting a desired disc
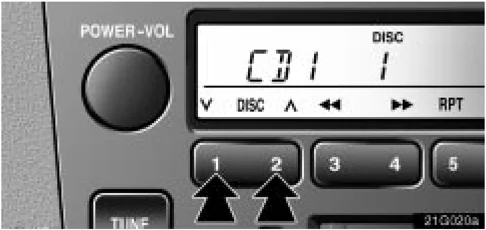
Push the "v" or "∧" button to select the disc number.
Push the button several times until the desired disc number appears on the display. When you release the button, the player will start playing the selected disc from the first track.
166
AUDIO
(d) Selecting a desired track
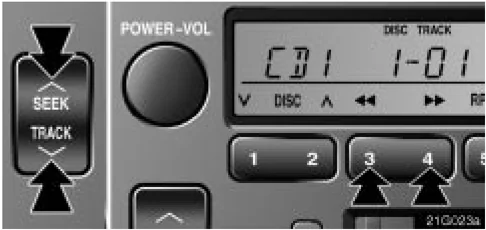
"TRACK" button: Use for direct access to a desired track. Push either side of the "TRACK" button several times until the desired track number appears on the display. As you release the button, the player will start playing the selected track from the beginning.
"Fast forward" button. Push the "►►" button and hold it to fast forward the disc. When you release the button, the compact disc player will resume playing from that position.
"Reverse" button. Push the "◄◄" button and hold it to reverse the disc. When you release the button, the compact disc player will resume playing.
(e) Searching for a desired track or disc
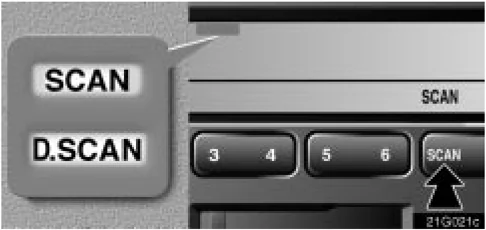
Searching for a desired track: Push the "SCAN" button briefly. "SCAN" will appear on the display. The compact disc player will play the next track for 10 seconds, then scan again. To select a track, push the "SCAN" button a second time. If the player reaches the end of the disc, it will continue scanning at track 1.
After all the tracks or discs in the magazine are scanned in one pass, normal play resumes.
Searching for a desired disc: Push the "SCAN" button until you hear a beep. With "D.SCAN" on the display, the program at the beginning of each disc will be played for 10 seconds. To continue listening to the program of your choice, push the button a second time.
After all the discs in the magazine are scanned in one pass, the scan function is cancelled.
167
AUDIO
(f) Other compact disc player functions
 " RPT" button: Use it for automatic repeat of the track or disc you are currently listening to.
Push the button briefly while the track is playing. "RPT" appears on the display. When the track is finished, the player will automatically go back to the beginning of the track and play the track again. To cancel it, push the button once again.
Push the button until you hear a beep. "D.RPT" appears on the display. When the disc is finished, the player will automatically go back to the first track of the disc and play again.
To cancel it, push the button once again.
" RAND" button: Use it for automatic track or disc selection and play by the system.
When the button is pushed briefly, "RAND" appears on the display. The system selects a track in the discs which are set and plays it. To cancel it, push the button once again.
When the button is pushed until you hear a beep, "D.RAND" appears on the display. The system selects a track and discs in the magazine which are set and plays it. To cancel it, push the button once again.
When a track is skipped or the system is inoperative, push the button to reset.
(g) If the player malfunctions
If "WAIT" appears on the display, audio signals of the disc cannot be read or the system has trouble. Push the "DISC" button once again.
If the player does not operate, check that the disc surface is not soiled or damaged. If the disc is O.K., the following two causes are possible.
-
Condensation may have occurred on the internal mechanism of the changer. Open the cover to let the air circulate.
-
The temperature of the player's internal mechanism is raised because of high external temperature. Remove the magazine from the player to cool it.
If the player still does not operate, take it to your Lexus dealer.
168
AUDIO
Steering pad switches (GS430 only)
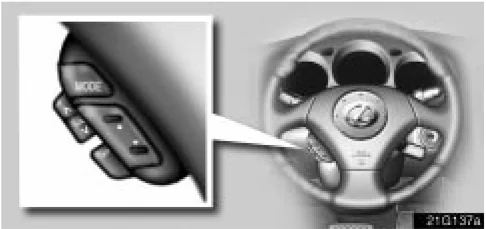
The steering pad switches are installed on the left side of the steering wheel.
“MODE” switch: Push the “MODE” switch to select an audio mode. Each push changes the mode sequentially if the desired mode is ready to use. When you push the switch with the audio system turned off, the audio system turns on.
“VOL” switches: Push “▲” to increase the volume and “▼” to decrease the volume. The volume continues to increase or decrease while the switch is being pressed.
“SET” switch: Push the “SET” switch to change to the preset volume. To preset the volume, adjust the volume and push the switch until you hear a beep.
“▼” or “▲” switch: The function in each mode is shown below.
(a) When the radio mode is selected
- Push this switch briefly to select a station that you assigned to a switch on the audio system.
- Push this switch and hold it until you hear a beep. The radio will begin seeking up or down for a station and stop on reception.
(b) When the “TAPE” mode is selected
- Push this switch briefly for automatic program selection. In automatic program selection, you can skip up to 9 programs at a time. For details, see page 162 for details.
- Push this switch until you hear a beep to fast forward or rewind the tape. To stop fast forwarding or rewinding, push the same side on the switch.
(c) When the “CD” mode is selected
- Push this switch briefly to select a desired track.
- To select a desired disc, push and hold this switch until you hear a beep.
CAUTION Operate the steering pad switches with due care while you are driving to avoid accidents.
169
AUDIO
Car audio system operating hints
NOTICE To ensure correct audio system operations:
- Be careful not to spill beverages over the audio system.
- Do not put anything other than a cassette tape or CD magazine into the cassette tape slot or CD changer.
- The use of a cellular phone inside or near the vehicle may cause a noise from the speakers of the audio system which you are listening to. However, this does not indicate a malfunction.
Radio reception
Usually, a problem with radio reception does not mean there is a problem with your radio – it is just the normal result of conditions outside the vehicle.
For example, nearby buildings and terrain can interfere with FM reception. Power lines or telephone wires can interfere with AM signals. And of course, radio signals have a limited range. The farther you are from a station, the weaker its signal will be. In addition, reception conditions change constantly as your vehicle moves.
Here are some common reception problems that probably do not indicate a problem with your radio:
FM
Fading and drifting stations – Generally, the effective range of FM is about 40 km (25 miles). Once outside this range, you may notice fading and drifting, which increase with the distance from the radio transmitter. They are often accompanied by distortion.
Multi-path – FM signals are reflective, making it possible for two signals to reach your antenna at the same time. If this happens, the signals will cancel each other out, causing a momentary flutter or loss of reception.
Static and fluttering – These occur when signals are blocked by buildings, trees, or other large objects. Increasing the bass level may reduce static and fluttering.
Station swapping – If the FM signal you are listening to is interrupted or weakened, and there is another strong station nearby on the FM band, your radio may tune in the second station until the original signal can be picked up again.
170
AUDIO
AM
Fading – AM broadcasts are reflected by the upper atmosphere – especially at night. These reflected signals can interfere with those received directly from the radio station, causing the radio station to sound alternately strong and weak.
Station interference – When a reflected signal and a signal received directly from a radio station are very nearly the same frequency, they can interfere with each other, making it difficult to hear the broadcast.
Static – AM is easily affected by external sources of electrical noise, such as high tension power lines, lightening, or electrical motors. This results in static.
Caring for your cassette player and tapes
For the best performance for your cassette player and tapes:
Clean the tape head and other parts regularly.
● A dirty tape head or tape path can decreases sound quality and tangle your cassette tapes. The easiest way to clean them is by using a cleaning tape. (A wet type is recommended.)
Use high-quality cassettes:
● Low-quality cassette tapes can cause many problems, including poor sound, inconsistent playing speed, and constant auto-reversing. They can also get stuck or tangled in the cassette player.
● Do not use a cassette if it has been damaged or tangled or if its label is peeling off.
● Do not leave a cassette in the player if you are not listening to it, especially if it is hot outside.
● Store cassettes in their cases and out of direct sunlight.
● Avoid using cassettes with a total playing time longer than 100 minutes (50 minutes per side). The tape used in these cassettes is thin and could get stuck or tangled in the cassette player.
171
AUDIO
Caring for your compact disc player and discs
- Your compact disc player is intended for use with 12 cm (4.7 in.) discs only.
- Extremely high temperature can keep your compact disc player from working. On hot days, use air conditioning to cool the vehicle interior before you listen to a disc.
- Bumpy roads or other vibrations may make your compact disc player skip.
- If moisture gets into your compact disc player, you may not hear any sound even though your compact disc player appears to be working. Eject all discs from the player and wait until the player dries.
⚠ CAUTION Compact disc players use an invisible laser beam which could cause hazardous radiation exposure if directed outside the unit. Be sure to operate the player correctly.
- Use only compact discs marked as shown above. The following products may not be playable on your compact disc player.
- Copy-protected CD
- CD-R (CD-Recordable)
- CD-RW (CD-Re-writable)
- CD-ROM
172
AUDIO
 ►Special shaped discs
 ►Labeled discs
 ►Low quality discs
NOTICE To prevent damage to the player or changer, do not use special shaped, low quality or labeled discs such as those shown in the illustrations.
173
AUDIO
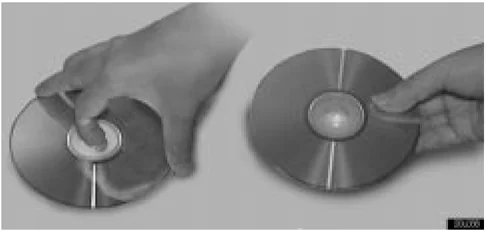
►Correct ►Wrong
- Handle compact discs carefully, especially when you set them into the player. Hold them on the edge and do not bend them. Avoid getting fingerprints on them, particularly on the shiny side.
- Dirt, scrapes, warping, pin holes, or other disc damage could cause the player to skip or to repeat a section of a track. (To see a pin hole, hold the disc up to the light.)
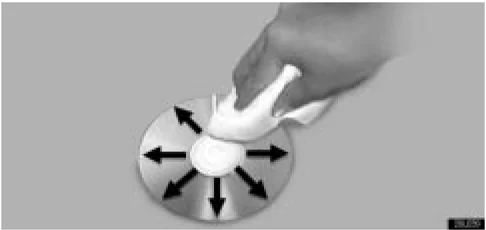
To clean a compact disc: Wipe it with a soft, lint-free cloth that has been dampened with water. Wipe in a straight line from the center to the edge of the disc (not in a circle). Do not use a conventional record cleaner or anti-static device.
174
SECTION 3 – 1
STARTING AND DRIVING
Starting and driving
- Three-way catalytic converters . . . . . . . . . . . . . . . . . . . . . . . . . . . . . . . . . . . . . . . . . . . . . . . . . . . . . . . . . . . . . . . . . . . . . . . . . . . . . . . . . . . . . . . . . . . . . . . . . . . . . . . . . . . . . . . . . . . . . . . . . . . . . . . . . . . . . . . . . . . . . . . . . . . . . . . . . . . . . . . . . . . . . . . . . . . . . . . . . . . . . . . . . . . . . . . . . . . . . . . . . . . . . . . . . . . . ........ 176
- Engine exhaust caution . . . . . . . . . . . . . . . . . . . . . . . . . . . . . . . . . . . . . . . . . . . . . . . . . . . . . . . . . . . . . . . . . . . . . . . . . . . . . . . . . . . . . . . . . . . . . . . . . . . . . . . . . . . . . . . . ........ 177
- Before starting the engine . . . . . . . . . . . . . . . . . . . . . . . . . . . . . . . . . . . . . . . . . . . . . . . . . . . . . . . . . . . . . . . . . . . . . . . . . . . . . . . . . . . . . . . . . . . . . . . . . . . . . . . . . . . . . . . . ........

STARTING AND DRIVING
THREE-WAY CATALYTIC CONVERTERS
 ►GS430
 ►GS300
Three-way catalytic converters are emission control devices installed in the exhaust system.
The purpose is to reduce pollutants in the exhaust gas.
CAUTION
- Keep people and combustible materials away from the exhaust pipe while the engine is running. The exhaust gas is very hot.
- Do not drive, idle or park your vehicle over anything that might burn easily such as grass, leaves, paper or rags.
NOTICE
A large amount of unburned gases flowing into the three-way catalytic converter may cause it to overheat and create a fire hazard. To prevent this and other damage, observe the following precautions:
- Use only unleaded gasoline.
- Do not drive with an extremely low fuel level; running out of fuel could cause the engine to misfire, creating an excessive load on the three-way catalytic converter.
- Do not allow the engine to run at idle speed for more than 20 minutes.
176
STARTING AND DRIVING
- Avoid racing the engine.
- Do not push-start or pull-start your vehicle.
- Do not turn off the ignition while the vehicle is moving.
- Keep your engine in good running order. Malfunctions in the engine electrical system, electronic ignition system or fuel system could cause an extremely high three-way catalytic converter temperature.
- If the engine becomes difficult to start or stalls frequently, take your vehicle in for a check-up as soon as possible. Remember, your Lexus dealer knows your vehicle and its three-way catalytic converter system best.
- To ensure that the three-way catalytic converter and the entire emission control system operate properly, your vehicle must receive the periodic inspections required by the Lexus Maintenance Schedule. For scheduled maintenance information, refer to the “Owner’s Manual Supplement / Scheduled Maintenance”.
ENGINE EXHAUST CAUTION
CAUTION
- Avoid inhaling the engine exhaust. It contains carbon monoxide, which is a colorless and odorless gas. It can cause unconsciousness or even death.
- Make sure the exhaust system has no holes or loose connections. The system should be checked from time to time. If you hit something, or notice a change in the sound of the exhaust, have the system checked immediately.
- Do not run the engine in a garage or enclosed area except for the time needed to drive the vehicle in or out. The exhaust gases cannot escape, making this a particularly dangerous situation.
- Do not remain for a long time in a parked vehicle with the engine running. If it is unavoidable, however, do so only in an unconfined area and adjust the heating or cooling system to force outside air into the vehicle.
- Keep the trunk lid closed while driving. An open or unsealed trunk lid may cause exhaust gases to be drawn into the vehicle.
177
STARTING AND DRIVING
- To allow proper operation of your vehicle's ventilation system, keep the inlet grilles in front of the windshield clear of snow, leaves, or other obstructions.
- If you smell exhaust fumes in the vehicle, drive with the windows open and the trunk lid closed. Have the cause immediately located and corrected.
BEFORE STARTING THE ENGINE
- Check the area around the vehicle before entering it.
- Adjust seat position, seatback angle, head restraint height and steering wheel angle.
- Adjust the inside and outside rear view mirrors.
- Lock all doors.
- Fasten seat belts.
Remember to check that the service reminder indicators function when turning the key to "ON", and check the fuel gauge to see that you have sufficient fuel.
IGNITION SWITCH WITH STEERING LOCK
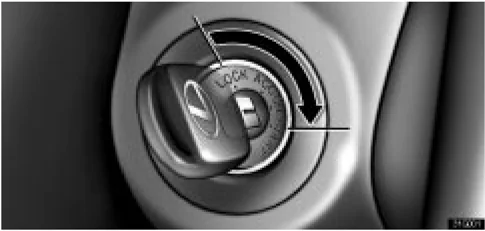
"START" – Starter motor on. The key will return to the "ON" position when released.
For starting tips, see page 180.
"ON" – Engine on and all accessories on.
This is the normal driving position.
NOTICE
Do not leave the key in the "ON" position if the engine is not running. The battery will discharge and the electronic ignition system could be damaged.
"ACC" – Accessories such as the radio operate, but the engine is off.
178
STARTING AND DRIVING
If you leave the key in the “ACC” or “LOCK” position and open the driver’s door, a buzzer will remind you to remove the key.*
NOTE: The volume or interval of beep sound can be changed. Ask your Lexus dealer for details.
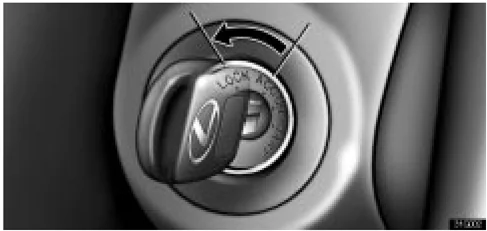
"LOCK" – Engine is off and the steering wheel is locked. The ignition key can be removed only at this position.
To turn the key from "ACC" to the "LOCK" position, you must put the transmission selector lever in the "P" position.
Once you remove the key, the engine immobiliser system is automatically set. See "Engine immobiliser system" on page 11.
When starting the engine, the key may seem stuck at the "LOCK" position. To free it, first be sure the key is pushed all the way in, and then rock the steering wheel slightly while turning the key gently.
If, in an emergency, you must turn the engine off while the vehicle is moving, turn the key only to "ACC".
PARKING BRAKE
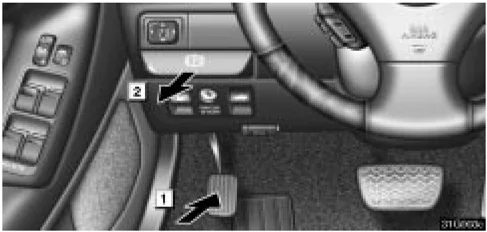
[1] To set: Fully depress the parking brake pedal. [2] To release: Pull the parking brake release lever.
Before leaving your vehicle, firmly apply the parking brake.
⚠ CAUTION
Before driving, make sure the parking brake is fully released and that the parking brake reminder light is off.
179
STARTING AND DRIVING
HOW TO START THE ENGINE
Before cranking
- Apply the parking brake firmly.
- Turn off unnecessary lights and accessories.
- Put the selector lever in "P". If you need to restart the engine while the vehicle is moving, put the selector lever in "N". A starter safety device will prevent the starter from operating if the selector lever is in any drive position.
- Depress the brake pedal and hold it to the floor until driving off.
Starting the engine
Before starting the engine, be sure to follow the instructions in "Before cranking".
Normal starting procedure
The multiport fuel injection system/sequential multiport fuel injection system in your engine automatically controls the proper air-fuel mixture for starting. You can start a cold or hot engine as follows:
With your foot off the accelerator pedal, crank the engine by turning the ignition switch to "START". Release it when the engine starts.
Engine should be warmed up by driving, not in idle. For warming up drive with smoothly turning engine until engine coolant temperature is within normal range.
If the engine stalls ... Simply restart it , using the correct procedure given in normal starting.
If the engine will not start See "If your vehicle will not start" on page 212.
NOTICE
- Do not crank for more than 30 seconds at a time. This may overheat the starter and wiring systems.
- Do not race a cold engine.
- If the engine becomes difficult to start or stalls frequently, have the engine checked immediately.
180
AUTOMATIC TRANSMISSION
Your automatic transmission has a shift lock system to minimize the possibility of incorrect operation. This means you can only shift out of "P" position when the brake pedal is depressed with the ignition switch in "ON" position. (★)
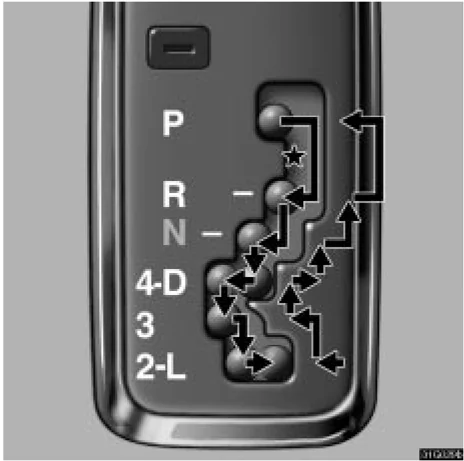
▶The shift position is displayed on the instrument cluster.
GS430: P: Parking, engine starting and key removal R: Reverse N: Neutral D: Normal driving (with overdrive on) 4: Engine braking
When the cruise control is being used, even if you downshift from "D" to "4", engine braking will not be enabled because the cruise control is not cancelled. For the operation to decrease the vehicle speed, see page 192.
3, 2: Stronger engine braking L: Maximum engine braking
STARTING AND DRIVING 181
STARTING AND DRIVING
GS300: P: Parking, engine starting and key removal R: Reverse N: Neutral D: Normal driving (with overdrive on) M: Manual shifting up or downshifting
When the cruise control is being used, even if you downshift from "D" to "4", engine braking will not be enabled because the cruise control is not cancelled. For the operation to decrease the vehicle speed, see page 192.
3, 2: Stronger engine braking L: Maximum engine braking
Correct use of the automatic transmission is explained in the following parts. (a) Normal driving (b) Driving in M mode (GS300 only) (c) Using engine braking (d) Using the "3", "2" and "L" positions (e) Backing up (f) Parking (g) Good driving practice (h) If you cannot shift the selector lever
182