1998 Lexus Owner’s Manual
LS 400
LS400 (U) 表 1
FOREWORD
Welcome to the growing group of value-conscious people who drive Lexus vehicles. We are proud of the advanced engineering and quality construction of each vehicle we build.
This Owner’s Manual explains the features of your new Lexus. Please read it and follow the instructions carefully so that you can enjoy many years of safe motoring.
When it comes to service, remember that your Lexus dealer knows your vehicle best and is interested in your complete satisfaction. Your Lexus dealer will provide quality maintenance and any other assistance you may require.
If there is not a Lexus dealer near you, or you need emergency assistance for any reason, please call the following number:
U.S. OWNERS
- When traveling in the U.S. mainland or Canada: Lexus Roadside Assistance 1–800–25–LEXUS (Toll-Free) (1–800–255–3987)
- HAWAII: Lexus Customer Service Assistance 1–800–25–LEXUS (Toll-Free) (1–800–255–3987)
CANADIAN OWNERS
- Please refer to the separate "Owner's Guide" or "Owner's Manual Supplement".
Please leave this Owner's Manual in this vehicle at the time of resale. The next owner will need this information also.
All information and specifications in this manual are current at the time of printing. However, because of the Lexus policy of continual product improvement, we reserve the right to make changes at any time without notice.
Please note that this manual applies to all models and explains all equipment, including options. Therefore, you may find some explanations for equipment not installed on your vehicle.
TOYOTA MOTOR CORPORATION
i
INTRODUCTION
New vehicle warranty Your new vehicle is covered by the following Lexus limited warranties:
- New vehicle warranty
- Emission control systems warranty
- Others
For further information, please refer to the separate "Owner's Guide", "Owner's Manual Supplement" or "Warranty Booklet".
Your responsibility for maintenance It is the owner's responsibility to make sure the specified maintenance is performed. Section 5 of this Owner's Manual gives details of these maintenance requirements. Included in Section 6 is general maintenance. For scheduled maintenance information, please refer to the separate "Owner's Manual Supplement/Maintenance Schedule".
Accessories, spare parts and modification of your Lexus A wide variety of non-genuine spare parts and accessories for Lexus vehicles are currently available in the market. You should know that Toyota does not warrant these products and is not responsible either for their performance, repair or replacement, or for any damage they may cause to, or adverse effect they may have on, your Lexus vehicle.
This vehicle should not be modified with non-genuine Lexus products. Modification with non-genuine Lexus products could affect its performance, safety or durability, and may even violate governmental regulations. In addition, damage or performance problems resulting from the modification may not be covered under warranty.
Spark ignition system of your Lexus The spark ignition system in your Lexus meets all requirements of the Canadian Interference-Causing Equipment Standard.
Installation of a mobile two-way radio system As the installation of a mobile two-way radio system in your vehicle could affect electronic systems such as the multiport fuel injection system/sequential multiport fuel injection system, cruise control system, anti-lock brake system and Supplemental Restraint System (SRS), be sure to check with your Lexus dealer for precautionary measures or special instructions regarding installation.
Scrapping of your Lexus The Supplemental Restraint System (SRS) in your Lexus consists of driver and front passenger airbags, side airbags and seat belt pretensioners. The SRS device contains explosive chemicals. If the vehicle is scrapped with the airbags and seat belt pretensioners left as they are, it may cause an accident such as a fire. Be sure to have the SRS removed and disposed of by a qualified service shop or by your Lexus dealer before you scrap your vehicle.
ii
HOW TO USE THIS MANUAL
HOW TO USE THIS MANUAL
The contents of this manual are explained briefly on this page to help you make the best use of the manual. Please read this page and the rest of the Owner’s Manual carefully to make sure you fully understand the operation of your vehicle.
This will help you enjoy safe and comfortable driving.
TABLE OF CONTENTS
The table of contents and the pictorial index provide easy reference to the appropriate pages.
BASIC OPERATION – QUICK REFERENCE
Operation of basic equipment is briefly explained in an easily understandable way for quick reference.
SECTION 1 – INSTRUMENTS AND CONTROLS
The vehicle’s equipment is divided into the 7 groups listed below. Use of the equipment is explained, including any points you should pay particular attention to.
- Keys and doors
- Switches
- Gauges, meters and service reminder indicators
- Interior equipment
- Exterior equipment
- Comfort adjustment
- Theft deterrent
SECTION 2 – AIR CONDITIONING AND AUDIO
The features of the vehicle’s air conditioning and audio are explained in detail. Be sure to read this section so that you can make full use of them.
SECTION 3 – STARTING AND DRIVING
Starting the engine, driving, stopping, operation of features affecting vehicle handling, hints on vehicle safety and safe driving techniques are all explained. Please read everything in this section, and remember – drive safely!
SECTION 4 – IN CASE OF AN EMERGENCY
This section explains what to do in the event of an urgent situation such as the engine not starting or getting a flat tire, etc. If such a problem occurs, check the contents of this Owner’s Manual and follow the instructions given.
SECTION 5 – MAINTENANCE
This section explains the importance of regular maintenance. Regular and periodic inspection and maintenance of your Lexus will help to keep your vehicle in its best condition.
SECTION 6 – SERVICE PROCEDURES AND SPECIFICATIONS
Simple maintenance procedure and service data are provided here for your reference should you wish to perform inspection and maintenance yourself.
iii
HOW TO USE THIS MANUAL
INDEX The page number is listed for each item in the Owner’s Manual so that you can rapidly find the item and page you are searching for.
GAS STATION INFORMATION The information you need to know for appropriate servicing at the gas station is provided here.
QUICK INDEX This is designed so that you can quickly find the needed information when an urgent situation arises.
Safety symbol

In this manual, you will also see a circle with a slash through it. This means "Do not", "Do not do this", or "Do not let this happen".
Safety and vehicle damage warnings In this manual you will see CAUTION and NOTICE warnings. These are used in the following ways:
CAUTION This is a warning against something which may cause injury to people if the warning is ignored. You are informed what you must or must not do in order to avoid or reduce the risk to yourself and other people.
NOTICE This is a warning against something which may cause damage to the vehicle or its equipment if the warning is ignored. You are informed what you must or must not do in order to avoid or reduce the risk of damage to your Lexus and its equipment.
Your Lexus Owner’s Manual provides you with a considerable amount of information. To use this information most effectively, please take the time to familiarize yourself with the contents and use of the manual.
iv

TABLE OF CONTENTS
- BASIC OPERATION – QUICK REFERENCE . . . . . . . . . . . . . . . . . . . . . . . . . . . . . . . . . . . . . . . . . . . . . . . . . . . . . . . . . . . . . . . . . . . . . . . . . . . . . . . . . . . . . . . . . . . . . . . . . . . . ........ 1 SECTION 1 INSTRUMENTS AND CONTROLS
- [1] Keys and doors . . . . . . . . . . . . . . . . . . . . . . . . . . . . . . . . . . . . . . . . . . . . . . . . . . . . . . . . . . . . . . . . . . . . . . . . . . . . . . . . . . . . . . . . . . . . . . . . . . . . ........ 7
- [2] Switches . . . . . . . . . . . . . . . . . . . . . . . . . . . . . . . . . . . . . . . . . . . . . . . . . . . . . . . . . . . . . . . . . . . . . . . . . . . . . . . . . . . . . . . . . . . . . . . . . . . . . . . . . . . . . . . . . . . . . . . ........
PICTORIAL INDEX
INSTRUMENT PANEL
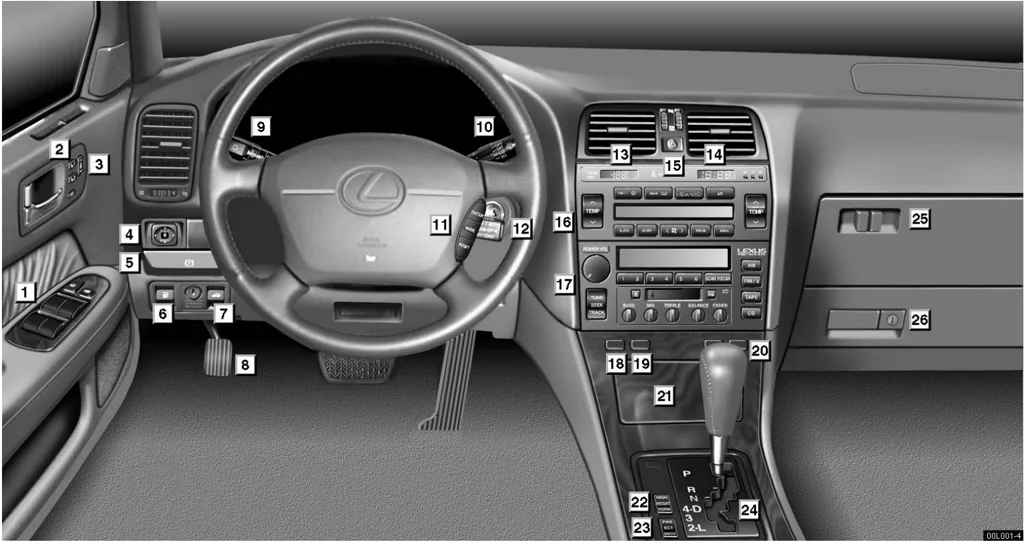
PICTORIAL INDEX
| # | Item | Page |
|---|---|---|
| 1 | Door lock switch and power window switches | 19, 28 |
| 2 | Driving position memory switch | 113 |
| 3 | Shoulder anchor control switch | 83 |
| 4 | Power rear view mirror control switch | 78 |
| 5 | Parking brake release lever | 158 |
| 6 | Fuel filler door opener | 65 |
| 7 | Trunk lid opener | 64 |
| 8 | Parking brake | 158 |
| 9 | Headlight, turn signal and fog light switch | 22, 24, 25 |
| 10 | Windshield wiper and washer switch | 25 |
| 11 | Multi information control switch | 41 |
| 12 | Cruise control switch | 168 |
| 13 | Outside temperature display | 51 |
| 14 | Clock | 51 |
| 15 | Emergency flasher switch | 31 |
| 16 | Automatic air conditioning controls | 121 |
| 17 | Car audio | 132 |
| 18 | Vehicle skid control system off switch | 173 |
| 19 | Headlight cleaner switch | 27 |
| 20 | Seat heater switches | 32 |
| 21 | Ashtray | 52 |
| 22 | Height control switch | 171 |
| 23 | Driving pattern selector switch | 160 |
| 24 | Automatic transmission selector lever | 160 |
| 25 | CD automatic changer | 143 |
| 26 | Glovebox | 54 |
For detailed information, refer to the description given in each section.
vii
PICTORIAL INDEX
INSTRUMENT CLUSTER (Vehicles sold in U. S. A.)
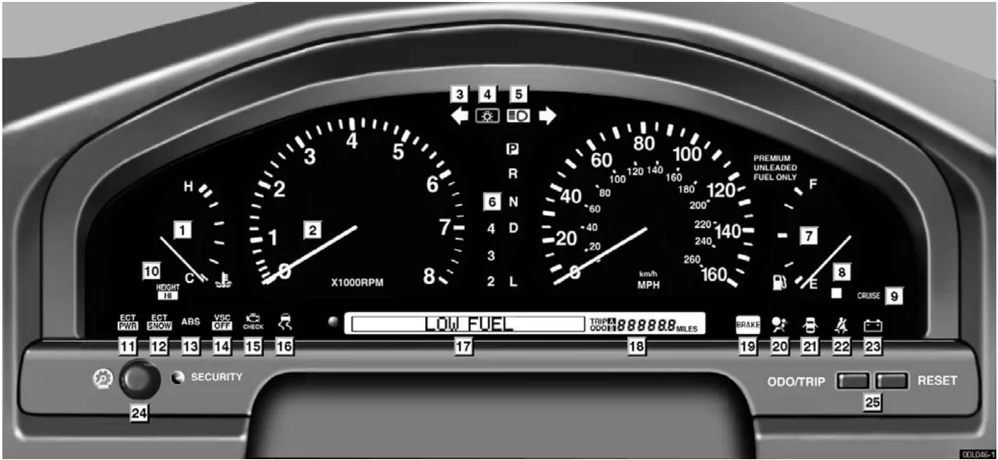
viii
PICTORIAL INDEX
| # | Item | Page |
|---|---|---|
| 1 | Engine coolant temperature gauge | 34 |
| 2 | Tachometer | 35 |
| 3 | Turn signal indicator light | 24 |
| 4 | Headlight indicator light | 22 |
| 5 | Headlight high beam indicator light | 24 |
| 6 | Automatic transmission indicator lights | 160 |
| 7 | Fuel gauge | 34 |
| 8 | Low fuel level warning light | 40 |
| 9 | Cruise control indicator light | 168 |
| 10 | Height control indicator light | 172 |
| 11 | Power mode indicator light | 167 |
| 12 | Snow mode indicator light | 167 |
| 13 | Anti-lock brake system warning light | 39 |
| 14 | Vehicle skid control system off indicator light | 173 |
| 15 | Malfunction indicator lamp | 39 |
| 16 | Slip indicator light | 173 |
| 17 | Multi information display | 41 |
| 18 | Odometer and trip meter | 36 |
| 19 | Brake system warning light | 37 |
| 20 | SRS warning light | 38 |
| 21 | Open door warning light | 39 |
| 22 | Driver’s seat belt reminder light | 38 |
| 23 | Discharge warning light | 39 |
| 24 | Instrument panel light control | 46 |
| 25 | ODO/TRIP RESET button | 36 |
For detailed information, refer to the description given in each section.
ix
PICTORIAL INDEX
INSTRUMENT CLUSTER (Vehicles sold in Canada)
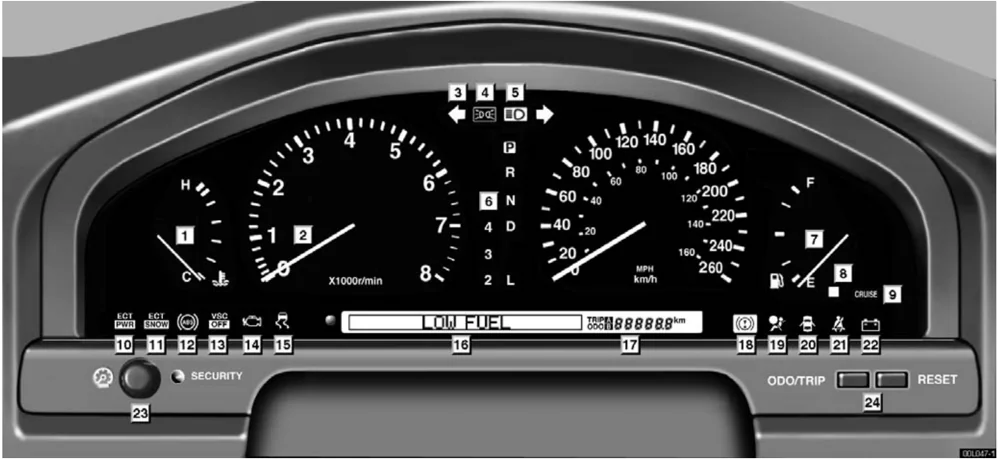
x
PICTORIAL INDEX
| # | Item | Page |
|---|---|---|
| 1 | Engine coolant temperature gauge | 34 |
| 2 | Tachometer | 35 |
| 3 | Turn signal indicator light | 24 |
| 4 | Tail light indicator light | 22 |
| 5 | Headlight high beam indicator light | 24 |
| 6 | Automatic transmission indicator lights | 160 |
| 7 | Fuel gauge | 34 |
| 8 | Low fuel level warning light | 40 |
| 9 | Cruise control indicator light | 168 |
| 10 | Power mode indicator light | 167 |
| 11 | Snow mode indicator light | 167 |
| 12 | Anti-lock brake system warning light | 39 |
| 13 | Vehicle skid control system off indicator light | 173 |
| 14 | Malfunction indicator lamp | 39 |
| 15 | Slip indicator light | 173 |
| 16 | Multi information display | 41 |
| 17 | Odometer and trip meter | 36 |
| 18 | Brake system warning light | 37 |
| 19 | SRS warning light | 38 |
| 20 | Open door warning light | 39 |
| 21 | Driver’s seat belt reminder light | 38 |
| 22 | Discharge warning light | 39 |
| 23 | Instrument panel light control | 46 |
| 24 | ODO/TRIP RESET button | 46 |
For detailed information, refer to the description given in each section.
PICTORIAL INDEX
SEAT AND STEERING WHEEL
 Page
- [1] Tilt and telescopic steering adjustment switch ........ 76
- [2] Seat position, seat cushion angle and height control switch ........ 71, 72
- [3] Seatback angle and head restraint control switch ........ 72, 73
- [4] Lumbar support control switch ........ 73
For detailed information, refer to the description given in each section.
xii
EXTERIOR VIEW
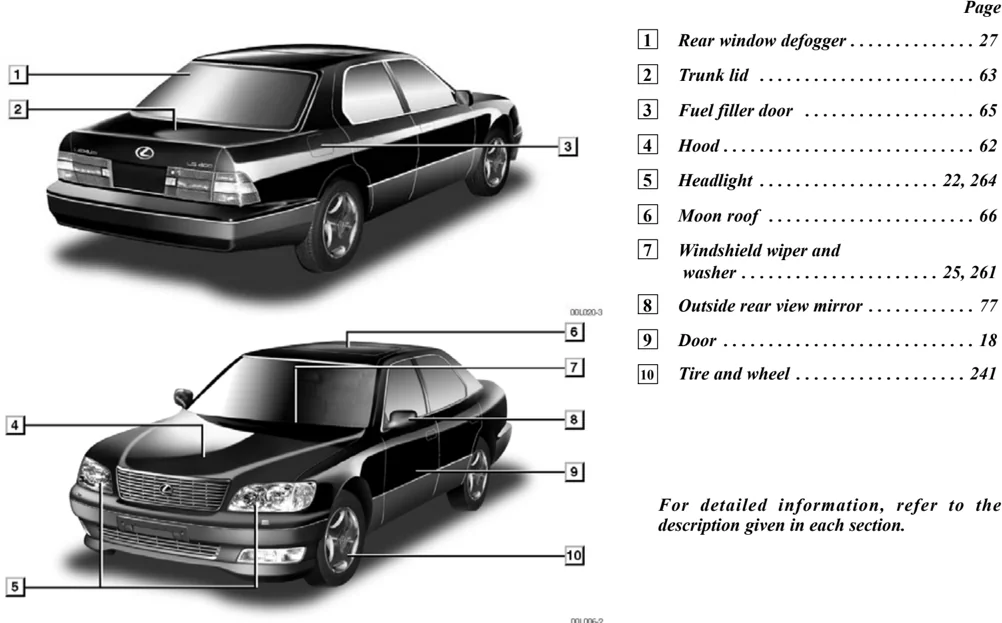
PICTORIAL INDEX
| # | Part | Page |
|---|---|---|
| 1 | Rear window defogger | 27 |
| 2 | Trunk lid | 63 |
| 3 | Fuel filler door | 65 |
| 4 | Hood | 62 |
| 5 | Headlight | 22, 264 |
| 6 | Moon roof | 66 |
| 7 | Windshield wiper and washer | 25, 261 |
| 8 | Outside rear view mirror | 77 |
| 9 | Door | 18 |
| 10 | Tire and wheel | 241 |
For detailed information, refer to the description given in each section.
xiii
xiv
BASIC OPERATION
QUICK REFERENCE
B
Driver's seat . . . . . . . . . . . . . . . . . . . . . . . . . . . . . . 2 Steering wheel . . . . . . . . . . . . . . . . . . . . . . . . . . . . 3 Automatic transmission . . . . . . . . . . . . . . . . . . . . . . . 4 Headlight and turn signal switch . . . . . . . . . . . . . . . . . . 5 Wiper switch . . . . . . . . . . . . . . . . . . . . . . . . . . . . 6
1
BASIC OPERATION – QUICK REFERENCE
- DRIVER’S SEAT
| Power head restraint type | Manual head restraint type | ||
|---|---|---|---|
| Seat adjustment | Seat adjustment | ||
| Seat position | |||
| Seat cushion angle | |||
| Seat cushion height | |||
| Head restraint height | |||
| Seatback angle | |||
| Lumbar support | |||
| Head restraint angle | |||
| Seat position | |||
| Seat cushion angle | |||
| Seat cushion height | |||
| Seatback angle | |||
| Lumbar support | |||
| Head restraint height | |||
| Head restraint angle |
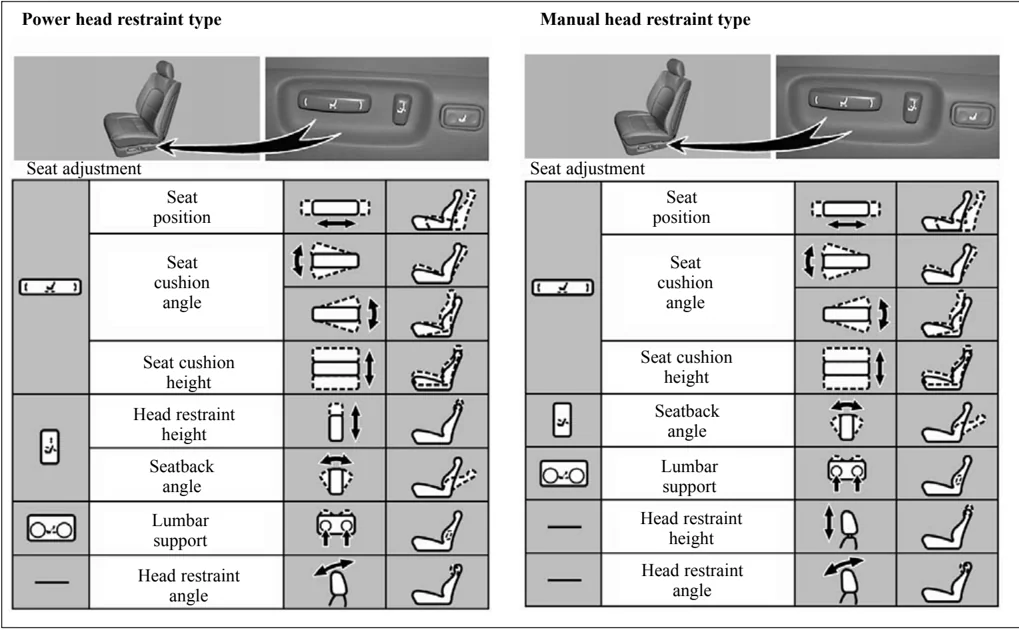
BASIC OPERATION – QUICK REFERENCE
- STEERING WHEEL
● TILT STEERING WHEEL
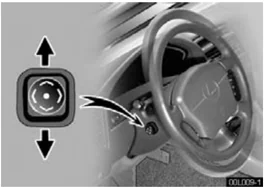
To tilt the steering wheel up or down to the desired angle, push the control switch in the required direction and release the button when the steering wheel reaches the desired angle.
● TELESCOPIC STEERING WHEEL
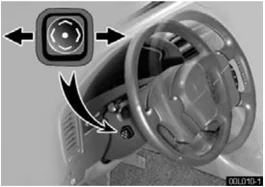
To move the steering wheel to the desired position, push the control switch away from you or pull it toward you until the steering wheel reaches the desired position.
B
3
BASIC OPERATION – QUICK REFERENCE
3. AUTOMATIC TRANSMISSION
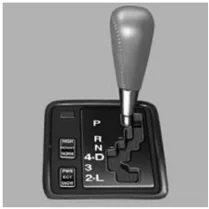
SELECTOR LEVER POSITION P: Parking, engine starting and key removal position R: Reverse position N: Neutral position D: Normal driving position (Shifting into overdrive possible) 4: Position for engine braking (Shifting into overdrive not possible)* 3, 2: Position for more powerful engine braking L: Position for maximum engine braking
OPERATION OF SELECTOR LEVER
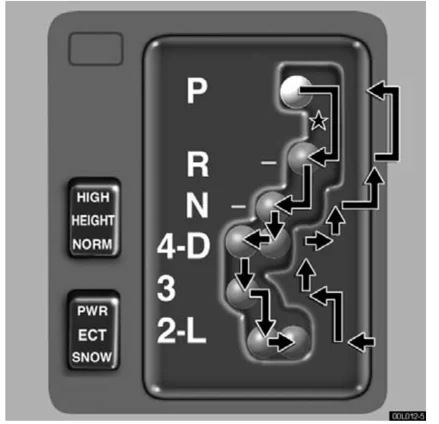
★ Shift while pressing the brake pedal. (Ignition switch must be in the "ON" position.)
*: When the cruise control is being used, even if you downshift from "D" to "4", engine braking will not be applied because the cruise control is not cancelled. For the operation to decrease the vehicle speed, see page 170.
4
4. HEADLIGHT AND TURN SIGNAL SWITCH
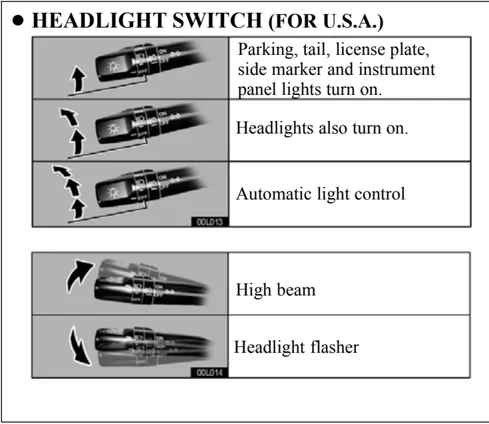
● HEADLIGHT SWITCH (FOR U.S.A.)
| Parking, tail, license plate, side marker and instrument panel lights turn on. | |
| Headlights also turn on. | |
| Automatic light control |
| High beam | |
| Headlight flasher |
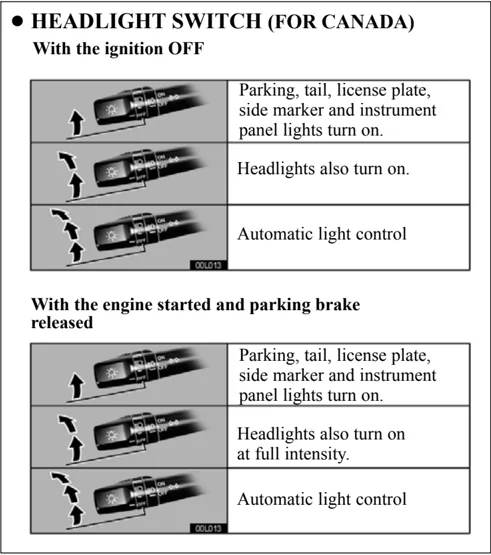
● HEADLIGHT SWITCH (FOR CANADA)
With the ignition OFF
| Parking, tail, license plate, side marker and instrument panel lights turn on. | |
| Headlights also turn on. | |
| Automatic light control |
With the engine started and parking brake released
| Parking, tail, license plate, side marker and instrument panel lights turn on. | |
| Headlights also turn on at full intensity. | |
| Automatic light control |
BASIC OPERATION – QUICK REFERENCE
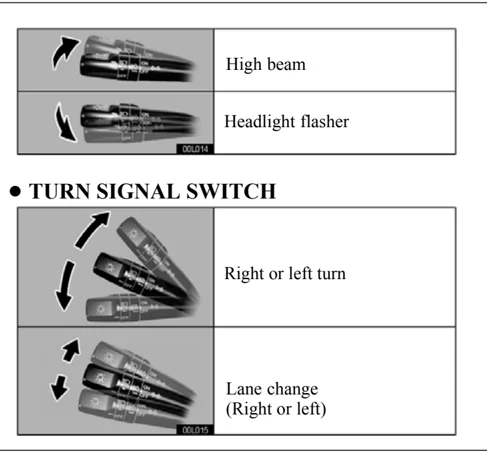
● TURN SIGNAL SWITCH
| High beam | |
| Headlight flasher |
| Right or left turn | |
| Lane change (Right or left) |
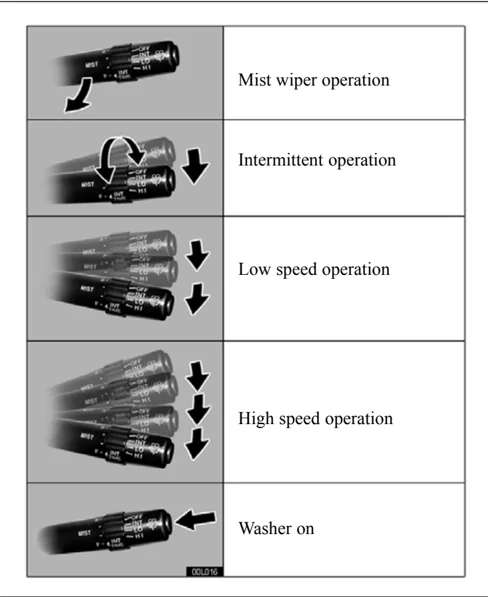
5. WIPER SWITCH
| Mist wiper operation | |
| Intermittent operation | |
| Low speed operation | |
| High speed operation | |
| Washer on |
SECTION 1 – 1
INSTRUMENTS AND CONTROLS
Keys and doors
-
Keys . . . . . . . . . . . . . . . . . . . . . . . . . . . . . . . . . . . . . . . . . . . . . . . . . . . . . . . . . . . . . . . . . . . . . . . . . . . . . . . . . . . . . . . . . . . . . . . . . . . . . . . . . . . . . . . . . . . . . . . . . . . . . . . . . . . . . . . . . . . . . . . . . . . . . . . . . . . . . . . . . . . . . . . . . . . . . . . . . . . . . . . . . . . . . . . . . . . . . . . . . . . . . . . . . . . . . . . . . . . . . . . . . ........ 8
-
Engine immobiliser system . . . . . . . . . . . . . . . . . . . . . . . . . . . . . . . . . . . . . . . . . . . . . . . . . . . . . . . . . . . . . . . . . . . . . . . . . . . . . . . . . . . . . . . . . . . . . . . . . . . . . . . . . . . . . . . . ........ 10
-
Wireless remote control . . . . . . . . . . . . . . . . . . . . . . . . . . . . . . . . . . . . . . . . . . . . . . . . . . . . . . . . . . . . . . . . . . . . . . . . . . . . . . . . . . . . . . . . . . . . . . . . . . . . . . . . . . . . . . . . ........

KEYS AND DOORS
KEYS
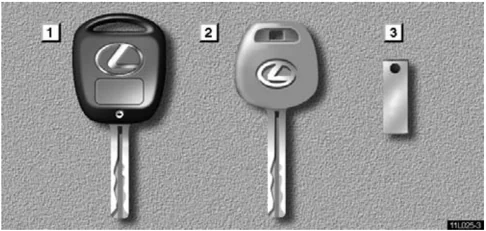
[1] Master key (black) – The master key works in every lock. For your Lexus dealer to make you a new key with built-in transponder chip, your dealer will need it.
[2] Subkey (gray) – The subkey will not open the trunk, trunk main switch and the glovebox.
[3] Key number plate – Keep the plate in a safe place such as your wallet, not in the vehicle.
The master key and subkey each have a transponder chip in their key head which is very important for the immobiliser system function, so be careful not to lose these keys. If you make your own duplicate key, you will not be able to cancel the system or start the engine.
To protect things locked in the trunk or glovebox when you have your vehicle parked, leave the subkey with the attendant.
Since the doors and trunk lid can be locked without a key, you should always carry a spare master key in case you accidentally lock your keys inside the vehicle.
If you should lose your keys or if you need additional keys, duplicates can be made by a Lexus dealer using the key number.
You should also put a copy of the key number with your important papers.
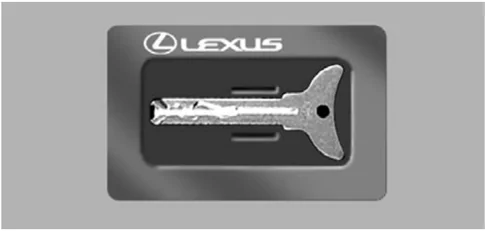
Since a transponder chip is not built in this flat key, you cannot start the engine with this key. Use this key to release the lock in case you accidentally lock your keys inside the vehicle or trunk.
Insert your flat key in its key case as shown. We recommend that you always carry this with you for emergency use. Do not leave it in your vehicle.
8
KEYS AND DOORS
NOTICE
- Do not let the key case become bent as the key may fall out or become bent also.
- The flat key is designed for emergency use only.
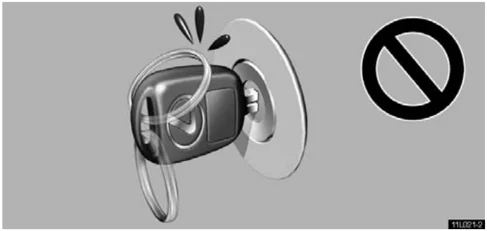
NOTICE When using a key containing a transponder chip, observe the following precautions:
- When starting the engine, do not use the key with a key ring resting on the key grip and do not press the key ring against the key grip. Otherwise the engine may not start, or may stop soon after it starts.
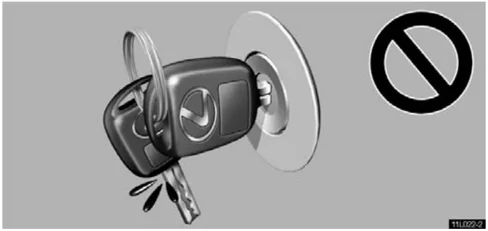
- When starting the engine, do not use the key in contact with another transponder key (including keys of other vehicles) and do not press another key plate against the key grip. Otherwise the engine may not start, or may stop soon after it starts.
9