GAUGES, METERS AND SERVICE REMINDER INDICATORS
ODOMETER AND TRIP METER
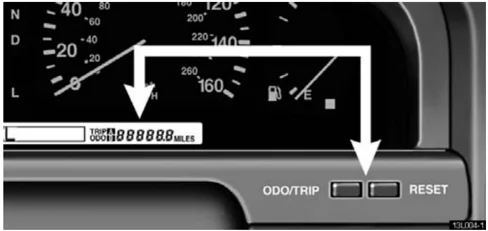
This meter displays the odometer and two trip meters. To change the mode indication, push the "ODO/TRIP" button.
The odometer records the total distance the vehicle has been driven. The twin trip meter records two different distances independently.
For example, you can use one meter to calculate the fuel economy and the other to measure the distance on each trip.
To change the trip meter indication from one trip to the other, push the "ODO/TRIP" button. To set the A trip meter to zero, display the A meter reading, then push the "RESET" button. The same applies for the B trip meter.
The data of trip meters will be cancelled if the electrical power source is disconnected.
SERVICE REMINDER INDICATORS AND WARNING BUZZERS
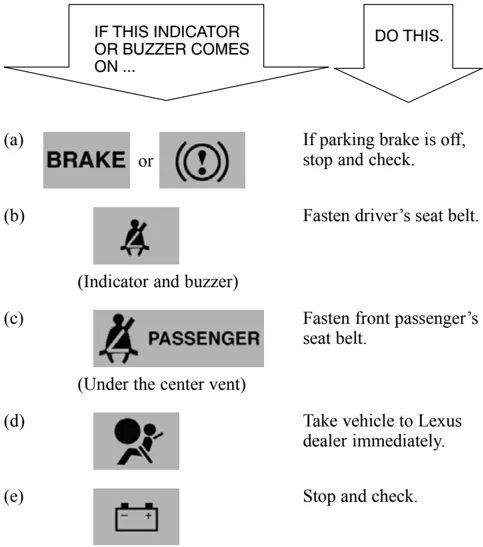
(a) BRAKE or If parking brake is off, stop and check. (b) (Indicator and buzzer) Fasten driver’s seat belt. (c) (Under the center vent) Fasten front passenger’s seat belt. (d) Take vehicle to Lexus dealer immediately. (e) Stop and check.
36
GAUGES, METERS AND SERVICE REMINDER INDICATORS
(f)
 Take vehicle to Lexus dealer.
(g)
ABS or ABS in circle
Take vehicle to Lexus dealer.
(h)
 Close all doors.
(i)
Low fuel level warning light
Fill up tank.
(j)
Key reminder buzzer
Remove key.
(a) Brake System Warning Light
This light has the following two functions:
Parking brake reminder
If this light is on, make sure the parking brake is fully released. The light should go off.
Low brake fluid level warning
If this light comes on and stays on while you are driving, slow down and pull off the road. Then stop the vehicle carefully. Remember that stopping distance and pedal effort may be increased. There may be a problem somewhere in the brake system. Check the fluid level of the see-through reservoir.
To make sure the parking brake has not caused the warning light to come on, check to see that the parking brake is fully released.
If the brake fluid level is low ...
At a safe place, test your brakes by starting and stopping.
- If you judge that the brakes still work adequately, drive cautiously to your nearest dealer or shop for repairs.
- If the brakes are not working, have the vehicle towed in for repairs. (For towing information, see page 205.)
CAUTION
It is dangerous to continue driving normally when the brake fluid level is low.
37

GAUGES, METERS AND SERVICE REMINDER INDICATORS
If the brake fluid level is correct ... Have the warning system checked by your Lexus dealer.
(b) Driver’s Seat Belt Reminder Light and Buzzer Once the ignition key is turned to "ON" or "START", the reminder light flashes and buzzer sounds if the driver's seat belt is not fastened. Unless the driver fastens the belt, the light stays flashing and the buzzer stops after about 4 to 8 seconds.
(c) Front Passenger’s Seat Belt Reminder Light Once the ignition key is turned to "ON" or "START", the reminder light flashes if a passenger sits in the front passenger seat and does not fasten the seat belt. Unless the front passenger fastens the belt, the light stays flashing.
If luggage load is placed on the front passenger seat, depending on its weight and how it is placed on the seat, built-in sensors in the seat cushion may detect the pressure, causing the reminder light to come on.
(d) SRS Warning Light The indicators come on when the ignition key is turned to the "ACC" or "ON" position. It goes off after about 6 seconds. This means the SRS is operating properly.
The SRS warning light system monitors the airbag sensor assemblies, inflators, seat belt pretensioners, warning light, interconnecting wiring and power sources.
If either of the following conditions occurs, this indicates a malfunction somewhere in the parts monitored by the warning light system. Contact your Lexus dealer as soon as possible to service the vehicle.
- The light does not come on as described above.
- The light stays on or flashes.
- The light comes on or starts flashing while driving.
If the light stays on, it indicates that the driver and front passenger airbags fail. If the light flashes, the side airbags and/or seat belt pretensioners fail.
38
GAUGES, METERS AND SERVICE REMINDER INDICATORS
(e) Discharge Warning Light This light warns that the battery is being discharged.
If it comes on while you are driving, stop the vehicle, turn off the engine, and check for the cause. Look first at the engine drive belt.
- If it is loose or broken, the generator will not charge the battery properly.
- If the belt is O.K., there is a problem somewhere in the charging system.
The engine ignition will continue to operate, however, until the battery is discharged. Turn off the air conditioning, blower, radio, etc., and drive directly to the nearest Lexus dealer or repair shop.
NOTICE Do not continue driving if the engine drive belt is broken or loose.
(f) Malfunction Indicator Lamp This lamp comes on in the following cases.
a. The fuel tank is completely empty. (See "Fuel gauge" on page 34 for instructions.) b. The fuel tank cap is not tightened securely. (See "Fuel tank cap" on page 65 for instructions.) c. There is a problem somewhere in your engine electrical system or electronic throttle control system.
If it comes on while you are driving in case c., have your vehicle checked/repaired by your Lexus dealer as soon as possible.
(g) "ABS" Warning Light This light warns that there is a problem somewhere in your anti-lock brake system.
If the light comes on while you are driving, have your vehicle checked by your Lexus dealer as soon as possible.
The light will come on when the ignition key is turned to "ON", and will go off after about a few seconds.
When the "ABS" warning light is on (and the brake system warning light is off), the brake system operates conventionally but anti-lock brake system is not assisting brake performance so that the wheels could lock up during a sudden brake or braking on slippery road surfaces.
(h) Open Door Warning Light This light remains on until all the doors are completely closed.
39
GAUGES, METERS AND SERVICE REMINDER INDICATORS
(i) Low Fuel Level Warning Light This light comes on when the fuel level in the tank becomes nearly empty. Fill the tank as soon as possible. On inclines or curves, due to the movement of fuel in the tank, the low fuel level warning light may come on earlier than usual.
(j) Key Reminder Buzzer This buzzer reminds you to remove the key when you open the driver’s door with the ignition key in the "ACC" or "LOCK" position.
How to check all the service reminder indicators (except the low fuel level warning light):
- Apply the parking brake.
- Open the door. The following service reminder indicator should come on. It goes off when you close the door completely.

- Turn the ignition key to "ACC". The following service reminder indicator should come on. It goes off after 6 seconds.

- Turn the ignition key to "ON". The following service reminder indicators should come on.

or

The following service reminder indicators go off after 3 seconds.
40
GAUGES, METERS AND SERVICE REMINDER INDICATORS
or
- Turn the ignition key to "START". The following service reminder indicator should come on.
 or
If any service reminder indicator or warning buzzer does not function, either the bulb is burned out or circuit is in need of repair. Have it checked by your Lexus dealer as soon as possible.
MULTI INFORMATION DISPLAY
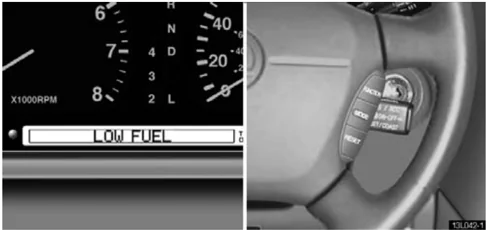
The multi information display provides cruise information on your vehicle's driving condition and warning messages if your vehicle has trouble. During ordinary driving, cruise information is shown in the display. However, if any problem occurs in your vehicle, a warning message appears in place of cruise information. To change to the cruise information display, push the "FUNCTION" button.
41
GAUGES, METERS AND SERVICE REMINDER INDICATORS
(a) Cruise information
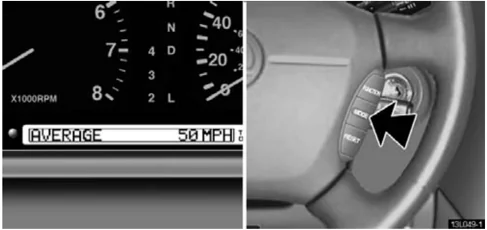
The following information is shown with the ignition switch turned on. Each time you push the "MODE" button, the displayed information is changed.
- Available driving distance
- Average fuel consumption
- Current fuel consumption
- Average fuel consumption after being refueled
- Driving distance after being refueled
- Elapsed time
- Average vehicle speed
The displayed values of cruise information indicate the general driving condition, so those may not show precise and actual condition.
- Available driving distance
RANGE OVER 888 Mi ▶When the fuel gauge indicates around "F"
RANGE APPROX 888 Mi ▶When the fuel gauge indicates around middle
LOW FUEL ▶When the fuel gauge indicates around "E"
Available driving distance with the remaining fuel is calculated and displayed depending on the amount of remaining fuel.
- Average fuel consumption
AVERAGE 18.0 MPG
The average fuel consumption is calculated and displayed based on the total driving distance and the total fuel consumption with the engine running.
The value is updated every 10 seconds.
To calculate from the beginning, push the "RESET" button.
42
GAUGES, METERS AND SERVICE REMINDER INDICATORS
• Current fuel consumption
The current fuel consumption is calculated and displayed based on the driving distance and the fuel consumption for 2 seconds with the engine running. The value is updated every 2 seconds. If you are driving at low speeds just before stopping, the accurate figure may not be shown.
• Average fuel consumption after being refueled
The average fuel consumption after being refueled is calculated and displayed based on the total driving distance and the total fuel consumption after being refueled. The value is updated every 10 seconds. To calculate from the beginning, push the "RESET" button.
• Driving distance after being refueled
The driving distance after being refueled is displayed.
• Elapsed time
The total time during the engine running is displayed. When the engine is started again after the ignition is off, the driving time is added to the previous value. Up to 99 hours 59 minutes can be displayed. When the driving time exceeds 99 hours 59 minutes, the display returns to 0 and recounting starts. To count from the beginning, push the "RESET" button.
• Average vehicle speed
The average vehicle speed is calculated and displayed based on the total driving distance and the total driving time with the engine running. The displayed value is updated every 10 seconds. To calculate from the beginning, push the "RESET" button.
1 43
GAUGES, METERS AND SERVICE REMINDER INDICATORS
(b) Warning messages
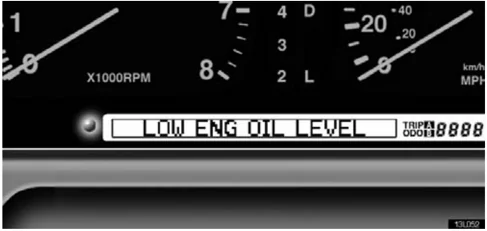
►Reminder light
LOW OIL PRESSURE
When the engine oil pressure becomes too low, the above message appears, the reminder light flashes and the warning tone sounds.
If this message appears while you are driving, pull off the road to a safe place and stop the engine immediately. Call a Lexus dealer or qualified repair shop for assistance.
The message may appear when the oil level is extremely low. It is not designed to indicate low oil level, and the oil level must be checked using the oil level dipstick.
NOTICE Do not drive the vehicle with the warning message displayed – even for one block. It may ruin the engine.
BRAKE WEAR
When your brake pads are worn enough to require replacement, the above message appears, the reminder light flashes and the warning tone sounds.
If this message appears while you are driving, have the brake pads checked and replaced by your Lexus dealer as soon as possible.
RIGHT FRONT DOOR LEFT FRONT DOOR RIGHT REAR DOOR LEFT REAR DOOR TRUNK OPEN
When any door or trunk is open with the ignition switch turned on, the message which door or trunk is open appears, and the reminder light comes on.
44
GAUGES, METERS AND SERVICE REMINDER INDICATORS
If you continue driving with any door or trunk open, the reminder light starts flashing and the warning tone sounds to remind you to close the door or trunk.
MOONROOF OPEN
If the driver’s door is opened with the ignition switch turned off and the moon roof opened, the above message appears and the reminder light flashes.
CHECK VSC
In the following cases, the warning message appears and the reminder light next to the warning message and the "VSC OFF" indicator light come on. And the warning tone also sounds.
(a) After the removal of the battery terminals (See "Initial adjustment of vehicle skid control system" on page 175.)
(b) If the vehicle skid control system malfunctions
If the above message appears for the cause of (b), have your vehicle checked by your Lexus dealer as soon as possible.
Although the above message appears, you can continue your normal driving, but without the vehicle skid control system function.
TAILLAMP FAILURE
In the following cases, the above message appears, the reminder light comes on and the warning tone sounds.
- When the headlight switch is turned to the first or second clickstop with one or more of tail light bulbs burned out.
- When the brake pedal is held down with one or more of stop light bulbs burned out.
Have defective bulbs replaced as soon as possible.
LOW ENG OIL LEVEL
When the engine oil level is too low, the above message appears, the reminder light comes on and the warning tone sounds.
Add oil as soon as possible. (For instructions, see "Checking the engine oil level" on page 230.)
NOTICE
Continued engine operation with low engine oil will damage the engine.
1
45
GAUGES, METERS AND SERVICE REMINDER INDICATORS
LOW WASHER FLUID
When the fluid level in the tank becomes nearly empty, the above message appears, the reminder light comes on and the warning tone sounds.
Fill the tank as soon as possible.
HEADLIGHT LEVELING
When there is a problem somewhere in the automatic headlight leveling system, the above message appears, the reminder light comes on and the warning tone sounds.
If this message appears, have your vehicle checked by your Lexus dealer.
INSTRUMENT PANEL LIGHT CONTROL
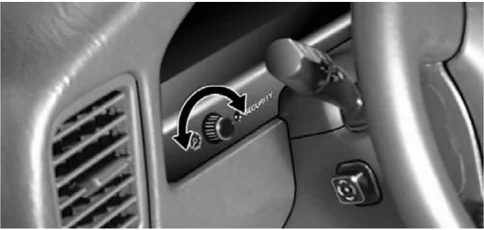
To adjust the brightness of the instrument panel lights, turn the knob.
46
SECTION 1 – 4
INSTRUMENTS AND CONTROLS
Interior equipment
-
Vanity mirrors . . . . . . . . . . . . . . . . . . . . . . . . . . . . . . . . . . . . . . . . . . . . . . . . . . . . . . . . . . . . . . . . . . . . . . . . . . . . . . . . . . . . . . . . . . . . . . . . . . . . . . . . . . . . . . . . . . . . . . . . . . . . . . . . . . . . . . . . . . . . . . . . . . . . . . . . . . . . . . . . . . . . . . . . . . . . . . . . . . . . . . . . . . . . . . . . . . . . . . . . . . . . . . . . . . . . . . . . ........ 48
-
Interior lights . . . . . . . . . . . . . . . . . . . . . . . . . . . . . . . . . . . . . . . . . . . . . . . . . . . . . . . . . . . . . . . . . . . . . . . . . . . . . . . . . . . . . . . . . . . . . . . . . . . . . . . . . . . . . . . . . . . . . ........ 49
-
Personal lights . . . . . . . . . . . . . . . . . . . . . . . . . . . . . . . . . . . . . . . . . . . . . . . . . . . . . . . . . . . . . . . . . . . . . . . . . . . . . . . . . . . . . . . . . . . . . . . . . . . . . . . . . . . . . . . . . . . . . . ........

INTERIOR EQUIPMENT
VANITY MIRRORS
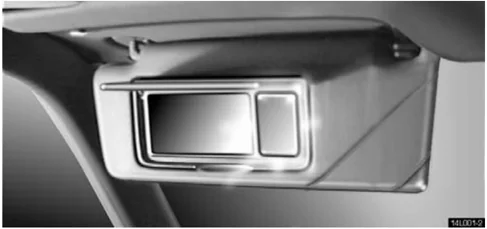
To use the vanity mirrors, swing the sun visor down and open the cover.
The vanity light comes on when you open the cover.
Sun visors
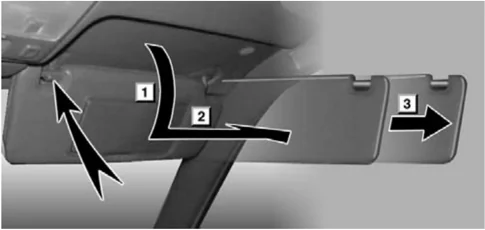
1 To block out glare from the front, swing the sun visor down.
2 To block out glare from the side, remove the sun visor from the hook and swing it to the side.
3 To block out glare coming obliquely from behind you, slide the visor backwards.
At this position, the vanity light does not come on.
48
INTERIOR EQUIPMENT
INTERIOR LIGHTS
Front
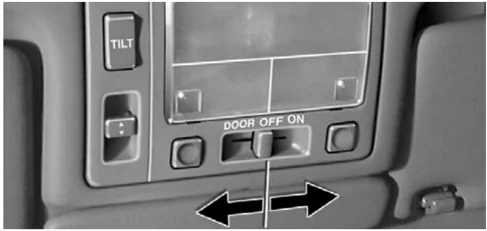
To turn on the interior light, slide the switch.
With the switch in the "DOOR" position, the light comes on when any of the doors are opened. After all the doors are closed, the light remains on for about 15 seconds and then goes out.
However, in the following cases, the light goes out immediately:
- All the doors are closed when the ignition key is in "ACC" or "ON" position.
- The ignition key is turned to "ACC" or "ON" when the light is still on.
- All the doors are locked when the light is still on.
- One door is closed with the lock button pushed in while the other doors are locked.
Rear
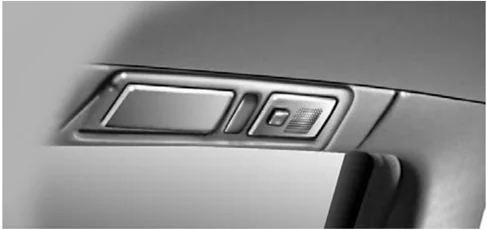
When you open the rear door, the light turns on. Closing it turns off the light.
49
INTERIOR EQUIPMENT
PERSONAL LIGHTS
Front
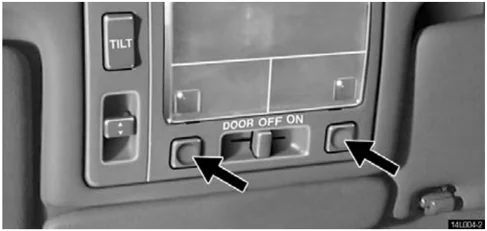
Rear
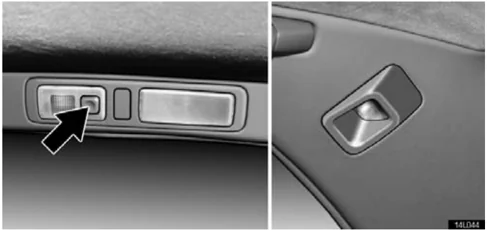
To turn on the personal light, push the switch. To turn it off, push the switch again.
IGNITION SWITCH LIGHT
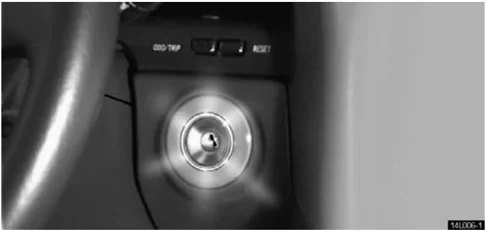
For easy access to the ignition switch, the ignition switch light comes on when any of the doors are opened.
The light remains on for about 15 seconds and goes out after all the doors are closed. However, the light goes out immediately when all the doors are locked or the ignition key is in the "ACC" or "ON" position.
50
INTERIOR EQUIPMENT
CLOCK
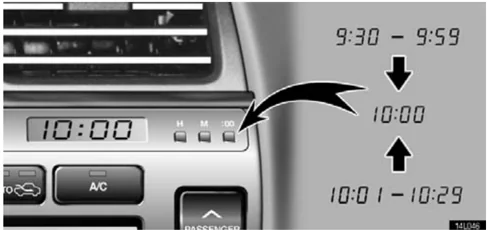
The digital clock indicates the time with the ignition key at the "ACC" or "ON" position. To reset the hour, press the "H" button. To reset the minutes, press the "M" button. To adjust the time to the nearest hour, press the ":00" button.
For example, if the ":00" button is pressed when the time is between 9:30 – 9:59 or between 10:01 – 10:29, the time will change to 10:00.
Once the electrical power source has been disconnected from the clock, the time is automatically set to 1:00.
For vehicles equipped with Navigation System, refer to the separate "Owner's Manual for Navigation System".
OUTSIDE TEMPERATURE DISPLAY
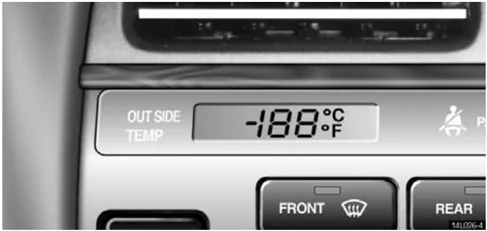
This display shows the outside temperature when the ignition switch is on.
The displayed temperature ranges from –30°C (–22°F) up to 50°C (122°F). If the temperature does not appear on the display or it shows "— — —", take your vehicle to your Lexus dealer.
51
INTERIOR EQUIPMENT
CIGARETTE LIGHTER AND ASHTRAY
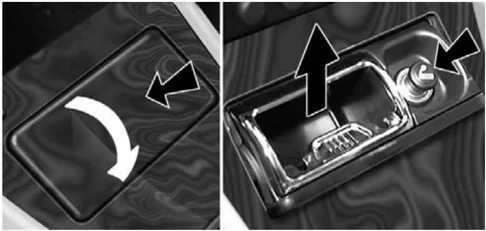
►Front cigarette lighter and ashtray
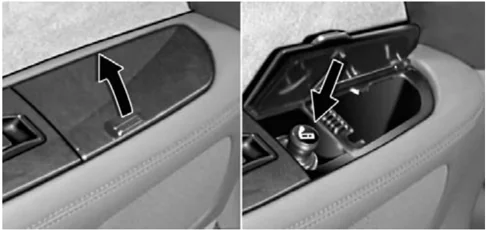
►Rear cigarette lighter and ashtray
Open the ashtray cover. To use the cigarette lighter, press in the cigarette lighter. When it becomes heated, it automatically pops out ready for use.
Do not hold the cigarette lighter pressed in.
If the engine is not running, the ignition key must be in the "ACC" position.
When finished with your cigarette, thoroughly extinguish it in the ashtray to prevent other cigarette butts from catching fire. After using the ashtray, push it back in or close the lid completely.
To remove the ashtray, just pull it up.
Use a Lexus genuine cigarette lighter or equivalent for replacement.
CAUTION
To reduce the chance of injury in case of an accident or sudden stop while driving, always close the ashtray completely after using.
52

INTERIOR EQUIPMENT
POWER OUTLET
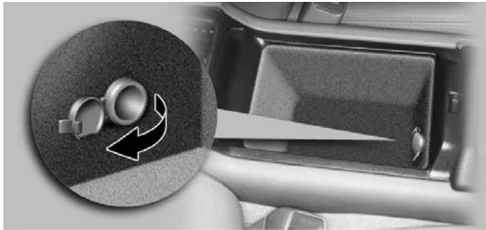
The power outlet is designed for power supply for car accessories.
The ignition key must be in the "ACC" or "ON" position for the power outlet to be used.
NOTICE
• To prevent the fuse from being blown, do not use the electricity over the total vehicle capacity of 3.5A/12V.
• To prevent the battery from being discharged, do not use the power outlet longer than necessary when the engine is not running.
• Close the power outlet lid when the power outlet is not in use. Inserting a foreign object other than the appropriate plug that fits the outlet, or allowing any liquid into the outlet may cause electrical failure or short circuits.
1
53
INTERIOR EQUIPMENT
GLOVEBOX
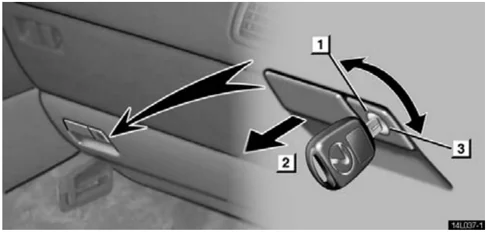
▶ 1 Unlock 2 Open 3 Lock
To open the glovebox door, pull the lever. To lock the glovebox door, insert the master key and turn it clockwise.
With the tail lights on, the glovebox light will come on when the glovebox door is open.
⚠ CAUTION To reduce the chance of injury in case of an accident or a sudden stop, always keep the glovebox door closed while driving.
GARAGE DOOR OPENER
Garage door openers manufactured under the license from HomeLink® can be programmed in the garage door opener on the vehicle.
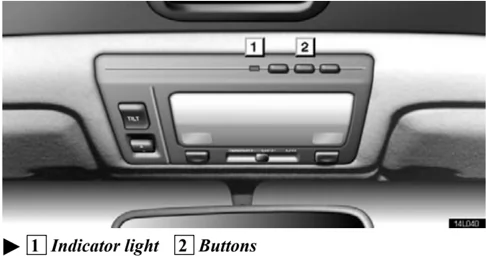
(a) Programming the garage door opener

▶ 1 Indicator light 2 Buttons
This garage door opener has 3 buttons and you can store one program for each button.
-
Decide which one of the 3 buttons you want to program. Push and hold down one of the buttons until its indicator light begins to flash. While holding this button, follow the step "2".
-
Bring the original garage door opener closer to the garage door opener equipped on the vehicle within about 25 mm (1 in.) and push the button on the original garage door opener. The signal from the original garage door opener is sent to the one to be programmed.
54
INTERIOR EQUIPMENT
- When the frequency and code is registered, the indicator light flashes rapidly. Then you can release both buttons.
- If you wish, repeat the procedure for each remaining button for another garage door opener.
If you want to write a new program over the program set already, select a button you want to program and repeat the procedure from step 1. The previous program is erased and a new program will be set.
If the transmitter has a "rolling code" feature, it is necessary to program the garage door opener receiver on the garage, after programming the garage door opener on the vehicle,. For the setting of the receiver, refer to the instruction manual for the receiver.
After setting the receiver, push the programmed button on the vehicle for about 1 to 2 seconds within the operational range.
The old-type garage door openers manufactured before 1982 cannot be programmed in this system.
CAUTION When programming or operating the garage door opener, make sure there is no one around the moving door. It is dangerous if someone is caught.
(b) Operating the garage door opener Push the appropriate button to activate the garage door opener. The indicator light comes on. The garage door opener continues to send the signal for up to 20 seconds as long as the button is pushed.
(c) Erasing the garage door opener memory Push and hold down the 2 outside buttons until the indicator light flashes. All memorized data will be erased.
FCC ID: CB2V94800 CANADA: 1763 102 264
This device complies with FCC Rules part 15. Operation is subject to the following two conditions: (1) This device may not cause harmful interference, and (2) this device must accept any interference that may be received, including interference that may cause undesired operation. WARNING: This transmitter has been tested and complies with FCC and DOC/MDC rules. Changes or modifications not expressly approved by the partly responsible for compliance could void the user's authority to operate the device.
1 55

INTERIOR EQUIPMENT
CUP HOLDER
Front
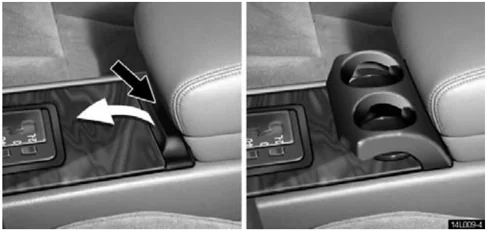
To use the cup holder, push the top of the cup holder portion of the console box.
The cup holder is designed so that cups or cans fit snugly in the holes.
CAUTION
- Do not place anything else on the cup holder, as such item may be thrown about in the compartment and possibly injure people in the vehicle during sudden braking or an accident.
- To reduce the chance of injury in case of an accident or sudden stop while driving, keep the cup holder shut when not in use.
56
INTERIOR EQUIPMENT
Rear
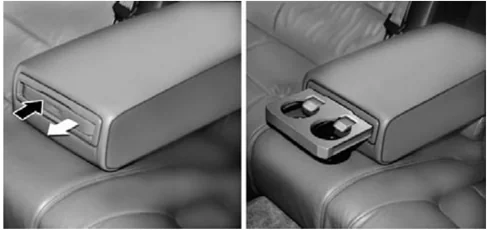
To use the cup holder, push the cup holder portion of the center armrest in the rear seat.
The cup holder is designed so that cups or cans fit snugly in the holes.
CAUTION
- Do not place anything else on the cup holder, as such item may be thrown about in the compartment and possibly injure people in the vehicle during sudden braking or an accident.
- To reduce the chance of injury in case of an accident or sudden stop while driving, keep the cup holder shut when not in use.
COIN BOX
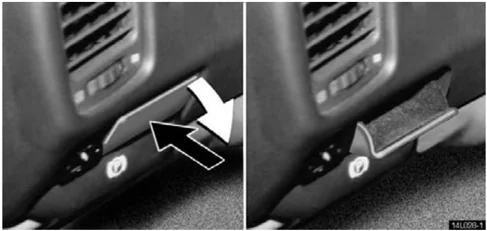
To use the coin box, push against the coin box cover.
CAUTION
Keep the coin box shut when not in use.
57


INTERIOR EQUIPMENT
PENLIGHT
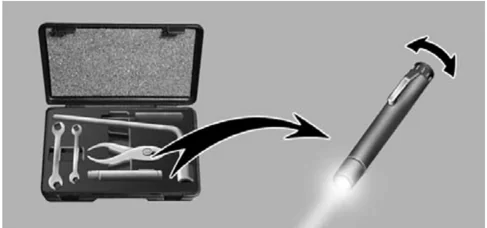
The penlight is in the tool box on the right side of the trunk.
- Battery insertion: Insert the batteries into the penlight. (The penlight terminals have no + or – end, but be sure to insert both batteries facing the same direction.)
- To turn the penlight on, turn the penlight head.
- To turn it off, turn the penlight head further in the same direction or turn it in the reverse direction.
FLOOR MAT
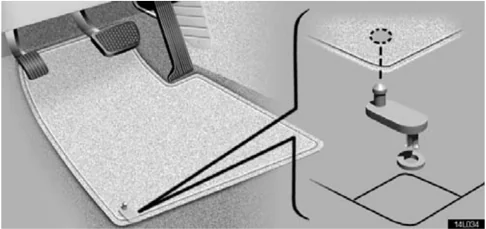
Use a floor mat of the correct size.
If the floor mat has a hole, then it is designed for use with a locking clip. Fix the floor mat and locking clip into the hole in the floor carpet.
58
INTERIOR EQUIPMENT
LUGGAGE STOWAGE PRECAUTIONS
When stowing luggage or cargo in the vehicle, observe the following:
- Put luggage or cargo in the trunk when at all possible. Be sure all items are secured in place.
- Be careful to keep the vehicle level. Placing the weight as far forward as possible helps maintain vehicle balance.
- For better fuel economy, do not carry unnecessary weight.
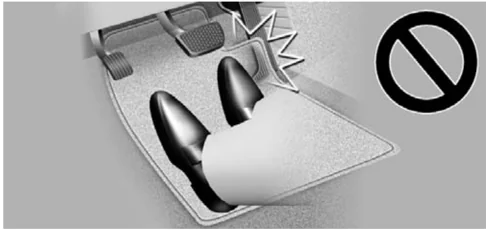
CAUTION
Make sure the floor mat is properly placed on the floor carpet. If the floor mat slips and interferes with the movement of the pedals during driving, it may cause an accident.
CAUTION
- Do not place anything on the filler panel behind the rear seatback. Such items may be thrown about and possibly injure people in the vehicle during sudden braking or an accident.
- Do not drive with objects left on top of the instrument panel. They may interfere with the driver's field of view. Or they may move during sharp vehicle acceleration or turning, and impair the driver's control of the vehicle. In an accident they may injure the vehicle occupants.
59