KEYS AND DOORS
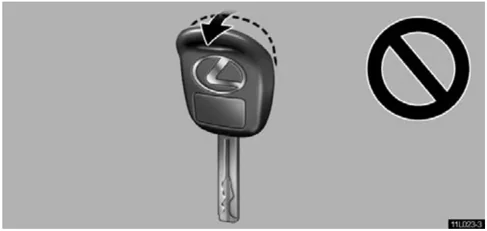
- Do not bend the key grip.
- Do not cover the key grip with any material that cuts off electromagnetic waves.
- Do not knock the key hard against other objects.
- Do not leave the key exposed to high temperatures for a long period, such as on the dashboard and hood under the direct sunlight.
- Do not put the key in water or wash it in an ultrasonic washer.
- Do not use the key with electromagnetic materials.
ENGINE IMMOBILISER SYSTEM
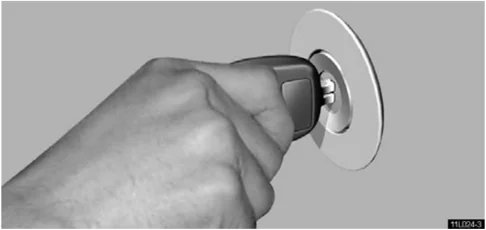
The engine immobiliser system is a theft prevention system. When you insert the key in the ignition switch, the transponder chip in the key’s head transmits an electronic code to the vehicle. The engine will start, only when the electronic code in the chip corresponds to the registered ID code for the vehicle.
The system is automatically set when the key is removed from the ignition switch. At this time, the security indicator light at the bottom of the instrument cluster flashes. When you insert the key in the ignition switch, the security indicator light goes out and the system is canceled automatically, which enables the engine to start.
For your Lexus dealer to make you a new key with built-in transponder chip, your dealer will need your key number and master key. However, there is a limit to the number of additional keys your Lexus dealer can make for you.
KEYS AND DOORS
If you make your own duplicate key, you will not be able to cancel the system or start the engine.
For vehicles sold in U.S.A.
FCC ID: MOZ RI-4ATY MADE IN JAPAN
This device complies with Part 15 of the FCC Rules. Operation is subject to the following two conditions: (1) This device may not cause harmful interference, and (2) this device must accept any interference received, including interference that may cause undesired operation.
CAUTION
Changes or modifications not expressly approved by the party responsible for compliance could void the user’s authority to operate the equipment.
For vehicles sold in Canada
This device complies with RSS-210 of Industry and Science Canada. Operation is subject to the following two conditions: (1) this device may not cause interference, and (2) this device must accept any interference, including interference that may cause undesired operation of the device.
WIRELESS REMOTE CONTROL*

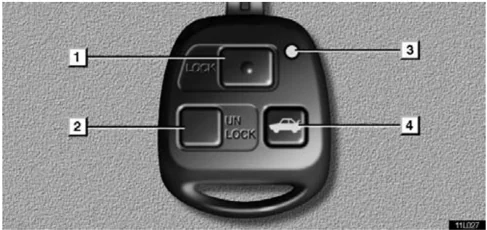
[1] Locking the doors and sounding an alarm [2] Unlocking the doors [3] Indicator light [4] Unlocking the trunk lid
NOTE: *This feature can be set inoperative as vehicle theft deterrent measure in case of the loss of the wireless remote control key. Ask your Lexus dealer for details.
When you operate any button on the key, push it slowly and surely. The operational range of the wireless remote control is approximately 1 meter (3 feet). The effective range may vary with different conditions. To activate the wireless remote control without fail, do it approximately 1 meter (3 feet) from your Lexus.
11
KEYS AND DOORS
In the following cases, the battery in the key may be discharged. If this is a case, replace it using a special screwdriver.
● The remote control does not work.
● The operational range of wireless remote control becomes extremely short.
● The indicator light on the key is dimmed or does not come on.
For the replacement of the battery, see "Replacing the battery" on page 16. You can also have the battery of the key replaced by your Lexus dealer.
If you lose the wireless key, contact your Lexus dealer as soon as possible to avoid the possibility of theft, or an accident.
You can use up to 4 wireless remote control keys for the same vehicle. Contact your Lexus dealer for detailed information.
The wireless remote control key is an electronic component. Observe the following instructions in order not to cause damage on the key.
● Do not leave the wireless remote control key on the places where the temperature becomes high such as on the dashboard.
● Do not disassemble it.
● Avoid knocking it hard against other objects or dropping it.
● Avoid putting it in water.
Locking/Unlocking the doors
When you push the "LOCK" button on the key briefly, all the doors can be locked from outside the vehicle.
At this time, you can hear one beep.* However, when you push the "LOCK" button with any door not closed securely, the buzzer sounds for 10 seconds.** To stop the buzzer, close all the doors securely or push the "UNLOCK" button. If the key is in the ignition switch, locking cannot be done.
Make sure all the doors are locked when you leave the vehicle. Push the "LOCK" button once again. If they were already locked, the turn signal lights will flash.***
NOTE: *The volume of beep sound can be changed. **The buzzer can be set not to sound with any door not closed securely. ***The turn signal lights can be set not to flash. Ask your Lexus dealer for details.
NOTICE Do not push the "LOCK" button any longer than 2 to 3 seconds. Pushing the button longer activates an alarm. For details, see page 14.
When you push the "UNLOCK" button, the driver's door is unlocked. Pushing that button once again within 3 seconds from the first push, all other doors are also unlocked.*
NOTE: *Unlocking by a 2-time operation can be changed. Ask your Lexus dealer for details.
12
KEYS AND DOORS
At this time, two beeps sound.* Together with the activation of unlocking, the interior light comes on for 15 seconds if the interior light switch is in "DOOR" position.** However, this function does not work when the ignition key is in the "ON" position. For further information, see "Interior lights" on page 49.
You have 30 seconds to open a door after using the wireless remote unlock feature.*** If a door is not opened by then, all the doors will be automatically locked again.
Even if the "LOCK" or "UNLOCK" switch is kept pressed in, the locking or unlocking operation is not repeated. Release the button and then push again.
NOTE: *The volume of beep sound can be changed. **The interior light can be set not to come on or the duration of lighting can be changed. ***The time before automatic re-locking can be changed. Ask your Lexus dealer for details.
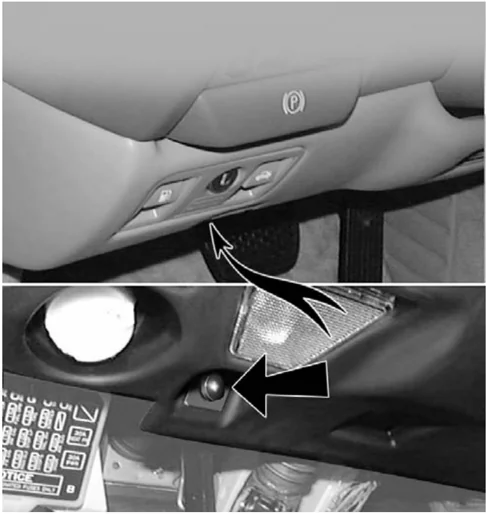
To turn off the beep sound, push this switch. Pushing it again turns on the beep sound.
13
KEYS AND DOORS
Unlocking the trunk lid
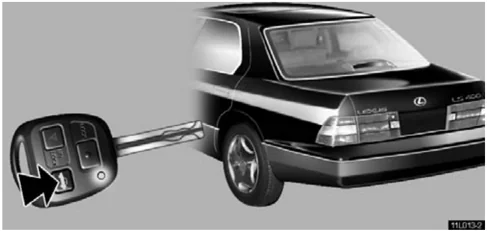
When you keep the button pushed for about 1 second, you can unlock the trunk lid.* One beep sounds. This function does not work when the ignition key is in the "ON" position. NOTE: *The operation method can be changed. Ask your Lexus dealer for details.
Sounding an alarm*
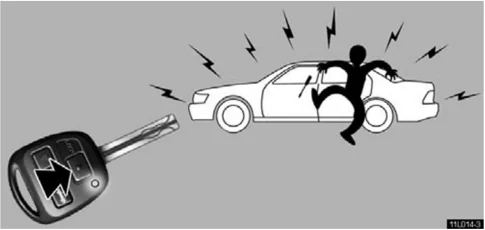
When you push the "LOCK" button for about 2 to 3 seconds, an alarm sounds to deter any person trying to break into or damage your vehicle. If you want to stop the alarm, push any button. This function does not work when the ignition key is in the "ON" position. NOTE: *The alarm can be set not to sound. Ask your Lexus dealer for details.
14
KEYS AND DOORS
Operating the windows and moon roof
The windows and moon roof can be operated using a wireless key from outside the vehicle.*
NOTE: *The windows can be set inoperative. The moon roof can be set to slide open, tilt up or inoperative. Ask your Lexus dealer for details.
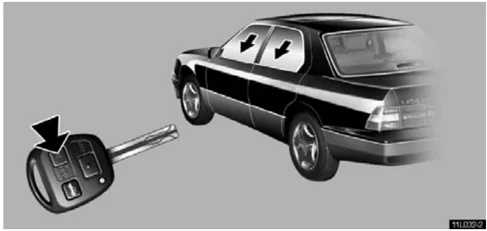
Push the "UNLOCK" button until the windows and moon roof start to move. When you release the button, the windows and moon roof stop operating.
For vehicles sold in U.S.A.
This device complies with Part 15 of the FCC Rules. Operation is subject to the following two conditions: (1) This device may not cause harmful interference, and (2) this device must accept any interference received, including interference that may cause undesired operation.
This equipment has been tested and found to comply with the limits for a Class B digital device, pursuant to Part 15 of the FCC Rules. These limits are designed to provide reasonable protection against harmful interference in a residential installation. This equipment generates, uses and can radiate radio frequency energy and, if not installed and used in accordance with the instructions, may cause harmful interference to radio communications. However, there is no guarantee that interference will not occur in a particular installation. If this equipment does cause harmful interference to radio or television reception, which can be determined by turning the equipment off and on, the user is encouraged to try to correct the interference by one or more of the following measures:
– Reorient or relocate the receiving antenna.
– Increase the separation between the equipment and receiver.
– Connect the equipment into an outlet on a circuit different from that to which the receiver is connected.
– Consult the dealer or an experienced radio / TV technician for help.
15
KEYS AND DOORS
CAUTION Changes or modifications not expressly approved by the party responsible for compliance could void the user’s authority to operate the equipment.
For vehicles sold in Canada
This device complies with RSS-210 of Industry and Science Canada. Operation is subject to the following two conditions: (1) this device may not cause interference, and (2) this device must accept any interference, including interference that may cause undesired operation of the device.
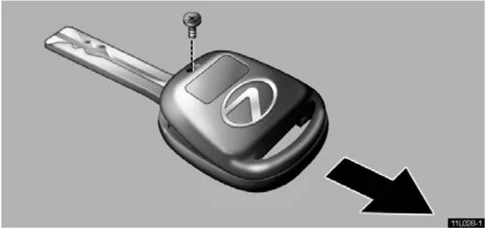
Replacing the battery When you replace the battery, prepare a lithium battery CR1616 and a special screwdriver.
CAUTION Special care should be taken that small children do not swallow the removed battery or components.
NOTICE When replacing the battery, be careful not lose the components, screws and O-ring.

- Remove the screw, and then the cover while pushing it in the arrow direction.
16

KEYS AND DOORS
 2. Remove the module from the key frame.
 3. Remove the 2 screws to take out the lid of the module.
4. Take out the discharged battery and put a new battery with the positive side up.
NOTICE
- Make sure the positive side and negative side of the battery should be faced correctly.
- Be careful not to bend the electrode of the battery insertion and that dust or oils do not adhere to the inside of the module.
- Take care not to lose the screws and O-ring.
- Install the lid with the O-ring and 2 screws.
NOTICE Take care not to damage or bend the O-ring when installing.
- Install the module into the key frame and secure the cover with the screw.
- When pushing any switch on the wireless key, make sure the indicator light comes on.
1
KEYS AND DOORS
DOORS
Locking with key
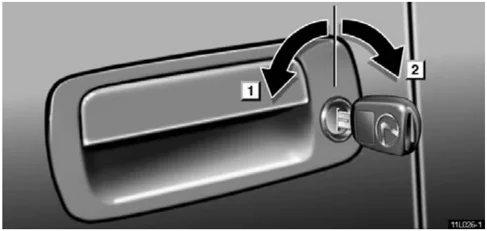
▶ 1 Lock 2 Unlock
Turn the key towards the front of the vehicle to lock and towards the back to unlock.
The doors lock and unlock simultaneously with either front door. In the driver's door lock, turning the key once will unlock the driver's door and twice in succession will unlock all doors simultaneously.* In the passenger's door lock, turning the key once will unlock all doors simultaneously.
NOTE: *Unlocking by a 2-time operation can be changed. Ask your Lexus dealer for details.
Locking with inside lock button
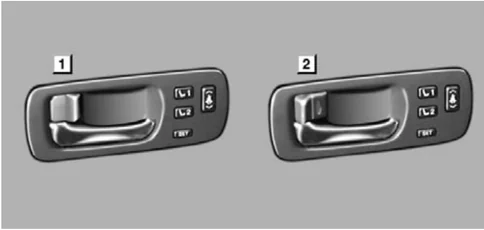
▶ 1 Lock 2 Unlock
Push in the lock button to lock and unlock the door.
When locked, the door cannot be opened with either the outside or inside door handle.
Closing the door with the lock button pushed in will also lock the door. Be careful not to lock your keys in the vehicle. The door will not lock if the key is left in the ignition switch when closing the front doors.
18
KEYS AND DOORS
CAUTION Before driving, make sure the doors are closed and locked, especially when small children are in the vehicle. Along with the proper use of seat belts, locking the doors helps prevent the driver and passengers from being thrown out from the vehicle during an accident. It also helps prevent the doors from being opened unintentionally.
Locking with power door lock switch
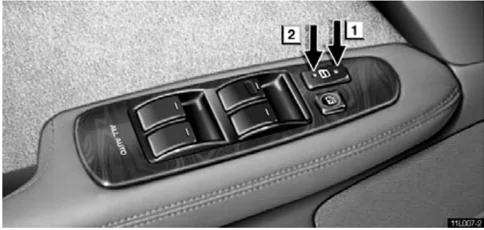
1 Lock 2 Unlock
To lock all the doors simultaneously, push the power door lock switch on the front side. Pushing on the rear side will unlock them.
The same switch is also equipped on the front passenger’s side.
Locking with rear door child-protector
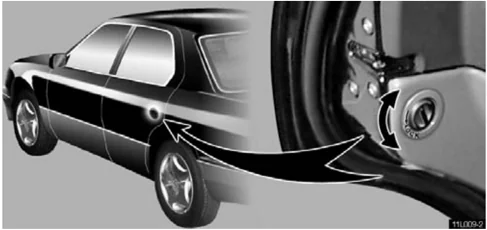
Whenever small children are in the vehicle, lock the rear door so that it does not open from the inside. To do this, turn the knob to the "LOCK" position as shown and then close the door.
19
20
SECTION 1 – 2
INSTRUMENTS AND CONTROLS
Switches
- Headlight switch . . . . . . . . . . . . . . . . . . . . . . . . . . . . . . . . . . . . . . . . . . . . . . . . . . . . . . . . . . . . . . . . . . . . . . . . . . . . . . . . . . . . . . . . . . . . . . . . . . . . . . . . . . . . . . . . . . . . . . . . . . . . . . . . . . . . . . . . . . . . . . . . . . . . . . . . . . . . . . . . . . . . . . . . . . . . . . . . . . . . . . . . . . . . . . . . . . . . . . . . . . . . . . . . . . . . . . . . . . . . . . ........ 22
- Headlight dimmer and turn signal switch . . . . . . . . . . . . . . . . . . . . . . . . . . . . . . . . . . . . . . . . . . . . . . . . . . . . . . . . . . . . . . . . . . . . . . . . . . . . . . . . . . . . . . . . . . . . . . . . . . . . . . . . ........ 24
- Fog light switch . . . . . . . . . . . . . . . . . . . . . . . . . . . . . . . . . . . . . . . . . . . . . . . . . . . . . . . . . . . . . . . . . . . . . . . . . . . . . . . . . . . . . . . . . . . . . . . . . . . . . . . . . . . . . . . . . . . . ........

SWITCHES
HEADLIGHT SWITCH
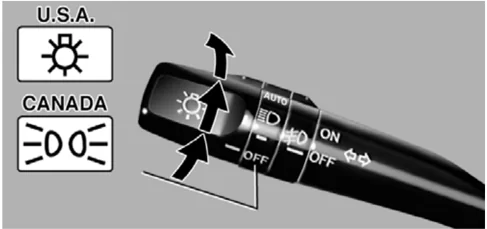
To turn the lights on, twist the knob on the end of the lever. FIRST CLICKSTOP: Only the parking, tail, license plate, side marker and instrument panel lights turn on. SECOND CLICKSTOP: Headlights also turn on. THIRD CLICKSTOP ("AUTO"): The headlights and all other lights automatically turn on depending on the darkness of the surroundings.* Vehicles sold in U.S.A.: When the headlights are on, the headlight indicator lights up in the instrument cluster. Vehicles sold in Canada: When the tail lights are on, the tail light indicator lights up in the instrument cluster. Manually twist the knob to the second clickstop to turn on the headlights if they are needed immediately when entering a dark tunnel, parking structure, etc.
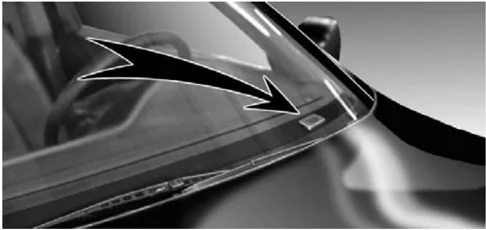
The automatic light control sensor is on top of the driver's side instrument panel.
Do not place anything on the instrument panel, and/or do not affix anything on the windshield to block this sensor.
When the headlights come on, the lights automatically turn off about 30 seconds after any of the doors is opened and closed with the ignition key turned to the "ACC" or "LOCK" position.** To turn them on again, turn the ignition key to the "ON" position, or turn the headlight switch off and then twist the knob until the first or second clickstop. If you are going to park for over one week, make sure the headlight switch is off.
When the headlight switch is on with all the doors locked, pushing the "LOCK" button on the wireless remote control key turns off the headlights.
NOTE: *The operating condition or sensitivity can be changed. **The time before turning off the lights can be changed. Ask your Lexus dealer for details.
22
SWITCHES
Daytime Running Light System (Canada only)
The headlights turn on when the parking brake is released with the engine started, even with the light switch in the "OFF" position. They will not go off until the ignition switch is turned off.
To turn on the other exterior lights and instrument panel lights, twist the knob to the first clickstop.
Under the daytime running light system, the headlights turn on at reduced intensity. Twist the knob to the second clickstop to turn to full intensity for driving at night.
When setting the knob to the third clickstop ("AUTO"), the headlights will automatically adjust to full intensity and/or turn on the other lights depending on the darkness of the surroundings. Likewise, as the surroundings become brighter, the headlights will turn to reduced intensity, ultimately turning off the other lights.
NOTICE To prevent the battery from being discharged, do not leave the lights on longer than necessary when the engine is not running.
Automatic headlight leveling system (Vehicles with discharge headlight only)
As the headlight beam level is always maintained automatically at the proper level in all loading conditions, your headlights do not dazzle other road users.
If this system fails, the multi information display shows a message "HEADLIGHT LEVELING". If this occurs, have your vehicle checked by Lexus dealer.
1
23
SWITCHES
HEADLIGHT DIMMER AND TURN SIGNAL SWITCH
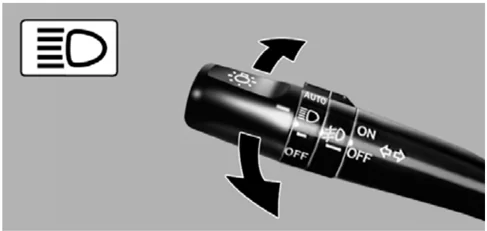
For high beam, push the lever forward. Pull it back for low beam. For the headlight flasher, pull it further back.
A blue light in the instrument cluster indicates high beam or headlight flasher is on.
The headlight flasher works even when the headlight switch is off.
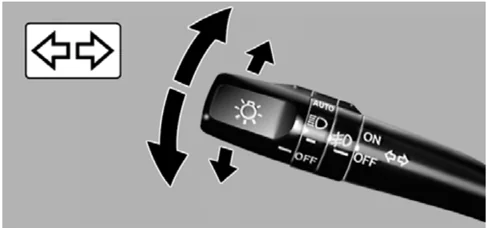
For signaling turns, move the lever up or down in the conventional manner.
The ignition key must be in the "ON" position.
The turn signal is self-cancelling after a turn, but after a lane change, you may have to cancel it by hand. You can also signal a lane change by moving the turn signal lever partway and holding it there.
If the green light in the instrument cluster flashes faster than normal, it indicates that the front or rear turn signal bulb has burned out. If this indicator light does not come on, the fuse or the indicator light itself has probably failed.
24
SWITCHES
FOG LIGHT SWITCH
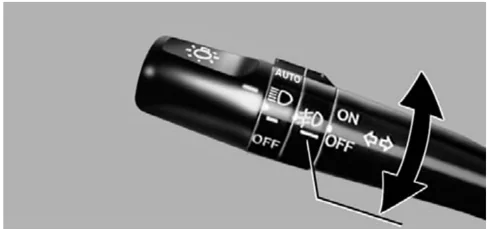
To turn on the fog lights, turn the switch to the "ON" position. The fog lights come on only when the headlights are on low beam.
WINDSHIELD WIPER AND WASHER SWITCH
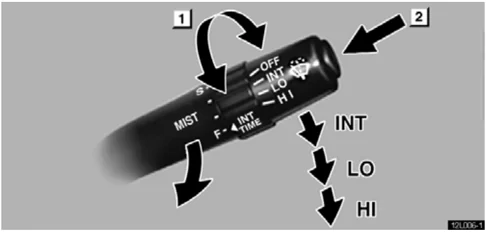
▶ 1 Interval adjuster 2 Washer on
To turn the wipers on, move the lever down until you reach the desired speed setting.
The ignition key must be in the "ON" position.
There are 3 settings: "INT" position: Intermittent operation "LO" position: Low speed operation "Hl" position: High speed operation
Twist the interval adjuster upward to increase the wiping time interval between sweeps, and downward to decrease it.
The wiper lever must be in the "INT" position.
25
SWITCHES
The time interval between sweeps is shortened when the vehicle speed increases. When the vehicle speed reaches more than about 20 km/h (12 mph) with the interval adjuster in "F" position, the time interval becomes the shortest 1.5 seconds.
If you stop the vehicle with the wiper switch in the "LO" position, the wiper speed automatically changes from low speed to intermittent operation speed.* This function does not work when the interval adjuster is in the "F" position.
NOTE: *This feature can be set inoperative. Ask your Lexus dealer for details.
For mist wiper operation (a single wipe), pull the lever toward you and release it.
To make the washer squirt, push the button on the end of the lever.
If the wiper lever is in the "OFF" position, the wipers will automatically operate a couple of times and a few seconds later, make a single wipe again to sweep the windshield completely.* The last sweep does not happen if the vehicle speed exceeds about 170 km/h (106 mph).
NOTE: *The last single wipe can be set inoperative. Ask your Lexus dealer for details.
The warning message "LOW WASHER FLUID" is displayed in the multi information display when the fluid level in the tank becomes nearly empty. For information on adding washer fluid, see "Adding washer fluid" on page 261.
In cold weather, warm the windshield with the defroster before using the washer. This will help prevent icing, which could block your vision.
NOTICE
Do not operate the wipers if the windshield is dry. It may scratch the glass.
26
SWITCHES
HEADLIGHT CLEANER SWITCH (CANADA ONLY)
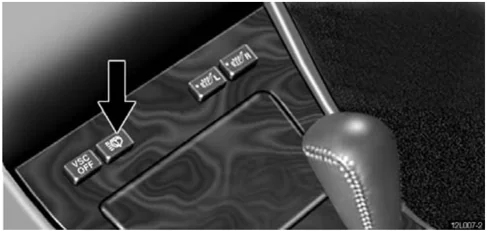
To spray fluid on the headlights, push the switch with the headlights on.
The ignition key must be in the "ON" position.
The warning message "LOW WASHER FLUID" is displayed in the multi information display when the fluid level in the tank becomes nearly empty. For information on adding washer fluid, see "Adding washer fluid" on page 261.
NOTICE Do not turn the headlight cleaner on with the tank empty. It may cause the cleaner motor to overheat.
REAR WINDOW AND OUTSIDE REAR VIEW MIRROR DEFOGGER SWITCH
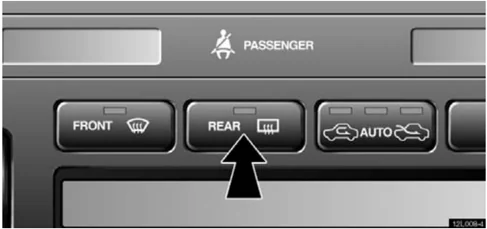
To turn the electric rear window defogger on, push the switch. The ignition key must be in the "ON" position.
The thin heater wires on the inside of the rear window and the heater panels in the outside rear view mirrors will quickly clear the surface. Keep your hands off the mirror faces when the switch is on. An indicator light is on when the defogger is operating.
The system will automatically shut off when the defogger has operated about 15 minutes.
27
SWITCHES
If further defrosting or defogging is desired, simply actuate the switch again. When the surface has cleared, push the switch once again to turn the defogger off. Continuous use may cause the battery to discharge, especially during stop-and-go driving. The defogger is not designed to dry rain water or to melt snow.
If the outside rear view mirrors are heavily coated with ice, use a spray de-icer before operating the switch.
NOTICE
- When cleaning the inside of the rear window, be careful not to scratch or damage the heater wires.
- To prevent the battery from being discharged, do not operate the defogger continuously longer than necessary.
POWER WINDOW SWITCHES
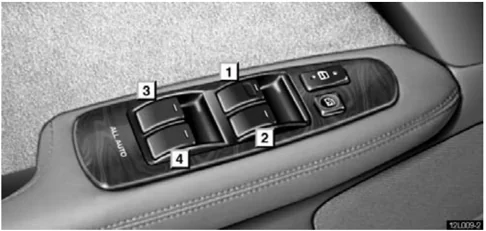
1 For driver's window 2 For front passenger's window 3 For left rear window 4 For right rear window
To raise or lower the windows, use the switch on each door. The passengers' windows can also be controlled by the switches on the driver's door.
The power windows work when the ignition key is in the "ON" position.
Key off operation: Even if the ignition key is turned to the "ACC" or "LOCK" position, the window can be operated until any of the doors is opened (or for about 45 seconds).
28
SWITCHES
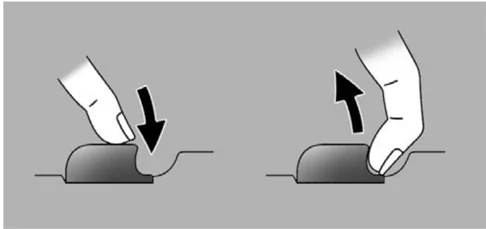
Operating the switches To raise or lower the window, pull the switch halfway up or push it halfway down.
Automatic operation: To fully raise or lower the window automatically, pull the switch fully up or push it fully down.
To stop the window partway, lightly push or pull the switch in the opposite direction and then release it.
Operating the window lock switch
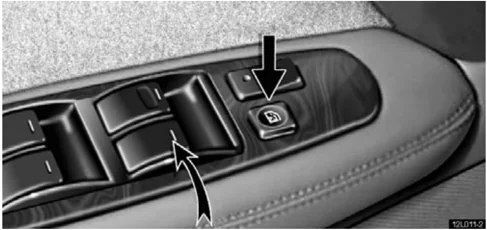
►Indicator light With the window lock switch pressed in, only the driver's window can be raised or lowered.
The indicator lights on the switch tell you which of the switches can be operated.
29
SWITCHES
Operating the windows from outside the vehicle
The windows can be operated using an ignition key.*
NOTE: *This feature can be set inoperative. Ask your Lexus dealer for details.
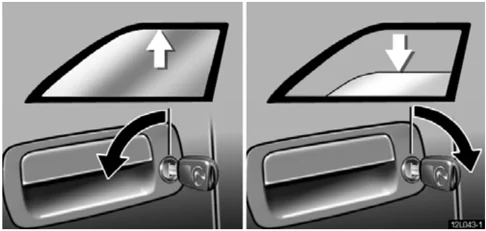
Insert the ignition key into the key hole on the driver’s side.
To close the windows: Turn the key in the locking direction and hold it for a few seconds.
To open the windows: Turn the key in the unlocking direction and hold it for a few seconds.
Jam protection function
During automatic raising operation, key off raising operation or raising operation using the ignition key from the outside, the window stops and is lowered if something gets caught between the window and window frame.
If an impact is given to the window, this function may work without anything caught.
CAUTION
- Never try jamming any part of your body to make the jam protection function work intentionally.
- The jam protection function may not work when something gets caught just before the window fully closed.

SWITCHES
CAUTION To avoid serious personal injury, you must do the following.
- Always make sure the head, hands and other parts of the body of all occupants are kept completely inside the vehicle before you close the power windows. If someone's neck, head or hands gets caught in a closing window, it could result in a serious injury. When anyone closes the power windows, be sure that they operate the windows safely.
- When small children are in the vehicle, never let them use the power window switches without supervision. Use the window lock switch to prevent them from making unexpected use of the switches.
- Never leave small children alone in the vehicle, especially with the ignition key still inserted. They could use the power window switches and get trapped in a window. Unattended children can become involved in serious accidents.
EMERGENCY FLASHER SWITCH
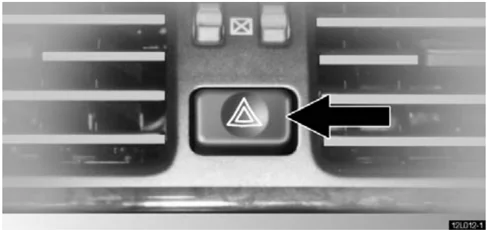
1
To turn on the emergency flashers, push the switch.
All the turn signal lights will flash. The emergency flashers will work with the engine running or off and with or without the ignition key.
Turn on the emergency flashers to warn other drivers if you must stop your vehicle where it might be a traffic hazard.
Always pull your vehicle as far off the road as possible.
The turn signal light switch will not work when the emergency flashers are in operation.
NOTICE To prevent the battery from being discharged, do not leave the switch on longer than necessary when the engine is not running.
31
SWITCHES
SEAT HEATER SWITCHES
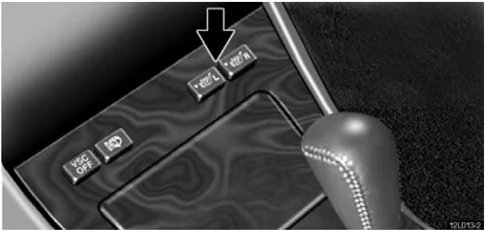
The seat heater has two switches one marked "L" (for the left seat) and the other marked "R" (for the right seat). Push these switches to turn the respective seat heater on, and push the switches again to turn them off.
The ignition key must be in the "ON" position.
CAUTION Occupants must use caution when operating the seat heater because it may make them feel too hot or cause burns at low temperatures (erythema, varicella). Use extra caution for;
- Baby, small child, elderly person, sick person or handicapped person
- Persons who have delicate skin
- Persons who are exhausted
- Persons who have taken alcohol or drugs which induce sleep (sleeping drug, cold remedy, etc.)
To prevent the seat overheating, do not use the seat heater with a blanket, cushion, or other insulating objects which cover the seat.
NOTICE
- Do not put unevenly weighted objects on the seat and do not stick sharp objects (needles, nails, etc.) into the seat.
- When cleaning the seats, do not use organic substances (paint thinner, benzine, alcohol, gasoline, etc.). They may damage the heater and seat surface.
- To prevent the battery from being discharging, turn the switches on when the engine is running.
32
SECTION 1 – 3
INSTRUMENTS AND CONTROLS
Gauges, meters and service reminder indicators
- Fuel gauge . . . . . . . . . . . . . . . . . . . . . . . . . . . . . . . . . . . . . . . . . . . . . . . . . . . . . . . . . . . . . . . . . . . . . . . . . . . . . . . . . . . . . . . . . . . . . . . . . . . . . . . . . . . . . . . . . . . . . . . . . . . . . . . . . . . . . . . . . . . . . . . . . . . . . . . . . . . . . . . . . . . . . . . . . . . . . . . . . . . . . . . . . . . . . . . . . . . . . . . . . . . . ........ 34
- Engine coolant temperature gauge . . . . . . . . . . . . . . . . . . . . . . . . . . . . . . . . . . . . . . . . . . . . . . . . . . . . . . . . . . . . . . . . . . . . . . . . . . . . . . . . . . . . . . . . . . . . . . . . . . . . . . . . . . . . ........ 34
- Tachometer . . . . . . . . . . . . . . . . . . . . . . . . . . . . . . . . . . . . . . . . . . . . . . . . . . . . . . . . . . . . . . . . . . . . . . . . . . . . . . . . . . . . . . . . . . . . . . . . . . . . . . . . . . . . . . . . . . . . . . . . ........

GAUGES, METERS AND SERVICE REMINDER INDICATORS
FUEL GAUGE
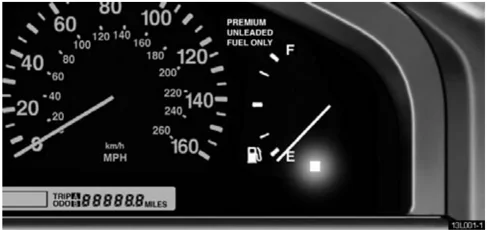
►Low fuel level warning light The gauge is displayed when the ignition switch is on and indicates the approximate quantity of fuel remaining in the tank. It is a good idea to keep the tank over 1/4 full. If the fuel level approaches "E" or the low fuel level warning light comes on, fill the fuel tank as soon as possible. On inclines or curves, due to the movement of fuel in the tank, the fuel gauge needle may fluctuate or the low fuel level warning light may come on earlier than usual. If the fuel tank is completely empty, the malfunction indicator lamp comes on. Fill the fuel tank immediately. The indicator lamp goes off after driving several times. If the indicator lamp does not go off, contact your Lexus dealer as soon as possible. See the inner back cover for fuel capacity and recommended fuel selection.
ENGINE COOLANT TEMPERATURE GAUGE
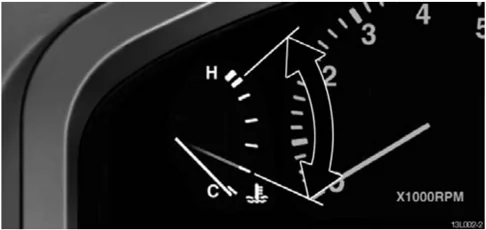
►Normal range The gauge indicates the engine coolant temperature when the ignition switch is on. The engine operating temperature will vary with changes in weather and engine load. If the needle points to the red zone or higher, stop your vehicle and allow the engine to cool. Your vehicle may overheat during severe operating conditions, such as:
- Driving up a long hill on a hot day.
- Reducing speed or stopping after high speed driving.
34
GAUGES, METERS AND SERVICE REMINDER INDICATORS
- Idling for a long period with the air conditioning on in stop-and-go traffic.
- Towing a trailer.
NOTICE
- Do not remove the thermostat in the engine cooling system as this may cause the engine to overheat. The thermostat is designed to control the flow of coolant to keep the temperature of the engine within the specified operating range.
- Do not continue driving with an overheated engine. See "If your vehicle overheats" on page 196.
TACHOMETER
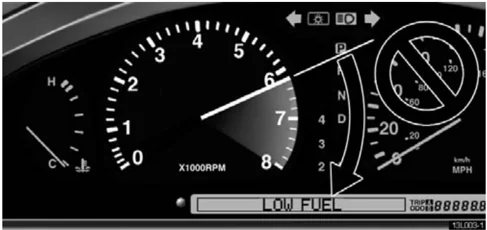
The tachometer indicates engine speed in thousands of rpm (revolutions per minute). Use it while driving to prevent engine overrevving.
Driving with the engine running too fast causes excessive engine wear and poor fuel economy. Remember, in most cases the slower the engine speed, the greater the fuel economy.
NOTICE
Do not let the indicator needle get into the red zone. This may cause severe engine damage.