COMFORT ADJUSTMENT
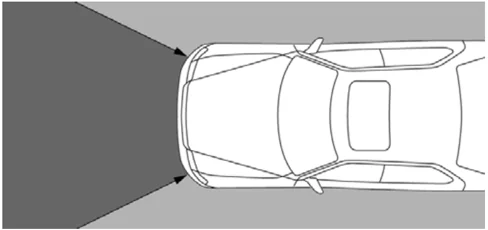
The driver and front passenger airbags and seat belt pretensioners are designed to activate in response to a severe frontal impact within the shaded area between the arrows in the illustration.
There may be the case that the driver and passenger airbags and seat belt pretensioners will not activate with such an impact in which the occupant wearing the seat belt correctly would not get serious injury.
The driver and front passenger airbags and seat belt pretensioners will work if the severity of the impact is above the designed threshold level, comparable to an approximate 20 km/h (14 mph) collision when impacting straight into a fixed barrier that does not move or deform.
If the severity of the impact is below the above threshold level, the driver and front passenger airbags and seat belt pretensioners may not work.
However, this threshold velocity will be considerably higher if the vehicle strikes an object, such as a parked vehicle or sign pole, which can move or deform on impact, or if it is involved in an underride collision (e.g. a collision in which the nose of the vehicle "underrides", or goes under, the bed of a truck).
It is possible with collision severity at the marginal level of driver and passenger airbag sensor detection and activation that only one of your vehicle's driver and front passenger airbags and seat belt pretensioners will work.
For the safety of all occupants, be sure to always wear seat belts.
88
COMFORT ADJUSTMENT
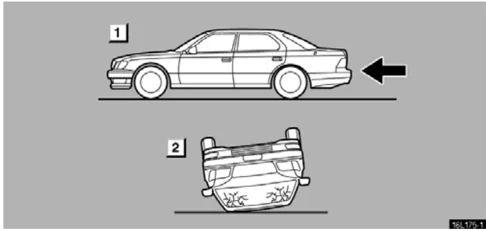
▶ 1 Collision from the rear 2 Vehicle roll-over
The driver and front passenger airbags and seat belt pretensioners are not designed to inflate if the vehicle is subjected to a rear impact, if it rolls over, or if it is involved in a low-speed frontal collision.
The side airbags are designed to inflate when the passenger compartment gets a severe impact from the side.
The side airbags may rather not to activate in the impact in which the occupant wearing the seat belt correctly would not get serious injury.
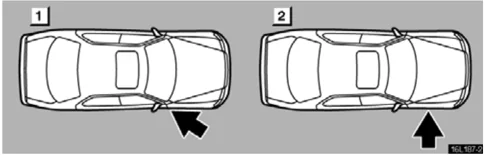
▶ 1 Collision from the side at an angle 2 Collision from the side to the vehicle body other than the passenger compartment
The side airbags may not inflate if the vehicle is subjected to a collision from the side at an angle, or a collision to the side of the vehicle body other than the passenger compartment, which impact is not severe enough for the passenger compartment.
1
89

COMFORT ADJUSTMENT

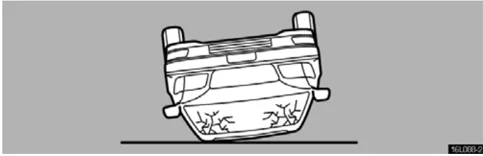
▶Vehicle roll-over
The side airbags are not designed to inflate if the vehicle is rolled over.
If the impact on the body of the passenger compartment is not strong as illustrated above, the relevant side airbag may not inflate.
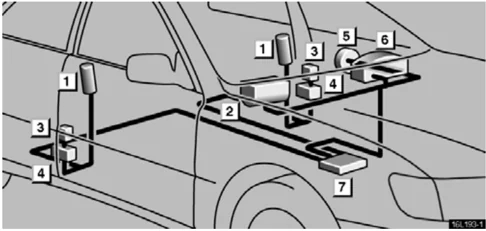
1 Side airbag module (airbag and inflator) 2 Front passenger airbag module (airbag and inflator) 3 Side airbag sensor assembly 4 Seat belt pretensioner 5 Steering wheel pad assembly (airbag and inflator) 6 SRS warning light 7 Driver and front passenger airbag sensor assembly
The SRS airbag sensor assemblies consist of a safing sensor and driver and front passenger airbag sensor.
In a severe frontal impact, the driver and front passenger airbag sensor detects deceleration and the system triggers the front airbag inflators and seat belt pretensioners. In a severe side impact, the side airbag sensor triggers the side airbag inflator. Then a chemical reaction in the inflators momentarily fills the airbags with non-toxic gas to help restrain the forward or lateral motion of the occupants. Then the inflators fill the airbags and the seat belts are quickly drawn back in by the retractors to help restrain forward motion of the occupants.
When the SRS operates, it produces a fairly loud noise and release
90
COMFORT ADJUSTMENT
some smoke along with non-toxic gas. This does not indicate a fire. Be sure to wash off any residue as soon as possible to prevent minor skin irritation.
Deployment of the airbags happen in a fraction of a second, so the airbags must inflate with considerable force. While the system is designed to reduce serious injuries, it may also cause minor burns or abrasions and swellings.
Parts of the airbag module (steering wheel hub, dashboard, front seats) may be hot for several minutes, but the airbags themselves will not be hot. The airbags are designed to inflate only once.
A crash severe enough to inflate the driver and front passenger airbags may break the windshield as the vehicle buckles. In vehicles with a front passenger airbag, the windshield may also be damaged by absorbing some of the force of the inflating airbag.
CAUTION
- The SRS is designed only as a supplement to the primary protection of the driver side and front passenger side seat belt systems. The front seat occupants can be killed or seriously injured by an inflating airbag if they do not wear the available seat belts. During sudden braking just before a collision, an unrestrained driver or front passenger can move forward into direct contact with or close proximity to the airbag which may then deploy during the collision. To obtain maximum protection in an accident, the driver and all passengers in the vehicle must wear their seat belts. Wearing a seat belt during an accident reduces the chances of death or serious injuries or being thrown out of the vehicle. For instructions and precautions concerning the seat belt system, see "Seat belts" on page 80.
- Improperly seated and/or restrained infants and children can be killed or seriously injured by a deploying airbag. An infant or child who is too small to use a seat belt should be properly secured using a child restraint system. Lexus strongly recommends that all infants and children be placed in the rear seat of the vehicle and properly restrained. The rear seat is the safest for infants and children. For instructions concerning the installation of a child restraint system, see "Child restraint" on page 98 .
1
91

COMFORT ADJUSTMENT
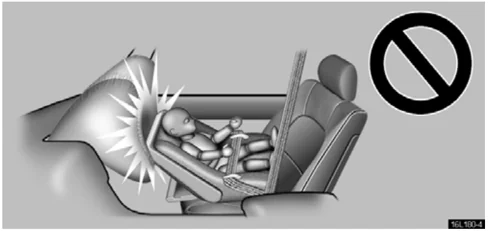
- Never put a rear-facing child restraint system on the front seat because the force of the rapid inflation of the front passenger airbag can cause death or serious injury to the child.
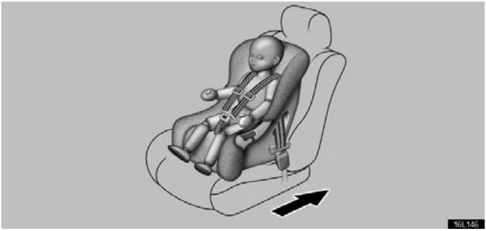
▶Move seat fully back
- A forward-facing child restraint system should be allowed to put on the front seat only when it is unavoidable. Always move the seat as far back as possible, because the force of a deploying airbag could cause death or serious injury to the child. Do not allow the child to lean against the front door or around the front door even if the child is seated in a child restraint system. It is dangerous if the side airbag inflates, and the impact could cause death or serious injury to the child. For instructions concerning the installation of a child restraint system, see "Child restraint" on page 98.
92
COMFORT ADJUSTMENT
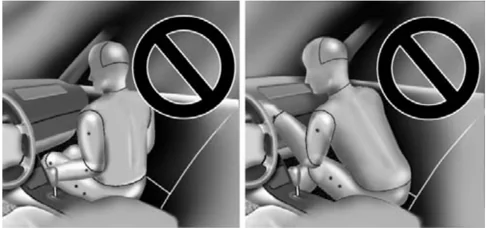
- Do not sit on the edge of the seat or lean over the dashboard when the vehicle is in use. The airbags inflate with considerable speed and force; you may be killed or seriously injured. Sit up straight and well back in the seat, and always use your seat belt.
- Do not lean against the front door when the vehicle is in use. The side airbag inflates with considerable speed and force; you may be killed or seriously injured.
- Do not apply excessive weight to the outer side of the front seats on vehicles with side airbags.
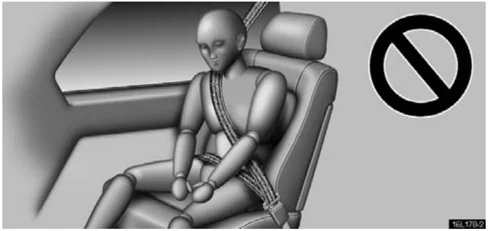
- The child head should not be leaned against the vicinity of the part where the side airbag activates.
1
93
COMFORT ADJUSTMENT
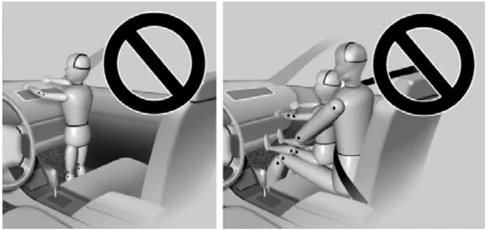
- Do not allow a child to stand up, or to kneel on the front passenger seat. The airbag inflates with considerable speed and force; the child may be killed or seriously injured.
- Do not hold a child on your lap or in your arms. Use a child restraint system in the rear seat. For instructions concerning the installation of a child restraint system, see "Child restraint" on page 98.
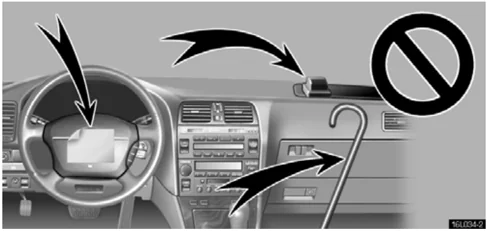
- Do not put objects or your pets on or in front of the dashboard or steering wheel pad that houses the driver and front passenger airbag system. They might restrict inflation or cause death or serious injury as they are projected rearward by the force of the deploying airbags. Likewise, the driver and front passenger should not hold things in their arms or on their knees.
94
COMFORT ADJUSTMENT
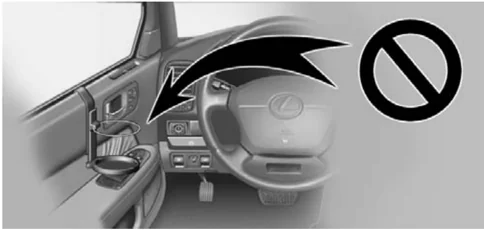
- Do not attach a cup holder or any other device on or around the door. When the side airbag inflates, the cup holder or any other device will be thrown with great force, or the side airbag may not activate correctly, resulting in death or serious injury. Likewise, the driver and front passenger should not hold things in their arms or on their knees.
- Do not use accessories for the seats which cover the parts where the side airbags should inflate. Such accessories may prevent the side airbags from activating correctly, causing death or serious injury.
- Do not modify or remove any wiring. Do not modify, remove, strike or open any components, such as the steering wheel column cover, front passenger airbag cover, front seats, airbag sensor assembly or seat belt assemblies. Doing any of these may cause sudden SRS operation or disable the system, which could result in death or serious injury.
- Do not modify or replace the seats or surface of the front seats with side airbags. Such changes may disable the system or cause the side airbags to inflate, resulting in death or serious injury. Consult your Lexus dealer.
Failure to follow these instructions can result in death or serious injuries.
1
95
COMFORT ADJUSTMENT
NOTICE
Do not perform any of the following changes without consulting your Lexus dealer. Such changes can interfere with proper operation of the SRS in some cases.
- Installation of electronic items such as a mobile two-way radio, cassette tape player or compact disc player.
- Modification of the suspension system.
- Modification of the front end structure and side structure of the passenger compartment.
- Attachment of a grille guard (bull bar, kangaroo bar, etc.), snow plow, winches or any other equipment to the front end.
- Repairs made on or near the front fenders, front end structure, console, steering column, steering wheel, dashboard near the front passenger airbag, front seats or seat belt assembly.
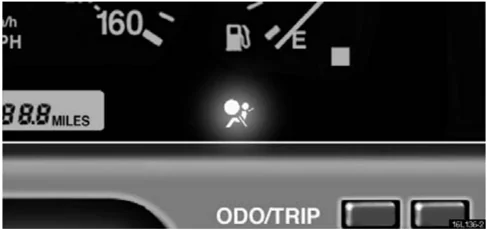
This SRS has an indicator to inform the driver of operating problems. If either of the following conditions occurs, this indicates a malfunction of the airbags and/or seat belt pretensioners. Even if the seat belt pretensioners should fail, the seat belts will operate conventionally. Contact your Lexus dealer as soon as possible to service the vehicle.
- The light does not come on as described above.
- The light stays on or flashes.
- The light comes on or starts flashing while driving.
If the light stays on, it indicates that the driver and front passenger airbags fail. If the light flashes, the side airbags and/or seat belt pretensioners fail.
COMFORT ADJUSTMENT
In the following cases, contact your Lexus dealer as soon as possible:
- Any of the SRS airbags have been inflated.
- If either front seat belt does not retract or cannot be pulled out due to a malfunction or activation of the pretensioner.
- The front seat belt retractor assembly or surrounding area has been damaged.
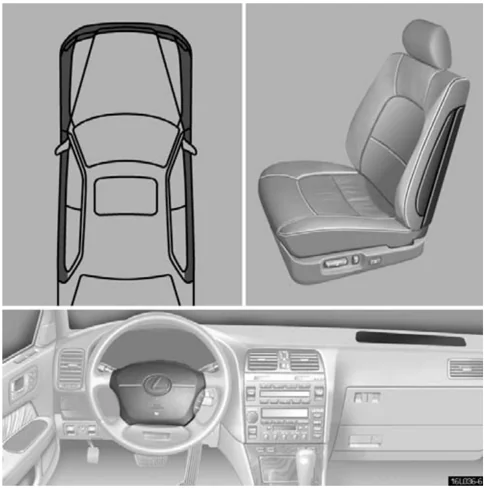
- The front part of the vehicle and portion of the doors (shaded in the illustration) were involved in an accident that did not cause the SRS to work.
- The surface of the seats with the side airbags or the pad section of the steering wheel or front passenger airbag cover (shaded in the illustration) is scratched, cracked, or otherwise damaged.
NOTICE Do not disconnect the battery cables before contacting your Lexus dealer.
1 97
COMFORT ADJUSTMENT
CHILD RESTRAINT
Child restraint precautions
Lexus strongly urges the use of child restraint systems for children small enough to use them.
The laws of all fifty states in the U.S.A. and Canada now require the use of a child restraint system.
Your vehicle conforms to SAE J1819.
If a child is too large for a child restraint system, the child should sit in the rear seat and must be restrained using the vehicle’s seat belt. See "Seat belts" on page 80 for details.
CAUTION
-
For effective protection in automobile accidents and sudden stops, children must be properly restrained using a seat belt or child restraint depending on age and size. Holding a child in your arms is not a substitute for a child restraint system. In an accident, the child can be crushed against the windshield, or between you and the vehicle’s interior if you are unrestrained.
-
Lexus strongly urges use of a proper child restraint which conforms to the size of the child and is put on the rear seat. According to accident statistics, the child is safer when properly restrained in the rear seat than in the front seat.
-
Never put a rear-facing child restraint system on the front seat. In the event of an accident, the force of the rapid inflation of the airbag can cause death or serious injury if a rear-facing child restraint system is put on the front seat.
-
Unless it is unavoidable, do not put a forward-facing child restraint system on the front seat.
-
A forward-facing child restraint system should be put on the front seat only when it is unavoidable. Always move the seat as far back as possible, because the force of a deploying airbag could cause death or serious injury to the child. Make sure you have complied with all installation instructions provided by the child restraint manufacturer and that the system is properly secured. Do not allow the child to lean over the front door or around the front door even if the child is seated in a child restraint system. It is dangerous if the side airbag inflates, and the impact could cause death or serious injury to the child.
Child restraint system
A child restraint system for a small child or baby must itself be properly restrained on the seat with the lap portion of the lap/shoulder belt. You must carefully consult the manufacturer’s instructions which accompany by your child restraint system.
98

COMFORT ADJUSTMENT
To provide proper restraint, use a child restraint system following the manufacturer’s instructions about the appropriate age and size of the child for the restraint system.
Install the child restraint system correctly following the instructions provided by its manufacturer of the system. General directions are also provided under the following illustrations.
The child restraint system should be installed on the rear seat. According to accident statistics, the child is safer when properly restrained in the rear seat than in the front seat.
CAUTION
-
Never put a rear-facing child restraint system on the front seat. In the event of an accident, the force of the rapid inflation of the airbag can cause death or serious injury if a rear-facing child restraint system is put on the front seat.
-
Unless it is unavoidable, do not put a forward-facing child restraint system on the front seat.
-
A forward-facing child restraint system should be put on the front seat only when it is unavoidable. Always move the seat as far back as possible, because the force of a deploying airbag could cause death or serious injury to the child. Do not allow the child to lean over the front door or around the front door even if the child is seated in a child restraint system. It is dangerous if the side airbag inflates, and the impact could cause death or serious injury to the child.
-
After installing the child restraint system, make sure it is secured in place according to the manufacturer's instructions. If it is not restrained securely, it may cause death or serious injury to the child in the event of a sudden stop or accident.
When not using the child restraint system, keep it secured with the seat belt or place it in the trunk or somewhere other than in the passenger compartment. This will prevent it from injuring passengers in the event of a sudden stop or accident.
Your vehicle has anchors for securing the top strap of a child restraint system. The anchor nuts are welded beneath the sheet metal to permit installation of an anchor bracket for a child restraint system.
1
99

COMFORT ADJUSTMENT
To install an anchor bracket, use an 8 mm X 30 mm X 1.25 mm coarse thread metric bolt and a 15 mm (0.6 in.) spacer for the outer anchors or a 10 mm (0.4 in.) spacer for the center anchor. Note that the bolts accompanying many child restraint systems are not metric. You can damage the anchor nuts on your vehicle if you force bolts with different thread into the anchor nuts.
For instructions about how to install the anchor bracket, see "Top strap anchors and locations".
If your child restraint system does not provide any of the necessary parts, you can purchase the following items from your Lexus dealer.
- CRS installation kit (Part No. 04731-22012) – contains 1 bolt, 3 types of spacer and 1 locking clip.
- Bolt (Part No. 91511-60830)
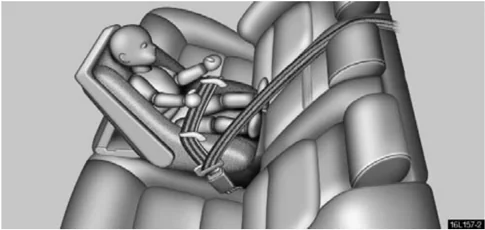
Types of child restraint system Child restraint systems are classified into the following 3 types depending on the child's age and size. (A) Infant seat (B) Convertible seat (C) Booster seat Install the child restraint system following the instructions provided by its manufacturer. (A) Infant seat
100
COMFORT ADJUSTMENT
(B) Convertible seat
 (C) Booster seat
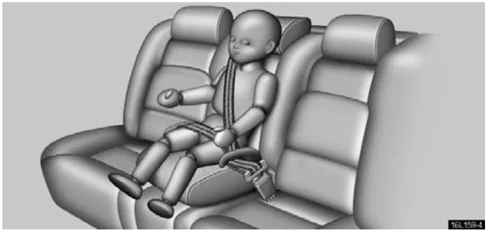
INSTALLATION WITH 3–POINT TYPE SEAT BELT
(A) Infant seat installation
 An infant seat is used in rear–facing position only.
101
COMFORT ADJUSTMENT
 16L100-4
CAUTION Never put a rear-facing child restraint system in the front seat because the force of the rapid inflation of the front passenger airbag can cause death or serious injury to the child.
 16L160-2
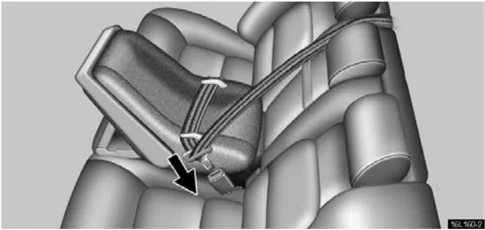
- Run the lap and shoulder belt through or around the infant seat following the instructions provided by its manufacturer and inserting the tab into the buckle taking care not to twist the belt. Keep the lap portion of the belt tight.
CAUTION
- After inserting the tab, make sure the tab and buckle are locked and that the lap and shoulder portions of the belt are not twisted.
- Do not insert coins, clips, etc. in the buckle as this may prevent you from properly latching the tab and buckle.
- If the seat belt does not function normally, immediately contact your Lexus dealer. Do not use the seat until the seat belt is fixed. It cannot protect your child from injury.
102

COMFORT ADJUSTMENT
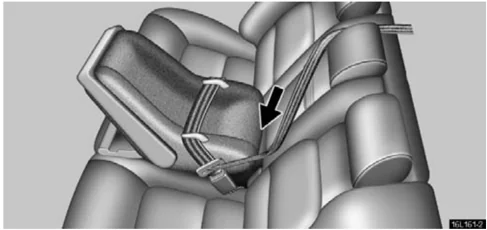
- Fully extend the shoulder belt to put it in the lock mode. When the belt is then retracted even slightly, it cannot be extended. To hold the infant seat securely, make sure the belt is in the lock mode before letting the belt to retract.
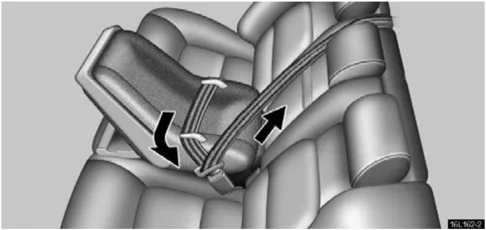
- While pressing the infant seat firmly against the seat cushion and seatback, let the shoulder belt retract as far as it will go to hold the infant seat securely.
103
COMFORT ADJUSTMENT
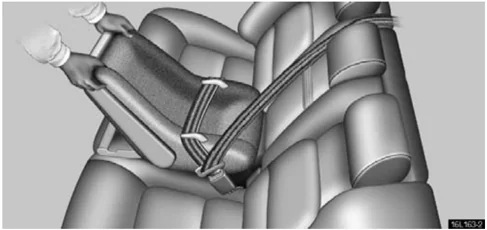
CAUTION Push and pull the child restraint system in different directions to be sure it is secure. Follow all the installation instructions provided by its manufacturer.
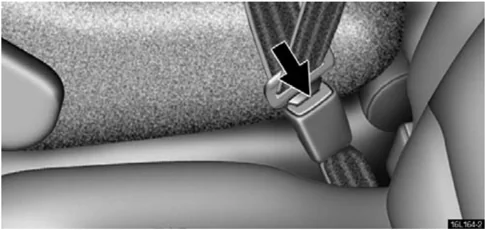
- To remove the infant seat, press the buckle-release button and allow the belt to retract completely. The belt will move freely again and be ready to work for an adult or older child passenger.
104

COMFORT ADJUSTMENT
(B) Convertible seat installation
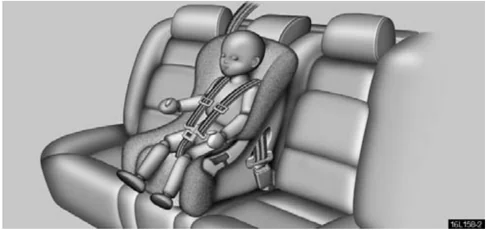
A convertible seat is used in forward-facing and rear-facing positions depending on the age and size of the child. When installing, follow the manufacturer’s instructions about the appropriate age and size of the child as well as direction for installing of a child restraint system.
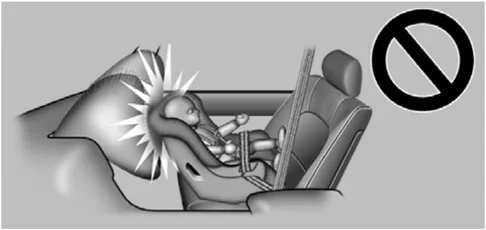
CAUTION
- Never put a rear-facing child restraint system in the front seat because the force of the rapid inflation of the front passenger airbag can cause death or serious injury to the child.
105

COMFORT ADJUSTMENT
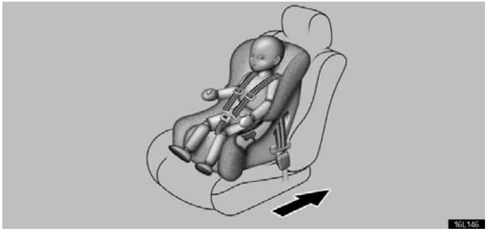
►Move seat fully back
- A forward-facing child restraint system should be put on the front seat only when it is unavoidable. Always move the seat as far back as possible, because the force of a deploying airbag could cause death or serious injury to the child. Do not allow the child to lean over the front door or around the front door even if the child is seated in a child restraint system. It is dangerous if the side air bag inflates, and the impact could cause death or serious injury to the child.
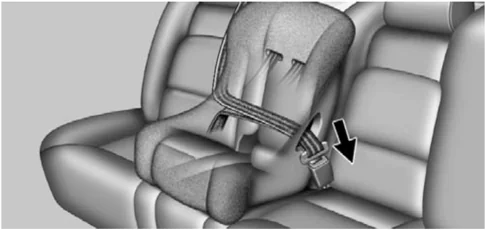
- Run the lap and shoulder belt through or around the convertible seat following the instructions provided by its manufacturer and inserting the tab into the buckle taking care not to twist the belt. Keep the lap portion of the belt tight.
CAUTION
- After inserting the tab, make sure the tab and buckle are locked and that the lap and shoulder portions of the belt are not twisted.
- Do not insert coins, clips, etc. in the buckle as this may prevent you from properly latching the tab and buckle.
- If the seat belt does not function normally, immediately contact your Lexus dealer. Do not use the seat until the seat belt is fixed. It cannot protect your child from injury.
106

COMFORT ADJUSTMENT
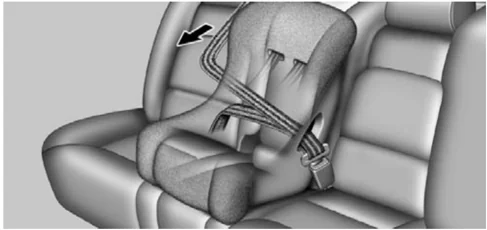
- Fully extend the shoulder belt to put it in the lock mode. When the belt is then retracted slightly, it cannot be extended. To hold the convertible seat securely, make sure the belt is in the lock mode before letting the belt to retract.
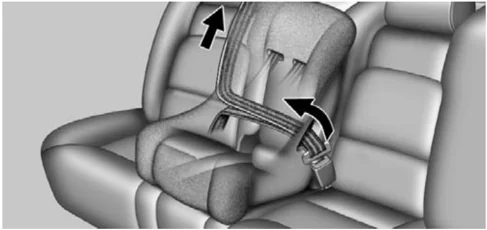
- While pressing the convertible seat firmly against the seat cushion and seatback, let the shoulder belt retract as far as it will go to hold the convertible seat securely.
107
COMFORT ADJUSTMENT
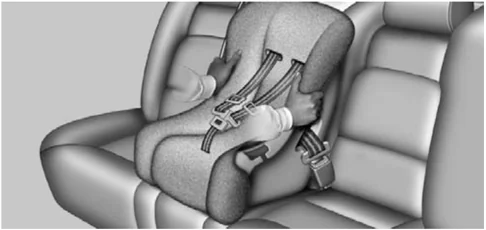
CAUTION Push and pull the child restraint system in different directions to be sure it is secure. Follow all the installation instructions provided by its manufacturer.
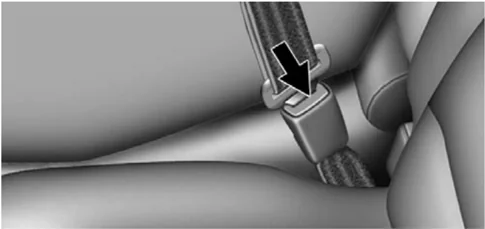
- To remove the convertible seat, press the buckle-release button and allow the belt to retract completely. The belt will move freely again and be ready to work for an adult or older child passenger.
108

COMFORT ADJUSTMENT
(C) Booster seat installation
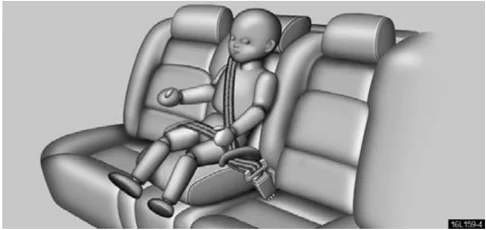
A booster seat is used in forward-facing position only.
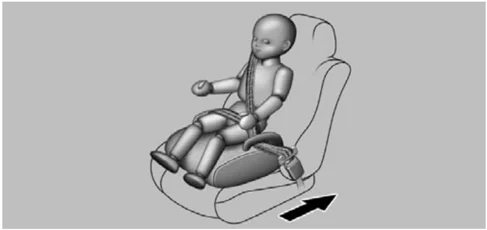
▶Move seat fully back
CAUTION A forward-facing child restraint system should be put on the front seat only when it is unavoidable. Always move the seat as far back as possible, because the force of a deploying airbag could cause death or serious injury to the child. Do not allow the child to lean over the front door or around the front door even if the child is seated in a child restraint system. It is dangerous if the side airbag inflates, and the impact could cause death or serious injury to the child.
109

COMFORT ADJUSTMENT
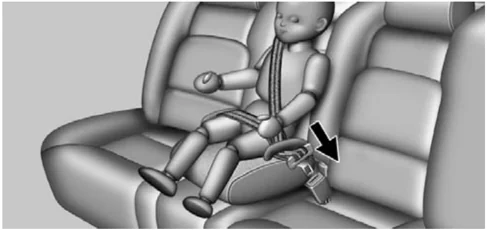
- Sit the child on a booster seat. Run the lap and shoulder belt through or around the booster seat and child following the instructions provided by its manufacturer and insert the tab into the buckle.
Make sure the shoulder belt is correctly across the child’s shoulder and that the lap belt is positioned as low as possible on child’s hips. See "Seat belts" on page 80 for details.
CAUTION
-
Always make sure the shoulder belt is positioned across the center of child’s shoulder. The belt should be kept away from child’s neck, but not falling off child’s shoulder. Failure to do so could reduce the amount of protection in an accident and cause serious injuries in a collision.
-
High-positioned lap belts and loose-fitting belts both could cause serious injuries due to sliding under the lap belt during a collision or other unintended result. Keep the lap belt positioned as low on hip as possible.
-
For child’s safety, do not place the shoulder belt under child’s arm.
-
After inserting the tab, make sure the tab and buckle are locked and that the lap and shoulder portions of the belt are not twisted.
-
Do not insert coins, clips, etc. in the buckle as this may prevent you from properly latching the tab and buckle.
-
If the seat belt does not function normally, immediately contact your Lexus dealer. Do not use the seat until the seat belt is fixed. It cannot protect your child from injury.
110

COMFORT ADJUSTMENT
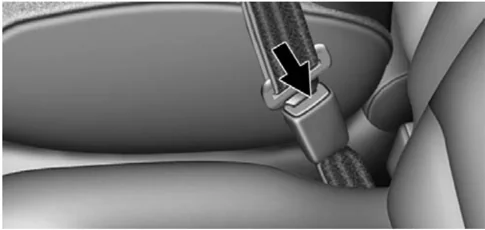
- To remove the child restraint system, press the buckle-release button and allow the belt to retract.
Top strap anchors and locations
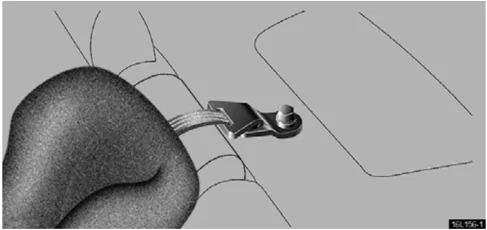
If your child restraint system requires the use of a top strap, latch the hook onto the anchor bracket and tighten the top strap.
See the following instructions to install the anchor bracket.
COMFORT ADJUSTMENT
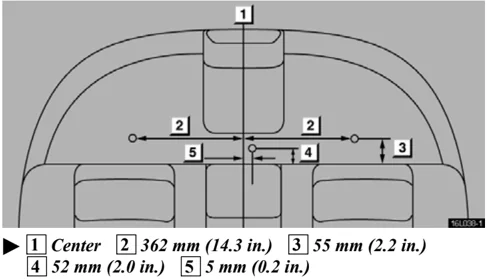
► 1 Center 2 362 mm (14.3 in.) 3 55 mm (2.2 in.) 4 52 mm (2.0 in.) 5 5 mm (0.2 in.)
- Run your fingers across the trim of the filler panel to locate the holes underneath it in the positions shown above.
- Make a hole in the covering directly above the hole in the filler panel.
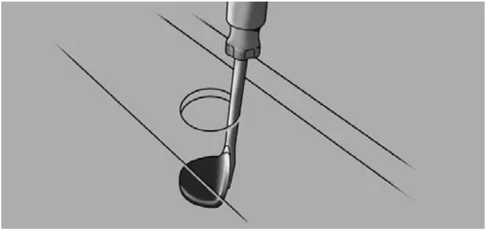
- Remove the seals from the anchors using a screwdriver or the like.
112
COMFORT ADJUSTMENT
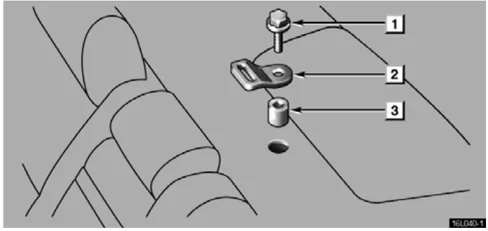
1 Bolt 2 Anchor bracket 3 Spacer
- Insert a 15 mm (0.6 in.) spacer, and tighten down the anchor bracket for your child restraint system with a bolt. Torque the bolt to 16.5 – 24.7 N·m (1.68 –2.52 kgf·m, 12.2 – 18.2 ft·lbf.).
To comply with Canada Motor Vehicle Safety Standards, vehicles sold in Canada are provided with a bracket set in the glovebox.
DRIVING POSITION MEMORY SYSTEM
The micro computer can memorize the position of the driver’s seat, the height of the shoulder belt anchor of the driver’s seat belt, and the positions of the tilt and telescopic steering, and outside rear view mirrors. Two different driving position profiles can be entered into the computer’s memory.
Recording a driving position in the computer’s memory can only be done when the ignition key is in the "ON" position and the shift lever is in the "P" position.
Setting a driving position
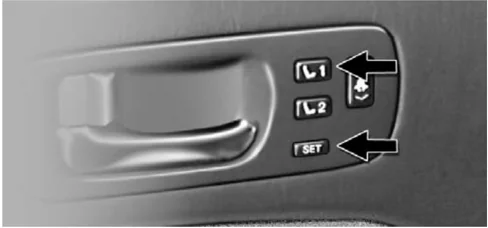
-
Adjust the driver’s seat, driver’s shoulder belt anchor, tilt and telescopic steering and outside rear view mirrors to the desired position.
-
While pushing the "SET" button, push button "1" or "2" until the signal beeps.
113
COMFORT ADJUSTMENT
The beep sound means that the positions are recorded in the computer’s memory.
By repeating these two steps and pressing the remaining button, the driving position for another driver can be recorded.
To set a new memorized position, select the desired position and perform step 2. The previous memory will be erased and the new position will be set.
To make only slight changes to an already memorized position, the easiest way is to first activate the memorized position, then make the desired changes and perform step 2 above.
Activating a memorized position
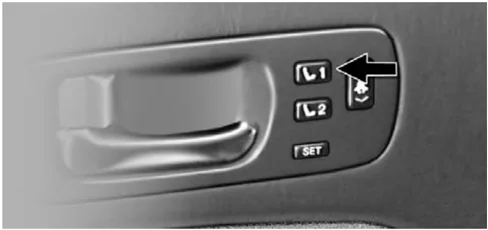
When you push button "1" or "2", the driving position will be automatically adjusted to the position recorded for that button.
Conditions for memorized position activation
- Ignition key "ON" and shift lever in "P" position. All parts of the memorized positions can be activated. However, if the brake pedal is being depressed, the seat position will not change.
- Key not in ignition switch and within 30 seconds of opening driver's door. The memorized position can be activated, except for the tilt and telescopic steering.
If any driving position memory switch is pushed while one of the memorized driving position profiles is being activated, the operation will stop.
To activate the system, push the desired button ("1" or "2") again.
The driving position memory control system cannot be operated while the vehicle is moving.
If the vehicle's battery is disconnected, the computer's memory will be erased and the memorized positions will have to be set again.
CAUTION
- Do not start the vehicle while the adjustments are being made.
- Take care not to select the wrong button, or the seat could strike the rear passenger or hit your body against the steering wheel. If this happens, you can stop the movement by pressing another driving position memory switch, or depressing the brake pedal.

115
116
SECTION 1 – 7
INSTRUMENTS AND CONTROLS
Theft deterrent
- Theft deterrent system . . . . . . . . . . . . . . . . . . . . . . . . . . . . . . . . . . . . . . . . . . . . . . . . . . . . . . . . . . . . . . . . . . . . . . . . . . . . . . . . . . . . . . . . . . . . . . . . . . . . . . . . . . . . . . . . . . . . . . . . . . . . . . . . . . . . . . . . . . . . . . . . . . . . . . . . . . . . . . . . . . . . . . . . . . . . . . . . . . . . . . . . . . . . . . . . . . . . . . . . . . . . . . . . . . . ........ 117
- Theft prevention labels . . . . . . . . . . . . . . . . . . . . . . . . . . . . . . . . . . . . . . . . . . . . . . . . . . . . . . . . . . . . . . . . . . . . . . . . . . . . . . . . . . . . . . . . . . . . . . . . . . . . . . . . . . . . . . . . . . ........ 119
1

THEFT DETERRENT
THEFT DETERRENT SYSTEM
To deter theft of the vehicle, this system is designed to give an alarm if any of the doors, trunk or hood is forcibly unlocked or the battery terminal is disconnected and then reconnected while the vehicle is locked.*
NOTE: *The system operating condition can be changed. Ask your Lexus dealer for details.
The alarm blows the horn intermittently and flashes the headlights, tail lights and other exterior lights.
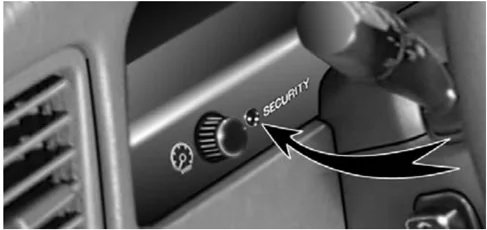
Setting the system
- Turn the ignition key to the "LOCK" position and remove it.
- Close and lock all the doors, trunk and hood using an ignition key or wireless remote control.
If you lock them with wireless remote control, the turn signals flash once.* If you do not want to make them flash, consult with your Lexus dealer.
NOTE: *The turn signals can be set not to flash. Ask your Lexus dealer for details.
The indicator light will come on when all the doors, trunk and hood are closed and locked.
- After 30 seconds, the indicator flashes and the system is set.
Cancelling the system
When you unlock any door or trunk using an ignition key or wireless remote control, the system is cancelled.
If you unlock any door or trunk with wireless remote control, the turn signals flash twice.* If you do not want to make them flash, consult with your Lexus dealer.
NOTE: *The turn signals can be set not to flash. Ask your Lexus dealer for details.
Activating the system
The alarm sounds for 60 seconds if any of the following are operated:
• Unlocking any door or trunk without using an ignition key or wireless remote control.
• Opening the hood forcibly.
• Reconnecting the battery.
117
THEFT DETERRENT
If any door is unlocked and the ignition key is not in the ignition switch during the alarm sounding, its door is automatically locked. To stop the alarm: Use either of the following methods.
- Unlock the door or trunk using an ignition key or wireless remote control.
- Turn the ignition switch on.
Testing the system
- Open all the windows.
- Set the system as described above.
The front doors should be locked with the ignition key or wireless remote control. Be sure to wait until the indicator light starts flashing.
-
Unlock one of the doors from the inside. The system should activate the alarm.
-
Unlock any of the doors with a key or the wireless remote control to cancel the system.
-
Repeat this operation for the other doors and hood.
When testing the hood, also check that the system is activated when the battery terminal is disconnected and then reconnected.
If the system does not work properly, have it checked by your Lexus dealer.
NOTICE
Disconnecting the battery may result in the erasure of information you have set in the computer memory. After reconnecting the battery, check that the memorized data has been retained. If it has been erased, input it into the computer once more.
118 1
THEFT DETERRENT
THEFT PREVENTION LABELS
(U.S.A.ONLY)
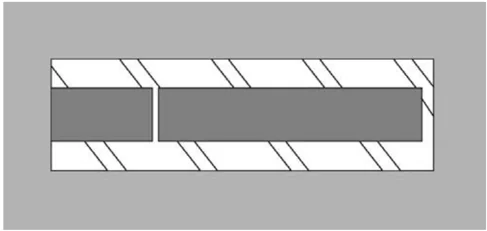
Your new vehicle carries theft prevention labels which are approximately 56 mm (2.20 in.) by 16 mm (0.63 in.).
The purpose of these labels is to reduce the incidence of vehicle thefts by facilitating the tracing and recovery of parts from stolen vehicles. The label is designed so that once it is applied to a surface, any attempt to remove it will result in destroying the integrity of the label. Transferring these labels intact from one part to another will be impossible.
NOTICE You should not attempt to remove the theft prevention labels as it may violate certain state or federal laws.
119
SECTION 2
AIR CONDITIONING AND AUDIO
- Automatic air conditioning controls . . . . . . . . . . . . . . . . . . . . . . . . . . . . . . . . . . . . . . . . . . . . . . . . . . . . . . . . . . . . . . . . . . . . . . . . . . . . . . . . . . . . . . . . . . . . . . . . . . . . . . . . . . . . . . . . . . . . . . . . . . . . . . . . . . . . . . . . . . . . . . . . . . . . . . . . . . . . . . . . . . . . . . . . . . . . . . . . . . . . . . . . . . . . . . . . . . . . . . . . . . . . . . . . . . . . . . . . ........ 121
- Audio system . . . . . . . . . . . . . . . . . . . . . . . . . . . . . . . . . . . . . . . . . . . . . . . . . . . . . . . . . . . . . . . . . . . . . . . . . . . . . . . . . . . . . . . . . . . . . . . . . . . . . . . . . . . . . . . . . . . . ........ 132
For vehicles equipped with Navigation System, please refer to the separate "Owner's Manual for Navigation System".
2
120

AIR CONDITIONING AND AUDIO
AUTOMATIC AIR CONDITIONING CONTROLS
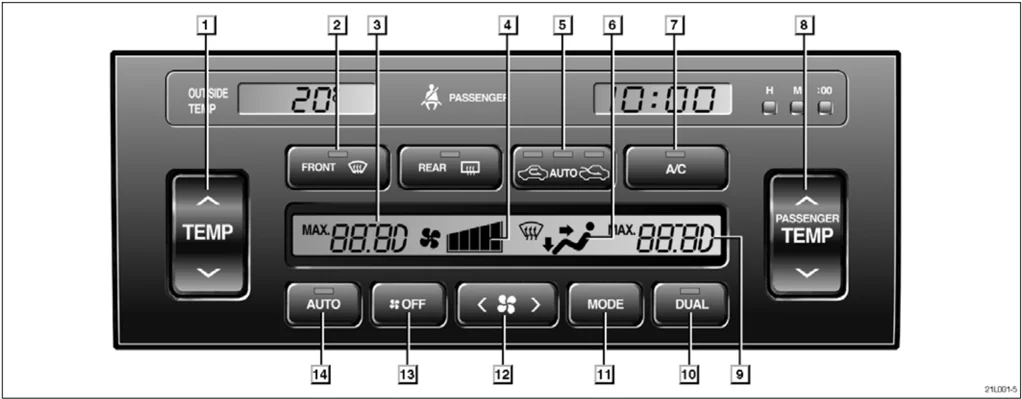
►The automatic air conditioning automatically maintains the set temperature.
This air conditioning features automatic fan speed and air flow control which automatically selects the most suitable fan speed and air flow to control the temperature. The ignition key must be in the "ON" position.
NOTICE To prevent the battery from being discharged, do not leave the air conditioning on longer than necessary when the engine is not running.
121
AIR CONDITIONING AND AUDIO
[1] Driver side temperature control button [2] Front windshield button [3] Driver side temperature display (in degrees Fahrenheit or Centigrade) [4] Fan speed display [5] Air intake control button [6] Air flow display [7] Air conditioning on-off button [8] Passenger side temperature control button [9] Passenger side temperature display (in degrees Fahrenheit or Centigrade) [10] Separate/dual control button [11] Air flow control button [12] Fan speed control button [13] OFF button [14] Automatic control button
2
122
AIR CONDITIONING AND AUDIO
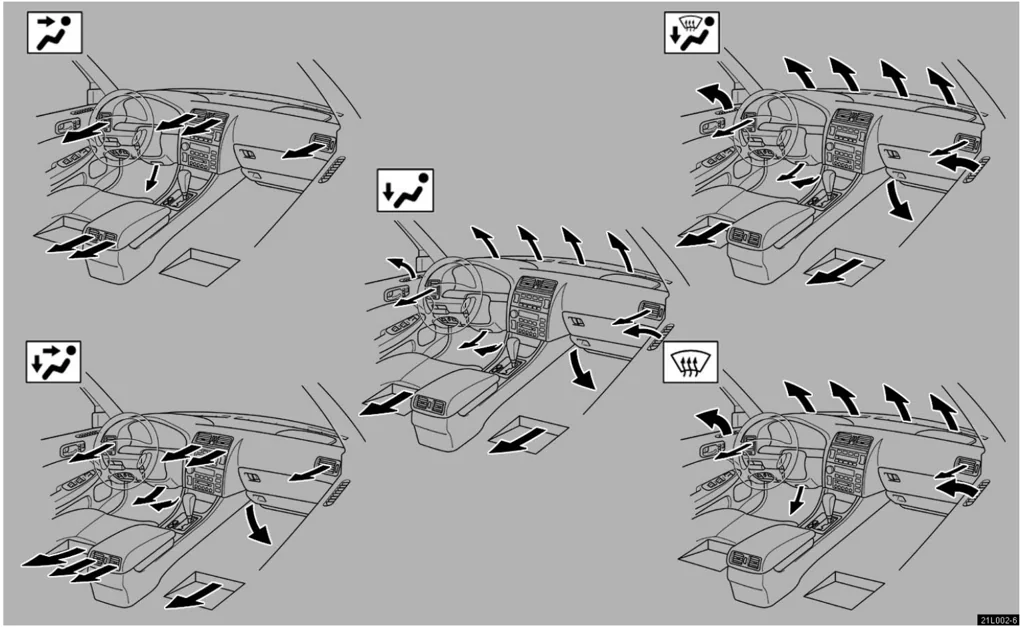
▶Air flow selection 21L002-6 123
AIR CONDITIONING AND AUDIO
(a) Climate control SETTING OPERATION – automatic control
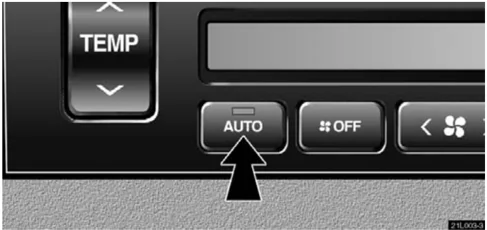
- Push the "AUTO" button.
Air flow quantity, switching of the diffusers, on-off of the air conditioning, and switching of the air intake between RECIRCULATED AIR and OUTSIDE AIR are automatically adjusted. The operation status is shown by each indicator.
When one of the manual control buttons is depressed while operating in automatic mode, the operation corresponding to the button depressed is set. Other conditions continue to be adjusted automatically.
Push the "OFF" button to turn the air conditioning off.
- Use the "TEMP" or "PASSENGER TEMP" button to set the desired temperature.
The "TEMP" or "PASSENGER TEMP" button is used to set the desired temperature. The temperature will be controlled on the driver and passenger sides simultaneously or individually.
"TEMP" button – Changes the temperature on the driver and passenger sides simultaneously or the driver side only.
"PASSENGER TEMP" button – Changes the temperature on the passenger side only.
"DUAL" button – Changes the mode of the temperature setting.
The indicator on the "DUAL" button has two modes:
• With the indicator on – For individual temperature setting
• With the indicator off – For simultaneous temperature setting
124