154
SECTION 3 – 1
STARTING AND DRIVING
Starting and driving
- Three-way catalytic converter . . . . . . . . . . . . . . . . . . . . . . . . . . . . . . . . . . . . . . . . . . . . . . . . . . . . . . . . . . . . . . . . . . . . . . . . . . . . . . . . . . . . . . . . . . . . . . . . . . . . . . . . . . . . . . . . . . . . . . . . . . . . . . . . . . . . . . . . . . . . . . . . . . . . . . . . . . . . . . . . . . . . . . . . . . . . . . . . . . . . . . . . . . . . . . . . . . . . . . . . . . . . . ........ 155
- Engine exhaust caution . . . . . . . . . . . . . . . . . . . . . . . . . . . . . . . . . . . . . . . . . . . . . . . . . . . . . . . . . . . . . . . . . . . . . . . . . . . . . . . . . . . . . . . . . . . . . . . . . . . . . . . . . . . . . . . . ........ 156
- Before starting the engine . . . . . . . . . . . . . . . . . . . . . . . . . . . . . . . . . . . . . . . . . . . . . . . . . . . . . . . . . . . . . . . . . . . . . . . . . . . . . . . . . . . . . . . . . . . . . . . . . . . . . . . . . . . . . . . ........

STARTING AND DRIVING
THREE-WAY CATALYTIC CONVERTER
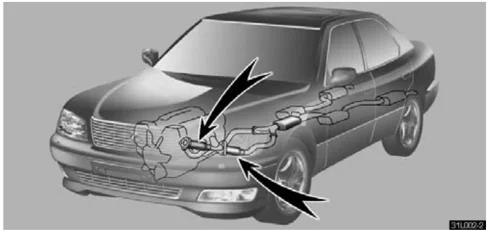
Three-way catalytic converters are emission control devices installed in the exhaust system.
It looks somewhat like a muffler, but its purpose is to reduce pollutants in the exhaust gas.
CAUTION
- Keep people and combustible materials away from the exhaust pipe while the engine is running. The exhaust gas is very hot.
- Do not drive, idle or park your vehicle over anything that might burn easily such as grass, leaves, paper or rags.
NOTICE
A large amount of unburned gases flowing into the three-way catalytic converter may cause it to overheat and create a fire hazard. To prevent this and other damage, observe the following precautions:
- Use only unleaded gasoline.
- Do not drive with an extremely low fuel level; running out of fuel could cause the engine to misfire, creating an excessive load on the three-way catalytic converter.
- Do not allow the engine to run at idle speed for more than 20 minutes.
- Avoid racing the engine.
- Do not push-start or pull-start your vehicle.
- Do not turn off the ignition while the vehicle is moving.
- Keep your engine in good running order. Malfunctions in the engine electrical system, electronic ignition system/distributor ignition system or fuel system could cause an extremely high three-way catalytic converter temperature.
- If the engine becomes difficult to start or stalls frequently, take your vehicle in for a check-up as soon as possible. Remember, your Lexus dealer knows your vehicle and its three-way catalytic converter system best.
155

STARTING AND DRIVING
- To ensure that the three-way catalytic converter and the entire emission control system operate properly, your vehicle must receive the periodic inspections required by the Lexus Maintenance Schedule. For scheduled maintenance information, refer to the separate "Owner's Manual Supplement/ Maintenance Schedule".
ENGINE EXHAUST CAUTION
! CAUTION
- Avoid inhaling the engine exhaust. It contains carbon monoxide, which is a colorless and odorless gas. It can cause unconsciousness or even death.
- Make sure the exhaust system has no holes or loose connections. The system should be checked from time to time. If you hit something, or notice a change in the sound of the exhaust, have the system checked immediately.
- Do not run the engine in a garage or enclosed area except for the time needed to drive the vehicle in or out. The exhaust gases cannot escape, making this a particularly dangerous situation.
- Do not remain for a long time in a parked vehicle with the engine running. If it is unavoidable, however, do so only in an unconfined area and adjust the heating or cooling system to force outside air into the vehicle.
- Keep the trunk lid closed while driving. An open or unsealed trunk lid may cause exhaust gases to be drawn into the vehicle. If you must drive with the trunk lid open to accommodate a large object, close the windows, open all the dashboard vents and have the heating or cooling system deliver fresh air into the vehicle by turning the fan to high speed with the air intake control button in the OUTSIDE AIR mode.
- To allow proper operation of your vehicle's ventilation system, keep the inlet grilles in front of the windshield clear of snow, leaves, or other obstructions.
- If you smell exhaust fumes in the vehicle, drive with the windows open and the trunk lid closed. Have the cause immediately located and corrected.
156 3

STARTING AND DRIVING
BEFORE STARTING THE ENGINE
- Check the area around the vehicle before entering it.
- Adjust seat position, seatback angle, head restraint height and steering wheel angle.
- Adjust inside and outside rear view mirrors.
- Lock all doors.
- Fasten seat belts.
Remember to check that the service reminder indicators function when turning the key to "ON", and check the fuel gauge to see that you have sufficient fuel.
IGNITION SWITCH WITH STEERING LOCK
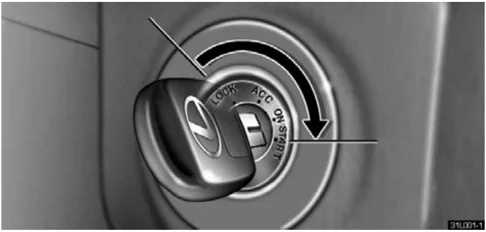
"START" – Starter motor on. The key will return to the "ON" position when released.
For starting tips, see page 159.
"ON" – Engine on and all accessories on.
This is the normal driving position.
NOTICE Do not leave the key in the "ON" position if the engine is not running. The battery will discharge and the electronic ignition system/distributor ignition system could be damaged.
"ACC" – Accessories such as the radio operate, but the engine is off.
If you leave the key in the "ACC" or "LOCK" position and open the
3 157
STARTING AND DRIVING
driver’s door, a buzzer will remind you to remove the key.* NOTE: *The volume or interval of beep sound can be changed. Ask your Lexus dealer for details.
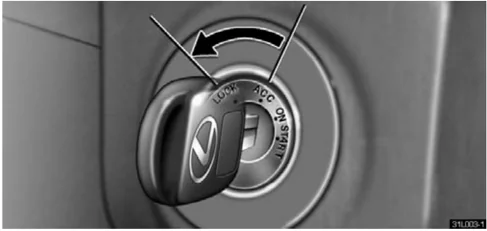
"LOCK" – Engine is off and the steering wheel is locked. The ignition key can be removed only at this position. To turn the key from "ACC" to the "LOCK" position, you must put the transmission selector lever in the "P" position. Once you remove the key, the engine immobiliser system is automatically set. See "Engine immobiliser system" on page 10. When starting the engine, the key may seem stuck at the "LOCK" position. To free it, first be sure the key is pushed all the way in, and then rock the steering wheel slightly while turning the key gently. If, in an emergency, you must turn the engine off while the vehicle is moving, turn the key only to "ACC".
158
PARKING BRAKE
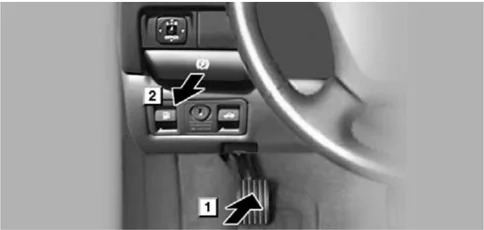
[1] To set: Fully depress the parking brake pedal. [2] To release: Pull the parking brake release lever. Before leaving your vehicle, firmly apply the parking brake.
CAUTION Before driving, make sure the parking brake is fully released and that the parking brake reminder light is off.

HOW TO START THE ENGINE
Before cranking
- Apply the parking brake firmly.
- Turn off unnecessary lights and accessories.
- Put the selector lever in "P". If you need to restart the engine while the vehicle is moving, put the selector lever in "N". A starter safety device will prevent the starter from operating if the selector lever is in any drive position.
- Depress the brake pedal and hold it to the floor until you are ready to drive off.
Starting the engine
Before starting the engine, be sure to follow the instructions in "Before cranking".
Normal starting procedure
The multiport fuel injection system/sequential multiport fuel injection system in your engine automatically controls the proper air-fuel mixture for starting. You can start a cold or hot engine as follows:
- With your foot off the accelerator pedal, crank the engine by turning the key to "START". Release it when the engine starts.
- After the engine runs for about 10 seconds, you are ready to drive.
If the weather is below freezing, let the engine warm up for a few minutes before driving. Do not leave the vehicle while the engine is warming up.
If the engine stalls ...
Simply restart it, using the correct procedure given in normal starting.
If the engine will not start
See "If your vehicle will not start" on page 193.
NOTICE
- Do not crank for more than 30 seconds at a time. This may overheat the starter and wiring systems.
- Do not race a cold engine.
- If the engine becomes difficult to start or stalls frequently, have the engine checked immediately.
STARTING AND DRIVING
AUTOMATIC TRANSMISSION
Your automatic transmission has a shift lock system to minimize the possibility of incorrect operation. This means you can only shift out of "P" position when the brake pedal is depressed with the ignition switch in "ON" position.(★)
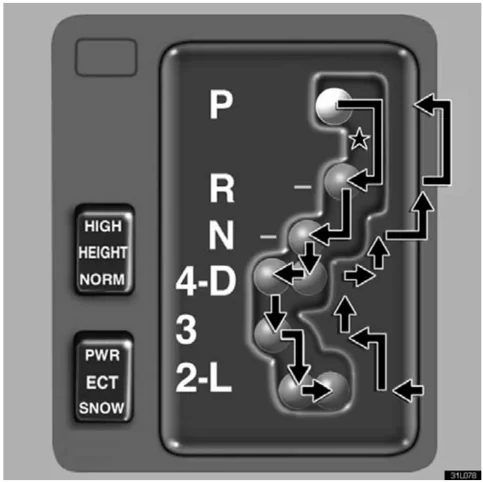
The shift position is displayed on the instrument cluster.
P: Parking, engine starting and key removal position R: Reverse position N: Neutral position D: Normal driving position (Shifting into overdrive possible) 4: Position for engine braking (Shifting into overdrive not possible)
When the cruise control is being used, even if you downshift from "D" to "4", engine braking will not be applied because the cruise control is not cancelled. For the operation to decrease the vehicle speed, see page 170.
3, 2: Position for more powerful engine braking L: Position for maximum engine braking
STARTING AND DRIVING
Correct use of the automatic transmission is explained in the following parts. (a) Normal driving (b) Using engine braking (c) Using the "3", "2" and "L" positions (d) Backing up (e) Parking (f) Good driving practice (g) Rocking your vehicle if stuck (h) If you cannot shift the selector lever (i) If the "ECT PWR" indicator light flashes
(a) Normal driving
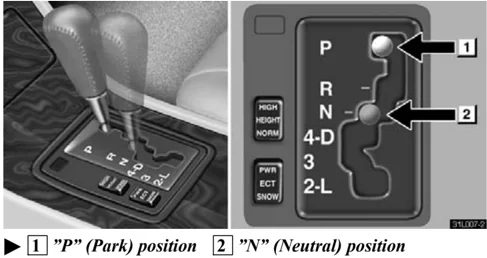
▶ 1 "P" (Park) position 2 "N" (Neutral) position
- Start the engine as instructed in "How to start the engine" on page 159. The transmission must be in "P" or "N". The engine will not start in any drive position even if the ignition key is turned to "START".
STARTING AND DRIVING
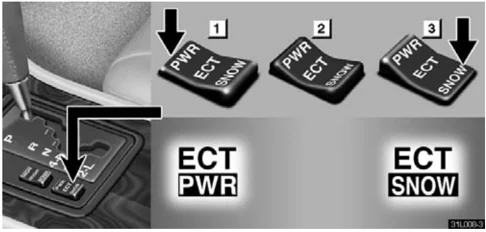
► 1 Power mode 2 Normal mode 3 Snow mode
- Set the driving pattern selector switch to the "Normal" position.
Your transmission has a driving pattern selector switch which allows you to select "Power", "Normal" or "Snow" mode to suit your driving condition. For ordinary driving, Lexus recommends that you use the "Normal" position to improve fuel economy.
- For more powerful acceleration and sporty driving, use the "Power" position.
In the POWER position, the "ECT PWR" light in the instrument cluster is on and the transmission is shifted up at higher vehicle speeds and shifted down more responsively than in the NORMAL position.
For "Snow" mode, see "Electronic Throttle Control System" on page 167.
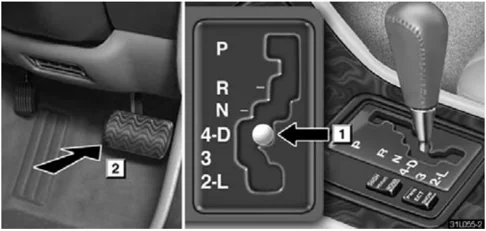
► 1 "D" (Drive) position 2 Brake pedal
- With your foot holding down the brake pedal, shift the selector lever to "D".
Always use the "D" position to improve fuel economy and quiet driving. Only in this position, shifting into the overdrive gear is possible. However, while the engine coolant temperature is low, the transmission will not shift into the overdrive gear even in the "D" position. (See "(b) Using engine braking" and "(f) Good driving practice" for exceptions.)
CAUTION Never put your foot on the accelerator pedal while shifting.
162 3

STARTING AND DRIVING
- Release the parking brake and brake pedal. Depress the accelerator pedal slowly for smooth starting.
In normal cruising, the vehicle will start in the first gear and automatically shift up to the most suitable gear. On inclines, declines or winding roads, etc., the vehicle shifts up and down automatically according to the running conditions to obtain the suitable driving power and engine braking.
In "4" position, the automatic transmission system will select the most suitable gear for the running conditions such as hill climbing, hard towing, etc.
If you need to accelerate rapidly while driving, depress the accelerator pedal to the full throttle position. This provides more acceleration by automatically downshifting the transmission to the next lower gear or beyond, depending on the vehicle speed.
If engine braking is needed, such as in descending a long hill, see "(b) Using engine braking".
(b) Using engine braking
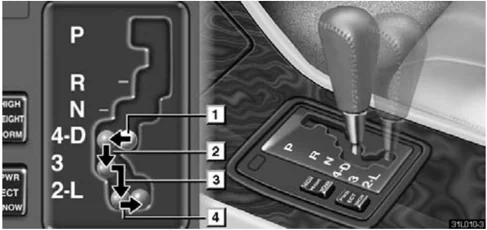
To use the braking power of the engine, downshift the transmission in the way described below:
[1] Shift into the "4" position. The transmission will downshift to the fourth gear and engine braking will be obtained.
When the cruise control is being used, even if you downshift from "D" to "4", engine braking will not be applied because the cruise control is not cancelled. If you need to decrease the vehicle speed, see page 170.
[2] Shift into the "3" position. The transmission will downshift to the third gear when the vehicle speed is or becomes lower than 154 km/h (96 mph) and more powerful engine braking will be obtained.
163
STARTING AND DRIVING
[3] Shift into the "2" position. The transmission will downshift to the second gear when the vehicle speed is or becomes lower than 104 km/h (65 mph) and more powerful engine braking than that of "3" position will be obtained.
[4] Shift into the "L" position. The transmission will downshift to the first gear when the vehicle speed is or becomes lower than 18 km/h (11 mph) and maximum engine braking will be applied.
CAUTION Be careful when downshifting on a slippery surface. The abrupt change in engine speed could cause the vehicle to spin or skid.
(c) Using the "3", "2" and "L" positions
The "3", "2" and "L" positions are used for strong engine braking as described previously.
With the selector lever in "3", "2" or "L", you can start the vehicle in motion as with the lever in "D".
With the selector lever in "3" or "2", the vehicle will start in the first gear and automatically shift to the third or second gear.
With the selector lever in "L", the transmission is engaged in the first gear.
NOTICE
- Be careful not to overrev the engine. Watch the tachometer to keep engine rpm from going into the red zone. The approximate maximum allowable speed for each position is given below for your reference: "3" . . . 160 km/h (99 mph) "2" . . . 104 km/h (65 mph) "L" . . . 68 km/h (42 mph)
- Do not continue hill climbing or hard towing for a long time in the "3", "2" or "L" position. This may cause severe automatic transmission damage from overheating. To prevent such damage, "4" position should be used in hill climbing or hard towing.
164 3

STARTING AND DRIVING
(d) Backing up
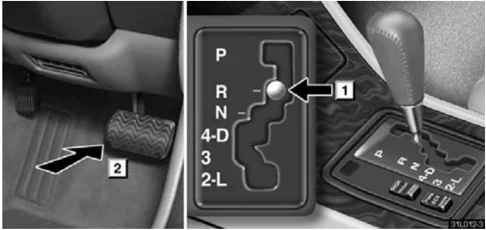
► 1 "R" (Reverse) position 2 Brake pedal
- Bring the vehicle to a complete stop.
- With the brake pedal held down with your foot, shift the selector lever to the "R" position.
NOTICE Never shift into reverse while the vehicle is moving.
When you are backing up, you can adjust the outside rear view mirror on the passenger's side down quickly. For details, see page 78.
(e) Parking
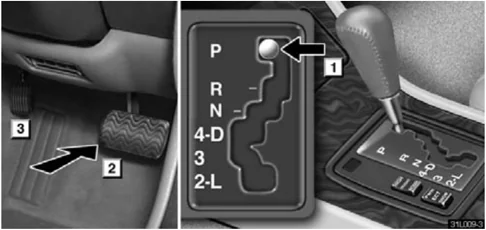
► 1 "P" (Park) position 2 Brake pedal 3 Parking brake pedal
- Bring the vehicle to a complete stop.
- Depress the parking brake pedal fully.
- With the brake pedal held down with your foot, shift the selector lever to the "P" position.
CAUTION While the vehicle is moving, never attempt to move the selector lever into "P" under any circumstances. Serious mechanical damage and loss of vehicle control may result.
165

STARTING AND DRIVING
(f) Good driving practice
- If the transmission repeatedly upshifts and downshifts between the fourth and overdrive gears when climbing a gentle slope, shift the selector lever to the "4" position. Be sure to shift the selector lever to the "D" position after climbing the slope.
- When towing a trailer, in order to maintain efficient engine braking and electrical charging performance, do not use overdrive. The selector lever must be in the "4" position.
CAUTION Always keep your foot on the brake pedal while stopped with the engine running. This prevents the vehicle from creeping.
NOTICE Do not hold the vehicle on an upgrade with the accelerator pedal. This can cause the transmission to overheat. Always use the brake pedal or parking brake.
(g) Rocking your vehicle if stuck
CAUTION If your vehicle becomes stuck in snow, mud, sand, etc., then you may attempt to rock the vehicle free by moving it forward and backward. Do not attempt this procedure if people or objects are anywhere near the vehicle. During the rocking operation the vehicle may suddenly move forward or back as it becomes un-stuck, causing injury or damage to nearby people or objects.
NOTICE If you rock your vehicle, observe the following precautions to prevent damage to the transmission and other parts.
- Do not depress the accelerator pedal while shifting the selector lever or before the transmission is completely shifted to forward or reverse gear.
- Do not race the engine and avoid spinning the wheels.
- If your vehicle remains stuck after rocking the vehicle several times, consider other ways such as towing.
166 3


STARTING AND DRIVING
(h) If you cannot shift the selector lever If you cannot shift the selector lever even though the brake pedal is depressed, use the shift lock override button. For instructions, see "If you cannot shift automatic transmission selector lever" on page 209.
(i) If the "ECT PWR" indicator light flashes If the "ECT PWR" indicator light flashes, contact your Lexus dealer as soon as possible. There may be trouble in the transmission system.
ELECTRONIC THROTTLE CONTROL SYSTEM
The electronic throttle control system always maintains appropriate engine output in relation to the accelerator opening in all driving conditions.
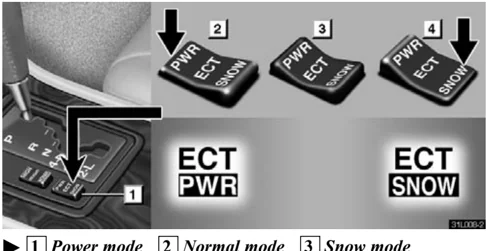
► 1 Power mode 2 Normal mode 3 Snow mode
The electronic throttle control system has 3 modes: Normal, Power and Snow modes.
Normal mode: For ordinary driving, Lexus recommends that you use the normal mode to improve fuel economy.
Power mode: For more powerful acceleration and sporty driving.
167
STARTING AND DRIVING
In the power mode, the "ECT PWR" light in the instrument cluster is on and the transmission is shifted up at higher vehicle speeds and shifted down more responsively than is the normal mode.
To return to the normal mode, push the driving pattern selector switch lightly on the "SNOW" side.
Snow mode: For slippery road surfaces such as as in snow. In this mode, the spinning of the rear wheels is controlled appropriately.
When you push the driving pattern selector switch on the "SNOW" side, the snow mode is turned on and the "ECT SNOW" light in the instrument cluster comes on.
To return to the normal mode, push the driving pattern selector switch on the "SNOW" side again.
When you turn the ignition switch off in the snow mode, the mode automatically changes to the normal mode.
CRUISE CONTROL
The cruise control allows you to cruise the vehicle at a desired speed over 40 km/h (25 mph) with your foot off the accelerator pedal.
Your cruising speed can be maintained although a slight speed change may occur when driving up or down a gradient, within the limits of engine performance. On steeper hills, a great speed change will occur so it is better to drive without the cruise control.
When the cruise control is on, the driving pattern of the automatic transmission is fixed in the normal position, regardless of the position of the selector switch.
CAUTION
- To help maintain maximum control of your vehicle, do not use the cruise control when driving in heavy or varying traffic, or on slippery (rainy, icy or snow-covered) or winding roads.
- Avoid vehicle speed increases when driving downhill. If the vehicle speed is too fast in relation to the cruise control set speed, cancel the cruise control then downshift the transmission to use engine braking to slow down.
168 3

STARTING AND DRIVING
Turning on the system
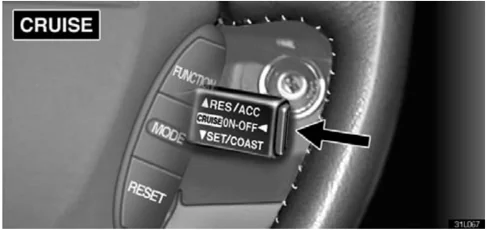
To operate the cruise control, push the main switch. This turns the system on. The indicator light in the instrument cluster shows that you can now set your desired cruising speed. Another push on the switch will turn the system completely off.
When the ignition key is turned off, the main switch is also automatically turned off. To use the cruise control again, push the main switch again to turn it on.
CAUTION To avoid accidental cruise control engagement, keep the main switch off when not using the cruise control.
Setting at a desired speed
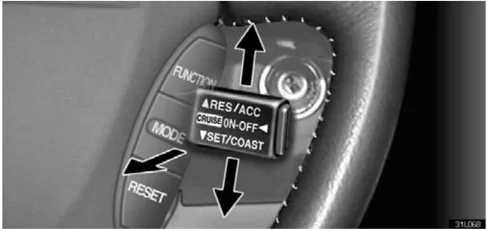
The transmission must be in "D" or "4" before you set the cruise control speed.
Bring the vehicle to the desired speed, press the control lever downward in the "SET/COAST" direction and release it. This sets the vehicle at that speed. Now you may take your foot off the accelerator pedal. If you need acceleration – for example, when passing – depress the accelerator pedal enough for the vehicle to exceed the set speed. When you release the accelerator pedal, the vehicle will return to the speed set prior to the acceleration.
Cancelling the preset speed
You can cancel the preset speed by either of the following: a. Pulling the control lever in the "CANCEL" direction. b. Depressing the brake pedal.
169

STARTING AND DRIVING
If the vehicle speed falls below about 40 km/h (25 mph), the preset speed will be automatically cancelled.
If the vehicle speed drops 16 km/h (10 mph) below the preset speed, the preset speed will also automatically be cancelled.
If the preset speed automatically cancels out for other than these reasons, have your vehicle checked by your Lexus dealer at the earliest opportunity.
Resetting to a faster speed
Press the control lever upward in the "RES/ACC" direction and hold it. Release the lever when the desired speed is attained. While the lever is held upward, the vehicle will gradually gain speed.
When the difference between the actual vehicle speed and the set speed is less than 5 km/h (3 mph), the set speed can be increased 1.6 km/h (1 mph) each time by pressing the control lever upward in the "RES/ACC" direction quickly within 0.6 seconds.
However, a quicker way to reset is to accelerate the vehicle and then press the control lever downward in the "SET/COAST" direction.
Resetting to a slower speed
Press the control lever downward in the "SET/COAST" direction and hold it. Release the lever when the desired speed is attained. While the lever is held downward, the vehicle speed will gradually decrease.
When the difference between the actual vehicle speed and the set speed is less than 5 km/h (3 mph), the set speed can be lowered 1.6 km/h (1 mph) each time by pressing the control lever downward in the "SET/COAST" direction quickly within 0.6 seconds.
However, a quicker way to reset is to depress the brake pedal and then press the control lever downward in the "SET/COAST" direction.
Even if you downshift the transmission from the "D" position to "4" with the cruise control on, engine braking will not be applied because the cruise control is not cancelled. To decrease the vehicle speed, reset to a slower speed with the cruise control lever or depress the brake pedal. If you use the brake pedal, cruise control is cancelled.
Resuming the preset speed
If the preset speed is cancelled by pulling the control lever or by depressing the brake pedal, pushing the lever up in the "RES/ACC" direction will restore the speed set prior to cancellation. However, once the vehicle speed falls below about 40 km/h (25 mph), the preset speed will not be resumed.
170 3
STARTING AND DRIVING
Cruise control failure warning
If the "CRUISE" indicator light in the instrument cluster flashes when using the cruise control, push the main switch to turn the system off and then push it again to turn it on.
If any of the following conditions then occurs, there is some trouble in the cruise control system.
- The indicator light does not come on.
- The indicator light flashes again.
- The indicator light goes out after it comes on.
If this is the case, contact your Lexus dealer and have your Lexus inspected.
ELECTRONICALLY MODULATED AIR SUSPENSION (U.S.A. ONLY)
This electronically modulated air suspension adjusts the damping effect on the shock absorbers and the vehicle height. This adjustment is automatically made in response to the driving conditions to provide good riding comfort and stability in all driving conditions.
(a) Vehicle height adjustment
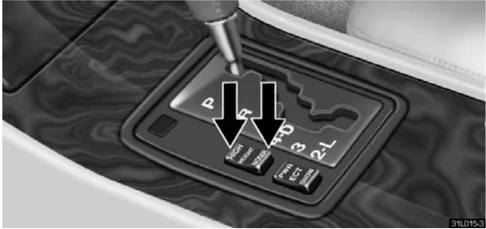
This system maintains a stable vehicle height, regardless of occupants and luggage weight. You can select one of the following modes using a selector switch.
171
STARTING AND DRIVING
"NORMAL" mode – For driving on roads with a normal surface. "HIGH" mode – For driving on rough roads which are unsurfaced or continually bumpy.
The damping effect is set slightly firmer in "HIGH" mode. So you may feel the vibration of the vehicle compared to in "NORMAL" mode. However, this does not mean a malfunction in the system. We recommend you use a "NORMAL" mode in normal driving.
To change the mode, push the selector switch.
"NORMAL" mode The vehicle height remains at normal height at all driving speeds.
"HIGH" mode The vehicle height switches between the following two vehicle heights according to the driving conditions:
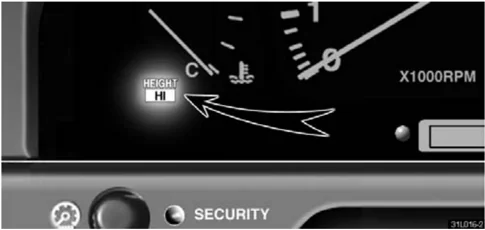
The indicator light shows "HIGH" mode is selected. When you turn the ignition key to the "ON" position, the indicator light will come on for 2 seconds in any mode.
NOTICE For vehicles equipped with the height control switch, be sure to turn the ignition switch off before jacking. If this is not done, the vehicle height adjustment function will operate, which may cause body damage.
(b) Malfunction warning If the "HI" indicator light blinks, there is a malfunction in this system. Have the system checked by your Lexus dealer at the first opportunity.
172 3
STARTING AND DRIVING
TRACTION CONTROL SYSTEM
The traction control system automatically helps control the spinning of the rear wheels which may occur when accelerating on slippery road surfaces, thus assisting driver to control the driving power of the rear wheels.
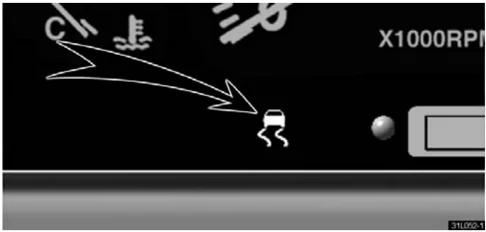
When you turn the ignition switch on, this system always turns on. Leave the system on during ordinary driving so that it can operate when needed. When traction control is applied, the slip indicator light blinks.
When the traction control system is operating, you may feel vibration of your vehicle, caused by operation of the brakes. This indicates the system is functioning properly.
When getting the vehicle out of mud or new snow, etc. the traction control system will help operate to prevent the wheels from spinning.
To turn off the traction control system, see page 174.
CAUTION
Under certain slippery road conditions, full traction of the vehicle and power to the rear wheels cannot be maintained, even though the traction control system is in operation. Do not drive the vehicle under any speed or maneuvering conditions which will cause the vehicle to lose traction. In situations where the road surface is covered with ice or snow, your vehicle should be fitted with snow tires or tire chains. Always drive at an appropriate and cautious pace.
173

STARTING AND DRIVING
VEHICLE SKID CONTROL SYSTEM
The vehicle skid control system helps to provide comprehensive control of the systems such as an anti-lock brake system, traction control, engine control, electronically modulated air suspension, etc. This system automatically controls the output of the brakes or engine to help prevent the vehicle from skidding when cornering on a slippery road surface or abrupt steering wheel operation occurs.
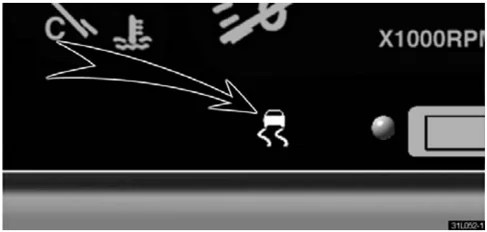
►Slip indicator light
If the vehicle is going to skid during driving, the slip indicator light flashes and an alarm sounds.
The vehicle skid control activates when the vehicle speed is about more than 15 km/h (9 mph).
Depressing the brake pedal repeatedly causes a small noise from the engine compartment. This is a pump pulsating sound of the brake system and it is not a malfunction.
You may hear a slight clicking noise in the engine compartment for a few seconds when the engine is started or just after the vehicle is started. This means that the vehicle skid control is in the self-check mode and does not indicate a malfunction.
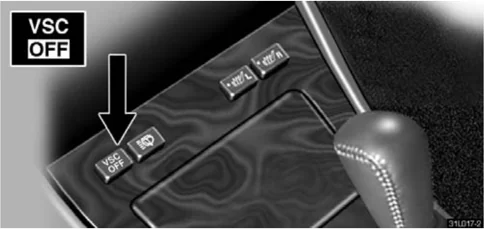
You can turn off the vehicle skid control system by pushing the "VSC OFF" switch. The "VSC OFF" indicator comes on. At this time, the traction control system also turns off. You cannot turn off either one of them. Pushing the "VSC OFF" switch a second time turns the system back on and extinguishes the "VSC OFF" indicator light.
When you turn the ignition switch on, this system always turns on.
174 3
Vehicle skid control failure warning
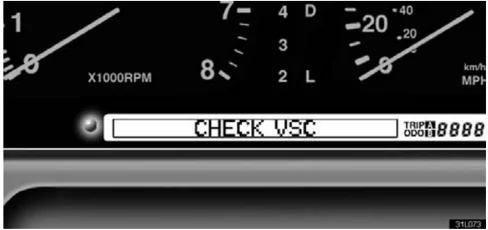
In the following cases, the warning message appears and the reminder light next to the warning message and the "VSC OFF" indicator light come on. And the warning tone also sounds.
(a) After the removal of the battery terminals (See "Initial adjustment of vehicle skid control system" described below.) (b) If the vehicle skid control system malfunctions
If the message appears for the cause of (b), have your vehicle checked by Lexus dealer as soon as possible.
Although the message appears, there is no problem to continue your normal driving.
Initial adjustment of vehicle skid control system
After the battery terminals are disconnected, an initial adjustment should be made. At this time, the reminder light comes on and the warning message appears in the multi information display.
Make an initial adjustment in the following ways:
- Apply the parking brake and put the transmission in "P".
- Connect the battery terminals.
- Turn the ignition switch on. At this time, the "VSC OFF" indicator light comes on and then about 6 seconds later, the reminder light comes on and the "CHECK VSC" warning message appears in the multi information display.
- The warning message and the "VSC OFF" indicator light go out about 15 seconds after the ignition switch is turned on. If the vehicle is shaken after the ignition switch is turned to "ON", it may take longer to go out the warning message.
If the warning message does not go out about 1 minute after you turn the ignition switch on, turn it off and then on again.
If the vehicle is on the moving object like a ship or turntable, an accurate adjustment cannot be made. Move the vehicle on the ground (or the part not causing vibrations to the vehicle) and make an adjustment from step 1.
STARTING AND DRIVING
CAUTION
- Do not rely excessively on the vehicle skid control system. Even if the vehicle skid control system is operating, it is not that your vehicle is absolutely safe. Reckless driving will result in an unexpected accident. Always keep safety driving in mind. If the slip indicator light flashes, sounding an alarm, special care should be taken while driving.
- Only use tires of specified size. The size, manufacturer, brand and tread pattern for all 4 tires should be the same. If you use the tires other than specified, or different type or size, the vehicle skid control system may not function correctly. When replacing the tires or wheels, contact your Lexus dealer.
BRAKE SYSTEM
The tandem master cylinder brake system is a hydraulic system with two separate sub-systems. If either sub-system should fail, the other will still work. However, the pedal will be harder to press, and your stopping distance will be longer. Also, the brake system warning light may come on.
CAUTION Do not drive your vehicle with only a single brake system. Have your brakes fixed immediately.
Brake booster
The brake booster uses engine vacuum to power-assist the brakes. If the engine should quit while you are driving, you can bring the vehicle to a stop with normal pedal pressure. There is enough reserve vacuum for one or two stops but no more!
CAUTION
- Do not pump the brake pedal if the engine stalls. Each push on the pedal uses up your vacuum reserve.
- Even if the power assist is completely lost, the brakes will still work. But you will have to push the pedal hard – much harder than normal. And your braking distance will be longer.
176 3



STARTING AND DRIVING
Anti-lock brake system
The anti-lock brake system is designed to automatically help prevent lock-up of the wheels during a sudden brake or braking on slippery road surfaces. This assists in providing directional stability and steering performance of the vehicle under these circumstances.
The anti-lock brake system becomes operative after the vehicle has accelerated to a speed in excess of approximately 10 km/h (6 mph). It stops operating when the vehicle decelerates to a speed below approximately 5 km/h (3 mph).
You may hear a sound in the engine compartment for a few seconds when the engine is started or just after the vehicle is started. This means that the anti-lock brake system is in the self-check mode, and does not indicate a malfunction.
Effective way to press the ABS brake pedal: When the anti-lock brake system function is in action, you may feel the brake pedal pulsating and hear a noise. In this situation, to let the anti-lock brake system work for you, just hold the brake pedal down more firmly. Do not pump the brake. This will result in reduced braking performance.
The brake pedal pulsation caused by the anti-lock brake system may indicate hazardous road surface conditions. Although the anti-lock brake system assists in providing vehicle control, it is still important to drive with all due care, because the anti-lock brake system cannot overcome the laws of physics that act on your vehicle:
- Braking capability is dependent on tire friction with the road surface.
- Even though the anti-lock brake system is operating, a driver cannot maintain full control on certain slippery road surfaces, when cornering at high speeds, or in violent maneuvers.
- Avoid high speeds on wet roads. The anti-lock brake system cannot eliminate the risk of hydroplaning and loss of tire friction.
Always maintain a safe distance from the vehicle in front of you. Compared with vehicles not fitted with an anti-lock brake system, your vehicle may require a longer stopping distance in the following cases:
- Driving on rough, gravel or snow-covered roads.
- Driving with tire chains installed.
- Driving on roads where the road surface is pitted or has other differences in surface height.
177
STARTING AND DRIVING
"ABS" warning light
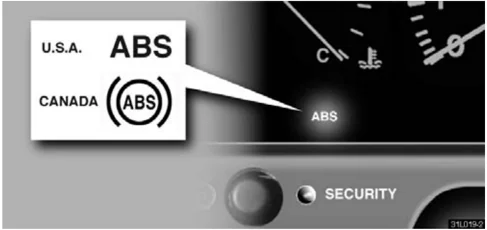
This light comes on when the ignition key is turned to the "ON" position. After about a few seconds, the light will go off.
If either of the following conditions occurs, this indicates a malfunction somewhere in the parts monitored by the warning light system. Contact your Lexus dealer as soon as possible to service the vehicle.
- The light does not come on as described above, or remains on.
- The light comes on while driving.
Even if the anti-lock brake system should fail, the brake system will still operate conventionally. But when the "ABS" warning light is on (and the brake system warning light is off), anti-lock brake system is not assisting brake performance so that the wheels could lock up during a sudden brake or braking on slippery road surfaces. Have your vehicle checked by your Lexus dealer as soon as possible.
Drum-in-disctype parking brake system
Your vehicle has a drum-in-disc type parking brake system. This type of brake system needs bedding-down of the brake shoes periodically or whenever the parking brake shoes and/or drums are replaced.
Have your Lexus dealer perform the bedding-down.
Brake pad wear limit warning message
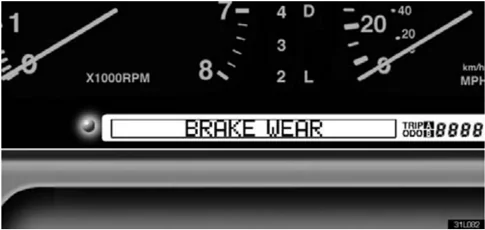
When your brake pads are worn enough to require replacement, the brake pad wear warning message in the multi information display appears.
If the warning message in the multi information display appears while driving, have the brake pads checked and replaced by your nearest Lexus dealer immediately.
Continuous driving without replacing the brake pads will cause expensive rotor damage and increasing brake pedal effort to get the same stopping distance.
178 3
STARTING AND DRIVING
TYPES OF TIRES
Determine what kind of tires your vehicle is originally equipped with.
1. Summer tires
Summer tires are high-speed capability tires best suited to highway driving under dry conditions.
Since summer tires do not have the same traction performance as snow tires, summer tires are inadequate for driving on snow-covered or icy roads. For driving on snow-covered or icy roads, we recommend using snow tires. If installing snow tires, be sure to replace all four tires.
2. All season tires
All season tires are designed to provide better traction in snow and to be adequate for driving in most winter conditions, as well as for use all year round.
All season tires, however, do not have adequate traction performance compared with snow tires in heavy or loose snow. Also, all season tires fall short in acceleration and handling performance compared with summer tires in highway driving.
CAUTION
- Do not mix summer and all season tires on your vehicle as this can cause dangerous handling characteristics, resulting in loss of control.
- Do not use tires other than the manufacturer's designated tires, and never mix tires or wheels of the sizes different from the originals.
179

SECTION 3 – 2
STARTING AND DRIVING
Driving tips
-
Break-in period . . . . . . . . . . . . . . . . . . . . . . . . . . . . . . . . . . . . . . . . . . . . . . . . . . . . . . . . . . . . . . . . . . . . . . . . . . . . . . . . . . . . . . . . . . . . . . . . . . . . . . . . . . . . . . . . . . . . . . . . . . . . . . . . . . . . . . . . . . . . . . . . . . . . . . . . . . . . . . . . . . . . . . . . . . . . . . . . . . . . . . . . . . . . . . . . . . . . . . . . . . . . . . . . . . . . . . . . . . . . . ........ 181
-
Operation in foreign countries . . . . . . . . . . . . . . . . . . . . . . . . . . . . . . . . . . . . . . . . . . . . . . . . . . . . . . . . . . . . . . . . . . . . . . . . . . . . . . . . . . . . . . . . . . . . . . . . . . . . . . . . . . . ........ 181
-
Tips for driving in various conditions . . . . . . . . . . . . . . . . . . . . . . . . . . . . . . . . . . . . . . . . . . . . . . . . . . . . . . . . . . . . . . . . . . . . . . . . . . . . . . . . . . . . . . . . . . . . . . . . . . . . . . . . . ........

DRIVING TIPS
BREAK-IN PERIOD
Drive gently and avoid high speeds.
You need not follow a break-in schedule with your new Lexus. But following a few simple tips for the first 1600 km (1000 miles) can add to the future economy and long life of your vehicle:
- Do not drive over 88 km/h (55 mph).
- Avoid overrevving. Maintain engine speed between 2000 and 4000 rpm.
- Avoid full-throttle starts.
- Try to avoid hard stops during the first 300 km (200 miles).
- Do not drive for a long time at any single speed, either fast or slow.
- Do not tow a trailer during the first 800 km (500 miles).
OPERATION IN FOREIGN COUNTRIES
If you plan to drive your Lexus in another country ...
First, comply with the vehicle registration laws.
Second, confirm the availability of the correct fuel (unleaded and minimum octane rating).
TIPS FOR DRIVING IN VARIOUS CONDITIONS
- Always slow down in gusty crosswinds. This will allow you much better control.
- Drive slowly onto curbs and, if possible, at a right angle. Avoid driving onto high, sharp-edged objects and other road hazards. Failure to do so can lead to severe tire damage resulting in tire bursts.
- When parking on a hill, turn the front wheels until they touch the curb so that the vehicle will not roll. Apply the parking brake, and place the transmission in "P". If necessary, block the wheels.
- Washing your vehicle or driving through deep water may get the brakes wet. To see whether they are wet, check that there is no traffic near you and then press the pedal lightly. If you do not feel a normal braking force, the brakes are probably wet. To dry them, drive the vehicle cautiously while lightly pressing the brake pedal with the parking brake applied. If they still do not work safely, pull to the side of the road and call a Lexus dealer for assistance.
Before driving off, make sure the parking brake is fully released and that the parking brake reminder light is off.
181

DRIVING TIPS
- Do not rest your foot on the brake pedal while driving. It can cause dangerous overheating, needless wear, and poor fuel economy.
- To drive down a long or steep hill, reduce your speed and downshift. Remember, if you ride the brakes excessively, they may overheat and not work properly. See page 163.
- Be careful when accelerating, upshifting, downshifting or braking on a slippery surface. The abrupt change in engine speed, such as sudden acceleration or engine braking, could cause the vehicle to spin or skid.
- Do not drive in excess of the speed limit. Even if the legal speed limit permits it, do not drive over 140 km/h (85 mph) unless your vehicle has high-speed capability tires. Driving over 140 km/h (85 mph) may result in tire failure, loss of control and possible injury. Be sure to consult a tire dealer to determine whether the tires on your vehicle are high-speed capability tires or not before driving at such speeds.
- Do not continue normal driving when the brakes are wet. If they are wet, your vehicle will require a longer stopping distance, and it may pull to one side when the brakes are applied. Also, the parking brake will not hold the vehicle securely.
WINTER DRIVING TIPS
Make sure you have ethylene-glycol antifreeze in the radiator.
NOTICE Do not use alcohol type antifreeze.
Check the condition of the battery and cables.
Cold temperatures reduce the capacity of any battery, so it must be in top shape to provide enough power for winter starting. Page 253 tells you how to visually inspect the battery. Your Lexus dealer and most service stations will be pleased to check the battery charge level.
Make sure the engine oil viscosity is suitable for the cold weather.
See page 232 for recommended viscosity. Leaving a heavy summer oil in your vehicle during winter months may cause harder starting. If you are not sure about which oil to use, call your Lexus dealer – they will be pleased to help.
Check the electronic ignition system for loose connections or obvious damage.
Keep the door locks from freezing.
Squirt lock de-icer or glycerine into the locks to keep them from freezing.
182
DRIVING TIPS
Use a washer fluid containing an antifreeze solution.
This product is available at your Lexus dealer and most auto parts stores. Follow the manufacturer’s directions for how much to mix with water.
NOTICE Do not use engine antifreeze or any other substitute because it may damage your vehicle’s paint.
Do not use your parking brake when there is a possibility it could freeze.
When parking, put the transmission into "P" and block the front wheels. Do not use the parking brake, or snow or water accumulated in and around the parking brake mechanism may freeze the parking brake, making it hard to release.
Keep ice and snow from accumulating under the fenders.
Ice and snow built up under your fenders can make steering difficult. During bad winter driving, stop and check under the fenders occasionally.
Depending on where you are driving, we recommend you carry some emergency equipment.
Some of the things you might put in the vehicle are tire chains, window scraper, bag of sand or salt, flares, small shovel, jumper cables, etc.
TRAILER TOWING
Your vehicle is designed primarily as a passenger-carrying vehicle. Towing a trailer will have an adverse effect on handling, performance, braking, durability and driving economy (fuel consumption, etc.). Your safety and satisfaction depend on the proper use of correct equipment and cautious driving habits. For your safety and the safety of others, you must not overload your vehicle or trailer. Lexus warranties do not apply to damage or malfunction caused by towing a trailer for commercial purposes. Ask your local Lexus dealer for further details before towing.
NOTICE When towing a trailer, be sure to consult your Lexus dealer for further information on additional requirements.
Weight limits
Before towing, make sure the total trailer weight, gross vehicle weight, gross axle weight and trailer tongue load are all within the limits.
The total trailer weight and tongue load can be measured with platform scales found at a highway weighing station, building supply company, trucking company, junk yard, etc.
183
DRIVING TIPS
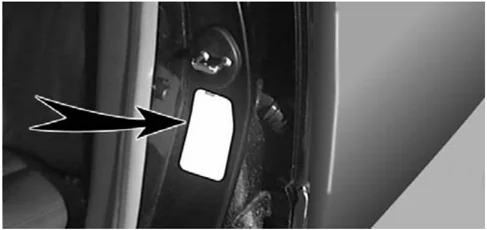
►Certification label
CAUTION
- The total trailer weight (trailer weight plus its cargo load) must not exceed 907 kg (2000 lb.). Exceeding this weight is dangerous.
- The gross vehicle weight must not exceed the Gross Vehicle Weight Rating (GVWR) indicated on the Certification Label. The gross vehicle weight is the sum weight of the unloaded vehicle, driver, passengers, luggage, hitch and trailer tongue load. It also includes the weight of any special equipment installed on your vehicle.
- The load on either the front or rear axle resulting from distribution of the gross vehicle weight on both axles must not exceed the Gross Axle Weight Rating (GAWR) listed on the Certification Label.
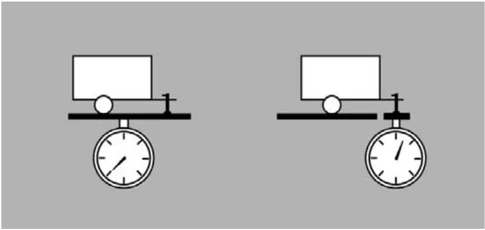
►Total trailer weight ►Tongue load
- The trailer cargo load should be distributed so that the tongue load is 9 to 11 % of the total trailer weight, not exceeding the maximum of 90 kg (200 lb.).
$ \fracTongue loadTotal trailer weight × 100 = 9 to 11% $
- Never load the trailer with more weight in the back than in the front. About 60 % of the trailer load should be in the front half of the trailer and the remaining 40 % in the rear.
184 3

DRIVING TIPS
Hitches
- If you wish to install a trailer hitch, your Lexus dealer should be consulted.
- Use only a hitch which is recommended by the hitch manufacturer and conforms to the total trailer weight requirement.
- Follow the directions supplied by the hitch manufacturer. Lubricate the hitch ball with a light coat of grease.
- Lexus recommends removing the trailer hitch whenever you are not towing a trailer to reduce the possibility of additional damage caused by the hitch if your vehicle is struck from behind. After removing the hitch, seal any mounting holes in the vehicle body to prevent entry of pollutants such as exhaust fumes, dirt, water, etc.
NOTICE
- Install the trailer hitch using only the position recommended by your Lexus dealer. Do not install the trailer hitch on the bumper; this may cause body damage.
- Do not use axle-mounted hitches as they can cause damage to the axle housing, wheel bearings, wheels or tires.
Brakes and safety chains
- Lexus recommends trailers with brakes that conform to any applicable federal and state/provincial regulations.
- A safety chain must always be used between the towing vehicle and the trailer. Leave sufficient slack in the chain for turns. The chain should cross under the trailer tongue to prevent the tongue from dropping to the ground in case it becomes damaged or separated. For correct safety chain procedures, follow the hitch or trailer manufacturer's recommendations.
CAUTION
- If the total trailer weight exceeds 450 kg (1000 lb.), trailer brakes are required.
- Never tap into your vehicle's hydraulic system as it will lower its braking effectiveness.
- Never tow a trailer without using a safety chain securely attached to both the trailer and the vehicle. If damage occurs to the coupling unit or hitch ball, there is possible danger of the trailer wandering over into another lane.
185

DRIVING TIPS
Tires
-
Ensure that your vehicle’s tires are properly inflated. Adjust the tire pressure to the recommended cold tire pressure indicated below:
Tire pressure, kPa (kgf/cm² or bar, psi) Front 220 (2.2, 32) Rear 220 (2.2, 32)
-
The trailer tires should be inflated to the pressure recommended by the trailer manufacturer in respect to the total trailer weight.
Trailer lights
- Trailer lights must comply with federal, state/provincial and local regulations. See your local recreational vehicle dealer or rental agency for the correct type of wiring and relays for your trailer. Check for correct operation of the turn signals and stop lights each time you hitch up. Direct splicing may damage your vehicle’s electrical system and cause a malfunction of your lights.
Break-in schedule
- Lexus recommends that you do not tow a trailer with a new vehicle or a vehicle with any new power train component (engine, transmission, differential, wheel bearing, etc.) for the first 800 km (500 miles) of driving.
Maintenance
- If you tow a trailer, your vehicle will require more frequent maintenance due to the additional load. For this information, please refer to the scheduled maintenance information in the "Owner's Manual Supplement/ Maintenance Schedule".
- Retighten all fixing bolts of the towing ball and bracket after approximately 1000 km (600 miles) of trailer driving.
Pre-towing safety check
- Check that your vehicle remains level when a loaded or unloaded trailer is hitched. Do not drive if the vehicle has an abnormal nose-up or nose-down condition, and check for improper tongue load, overload, worn suspension or other possible causes.
- Make sure the trailer cargo is securely loaded so that it cannot shift.
- Check that your rear view mirrors conform to any federal, state/provincial or local regulation. If they do not, install required rear view mirrors appropriate for towing purposes.
186 3
DRIVING TIPS
Trailer towing tips
When towing a trailer, your vehicle will handle differently than when not towing. The three main causes of vehicle-trailer accidents are driver error, excessive speed and improper trailer loading. Keep these in mind when towing:
-
Before starting out, check the operation of the lights and all vehicle–trailer connections. After driving a short distance, stop and recheck the lights and connections. Practice turning, stopping and backing with a trailer in an area away from traffic until you learn the feel.
-
Backing with a trailer is difficult and requires practice. Grip the bottom of the steering wheel and move your hand to the left to move the trailer to the left. Move your hand to the right to move the trailer to the right. (This procedure is generally opposite to that when backing without a trailer.) Also, just turn the steering wheel a little at a time, avoiding sharp or prolonged turning. Have someone guide you when backing to reduce the risk of an accident.
-
Because stopping distance may be increased, vehicle-to-vehicle distance should be increased when towing a trailer. For each 16 km/h (10 mph) of speed, allow at least one vehicle and trailer length between you and the vehicle ahead. Avoid sudden braking as you may skid, resulting in jackknifing and loss of control. This is especially true on wet or slippery surfaces.
-
Avoid jerky starts or sudden acceleration.
-
Avoid jerky steering and sharp turns. The trailer could hit your vehicle in a tight turn. Slow down before making a turn to avoid the need of sudden braking.
-
Remember that when making a turn, the trailer wheels will be closer than the vehicle wheels to the inside of the turn. Therefore, compensate for this by making a larger than normal turning radius with your vehicle.
-
Crosswinds and rough roads will adversely affect handling of your vehicle and trailer, causing sway. Pay attention to the rear from time to time to prepare yourself for being passed by large trucks or buses, which may cause your vehicle and trailer to sway. If swaying happens, firmly grip the steering wheel and reduce speed immediately but gradually. Never increase speed. If it is necessary to reduce speed, brake slowly. Steer straight ahead. If you make no extreme correction with the steering or brakes, your vehicle and trailer will stabilize.
-
Be careful when passing other vehicles. Passing requires considerable distance. After passing a vehicle, do not forget the length of your trailer and be sure you have plenty of room before changing lanes.
-
In order to maintain efficient engine braking and electrical charging performance, do not use overdrive. Transmission must be in the "4" position.
187
DRIVING TIPS
- Because of the added load of the trailer, your vehicle's engine may overheat on hot days (at temperatures over 30°C [85°F]) when going up a long or steep grade with a trailer. If the engine coolant temperature gauge indicates overheating, immediately turn off the air conditioning (if in use), pull your vehicle off the road and stop in a safe spot. See "If your vehicle overheats" on page 196 of this manual.
- Always place wheel blocks under both the vehicle and trailer wheels when parking. Apply the parking brake firmly. Put the transmission in "P". Avoid parking on a slope with a trailer, but if it cannot be avoided, do so only after performing the following:
- Apply the brakes and keep them applied.
- Have someone place wheel blocks under both the vehicle and trailer wheels.
- When the wheel blocks are in place, release your brakes slowly until the blocks absorb the load.
- Apply the parking brake firmly.
- Shift into "P" and turn off the engine.
When restarting out after parking on a slope:
- With the transmission in "P" position, start the engine. Be sure to keep the brake pedal depressed.
- Shift into the "3", "2", "L" or "R" position.
- Release the parking brake and brake pedal and slowly pull or back away from the wheel blocks. Stop and apply your brakes.
- Have someone retrieve the blocks.
CAUTION
- Do not exceed 72 km/h (45 mph) or the posted towing speed limit, whichever is lower. Because instability (swaying) of a towing vehicle–trailer combination usually increases as the speed increases, exceeding 72 km/h (45 mph) may cause loss of control.
- Slow down and downshift before descending steep or long downhill grades. Do not make sudden downshifts.
- Avoid holding the brake pedal down too long or too frequently. This could cause the brakes to overheat and result in reduced braking efficiency.
188

DRIVING TIPS
HOW TO SAVE FUEL AND MAKE YOUR VEHICLE LAST LONGER
Getting more kilometer/mileage from a liter/gallon of fuel is easy – just take it easy. It will help make your vehicle last longer, too. Here are some specific tips on how to save money on both fuel and repairs:
- Keep your tires inflated at the correct pressure. Check the pressure every two weeks, or at least once a month. Underinflation causes tire wear and wastes fuel.
- Do not carry unneeded weight in your vehicle. Excess weight puts a heavier load on the engine, causing greater fuel consumption.
- Avoid lengthy warm-up idling. Once the engine is running smoothly, begin driving – but gently. Remember, however, that on cold winter days this may take a little longer.
- Accelerate slowly and smoothly. Avoid jackrabbit starts.
- Avoid long engine idling. If you have a long wait and you are not in traffic, it is better to turn off the engine and start again later.
- Avoid engine overrevving. Use a gear position suitable for the road on which you are traveling.
- Avoid continuous speeding up and slowing down. Stop-and-go driving wastes fuel.
- Avoid unnecessary stopping and braking. Maintain a steady pace. Try to time the traffic signals so you only need to stop as little as possible or take advantage of through streets to avoid traffic lights. Keep a proper distance from other vehicles to avoid sudden braking. This will also reduce wear on your brakes.
- Avoid heavy traffic or traffic jams whenever possible.
- Do not rest your foot on the brake pedal. This causes needless wear, overheating and poor fuel economy.
- Maintain a moderate speed on highways. The faster you drive, the greater the fuel consumption. By reducing your speed, you will cut down on fuel consumption.
- Keep the front wheels in proper alignment. Avoid hitting the curb and slow down on rough roads. Improper alignment not only causes faster tire wear but also puts an extra load on the engine, which, in turn, wastes fuel.
- Keep the bottom of your vehicle free from mud, etc. This not only lessens weight but also helps prevent corrosion.
- Keep your vehicle tuned-up and in top shape. A dirty air cleaner, improper valve clearance, dirty plugs, dirty oil and grease, brakes not adjusted, etc. all lower engine performance and contribute to poor fuel economy. For longer life of all parts and lower operating costs, keep all maintenance work on schedule, and if you often drive under severe conditions, see that your vehicle receives more frequent maintenance. (For scheduled maintenance information, please refer to the separate "Owner's Manual Supplement/Maintenance Schedule".)
CAUTION
189

DRIVING TIPS
Never turn off the engine to coast down hills. Your power steering and brake booster will not function without the engine running. Also, the emission control system operates properly only when the engine is running.
3
190
191