218
SECTION 6 – 1
SERVICE PROCEDURES AND SPECIFICATIONS
Introduction
- Vehicle identification . . . . . . . . . . . . . . . . . . . . . . . . . . . . . . . . . . . . . . . . . . . . . . . . . . . . . . . . . . . . . . . . . . . . . . . . . . . . . . . . . . . . . . . . . . . . . . . . . . . . . . . . . . . . . . . . . . . . . . . . . . . . . . . . . . . . . . . . . . . . . . . . . . . . . . . . . . . . . . . . . . . . . . . . . . . . . . . . . . . . . . . . . . . . . . . . . . . . . . . . . . . . ........ 219
- Engine compartment overview . . . . . . . . . . . . . . . . . . . . . . . . . . . . . . . . . . . . . . . . . . . . . . . . . . . . . . . . . . . . . . . . . . . . . . . . . . . . . . . . . . . . . . . . . . . . . . . . . . . . . . . . . . . . . . . . ........ 220
- Do-it-yourself service precautions . . . . . . . . . . . . . . . . . . . . . . . . . . . . . . . . . . . . . . . . . . . . . . . . . . . . . . . . . . . . . . . . . . . . . . . . . . . . . . . . . . . . . . . . . . . . . . . . . . . . . . . . . . . . ........

INTRODUCTION
VEHICLE IDENTIFICATION
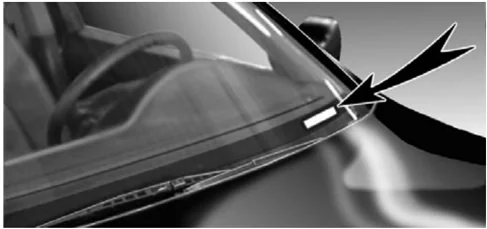
The vehicle identification number (VIN) is the legal identifier for your vehicle. This number is on the left top of the instrument panel and can be seen through the windshield from outside. This is the primary identification number for your Lexus. It is used in registering the ownership of your vehicle.
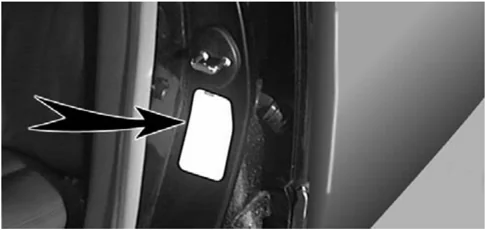
The vehicle identification number (VIN) is also on the Certification Label.
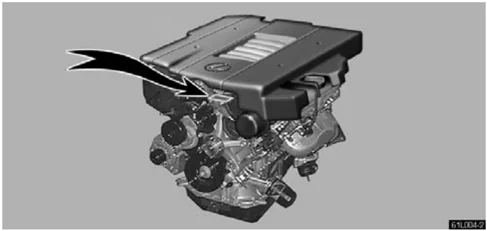
The engine number is stamped on the engine block as shown.
219
INTRODUCTION
ENGINE COMPARTMENT OVERVIEW
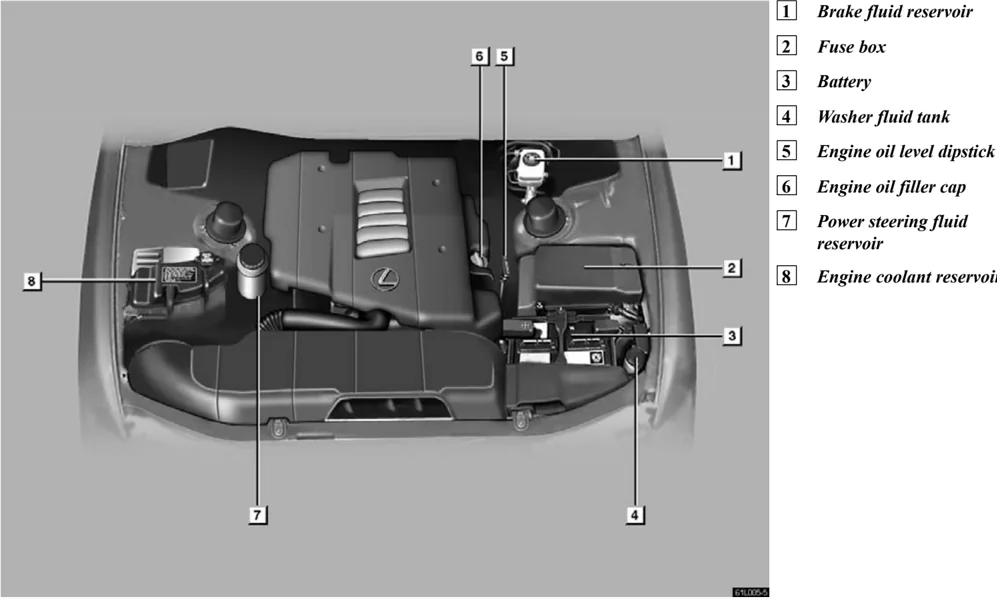
1 Brake fluid reservoir 2 Fuse box 3 Battery 4 Washer fluid tank 5 Engine oil level dipstick 6 Engine oil filler cap 7 Power steering fluid reservoir 8 Engine coolant reservoir
220
INTRODUCTION
DO-IT-YOURSELF SERVICE PRECAUTIONS
If you perform maintenance yourself, be sure to follow the correct procedure given in this Section.
You should be aware that improper or incomplete servicing may result in operating problems.
Performing do-it-yourself maintenance during the warranty period may affect your warranty coverage. Read the separate Lexus Warranty statement for details and suggestions.
This Section gives instructions only for those items that are relatively easy for an owner to perform. As explained in Section 5, there are still a number of items that must be performed by a qualified technician with special tools.
For information on tools and parts for do-it-yourself maintenance, see "Parts and tools".
Utmost care should be taken when working on your vehicle to prevent accidental injury. Here are a few precautions that you should be especially careful to observe:
CAUTION
- When the engine is running, keep hands, clothing, and tools away from the moving fan and engine drive belt. (Removing rings, watches, and ties is advisable.)
- Right after driving, the engine compartment – the engine, radiator, exhaust manifold and power steering fluid reservoir, etc. – will be hot. So be careful not to touch them. Oil and other fluids may also be hot.
- Do not smoke, cause sparks or allow open flames around fuel or the battery. Their fumes are flammable.
- Be extremely cautious when working on the battery. It contains poisonous and corrosive sulfuric acid.
- Do not get under your vehicle with just the body jack supporting it. Always use automotive jack stands or other solid supports.
- Be sure the ignition is off if you work near the electric cooling fan or radiator grille. With the ignition on, the electric cooling fan may automatically start to run if the air conditioning is on and/or if the coolant temperature is high.
- Use eye protection whenever you work on or under your vehicle where you may be exposed to flying or falling material, fluid spray, etc.
NOTICE
221

INTRODUCTION
- Remember that battery and ignition cables carry high currents or voltages. Be careful of accidentally causing a short circuit.
- Before closing the engine hood, check to see that you have not forgotten any tools, rags, etc.
- Do not drive with the air cleaner removed, or excessive engine wear could result. Also backfiring could cause a fire in the engine compartment.
- Do not overfill automatic transmission fluid, or the transmission could be damaged.
- Be careful not to scratch the glass surface with the wiper frame.
PARTS AND TOOLS
Here is a list of parts and tools you will need to perform do-it-yourself maintenance. Remember all Lexus parts are designed in metric sizes, so your tools must be metric.
Checking the engine oil level
Parts (if level is low):
- Use API grade SH, "Energy-Conserving II" or SJ, "Energy-Conserving" multigrade engine oil or ILSAC multigrade engine oil. For recommended oil viscosity, see page 232.
Tools:
- Rag or paper towel
- Funnel (only for adding oil)
Checking the engine coolant level
Parts (if level is low):
- Ethylene-glycol coolant
- Demineralized or distilled water
Tools:
- Funnel (only for adding coolant)
6 222
INTRODUCTION
Checking brake fluid Parts (if level is low): • FMVSS No. 116 DOT 3 or SAE J1703 brake fluid Tools: • Funnel (only for adding fluid)
Checking power steering fluid Parts (if level is low): • Automatic transmission fluid DEXRON®II or III Tools: • Rag or paper towel • Funnel (only for adding fluid)
Checking battery condition Non-maintenance batteries Tools: • Warm water • Baking soda • Grease • Conventional wrench (for terminal clamp bolts) Maintenance type batteries Parts (if level is low): • Distilled water Tools: • Warm water • Baking soda • Grease • Conventional wrench (for terminal clamp bolts) • Coin (for vent plugs) • Funnel (only for adding distilled water)
Checking and replacing the blade type fuses Parts (if replacement is necessary): • Fuse with same amperage rating as original
Checking the cartridge type fuses Parts (if replacement is necessary): • Genuine Lexus fuse or equivalent with same amperage rating as original
Adding washer fluid Parts: • Water • Washer fluid containing antifreeze (for winter use) Tools: • Funnel
223
SECTION 6 – 2
SERVICE PROCEDURES AND SPECIFICATIONS
Engine
- Specifications . . . . . . . . . . . . . . . . . . . . . . . . . . . . . . . . . . . . . . . . . . . . . . . . . . . . . . . . . . . . . . . . . . . . . . . . . . . . . . . . . . . . . . . . . . . . . . . . . . . . . . . . . . . . . . . . . . . . . . . . . . . . . . . . . . . . . . . . . . . . . . . . . . . . . . . . . . . . . . . . . . . . . . . . . . . . . . . . . . . . . . . . . . . . . . . . . . . . . . . . . . . . . . . . . . . . . . . ........ 225
- Fuel . . . . . . . . . . . . . . . . . . . . . . . . . . . . . . . . . . . . . . . . . . . . . . . . . . . . . . . . . . . . . . . . . . . . . . . . . . . . . . . . . . . . . . . . . . . . . . . . . . . . . . . . . . . . . . . . . . . . . . . . ........ 227
- Facts about engine oil consumption . . . . . . . . . . . . . . . . . . . . . . . . . . . . . . . . . . . . . . . . . . . . . . . . . . . . . . . . . . . . . . . . . . . . . . . . . . . . . . . . . . . . . . . . . . . . . . . . . . . . . . . . . ........

SPECIFICATIONS
– GENERAL
| Model | 1UZ-FE |
|---|---|
| Type | 8 cylinder V type, 4 cycle, gasoline |
| Bore and stroke | 87.5 X 82.5 mm (3.44 X 3.25 in.) |
| Displacement | 3969 cm³ (242.1 cu.in.) |
| Valve clearance (engine cold) | |
| Intake | 0.15 – 0.25 mm (0.006 – 0.010 in.) |
| Exhaust | 0.25 – 0.35 mm (0.010 – 0.014 in.) |
| Drive belt tension | Automatic adjustment |
– LUBRICATION SYSTEM
| Oil capacity | |
|---|---|
| Drain and refill | |
| with filter | 5.6 L (5.9 qt., 4.9 lmp.qt.) |
| without filter | 5.3 L (5.6 qt., 4.7 lmp.qt.) |
| Oil grade | API SH, "Energy-Conserving II" or SJ, "Energy-Conserving" multigrade engine oil or ILSAC multigrade engine oil |
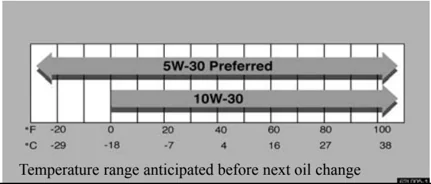
| Recommended oil viscosity (SAE): |
Temperature range anticipated before next oil change
ENGINE
– COOLING SYSTEM
| Capacity | 10.8 L (11.4 qt., 10.4 lmp.qt.) |
|---|---|
| Coolant type | Ethylene – glycol coolant (Do not use alcohol type.) |
– FUEL
| Fuel type | Only UNLEADED |
|---|---|
| Octane rating | 91 (Research octane number 96) or higher |
– IGNITION SYSTEM
| Spark plug – Make | DENSONGK |
|---|---|
| – Gap | SK20R11IFR6A111.1 mm (0.043 in.) |
– ELECTRICAL SYSTEM
| Battery – Maintenance type batterySpecific gravity reading at 20°C (68°F): | 1.260 Fully charged1.160 Half charged1.060 Discharged |
|---|---|
| Charging ratesQuick chargeSlow charge | 15A max.5A max. |
| – Non–maintenance batteryOpen voltage at 20°C (68°F): | 12.7V Fully charged12.3V Half charged11.9V Discharged[Voltage that is checked 20 minutes after the key is removed with all the lights turned off] |
| Charging rates | 5A max. |
ENGINE
FUEL
Fuel type
Your vehicle must use only unleaded gasoline.
To help prevent gas station mixups, your Lexus has a smaller fuel tank opening. The special nozzle on pumps with unleaded fuel will fit it, but the larger nozzle on pumps with leaded gas will not.
At a minimum, the gasoline you use should meet the specifications of ASTM D4814 in the U.S.A. and CGSB 3.5–M93 in Canada.
NOTICE
Do not use leaded gasoline. Use of leaded gasoline will cause the three-way catalytic converter to lose its effectiveness and the emission control system to function improperly. Also, this can increase maintenance costs.
Octane rating
Select premium unleaded gasoline with an Octane Rating of 91 (Research Octane Number 96) or higher for optimum engine performance. However, if such premium type cannot be obtained, you may temporarily use unleaded gasoline with an Octane Rating as low as 87 (Research Octane Number 91).
Use of unleaded fuel with an octane number or rating lower than stated above will cause persistent heavy knocking. If severe, this will lead to engine damage.
If your engine knocks ...
If you detect heavy knocking even when using the recommended fuel, or if you hear steady knocking while holding a steady speed on level roads, consult your Lexus dealer.
However, now and then, you may notice light knocking for a short time while accelerating or driving up hills. This is no cause for concern.
Gasolines containing detergent additives
Lexus recommends use of gasolines that contain detergent additives to avoid build-up of engine deposits.
For further details, ask your Lexus dealer or a local gasoline retailer.
227
ENGINE
Improved gasolines
The American Automobile Manufacturers Association (AAMA) has developed a specification of improved gasolines. The AAMA specification offers optimal fuel information for better vehicle performance and better protection of your engine.
Lexus recommends the use of gasolines that meet the AAMA specification, if available, for improved drivability and emission control system.
Gasolines containing MTBE
Gasolines that contain MTBE (Methyl Tertiary-Butyl Ether) are available in the market. If you use a gasoline mixed with MTBE, make certain that it does not contain more than 15% of MTBE.
If the use of gasolines containing MTBE causes poor drivability and/or poor fuel economy, you should stop using them.
Gasolines containing MMT
Some gasolines contain an octane-enhancing additive called MMT (methylcyclopentadienyl manganese tricarbonyl).
Lexus does not recommend the use of gasolines that contain MMT. If fuels containing MMT are used, your emission control system may be adversely affected. The Malfunction Indicator Lamp on the instrument cluster may come on. If this happens, contact your Lexus dealer for service.
Gasolines containing alcohol
Gasohol is a mixture of gasoline and ethanol. If you use gasohol in your Lexus, be sure that it is unleaded, has an octane rating no lower than 87 and does not contain more than 10% ethanol. Lexus does not recommend the use of gasolines containing methanol.
If you use gasoline containing methanol, use only gasoline meeting the requirements above and also containing less than 5% methanol with cosolvents and corrosion inhibitors for methanol.
NOTICE
- Do not use gasohol other than stated above. It will cause fuel system damage or vehicle performance problems.
- If drivability problems are encountered (poor hot starting, vaporizing, engine knock, etc.), discontinue its use.
- Take care not to spill gasohol during refueling. Gasohol may cause paint damage.
Fuel tank capacity
85 L (22.5 gal., 18.7 lmp.gal.)
228 6
ENGINE
FACTS ABOUT ENGINE OIL CONSUMPTION
Functions of engine oil
Engine oil has the primary function of lubricating and cooling the inside of the engine, and plays a major role in maintaining the engine in proper working order.
Engine oil consumption
It is normal that an engine should consume some engine oil during normal engine operation. The causes of oil consumption in a normal engine are as follows.
- Oil is used to lubricate pistons, piston rings and cylinders. A thin film of oil is left on the cylinder wall when a piston moves downwards in the cylinder. High negative pressure generated when the vehicle is decelerating sucks some of this oil into the combustion chamber. This oil as well as some part of the oil film left on the cylinder wall is burned by the high temperature combustion gases during the combustion process.
- Oil is also used to lubricate the stems of the intake valves. Some of this oil is sucked into the combustion chamber together with the intake air and is burned along with the fuel. High temperature exhaust gases also burn the oil used to lubricate the exhaust valve stems.
The amount of engine oil consumed depends on the viscosity of the oil, the quality of the oil and the way the vehicle is driven.
More oil is consumed by high-speed driving and frequent acceleration and deceleration.
A new engine consumes more oil, since its pistons, piston rings and cylinder walls have not become conditioned.
When judging the amount of oil consumption, keep in mind that the oil may have become diluted, making it difficult to judge the true level accurately.
For example, if a vehicle is used for repeated short trips and consumes a normal amount of oil, the dipstick may not show any drop in the oil level at all, even after 1000 km (600 miles) or more. This is because the oil is gradually becoming diluted with fuel or moisture, making it appear that the oil level has not changed.
The diluting ingredients evaporate out when the vehicle is then driven at high speeds, as on an expressway, making it appear that oil is excessively consumed after driving at high speeds.
I mportance of engine oil level check
One of the most important points in proper vehicle maintenance is to keep the engine oil at the optimum level so that oil function will not be impaired. Therefore, it is essential that the oil level be checked regularly. Lexus recommends that the oil level be checked every time you refuel the vehicle.
NOTICE
229
ENGINE
Failure to check the oil level regularly could lead to serious engine trouble due to insufficient oil.
For detailed information on oil level check, see "Checking the engine oil level" on page 230.
USED ENGINE OIL
CAUTION
- Used engine oil contains potentially harmful contaminants which may cause skin disorders such as inflammation or skin cancer, so care should be taken to avoid prolonged and repeated contact with it. To remove used engine oil from your skin, wash thoroughly with soap and water.
- Do not leave used oil within the reach of children.
- Dispose of used oil and used oil filters only in a safe and acceptable manner. Do not dispose of used oil and used oil filters in household trash, in sewers or onto the ground. Call your Lexus dealer or a service station for information concerning recycling or disposal.
CHECKING THE ENGINE OIL LEVEL
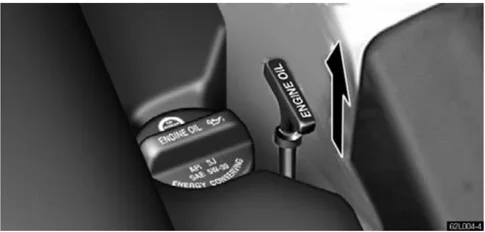
With the engine at operating temperature and turned off, check the oil level on the dipstick.
- To get a true reading, the vehicle should be on a level spot. After turning off the engine, wait a few minutes for the oil to drain back into the bottom of the engine.
- Pull out the dipstick, and wipe it clean with a rag.
- Reinsert the dipstick and push it in as far as it will go, or the reading will not be correct.
230 6

ENGINE
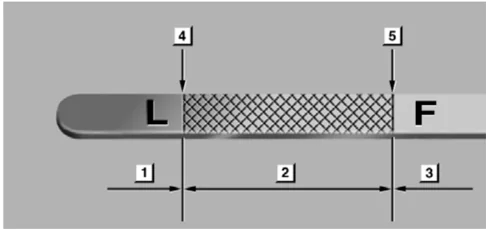
▶ 1 Add oil 2 O.K. 3 Too full
- Pull the dipstick out and look at the oil level on the end. If it is between the full line ( 5 ) and the low line ( 4 ), it is O.K.
Remove the oil filler cap and add engine oil a little at a time, checking the dipstick. The approximate quantity of oil needed to fill between the low line and the full line on the dipstick is indicated below for reference.
When the level reaches within the correct range, return the filler cap and turn the cap clockwise until you hear a click.
Oil quantity. L (qt., Imp. qt.) 1.5 (1.6, 1.3)
NOTICE
Avoid overfilling, or the engine could be damaged. Check the oil level on the dipstick once again after adding the oil.
If the oil level is below or only slightly above the low line, add engine oil of the same type as already in the engine.
231
ENGINE
Engine oil selection
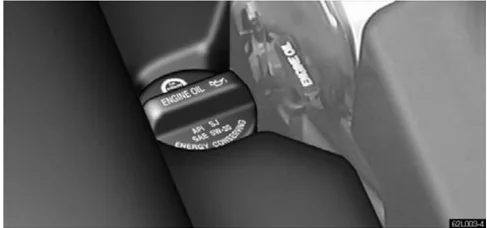
Use API SH, "Energy-Conserving II" or SJ, "Energy-Conserving" multigrade engine oil or ILSAC multigrade engine oil.
Recommended viscosity (SAE):
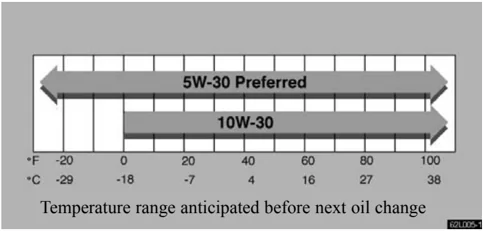
Temperature range anticipated before next oil change
SAE 5W–30 is the best choice for your vehicle, for good fuel economy, and good starting in cold weather.
If you use SAE 10W–30 engine oil in extremely low temperatures, the engine may become difficult to start, so SAE 5W–30 engine oil is recommended.
Oil identification marks
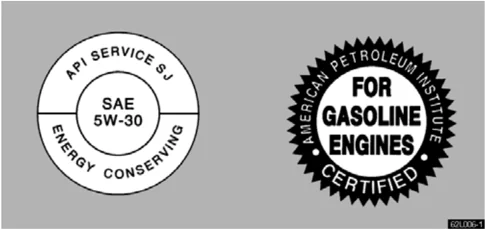
►API Service Symbol ►ILSAC Certification Mark
Either or both API registered marks are added to some oil containers to help you select the oil you should use.
- The API Service Symbol is located anywhere on the outside of the container.
The top portion of the label shows the oil quality by API (American Petroleum Institute) designation such as SJ. The center portion of the label shows the SAE viscosity grade such as SAE 5W–30. "Energy-Conserving", shown in the lower portion, indicates that the oil has fuel-saving capabilities.
- The ILSAC (International Lubricant Standardization and Approval Committee) Certification Mark is displayed on the front of the container.
232 6
ENGINE
CHECKING THE ENGINE COOLANT LEVEL
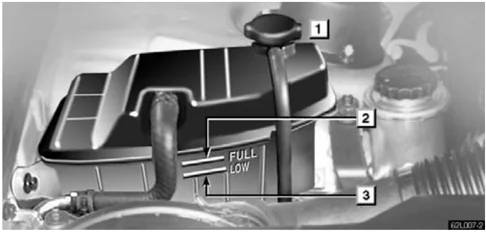
▶ 1 Reservoir cap 2 Upper line 3 Lower line
Park the vehicle at a level spot and look at the see-through coolant reservoir when the engine is cool. The coolant level is satisfactory if it is between the upper and lower lines on the tank. If the level is low, add ethylene-glycol type coolant.
The coolant level in the reservoir will vary with engine coolant temperature. However, if the level is on or below the lower line, add coolant to bring the level up to the upper line.
Use only ethylene-glycol type coolant. It will prevent freezing and corrosion. Neither supplemental inhibitors nor additives are needed nor recommended. (For information on ethylene-glycol coolant, see also "Engine coolant selection" described below.)
If the coolant level drops within a short time after replenishing, there may be a leak in the system. Visually check the radiator, hoses, reservoir cap, drain cock and water pump.
If you can find no leak, have your Lexus dealer test the cap pressure and check for leaks in the cooling system.
CAUTION To prevent burning yourself, do not remove the reservoir cap when the engine is hot.
Engine coolant selection
Your coolant must contain ethylene-glycol antifreeze. In addition to preventing freezing and subsequent damage to the engine, this will also prevent corrosion. Further supplemental inhibitors or additives are neither needed nor recommended.
Read the antifreeze container for information on freeze protection. Follow the manufacturer's directions for how much to mix with water. The total capacity of the cooling system is given on page 226. We recommend 50% solution be used for your Lexus, or a sufficient quantity to provide protection to about –35°C (–31°F).
NOTICE Do not use alcohol type antifreeze or plain water alone.
233

ENGINE
SPARK PLUGS
Your engine is fitted with iridium spark plugs.
NOTICE Use only iridium spark plugs for your engine performance.
234 6
235
236
SECTION 6 – 3
SERVICE PROCEDURES AND SPECIFICATIONS
Chassis
- Specifications . . . . . . . . . . . . . . . . . . . . . . . . . . . . . . . . . . . . . . . . . . . . . . . . . . . . . . . . . . . . . . . . . . . . . . . . . . . . . . . . . . . . . . . . . . . . . . . . . . . . . . . . . . . . . . . . . . . . . . . . . . . . . . . . . . . . . . . . . . . . . . . . . . . . . . . . . . . . . . . . . . . . . . . . . . . . . . . . . . . . . . . . . . . . . . . . . . . . . . . . . . . . . . . . . . . . ........ 237
- Checking brake fluid . . . . . . . . . . . . . . . . . . . . . . . . . . . . . . . . . . . . . . . . . . . . . . . . . . . . . . . . . . . . . . . . . . . . . . . . . . . . . . . . . . . . . . . . . . . . . . . . . . . . . . . . . . . . . . . . ........ 239
- Checking power steering fluid . . . . . . . . . . . . . . . . . . . . . . . . . . . . . . . . . . . . . . . . . . . . . . . . . . . . . . . . . . . . . . . . . . . . . . . . . . . . . . . . . . . . . . . . . . . . . . . . . . . . . . . . . . . . . . . ........

SPECIFICATIONS
– AUTOMATIC TRANSMISSION
| Fluid capacity | 1.9 L (2.0 qt., 1.7 lmp.qt.) |
|---|---|
| Drain and refill | |
| Fluid type | Automatic transmission fluid Type T – IV or equivalent |
– DIFFERENTIAL
| Oil capacity | 1.3 L (1.4 qt., 1.1 lmp.qt.) |
|---|---|
| Oil type | Hypoid gear oil API GL–5 |
| Oil viscosity | Above –18°C (0°F): SAE 90Below –18°C (0°F): SAE 80W or SAE 80W–90 |
– BRAKES
| Pedal clearance | 70 mm (2.8 in.) Min. *1 |
|---|---|
| Pedal freeplay | 1 – 6 mm (0.04 – 0.24 in.) |
| Brake pad wear limit | 1.0 mm (0.04 in.) |
| Parking brake lining wear limit | 1.0 mm (0.04 in.) |
| Parking brake adjustment | 5 – 7 clicks *2 |
| Fluid type | SAE J1703 or FMVSS No. 116 DOT 3 |
*1: Minimum pedal clearance when depressed with the pressure of 490 N (50 kgf, 110 lbf.) with the engine running
*2: Parking brake adjustment when depressed with the pressure of 294 N (30 kgf, 66.1 lbf.)
CHASSIS
– STEERING
| Freeply | Less than 30 mm (1.2 in.) |
|---|---|
| Power steering fluid | Automatic transmission fluid DEXRON®II or III |
– TIRES AND WHEELS
| Tire size | P225/60R16 97V |
|---|---|
| Tire inflation pressure | |
| Recommended cold tire inflation pressure | |
| Vehicle load up to four occupants | Front 200 kPa (2.0 kgf/cm² or bar, 29 psi)Rear 200 kPa (2.0 kgf/cm² or bar, 29 psi) |
| Vehicle loaded up to vehicle capacity weight | Front 220 kPa (2.2 kgf/cm² or bar, 32 psi)Rear 220 kPa (2.2 kgf/cm² or bar, 32 psi)For sustained high speeds above 160 km/h (100 mph), in countries where such speeds are permitted by law, add 80 kPa (0.9 kgf/cm², 0.8 bar, 12 psi) to the front tires and rear tires, but never exceed the maximum cold tire pressure molded on the tire sidewall. |
| Wheel size | 16 x 7 JJ |
| Wheel nut torque | 103 N·m (10.5 kgf·m, 76 ft·lbf.) |
CHASSIS
CHECKING BRAKE FLUID
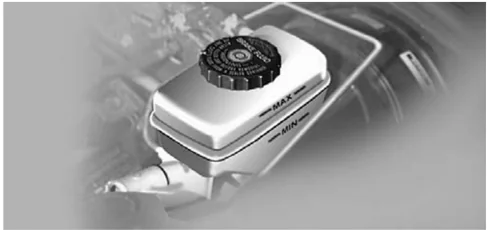
To check the fluid level, simply look at the see-through reservoir. The level should be between the "MAX" and "MIN" lines on the tank.
It is normal for the brake fluid level to go down slightly as the brake pads wear. So be sure to keep the reservoir filled.
If the reservoir needs frequent refilling, it may indicate a serious mechanical problem.
If the level is low, add FMVSS No.116 DOT 3 or SAE J1703 brake fluid to the brake reservoir.
Remove and replace the reservoir cover by hand. Add brake fluid up to the "MAX" line.
Use only newly opened brake fluid. Once opened, brake fluid absorbs moisture from the air, and excess moisture can cause a dangerous loss of braking efficiency.
CAUTION Take care when filling the reservoir because brake fluid can harm your eyes and damage painted surfaces. If fluid gets in your eyes, flush your eyes with clean water.
239

CHASSIS
CHECKING POWER STEERING FLUID
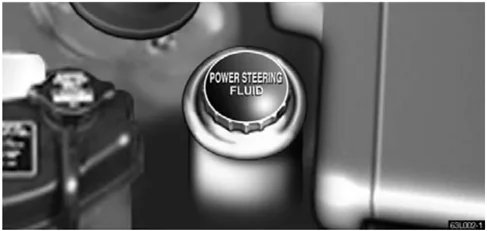
Check the fluid level on the dipstick. If necessary, add automatic transmission fluid DEXRON®II or III.
If the vehicle has been driven around 80 km/h (50 mph) for 20 minutes (a little more in frigid temperatures), the fluid is hot (60°C – 80°C or 140°F – 175°F). You may also check the level when the fluid is cold (about room temperature, 10°C – 30°C or 50°F – 85°F) if the engine has not been run for about five hours.
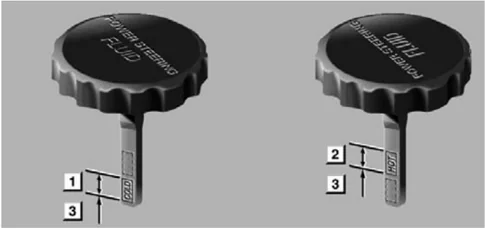
► 1 If cold O.K. 2 If hot O.K. 3 Add fluid
- Clean all dirt off the reservoir.
- Remove the filler cap by turning it counterclockwise and wipe the dipstick clean.
- Reinstall the filler cap.
- Remove the filler cap again and look at the fluid level. If the fluid is cold, the level should be in the "COLD" range on the dipstick. Similarly, if it is hot, the fluid level should be in the "HOT" range. If the level is at the low side of either range, add automatic transmission fluid DEXRON®II or III to bring the level within the range.
- After replacing the filler cap, visually check the steering box case, vane pump and hose connections for leaks or damage.
240 6
CHASSIS
CAUTION
The reservoir may be hot so be careful not to burn yourself.
NOTICE
- Avoid overfilling, or the power steering could be damaged.
- When adding the power steering fluid, avoid spilling it. The generator under the power steering reservoir could be damaged if fluid is spilled on it.
CHECKING TIRE PRESSURE
 The recommended cold tire pressures, tire size and the vehicle capacity weight are given on the label inside the glovebox lid.
You should check the tire pressures every two weeks, or at least once a month. And don't forget the spare! The pressure for the spare tire should be 220 kPa (2.2 kgf/cm² or bar, 32 psi). Incorrect tire pressure can reduce tire life and make your vehicle less safe to drive.
Low tire pressure results in excessive wear, poor handling, reduced fuel economy, and the possibility of blowouts from overheated tires. Also, low tire pressure can cause poor sealing of the tire bead. If the tire pressure is excessively low, there is the possibility of wheel deformation and/or tire separation. So keep your tire pressures at the proper level. If a tire needs frequent refilling, have it checked by your Lexus dealer.
241
CHASSIS
High tire pressure produces a harsh ride, handling problems, excessive wear at the center of the tire tread, and a greater possibility of tire damage from road hazards.
The following instructions for checking tire pressure should be observed:
- The pressure should be checked only when the tires are cold. If your vehicle has been parked for at least 3 hours and has not been driven for more than 1.5 km or 1 mile since, you will get an accurate cold tire pressure reading.
- Always use a tire pressure gauge. The appearance of the tire can be misleading. Besides, tire pressures that are even just a few pounds off can degrade handling and ride.
- Do not bleed or reduce tire pressure after driving. It is normal for the tire pressure to be higher after driving.
- Never exceed the vehicle capacity weight. The passengers and luggage weight should be located so that the vehicle is balanced.
- Be sure to reinstall the tire valve caps. Without the valve caps, dirt or moisture could get into the valve core and cause air leakage. If the caps have been lost, have new ones put on as soon as possible.
ROTATING TIRES
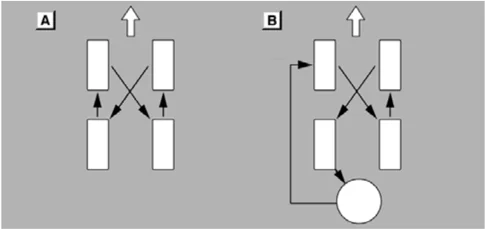
To equalize tire wear and help extend tire life, Lexus recommends that you rotate your tires approximately every 12000 km (7500 miles). However, the most appropriate timing for tire rotation may vary according to your driving habits and road surface conditions.
The wheel assemblies must be rotated as illustrated above. If the optional chrome-plated wheels are mounted, rotate them as pattern A. For the standard wheels, use pattern B.
When rotating tires, check for uneven wear and damage. Abnormal wear is usually caused by incorrect tire pressure, improper wheel alignment, out-of balance wheels, or severe braking.
Before storing radial, snow or studded tires, mark the direction of rotation and be sure to install them in the same direction when using them again. Tires should be stored in a cool dry place.
242
CHASSIS
CHECKING AND REPLACING TIRES
When to replace your tires
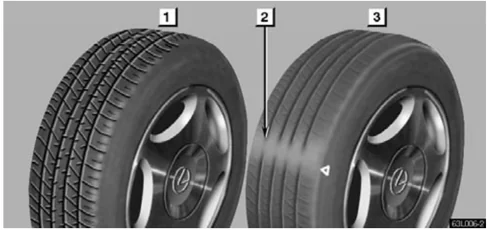
1 New tread 2 Tread wear indicator 3 Worn tread
Replace the tires when the tread wear indicators show. The location of the tread wear indicators is shown by the "TWI" or "Δ" marks molded on the sidewall of each tire.
The tires on your Lexus have built-in tread wear indicators to help you know when the tires need replacement. When the tread depth wears to 1.6 mm (0.06 in.) or less, the indicators will appear. If you can see the indicators in two or more adjacent grooves, the tire should be replaced.
The effectiveness of snow tires is lost if the tread wears down below 4 mm (0.16 in.).
If you have tire damage such as cuts, splits, cracks deep enough to expose the fabric, or bulges indicating internal damage, the tire should be replaced.
If a tire often goes flat or cannot be properly repaired due to the size or location of a cut or other damage, it should be replaced. If you are not sure, consult with your Lexus dealer.
If an air loss occurs while driving, do not continue driving with a deflated tire. Driving even a short distance can damage a tire beyond repair.
Any tires which are over 6 years old must be checked by a qualified technician even if damage is not obvious.
Tires deteriorate with age even if they have never or seldom been used.
This also applies to the spare tire and tires stored for future use.
243
CHASSIS
Uniform tire quality grading
This information has been prepared in accordance with regulations issued by the National Highway Traffic Safety Administration of the U.S. Department of Transportation. It provides the purchasers and/or prospective purchasers of Lexus vehicles with information on uniform tire quality grading.
Your Lexus dealer will help answer any questions you may have as you read this information.
DOT quality grades – All passenger vehicle tires must conform to Federal Safety Requirements in addition to these grades. These quality grades are molded on the sidewall.
Treadwear – The treadwear grade is a comparative rating based on the wear rate of the tire when tested under controlled conditions on a specified government test course. For example, a tire graded 150 would wear one and a half (1 – 1/2) times as well on the government course as a tire graded 100. The relative performance of tires depends upon the actual conditions of their use, however, and may depart significantly from the norm due to variations in driving habits, service practices and differences in road characteristics and climate.
Traction A, B, C – The traction grades, from highest to lowest, are A, B and C, and they represent the tire’s ability to stop on wet pavement as measured under controlled conditions on specified government test surfaces of asphalt and concrete. A tire marked C may have poor traction performance.
Warning: The traction grade assigned to this tire is based on braking (straight ahead) traction tests and does not include cornering (turning) traction.
Temperature A, B, C – The temperature grades are A (the highest), B, and C, representing the tire’s resistance to the generation of heat and its ability to dissipate heat when tested under controlled conditions on a specified indoor laboratory test wheel. Sustained high temperature can cause the material of the tire to degenerate and reduce tire life, and excessive temperature can lead to sudden tire failure. The grade C corresponds to a level of performance which all passenger car tires must meet under the Federal Motor Vehicle Safety Standard No. 109. Grades B and A represent higher levels of performance on the laboratory test wheel than the minimum required by law.
Warning: The temperature grade of this tire established for a tire that is properly inflated and not overloaded. Excessive speed, underinflation, or excessive loading, either separately or in combination, can cause heat buildup and possible tire failure.
6
244
CHASSIS
Tire selection
When replacing a tire, use only the same size and construction as originally installed and with the same or greater load capacity.
Using any other size or type of tire may seriously affect handling, ride, speedometer/odometer calibration, ground clearance, and clearance between the body and tires or snow chains.
Do not mix radial, belted, or conventional tires on your vehicle.
Do not use tires or wheels other than the manufacturer’s recommended size.
It can cause dangerous handling characteristics, resulting in loss of control. If you need to change from conventional tires to radial tires or vice versa, replace them as a set.
INSTALLING SNOW TIRES AND CHAINS
When to use snow tires or chains
Snow tires or chains are recommended when driving on snow or ice.
On wet or dry roads, conventional or radial tires provide better traction than snow or studded tires.
Snow tire selection
If you need snow tires, select the same size, construction and load capacity as the original tires on your Lexus.
Do not use tires other than stated above. Since your vehicle has radial tires as original equipment, make sure your snow tires also have radial construction. Do not install studded tires without first checking local regulations for possible restrictions.
Snow tire installation
Snow tires should be installed on all wheels.
Installing snow tires on the rear wheels only can lead to an excessive difference in road grip capability between the front and rear tires which could cause loss of vehicle control.
245
CHASSIS
CAUTION
- Do not drive with the snow tires incorrectly inflated.
- Never drive over 120 km/h (75 mph) with any type of snow tires.
Tire chain selection Regulations regarding the use of tire chains vary according to location or type of road. Always check the local regulations before installing chains.
Use SAE Class "S" type radial tire chains, with the exception of radial cable chains or V-bar type chains.
Chain installation Install the chains on the rear tires as tightly as possible. Do not use tire chains on the front tires. Retighten chains after driving 0.5 – 1.0 km (1/4 – 1/2 mile).
When installing chains on your tires, carefully follow the instructions of the chain manufacturer.
CAUTION
- Do not exceed 50 km/h (30 mph) or the chain manufacturer's recommended speed limit, whichever is lower.
- Drive carefully avoiding bumps, holes, and sharp turns, which may cause the vehicle to bounce.
- Avoid sharp turns or locked-wheel braking, as use of chains may adversely affect vehicle handling.
246 6

CHASSIS
REPLACING WHEELS
When to replace your wheels
If you have wheel damage such as bending, cracks or heavy corrosion, the wheel should be replaced.
If you fail to replace damaged wheels, a tire may slip off a wheel or they may cause loss of handling control.
Replacement with used wheels is not recommended as they may have been subjected to rough treatment or high mileage and could fail without warning. Also, bent wheels which have been straightened may have hidden structural damage and therefore should not be used. Never use an inner tube in a leaking wheel which is designed for a tubeless tire.
Wheel selection
When replacing wheels, care should be taken to ensure that they are equivalent to those removed in load capacity, diameter, rim width, and offset.
Correct replacement wheels are available at your Lexus dealer.
A wheel of a different size or type may adversely affect handling, wheel and bearing life, brake cooling, speedometer/odometer calibration, stopping ability, headlight aim, bumper height, vehicle ground clearance, and tire or snow chain clearance to the body and chassis.
ALUMINUM WHEEL PRECAUTIONS
- After driving your vehicle the first 1600 km (1000 miles), check that the wheel nuts are tight.
- If you have rotated, repaired, or changed your tires, check that the wheel nuts are still tight after driving 1600 km (1000 miles).
- When using tire chains, be careful not to damage the aluminum wheels.
- Use only the Lexus wheel nuts and wrench designed for your aluminum wheels.
- When balancing your wheels, use only Lexus balance weights or equivalent and a plastic or rubber hammer.
- As with any wheel, periodically check your aluminum wheels for damage. If damaged, replace immediately.
SUSPENSION AND CHASSIS
CAUTION
Do not modify the suspension/chassis with lift kits, spacers, springs, etc. It can cause dangerous handling characteristics, resulting in loss of control.
247

SECTION 6 – 4
SERVICE PROCEDURES AND SPECIFICATIONS
Electrical components
- Specifications . . . . . . . . . . . . . . . . . . . . . . . . . . . . . . . . . . . . . . . . . . . . . . . . . . . . . . . . . . . . . . . . . . . . . . . . . . . . . . . . . . . . . . . . . . . . . . . . . . . . . . . . . . . . . . . . . . . . . . . . . . . . . . . . . . . . . . . . . . . . . . . . . . . . . . . . . . . . . . . . . . . . . . . . . . . . . . . . . . . . . . . . . . . . . . . . . . . . . . . . . . . . . . . . ........ 249
- Checking battery condition . . . . . . . . . . . . . . . . . . . . . . . . . . . . . . . . . . . . . . . . . . . . . . . . . . . . . . . . . . . . . . . . . . . . . . . . . . . . . . . . . . . . . . . . . . . . . . . . . . . . . . . . . . . . . . . . ........ 253
- Battery recharging precautions . . . . . . . . . . . . . . . . . . . . . . . . . . . . . . . . . . . . . . . . . . . . . . . . . . . . . . . . . . . . . . . . . . . . . . . . . . . . . . . . . . . . . . . . . . . . . . . . . . . . . . . . . . . ........

ELECTRICAL COMPONENTS
SPECIFICATIONS
– FUSE LOCATIONS
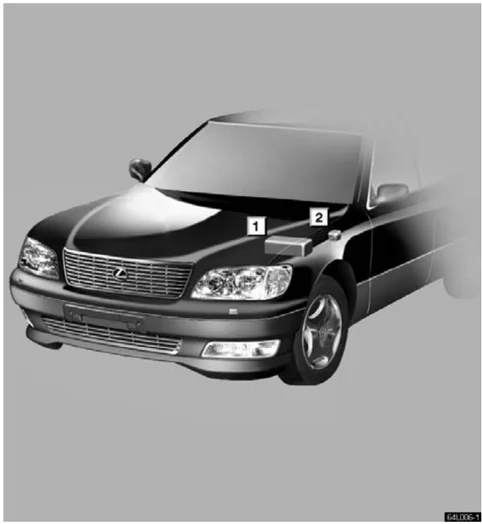
► 1 Engine compartment 2 Driver’s side instrument panel
– FUSES
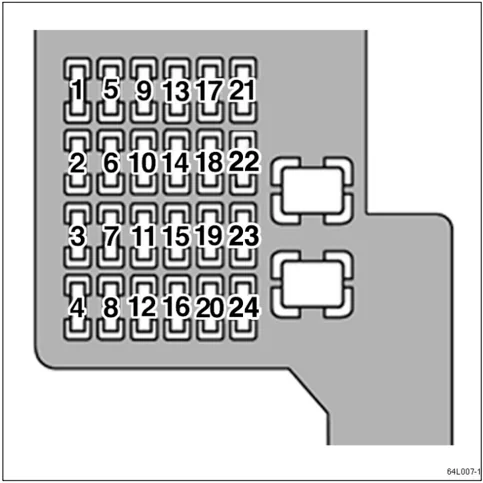
►Driver’s side instrument panel
249