Coolant
- With the engine at normal operating temperature, check the coolant level in the reserve tank. It should be between the UPPER ( 1 ) and LOWER ( 2 ) level marks. If the reserve tank is empty, or if coolant loss is excessive, check for leaks and see your Honda dealer for repair.
- Remove the lower fairing (page 93 ).
- Remove the reserve tank cap ( 3 ). Always add coolant to the reserve tank. Do not attempt to add coolant by removing the radiator cap.
- Add coolant to the reserve tank as required to bring the coolant level to the UPPER level mark.
Coolant Replacement
Refer to Safety Precautions on page 74 .
Coolant should be replaced by your Honda dealer, unless you have the proper tools and service data and are mechanically qualified. Refer to the official Honda Service Manual (page 234 ).
116 Servicing Your Honda
Coolant
WARNING
Removing the radiator cap while the engine is hot can cause the coolant to spray out, seriously scalding you.
Always let the engine and radiator cool down before removing the radiator cap.
To properly dispose of drained coolant, refer to You & the Environment, page 180 .
NOTICE
Improper disposal of drained fluids is harmful to the environment.
Servicing Your Honda 117
Air Cleaner
Refer to Safety Precautions on page 74.
Service the air cleaner more frequently if you ride in unusually wet or dusty areas. Your Honda dealer can help you determine the correct service interval for your riding conditions.
Your motorcycle’s air cleaner has very specific performance requirements. Use a new genuine Honda air cleaner specified for your model or an air cleaner of equivalent quality.
NOTICE Using the wrong air cleaner may result in premature engine damage.
Proper air cleaner maintenance can prevent premature engine wear or damage, expensive repairs, low engine power, poor gas mileage, and spark plug fouling.
NOTICE Improper or lack of proper air cleaner maintenance can cause poor performance and premature engine wear.
118 Servicing Your Honda
Air Cleaner
Air Cleaner Replacement
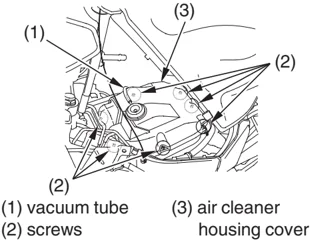
(1) vacuum tube (2) screws (3) air cleaner housing cover
- Raise the fuel tank (page 98 ).
- Disconnect the vacuum tube (1).
- Remove the screws (2) that secure the air cleaner housing cover (3).
- Remove the cover.
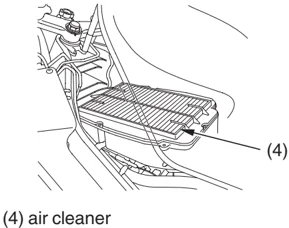
(4) air cleaner
- Remove the air cleaner (4).
- Discard the air cleaner.
- Install a new air cleaner.
- Install the removed parts in reverse order of removal.
Servicing Your Honda 119
Throttle
Throttle Freeplay
Refer to Safety Precautions on page 74.
RIGHT HANDLEBAR
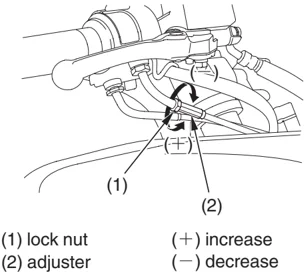
(1) lock nut (2) adjuster (+) increase (−) decrease
Inspection
Check freeplay at the throttle grip flange. Freeplay: 1/16 – 1/4 in (2 – 6 mm) If necessary, adjust to the specified range.
Adjustment
- Loosen the lock nut (1).
- Turn the adjuster (2).
- After adjustment, check for smooth rotation of the throttle grip from fully closed to fully open in all steering positions.
120 Servicing Your Honda
Throttle
Throttle Inspection
Refer to Safety Precautions on page 74.
- Check that the throttle assembly is positioned properly and the securing bolts are tight.
- Check for smooth rotation of the throttle from fully open to fully closed in all steering positions. If there is a problem, see your Honda dealer.
Servicing Your Honda 121
Clutch System
Your motorcycle has a hydraulically-actuated clutch. There are no adjustments to perform, but the clutch system must be inspected periodically for fluid level and leakage.
If control lever freeplay becomes excessive and the motorcycle creeps or stalls when shifted into gear, or if the clutch slips, causing acceleration to lag behind engine speed, there is probably air in the clutch system. See your Honda dealer to have the air bled out of the system.
Clutch Lever Adjustment
Refer to Safety Precautions on page 74.
The distance between the tip of the clutch lever and the grip may be adjusted.
LEFT HANDLEBAR
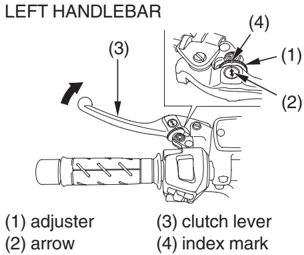
(1) adjuster (2) arrow (3) clutch lever (4) index mark
122 Servicing Your Honda
Clutch System
- Turn the adjuster (1) while pushing the clutch lever forward.
- Align the arrow (2) on the clutch lever (3) with the index mark (4) on the adjuster.
- Start the engine, pull the clutch lever in, and shift into gear. Make sure the engine does not stall and the motorcycle does not creep. Gradually release the clutch lever and open the throttle. Your motorcycle should move smoothly and accelerate gradually.
Fluid Level Inspection
Refer to Safety Precautions on page 74 .
LEFT FRONT
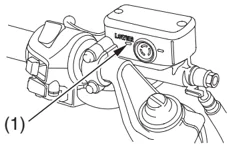
(1) LOWER level mark
Check that the fluid level is above the LOWER level mark. If the fluid level is below the LOWER level mark, it indicates fluid leakage. See your Honda dealer for repair.
Servicing Your Honda 123
Clutch System
Other Inspections
• Make sure there are no fluid leaks. • Check for deterioration or cracks in the hose and fittings. • Check that the clutch lever assembly is positioned properly and the securing bolts are tight.
124 Servicing Your Honda
Engine Idle Speed
Remember, idle speed adjustment is not a “cure-all” for other problems in your engine’s fuel-delivery system. Adjusting the idle will not compensate for a fault elsewhere.
The engine must be at normal operating temperature for accurate idle speed adjustment.
I dle Speed Adjustment
Refer to Safety Precautions on page 74.
RIGHT SIDE
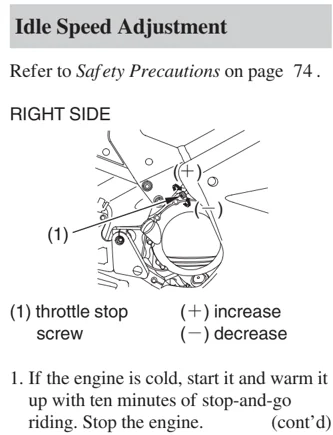
(1) throttle stop screw (+) increase (−) decrease
- If the engine is cold, start it and warm it up with ten minutes of stop-and-go riding. Stop the engine. (cont’d)
Servicing Your Honda 125
Engine Idle Speed
- Place your motorcycle on its center stand on a firm, level surface.
- Shift into neutral. Start the engine.
- Adjust idle speed with the throttle stop screw (1). Idle speed (in neutral): 1,200 ± 100 rpm
126 Servicing Your Honda
Spark Plugs
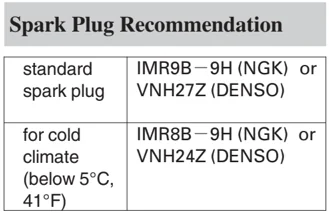
Spark Plug Recommendation
Use only the recommended type of spark plugs in the recommended heat range.
NOTICE
Using spark plugs with an improper heat range can cause engine damage.
This motorcycle uses spark plugs that have an iridium coated center electrode. Be sure to observe the following when servicing the spark plugs.
• Do not clean the spark plugs. If an electrode is contaminated with accumulated objects or dirt, replace the spark plug with a new one.
• To check the spark plug gap, use only a "wire-type feeler gauge." To prevent damaging the iridium coating of the center electrode, never use a "leaf-type feeler gauge."
• Do not adjust the spark plug gap. If the gap is out of specification, replace the spark plug with a new one.
Servicing Your Honda 127
Spark Plugs
Spark Plug Replacement & Inspection
Refer to Safety Precautions on page 74.
Spark Plug Access To access the rear cylinder spark plugs:
- Raise the fuel tank (page 98).
- Remove the bolts (1).
- Disconnect the ignition coil connectors ( 2 ).
- Disconnect the ignition coils ( 3 ) from the spark plugs.
LEFT SIDE (right side similar) (rear cylinder)
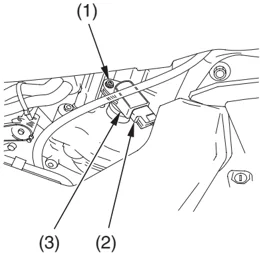
(1) bolts (2) ignition coil connectors (3) ignition coils
128 Servicing Your Honda
Spark Plugs
- Clean any dirt from around the spark plug bases.
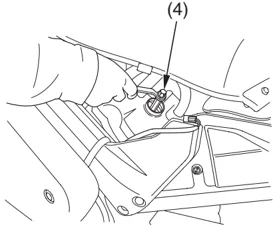
- Using a spark plug wrench (4), remove the spark plugs.
Be careful not to damage the hoses and the wire harness.
LEFT SIDE (right side similar) (rear cylinder)
(4) spark plug wrench
Servicing Your Honda 129
Spark Plugs
To access the front cylinder spark plugs:
- Remove the bolts (5) and wire harness holder (6).
- Disconnect the ignition coil connectors ( 7 ).
- Disconnect the ignition coils ( 8 ) from the spark plugs.
FRONT (front cylinder)
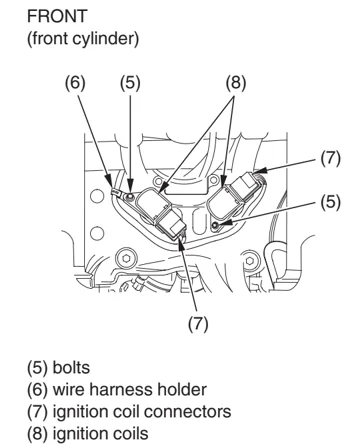
(5) bolts (6) wire harness holder (7) ignition coil connectors (8) ignition coils
130 Servicing Your Honda
Spark Plugs
- Clean any dirt from around the spark plug bases.
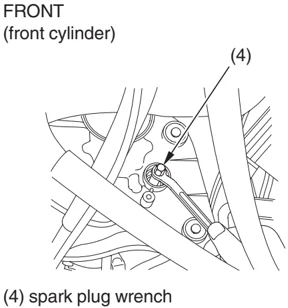
- Using a spark plug wrench (4), remove the spark plugs.
FRONT (front cylinder)
(4) spark plug wrench
- Inspect the electrodes and center porcelain for deposits, corrosion, or carbon fouling. If the corrosion or deposits are heavy, replace the plug.
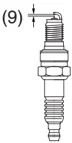
- Make sure that a 1.0 mm wire-type feeler gauge cannot be inserted between the spark plug gap ( 9 ). If the gauge fits in the gap, replace the plug with a new one.
- Make sure the plug washer is in good condition.
(9) spark plug gap
(cont'd)
Servicing Your Honda 131
Spark Plugs
- With the plug washers attached, thread the spark plugs in by hand to prevent cross-threading.
- Tighten each spark plug:
- If the old plug is good: 1/8 turn after it seats.
- If installing a new plug, tighten it twice to prevent loosening: a) First, tighten the plug: NGK: 1/2 turn after it seats. DENSO: 1 turn after it seats. b) Then loosen the plug. c) Next, tighten the plug again: 1/8 turn after it seats.
NOTICE Improperly tightened spark plugs can damage the engine. If a plug is too loose, a piston may be damaged. If a plug is too tight, the threads may be damaged.
- Reinstall the ignition coils (10).
- Connect the ignition coil connectors (11) to the ignition coils as before removal.
- Install the wire harness holder (12 ) to the right side of front cylinder and install and tighten the bolts.
- Install the remaining parts in the reverse order of removal.
- Hold the ignition coils wire harness (13 ) in the right side of front cylinder with the wire harness holder (12 ).
132 Servicing Your Honda
Spark Plugs
RIGHT FRONT (front cylinder)
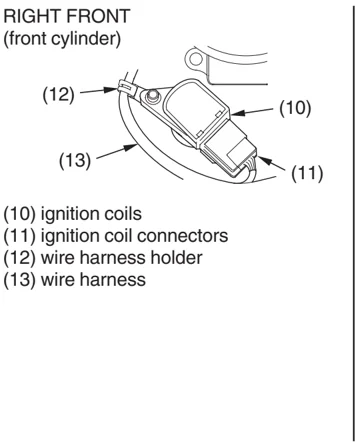
(10) ignition coils (11) ignition coil connectors (12) wire harness holder (13) wire harness
Servicing Your Honda 133