Suspension
Your front and rear suspension systems use springs, hydraulic damping devices, and linkages (rear only) that suspend your weight and most of the weight of your motorcycle.
The spring pre-loads for your front and rear suspension systems adjust the amount of force required to begin compression of the spring.
The oil damper systems hydraulically control the rebound of the suspension springs so that traction and comfort are maintained as the wheels ride over road surfaces.
Consider adjusting your suspension whenever you change your normal load, by adding or subtracting a passenger, cargo, or accessories, or when the road or riding conditions change.
The way you ride your motorcycle and the type of ride you want to experience can also influence your suspension needs.
You may adjust the spring pre-load of both suspension systems. You may also adjust the rebound damping of the rear suspension system.
134 Servicing Your Honda
Suspension
Lower spring pre-load and softer damping provide a softer ride and are usually preferred for light loads and smooth roads. Higher spring pre-load and firmer damping provide a firmer ride and are recommended for heavy loads, rough road conditions, and faster, more challenging riding.
Front Suspension Adjustment
The front suspension can be adjusted for rider (and passenger) weight and riding conditions by changing the spring pre-load.
Servicing Your Honda 135
Suspension
Front Suspension Spring Pre-load
Refer to Safety Precautions on page 74.
FRONT STANDARD POSITION
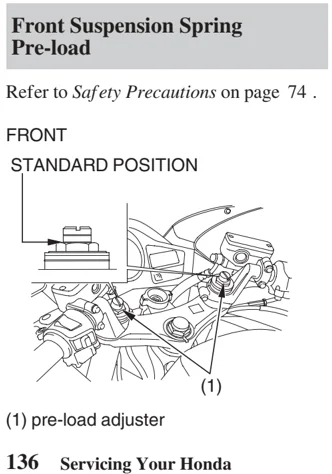
(1) pre-load adjuster
Adjust the spring pre-load by turning the pre-load adjuster (1).
Make sure that both fork legs are adjusted to the same position.
To Reduce Spring Pre-load (SOFT): For a light load and smooth road conditions, turn the adjuster counterclockwise toward SOFT.
To Increase Spring Pre-load (HARD): For a firmer ride and rough road conditions, turn the adjuster clockwise toward HARD.
136 Servicing Your Honda
Suspension
Rear Suspension Adjustment
The rear suspension can be adjusted for rider (and passenger) weight and riding conditions by changing the spring pre-load and rebound damping.
The rear shock absorber includes a damper unit that contains high pressure nitrogen gas. Do not attempt to disassemble, service, or dispose of the damper; see your Honda dealer. The instructions found in this owner’s manual are limited to adjustments of the shock assembly only.
Servicing Your Honda 137
Suspension
Rear Suspension Spring Pre-load
Refer to Safety Precautions on page 74.
LEFT SIDE (INTERCEPTOR)
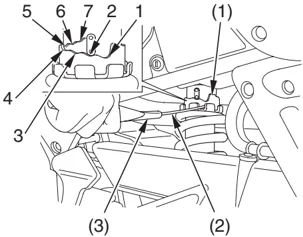
(1) spring pre-load adjuster (2) pin spanner (3) extension bar
The spring pre-load adjuster (1) has 7 positions for different load or riding conditions. Use the pin spanner (2) and extension bar (3) to adjust the rear shock spring pre-load. Position 1: for a light load and smooth road conditions. Position 2: standard position. Positions 3 to 7: for when the motorcycle is more heavily loaded. (Also increase spring pre-load for stiffer rear suspension.)
Always adjust the shock absorber position in sequence (1-2-3-4-5-6-7 or 7-6-5-4-3-2-1). Attempting to adjust directly from 1 to 7 or 7 to 1 may damage the shock absorber.
138 Servicing Your Honda
Suspension
(INTERCEPTOR ABS) The spring pre-load adjuster knob (1) has 35 spring pre-load positions (clicks) or more for different load or riding conditions.
To adjust the spring pre-load, turn the adjuster knob (1).
To adjust to the standard position:
- Turn the spring pre-load adjuster knob (1) counterclockwise until it will no longer turn (lightly seats). This is the full LOW setting.
- Turn the adjuster clockwise by 7 clicks. At that position, the end of the adjuster knob (2) should be aligned with the indicator line (3).
To Reduce Spring Pre-load (LOW): For a light load and smooth road conditions, turn the adjuster counterclockwise toward LOW.
To Increase Spring Pre-load (HIGH): For a firmer ride and rough road conditions, turn the adjuster clockwise toward HIGH.
RIGHT SIDE
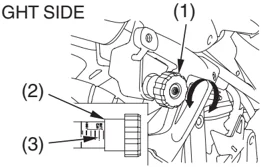
(1) adjuster knob (2) end of the adjuster knob (3) indicator line
Servicing Your Honda 139
Suspension
Rear Suspension Damping
Refer to Safety Precautions on page 74.
Rebound Damping
LEFT UNDER
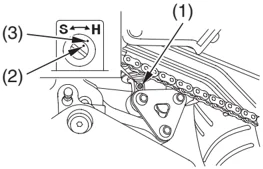
(1) damping adjuster (2) punch mark (3) reference punch mark
To adjust to the standard position:
- Turn the damping adjuster (1) clockwise until it will no longer turn. This is the full hard setting.
- Turn the adjuster counterclockwise approximately 1-1/4 turns so that the punch mark (2) on the adjuster aligns with the reference punch mark (3). This is the standard position.
To Reduce Rebound Damping (SOFT): For a light load and smooth road conditions, turn the adjuster counterclockwise toward SOFT (S).
To Increase Rebound Damping (HARD): For a firmer ride and rough road conditions, turn the adjuster clockwise toward HARD (H).
140 Servicing Your Honda
The hydraulic braking systems on your motorcycle dissipate the heat generated by the friction of the brake pads on the brake discs as the wheels are slowed.
As the brake pads wear, the brake fluid level will drop. A leak in the system will also cause the level to drop.
Frequently inspect the system to ensure there are no fluid leaks. Periodically inspect the brake fluid level and the brake pads for wear.
If the brake lever or brake pedal freeplay does not feel within the normal range while riding, check the brake pads for wear (page 145 ). Worn pads should be replaced. If the pads are not worn beyond the recommended limit, there is probably air in the brake system. See your Honda dealer to have the air bled from the system.
Brakes
Front Brake Lever Adjustment
Refer to Safety Precautions on page 74 .
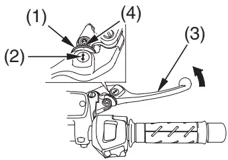
The distance between the tip of the brake lever and the grip may be adjusted.
RIGHT HANDLEBAR
(1) adjuster (2) arrow (3) brake lever (4) index mark
Servicing Your Honda 141
Brakes
- Turn the adjuster (1) while pushing the lever forward.
- Align the arrow (2) on the brake lever (3) with the index mark (4) on the adjuster.
- Apply the brake, release it, then spin the wheel and check that it rotates freely. Repeat this procedure several times.
Brake Fluid Recommendation
| brake fluid | Honda DOT 4 Brake Fluid |
|---|
The recommended brake fluid is Honda DOT 4 Brake Fluid, or any brake fluid of equal quality and performance. Use fresh brake fluid from a sealed container. Be sure to read the label before opening the sealed container. An opened container may be contaminated or may have absorbed moisture from the air.
142 Servicing Your Honda
Brakes
Fluid Level Inspection
Refer to Safety Precautions on page 74.
If your inspection indicates a low fluid level, have your Honda dealer add the recommended brake fluid.
Do not add or replace brake fluid, except in an emergency. If you do add fluid, have your Honda dealer check the system as soon as possible.
NOTICE Brake fluid can damage plastic and painted surfaces. Handle with care.
Wipe up spills immediately. Avoid contact with skin or eyes. In case of contact, wash thoroughly and call a doctor immediately if it contacts your eyes.
RIGHT HANDLEBAR (front brake)
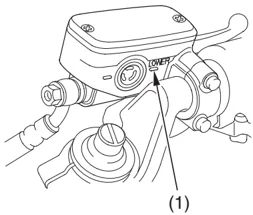
(1) LOWER level mark
Servicing Your Honda 143
Brakes
UNDER SEAT
(rear brake)
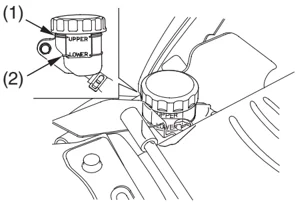
(1) UPPER level mark (2) LOWER level mark
- Place your motorcycle on its center stand on a firm, level surface.
- Remove the seat (page 90 ).
- Check the fluid level. It should be between the UPPER (1) and LOWER (2) level marks. If the level is at or below the LOWER level mark, check the brake pads for wear (page 145 ).
Worn pads should be replaced. If the pads are not worn beyond the recommended limit, have your brake system inspected for leaks.
Other Inspections
- Make sure there are no fluid leaks.
- Check for deterioration or cracks in the hoses and fittings.
144 Servicing Your Honda
Brakes
Brake Pad Wear
Refer to Safety Precautions on page 74.
Brake pad wear depends upon the severity of usage, the type of riding, and road conditions. Generally, the pads will wear faster on wet and dirty roads. Inspect the pads at each regular maintenance interval (page 82).
Always inspect both pads in both the right and left front brake calipers.
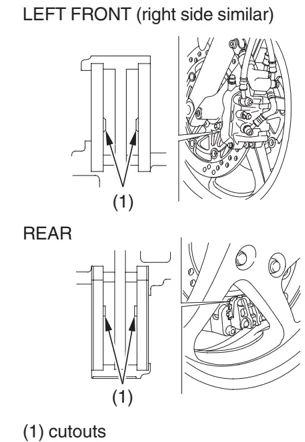
Check the cutouts (1) in each pad. If either pad is worn to the cutout, replace both pads as a set. See your Honda dealer for this service.
LEFT FRONT (right side similar)
(1)
REAR
(1)
(1) cutouts
Servicing Your Honda 145
Brakes
Brake System Inspection
Refer to Safety Precautions on page 74.
- Place the motorcycle on its center stand, stop the engine, and place the transmission in neutral.
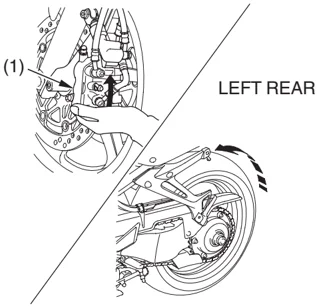
- Move the left caliper assembly (1) upward while slowly rotating the rear wheel. The brake system is normal if the rear wheel stops. If the rear wheel does not stop, see your Honda dealer.
(1) left caliper assembly
146 Servicing Your Honda
Tires
To safely operate your motorcycle, your tires must be the proper type and size, in good condition with adequate tread, and correctly inflated for the load you are carrying.
⚠ WARNING
Using tires that are excessively worn or improperly inflated can cause a crash in which you can be seriously hurt or killed.
Follow all instructions in this owner’s manual regarding tire inflation and maintenance.
The following pages give detailed information on how and when to check your air pressure, how to inspect your tires for wear and damage, and our recommendations for tire repair and replacement.
Air Pressure
Refer to Safety Precautions on page 74.
Properly inflated tires provide the best combination of handling, tread life, and riding comfort. Generally, underinflated tires wear unevenly, adversely affect handling, and are more likely to fail from being overheated. Overinflated tires make your motorcycle ride harshly, are more prone to damage from road hazards, and wear unevenly.
Tires
We recommend that you visually check your tires before every ride and use an air pressure gauge to measure the air pressure at least once a month or any time you think the tires might be low. Even tires that are in good condition may lose one to two psi per month if not checked and adjusted regularly.
Tubeless tires have some degree of self-sealing ability if they are punctured. However, because leakage is often very slow, you should look closely for punctures whenever a tire is not fully inflated.
Always check air pressure when your tires are “cold” — after the motorcycle has been parked for at least three hours. If you check air pressure when your tires are “warm” — even if your motorcycle has only been ridden for a few miles — the readings will be higher. If you let air out of warm tires to match the recommended cold pressures, the tires will be underinflated.
The recommended “cold” tire pressures are:
148 Servicing Your Honda
Tires
Inspection
Refer to Safety Precautions on page 74.
Whenever you check the tire pressures, you should also look for:
- Bumps or bulges in the side of the tire or the tread. Replace any tire that has a bump or bulge.
- Cuts, slits, or cracks in the tires. Replace the tire if you can see fabric or cord.
- Nails or other foreign objects embedded in the side of the tire or tread.
- Excessive tread wear.
Also, if you hit a pothole or hard object while riding, pull to the side of the road as soon as you safely can and carefully inspect the tires for damage.
Tread Wear
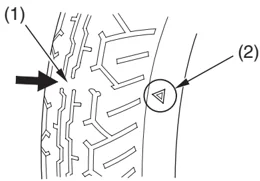
(1) wear indicator (2) wear indicator location mark
Servicing Your Honda 149
Tires
For the best performance, you should replace a tire before the tread depth at the center reaches the following limits:
If the wear indicators are visible, replace the tire immediately as it is no longer safe.
Tire Repair
Refer to Safety Precautions on page 74.
We strongly recommend that you replace, not repair, any tire that is punctured or damaged. As discussed below, a tire that is repaired, either temporarily or permanently, will have lower speed and performance limits than a new or undamaged tire.
A temporary repair can sometimes be made in an emergency situation. However, since a temporary repair may not hold, you must ride very slowly, preferably without any cargo or passenger, and have the tire replaced or permanently repaired as soon as possible.
(For more information on temporary repairs, see If You Have a Flat Tire, page 188 .)
150 Servicing Your Honda
Tires
A permanent repair, such as an internal plug patch, can be made if a tire has only a small puncture in the tread area. With such a repair, you should not exceed 50 mph (80 km/h) for the first 24 hours, or 80 mph (130 km/h) at any time thereafter. In addition, you may not be able to safely carry as much weight. If you choose to have a tire repaired, be sure the repair work is performed by a professional and that the wheel is balanced before you ride.
If you have a tire professionally repaired at a non-Honda facility, we recommend that you have the work checked by your Honda dealer.
Tire Replacement
Refer to Safety Precautions on page 74.
The tires that came on your motorcycle were designed to match the performance capabilities of your motorcycle and provide the best combination of handling, braking, durability, and comfort.
Servicing Your Honda 151