Safety Labels
Safety labels on your motorcycle either warn you of potential hazards that could cause serious injury or they provide important safety information. Read these labels carefully and don’t remove them.
If a label comes off or becomes hard to read, contact your Honda dealer for a replacement.
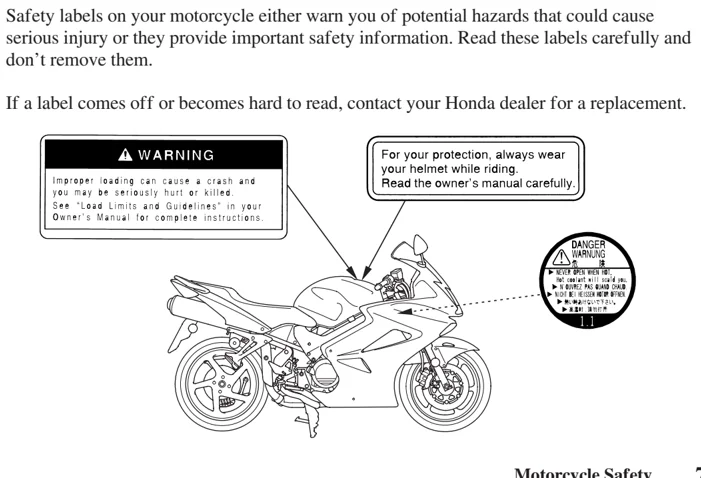
WARNING Improper loading can cause a crash and you may be seriously hurt or killed. See "Load Limits and Guidelines" in your Owner's Manual for complete instructions.
For your protection, always wear your helmet while riding. Read the owner's manual carefully.
DANGER WARNUNG 危険 危険 ▶ NEVER OPEN WHEN HOT. Hot coolant will scald you. ▶ N'OUVREZ PAS QUAND CHAUD. ▶ NICHT BEI HEISSEN MOTOR ÖFFNEN. ▶ 熱い時あけないで下さい。 ▶ 高温时,请勿打开。
Motorcycle Safety 7
Safety Labels
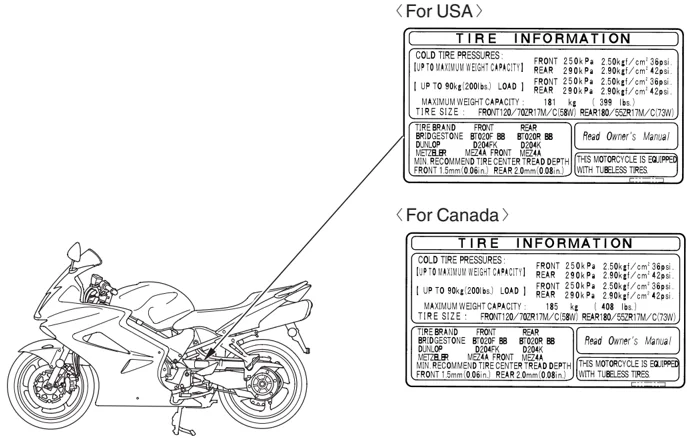
For USA
TIRE INFORMATION
COLD TIRE PRESSURES:
[UP TO MAXIMUM WEIGHT CAPACITY]
FRONT 250kPa 2.50kgf/cm² 36psi.
REAR 290kPa 2.90kgf/cm² 42psi.
[ UP TO 90kg(200lbs.) LOAD ]
FRONT 250kPa 2.50kgf/cm² 36psi.
REAR 290kPa 2.90kgf/cm² 42psi.
MAXIMUM WEIGHT CAPACITY: 181 kg (399 lbs.)
TIRE SIZE: FRONT120/70ZR17M/C(58W) REAR180/55ZR17M/C(73W)
TIRE BRAND
FRONT REAR
BRIDGESTONE BT020F BB BT020R BB
DUNLOP D204FK D204K
METZELER MEZ4A FRONT MEZ4A
MIN. RECOMMEND TIRE CENTER TREAD DEPTH
FRONT 1.5mm(0.06in.) REAR 2.0mm(0.08in.)
Read Owner's Manual
THIS MOTORCYCLE IS EQUIPPED WITH TUBELESS TIRES.
For Canada
TIRE INFORMATION
COLD TIRE PRESSURES:
[UP TO MAXIMUM WEIGHT CAPACITY]
FRONT 250kPa 2.50kgf/cm² 36psi.
REAR 290kPa 2.90kgf/cm² 42psi.
[ UP TO 90kg(200lbs.) LOAD ]
FRONT 250kPa 2.50kgf/cm² 36psi.
REAR 290kPa 2.90kgf/cm² 42psi.
MAXIMUM WEIGHT CAPACITY: 185 kg (408 lbs.)
TIRE SIZE: FRONT120/70ZR17M/C(58W) REAR180/55ZR17M/C(73W)
TIRE BRAND
FRONT REAR
BRIDGESTONE BT020F BB BT020R BB
DUNLOP D204FK D204K
METZELER MEZ4A FRONT MEZ4A
MIN. RECOMMEND TIRE CENTER TREAD DEPTH
FRONT 1.5mm(0.06in.) REAR 2.0mm(0.08in.)
Read Owner's Manual
THIS MOTORCYCLE IS EQUIPPED WITH TUBELESS TIRES.
8 Motorcycle Safety
Instruments & Controls
This section shows the location of all gauges, indicators, and controls you would normally use before or while riding your motorcycle.
The items listed on this page are described in this section. Instructions for other components are presented in other sections of this manual where they will be most useful.
- Operation Component Locations ........ 11
- Gauges, Indicators & Displays ........ 14
- Multi-function Display ........ 24
- Fuel Gauge ........ 25
- Coolant Temperature Meter ........ 26
- Air Temperature Meter ........ 28
- Speedometer ........ 30
- Odometer ........ 30
- Tripmeter A & B ........ 31 Changing the Speed and
- Mileage Unit ........ 32
- Digital Clock ........ 33
(cont'd)
Instruments & Controls 9
Instruments & Controls
- Controls & Features ........ 35
- Ignition Switch ........ 35
- Start Button ........ 36
- Engine Stop Switch ........ 36
- Hazard Switch ........ 37
- Headlight Dimmer Switch ........ 38
- Turn Signal Switch ........ 38
- Horn Button ........ 39
- SELECT Button ........ 39
- RESET Button ........ 39
10 Instruments & Controls
Operation Component Locations
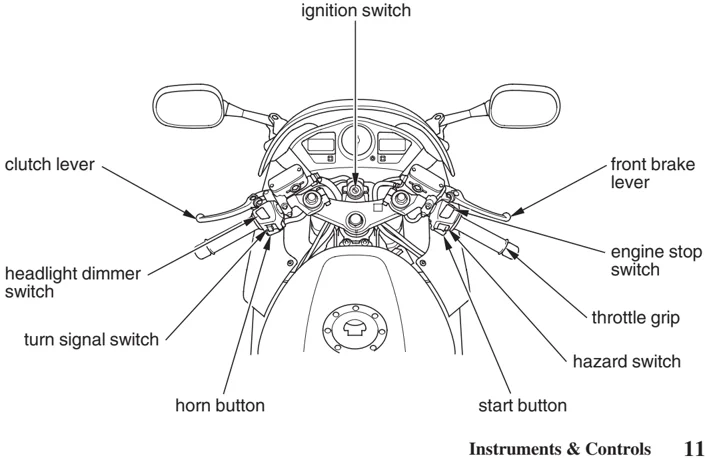
ignition switch
clutch lever front brake lever engine stop switch throttle grip hazard switch start button horn button turn signal switch headlight dimmer switch
Instruments & Controls 11
Operation Component Locations
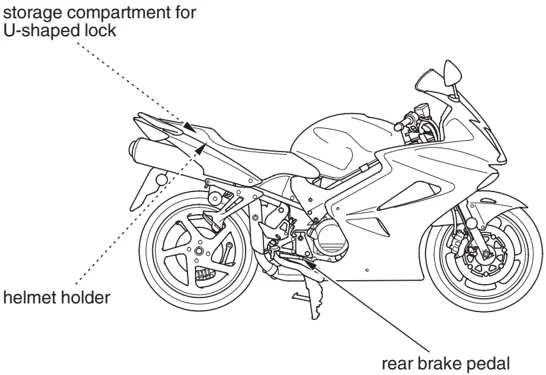
storage compartment for U-shaped lock
helmet holder
rear brake pedal
12 Instruments & Controls
Operation Component Locations
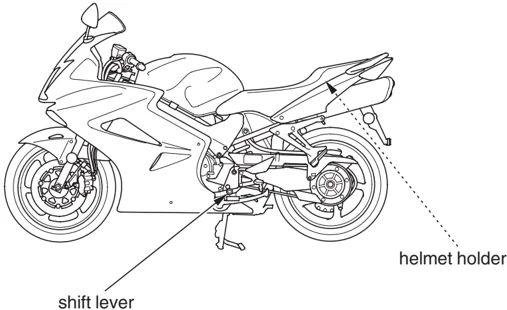
shift lever helmet holder
Instruments & Controls 13
Gauges, Indicators & Displays
The gauges, indicators and displays on your motorcycle keep you informed, alert you to possible problems, and make your riding safer and more enjoyable. Refer to the gauges, indicators and displays frequently. Their functions are described on the following pages.
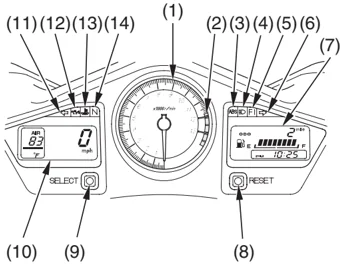
(1) tachometer (2) tachometer red zone (3) anti-lock brake system (ABS) indicator (INTERCEPTOR ABS only) (4) high beam indicator (5) PGM-FI malfunction indicator lamp (MIL) (6) right turn signal indicator (7) right multi-function display (8) RESET button (9) SELECT button (10) left multi-function display (11) left turn signal indicator (12) low oil pressure indicator (13) high coolant temperature indicator (14) neutral indicator
14 Instruments & Controls
Gauges, Indicators & Displays
Lamp Check
The low oil pressure indicator comes on when you turn the ignition switch ON so you can check that it is working. The indicator remains on until after the engine is started.
The PGM-FI malfunction indicator lamp lights for a few seconds and then goes off when you turn the ignition switch ON.
(INTERCEPTOR ABS only) The anti-lock brake system (ABS) indicator comes on when you turn the ignition switch ON. This indicator goes off after you ride the motorcycle at a speed above 6 mph (10 km/h).
When applicable, the high beam and neutral indicators come on when you turn the ignition switch ON and remain on until you select the low beam or shift out of neutral.
These indicators are identified in the table on pages 18 — 23 with the words: Lamp Check.
If one of these indicators does not come on when it should, have your Honda dealer check for burned-out bulbs or other problems.
Instruments & Controls 15
Gauges, Indicators & Displays
Display Check
When the ignition switch is turned ON, the left multi-function display (1) and right multi-function display (2) will temporarily show all the modes and digital segments so you can make sure the liquid crystal display is functioning properly. (Except digital clock)
The displays are identified in the table on pages 20 — 22 with the words: Display Check.
If any part of these displays does not come on when it should, have your Honda dealer check for problems.
16 Instruments & Controls
Gauges, Indicators & Displays
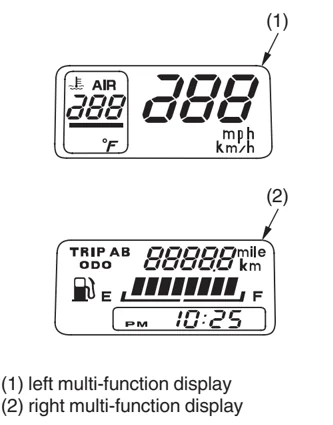
(1) left multi-function display (2) right multi-function display
Instruments & Controls 17
Gauges, Indicators & Displays
| 1 | tachometer | Shows engine speed in revolutions per minute (rpm). |
|---|---|---|
| 2 | tachometer red zone | Shows excessive engine rpm range (indicated from the beginning of the tachometer red zone) in which operation may damage the engine. Do not let the tachometer needle enter the red zone. |
| 3 | anti-lock brake system (ABS) indicator (red) (INTERCEPTOR ABS) | Lights when there is any abnormality in the anti-lock brake system (ABS). Normally, this indicator comes on when the ignition switch is turned ON, and goes off after you ride the motorcycle at a speed above 6 mph (10 km/h). If the indicator comes on while riding, stop the motorcycle in a safe place and turn off the engine. Refer to ABS Indicator, page 62. For information about ABS, see page 61. Lamp Check. |
| 4 | high beam indicator (blue) | Lights when the headlight is on high beam. |
18 Instruments & Controls
Gauges, Indicators & Displays
| 5 | PGM-FI malfunction indicator lamp (MIL) (red) | Flashes when there is any abnormality in the PGM-FI (Programmed Fuel Injection) system. Should also light for a few seconds and then go off when the ignition switch is turned ON and the engine stop switch is at RUN. If the indicator comes on at any other time, reduce speed and take your motorcycle to a Honda dealer as soon as possible. Lamp Check. |
|---|---|---|
| 6 | right turn signal indicator (amber) | Flashes when the right turn signal operates. |
Instruments & Controls 19
Gauges, Indicators & Displays
| 7 | right multi-function display | The display includes the following functions: Display Check. |
|---|---|---|
| tripmeter A & B | Shows the number of miles or kilometers ridden since you last reset the meter. The tripmeter has two sub modes, “A” and “B.” To zero (0) the tripmeter, press the RESET button (page 31). | |
| odometer | Shows the total miles or kilometers ridden (page 30). | |
| fuel gauge | Shows approximate fuel supply available (page 25). When segment F comes on, the fuel tank capacity is: 5.81 US gal (22.0 ℓ) When segment E flashes while riding, fuel reserved in the tank is about: 0.92 US gal (3.5 ℓ) | |
| digital clock | Shows hour and minute (page 33). |
20 Instruments & Controls
Gauges, Indicators & Displays
| 8 | RESET button | Selects odometer and trip meter A or B and resets the trip meter to zero (0) (page 31). Also used to set the digital clock (page 33). |
|---|---|---|
| 9 | SELECT button | Selects coolant or air temperature meter (page 26) and changes speed and mileage units for the speedometer/odometer/trip meter (page 32). Also used to set the digital clock (page 33). |
Instruments & Controls 21
Gauges, Indicators & Displays
| 10 | left multi-function display | The display includes the following functions: Display Check. |
|---|---|---|
| speedometer | Shows riding speed in miles or kilometers per hour (page 30). | |
| coolant temperature meter | Shows engine coolant temperature digitally (page 26). USA: Fahrenheit (°F), Canada: Centigrade (°C). If the display begins to flash and a red bar appears on the display, pull safely to the side of the road. See page 199 for instructions and cautions. | |
| air temperature meter | Shows air (ambient) temperature (page 28). USA : Fahrenheit (°F), Canada : Centigrade (°C). |
22 Instruments & Controls
Gauges, Indicators & Displays
| 11 | left turn signal indicator (amber) | Flashes when the left turn signal operates. |
|---|---|---|
| 12 | low oil pressure indicator (red) | Lights when engine oil pressure is low enough to cause engine damage. If the low oil pressure indicator lights during operation, pull safely to the side of the road. See page 201 for instructions and cautions. Lamp Check. |
| 13 | high coolant temperature indicator (red) | Lights when the coolant is over the specified temperature. If the indicator comes on, pull safely to the side of the road. See pages 199 — 200 for instructions and cautions. |
| 14 | neutral indicator (green) | Lights when the transmission is in neutral. |
Instruments & Controls 23
Gauges, Indicators & Displays
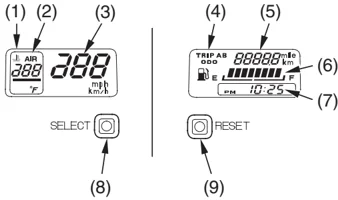
Multi-function Display
The left multi-function display (1) includes the following functions: coolant/air temperature meter speedometer
The right multi-function display (4) includes the following functions: odometer/tripmeter fuel gauge digital clock
Both the digital clock and tripmeter will reset if the battery is disconnected.
(1) left multi-function display (2) coolant/air temperature meter (3) speedometer (4) right multi-function display (5) odometer/tripmeter (6) fuel gauge (7) digital clock (8) SELECT button (9) RESET button
24 Instruments & Controls
Gauges, Indicators & Displays
Fuel Gauge
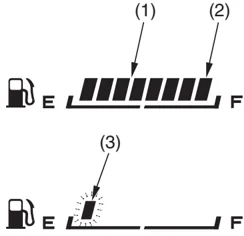
The fuel gauge liquid crystal display (1) shows the approximate fuel supply available in a graduated display. When segment F (2) goes on, the fuel tank capacity is: 5.81 US gal (22.0 l) When segment E (3) flashes, you should refill the tank as soon as possible. The amount of fuel remaining when the flashing starts is approximately: 0.92 US gal (3.5 l)
(1) fuel gauge display (2) segment F (3) segment E
Instruments & Controls 25
Gauges, Indicators & Displays
Coolant Temperature Meter
The coolant temperature meter (1) shows the coolant temperature digitally.
USA : Fahrenheit (°F), Canada : Centigrade (°C).
If the air temperature is displayed, push the SELECT button (4) to display the coolant temperature.
Temperature Display
(1) coolant temperature meter (2) black bar
26 Instruments & Controls
Gauges, Indicators & Displays
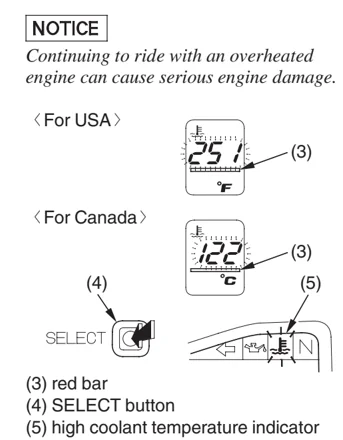
Overheating Message: When the coolant temperature reaches 251°F (122°C), the numbers in the temperature display start flashing and the black bar (2) under the numbers becomes a red bar (3). At the same time, the high coolant temperature indicator (5) lights. If this occurs, stop the engine and check the reserve tank coolant level. Read pages 114 — 117 and do not ride the motorcycle until the problem has been corrected.
If the coolant temperature reaches 251°F (122°C) while the air temperature display is selected, the display will automatically switch to coolant temperature.
NOTICE Continuing to ride with an overheated engine can cause serious engine damage.
〈For USA〉
〈For Canada〉
(3) red bar (4) SELECT button (5) high coolant temperature indicator
Instruments & Controls 27
Gauges, Indicators & Displays
Air Temperature Meter
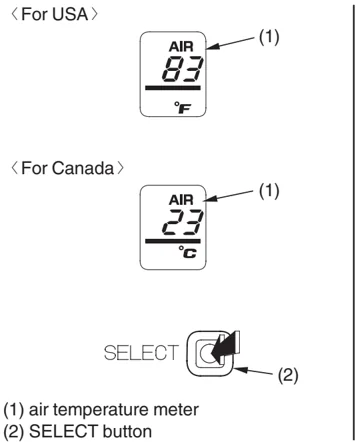
The air temperature meter (1) shows the air temperature digitally.
USA : Fahrenheit (°F), Canada : Centigrade (°C).
If the coolant temperature is displayed, push the SELECT button (2) to display the air temperature.
Temperature Display
The temperature sensor is located in the upper fairing. Therefore, the temperature reading can be affected by heat reflection from the road surface, engine heat, and the exhaust from the surrounding traffic. This can cause an error in the temperature reading when your speed is under 19 mph (30 km/h).
28 Instruments & Controls
Gauges, Indicators & Displays
〈For USA〉
(1)
AIR 83 °F
〈For Canada〉
(1)
AIR 23 °C
SELECT
(2)
(1) air temperature meter (2) SELECT button
Instruments & Controls 29
Gauges, Indicators & Displays
Speedometer
The speedometer (1) shows riding speed in miles or kilometers per hour. The speedometer will show “mph” (USA) or “km/h” (Canada) when the battery is reconnected.
Odometer
The odometer (2) shows the total miles or kilometers ridden. This meter can display from 0 to 99,999 miles (kilometers). If the display exceeds 99,999 miles (kilometers), it will return to 0 automatically.
However, you may check the complete odometer reading when the ignition switch is turned ON. The missing sixth digit (indicating hundreds of thousands of miles or kilometers) will display by itself for 0.75 seconds. Then, the odometer will display the maximum 5 digits.
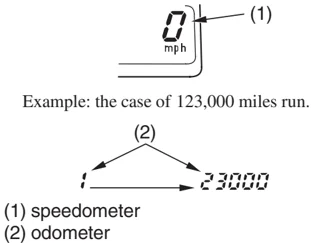
Example: the case of 123,000 miles run.
(1) speedometer (2) odometer
30 Instruments & Controls
Gauges, Indicators & Displays
Tripmeter A & B
The tripmeter shows number of miles or kilometers ridden since you last reset the meter.
The tripmeter has two sub modes, A (3) and B (4).
Push the RESET button (5) to switch between the odometer (2), tripmeter A (3) and tripmeter B (4).
To reset the tripmeter, push and hold the RESET button (5) with the display in the tripmeter A or B mode.
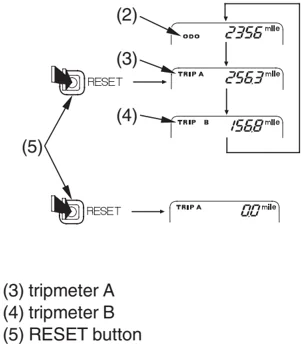
(3) tripmeter A (4) tripmeter B (5) RESET button
Instruments & Controls 31
Gauges, Indicators & Displays
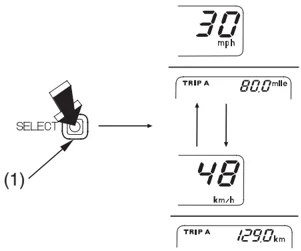
Changing the Speed and Mileage Unit
The speedometer displays both “mph” and “km/h.” The odometer/tripmeter displays both “mile” and “km.” Press and hold the SELECT button ( 1 ) to select “mph”/“mile” and “km/h”/“km.”
(1) SELECT button
32 Instruments & Controls
Gauges, Indicators & Displays
Digital Clock
Shows hour and minute. To adjust the time, proceed as follows:
- Turn the ignition switch ON.
- Push and hold both the SELECT button (2) and RESET button (3) for more than 2 seconds. The digital clock (1) will be set in the adjust mode with the display flashing.
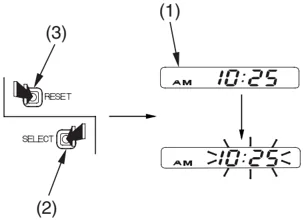
(1) digital clock (2) SELECT button (3) RESET button
Instruments & Controls 33
Gauges, Indicators & Displays
-
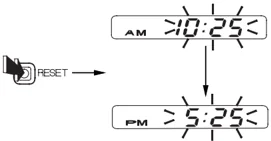
Push the RESET button until the desired time and AM/PM are displayed.
- The time is advanced by one minute, each time the button is pushed.
- The time is advanced by ten minutes, when the button is pushed and held.
-
To end the adjustment, press the RESET button 5 seconds after the last adjustment, or turn the ignition switch OFF.
34 Instruments & Controls