Tires
You should replace the tires with tires of the same size, load range, and speed rating as the originals.
⚠ WARNING
Installing improper tires on your motorcycle can affect handling and stability. This can cause a crash in which you can be seriously hurt or killed.
Always use the size and type of tires recommended in this owner’s manual.
The recommended tires for your motorcycle are:
Whenever you replace a tire, remember:
• Have the wheel balanced after the tire is installed.
• Have the tire replaced by your Honda dealer if possible.
152 Servicing Your Honda
Tires
If you have a tire professionally replaced at a non-Honda facility, we recommend that you have the work checked by your Honda dealer.
I mportant Safety Reminders
• Do not install a tube inside a tubeless tire on this motorcycle. Excessive heat build-up can cause the tube to burst.
• Use only tubeless tires on this motorcycle. The rims are designed for tubeless tires, and during hard acceleration or braking, a tube-type tire could slip on the rim and cause the tire to rapidly deflate.
• Do not install a bias-ply tire on this motorcycle. Mixing bias-ply and radial tires can adversely affect handling and stability.
Servicing Your Honda 153
Side Stand
Refer to Safety Precautions on page 74.
LEFT SIDE
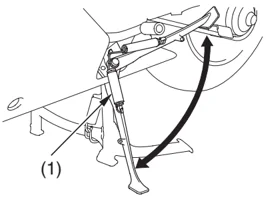
(1) side stand spring
- Check that the side stand assembly is working properly. If the side stand is stiff or squeaky, clean the pivot area and lubricate the pivot bolt with clean grease.
- Check the spring for damage or loss of tension.
- Check the side stand ignition cut-off system:
- Sit astride the motorcycle and put the transmission in neutral.
- Raise the side stand.
- Start the engine.
- Pull the clutch lever in.
- Shift the transmission into gear.
- Lower the side stand all the way.
The engine should stop as you lower the side stand. If the engine doesn’t stop, see your Honda dealer for service.
154 Servicing Your Honda
Drive Chain
An endless (riveted master link) chain connects the countershaft and rear wheel sprockets. The O-ring chain uses rubber rings between the side plates of the pin and roller links to seal in the manufacturer-installed lubricating grease and keep out moisture and dirt.
The service life of the chain depends on proper lubrication and adjustment. Poor maintenance can cause premature wear or damage to the drive chain or sprockets.
The drive chain should be checked, adjusted, and lubricated as part of the pre-ride inspection (page 45 ).
Under severe usage, or when the motorcycle is ridden in unusually dusty or muddy areas, more frequent maintenance will be necessary.
Before servicing your drive chain, turn the engine OFF, lower the center stand (page 64 ), and check that your transmission is in neutral.
It is not necessary to remove or replace the drive chain to perform the recommended service in the Maintenance Schedule.
Servicing Your Honda 155
Drive Chain
Inspection
Refer to Safety Precautions on page 74.
- Check slack in the lower drive chain (1) run midway between the sprockets. Drive chain slack should allow the following vertical movement by hand: 1 – 1 3/8 in (25 – 35 mm)
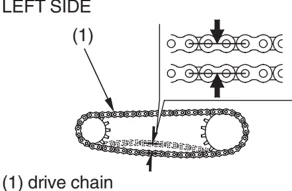
LEFT SIDE
(1)
(1) drive chain
-
Check drive chain slack at several points along the chain. The slack should remain constant. If it isn’t, some links may be kinked and binding. Lubricating the chain will often eliminate binding and kinking.
-
Inspect the drive chain for: • damaged rollers • dry or rusted links • kinked or binding links • excessive wear • improper adjustment • damaged or missing O-rings
156 Servicing Your Honda
Drive Chain
Replace the drive chain (page 161) if it has damaged rollers, loose pins, or kinks that cannot be freed. Lubricate the drive chain (page 160) if it appears dry or shows signs of rust. Lubricate any kinked or binding links and work them free. Adjust chain slack if needed.
- Inspect the front and rear sprocket teeth for excessive wear or damage. If necessary, have your Honda dealer replace a worn sprocket.
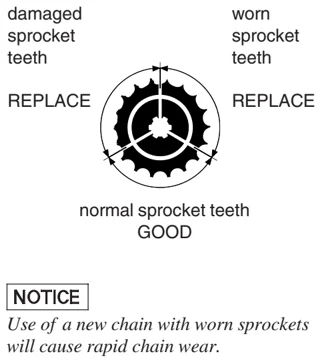
damaged sprocket teeth
REPLACE
worn sprocket teeth
REPLACE
normal sprocket teeth GOOD
NOTICE Use of a new chain with worn sprockets will cause rapid chain wear.
Servicing Your Honda 157
Drive Chain
Wear Inspection
LEFT SIDE
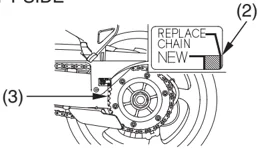
(2) red zone (3) tip of driven sprocket teeth
Check the chain wear label when adjusting the chain. If the red zone (2) on the label aligns with the tip of driven sprocket teeth (3) after the chain has been adjusted to the proper slack, the chain is excessively worn and must be replaced. The proper slack is: 1 – 1 3/8 in (25 – 35 mm)
The bottom part of the frame may be damaged by excessive drive chain slack of more than: 1 15/16 in (50 mm)
Adjustment
Refer to Safety Precautions on page 74.
Drive chain slack should be checked and adjusted, if necessary, every 500 miles (800 km). When operated at sustained high speeds or under conditions of frequent rapid acceleration, the chain may require more frequent adjustments.
158 Servicing Your Honda
Drive Chain
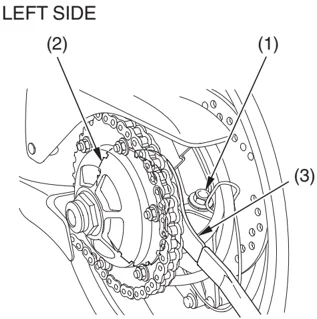
LEFT SIDE
(1) bearing holder pinch bolt (2) bearing holder (3) pin spanner
- Place the motorcycle on its center stand with the transmission in neutral and the ignition switch OFF.
- Loosen the bearing holder pinch bolt (1).
- Turn the bearing holder (2) clockwise or counterclockwise to obtain the proper chain slack with the pin spanner (3).
- Torque the bearing holder pinch bolt to: 54 lbf·ft (74 N·m , 7.5 kgf·m)
If a torque wrench is not used for this installation, see your Honda dealer as soon as possible to verify proper assembly. Improper assembly may lead to a loss of braking capacity.
- Recheck chain slack. Chain slack should be: 1 – 1 3/8 in (25 – 35 mm)
Servicing Your Honda 159
Drive Chain
Lubrication
Refer to Safety Precautions on page 74.
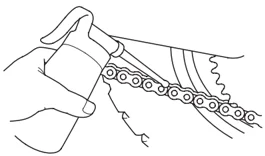
Lubricate every 500 miles (800 km) or sooner if chain appears dry. Lubricant: SAE 80 or 90 gear oil
Lubricate only with SAE 80 or 90 gear oil. Commercial chain lubricants may contain solvents which could damage the rubber O-rings.
160 Servicing Your Honda
Drive Chain
Removal, Cleaning & Replacement
Refer to Safety Precautions on page 74.
Your motorcycle has an endless (riveted master link) type chain. It should only be removed or replaced by your Honda dealer.
The O-rings can be damaged by steam cleaning, high pressure washers, and certain solvents.
- Clean the side surfaces of the chain with a dry cloth. Use a high flashpoint solvent such as kerosene — not gasoline. Do not brush the rubber O-rings. Brushing will damage them. Use of a solvent may also damage the O-rings.
- Inspect the drive chain for possible wear or damage.
Replace the drive chain if it has damaged rollers, loose fitting links, damaged O-rings, or otherwise appears unserviceable.
Replacement Chain: DID50VA8 or RK50HFOZ5
Servicing Your Honda 161
Battery
Your motorcycle has a maintenance-free type battery. You do not have to check the battery electrolyte level or add distilled water as you would with a conventional-type battery.
NOTICE
Your battery is a maintenance-free type and can be permanently damaged if the cap strip is removed.
Electrical accessories use current from the battery — even when the ignition is OFF. Limited operation also allows the battery to discharge. If you have electrical accessories on your motorcycle — or do not ride frequently, we recommend that you charge the battery frequently (see Battery Charging, page 166 ).
If you do not expect to ride your motorcycle for at least two weeks, we recommend you remove the battery — or at least disconnect the battery cables (negative cable first).
If you plan to store your motorcycle, see Battery Storage, page 163 .
If your battery seems weak and/or is leaking electrolyte (causing slow starting or other electrical problems), see your Honda dealer.
WARNING: Battery posts, terminals and related accessories contain lead and lead compounds. Wash hands after handling.
162 Servicing Your Honda
Battery
Battery Storage
Refer to Safety Precautions on page 74.
If you plan to store your motorcycle, we recommend you remove the battery and store it where it can be charged at least every 30 days to maintain its service life.
If you do not remove the battery, we recommend disconnecting the battery cables (negative cable first).
You will get the best storage results from removing the battery and slow (trickle) charging it every 30 days (see Battery Charging, page 166).
Before you remove the battery, be sure to read all the information that follows, as well as the information on the battery label.
WARNING
The battery gives off explosive hydrogen gas during normal operation.
A spark or flame can cause the battery to explode with enough force to kill or seriously hurt you.
Wear protective clothing and a face shield, or have a skilled mechanic do the battery maintenance.
Servicing Your Honda 163
Battery
The battery is located in the battery box below the seat.
Removal
- Make sure the ignition switch is OFF.
- Remove the seat (page 90).
- Remove the battery cover clips (1), then remove the battery cover (2).
- Release the rings and remove the rubber band (3).
- Disconnect the negative (−) terminal lead (4) from the battery first, then disconnect the positive (+) terminal lead (5).
- Pull the battery (6) out of the battery box.
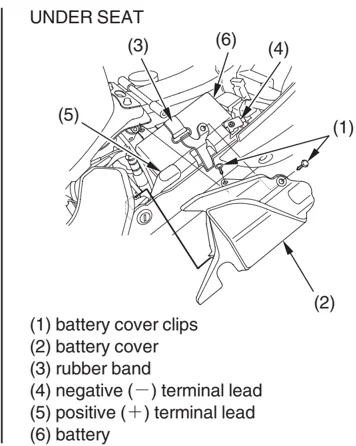
UNDER SEAT
(1) battery cover clips (2) battery cover (3) rubber band (4) negative (−) terminal lead (5) positive (+) terminal lead (6) battery
164 Servicing Your Honda
Battery
- Charge the battery (see following section), unless you have been riding regularly.
- Store your battery in an easy-to-reach location off the floor, in an area protected from freezing temperatures and direct sunlight.
- Clean the battery box after removing the battery for storage. Dry the battery box and, if paint is missing, re-paint the area.
- Slow charge the battery (see following section) once every 30 days.
I nstallation
- Reinstall in the reverse order of removal. Be sure to connect the positive (+) terminal first, then the negative (-) terminal.
- Check all bolts and other fasteners are secure.
Servicing Your Honda 165
Battery
Battery Charging
Refer to Safety Precautions on page 74 .
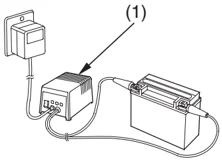
(1) “trickle” charger
Be sure to read the information that came with your battery charger and follow the instructions on the battery. Improper charging may damage the battery.
We recommend using a “trickle” charger (1) for home charging. These units can be left connected for long periods without risking damage to the battery. However, do not intentionally leave the charger connected longer than the time period recommended in the charger’s instructions.
Avoid using an automotive-type battery charger. An automotive charger can overheat a motorcycle battery and cause permanent damage.
166 Servicing Your Honda