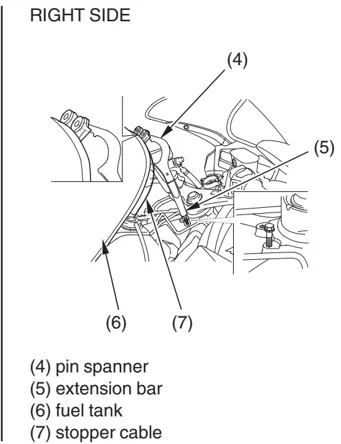
Maintenance Component Locations
Servicing Your Honda 85
Maintenance Component Locations
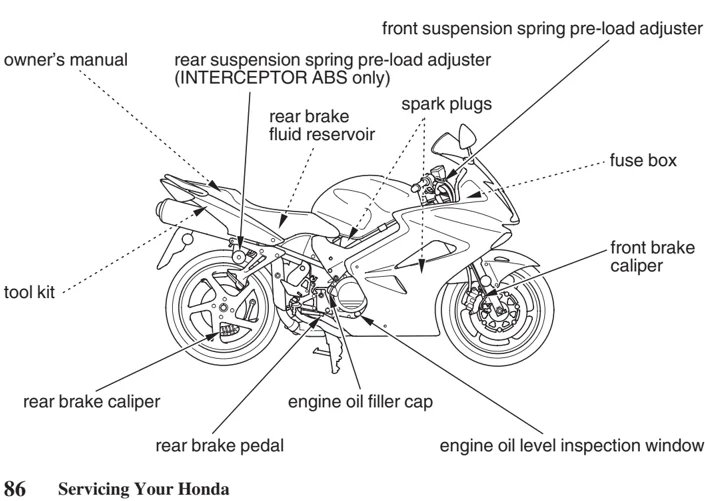
front suspension spring pre-load adjuster owner's manual rear suspension spring pre-load adjuster (INTERCEPTOR ABS only) spark plugs fuse box rear brake fluid reservoir tool kit front brake caliper rear brake caliper engine oil filler cap rear brake pedal engine oil level inspection window
86 Servicing Your Honda
Maintenance Component Locations
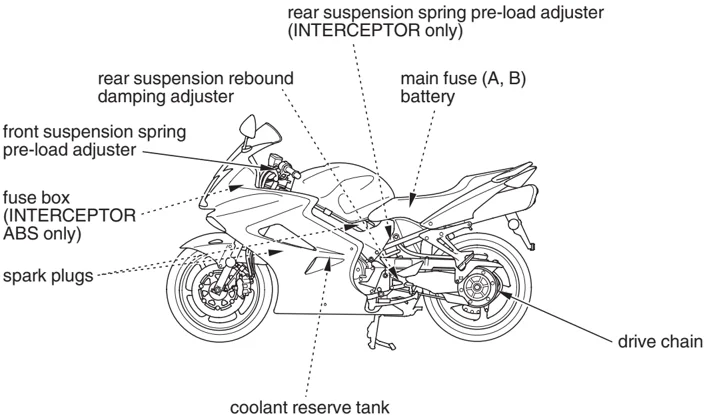
rear suspension spring pre-load adjuster (INTERCEPTOR only)
rear suspension rebound damping adjuster
main fuse (A, B) battery
front suspension spring pre-load adjuster
fuse box (INTERCEPTOR ABS only)
spark plugs
drive chain
coolant reserve tank
Servicing Your Honda 87

Tool Kit
The tool kit (1) is stored under the seat (page 90).
An optional, larger tool kit may be available. Check with your Honda dealer’s parts department.
UNDER SEAT
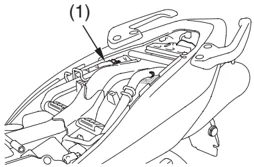
(1) tool kit
88 Servicing Your Honda
Owner’s Manual Storage
Your motorcycle provides storage for the owner’s manual so you’ll have it with you for easy reference. Store your owner’s manual (and other documents) in the plastic storage bag (1) in the storage compartment (2) under the seat.
Be careful not to flood this area when washing your motorcycle.
UNDER SEAT
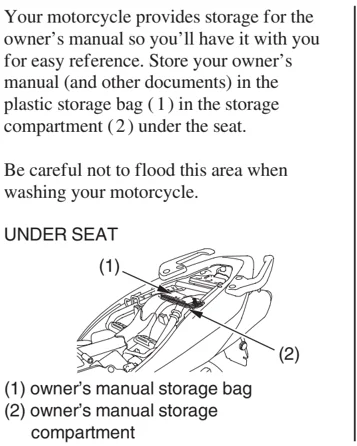
(1) owner’s manual storage bag (2) owner’s manual storage compartment
Servicing Your Honda 89
Seat Removal
Refer to Safety Precautions on page 74.
The seat must be removed for battery, main fuse and rear brake reservoir maintenance, to use the helmet holder, to access the tool kit and owner’s manual, or to lift the fuel tank.
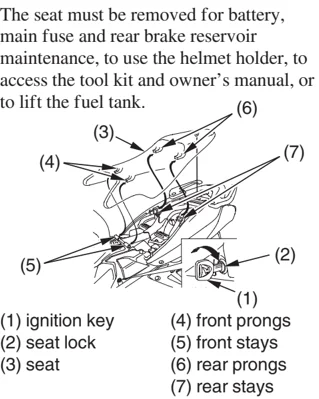
(1) ignition key (2) seat lock (3) seat (4) front prongs (5) front stays (6) rear prongs (7) rear stays
Removal
- Insert the ignition key (1) into the seat lock (2).
- Turn it clockwise and pull up on the rear of the seat (3).
- Pull the seat back and up.
Installation
- Insert the front prongs (4) into the front stays (5) and the rear prongs (6) into the rear stays (7) on the frame.
- Push forward and then down on the rear of the seat.
Be sure to securely lock the seat after reinstalling it.
90 Servicing Your Honda
Rear Seat Cover
Refer to Safety Precautions on page 74.
I nstallation
- Remove the seat (page 90).
- Remove the caps (1), grab rail mounting bolts (2) and washers (3).
- Remove the grab rails (4).
- Install the grab rail covers (5).
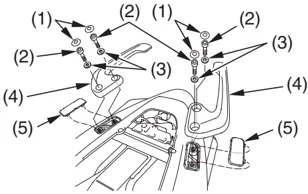
(1) caps (2) grab rail mounting bolts (3) washers (4) grab rails (5) grab rail covers
- Turn the seat over.
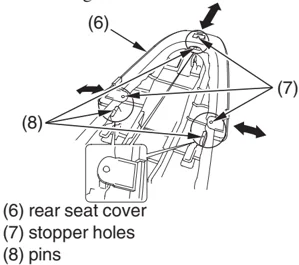
- Install the rear seat cover (6) to the seat.
- Fit the stopper holes (7) of rear seat cover securely into the pins (8).
- Install the seat (page 90).
The grab rails must be returned to position when riding in tandem.
(6) rear seat cover (7) stopper holes (8) pins
Servicing Your Honda 91
Rear Seat Cover
Removal
- Removal can be done in the reverse order of installation. The grab rails should be installed for riding with a passenger.
- Tighten the grab rail mounting bolts (2) to the specified torque: 16 lbf·ft (22 N·m , 2.2 kgf·m)
If a torque wrench was not used for installation, see your Honda dealer as soon as possible to verify proper assembly. The grab rails could come off easily and result in serious injury if the assembly is not done properly.
- Install the seat (page 90 ).
92 Servicing Your Honda
Lower Fairing Removal
Refer to Safety Precautions on page 74.
The lower fairing must be removed to service the coolant reserve tank or to remove the inner fairing.
RIGHT SIDE
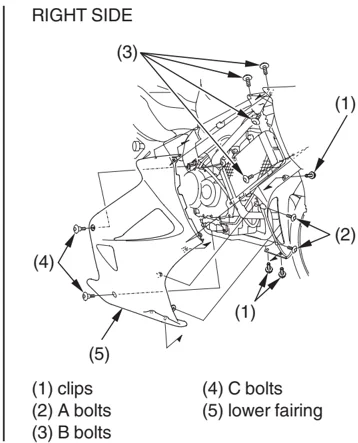
(1) clips (2) A bolts (3) B bolts (4) C bolts (5) lower fairing
Servicing Your Honda 93
Lower Fairing Removal
LEFT SIDE
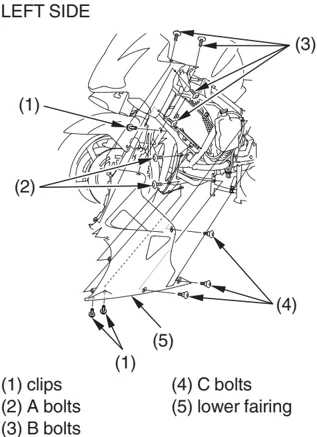
(1) clips (2) A bolts (3) B bolts (4) C bolts (5) lower fairing
Removal
- Remove the clips (1).
- Remove the A bolts (2).
- Remove the B bolts (3).
- Remove the C bolts (4).
- Remove the lower fairing (5).
Installation • Installation can be done in the reverse order of removal.
94 Servicing Your Honda
Inner Fairing Removal
Refer to Safety Precautions on page 74.
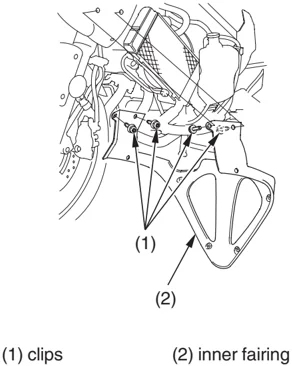
The inner fairing must be removed to service the engine oil filter.
Removal
- Remove the lower fairing (page 93).
- Remove the clips (1).
- Remove the inner fairing (2).
I nstallation
• Installation can be done in the reverse order of removal.
(1) clips (2) inner fairing
Servicing Your Honda 95
Inner Panel Removal
Refer to Safety Precautions on page 74.
The inner panel must be removed to service the fuses.
Removal
- Remove the bolts (1).
- Remove the clip (2).
- Remove the inner panel (3).
Installation
• Installation can be done in the reverse order of removal.
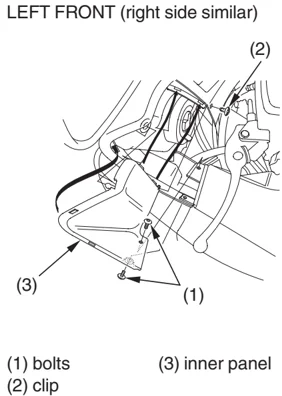
(1) bolts (2) clip (3) inner panel
96 Servicing Your Honda
Clip Removal
Clip removal and installation:
Removal ①Press down on the center pin to release the lock. ②Pull the clip out of the hole.
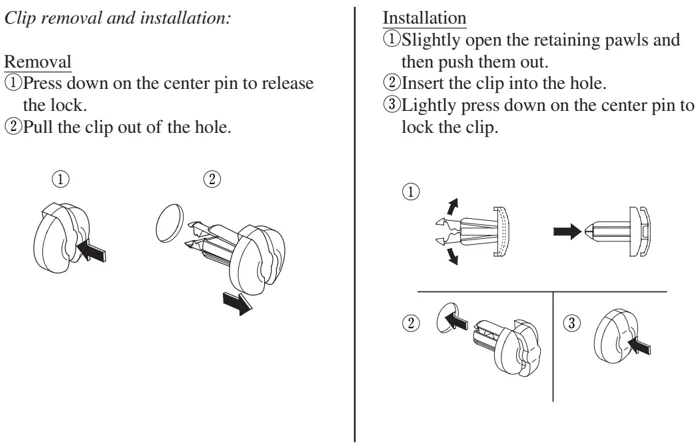
Installation ①Slightly open the retaining pawls and then push them out. ②Insert the clip into the hole. ③Lightly press down on the center pin to lock the clip.
Servicing Your Honda 97
Raising the Fuel Tank
Refer to Safety Precautions on page 74 .
The fuel tank must be raised to service the air cleaner or the rear cylinder spark plugs. The fuel tank does not require draining for this procedure.
- Place the motorcycle on its center stand with the transmission in neutral and the ignition switch off. Check that the fuel fill cap is closed.
- Remove the seat (page 90 ).
- Remove the two bolts (1) with washers (2) and the collars (3).
RIGHT SIDE
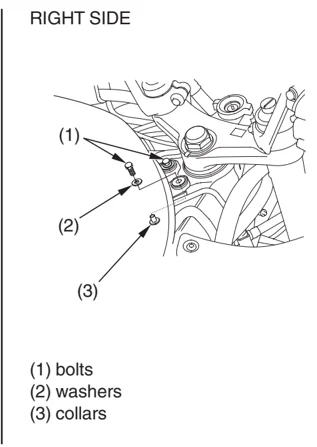
(1) bolts (2) washers (3) collars
98 Servicing Your Honda
Raising the Fuel Tank
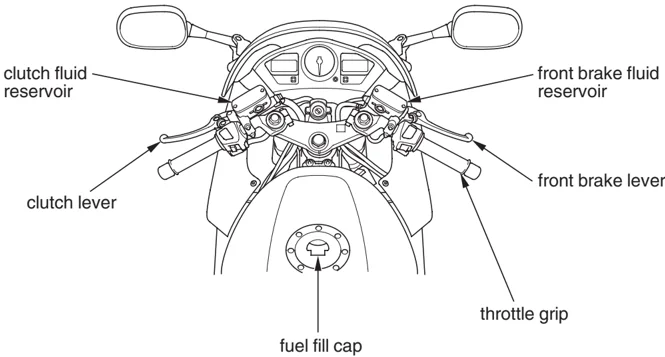
- Insert the pin spaner (4) in the extension bar (5) provided in the tool kit (page 88).
- Raise the front of the fuel tank (6) and install the bolt (1) to frame body.
Do not raise the fuel tank higher than the stopper cable (7) allows.
- Place the base of the extension bar over the installed bolt and position the pin spaner so that it supports the fuel tank.
When raising the fuel tank, be careful not to allow the collars fall down.
RIGHT SIDE
(4) pin spanner (5) extension bar (6) fuel tank (7) stopper cable
Servicing Your Honda 99