EXTERIOR EQUIPMENT
RETRACTABLE HARDTOP
The retractable hardtop is opened or closed with a switch located in the automatic air conditioning control panel.
Opening the retractable hardtop
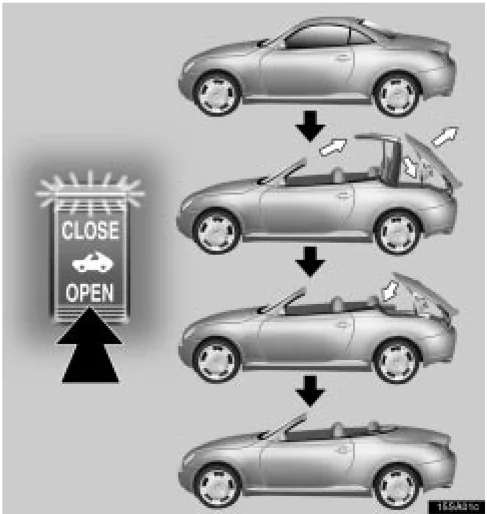
Be sure to stop your vehicle in a safe place.
To open the retractable hardtop, turn the ignition switch to "ON" position and hold down the switch on the "OPEN" side. The indicator remains on while the retractable hardtop is opening. When the retractable hardtop is fully opened, the indicator goes off and a beep sounds.
Conditions for retractable hardtop activation
- The luggage cover in the trunk is properly set. See page 77.
- The trunk lid is closed. See page 87.
- The trunk lid opener main switch in the glove box is on (in pushed-in position). See page 86.
If any of the conditions above is not met, the indicator blinks and the retractable hardtop will not activate. However, if the indicator blinks and the retractable hardtop does not activate even with all the conditions above fulfilled, perform either of the following and then open the retractable hardtop.
- Start the engine.
- Put the selector lever in "P".
If the indicator remains on or off with the switch pushed, and the retractable hardtop does not activate, have your vehicle checked by your Lexus dealer.
If you hold down the switch on the "OPEN" side after or when the retractable hardtop is opened fully, the side windows will close.
If the quarter windows are not opened completely with the retractable hardtop fully opened, hold down the switch on the "OPEN" side again. The quarter windows will be opened.
EXTERIOR EQUIPMENT
If you drive your vehicle without the retractable hardtop opened fully, a beep continues sounding. After you stop your vehicle in a safe place, immediately either open or close the retractable hardtop fully.
Closing the retractable hardtop
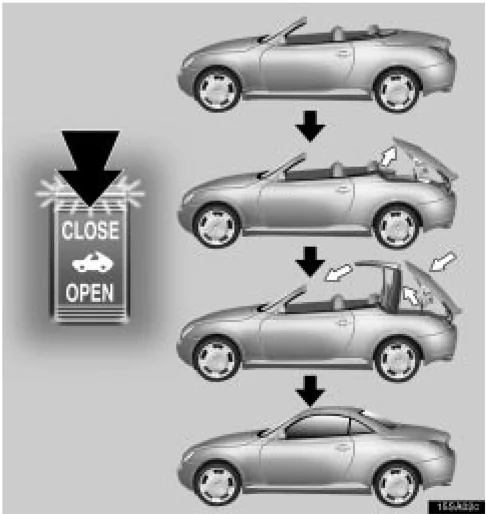
Be sure to stop your vehicle in a safe place.
To close the retractable hardtop, turn the ignition switch to “ON” position and hold down the switch on the “CLOSE” side. The indicator remains on while the retractable hardtop is closing. When the retractable hardtop is fully closed, the indicator goes off and a beep sounds.
Conditions for retractable hardtop activation
- The trunk lid is closed. See page 87.
- The trunk lid opener main switch in the glove box is on (in pushed-in position). See page 86.
If either of the conditions above is not met, the indicator blinks and the retractable hardtop will not activate. However, if the indicator blinks and the retractable hardtop does not activate even with all the conditions above fulfilled, perform either of the following and then close the retractable hardtop.
- Start the engine.
- Put the selector lever in “P”.
If the indicator remains on or off with the switch pushed, and the retractable hardtop does not activate, have your vehicle checked by your Lexus dealer.
If you hold down the switch on the “CLOSE” side after or when the retractable hardtop is closed fully, the side windows will close.
If the quarter windows are not closed completely with the retractable hardtop fully closed, hold down the switch on the “CLOSE” side again. The quarter windows will be closed.
2003 SC430 from May ’03 Prod. (OM24449U) 81
EXTERIOR EQUIPMENT
If you drive your vehicle without the retractable hardtop closed fully, a beep continues sounding. After you stop your vehicle in a safe place, immediately either open or close the retractable hardtop fully.
Indicator status and retractable hardtop activation:
The indicator blinks only while the switch is pushed.
If the indicator blinks with the switch pushed, and the retractable hardtop does not activate, see “Conditions for retractable hardtop activation” on page 80 and 81.
CAUTION
To avoid serious personal injury, you must do the following:
- When opening or closing the retractable hardtop, make sure there is no person around there.
- When opening or closing the retractable hardtop, keep hands away from the hinges of the hardtop side rails and any part of the hardtop linkage mechanism.
- Do not stop operating the switch in the middle of operation unless otherwise required. The roof will be gradually lowered, resulting in personal injury and damage to the hardtop mechanism.
- Do not open or close the retractable hardtop when the wind is strong.
- The vehicle should never be driven with the retractable hardtop partially opened. Make sure the hardtop has been either fully opened or fully closed before driving.
- While the vehicle is moving with the retractable hardtop opened, nobody should stand up on the seat, sit on the package tray or lean over it. Otherwise, they could be seriously injured if the vehicle stops suddenly or if the vehicle is involved in an accident.
82
EXTERIOR EQUIPMENT
WARNING
- Before opening or closing the retractable hardtop, first make sure it is safe to do so. Always make sure nobody places his/her head, hands or other parts of the body on the hardtop mechanism on the windows. If someone’s neck, head or hands get caught in the opening or closing retractable hardtop or the closing windows, it could result in serious injury. If any part of your body or something should be caught, release your hand from the switch immediately. The retractable hardtop operation will be stopped.
- Never leave small children alone in the vehicle, especially with the ignition key still inserted. They could use the retractable hardtop switch and get trapped in the retractable hardtop or the windows. Unattended children can be involved in serious accidents.
- When small children are in the vehicle, never let them use the switch.
NOTICE
- When opening or closing the retractable hardtop, make sure there is nothing above the vehicle.
- Make sure there are no items or packages in the package tray when opening or closing the retractable hardtop. Even small items may interfere with the retractable hardtop operation and can cause damage.
- Do not sit or place excessive weight on the retractable hardtop when the hardtop is operating. Damage to the hardtop may occur.
- Do not open or close the retractable hardtop when the temperature is below –20°C (–4°F), or the side windows or quarter windows cannot be opened because they are frozen. Damage to the hardtop, rear window or quarter windows may result. If it is necessary to do so, warm the vehicle in a heated garage prior to operating the retractable hardtop mechanism.
- Do not open the retractable hardtop if the hardtop is damp or wet. Possible interior water damage, water stains or mildew on the hardtop material may result.
- When the retractable hardtop is completely opened, keep the rear window defogger turned off to avoid damage to the hardtop.
2003 SC430 from May '03 Prod. (OM24449U) 83
EXTERIOR EQUIPMENT
- Do not open the trunk when the retractable hardtop is not closed or opened fully. The opened trunk may not be closed.
- Do not open or close the retractable hardtop repeatedly within a short time. If the motor prevention circuit activates, the retractable hardtop operation is disabled. In this case, turn the ignition switch off and operate the switch again after a while.
- Do not place anything on the luggage cover. Doing so could interfere with the retractable hardtop opening and damage its mechanism.
- The luggage should be loaded with the cover closed securely. Otherwise the retractable hardtop opening could be interfered and its mechanism could be damaged.
INFORMATION
- Do not operate the retractable hardtop when the vehicle is on the incline or gets on the step. The retractable hardtop may not activate properly.
- If you operate the "OPEN/CLOSE" switch after the ignition switch is turned to off and then on with the retractable hardtop opened partially, it takes several seconds before activation. This does not indicate a malfunction.
- When you open or close the retractable hardtop, audio sound is automatically adjusted. For details, see page 170.
84
HOOD
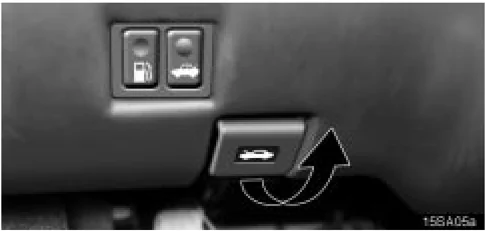
- To open the hood, pull the hood lock release lever under the instrument panel. The hood will spring up slightly.
EXTERIOR EQUIPMENT
 2. Insert your fingers under the hood, push up the auxiliary catch lever and lift the hood.
Before closing the hood, check to see that you have not forgotten any tools, rags, etc. Then lower the hood and make sure it locks.
CAUTION Before driving, be sure that the hood is securely locked. Otherwise, the hood may open unexpectedly while driving and an accident may occur.
TRUNK LID
Trunk lid opener
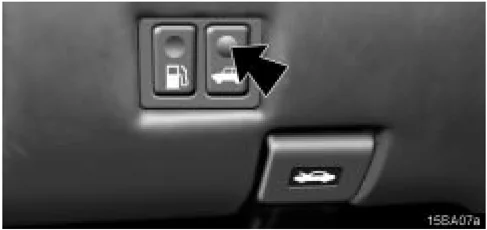
 To open the trunk lid while sitting in the driver’s seat, push the switch with the main switch in the glove box on.
The trunk lid can be unlocked using the wireless remote control key. For details, see page 15.
If the opener does not operate properly, use the lever located in the rear console box to unlock the trunk lid. See “(a) Unlocking the trunk lid, If the retractable hardtop does not close” on page 258.
2003 SC430 from May ’03 Prod. (OM24449U) 85
EXTERIOR EQUIPMENT
CAUTION
- Keep the trunk lid closed while driving. This not only prevents luggage from being thrown out, but also prevents exhaust gases from entering the vehicle.
- Always lock the trunk lid and all doors, and keep the vehicle keys out the reach of children.
- Never leave children unattended in the vehicle. Unsupervised children may lock themselves in the vehicle or trunk and suffer serious injuries or death.
Trunk lid opener main switch

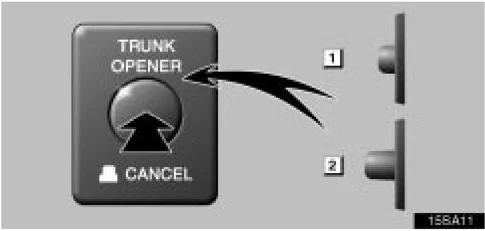
▶Main switch 1 Operative 2 Inoperative
If you do not want to activate the trunk lid opener system, turn off the main switch on the left side in the glove box. To turn it on, push in the main switch.
The main switch should be on to activate the retractable hardtop.
The trunk lid can be opened using a loop of wire in the rear console box even with the main switch in the glove box turned off. When keeping items in the trunk, be sure to turn off the main switch and lock the glove box and rear console box. For locking the glove box, see page 68. For locking the rear console box, see page 66.
86
EXTERIOR EQUIPMENT
 To close the trunk lid, pull down the lever and push down the trunk lid. After closing the trunk lid, try pulling it up to make sure it is securely closed.
Internal trunk release handle
 If a person is locked in the trunk, he/she can pull down the phosphorescent handle on the inside of trunk lid to open the trunk lid.
The phosphorescent (glow-in-the-dark) handle will continue to glow for a time after the trunk lid is closed. Exposing the handle to stronger light will cause it to glow longer.
2003 SC430 from May '03 Prod. (OM24449U) 87
EXTERIOR EQUIPMENT
FUEL TANK CAP
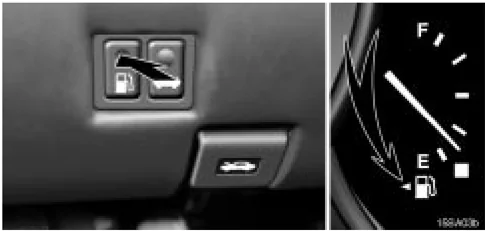
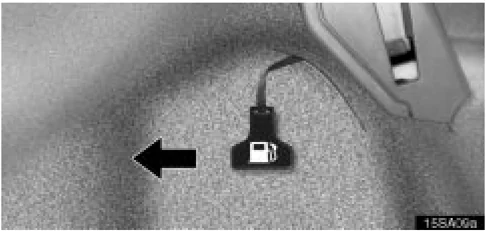
- To open the fuel filler door, push the switch. When refueling, turn off the engine. The arrow in the instrument cluster indicates that the fuel filler door is on the left side of your vehicle.
CAUTION
- Do not smoke, cause sparks or allow open flames when refuelling. The fumes are flammable.
- When opening the cap, do not remove the cap quickly. In hot weather, fuel under pressure could cause injury by spraying out of the filler neck if the cap is suddenly removed.
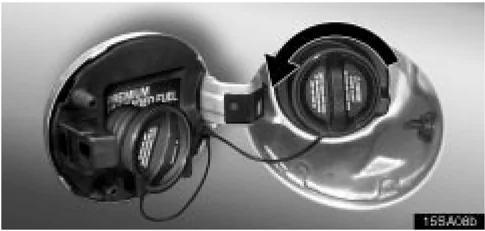
- To remove the fuel tank cap, turn the cap slowly counterclockwise, then pause slightly before removing it. The removed cap can be stored on the back side of the fuel filler door. It is not unusual to hear a slight swoosh when the cap is opened. When installing the cap, turn the cap clockwise until you hear a click. If the cap is not tightened securely, the malfunction indicator lamp comes on. Make sure the cap is tightened securely. The indicator lamp goes off after driving several times. If the indicator lamp does not go off, contact your Lexus dealer as soon as possible.
88
EXTERIOR EQUIPMENT
CAUTION
- Make sure the cap is installed securely to prevent fuel spillage in the event of an accident.
- Use only a genuine Lexus fuel tank cap for replacement. It is designed to regulate fuel tank pressure.
In case the opener is not actuated

Pull the manual lever toward the back. This is used in case the fuel filler door cannot be opened due to a discharged battery or other trouble.
Refueling the vehicle
As soon as the correctly operated nozzle switches off automatically for the first time, the tank is full. Do not try to add more fuel, because fuel may spill out.
2003 SC430 from May '03 Prod. (OM24449U) 89
90
SECTION 1 – 6
INSTRUMENTS AND CONTROLS
Comfort adjustment
- Seats . . . . . . . . . . . . . . . . . . . . . . . . . . . . . . . . . . . . . . . . . . . . . . . . . . . . . . . . . . . . . . . . . . . . . . . . . . . . . . . . . . . . . . . . . . . . . . . . . . . . . . . . . . . . . . . . . . . . . . . . . . . . . . . . . . . . . . . . . . . . . . . . . . . . . . . . . . . . . . . . . . . . . . . . . . . . . . . . . . . . . . . . . . . . . . . . . . . . . . . . . . . . . . . . . . . . . . . . . . . . ........ 92
- Front head restraints . . . . . . . . . . . . . . . . . . . . . . . . . . . . . . . . . . . . . . . . . . . . . . . . . . . . . . . . . . . . . . . . . . . . . . . . . . . . . . . . . . . . . . . . . . . . . . . . . . . . . . . . . . . . . . . . ........ 98
- Tilt and telescopic steering wheell . . . . . . . . . . . . . . . . . . . . . . . . . . . . . . . . . . . . . . . . . . . . . . . . . . . . . . . . . . . . . . . . . . . . . . . . . . . . . . . . . . . . . . . . . . . . . . . . . . . . . . . . . . . . ........

COMFORT ADJUSTMENT
SEATS
While the vehicle is being driven, all vehicle occupants should have the seatback upright, sit well back in the seat and properly wear the seat belts provided.
CAUTION
- Do not drive the vehicle unless the occupants are properly seated. Do not allow passengers to sit in the luggage compartment or cargo area. Persons not properly seated and/or properly restrained by seat belts can be severely injured in the event of emergency braking or a collision.
- During driving, do not allow passengers to stand up or move around between seats. Otherwise, severe injuries can occur in the event of emergency braking or a collision.
Front seat precautions
Driver seat
CAUTION
The driver airbag deploys with considerable force, and can cause death or serious injury especially if the driver is very close to the airbag. The National Highway Traffic Safety Administration ("NHTSA") advises:
Since the risk zone for driver airbag is the first 50–75 mm (2–3 in.) of inflation, placing yourself 250 mm (10 in.) from your driver airbag provides you with a clear margin of safety. This distance is measured from the center of the steering wheel to your breastbone. If you sit less than 250 mm (10 in.) away now, you can change your driving position in several ways:
- Move your seat to the rear as far as you can while still reaching the pedals comfortably.
- Slightly recline the back of the seat. Although vehicle designs vary, many drivers can achieve the 250 mm (10 in.) distance, even with the driver seat all the way forward, simply by reclining the back of the seat somewhat. If reclining the back of your seat makes it hard to see the road, raise yourself by using a firm, non-slippery cushion, or raise the seat if your vehicle has that feature.
92
COMFORT ADJUSTMENT
- If your steering wheel is adjustable, tilt it downward. This points the airbag toward your chest instead of your head and neck. The seat should be adjusted as recommended by NHTSA above, while still maintaining control of the foot pedals, steering wheel, and your view of the instrument panel controls.
Front passenger seat
CAUTION
The front passenger airbag also deploys with considerable force, and can cause death or serious injury especially if the front passenger is very close to the airbag. The front passenger seat should be as far from the airbag as possible with the seat position and the seatback adjusted, so the front passenger sits upright.
Front seats
CAUTION
The side airbags are installed in the driver and front passenger seats. Observe the following precautions.
- Do not lean against the door when the vehicle is in use, since the side airbag inflates with considerable speed and force. Otherwise, you may be killed or severely injured.
- Do not use seat accessories which cover the area where the side airbags inflate. Such accessories may prevent the side airbags from activating correctly, causing death or serious injury.
- Do not modify or replace the seats or the upholstery of seats equipped with side airbags. Such changes may prevent the side airbags from activating correctly, disable the system, or cause the side airbags to inflate accidentally, resulting in death or serious injury.
93
COMFORT ADJUSTMENT
Seat adjustment precautions
CAUTION
- Do not adjust the seat while the vehicle is moving as the seat may unexpectedly move and cause the driver to lose control of the vehicle.
- Be careful that the seat does not hit a passenger, luggage or the rear seat.
NOTICE
Do not operate the control switch in more than one dimension at a time. It may cause electrical overload.
Adjusting front seats

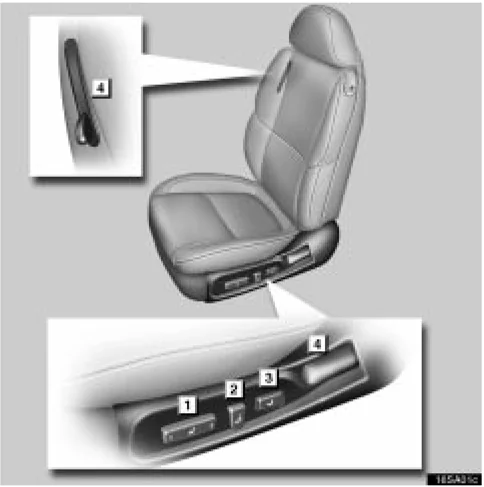
1 Seat position control switch, seat cushion angle and height control switch 2 Seatback angle control switch 3 Lumbar support control switch 4 Seatback lock release lever
94
COMFORT ADJUSTMENT
Adjusting seat position
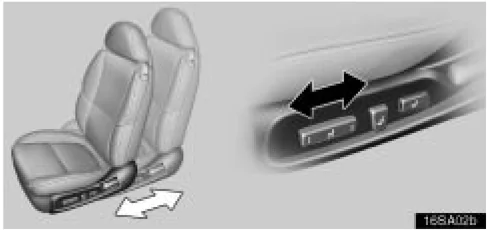
Move the control switch in the desired direction. Releasing the switch will stop the seat in that position. Do not place anything under the seat, as this might interfere with the seat movement.
Adjusting seatback angle
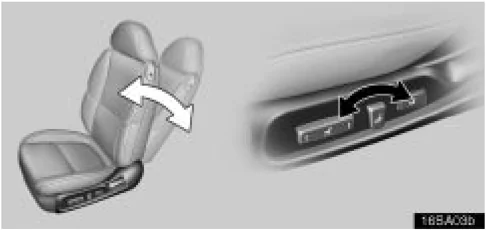
Move the control switch in the desired direction. Releasing the switch will stop the seatback in that position.
⚠ CAUTION To reduce the risk of sliding under the lap belt during a collision, avoid reclining the seatback any more than needed. The seat belts provide maximum protection in a frontal or rear collision when the driver and the passenger are sitting up straight and well back in the seats. If you are reclined, the lap belt may slide past your hips and apply restraint forces directly to the abdomen. In the event of a frontal collision, the more the seat is reclined, the greater the risk of personal injury.
95
COMFORT ADJUSTMENT
Adjusting seat cushion angle and height
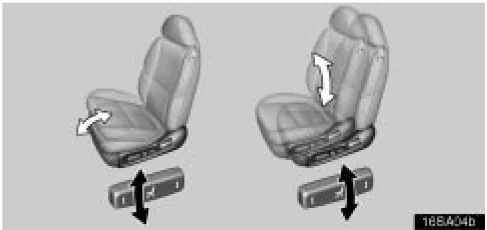
Move the control switch in the desired direction. Releasing the switch will stop the seat cushion in that position.
Adjusting lumbar support
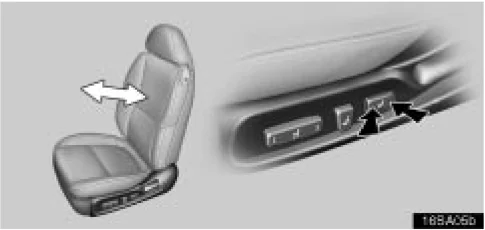
Push the control switch on either side. The amount of lumbar support will change while the switch is pushed.
96
COMFORT ADJUSTMENT
Inclining front seats for rear seat entry
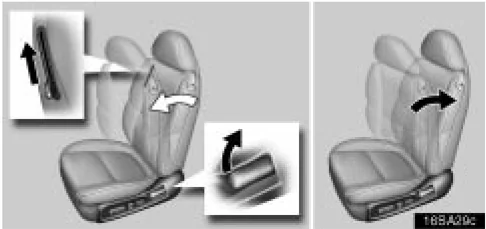
Lift the seatback lock release lever on the side of the seat or on the side of the seatback. The seatback will incline. This allows passengers to get in or out of the rear seat easily. If a driver or front passenger uses a seat belt guide, be sure to remove it before inclining the seatback. For seat belt guides, see page 107. After a passenger gets in or out, return the seatback until it locks.
CAUTION
- After the seatback returns, try pushing the seatback forward and rearward to make sure it is securely locked.
- Never allow anyone to touch seatback lock release levers while the vehicle is moving.
97

COMFORT ADJUSTMENT
FRONT HEAD RESTRAINTS
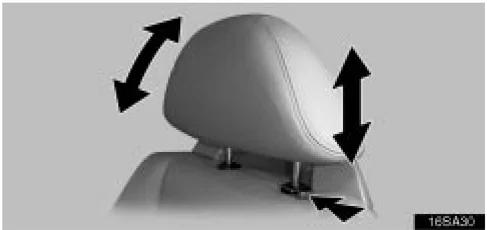
To raise the head restraint, pull it up. To lower it, press the lock release button and push the head restraint down. To move the head restraint forward or rearward, pull or push on the top.
The head restraint is most effective when it is close to your head. Therefore, using a cushion on the seatback is not recommended.
⚠ CAUTION
- Adjust the center of the head restraint so that it is closest to the top of your ears.
- After adjusting the head restraint, make sure it is locked in position.
- Do not drive with the head restraints removed.
TILT AND TELESCOPIC STEERING WHEEL
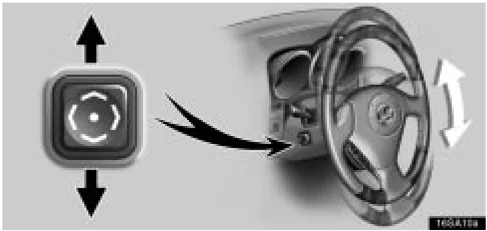
Adjustment of steering wheel tilt

To adjust the tilt of the steering wheel, push the control switch upward or downward to set it to the desired position.
⚠ CAUTION Do not adjust the steering wheel while the vehicle is moving. Doing so may cause the driver to mishandle the vehicle and an accident may occur resulting in death or serious injuries.
98
COMFORT ADJUSTMENT
Adjustment of telescopic steering column
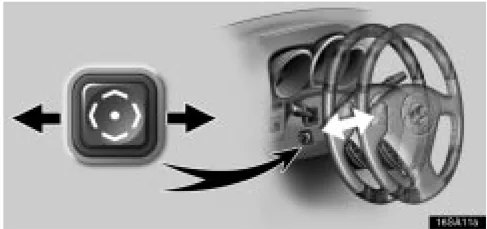
To adjust the steering column length, push the control switch forward or backward to set the steering wheel to the desired position.
CAUTION Do not adjust the steering column while the vehicle is moving. Doing so may cause the driver to mishandle the vehicle and an accident may occur resulting in death or serious injuries
Auto tilt away*
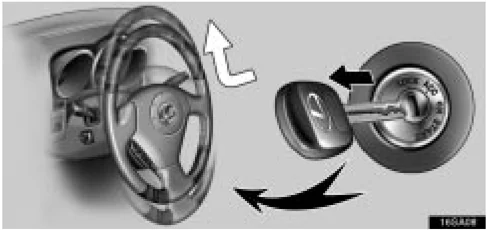
When the ignition key is removed, the steering column moves forward away from the driver and also tilts up for easy exit and entry.
When the key is inserted in the ignition switch, the steering column returns to the previously set position.
NOTE: This feature can be deactivated. Ask your Lexus dealer for details.
2003 SC430 from May '03 Prod. (OM24449U) 99
COMFORT ADJUSTMENT
OUTSIDE REAR VIEW MIRRORS
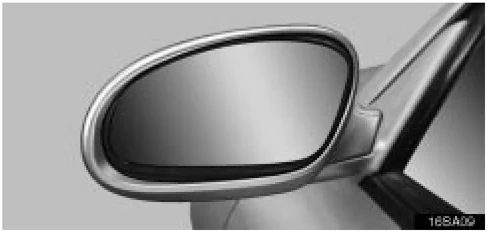
Adjust the mirror so that you can just see the side of your vehicle in the mirror.
Be careful when judging the size or distance of any object seen in the outside rear view mirror on the passenger’s side because it is a convex mirror. Any object seen in a convex mirror will look smaller and farther away than if seen in a normal flat mirror.
When the inside rear view mirror darkens in "AUTO" mode, the outside rear view mirrors also darken to reduce the reflection of the headlights of the following vehicle. For details, see "Inside rear view mirror" on page 102.
When you push the rear window defogger switch or turn on the wipers at lower than 25°C (77°F) of the outside temperature, the heater panels in the outside rear view mirrors will quickly clear the mirror surface. For details, see “Rear window and outside rear view mirror defogger switch” on page 28.
CAUTION
- Do not adjust the mirror while the vehicle is moving. Doing so may cause the driver to mishandle the vehicle and an accident may occur resulting in death or serious injuries.
- Since the mirror surfaces can get hot, do not touch them when the rear window and outside rear view mirror defogger switch is on. And do not touch the mirror surfaces also when the wiper switch is on at lower than 25°C (77°F) of the outside temperature.
100
COMFORT ADJUSTMENT
Power rear view mirror control
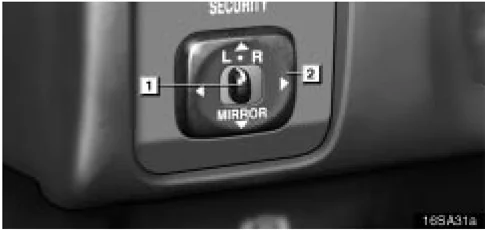
1 Master switch 2 Control switch
To adjust the power rear view mirror, first place the master switch at "L" (left) or "R" (right), and move the control switch in the desired side.
The power rear view mirrors can be adjusted when the ignition switch is in the "ACC" or "ON" position.
When you are backing up, you can adjust the mirrors down quickly by the following operations with the ignition ON.
- Put the selector lever in the "R" position.
- Place the master switch at "L" (left) or "R" (right).
The mirrors return to the previous position by any of the following operations.
- Put the selector lever in a position other than "R".
- Place the master switch in the neutral position.
- Turn the ignition switch to the "ACC" position.
NOTICE
If ice should jam the mirror, do not operate the control or scrape the mirror face. Use a spray de-icer to free the mirror.
101
COMFORT ADJUSTMENT
Folding rear view mirrors
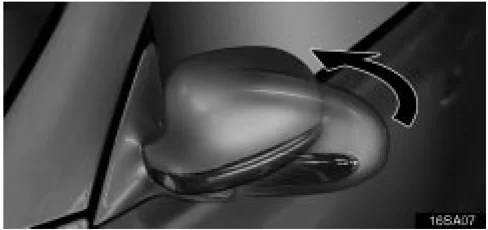
To fold the rear view mirror, push backward. The rear view mirrors can be folded backward for parking in compact areas.
CAUTION Do not drive with the mirrors folded backward. Both the driver and passenger side rear view mirrors must be extended and properly adjusted before driving.
INSIDE REAR VIEW MIRROR
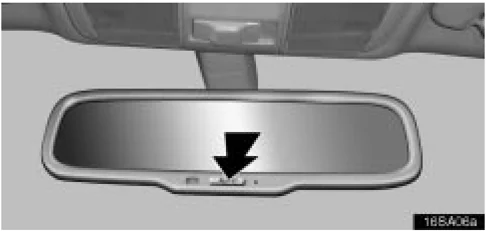
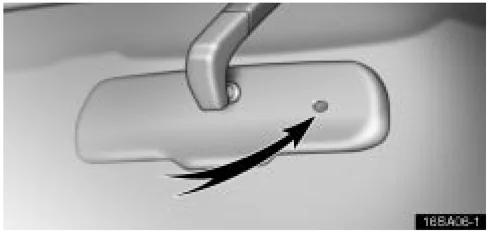
Adjust the mirror so that you can just see the rear of your vehicle in the mirror. Pushing the switch changes the mode between "AUTO" and "DAY". The indicator comes on when the "AUTO" mode is selected. "DAY" mode: The mirror surface is normal. "AUTO" mode: If the mirror detects light from the headlights of the vehicle behind you, the mirror surface darkens slightly to reduce the reflected light. When the inside rear view mirror surface changes, the outside rear view mirror surfaces will also become darker. When the ignition key is inserted and turned on, the inside rear view mirror always turns on in the "AUTO" mode.
102
COMFORT ADJUSTMENT
When the outside air temperature is low, it may take a little longer for the mirror to darken in response to the detection of headlights.
CAUTION Do not adjust the mirror while the vehicle is moving. Doing so may cause the driver to mishandle the vehicle and an accident may occur resulting in death or serious injuries.

To ensure correct functioning of an anti-glare mirror sensor located on the back side of the mirror, do not touch or cover the sensor with your finger or a piece of cloth, etc.
SEAT BELTS
Seat belt precautions
Lexus strongly urges that the driver and passengers in the vehicle be properly restrained at all times with the seat belts provided. Failure to do so could increase the chance of injury and/or the severity of injury in accidents.
The seat belts provided for your vehicle are designed for people of adult size, large enough to properly wear them.
Child. Use a child restraint system appropriate for the child until the child becomes large enough to properly wear the vehicle's seat belts. See "Child restraint" on page 126 for details.
If a child is too large for a child restraint system, the child should sit in the rear seat and must be restrained using the vehicle's seat belt. According to accident statistics, the child is safer when properly restrained in the rear seat than in the front seat.
If a child must sit in the front seat, the seat belts should be worn properly. Do not let the child sit on your lap. It does not provide sufficient restraint. If an accident occurs and the seat belts are not worn properly, the force of the rapid inflation of the airbag may cause severe injury to the child.
Do not allow the child to stand up or kneel on either rear or front seats. An unrestrained child could suffer serious injury or death during emergency braking or a collision.
Pregnant woman. Lexus recommends the use of a seat belt. Ask your doctor for specific recommendations. The lap belt should be worn securely and as low as possible over the hips and not on the waist.
103
COMFORT ADJUSTMENT
Injured person. Lexus recommends the use of a seat belt. Depending on the injury, first check with your doctor for specific recommendations.
CAUTION
Persons should ride in their seats properly wearing their seat belts whenever the vehicle is moving. Otherwise, they are much more likely to suffer serious bodily injury or death in the event of sudden braking or a collision.
When using the seat belts, observe the following:
-
Use the belt for only one person at a time. Do not use a single belt for two or more people – even children.
-
Avoid reclining the seatbacks too much. The seat belts provide maximum protection when the seatbacks are in the upright position. (See "Adjusting seatback angle" on page 95.)
-
Be careful not to damage the belt webbing or hardware. Take care that they do not get caught or pinched in the seat or doors.
-
Inspect the belt system periodically. Check for cuts, fraying, and loose parts. Damaged parts should be replaced. Do not disassemble or modify the system.
-
Keep the belts clean and dry. If they need cleaning, use a mild soap solution or lukewarm water. Never use bleach, dye, or abrasive cleaners – they may severely weaken the belts. (See "Cleaning the interior" on page 355 for instructions.)
-
Replace the belt assembly (including bolts) if it has been used in a severe impact. The entire assembly should be replaced even if damage is not obvious.
104
COMFORT ADJUSTMENT
Front seat belt buckle illumination
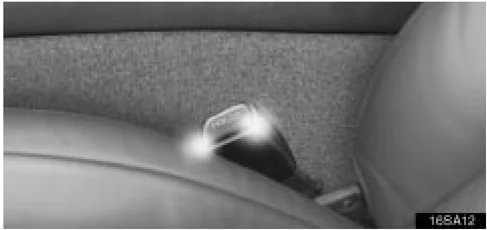
Opening the driver’s door lights up the driver’s seat belt buckle for easy use. The same applies for the front passenger’s door and seat belt buckle.
The light remains on for 15 seconds after the door is closed, but goes off immediately when both side doors are locked.
Fastening seat belts
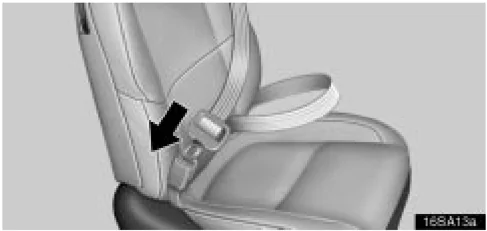
Adjust the seat as needed and sit up straight and well back in the seat. To fasten your belt, pull it out of the retractor and insert the tab into the buckle.
You will hear a click when the tab locks into the buckle.
The seat belt length automatically adjusts to your size and the seat position.
The retractor will lock the belt during a sudden stop or on impact. It also may lock if you lean forward too quickly. A slow, easy motion will allow the belt to extend, and you can move around freely.
When a passenger’s shoulder belt is completely extended and is then retracted even slightly, the belt is locked in that position and cannot be extended. This feature is used to hold the child restraint system securely. (For details, see “Child restraint” on page 126.) To free the belt again, fully retract the belt and then pull the belt out once more.
105
COMFORT ADJUSTMENT
If the seat belt cannot be pulled out of the retractor, firmly pull the belt and release it. You will then be able to smoothly pull the belt out of the retractor.
CAUTION
- After inserting the tab, make sure the tab and buckle are locked and that the belt is not twisted.
- Do not insert coins, clips, etc. in the buckle as this may prevent you from properly latching the tab and buckle.
- If the seat belt does not function normally, immediately contact your Lexus dealer. Do not use the seat until the seat belt is fixed. It cannot protect an adult occupant or your child from injury.

Adjust the position of the lap and shoulder belts. 1 Position the lap belt as low as possible on your hips – not on your waist. 2 Adjust it to a snug fit by pulling the shoulder portion upward through the latch plate.
CAUTION
- Both high-positioned lap belts and loose-fitting belts could cause serious injuries due to sliding under the lap belt during a collision or other unintended result. Keep the lap belt positioned as low on hip as possible.
- For your safety, do not place the shoulder belt under your arm.
106
COMFORT ADJUSTMENT
 To release the belt, press the buckle release button and allow the belt to retract.
If the belt does not retract smoothly, pull it out and check for kinks or twists. Then make sure it remains untwisted as it retracts.
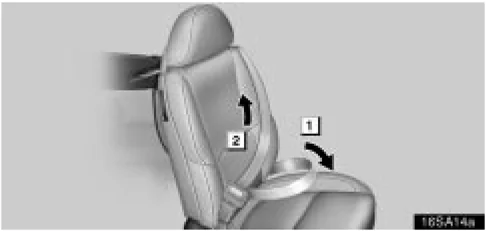
Seat belt guides
 The seat belt guides are attached on the shoulders of the front seats so that smaller front occupants can easily use the seat belts.
To use the seat belt guide, unattach the hook, let the seat belt run under the guide and then reattach the hook.
CAUTION
- When you get into or out of the rear seats, release the seat belt from the seat belt guide.
- Always make sure that the belt webbing is not twisted and runs freely through the guide when using it.
- Always adjust the seat belt webbing snugly, adjust the seat belt guide and seat position to assure proper fit and comfort of your seat belt.
107

COMFORT ADJUSTMENT
Rear seat belt holders
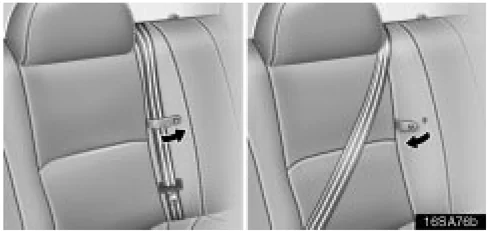
Hold the rear seat belt with the holder when not in use.
CAUTION Release the rear seat belt holder when using the rear seat belt.
Seat belt extender
If your seat belts cannot be fastened securely because they are not long enough, a personalized seat belt extender is available from your Lexus dealer free of charge.
Please contact your local Lexus dealer to order the proper required length for the extender. Bring the heaviest coat you expect to wear for proper measurement and selection of length. Additional ordering information is available at your Lexus dealer.
CAUTION When using the seat belt extender, observe the following. Failure to follow these instructions could reduce the effectiveness of the seat belt restraint system in case of vehicle accident, increasing the chance of personal injury.
- Remember that the extender provided for you may not be safe when used on a different vehicle, for another person, or at a different seating position than the one originally intended.
- Be sure to wear the seat belt without the seat belt extender if you can fasten the seat belt without the extender.
108
COMFORT ADJUSTMENT
- Do not use the seat belt extender when installing a child restraint system on the front or rear passenger seat. If installing a child restraint system with the seat belt extender connected to the seat belt, the seat belt will not securely hold the child restraint system, which could cause death or serious injury to the child or other passengers in the event of collision.
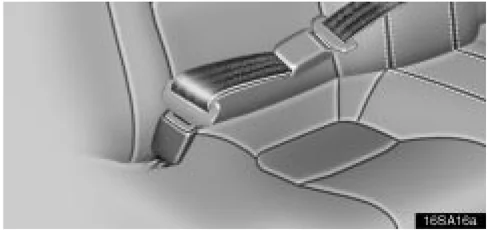
To connect the extender to the seat belt, insert the tab into the seat belt buckle so that the "PRESS" signs on the buckle release buttons of the extender and the seat belt are both facing outward as shown.
You will hear a click when the tab locks into the buckle.
When releasing the seat belt, press on the buckle release button on the extender, not on the seat belt. This helps prevent damage to the vehicle interior and extender itself.
When not in use, remove the extender and store in the vehicle for future use.
CAUTION
- After inserting the tab, make sure the tab and buckle are locked and that the seat belt extender is not twisted.
- Do not insert coins, clips, etc. in the buckle as this may prevent you from properly latching the tab and buckle.
- If the seat belt does not function normally, immediately contact your Lexus dealer. Do not use the seat until the seat belt is fixed. It cannot protect an adult occupant or your child from injury.
2003 SC430 from May '03 Prod. (OM24449U) 109

COMFORT ADJUSTMENT
Front seat belt pretensioners
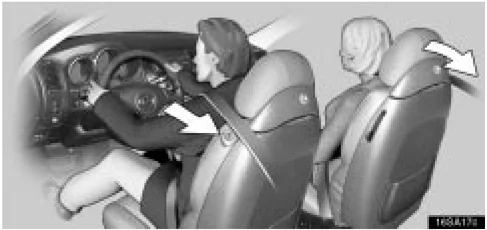
The driver and front passenger’s seat belt pretensioners are designed to be activated in response to a severe frontal impact.
When the airbag sensor detects the shock of a severe frontal impact, the front seat belts are quickly drawn back by the retractor so that the belts snugly restrain the front seat occupants.
The front passenger seat belt pretensioner will not activate if there is no passenger sitting in the front passenger seat. However, the front passenger seat belt pretensioner may activate if luggage is put in the seat, or the seat belt is buckled up regardless of the presence of the occupant in the seat.
The seat belt pretensioners and SRS airbags may not operate together in case of collisions at certain speeds and angles.
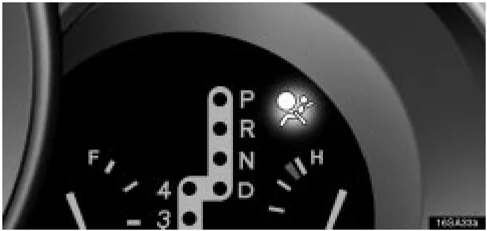
This indicator comes on when the ignition switch is turned to the “ON” position. It goes off after about 6 seconds. This means the front seat belt pretensioners are operating properly.
This warning light system monitors the airbag sensor assembly, front airbag sensors, side airbag sensors, occupant detection sensor, seat belt buckle switch, front seat belt pretensioner assemblies, inflators, warning light, interconnecting wiring and power sources. (For details, see "Service reminder indicators and warning buzzers" on page 38.)
110
COMFORT ADJUSTMENT
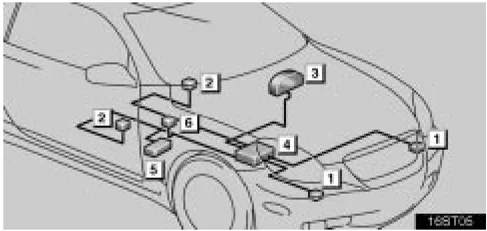
1 Front airbag sensors 2 Front seat belt pretensioner assembly 3 SRS warning light 4 Airbag sensor assembly 5 Occupant detection sensor 6 Seat belt buckle switch
The front seat belt pretensioner system mainly consists of the above components, and their locations are shown in the illustration.
The front seat belt pretensioners are controlled by the airbag sensor assembly. The airbag sensor assembly consists of a safing sensor and airbag sensor.
When the front seat belt pretensioners are activated, an operating noise may be heard and a small amount of smoke-like gas may be released. This gas is harmless and does not indicate that a fire is occurring.
Once the front seat belt pretensioners have been activated, the seat belt retractors remain locked.
CAUTION
Do not modify, remove, strike or open the front seat belt pretensioner assemblies, airbag sensor or surrounding area or wiring. Doing any of these may cause sudden operation of the front seat belt pretensioners or disable the system, which could result in death or serious injury.
Failure to follow these instructions can result in death or serious injury. Consult your Lexus dealer about any repairs and modifications.
NOTICE
Do not perform any of the following changes without consulting your Lexus dealer. Such changes can interfere with proper operation of the front seat belt pretensioners in some cases.
- Installation of electronic devices such as a mobile two-way radio, cassette tape player or compact disc player.
- Repairs on or near the front seat belt retractor assemblies.
- Modification of the suspension system.
- Modification of the front end structure.
- Attachment of a grille guard (bull bar, kangaroo bar, etc.), snowplow, winches or any other equipment to the front end.
111
COMFORT ADJUSTMENT
- Repairs made on or near the front fenders, front end structure or console.
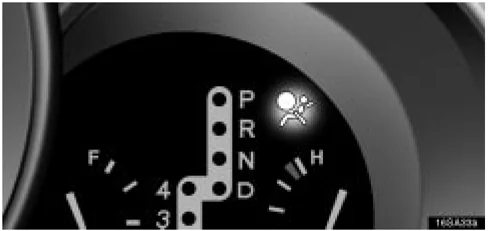
This front seat belt pretensioner system has a service reminder indicator to inform the driver of operating problems. If any of the following conditions occurs, this indicates a malfunction of the pretensioners. Contact your Lexus dealer as soon as possible to service the vehicle.
- When the ignition switch is turned to the "ON" position, the light does not come on or flashes.
- The light flashes while driving.
- If either front seat belt does not retract or cannot be pulled out due to a malfunction or activation of the relevant front seat belt pretensioner.
- The front seat belt pretensioner assembly or surrounding area has been damaged.
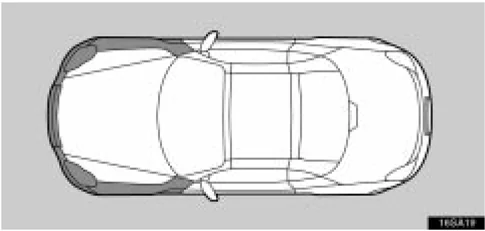
In the following cases, contact your Lexus dealer as soon as possible.
- The front of the vehicle (shaded in the illustration) was involved in an accident that did not cause the front seat belt pretensioners to operate.
- Either front seat belt pretensioner assembly or surrounding area is scratched, cracked, or otherwise damaged.
112
COMFORT ADJUSTMENT
SRS AIRBAGS
The SRS (Supplemental Restraint System) airbags are designed to provide further protection for the driver and front passenger in addition to the primary safety protection provided by the seat belts.
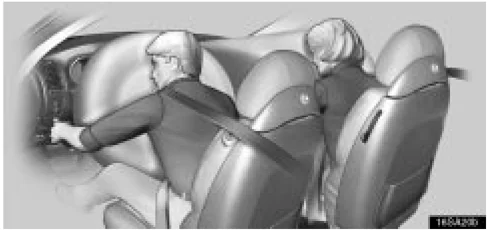
►Front airbags
In response to a severe frontal impact, the front airbags work together with the seat belts to help reduce injury by inflating. The front airbags help to reduce injuries mainly to the driver's or front passenger's head or chest directly hitting the steering wheel or dashboard.
The front passenger airbag will not activate if there is no passenger sitting in the front passenger seat. However, the front passenger airbag may deploy if luggage is put in the seat, or the seat belt is buckled up regardless of the presence of the occupant in the seat.
Your vehicle is equipped with a crash sensing and diagnostic module, which will record the use of the seat belt restraint system by the driver when the front airbags are inflated.
Be sure to wear your seat belt properly.
CAUTION
The driver or front passenger who is too close to the steering wheel or dashboard during airbag deployment can be killed or seriously injured. Lexus strongly recommends that:
- The driver sit as far back as possible from the steering wheel while still maintaining control of the vehicle.
- The front passenger sit as far back as possible from the dashboard.
- All vehicle occupants be properly restrained using the available seat belts.
- Always make sure that the belt webbing is not twisted and runs freely through the guide when using it.
- Always adjust the seat belt webbing snugly, adjust the seat belt guide and seat position to assure proper fit and comfort of your seat belt.
2003 SC430 from May '03 Prod. (OM24449U) 113