At a glance
Cockpit Instrument cluster Multifunction steering wheel Center console Overhead control panel Door control panel
21
At a glance
Cockpit
P68.10-3217-31
22
At a glance
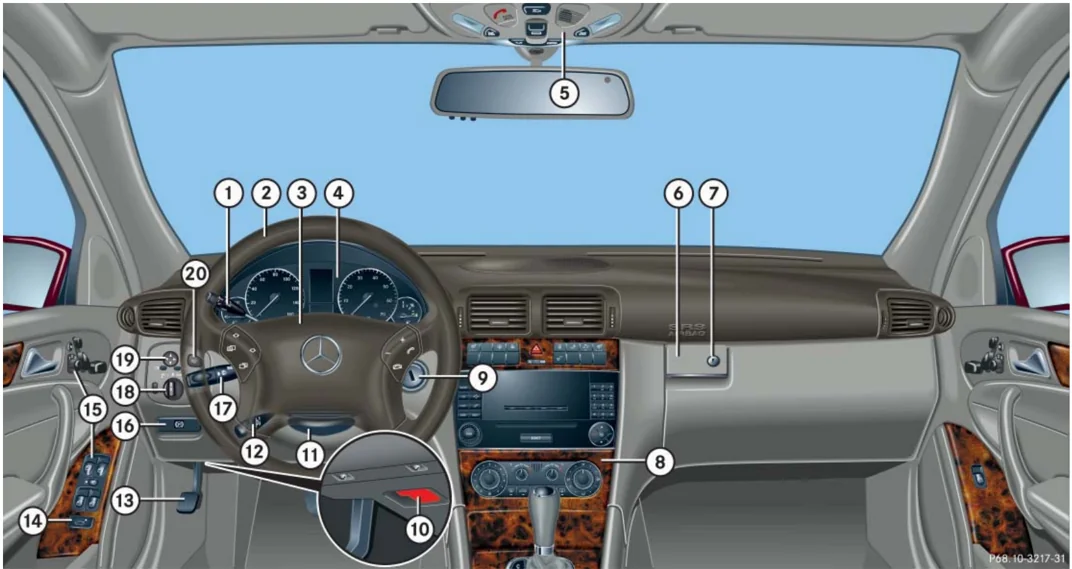
Cockpit
| Item | Page |
|---|---|
| ① Cruise control lever | 249 |
| ② Multifunction steering wheel | 26, 130 |
| ③ Horn | |
| ④ Instrument cluster | 24, 126 |
| ⑤ Overhead control panel | 29 |
| ⑥ Glove box lid release | 259 |
| ⑦ Glove box lock | 259 |
| ⑧ Center console | 27 |
| Item | Page |
|---|---|
| ⑨ Starter switch | 33 |
| ⑩ Hood lock release | 296 |
| ⑪ Steering wheel adjustment handle (manual) | 40 |
| ⑫ Steering wheel adjustment stalk (electrical)* | 40 |
| ⑬ Parking brake pedal | 48, 54 |
| ⑭ Remote trunk lid switch | 100 |
| ⑮ Door control panel | 30 |
| ⑯ Parking brake release | 48 |
| Item | Page |
|---|---|
| ⑰ Combination switch | |
| • Turn signals | 50 |
| • Windshield wipers | 51 |
| • High beam | 50 |
| ⑱ Exterior lamp switch | 49, 117 |
| ⑲ Exterior rear view mirror adjustment | 41, 116 |
| ⑳ Headlamp washer switch* | 172 |
23
At a glance
Instrument cluster
P54.32-2500-31
24
At a glance
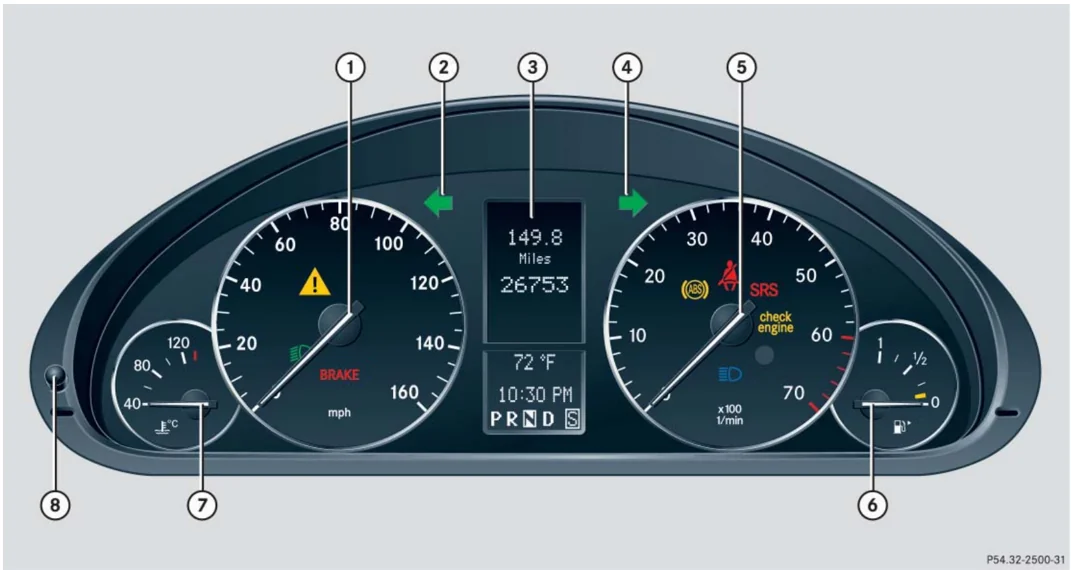
Instrument cluster
| Item | Page |
|---|---|
| ① Speedometer with: | |
| ⚠️ Electronic Stability Program (ESP) warning lamp | 85, 348 |
| BRAKE Brake warning lamp, USA only | 48, 54, 345 |
| ⚠️ Brake warning lamp, Canada only | 48, 54, 345 |
| 🌞 Low beam headlamp indicator lamp | 49, 117 |
| ② 🔄 Left turn signal indicator lamp | 50 |
| ③ Multifunction display with: | |
| Trip odometer | 127 |
| Main odometer | 129 |
| Gear selector lever position | 47, 129, 168 |
| Item | Page |
|---|---|
| Program mode | 169 |
| Status indicator (outside temperature/digital speedometer | 128, 144 |
| Digital clock | 129 |
| ④ ➡️ Right turn signal indicator lamp | 50 |
| ⑤ Tachometer with: | |
| (ABS) Antilock Brake System (ABS) indicator lamp | 83, 344 |
| 🛑 Engine malfunction indicator lamp, USA only | 346, 347 |
| 🛑 Engine malfunction indicator lamp, Canada only | 346, 347 |
| SRS Supplemental restraint system indicator lamp | 58, 349 |
| Item | Page |
|---|---|
| 🪑 Seat belt telltale | 64, 349 |
| 💡 High beam headlamp indicator lamp | 50, 121 |
| ⑥ Fuel gauge with: | |
| Fuel reserve warning lamp | 349 |
| 🛢️ Fuel filler cap location indicator: The fuel filler cap is on the rear right-hand side. | |
| ⑦ Coolant temperature gauge | 127 |
| ⑧ Reset button for: | |
| • Resetting trip odometer | 127 |
| • Resetting individual settings | 141 |
| • Instrument cluster illumination | 126 |
25
At a glance
Multifunction steering wheel
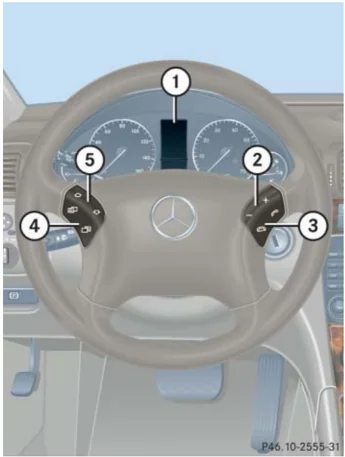
| Item | Page |
|---|---|
| ① Multifunction display | 129 |
| Operating control system | 130 |
| ② Selecting the submenu or setting the volume: Press button | |
| + up/to increase | |
| - down/to decrease | |
| ③ Telephone*: Press button | |
| 📞 to take a call | |
| 📞 to end a call |
| Item | Page |
|---|---|
| ④ Menu systems: Press button | |
| 📄 for next menu | |
| 📄 for previous menu | |
| ⑤ Moving within a menu: Press button | |
| ⬆️ for next display | |
| ⬇️ for previous display |
i
C 230 Kompressor Sport, and C 320 Sport:
Steering wheel in these vehicles will vary from steering wheel shown.
However, multifunction steering wheel symbols and feature description apply to Sport models as well.
26
Center console
Upper part
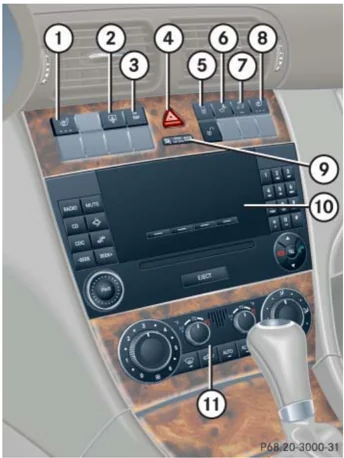
| Item | Page |
|---|---|
| ① Seat heating*, driver’s side | 113 |
| ② Rear window sunshade switch* | 176 |
| ③ ESP control switch | 85 |
| ④ Hazard warning flasher switch – switching on/off | 123 |
| ⑤ Central locking switch | 104 |
| Central unlocking switch | 104 |
| ⑥ Switch for folding back rear seat head restraints | 110 |
| ⑦ Tow-away alarm switch* | 91 |
| Anti-theft alarm system indicator lamp* | 90 |
| Item | Page |
|---|---|
| ⑧ Seat heating*, passenger side | 113 |
| ⑨ Front passenger front air bag off indicator lamp | 75, 350, 351 |
| ⑩ Audio system, or COMAND* (see separate operating instructions) | 201 |
| ⑪ Climate control | 178 |
| Automatic climate control* | 188 |
| Rear window defroster | 177 |
At a glance
Center console
27
At a glance
Center console
Lower part
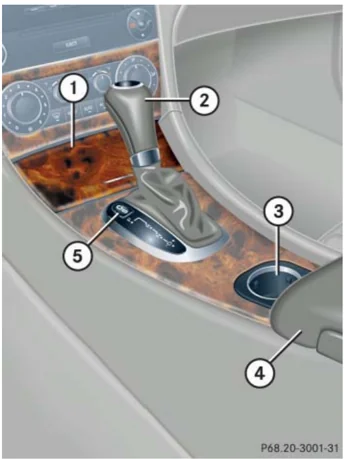
| Item | Page |
|---|---|
| ① Ashtray | 263 |
| Cigarette lighter | 265 |
| ② Gear selector lever for automatic transmission* | 47, 168 |
| Gearshift lever for manual transmission | 46, 162 |
| ③ Cup holders | 261 |
| ④ Armrest | 260 |
| ⑤ Program mode selector switch for automatic transmission* | 169 |
28
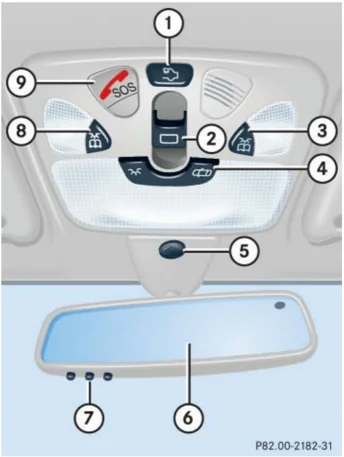
Overhead control panel
P82.00-2182-31
| Item | Page |
|---|---|
| ① Rear interior lighting on/off | 125 |
| ② Power tilt/sliding sunroof* | 245 |
| ③ Right reading lamp on/off | 125 |
| ④ Interior lighting control | 124 |
| ⑤ Hands-free microphone for Tele Aid* (emergency call system) and telephone* | 158, 226, 267 |
| Item | Page |
|---|---|
| ⑥ Interior rear view mirror | 41, 172 |
| ⑦ Garage door opener* | 274 |
| ⑧ Left reading lamp on/off | 125 |
| ⑨ Tele Aid* (emergency call system) button | 267 |
At a glance
Overhead control panel
29
At a glance
Door control panel
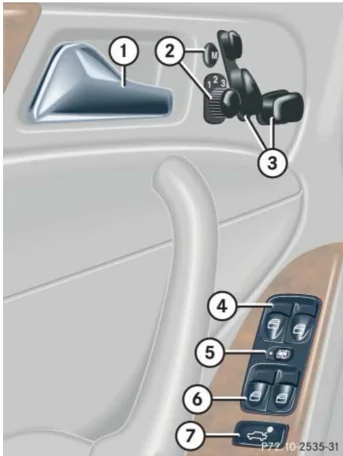
| Item | Page |
|---|---|
| ① Door handle | 98 |
| ② Memory function* (for storing seat, exterior mirror and steering wheel settings) | 114 |
| ③ Switches for seat adjustment* | 35, 106 |
| ④ Switches for opening/closing front door windows | 241 |
| ⑤ Switch for rear door window override | 80 |
| ⑥ Switches for opening/closing rear door windows | 241 |
| ⑦ Remote trunk lid switch | 100 |
30
Getting started
Unlocking Adjusting Driving Parking and locking
31
Getting started
Unlocking
The “Getting started” section provides an overview of the vehicle’s most basic functions. First-time Mercedes-Benz owners should pay special attention to the information given here.
If you are already familiar with the basic functions described here, the “Controls in detail” section will provide you with further information. The corresponding page references are located at the end of each segment.
Unlocking with the SmartKey
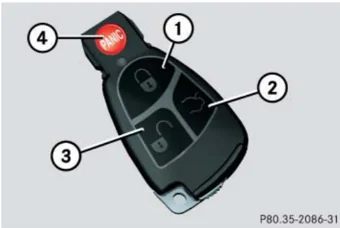
SmartKey with remote control ① Lock button ② Opening button for the trunk lid ③ Unlock button ④ PANIC Panic button* (▷ page 81)
i Canada only: Only vehicles equipped with an anti-theft alarm system* have SmartKeys with integrated panic button* ④.
Warning! When leaving the vehicle, always remove the SmartKey from the starter switch, take it with you, and lock the vehicle. Do not leave children unattended in the vehicle, or with access to an unlocked vehicle. Unsupervised use of vehicle equipment may cause an accident and/or serious personal injury.
► Press unlock button on the SmartKey.
All turn signal lamps flash once. The locking knobs in the doors move up. The anti-theft alarm system* is disarmed.
► Get in the vehicle and insert the SmartKey in the starter switch.
For more information, see “Locking and unlocking” (▷ page 94).
32
Getting started
Unlocking
Starter switch positions
Warning!
When leaving the vehicle, always remove the SmartKey from the starter switch, take it with you, and lock the vehicle. Do not leave children unattended in the vehicle, or with access to an unlocked vehicle. Unsupervised use of vehicle equipment may cause an accident and/or serious personal injury.
SmartKey
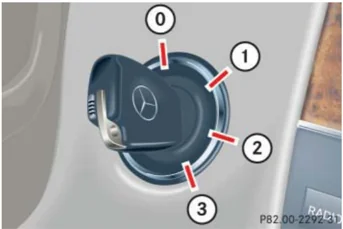
Starter switch
0 For removing SmartKey The steering is locked when the SmartKey is removed from the starter switch. If necessary, move steering wheel slightly to allow the locking mechanism to engage.
1 Power supply to some electrical consumers, such as seat adjustment
2 Ignition (power supply for all electrical consumers) and driving position. All lamps (except low beam headlamp indicator lamp, high beam headlamp indicator lamp, and turn signal indicator lamps unless activated) in the instrument cluster come on. If a lamp in the instrument cluster fails to come on when the ignition is switched on, have it checked and replaced if necessary. If a lamp in the instrument cluster remains on after starting the engine or comes on while driving, refer to “Lamps in instrument cluster” (▷ page 344).
3 Starting position
33
Getting started
Unlocking
When you switch on the ignition, the indicator and warning lamps (except low beam headlamp indicator lamp, high beam headlamp indicator lamp, and turn signal indicator lamps unless activated) in the instrument cluster come on. This indicates that the respective systems are operational. The indicator and warning lamps (except low beam headlamp indicator lamp, high beam headlamp indicator lamp, and turn signal indicator lamps if activated) should go out when the engine is running.
Vehicles with automatic transmission: The SmartKey can only be removed from the starter switch with the gear selector lever in position P.
If the SmartKey cannot be turned in the starter switch, the battery may not be sufficiently charged.
- Check the battery and charge it if necessary (▷ page 404).
- Get a jump start (▷ page 407).
To prevent accelerated battery discharge and a possible dead battery, always remove the SmartKey from the starter switch when the engine is not in operation.
34
Getting started
Adjusting
▼ Adjusting
Warning!
All seat, head restraint, steering wheel, and rear view mirror adjustments, as well as fastening of seat belts, must be done before the vehicle is put into motion.
Seats
The seats can be adjusted either manually or electrically, depending on the vehicle's equipment.
Warning!
Do not adjust the driver's seat while driving. Adjusting the seat while driving could cause the driver to lose control of the vehicle.
Never ride in a moving vehicle with the seat back in an excessively reclined position as this can be dangerous. You could slide under the seat belt in a collision. If you slide under it, the belt would apply force at the abdomen or neck.
That could cause serious or fatal injuries. The seat back and seat belts provide the best restraint when the wearer is in a nearly upright position and belts are properly positioned on the body. Your seat must be adjusted so that you can correctly fasten your seat belt (▷ page 43).
Never place hands under the seat or near any moving parts while a seat is being adjusted.
Warning!
When leaving the vehicle, always remove the SmartKey from the starter switch, take it with you, and lock the vehicle.
Even with the SmartKey removed from the starter switch, the power seats* can be operated when the respective door is open. Therefore, do not leave children unattended in the vehicle, or with access to an unlocked vehicle. Unsupervised use of vehicle equipment may cause an accident and/or serious personal injury.
Warning!
According to accident statistics, children are safer when properly restrained in the rear seating positions than in the front seating position. Thus, we strongly recommend that children be placed in the rear seats whenever possible. Regardless of seating position, children 12 years old and under must be seated and properly secured in an appropriate infant, or toddler restraint, or booster seat recommended for the size and weight of the child. For additional information, see "Children in the vehicle" (▷ page 68).
A child's risk of serious or fatal injuries is significantly increased if the child restraints are not properly secured in the vehicle and/or the child is not properly secured in the child restraint.
35
Getting started
Adjusting
Manual seat adjustment
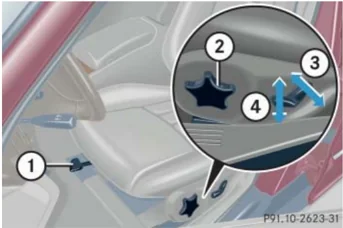
① Seat fore and aft adjustment ② Seat cushion tilt ③ Seat backrest tilt ④ Seat height
Seat fore and aft adjustment
- Lift handle ①.
- Slide seat to the desired position.
- Allow handle ① to reengage.
- Check for proper engagement before driving.
Adjust seat to a comfortable seating position that still allows you to reach the accelerator/brake pedal safely. The position should be as far rearward as possible, consistent with ability to properly operate controls.
When moving the seat, make sure that there are no items in the footwell or behind the seat. Otherwise you could damage the seat.
Seat cushion tilt
- Turn handwheel ② forward or backward until your upper legs are lightly supported.
Seat backrest tilt
- Switch on ignition (▷ page 33).
- Press switch ③ in direction of arrow until your arms are slightly angled when holding the steering wheel.
Seat height
- Switch on ignition (▷ page 33).
- Press switch ④ in direction of arrow until your legs are lightly supported.
36
Getting started
Adjusting
Head restraint height
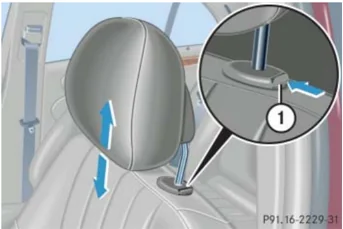
① Release button
Raising:
- Manually adjust the height of the head restraint by pulling it upward.
Lowering:
- To lower head the restraint, push release button ① and push down on the head restraint.
Warning!
For your protection, drive only with properly positioned head restraints.
Adjust head restraint so that the center of the head restraint supports the back of the head at eye level. This will reduce the potential for injury to the head and neck in the event of an accident or similar situation.
Do not drive the vehicle without the seat head restraints. Head restraints are intended to help reduce injuries during an accident.
Adjust the head restraint in such a way that it is as close to the head as possible.
Head restraint tilt
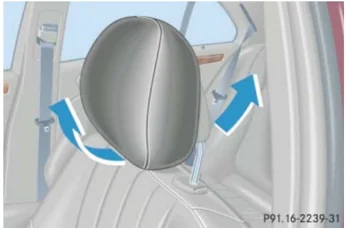
Manually adjust the angle of the head restraint.
- Push or pull on the lower edge of the head restraint cushion.
For more information, see “Seats” (▷ page 106).
37
Getting started
Adjusting
Power seat* adjustment
The seat adjustment switches are located in each front door.
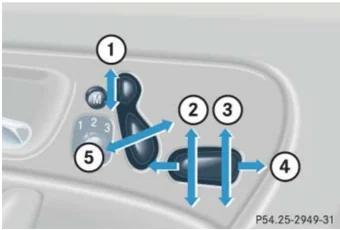
① Head restraint height ② Seat height ③ Seat cushion tilt ④ Seat fore and aft adjustment ⑤ Seat backrest tilt
► Switch on ignition (▷ page 33). or ► Open the respective door.
Seat fore and aft adjustment
► Press switch forward or backward in direction of arrow ④.
Adjust seat to a comfortable seating position that still allows you to reach the accelerator/brake pedal safely. The position should be as far rearward as possible, consistent with ability to properly operate controls.
! When moving the seat, make sure that there are no items in the footwell or behind the seat. Otherwise you could damage the seat.
i The memory function* (▷ page 114) lets you store the setting for the seat position together with the settings for the steering wheel and exterior rear view mirrors.
Seat cushion tilt
► Press switch up or down in direction of arrow ③ until your upper legs are lightly supported.
Seat backrest tilt
► Press switch forward or backward in direction of arrow ⑤ until your arms are slightly angled when holding the steering wheel.
Seat height
► Press switch up or down in direction of arrow ②.
Head restraint height
► Press switch up or down in direction of arrow ①.
i Adjust the head restraint in such a way that it is as close to the head as possible.
Getting started
Adjusting
Warning!
For your protection, drive only with properly positioned head restraints.
Adjust head restraint so that the center of the head restraint supports the back of the head at eye level. This will reduce the potential for injury to the head and neck in the event of an accident or similar situation.
Do not drive the vehicle without the seat head restraints. Head restraints are intended to help reduce injuries during an accident.
Head restraint tilt
 P91.16-2239-31
Manually adjust the angle of the head restraint.
- Push or pull on the lower edge of the head restraint cushion.
For more information, see “Seats” (> page 106).
Steering wheel
Warning!
Do not adjust the steering wheel while driving. Adjusting the steering wheel while driving, or driving without the adjustment locked could cause the driver to lose control of the vehicle.
When leaving the vehicle, always remove the SmartKey from the starter switch, take it with you, and lock the vehicle.
Even with the SmartKey removed from the starter switch, the electrical steering wheel adjustment feature* can be operated when the driver’s door is open. Therefore, do not leave children unattended in the vehicle, or with access to an unlocked vehicle. Unsupervised use of vehicle equipment may cause an accident and/or serious personal injury.
39
Getting started
Adjusting
Steering wheel adjustment, manual
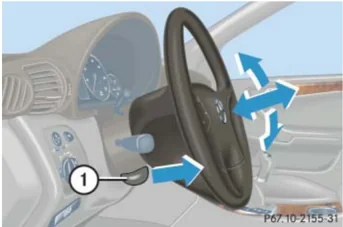
① Handle
- To unlock the steering column, pull handle ① out to its stop limit.
- Move steering wheel to the desired position.
- To lock the steering column, push handle ① all the way in until it engages.
The steering wheel is once again locked into position.
- Make sure the steering wheel is securely locked by trying to move it up and down, and in and out before driving off.
Warning!
Only adjust the steering wheel with the vehicle at a standstill and make sure the steering wheel is securely locked in place before driving off.
Driving without the steering wheel adjustment locked may cause an unexpected steering wheel movement which could cause the driver to lose control of the vehicle. Make sure the steering wheel is securely locked by trying to move it up and down, and in and out before driving off.
Steering wheel adjustment, electrical*
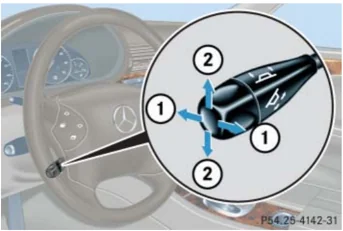
The stalk for steering wheel adjustment is located on the steering column (lower left).

① Adjusting steering column, in or out ② Adjusting steering column, up or down
- Switch on ignition (> page 33). or
- Open the driver's door.
40
Getting started
Adjusting
Adjusting steering column in or out
► Move stalk forward or back in the direction of arrow ① until a comfortable steering wheel position is reached with your arms slightly bent at the elbow.
Adjusting steering column up or down
► Move stalk up or down in the direction of arrow ②.
Make sure your legs can move freely and that all the displays (incl. malfunction and indicator lamps) on the instrument cluster are clearly visible.
The memory function* (▷ page 114) lets you store the setting for the steering wheel together with the settings for the seat position and exterior rear view mirrors.
Mirrors
Adjust the interior and exterior rear view mirrors before driving so that you have a good view of the road and traffic conditions.
Warning!
In the case of an accident, liquid electrolyte may escape the mirror housing if the mirror glass breaks.
Electrolyte has an irritating effect. Do not allow the liquid to come into contact with eyes, skin, clothing, or respiratory system. In case it does, immediately flush affected area with water, and seek medical help if necessary.
Electrolyte drops coming into contact with the vehicle paint finish can only be completely removed while in their liquid state and by applying plenty of water.
Interior rear view mirror
► Manually adjust the interior rear view mirror.
For more information, see “Rear view mirrors” (▷ page 172).
Exterior rear view mirrors
Warning!
Exercise care when using the passenger-side exterior rear view mirror. The mirror surface is convex (outwardly curved surface for a wider field of view). Objects in mirror are closer than they appear. Check your interior rear view mirror or glance over your shoulder before changing lanes.
41
Getting started
Adjusting
The buttons are located above the exterior lamp switch.
 ① Adjustment button
② Passenger-side exterior rear view mirror button
③ Driver’s side exterior rear view mirror button
▶ Switch on ignition (▷ page 33).
▶ Press button ③ for the driver’s side exterior rear view mirror or button ② for passenger-side exterior rear view mirror.
▶ Push adjustment button ① up, down, left, or right according to the desired setting.
! If an exterior rear view mirror was forcibly pushed forward (hit from the rear) or forcibly pushed rearward (hit from the front), reposition it by applying firm pressure until it snaps into place. The mirror housing is now properly positioned and you can adjust the mirror normally.
i The memory function* (▷ page 114) lets you store the setting for the exterior rear view mirrors together with the settings for the steering wheel and seat position.
i At low ambient temperatures, the exterior rear view mirrors will be heated automatically.
For more information, see “Rear view mirrors” (▷ page 172).
42
Getting started
Driving
▼ Driving
Warning!
Do not lay any objects in the driver’s footwell. Be careful that floor mats or carpets in the driver’s footwell have sufficient clearance for the pedals.
During sudden driving or braking maneuvers the objects could get caught between the pedals. You could then no longer brake or accelerate.
Fastening the seat belt
Warning!
Always fasten your seat belt before driving off. Always make sure your passengers are properly restrained, even those sitting in the rear and pregnant women.
Failure to wear and properly fasten and position your seat belt greatly increases your risk of injuries and their likely severity in an accident. You and your passengers should always wear seat belts.
If you are ever in an accident, your injuries can be considerably more severe without your seat belt properly buckled. Without your seat belt buckled, you are much more likely to hit the interior of the vehicle or be ejected from it. You can be seriously injured or killed.
In the same crash, the possibility of injury or death is lessened if you are wearing your seat belt. The air bags can only provide the protection they were designed to afford if the occupants are using their seat belts (▷ page 64).
Warning!
According to accident statistics, children are safer when properly restrained in the rear seating positions than in the front seating position. Thus, we strongly recommend that children be placed in the rear seats. Regardless of seating position, children 12 years old and under must be seated and properly secured in an appropriate infant or toddler restraint, or booster seat recommended for the size and weight of the child. For additional information, see “Children in the vehicle” (▷ page 68).
A child’s risk of serious or fatal injuries is significantly increased if the child restraints are not properly secured in the vehicle and/or the child is not properly secured in the child restraint.
43
Getting started
Driving
Warning!
Never let more people ride in the vehicle than there are seat belts available. Be sure everyone riding in the vehicle is correctly restrained with a separate seat belt. Never use a seat belt for more than one person at a time.
Warning!
Never ride in a moving vehicle with the seat backrest in an excessively reclined position as this can be dangerous. You could slide under the seat belt in a collision. If you slide under it, the belt would apply force at the abdomen or neck. That could cause serious or even fatal injuries. The seat backrest and seat belt provide the best restraint when the wearer is in a nearly upright position and the belt is properly positioned on the body.
Warning!
Read and observe the additional warning notices printed in the "Safety and Security" section (▷ page 62) and (▷ page 64).

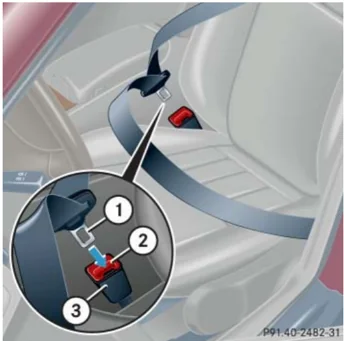
① Latch plate ② Release button ③ Buckle
► With a smooth motion, pull the belt from the belt outlet.
► Place the shoulder portion of the belt across the top of your shoulder and the lap portion across your hips.
► Push latch plate ① into buckle ③ until it clicks.
► If necessary, tighten the lap portion to a snug fit by pulling shoulder portion up.
44
Getting started
Driving
Belt outlet height adjustment Adjust seat belt so that shoulder portion is located as close as possible to the middle of your shoulder (it should not touch the neck or pass under the arm).
 P91.40-2351-31
Belt outlet, front seats ④ Release button
Raising ► Slide belt outlet upward.
Lowering ► Press button ④ and slide belt outlet downward.
Proper use of seat belts
- Do not twist the belt when fastening.
- Adjust seat belt so that the shoulder portion is located as close as possible to the middle of the shoulder (it should not touch the neck). Never pass the shoulder portion of the belt under your arm. For this purpose, you can adjust the height of the belt outlet.
- Position the lap belt as low as possible on your hips (over hip joint) and not across the abdomen.
- Place the seat backrest in a nearly upright position.
- Never use a seat belt for more than one person at a time.
- Do not fasten a seat belt around a person and another object at the same time. When using a seat belt to secure infant or toddler restraints or children in booster seats, always follow the child seat manufacturer's instructions.
- Check your seat belt periodically during travel to make sure that it is properly positioned.
- Make sure that the seat belt is always fitted snugly. Take special care of this when wearing loose clothing.
Warning! Do not pass belts over sharp edges. They could tear. Do not allow the belt to get caught in the door or in the seat adjustment mechanism. This could damage the belt. Never attempt to make modifications to seat belts. This could impair the effectiveness of the belts. Do not bleach or dye seat belts as this may severely weaken them. In a crash, they may not be able to provide adequate protection. Damaged seat belts or belts that were highly stressed in an accident must be replaced. Contact an authorized Mercedes-Benz Center.
45
Getting started
Driving
Starting the engine
Warning!
Inhalation of exhaust gas is hazardous to your health. All exhaust gas contains carbon monoxide, and inhaling it can cause unconsciousness and lead to death.
Do not run the engine in confined areas (such as garage) which are not properly ventilated. If you think that exhaust gas fumes are entering the vehicle while driving, have the cause determined and corrected immediately. If you must drive under these conditions, drive only with at least one window fully open.
Manual transmission
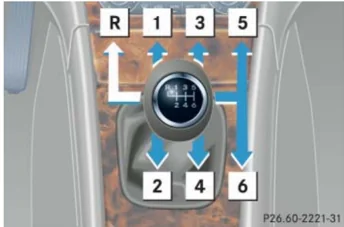
Gearshift pattern for manual transmission For more information, see “Manual transmission” ( page 162).
Starting
- Depress brake pedal.
- Make sure the gearshift lever is in neutral position (no gear selected).
- Fully depress clutch pedal.
Otherwise the engine cannot be started due to the integrated safety interlock.
- Do not depress the accelerator.
- Turn the SmartKey in the starter switch to position 3 and hold until the engine starts ( page 33).
For information on turning off the engine, see “Turning off engine” ( page 56).
46
Getting started
Driving
Automatic transmission*
 P27/00-2179-31
Gearshift pattern for automatic transmission
P Park position with gear selector lever lock R Reverse gear N Neutral D Drive position
For more information, see “Automatic transmission*” (▷ page 164).
Starting
▶ Make sure the gear selector lever is set to P.
▶ Do not depress the accelerator.
▶ Turn the SmartKey in the starter switch to position 3 and hold until the engine starts (▷ page 33).
You can also use the “touch-start” function. Turn the SmartKey in the starter switch to position 3 and release it again immediately. The engine then starts automatically.
▶ Depress the brake pedal.
The gear selector lever lock is released.
For information on turning off the engine, see “Turning off engine” (▷ page 56).
Starting difficulties
If the engine does not start as described, carry out the following steps:
▶ Turn the SmartKey in the starter switch to position 0 and repeat starting procedure (▷ page 46).
Remember that extended starting attempts can drain the battery.
▶ Get a jump start (▷ page 407).
If the engine does not start after several starting attempts, there could be a malfunction in the engine electronics or in the fuel supply system.
▶ Notify an authorized Mercedes-Benz Center.
47
Getting started
Driving
Parking brake
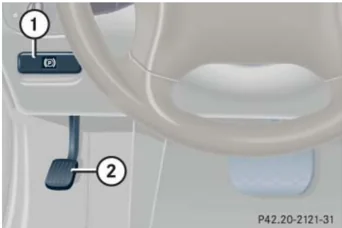
① Release handle ② Parking brake
Warning! When leaving the vehicle, always remove the SmartKey from the starter switch, take it with you, and lock the vehicle. Do not leave children unattended in the vehicle, or with access to an unlocked vehicle. Children could release the parking brake, which could result in an accident and/or serious injury.
▶ Release parking brake by pulling on handle ①. The warning lamp BRAKE (USA only) or (i) (Canada only) in the instrument cluster goes out.
Driving
▶ Depress the brake pedal. ▶ Move gear selector lever to position D or R (manual transmission: first or reverse gear).
i Vehicles with automatic transmission: Wait for the gear selection process to complete before setting the vehicle in motion.
▶ Release the brake pedal. ▶ Carefully depress the accelerator. Once the vehicle is in motion, the automatic central locking system engages and the locking knobs drop down.
i You can open a locked door from the inside. Open door only when conditions are safe to do so. You can deactivate the automatic locking using the control system (▷ page 153).
! Simultaneously depressing the accelerator pedal and applying the brake reduces engine performance and causes premature brake and drivetrain wear.
! If you hear a warning signal when driving off, you have forgotten to release the parking brake. Release the parking brake.
48
After a cold start, the automatic transmission shifts at a higher engine revolution. This allows the catalytic converter to reach its operating temperature earlier.
Warning!
On slippery road surfaces, never downshift in order to obtain braking action. This could result in drive wheel slip and reduced vehicle control. Your vehicle’s ABS will not prevent this type of loss of control.
!
Vehicles with automatic transmission: Place the gear selector lever in position P or R only when the vehicle is stopped in order to avoid damaging the transmission.
!
Do not run cold engine at high engine speeds. Running a cold engine at high engine speeds may shorten the service life of the engine.
Warning!
Vehicles with automatic transmission: It is dangerous to shift the gear selector lever out of P or N if the engine speed is higher than idle speed. If your foot is not firmly on the brake pedal, the vehicle could accelerate quickly forward or in reverse. You could lose control of the vehicle and hit someone or something. Only shift into gear when the engine is idling normally and when your right foot is firmly on the brake pedal.
For more information on driving, see “Driving instructions” (▷ page 283).
Getting started
Driving
Switching on headlamps
For more information on headlamps, see “Lighting” (▷ page 117).
Low beam headlamps
The exterior lamp switch is located on the dashboard to the left of the steering wheel.
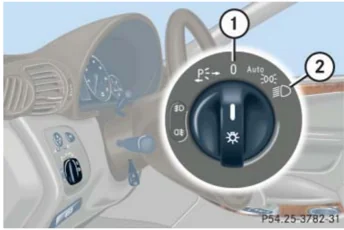
Exterior lamp switch ① Off ② Low beam headlamps on
49
Getting started
Driving
- Turn exterior lamp switch to position . The low beam headlamp indicator lamp in the instrument cluster comes on (▷ page 24).
High beam
The combination switch is located on the left of the steering column.

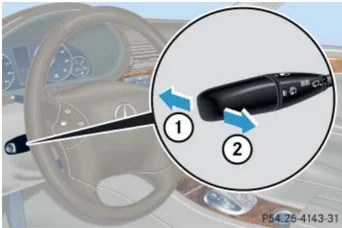
Combination switch ① High beam ② High beam flasher
- Push combination switch in direction of arrow ①. The high beam headlamp indicator lamp in the instrument cluster comes on (▷ page 24).
Turn signals
The combination switch is located on the left of the steering column.

Combination switch ① Turn signals, right ② Turn signals, left
- Press combination switch in direction of arrow ① or ②. The corresponding turn signal indicator lamp or in the instrument cluster flashes (▷ page 24).
The combination switch resets automatically after major steering wheel movements.
To signal minor directional changes such as changing lanes, press combination switch only to point of resistance and release. The corresponding turn signals will flash three times.
50
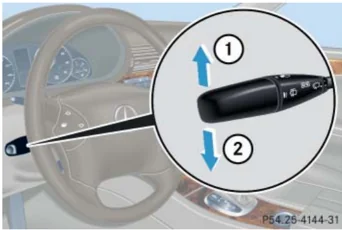
Windshield wipers
The combination switch is located on the left of the steering column.
 P54.25 4145-31
Combination switch
① Single wipe ② Switching on windshield wipers
▶ Switch on ignition (▷ page 33).
Switching on windshield wipers
▶ Turn the combination switch to the desired position depending on the intensity of the rain.
0 Windshield wipers off I Intermittent wiping II Normal wiper speed III Fast wiper speed
Vehicles without rain sensor: When the vehicle is standing still, the wiper speed returns to next lower setting.
Vehicles with rain sensor*: Intermittent wiping interval is dependent on wetness of windshield. After the initial wipe, pauses between wipes are automatically controlled by the rain sensor.
Getting started
Driving
! Vehicles with rain sensor*: Do not leave windshield wipers in intermittent setting when the vehicle is taken to an automatic car wash or during windshield cleaning. Wipers will operate in the presence of water sprayed on the windshield, and wipers may be damaged as a result.
The switch should not be left in intermittent setting as the wipers will wipe the windshield once every time the engine is started. Dust that accumulates on the windshield might scratch the glass and/or damage the wiper blades when wiping occurs on a dry windshield.
51