Locking and unlocking
In the “Controls in detail” section you will find detailed information on how to operate the equipment installed on your vehicle. If you are already familiar with the basic functions of your vehicle, this section will be of particular interest to you.
To quickly familiarize yourself with the basic functions of the vehicle, refer to the “Getting started” section of this manual. The corresponding page numbers are given at the beginning of each segment.
For more information on locking and unlocking, see “Getting started” (▷ page 32) and (▷ page 54).
SmartKey
Your vehicle comes supplied with two SmartKeys, each with remote control and a removable mechanical key.
The locking tabs for the mechanical key portion of the two SmartKeys are a different color to help distinguish each SmartKey unit.
The SmartKey provides an extended operating range. To prevent theft, however, it is advisable to only unlock the vehicle when you are in close proximity to it.
The SmartKey centrally locks and unlocks:
- the doors
- the trunk
- the fuel filler flap
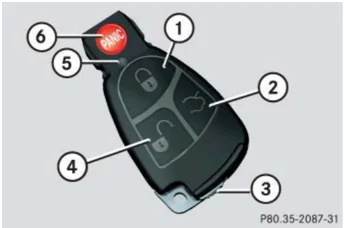
P80.35-2087-31
SmartKey with remote control
① Lock button ② Opening button for the trunk lid ③ Mechanical key locking tab ④ Unlock button ⑤ Battery check lamp ⑥ PANIC Panic button* (▷ page 81).
i Canada only: Only vehicles equipped with an anti-theft alarm system* have SmartKeys with integrated panic button ⑥.
94
Locking and unlocking
Warning! When leaving the vehicle, always remove the SmartKey from the starter switch, take it with you, and lock the vehicle. Do not leave children unattended in the vehicle, or with access to an unlocked vehicle. It is possible for children to open a locked door from the inside, which could result in an accident and/or serious injury.
! To prevent possible malfunction, avoid exposing the SmartKey to high levels of electromagnetic radiation.
ℹ️ USA only: This device complies with Part 15 of the FCC Rules. Operation is subject to the following two conditions: (1) This device may not cause harmful interference, and (2) this device must accept any interference received, including interference that may cause undesired operation. Any unauthorized modification to this device could void the user’s authority to operate the equipment.
ℹ️ Canada only: This device complies with RSS-210 of Industry Canada. Operation is subject to the following two conditions: (1) This device may not cause interference, and (2) this device must accept any interference received, including interference that may cause undesired operation of the device. Any unauthorized modification to this device could void the user’s authority to operate the equipment.
ℹ️ You can also open and close the power windows (▷ page 243) and power tilt/sliding sunroof* (▷ page 247) from outside using the SmartKey.
95
Locking and unlocking
Factory setting
Global unlocking ▶ Press button [icon]. All turn signal lamps flash once. The locking knobs in the doors move up. The anti-theft alarm system* is disarmed.
The vehicle will lock again automatically and reactivate the anti-theft alarm system* within approximately 40 seconds of unlocking if:
- neither door nor trunk is opened
- the SmartKey is not inserted in the starter switch
- the central locking switch is not activated
Global locking ▶ Press button [icon]. All turn signal lamps flash three times. The locking knobs in the doors move down. The anti-theft alarm system* is armed.
Selective setting If you frequently travel alone, you may wish to reprogram the SmartKey so that pressing [icon] only unlocks the driver's door and the fuel filler flap. ▶ Press and hold buttons [icon] and [icon] simultaneously for about five seconds until battery check lamp ⑤ flashes twice.
The SmartKey will then function as follows:
Unlocking driver's door and fuel filler flap ▶ Press button [icon] once. All turn signal lamps flash once. The locking knob in the driver's door moves up. The anti-theft alarm system* is disarmed.
Global unlocking ▶ Press button [icon] twice. All turn signal lamps flash once. The locking knobs in the doors move up. The anti-theft alarm system* is disarmed.
96
Locking and unlocking
Global locking
► Press button [lock icon].
All turn signal lamps flash three times. The locking knobs in the doors move down. The anti-theft alarm system* is armed.
Restoring to factory setting
► Press and hold buttons [unlock icon] and [lock icon] simultaneously for about six seconds until battery check lamp ⑤ flashes twice.
! If you can no longer lock or unlock the vehicle with the SmartKey, then either the batteries in the SmartKey are discharged, the SmartKey is malfunctioning or the vehicle battery is drained.
- Check the batteries in the SmartKey (▷ page 97) and replace them if necessary (▷ page 389).
- Use the mechanical key to unlock the driver’s door (▷ page 383) and the trunk lid (▷ page 384).
- Use the mechanical key to lock the driver’s door (▷ page 384).
- Have the vehicle battery and the battery connections checked (▷ page 404).
If the SmartKey is malfunctioning, contact an authorized Mercedes-Benz Center.
Checking the batteries
► Press button [lock icon] or [unlock icon].
Battery check lamp ⑤ comes on briefly to indicate that the SmartKey batteries are in order.
i If battery check lamp ⑤ does not come on briefly during check, then the SmartKey batteries are discharged.
Replace the batteries (▷ page 389).
You can obtain the required batteries at any authorized Mercedes-Benz Center.
i If the batteries are checked within signal range of the vehicle, pressing the [lock icon] or [unlock icon] button will lock or unlock the vehicle accordingly.
97
Locking and unlocking
Unlocking and opening the trunk lid
You can unlock and open the trunk separately.
A minimum height clearance of 5.71 ft (1.74 m) is required to open the trunk lid.
- Press button [icon] until trunk lid unlocks and begins to open.
! The trunk lid swings open upwards automatically. Always make sure there is sufficient overhead clearance.
Loss of SmartKey or mechanical key
If you lose a SmartKey or mechanical key, you should do the following:
- Have the SmartKey deactivated by an authorized Mercedes-Benz Center.
- Report the loss of the SmartKey or the mechanical key immediately to your car insurance company.
- If necessary, have the mechanical lock replaced.
Your authorized Mercedes-Benz Center will be glad to supply you with a replacement.
Opening the doors from the inside
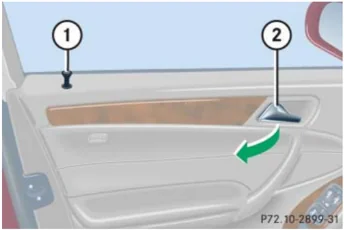
You can open a locked door from the inside. Open door only when conditions are safe to do so.
 P72.10-2899-31
① Locking knob
② Inside door handle
98
Locking and unlocking
i If the vehicle has previously been locked from the outside with the SmartKey, opening a door from the inside will trigger the anti-theft alarm system*.
To cancel the alarm, do one of the following:
- Press button [icon] or [icon] on the SmartKey.
- Insert the SmartKey in the starter switch.
Front doors
▶ Pull on door handle ② on the respective front door to open door.
If door was locked, locking knob ① will move up.
Rear doors
▶ Pull up locking knob ① on the respective rear door to unlock door.
▶ Pull on door handle ② on the respective rear door to open door.
Opening the trunk
Opening the trunk from the outside
A minimum height clearance of 5.71 ft (1.74 m) is required to open the trunk lid.
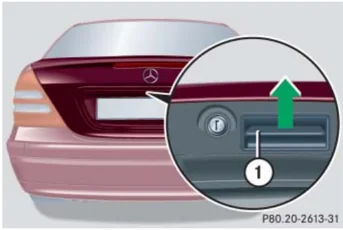
The handle is located above the rear license plate recess.

P80.20-2613-31
① Handle
99
Locking and unlocking
The vehicle must be unlocked.
► Pull on handle ①. The trunk lid unlocks and begins to open.
! The trunk lid swings open upwards automatically. Always make sure there is sufficient overhead clearance.
The trunk can also be opened using button [icon] on the SmartKey or from its inside in an emergency, see “Trunk lid emergency release” (▷ page 102).
Opening the trunk from the inside
You can open the trunk from the inside if the vehicle is stationary.
A minimum height clearance of 5.71 ft (1.74 m) is required to open the trunk lid.
The remote trunk lid switch is located on the driver’s door.
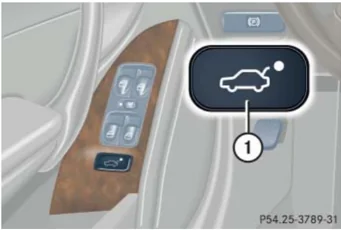
P54.25-3789-31
① Remote trunk lid switch with indicator lamp
► Press remote trunk lid switch ① until the trunk begins to open. The indicator lamp in the switch remains lit as long as the trunk is open.
! The trunk lid swings open upwards automatically. Always make sure there is sufficient overhead clearance.
The trunk can also be opened using button [icon] on the SmartKey or from its inside in an emergency, see “Trunk lid emergency release” (▷ page 102).
100
Locking and unlocking
Closing the trunk
Depending on production date, your vehicle is equipped with either trunk design A or B.
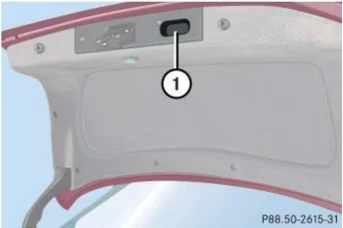
Trunk design A ① Handle ► Lower trunk lid by pulling firmly on handle ①. ► Close trunk lid with hands placed flat on the trunk lid.

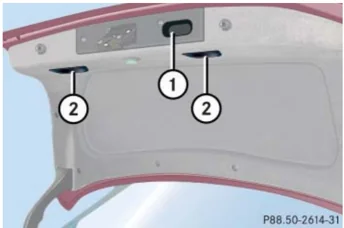
Trunk design B ① Handle Handles ► Lower trunk lid by pulling firmly on handle ① or handles ②. ► Close trunk lid with hands placed flat on the trunk lid.
Warning! To prevent possible personal injury, always keep hands and fingers away from the trunk opening when closing the trunk. Be especially careful when small children are around.
When leaving the vehicle, always remove the SmartKey from the starter switch, take it with you, and lock the vehicle. Do not leave children unattended in the vehicle, or with access to an unlocked vehicle. Unsupervised use of vehicle equipment may cause an accident and/or serious personal injury.
Warning! Only drive with the trunk closed as, among other dangers such as visibility blockage, exhaust fumes may enter the vehicle interior.
101
Locking and unlocking
i Do not place the SmartKey in the open trunk. You may lock yourself out.
i If the vehicle was previously centrally locked, the trunk lid will lock automatically after closing it. The turn signals will flash three times to confirm locking.
Trunk lid emergency release
The emergency release button is located on the inside of the trunk lid.
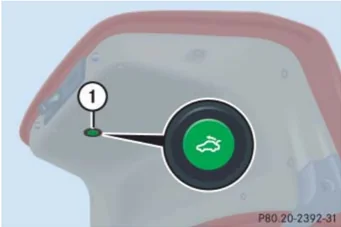
① Emergency release button
► Briefly press emergency release button ①.
The trunk lid unlocks and the trunk lid opens.
! The trunk lid swings open upwards automatically.
Illumination of the emergency release button:
- The button will flash for 30 minutes after opening the trunk.
- The button will flash for 60 minutes after closing the trunk.
i The emergency release button unlocks and opens the trunk while the vehicle is standing still or in motion.
i The emergency release button does not open the trunk lid if the vehicle battery is discharged or disconnected.
102
Locking and unlocking
i If the vehicle has previously been locked from the outside with the SmartKey, opening the trunk from the inside using the emergency release button will trigger the anti-theft alarm system*.
To cancel the alarm, do one of the following:
- Press button or on the SmartKey.
- Insert the SmartKey in the starter switch.
Automatic central locking
The doors and the trunk automatically lock when the ignition is switched on and the wheels are turning at vehicle speeds of approximately 9 mph (15 km/h) or more.
You can open a locked door from the inside. Open door only when conditions are safe to do so.
i The doors unlock automatically after an accident if the force of the impact exceeds a preset threshold.
To prevent the vehicle door locks from locking, deactivate the automatic central locking when the vehicle
- is pushed or towed
- is on a test stand
You can deactivate the automatic locking mode using the control system, see “Setting automatic locking” (▷ page 153).
103
Locking and unlocking
Locking and unlocking from the inside
You can lock or unlock the doors and the trunk from inside using the central locking or unlocking switch. This can be useful, for example, if you want to lock the vehicle before starting to drive.
You cannot lock or unlock the fuel filler flap with the central locking or unlocking switch.
Warning!
When leaving the vehicle, always remove the SmartKey from the starter switch, take it with you, and lock the vehicle. Do not leave children unattended in the vehicle, or with access to an unlocked vehicle. Unsupervised use of vehicle equipment may cause an accident and/or serious personal injury.
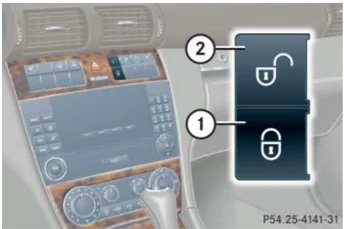
Depending on production date, your vehicle is equipped with either switch design A or B.
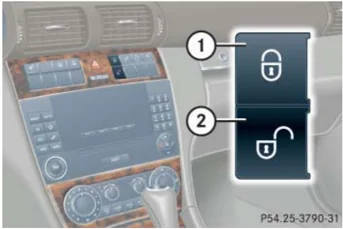
The switches are located in the center console.
P54.25-3790-31
Switch design A
① Central locking switch
② Central unlocking switch
P54.25-4141-31
Switch design B
① Central locking switch
② Central unlocking switch
104
Locking and unlocking
Locking
▶ Press central locking switch ①.
If all doors are closed, the vehicle locks.
Unlocking
▶ Press central unlocking switch ②.
The vehicle unlocks.
ℹ️ You can open a locked door from the inside. Open door only when conditions are safe to do so.
If the vehicle was previously centrally locked using the SmartKey, it will not unlock using the central unlocking switch ②.
If the vehicle was previously locked with the central locking switch ①
- while in the selective remote control mode, only the door opened from the inside is unlocked.
- while in the global remote control mode, the complete vehicle is unlocked when a door is opened from the inside.
105
Seats
For information on seat adjustment, see “Adjusting” (▷ page 35).
Easy-entry/exit feature*
This feature allows for easier entry into and exit from the vehicle.
The easy-entry/exit feature can be activated or deactivated in the Convenience submenu of the control system (▷ page 154).
Warning!
You must make sure no one can become trapped or injured by the moving steering wheel and driver’s seat when the easy-entry/exit feature is activated.
To cancel seat/steering wheel movement, do one of the following:
- Press seat adjustment switch* (▷ page 30).
- Move steering column stalk* (▷ page 40).
- Press memory position switch* (▷ page 115).
Do not leave children unattended in the vehicle, or with access to an unlocked vehicle. Children could open the driver’s door and unintentionally activate the easy-entry/exit feature, which could result in an accident and/or serious personal injury.
When exiting the vehicle, with the easy-entry/exit feature activated and depending on your selection, the steering wheel tilts upwards and/or the driver’s seat moves a few inches to the rear when you:
- remove the SmartKey from the starter switch, or
- open the driver’s door with the SmartKey in starter switch position 0 or 1.
If the current position for the steering wheel is in the uppermost tilt position, the steering wheel will no longer be able to move upward when the easy-entry/exit feature is activated.
106
Seats
If the current seat position falls into a factory-set position range and the system recognizes the current seat position to be rearward enough for easy entry and exit, the driver’s seat will not move to the rear when the easy-entry/exit feature is activated.
When entering the vehicle, with the easy-entry/exit feature activated, the steering wheel or, depending on your selection, the steering wheel and driver’s seat will return to their last set position or a factory-set maximum forward position when you:
- close the driver’s door with the ignition switched on
- insert the SmartKey into the starter switch with the driver’s door closed.
For safety reasons, the driver’s seat will not return to its last set position with the easy-entry/exit feature activated if the system recognizes the last set position as an extreme forward position. Instead, the driver’s seat will remain at or move to a factory-set maximum forward position. To again fully return the driver’s seat to your last set position or to memory position, adjust the seat to the desired position or press and hold the respective memory position switch* (\triangleright page 115).
Removing and installing front seat head restraints
For information on head restraint adjustment, see “Seats” (\triangleright page 35).
Adjust the head restraint in such a way that it is as close to the head as possible.
Warning!
For your protection, drive only with properly positioned head restraints.
Adjust head restraint so that the center of the head restraint supports the back of the head at eye level. This will reduce the potential for injury to the head and neck in the event of an accident or similar situation. \triangleright \triangleright
107
Seats
▷▷ Do not drive the vehicle without the seat head restraints. Head restraints are intended to help reduce injuries during an accident.
Do not interchange head restraints from front and rear seat.
Tilt the backrest to the rear for easier removal and installation of the head restraints.
Front seat head restraints, manual seat
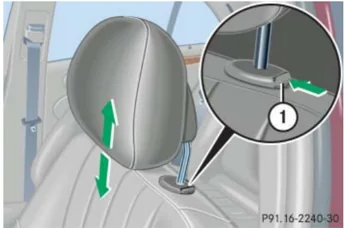
① Release button
Removing front seat head restraints
► Pull head restraint to its highest position.
► Push release button ① and pull out head restraint.
Installing front seat head restraints
► Insert head restraint and push it down until it engages.
► Push release button ① and adjust head restraint to desired position.
Front seat head restraints, power seat*
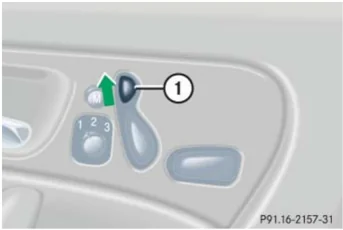
① Head restraint switch
► Switch on ignition (▷ page 33).
Removing front seat head restraints
► Press switch ① upwards and hold until head restraint is fully extended.
► Pull out head restraint.
108
Seats
Installing front seat head restraints
- Press switch ① upwards and hold for about five seconds.
- Push head restraint down until it engages.
- Adjust head restraint to desired position (▷ page 38).
Rear seat head restraints
Warning!
For safety reasons, always drive with the rear head restraints in the upright position when the rear seats are occupied.
Keep the area around head restraints clear of articles (e.g. clothing) to not obstruct the folding operation of the head restraints.
Head restraint height (rear outer seats)
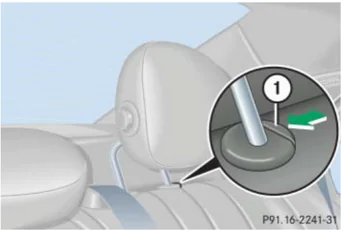
P91.16-2241-31
① Release button
Raising:
- Manually adjust the height of the head restraint by pulling it upward.
If the head restraint is fully retracted, push release button ① and pull the head restraint out.
Lowering:
- To lower the head restraint, push release button ① and push down on the head restraint.
i Adjust the head restraint in such a way that it is as close to the head as possible.
Warning!
For your protection, drive only with properly positioned head restraints.
Adjust head restraint so that the center of the head restraint supports the back of the head at eye level. This will reduce the potential for injury to the head and neck in the event of an accident or similar situation.
Do not drive the vehicle without the seat head restraints. Head restraints are intended to help reduce injuries during an accident.
109
Seats
Folding head restraints back with release button
The rear seat head restraints can be folded backward for increased visibility.
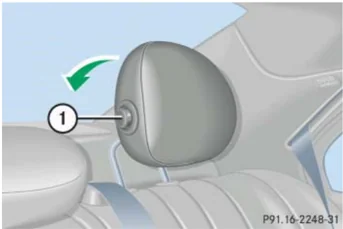
① Release button
► Push release button ①. The head restraint will fold backward.
You can also fold the rear outer seat head restraints back using the switch in the center console (▷ page 110).
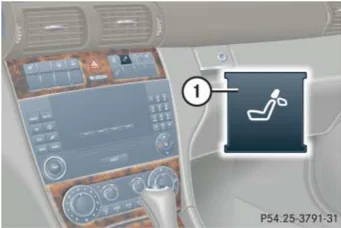
Folding head restraints back with switch in the center console (rear outer seats)

① Switch for rear seat head restraints
► Start the engine (▷ page 46).
► Press switch ①. The rear seat head restraints will fold backward.
Placing head restraints upright
► Pull the head restraint forward until it locks into position.
Warning!
Make sure the head restraints engage when placing them upright. Otherwise their protective function cannot be assured.
110
Seats
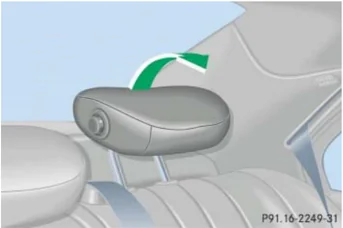
Head restraint tilt (rear outer seats) Two different head restraint angle positions are available:
- Press the release button (▷ page 110) and tilt the head restraint to the desired position.
Removing and installing rear seat head restraints (rear outer seats)
Adjust the head restraint in such a way that it is as close to the head as possible.
The rear center seat head restraint cannot be removed.
Warning! For your protection, drive only with properly positioned head restraints.
Adjust head restraint so that the center of the head restraint supports the back of the head at eye level. This will reduce the potential for injury to the head and neck in the event of an accident or similar situation.
Do not drive the vehicle without the seat head restraints. Head restraints are intended to help reduce injuries during an accident.
Do not interchange head restraints from front and rear seat.
 P91.16-2241-31
① Release button
Removing rear seat head restraints
- Fold back head restraint (▷ page 110).
- Pull head restraint to its highest position.
- Push release button ① and pull out head restraint.
Installing rear seat head restraints
- Insert head restraint and push it down until it engages.
- Push button ① and adjust head restraint to desired position.
111
Seats
Multicontour seats*
This multicontour seat has a movable seat cushion and inflatable air cushions built into the backrest to provide additional lumbar and side support.
The seat cushion movement, backrest cushion height and curvature can be continuously varied with switches on the side of the seat after switching on ignition.
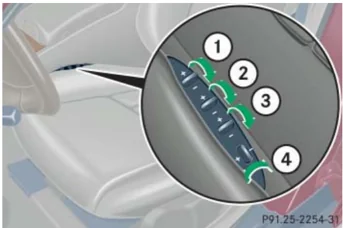
① Seat cushion depth ② Backrest bottom ③ Backrest center ④ Backrest side bolster adjustment
► Switch on ignition (▷ page 33).
Seat cushion depth
- Adjust the seat cushion depth to the length of your upper leg using switch ①.
Backrest contour
- Adjust the contour of the backrest to the desired position using switches ② and ③.
Backrest side bolsters
- Adjust the backrest side bolsters so that they provide good lateral support using switch ④.
112
Seat heating*
The switches for the front seats are located in the center console.
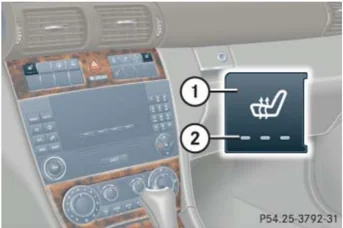
① Seat heating switch
② Indicator lamps
The red indicator lamps ② in the switch show the heating level selected.
| Level | Description |
|---|---|
| 3 | Three indicator lamps on.After approximately five minutes, seat heating is automatically switched to level 2. |
| 2 | Two indicator lamps on.After approximately ten minutes, seat heating is automatically switched to level 1. |
| 1 | One indicator lamp on.After approximately 20 minutes, seat heating is automatically switched off. |
| off | No indicator lamp on. |
▶ Switch on ignition (▷ page 33).
Controls in detail
Seats
Switching on seat heating
▶ Press switch ① twice.
Three red indicator lamps ② in the switch come on.
▶ Continue pressing switch ① until desired seat heating level is reached.
Switching off seat heating
▶ Press switch ① repeatedly until all indicator lamps ② go out.
ℹ If one or all of the indicator lamps ② on the seat heating switch are flashing, there is insufficient voltage due to too many electrical consumers are turned on. The seat heating switches off automatically.
The seat heating will switch back on again automatically as soon as sufficient voltage is available.
113