Manual transmission
Manual transmission is standard equipment on select models and not available on all models.
For information on driving with a manual transmission, see “Manual transmission” (▷ page 46).
Warning!
For vehicles equipped with a manual transmission, getting out of your vehicle with the gearshift lever not engaged in first or reverse gear and parking brake engaged is dangerous.
Also, when parked on an incline, an engaged first or reverse gear alone may not prevent your vehicle from moving, possibly hitting people or objects.
Always set the parking brake in addition to engaging first or reverse gear (▷ page 54).
When parked on an incline, turn front wheels towards the road curb.
Do not park this vehicle in areas where combustible materials such as grass, hay or leaves can come into contact with the hot exhaust system, as these materials could be ignited and cause a vehicle fire.
Warning!
When leaving the vehicle, always remove the SmartKey from the starter switch, take it with you, and lock the vehicle. Do not leave children unattended in the vehicle, or with access to an unlocked vehicle. Children could move the gearshift lever, which could result in an accident and/or serious injury.
Warning!
On slippery road surfaces, never downshift in order to obtain braking action. This could result in drive wheel slip and reduced vehicle control. Your vehicle’s ABS will not prevent this type of loss of control.
162
Manual transmission
 P26.60-2222-31
Gearshift pattern for manual transmission
! When you are shifting into the 5th or 6th gear, make sure that you press the gearshift lever to the right. Otherwise, you could accidentally shift into the 3rd or 4th gear and damage the transmission.
Downshifting gears leading to overrevving the engine can result in engine damage that is not covered by the Mercedes-Benz Limited Warranty.
Never hold the vehicle stopped on a hill by using the clutch pedal. The clutch may be damaged which is not covered by the Mercedes-Benz Limited Warranty.
Do not exceed the engine speed limits. Refer to tachometer (> page 128) for engine speeds.
Shifting into reverse
! Only shift into reverse gear R when the vehicle is stationary, as the transmission could otherwise be damaged.
▶ Stop the vehicle completely. ▶ Fully depress clutch pedal. ▶ Move the gearshift lever to neutral position (no gear selected). ▶ Move the gearshift lever to the left until you feel a certain resistance. ▶ Push the gearshift lever past this resistance. ▶ Then move the gearshift lever forward into position R.
163
Automatic transmission*
Automatic transmission is standard equipment on select models and available as optional equipment on select other models.
For more information on driving with an automatic transmission see “Automatic transmission*” (▷ page 47).
Your vehicle’s transmission adapts its gear shifting process to your individual driving style by continually adjusting the shift points up or down. These shift point adjustments are performed based on current operating and driving conditions.
If the operating conditions change, the automatic transmission reacts by adjusting its shift program.
During the brief warm-up, transmission upshifting is delayed. This allows the catalytic converter to heat up more quickly to operating temperature.
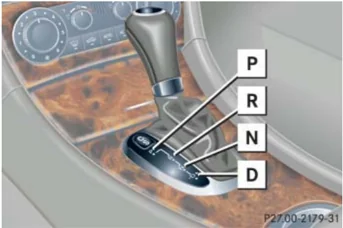
Gearshift pattern for automatic transmission
The automatic transmission selects individual gears automatically, depending on:
- the gear selector lever position D (▷ page 168) with gear ranges 4, 3, 2, 1 (▷ page 167)
- the selected program mode (C/S) (▷ page 169)
- the position of the accelerator pedal (▷ page 170)
- the vehicle speed
164
Automatic transmission*
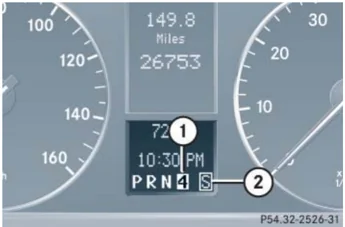
① Current gear range/gear selector lever position ② Current program mode
The current gear range/gear selector lever position and program mode (C/S) appear in the multifunction display.
An additional indication of the current gear selector lever position can be found on the cover of the shifting-gate.
The indicators come on when you activate a switch (e.g. unlocking the vehicle or opening a door) and go out after approximately 15 minutes.
Warning!
It is dangerous to shift the gear selector lever out of P or N if the engine speed is higher than idle speed. If your foot is not firmly on the brake pedal, the vehicle could accelerate quickly forward or reverse. You could lose control of the vehicle and hit someone or something. Only shift into gear when the engine is idling normally and when your right foot is firmly on the brake pedal.
! Allow engine to warm up under low load use. Do not place full load on the engine until the operating temperature has been reached.
Shift into reverse gear R or parking position P only when the vehicle is stopped.
Avoid spinning of a drive wheel for an extended period when driving off on slippery road surfaces. This may cause serious damage to the drivetrain which is not covered by the Mercedes-Benz Limited Warranty.
When the gear selector lever is in position D, you can influence transmission shifting by:
- limiting the gear range
- changing gears manually
165
Automatic transmission*
One-touch gearshifting
Even with an automatic transmission you can change the gears manually when the gear selector lever is in position D.
Downshifting
- Briefly press the gear selector lever to the left in the D- direction.
The transmission will shift from the current gear to the next lower gear as permitted by the shift program. This action simultaneously limits the gear range of the transmission (▷ page 167).
Warning!
On slippery road surfaces, never downshift in order to obtain braking action. This could result in drive wheel slip and reduced vehicle control. Your vehicle’s ABS will not prevent this type of loss of control.
To avoid overrevving the engine when the gear selector lever is moved to the D- direction, the transmission will not shift to a lower gear if the engine’s max. speed would be exceeded.
Upshifting
- Briefly press the gear selector lever to the right in the D+ direction.
The transmission will shift from the current gear to the next higher gear as permitted by the shift program. This action simultaneously extends the gear range of the transmission.
Canceling gear range limit
- Press and hold the gear selector lever in the D+ direction until D reappears in the multifunction display.
The transmission will shift from the current gear range directly to gear range D.
Shifting into optimal gear range
- Press and hold the gear selector lever in the D- direction.
The transmission will automatically select the gear range suited for optimal acceleration and deceleration. This will involve shifting down one or more gears.
166
Automatic transmission*
Gear ranges
With the gear selector lever in position D, you can limit the transmission’s gear range by pressing the gear selector lever to the left (D-), and reverse the gear range limit by pressing the gear selector lever to the right (D+).
The selected gear range appears in the multifunction display (▷ page 165). If you press on the accelerator when the engine has reached its rpm limit, the transmission will upshift beyond any gear range limit selected.
| Effect | |
|---|---|
| 4 | The transmission shifts through fourth gear only. |
| 3 | The transmission shifts through third gear only.With this selection you can use the braking effect of the engine. |
| Effect | |
|---|---|
| 2 | The transmission shifts through second gear only.Allows the use of engine’s braking power when driving:• on steep downgrades• in mountainous regions• under extreme operating conditions |
| 1 | The transmission operates in first gear only.For maximum use of engine’s braking effect on very steep or lengthy downgrades. |
167
Automatic transmission*
Gear selector lever position
| Effect | |
|---|---|
| P | Park positionGear selector lever position when the vehicle is parked. Place gear selector lever in position P only when vehicle is stopped. The park position is not intended to serve as a brake when the vehicle is parked. Rather, the driver should always set the parking brake in addition to placing the gear selector lever in position P to secure the vehicle. |
| Effect | |
|---|---|
| The SmartKey can only be removed from the starter switch with the gear selector lever in position P. With the SmartKey removed, the gear selector lever is locked in position P.If the vehicle’s electrical system is malfunctioning, the gear selector lever could remain locked in position P (▷ page 386). | |
| R | Reverse gearPlace gear selector lever in position R only when vehicle is stopped. |
| Effect | |
|---|---|
| N | NeutralNo power is transmitted from the engine to the drive axle. When the brakes are released, the vehicle can be moved freely (pushed or towed).To avoid damage to the transmission, never engage N while driving.If the ESP is deactivated or malfunctioning:Move gear selector lever to N only if the vehicle is in danger of skidding, e.g. on icy roads. |
| D | DriveThe transmission shifts automatically. All five forward gears are available. |
168
Automatic transmission*
! Coasting the vehicle, or driving for any other reason with gear selector lever in N can result in transmission damage that is not covered by the Mercedes-Benz Limited Warranty.
Warning!
Getting out of your vehicle with the gear selector lever not fully engaged in position P is dangerous. Also, position P alone is not intended to or capable of preventing your vehicle from moving, possibly hitting people or objects.
Always set the parking brake in addition to shifting to position P (▷ page 54).
When parked on an incline, turn the front wheels towards the road curb.
Do not park this vehicle in areas where combustible materials such as grass, hay or leaves can come into contact with the hot exhaust system, as these materials could be ignited and cause a vehicle fire.
Warning!
When leaving the vehicle, always remove the SmartKey from the starter switch, take it with you, and lock the vehicle. Do not leave children unattended in the vehicle, or with access to an unlocked vehicle. Children could move the gear selector lever from position P, which could result in an accident and/or serious personal injury.
Automatic shift program
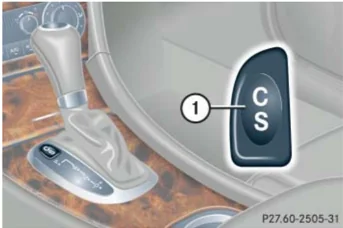
The program mode selector switch is located on the lower part of the center console.

① Program mode selector switch C Comfort For comfort driving S Sport For standard driving
The current gear selector lever position and the selected program mode (C/S) are indicated in the multifunction display (▷ page 165).
169
Automatic transmission*
! Never change the program mode when the gear selector lever is out of position P. This could result in a change of driving characteristics for which you may not be prepared.
i The last selected program mode (C or S) is switched on when the engine is restarted.
► Press program mode selector switch ① repeatedly until the letter of the desired program mode appears in the multifunction display.
Select C for comfort driving:
- The vehicle starts out in second gear (both forward and reverse) for gentler starts. This does not apply if full throttle is applied or gear range 1 is selected.
- Traction and driving stability are improved on icy roads.
- Upshifts occur earlier even when you give more gas. The engine then operates at lower rpms and the wheels are less likely to spin.
Driving tips
Accelerator position
Your driving style influences the transmission's shifting behavior:
Less throttle Earlier upshifting More throttle Later upshifting
Kickdown
Use kickdown when you want maximum acceleration.
► Press the accelerator past the point of resistance. The transmission shifts into a lower gear.
► Ease on the accelerator when you have reached the desired speed. The transmission shifts up again.
170
Automatic transmission*
Stopping
When you stop briefly, e.g. at traffic lights: ► Leave the transmission in gear. ► Hold the vehicle with the brake.
When you stop longer with the engine idling or on an uphill gradient: ► Move the gear selector lever to position P. ► Set the parking brake.
Maneuvering
When you maneuver in tight areas, e.g. when pulling into a parking space: ► Control the vehicle speed by gradually releasing the brakes. ► Accelerate gently. ► Never abruptly step on the accelerator.
Working on the vehicle
Warning! When working on the vehicle, set the parking brake and move gear selector lever to position P. Otherwise the vehicle could roll away.
Emergency operation (Limp Home Mode)
If vehicle acceleration worsens or the transmission no longer shifts, the transmission is most likely operating in limp home (emergency operation) mode. In this mode only second gear and reverse gear can be activated. ► Stop the vehicle. ► Move gear selector lever to P. ► Turn off the engine. ► Wait at least ten seconds before restarting. ► Restart the engine. ► Move gear selector lever to position D (for second gear) or R. ► Have the transmission checked at an authorized Mercedes-Benz Center as soon as possible.
171
Good visibility
For information on the windshield wipers, see “Windshield wipers” (▷ page 51).
Headlamp cleaning system*
The switch is located on the left side of the dashboard.
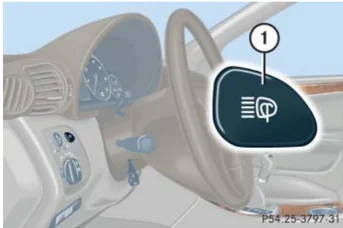
① Headlamp washer switch
▶ Switch on ignition (▷ page 33).
▶ Press switch ①. The headlamps are cleaned with a high-pressure water jet.
For information on filling up the washer reservoir, see “Windshield washer system and headlamp cleaning system*” (▷ page 303).
Rear view mirrors
For more information on setting the rear view mirrors, see “Mirrors” (▷ page 41).
Interior rear view mirror, antiglare position
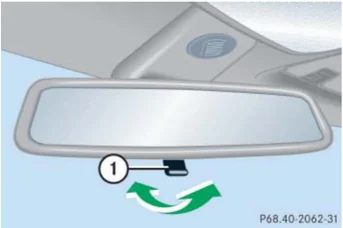
① Lever
▶ Tilt the mirror to the antiglare night position by moving lever ① towards the windshield.
The interior rear view mirror is dimmed.
172
Good visibility
Auto-dimming rear view mirrors* The reflection brightness of the exterior rear view mirror on the driver’s side and the interior rear view mirror will respond automatically to glare when
- the ignition is switched on and
- incoming light from headlamps falls on the sensor in the interior rear view mirror.
The rear view mirror will not react if
- reverse gear R is engaged
- the interior lighting is turned on
Warning! The auto-dimming function does not react if incoming light is not aimed directly at sensors in the interior rear view mirror.
The interior rear view mirror and the exterior rear view mirror on the driver’s side do not react, for example, if the rear window sunshade* is in raised position.
Glare can endanger you and others.
! Electrolyte drops coming into contact with the vehicle paint finish can be completely removed only while in the liquid state and by applying plenty of water.
Warning! In the case of an accident liquid electrolyte may escape from the mirror housing if the mirror glass breaks.
Electrolyte has an irritating effect. Do not allow the liquid to come into contact with eyes, skin, clothing, or respiratory system. In case it does, immediately flush affected area with water, and seek medical help if necessary.
Warning! Exercise care when using the passenger-side exterior rear view mirror. The mirror surface is convex (outwardly curved surface for a wider field of view). Objects in mirror are closer than they appear. Check your interior rear view mirror or glance over your shoulder before changing lanes.
173
Good visibility
Activating exterior rear view mirror parking position*
Follow these steps to activate the mirror parking position so that the passenger-side exterior rear view mirror will be turned downward to the stored position.
The buttons are located above the exterior lamp switch.
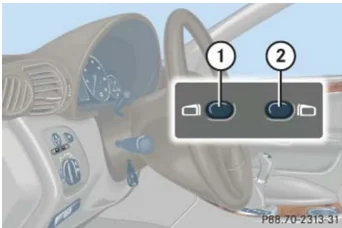
① Driver's side exterior rear view mirror button ② Passenger-side exterior rear view mirror button
- Make sure you have stored a parking position for the passenger-side exterior rear view mirror (▷ page 116).
- Make sure the Mirror set. parking aid function in the Convenience submenu of the control system is switched to On (▷ page 156).
- Switch on ignition (▷ page 33).
- Press button ② for the passenger-side exterior rear view mirror.
- Place the gear selector lever in reverse gear R.
The passenger-side exterior rear view mirror will be turned downward to the stored position.
The exterior rear view mirror returns to its previously stored driving position:
- ten seconds after you put the gear selector lever out of position R
- immediately once your vehicle exceeds a speed of approx. 6 mph (10 km/h)
- immediately when you press button ① for the driver's side exterior rear view mirror
174
Good visibility
Sun visors
The sun visors protect you from sun glare while driving.
Warning!
Do not use the vanity mirror while driving. Keep the mirrors in the sun visors closed while vehicle is in motion. Reflected glare can endanger you and others.
► Swing sun visors down when you experience glare.
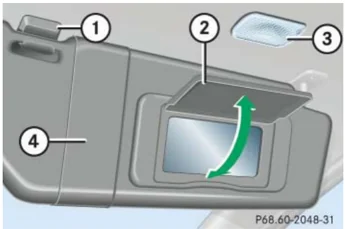
① Mounting ② Mirror cover ③ Mirror lamp ④ Sun visor
► To use illuminated mirror, lift up cover ②.
If sunlight enters through a side window, disengage sun visor from mounting ① and pivot to the side. The mirror lamp ③ will switch off.
175
Good visibility
Rear window sunshade*
The switch is located in the center console.
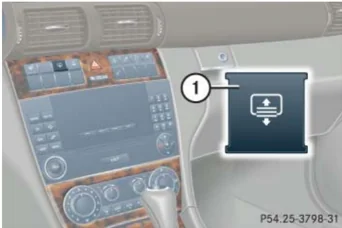
① Rear window sunshade switch
! Make sure that the movement of the rear window sunshade is not restricted by objects on the rear window shelf. Otherwise, the sunshade or the objects could be damaged.
► Switch on ignition (▷ page 33). Always raise the sunshade fully for its support against the window frame.
Raising the sunshade ► Press switch ① briefly. The sunshade is raised completely.
Stopping the raising procedure ► Press switch ① again. The sunshade stops.
Lowering the sunshade ► Press switch ① briefly. The sunshade is lowered completely.
Stopping the lowering procedure ► Press switch ① again. The sunshade stops.
Warning! When operating the rear window sunshade, make sure there is no danger of anyone being harmed by the raising or lowering procedure.
The raising or lowering procedure can be immediately halted by briefly pressing the switch.
Briefly press switch again to raise or lower the rear window sunshade completely.
Warning! When leaving the vehicle, always remove the SmartKey from the starter switch, take it with you, and lock the vehicle. Do not leave children unattended in the vehicle, or with access to an unlocked vehicle. Unsupervised use of vehicle equipment can cause an accident and/or serious personal injury.
176
Good visibility
Rear window defroster
The rear window defroster uses a large amount of power. To keep the battery drain to a minimum, switch off the defroster as soon as the rear window is clear. The defroster is automatically deactivated after approximately 6 to 17 minutes of operation depending on the outside temperature.
Activating
- Press button [icon] or [icon] in the climate control panel (▷ page 179) or automatic climate control panel* (▷ page 189).
The indicator lamp on the button comes on.
Deactivating
- Press button [icon] or [icon] again.
The indicator lamp on the button goes out.
Warning!
Any accumulation of snow and ice should be removed from the rear window before driving. Visibility could otherwise be impaired, endangering you and others.
If the rear window defroster switches off too soon and the indicator lamp starts flashing, this means that too many electrical consumers are operating simultaneously and there is insufficient voltage in the battery. The system responds automatically by deactivating the rear window defroster.
As soon as the battery has sufficient voltage, the rear window defroster automatically turns itself back on.
177