COMFORT ADJUSTMENT
-
Do not use seat accessories which cover the area where the side airbags inflate. Such accessories may prevent the side airbags from activating correctly, which could cause death or serious injury.
-
Do not modify or remove any wiring. Do not modify, remove, strike or open any components, such as the steering wheel pad, steering wheel, column cover, front passenger airbag cover or airbag sensor assembly. Doing so may cause sudden front airbags inflation or disable the system, which could result in death or serious injury.
-
Do not modify or replace the seats or upholstery of front seats equipped with side airbags. Such changes may disable the system or cause the side airbags to inflate accidentally, which could result in death or serious injury.
-
Do not disassemble or repair the front and rear pillars and roof side rail containing the curtain shield airbags. Such changes may disable the system or cause the curtain shield airbags to inflate accidentally, which could result in death or serious injury.
-
Do not use tires or wheels other than the manufacturer's recommended size. Such a use may cause the curtain shield airbags to inflate accidentally, which could result in death or serious injury. For details, see "Checking and replacing tires" on page 367.
-
Do not place luggage heavier than specified on the roof luggage carrier. Such luggage may cause the curtain shield airbags to inflate accidentally, which could cause in death or serious injury. For details, see "Roof luggage carrier" on page 83.
-
Do not modify or change the suspension system. Such changes may cause the curtain shield airbags to inflate accidentally, which could result in death or serious injury.
Failure to follow these instructions can result in death or serious injury. Consult your Lexus dealer before performing any repairs and modifications.
152
COMFORT ADJUSTMENT
NOTICE
Do not perform any of the following changes without first consulting your Lexus dealer. Such changes can interfere with proper operation of the SRS airbag system in some cases.
- Installation of electronic devices such as a mobile two-way radio, cassette tape player or compact disc player.
- Modification of the front end structure and side structure of the passenger compartment.
- Attachment of a grille guard (bull bar, kangaroo bar, etc.), snowplow, winches or any other equipment to the front end.
- Repairs made on or near the front fenders, front end structure, console, steering column, steering wheel, dashboard near the front passenger airbag or front seats.
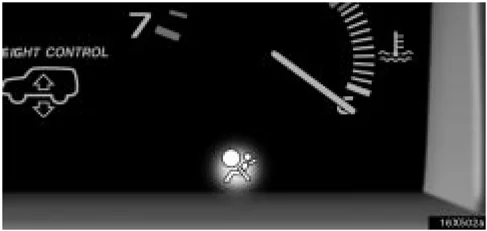
This SRS airbag system has an indicator to inform the driver of operating problems. If either of the following conditions occurs, this indicates a malfunction of the airbag system. Contact your Lexus dealer as soon as possible to service the vehicle.
- When the ignition switch is turned to the “ON” position, the light does not come on, stays on or flashes.
- The light comes on or starts flashing while driving.
If the light stays on, it indicates that the front airbag system has a problem. If the light flashes, the side and/or curtain shield airbag system has a problem.
153
COMFORT ADJUSTMENT

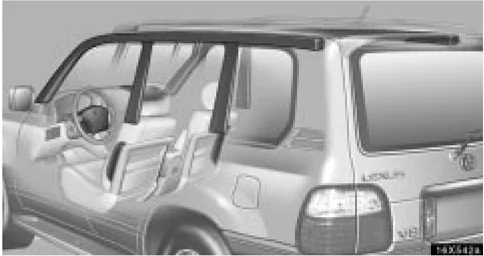
In the following cases, contact your Lexus dealer as soon as possible:
-
Any of the SRS airbags have been inflated.
-
The front of the vehicle and portion of the doors (shaded in the illustration) were involved in an accident that was not severe enough to cause the SRS airbags to inflate.
-
The surface of the seats with the side airbags or the pad section of the steering wheel or dashboard (shaded in the illustration) is scratched, cracked, or otherwise damaged.
-
The portion of the front, center and rear pillar garnish, roof interior containing the curtain shield airbags inside (shaded in the illustration) is scratched, cracked, or otherwise damaged.
154
COMFORT ADJUSTMENT
CHILD RESTRAINT
Child restraint precautions
Lexus strongly urges the use of child restraint systems for children small enough to use them.
The laws of all 50 states in the U.S.A. and Canada now require the use of a child restraint system.
Your vehicle conforms to SAE J1819.
If a child is too large for a child restraint system, the child should sit in the rear seat and must be restrained using the vehicle's seat belt. See "Seat belts" on page 124 for details.
! CAUTION
-
For effective protection in automobile accidents and sudden stops, a child must be properly restrained, using a seat belt or child restraint depending on age and size. Holding a child in your arms is not a substitute for a child restraint system. In an accident, the child can be crushed against the windshield, or between you and the vehicle's interior if you are unrestrained.
-
Lexus strongly urges use of a proper child restraint system which conforms to the size of the child installed on the rear seat. According to accident statistics, the child is safer when properly restrained in the rear seat than in the front seat.
-
Never put a rear-facing child restraint system on the front seat. In the event of an accident, the force of the rapid inflation of the airbag can cause death or serious injury if a rear-facing child restraint system is put on the front seat.
-
A forward-facing child restraint system should be put on the front seat only when it is unavoidable. Always move the seat as far back as possible, because the force of a deploying airbag could cause death or serious injury to the child.
-
Do not use the seat belt extender when installing a child restraint system on the front or rear passenger seat. If installing a child restraint system with the seat belt extender connected to the seat belt, the seat belt will not securely hold the child restraint system, which could cause death or serious injury to the child or other passengers in the event of collision.
-
Make sure you have complied with all installation instructions provided by the child restraint manufacturer and that the system is properly secured.
-
On vehicles with side airbags and curtain shield airbags, do not allow the child to lean against the front door or around the front door even if the child is seated in a child restraint system. It is dangerous if the side airbag and curtain shield airbag inflate, because the impact could cause death or serious injury to the child.
155

COMFORT ADJUSTMENT
Child restraint system
A child restraint system for a small child or baby must itself be properly restrained on the seat with the lap portion of the lap/shoulder belt. You must carefully consult the manufacturer's instructions which accompany the child restraint system.
To provide proper restraint, use a child restraint system following the manufacturer's instructions about the appropriate age and size of the child for the restraint system.
Install the child restraint system correctly following the instructions provided by its manufacturer. General directions are also provided under the following illustrations.
The child restraint system should be installed on the rear seat. According to accident statistics, the child is safer when properly restrained in the rear seat than in the front seat.
CAUTION
- Never put a rear-facing child restraint system on the front seat. In the event of an accident, the force of the rapid inflation of the airbag can cause death or serious injury if a rear-facing child restraint system is put on the front seat.
- A forward-facing child restraint system should be put on the front seat only when it is unavoidable. Always move the seat as far back as possible, because the force of a deploying airbag could cause death or serious injury to the child.
- On vehicles with side airbags and curtain shield airbags, do not allow the child to lean against the front door or around the front door even if the child is seated in a child restraint system. It is dangerous if the side airbag and curtain shield airbag inflate, because the impact could cause death or serious injury to the child.
- After installing the child restraint system, make sure it is secured in place according to the manufacturer's instructions. If it is not restrained securely, it may cause death or serious injury to the child in the event of a sudden stop or accident.
156
COMFORT ADJUSTMENT
When not using the child restraint system, keep it secured with the seat belt or place it somewhere other than in the passenger compartment. This will prevent it from injuring passengers in the event of a sudden stop or accident.
Your vehicle has anchors for securing the top strap of a child restraint system.
For instructions about how to use the anchor bracket, see "Using a top strap" on page 174.
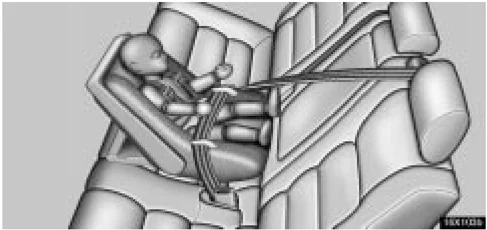
Types of child restraint system Child restraint systems are classified into the following 3 types depending on the child's age and size.
(A) Infant seat (B) Convertible seat (C) Booster seat
Install the child restraint system following the instructions provided by its manufacturer.
Child restraint lower anchorages approved for your vehicle may also be used. See "Installation with child restraint lower anchorages" on page 177.
(A) Infant seat
157
COMFORT ADJUSTMENT
(B) Convertible seat
 (C) Booster seat
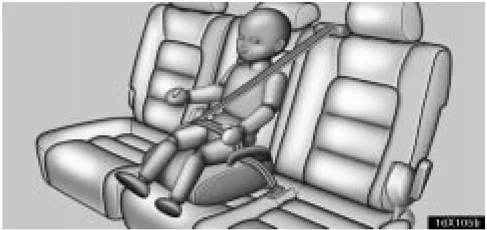
Installation with 2-point type seat belt
(A) Infant seat installation
 An infant seat is used in rear-facing position only.
158
COMFORT ADJUSTMENT
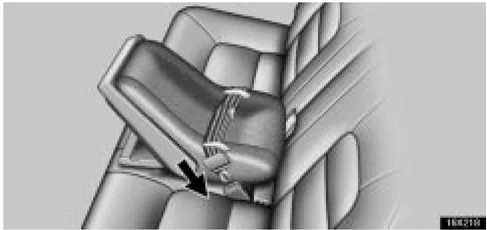
- Run the center lap belt through or around the infant seat following the instructions provided by its manufacturer and insert the tab into the buckle taking care not to twist the lap belt.
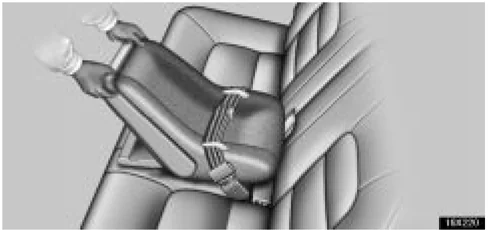
 2. When pressing the infant seat firmly against the seat cushion and seatback, tighten the lap belt by pulling its free end to hold the infant seat securely.
CAUTION
- After inserting the tab, make sure the tab and buckle are locked and that the lap belt is not twisted.
- Do not insert coins, clips, etc. in the buckle as this may prevent you from properly latching the tab and buckle.
- If the seat belt does not function normally, immediately contact your Lexus dealer. Do not use the child restraint system until the seat belt is fixed. It cannot protect your child from injury.
159

COMFORT ADJUSTMENT
-
ys_file_yh0y1m2k3n4o5p6q7r8s9t0u1v2w3x4y5z6a7b8c9d0e1f2g3h4i5j6k7l8m9n0o1p2q3r4s5t6u7v8w9x0y1z2a3b4c5d6e7f8g9h0i1j2k3l4m5n6o7p8q9r0s1t2u3v4w5x6y7z8a9b0c1d2e3f4g5h6i7j8k9l0m1n2o3p4q5r6s7t8u9v0w1x2y3z4a5b6c7d8e9f0g1h2i3j4k5l6m7n8o9p0q1r2s3t4u5v6w7x8y9z0a1b2c3d4e5f6g7h8i9j0k1l2m3n4o5p6q7r8s9t0u1v2w3x4y5z6a7b8c9d0e1f2g3h4i5j6k7l8m9n0o1p2q3r4s5t6u7v8w9x0y1z2a3b4c5d6e7f8g9h0i1j2k3l4m5n6o7p8q9r0s1t2u3v4w5x6y7z8a9b0c1d2e3f4g5h6i7j8k9l0m1n2o3p4q5r6s7t8u9v0w1x2y3z4a5b6c7d8e9f0g1h2i3j4k5l6m7n8o9p0q1r2s3t4u5v6w7x8y9z0a1b2c3d4e5f6g7h8i9j0k1l2m3n4o5p6q7r8s9t0u1v2w3x4y5z6a7b8c9d0e1f2g3h4i5j6k7l8m9n0o1p2q3r4s5t6u7v8w9x0y1z2a3b4c5d6e7f8g9h0i1j2k3l4m5n6o7p8q9r0s1t2u3v4w5x6y7z8a9b0c1d2e3f4g5h6i7j8k9l0m1n2o3p4q5r6s7t8u9v0w1x2y3z4a5b6c7d8e9f0g1h2i3j4k5l6m7n8o9p0q1r2s3t4u5v6w7x8y9z0a1b2c3d4e5f6g7h8i9j0k1l2m3n4o5p6q7r8s9t0u1v2w3x4y5z6a7b8c9d0e1f2g3h4i5j6k7l8m9n0o1p2q3r4s5t6u7v8w9x0y1z2a3b4c5d6e7f8g9h0i1j2k3l4m5n6o7p8q9r0s1t2u3v4w5x6y7z8a9b0c1d2e3f4g5h6i7j8k9l0m1n2o3p4q5r6s7t8u9v0w1x2y3z4a5b6c7d8e9f0g1h2i3j4k5l6m7n8o9p0q1r2s3t4u5v6w7x8y9z0a1b2c3d4e5f6g7h8i9j0k1l2m3n4o5p6q7r8s9t0u1v2w3x4y5z6a7b8c9d0e1f2g3h4i5j6k7l8m9n0o1p2q3r4s5t6u7v8w9x0y1z2a3b4c5d6e7f8g9h0i1j2k3l4m5n6o7p8q9r0s1t2u3v4w5x6y7z8a9b0c1d2e3f4g5h6i7j8k9l0m1n2o3p4q5r6s7t8u9v0w1x2y3z4a5b6c7d8e9f0g1h2i3j4k5l6m7n8o9p0q1r2s3t4u5v6w7x8y9z0a1b2c3d4e5f6g7h8i9j0k1l2m3n4o5p6q7r8s9t0u1v2w3x4y5z6a7b8c9d0e1f2g3h4i5j6k7l8m9n0o1p2q3r4s5t6u7v8w9x0y1z2a3b4c5d6e7f8g9h0i1j2k3l4m5n6o7p8q9r0s1t2u3v4w5x6y7z8a9b0c1d2e3f4g5h6i7j8k9l0m1n2o3p4q5r6s7t8u9v0w1x2y3z4a5b6c7d8e9f0g1h2i3j4k5l6m7n8o9p0q1r2s3t4u5v6w7x8y9z0a1b2c3d4e5f6g7h8i9j0k1l2m3n4o5p6q7r8s9t0u1v2w3x4y5z6a7b8c9d0e1f2g3h4i5j6k7l8m9n0o1p2q3r4s5t6u7v8w9x0y1z2a3b4c5d6e7f8g9h0i1j2k3l4m5n6o7p8q9r0s1t2u3v4w5x6y7z8a9b0c1d2e3f ........
-
ys_file_yh0y1m2k3n4o5p6q7r8s9t0u1v2w3x4y5z6a7b8c9d0e1f2g3h4i5j6k7l8m9n0o1p2q3r4s5t6u7v8w9x0y1z2a3b4c5d6e7f8g9h0i1j2k3l4m5n6o7p8q9r0s1t2u3v4w5x6y7z8a9b0c1d2e3f4g5h6i7j8k9l0m1n2o3p4q5r6s7t8u9v0w1x2y3z4a5b6c7d8e9f0g1h2i3j4k5l6m7n8o9p0q1r2s3t4u5v6w7x8y9z0a1b2c3d4e5f6g7h8i9j0k1l2m3n4o5p6q7r8s9t0u1v2w3x4y5z6a7b8c9d0e1f2g3h4i5j6k7l8m9n0o1p2q3r4s5t6u7v8w9x0y1z2a3b4c5d6e7f8g9h0i1j2k3l4m5n6o7p8q9r0s1t2u3v4w5x6y7z8a9b0c1d2e3f4g5h6i7j8k9l0m1n2o3p4q5r6s7t8u9v0w1x2y3z4a5b6c7d8e9f0g1h2i3j4k5l6m7n8o9p0q1r2s3t4u5v6w7x8y9z0a1b2c3d4e5f6g7h8i9j0k1l2m3n4o5p6q7r8s9t0u1v2w3x4y5z6a7b8c9d0e1f2g3h4i5j6k7l8m9n0o1p2q3r4s5t6u7v8w9x0y1z2a3b4c5d6e7f8g9h0i1j2k3l4m5n6o7p8q9r0s1t2u3v4w5x6y7z8a9b0c1d2e3f4g5h6i7j8k9l0m1n2o3p4q5r6s7t8u9v0w1x2y3z4a5b6c7d8e9f0g1h2i3j4k5l6m7n8o9p0q1r2s3t4u5v6w7x8y9z0a1b2c3d4e5f6g7h8i9j0k1l2m3n4o5p6q7r8s9t0u1v2w3x4y5z6a7b8c9d0e1f2g3h4i5j6k7l8m9n0o1p2q3r4s5t6u7v8w9x0y1z2a3b4c5d6e7f8g9h0i1j2k3l4m5n6o7p8q9r0s1t2u3v4w5x6y7z8a9b0c1d2e3f4g5h6i7j8k9l0m1n2o3p4q5r6s7t8u9v0w1x2y3z4a5b6c7d8e9f0g1h2i3j4k5l6m7n8o9p0q1r2s3t4u5v6w7x8y9z0a1b2c3d4e5f6g7h8i9j0k1l2m3n4o5p6q7r8s9t0u1v2w3x4y5z6a7b8c9d0e1f2g3h4i5j6k7l8m9n0o1p2q3r4s5t6u7v8w9x0y1z2a3b4c5d6e7f8g9h0i1j2k3l4m5n6o7p8q9r0s1t2u3v4w5x6y7z8a9b0c1d2e3f4g5h6i7j8k9l0m1n2o3p4q5r6s7t8u9v0w1x2y3z4a5b6c7d8e9f0g1h2i3j4k5l6m7n8o9p0q1r2s3t4u5v6w7x8y9z0a1b2c3d4e5f6g7h8i9j0k1l2m3n4o5p6q7r8s9t0u1v2w3x4y5z6a7b8c9d0e1f2g3h4i5j6k7l8m9n0o1p2q3r4s5t6u7v8w9x0y1z2a3b4c5d6e7f8g9h0i1j2k3l4m5n6o7p8q9r0s1t2u3v4w5x6y7z8a9b0c1d2e3f4g5h6i7j8k9l0m1n2o3p4q5r6s7t8u9v0w1x2y3z4a5b6c7d8e9f0g1h2i3j4k5l6m7n8o9p0q1r2s3t4u5v6w7x8y9z0a1b2c3d4e5f6g7h8i9j0k1l2m3n4o5p6q7r8s9t0u1v2w3x4y5z6a7b8c9d0e1f2g3h4i5j6k7l8m9n0o1p2q3r4s5t6u7v8w9x0y1z2a3b4c5d6e7f8g9h0i1j2k3l4m5n6o7p8q9r0s1t2u3v4w5x6y7z8a9b0c1d2e3 ........
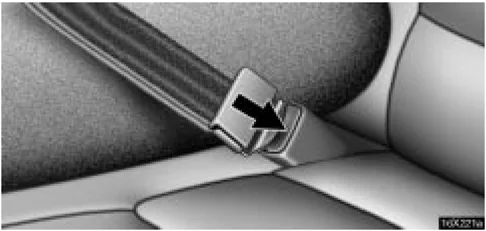
- To remove the infant seat, press the buckle-release button.
CAUTION
Push and pull the child restraint system in different directions to be sure it is secure. Follow all the installation instructions provided by its manufacturer.
COMFORT ADJUSTMENT
(B) Convertible seat installation
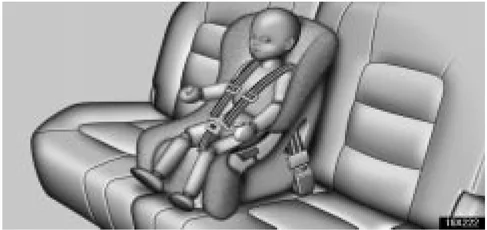
A convertible seat is used in forward-facing and rear-facing positions depending on the age and size of the child. When installing, follow the manufacturer's instructions about the appropriate age and size of the child as well as directions for installing a child restraint system.
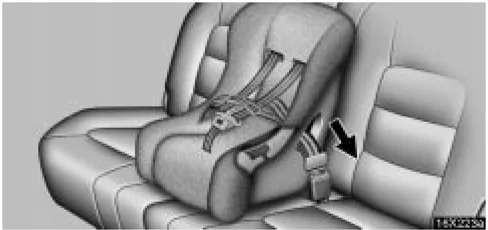
- Run the center lap belt through or around the convertible seat following the instructions provided by its manufacturer and insert the tab into the buckle taking care not to twist the lap belt.
CAUTION
- After inserting the tab, make sure the tab and buckle are locked and that the lap belt is not twisted.
- Do not insert coins, clips, etc. in the buckle as this may prevent you from properly latching the tab and buckle.
- If the seat belt does not function normally, immediately contact your Lexus dealer. Do not use the child restraint system until the seat belt is fixed. It cannot protect your child from injury.
161

COMFORT ADJUSTMENT
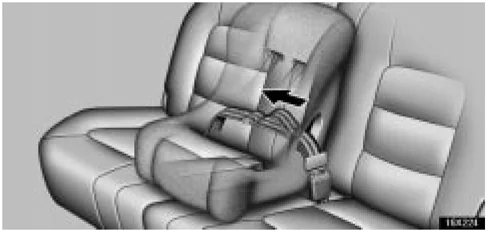
- While pressing the convertible seat firmly against the seat cushion and seatback, tighten the lap belt by pulling its free end to hold the convertible seat securely.
CAUTION
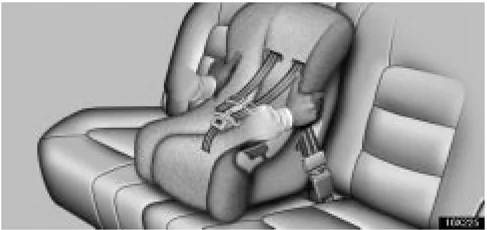
Push and pull the child restraint system in different directions to be sure it is secure. Follow all the installation instructions provided by its manufacturer.
162

COMFORT ADJUSTMENT
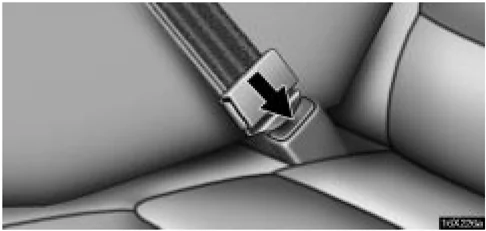
- To remove the convertible seat, press the buckle-release button.
Installation with 3-point type seat belt (A) Infant seat installation
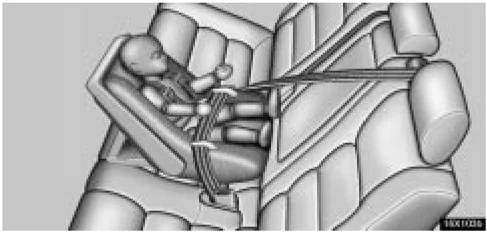
An infant seat is used in rear-facing position only.
163
COMFORT ADJUSTMENT
 T6K273
CAUTION If the driver's seat position does not allow sufficient space for safe installation, install the child restraint system on the second right seat.
 T6M0170E
CAUTION Never put a rear-facing child restraint system on the front passenger seat because the force of the rapid inflation of the front passenger airbag can cause death or serious injury to the child.
164
COMFORT ADJUSTMENT
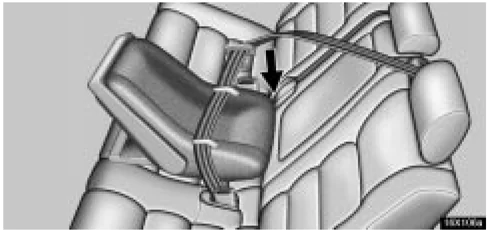
- Run the lap and shoulder belt through or around the infant seat following the instructions provided by its manufacturer and inserting the tab into the buckle taking care not to twist the belt. Keep the lap portion of the belt tight.
 2. Fully extend the shoulder belt to put it in the lock mode. When the belt is then retracted even slightly, it cannot be extended.
To hold the infant seat securely, make sure the belt is in the lock mode before letting the belt retract.
CAUTION
- After inserting the tab, make sure the tab and buckle are locked and that the lap and shoulder portions of the belt are not twisted.
- Do not insert coins, clips, etc. in the buckle as this may prevent you from properly latching the tab and buckle.
- If the seat belt does not function normally, immediately contact your Lexus dealer. Do not use the child restraint system until the seat belt is fixed. It cannot protect your child from injury.
165
COMFORT ADJUSTMENT
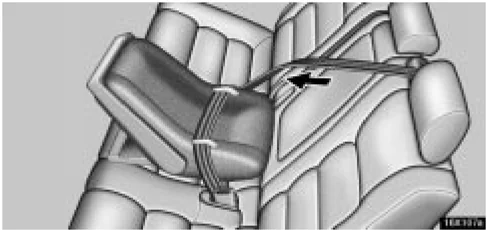
 3. While pressing the infant seat firmly against the seat cushion and seatback, let the shoulder belt retract as far as it will go to hold the infant seat securely.
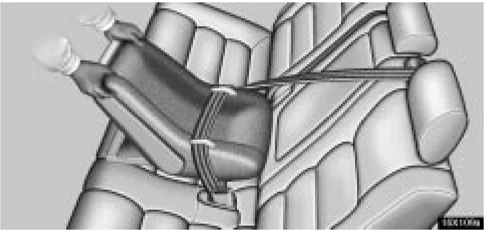
CAUTION Push and pull the child restraint system in different directions to be sure it is secure. Follow all the installation instructions provided by its manufacturer.
166
COMFORT ADJUSTMENT
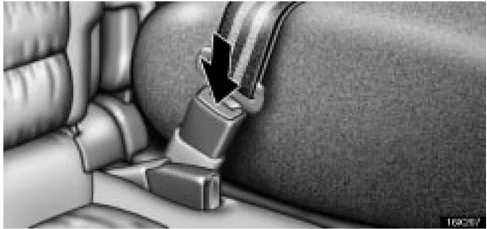
- To remove the infant seat, press the buckle-release button and allow the belt to retract completely. The belt will move freely again and be ready to work for an adult or older child passenger.
(B) Convertible seat installation
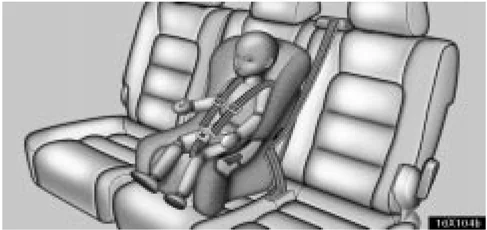
A convertible seat is used in forward-facing or rear-facing position depending on the age and size of the child. When installing, follow the manufacturer’s instructions about the appropriate age and size of the child as well as directions for installing the child restraint system.
167
COMFORT ADJUSTMENT
 T6K275
CAUTION If the driver's seat position does not allow sufficient space for safe installation, install the child restraint system on the second right seat.
 T6M071E
CAUTION
- Never put a rear-facing child restraint system on the front passenger seat because the force of the rapid inflation of the front passenger airbag can cause death or serious injury to the child.
168
COMFORT ADJUSTMENT
 ►Move seat fully back
- A forward-facing child restraint system should be put on the front seat only when it is unavoidable. Always move the seat as far back as possible, because the force of the deploying airbag could cause death or serious injury to the child.
- On vehicles with side airbags and curtain shield airbags, do not allow the child to lean against the front door or around the front door even if the child is seated in a child restraint system. It is dangerous if the side airbag and curtain shield airbag inflate, because the impact could cause death or serious injury to the child.
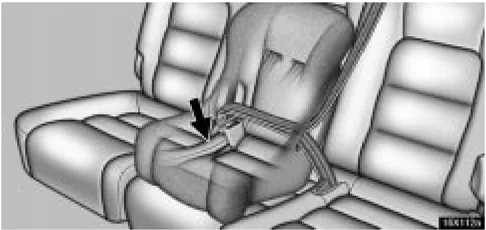
- Run the lap and shoulder belt through or around the convertible seat following the instructions provided by its manufacturer and inserting the tab into the buckle taking care not to twist the belt. Keep the lap portion of the belt tight.
⚠ CAUTION
- After inserting the tab, make sure the tab and buckle are locked and that the lap and shoulder portions of the belt are not twisted.
- Do not insert coins, clips, etc. in the buckle as this may prevent you from properly latching the tab and buckle.
- If the seat belt does not function normally, immediately contact your Lexus dealer. Do not use the child restraint system until the seat belt is fixed. It cannot protect your child from injury.
169

COMFORT ADJUSTMENT
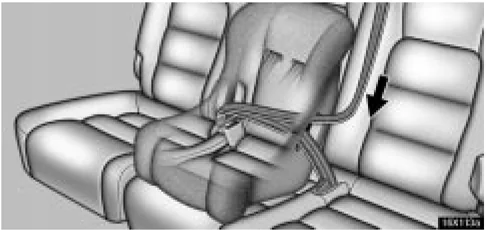
- Fully extend the shoulder belt to put it in the lock mode. When the belt is then retracted slightly, it cannot be extended. To hold the convertible seat securely, make sure the belt is in the lock mode before letting the belt retract.
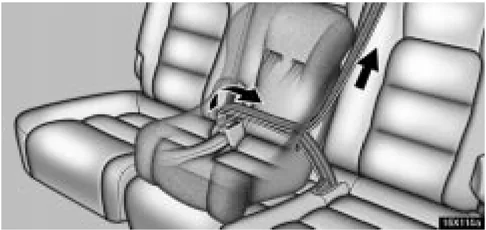
- While pressing the convertible seat firmly against the seat cushion and seatback, let the shoulder belt retract as far as it will go to hold the convertible seat securely.
170
COMFORT ADJUSTMENT
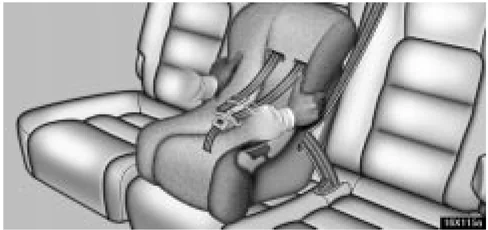

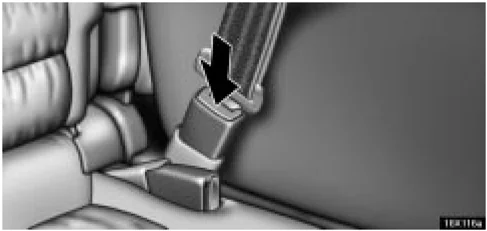
- To remove the convertible seat, press the buckle-release button and allow the belt to retract completely. The belt will move freely again and be ready to work for an adult or older child passenger.
CAUTION
Push and pull the child restraint system in different directions to be sure it is secure. Follow all the installation instructions provided by its manufacturer.
COMFORT ADJUSTMENT
(C) Booster seat installation
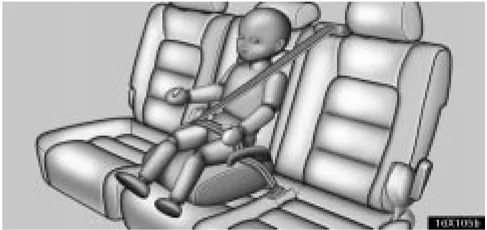
A booster seat is used in forward-facing position only.
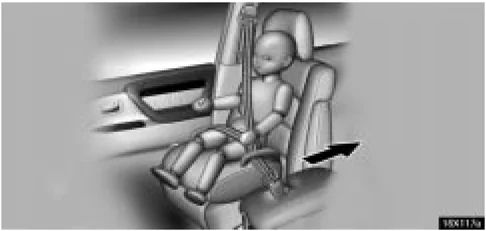
▶Move seat fully back
CAUTION
- A forward-facing child restraint system should be put on the front seat only when it is unavoidable. Always move the seat as far back as possible, because the force of the deploying airbag could cause death or serious injury to the child.
- On vehicles with side airbags and curtain shield airbags, do not allow the child to lean against the front door or around the front door even if the child is seated in a child restraint system. It is dangerous if the side airbag and curtain shield airbag inflate, because the impact could cause death or serious injury to the child.
172

COMFORT ADJUSTMENT
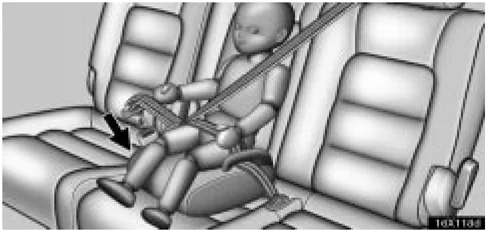
- Sit the child on a booster seat. Run the lap and shoulder belt through or around the booster seat and across the child following the instructions provided by its manufacturer and insert the tab into the buckle.
Make sure the shoulder belt is correctly across the child's shoulder and that the lap belt is positioned as low as possible on child's hips. See "Seat belts" on page 124 for details.
CAUTION
-
Always make sure the shoulder belt is positioned across the center of child's shoulder. The belt should be kept away from child's neck, but not falling off child's shoulder. Failure to do so could reduce the amount of protection in an accident and cause serious injuries in a collision.
-
Both high-positioned lap belts and loose-fitting belts could cause serious injuries due to sliding under the lap belt during a collision or other unintended result. Keep the lap belt positioned as low on child's hip as possible.
-
For child's safety, do not place the shoulder belt under child's arm.
-
After inserting the tab, make sure the tab and buckle are locked and that the lap and shoulder portions of the belt are not twisted.
-
Do not insert coins, clips, etc. in the buckle as this may prevent your child from properly latching the tab and buckle.
-
If the seat belt does not function normally, immediately contact your Lexus dealer. Do not use the child restraint system until the seat belt is fixed. It cannot protect your child from injury.
173
COMFORT ADJUSTMENT
 2. To remove the child restraint system, press the buckle-release button and allow the belt to retract.
Using a top strap
 Follow the procedure below for a child restraint system that requires the use of a top strap.
174
COMFORT ADJUSTMENT
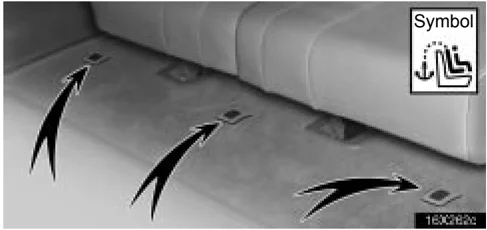
►Anchor brackets Use an anchor bracket located behind the second seat on the floor to attach the top strap. Anchor brackets are installed for each second seating position. The symbol shown in the illustration indicates the location of user ready anchor brackets.
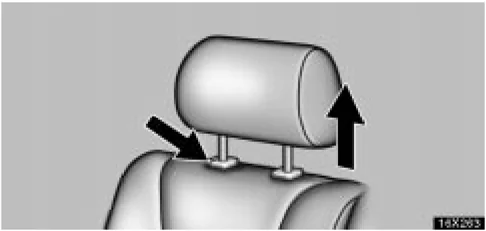
- Remove the head restraint.
175
COMFORT ADJUSTMENT
 2. Fix the child restraint system with the seat belt.
3. Take off the carpet, latch the hook onto the anchor bracket and tighten the top strap.
For instructions to install the child restraint system, see “Types of child restraint system” on page 157.
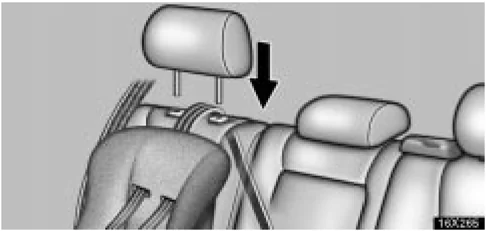
 4. Replace the head restraint.
⚠ CAUTION
- Make sure the top strap is securely latched, and check that the child restraint system is secure by pushing and pulling it in different directions.
- Follow all the installation instructions provided by its manufacturer.
176
COMFORT ADJUSTMENT
Installation with child restraint lower anchorages
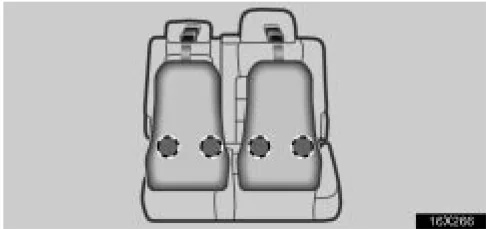
The lower anchorages for the child restraint system interfaced with the FMVSS225 or CMVSS210.2 specification are installed in the second seat.
The anchorages are installed in the clearance between the seat cushion and seatback of left and center second seats.
Child restraint system interfaced with the FMVSS225 or CMVSS210.2 specification can be fixed with these anchorages. In this case, it is not necessary to fix the child restraint system with a seat belt on the vehicle.
CHILD RESTRAINT SYSTEM INSTALLATION
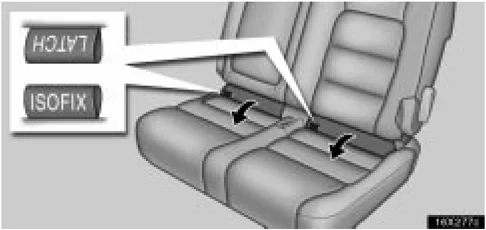
- Take off the cover between the seat cushion and seatback a little and confirm the position of the lower anchorages below the tag in the seat cushion.
177
COMFORT ADJUSTMENT
 Canada only
18X279c
Type A: 2. Latch the hooks of lower straps onto the anchorages and tighten the lower straps.
 Canada only
16X270c
Type B: 2. Latch the buckles onto the anchorages.
For owners in Canada The symbol on a child restraint system indicates the presence of a lower connector system.
If your child restraint system has a top strap, it should be anchored. (For the installation of the top strap, see "Using a top strap" on page 174.)
For the installation details, refer to the instruction manual equipped with each product.
CAUTION
- When using the lower anchorages for the child restraint system, be sure that there are no irregular objects around the anchorages or that the seat belt is not caught.
- Push and pull the child restraint system in different directions to be sure it is secure. Follow all the installation instructions provided by its manufacturer.
- After securing the child restraint system, never recline the seat.
- Do not put a child restraint system on the rear seat if it interferes with the lock mechanism of the front seat. This can cause severe injury to the child and front passenger in case of sudden braking or a collision.
178

COMFORT ADJUSTMENT
DRIVING POSITION MEMORY SYSTEM
A microcomputer will memorize the position of the driver's seat, and the positions of the tilt and telescopic steering, and outside rear view mirrors. Two different driving position profiles can be entered into the computer's memory.
Recording the driving position in the computer's memory can only be done when the ignition key is in the "ON" position and the selector lever is in the "P" position.
Setting the driving position
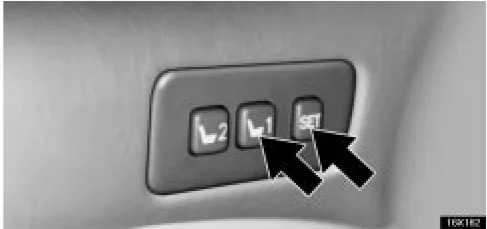
- Adjust the driver's seat, tilt and telescopic steering and outside rear view mirrors to the desired position.
- While pushing the "SET" button, push button "1" or "2" until the signal beeps.
The beep sound means that the positions are recorded in the computer's memory.
By repeating these two steps and pressing the remaining button, the driving position for another driver can be recorded.
To set a new memorized position, select the desired position and perform step 2. The previous memory will be erased and the new position will be set.
To make only slight changes to an already memorized position, the easiest way is to first activate the memorized position, then make the desired changes and perform step 2 above.
Recalling the memorized position
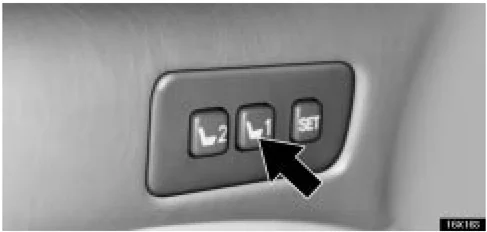
When you push button "1" or "2", the driving position will be automatically adjusted to the position recorded for that button.
179
COMFORT ADJUSTMENT
Conditions for memorized position activation
- Ignition key "ON" and selector lever in "P" position. All parts of the memorized positions can be activated.
- Key not in ignition switch and within 30 seconds of opening driver's door. The memorized position can be activated, except for the tilt and telescopic steering.
If any driving position memory switch is pushed while one of the memorized driving position profiles is being activated, the operation will stop.
To activate the system, push the desired button ("1" or "2") again.
The driving position memory control system cannot be operated while the vehicle is moving.
If the vehicle's battery is disconnected, the computer's memory will be erased and the memorized positions will have to be set again.
CAUTION
- Do not start the vehicle while the adjustments are being made.
- Take care not to select the wrong button, or the seat could strike the rear passenger or hit your body against the steering wheel. If this happens, you can stop the movement by pressing another driving position memory switch, or depressing the brake pedal.
180
SECTION 1 – 7
INSTRUMENTS AND CONTROLS
Theft deterrent
-
Theft deterrent system . . . . . . . . . . . . . . . . . . . . . . . . . . . . . . . . . . . . . . . . . . . . . . . . . . . . . . . . . . . . . . . . . . . . . . . . . . . . . . . . . . . . . . . . . . . . . . . . . . . . . . . . . . . . . . . . . . . . . . . . . . . . . . . . . . . . . . . . . . . . . . . . . . . . . . . . . . . . . . . . . . . . . . . . . . . . . . . . . . . . . . . . . . . . . . . . . . . . . . . . . . . . . . . . . . . . . . . . ........ 182
-
Theft prevention labels . . . . . . . . . . . . . . . . . . . . . . . . . . . . . . . . . . . . . . . . . . . . . . . . . . . . . . . . . . . . . . . . . . . . . . . . . . . . . . . . . . . . . . . . . . . . . . . . . . . . . . . . . . . . . . ........ 184
181

THEFT DETERRENT
THEFT DETERRENT SYSTEM
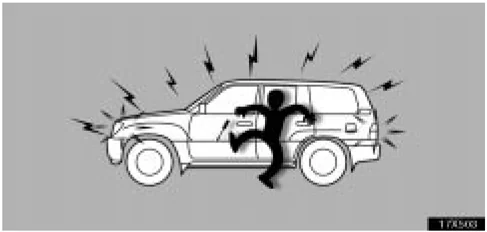
To deter theft of the vehicle, this system is designed to sound an alarm if any of the doors or hood is forcibly unlocked or the battery terminal is disconnected and then reconnected while the vehicle is locked. The alarm blows the horn intermittently and flashes the headlights, tail lights and other exterior lights.
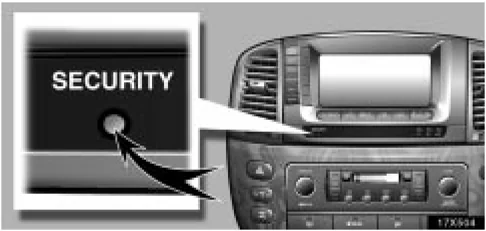
►Security indicator light (For U.S.A.)
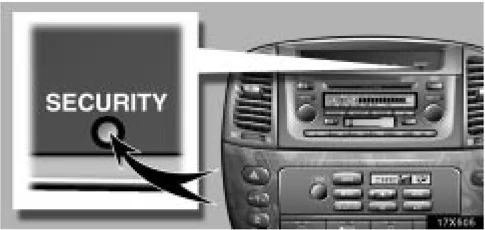
►Security indicator light (For Canada.)
182
THEFT DETERRENT
Setting the system
- Turn the ignition key to the "LOCK" position and remove it.
The engine immobiliser system causes the indicator light to flash.
- Close and lock all the doors and hood using an ignition key or wireless remote control.
If you lock them with wireless remote control, the turn signals flash once.*
NOTE: The turn signals can be set not to flash. Ask your Lexus dealer for details.
The flashing indicator light will remain on when all the doors and hood are closed and locked.
- After 30 seconds, the indicator starts flashing and the system is set.
Cancelling the system When you unlock any door using an ignition key or wireless remote control, the system is cancelled.
If you unlock any door with wireless remote control, the turn signals flash twice.*
NOTE: The turn signals can be set not to flash. Ask your Lexus dealer for details.
Activating the system The alarm sounds for 60 seconds if any of the following are operated:
- Unlocking any door without using an ignition key or wireless remote control.
- Opening the hood and any doors forcibly.
- Reconnecting the battery.
If any door is unlocked and the ignition key is not in the ignition switch during the alarm sounding, its door is automatically locked.
To stop the alarm: Use either of the following methods.
- Unlock the door using an ignition key or wireless remote control.
- Turn the ignition switch on.
183
THEFT DETERRENT
Testing the system
- Open all the windows.
- Set the system as described above.
The front doors should be locked with the ignition key or wireless remote control. Be sure to wait until the indicator light starts flashing.
- Unlock one of the doors from the inside.
The system should activate the alarm.
-
Unlock any of the doors with a key or the wireless remote control to cancel the system.
-
Repeat this operation for the other doors and hood.
When testing the hood, also check that the system is activated when the battery terminal is disconnected and then reconnected.
If the system does not work properly, have it checked by your Lexus dealer.
NOTICE Disconnecting the battery may result in the erasure of information you have set in the computer memory. After reconnecting the battery, check that the memorized data has been retained. If it has been erased, input it into the computer once more.
THEFT PREVENTION LABELS (U.S.A.ONLY)
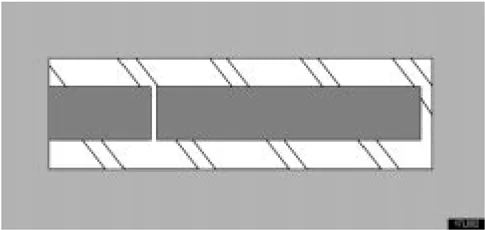
Your new vehicle carries theft prevention labels which are approximately 56 mm (2.20 in.) by 16 mm (0.63 in.).
The purpose of these labels is to reduce the incidence of vehicle thefts by facilitating the tracing and recovery of parts from stolen vehicles. The label is designed so that once it is applied to a surface, any attempt to remove it will result in destroying the integrity of the label. Transferring these labels intact from one part to another will be impossible.
NOTICE You should not attempt to remove the theft prevention labels as it may violate certain state or federal laws.
184
SECTION 2 – 1
AIR CONDITIONING AND AUDIO
Air conditioning Automatic air conditioning controls . . . . . . . . . . . . . . . . . . . . . 186 Rear air conditioning controls . . . . . . . . . . . . . . . . . . . . . . . . 196
For vehicles equipped with Navigation System, please refer to the separate “Navigation System Owner’s Manual”.
185

AIR CONDITIONING
AUTOMATIC AIR CONDITIONING CONTROLS
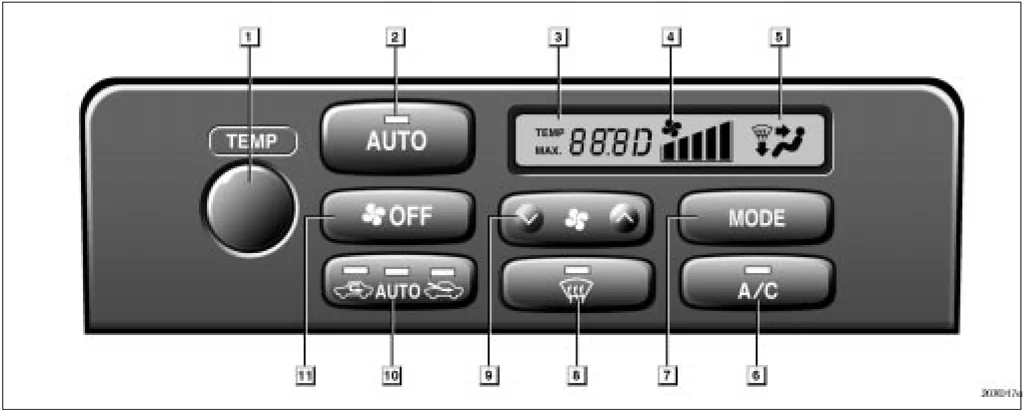
►You can adjust the brightness of the display. See “Instrument panel light control” on page 62 for details.
The automatic air conditioning automatically maintains the set temperature.
This air conditioning features automatic fan speed and air flow control which automatically selects the most suitable fan speed and air flow to control the temperature. The ignition key must be in the "ON" position.
NOTICE To prevent the battery from being discharged, do not leave the air conditioning on longer than necessary when the engine is not running.
186
AIR CONDITIONING
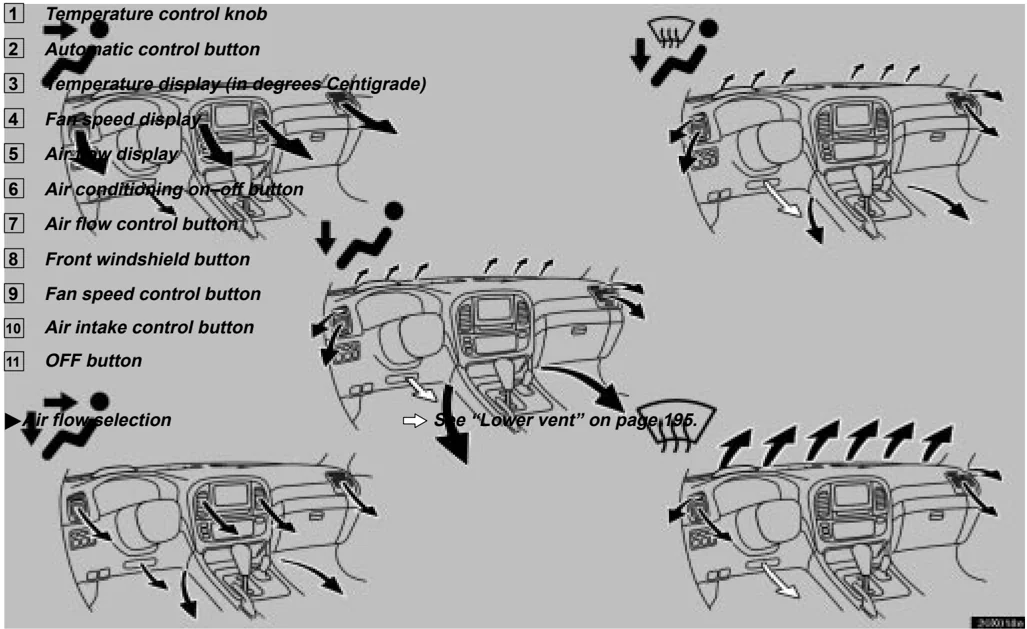
1 Temperature control knob 2 Automatic control button 3 Temperature display (in degrees Centigrade) 4 Fan speed display 5 Airflow display 6 Air conditioning on-off button 7 Air flow control button 8 Front windshield button 9 Fan speed control button 10 Air intake control button 11 OFF button
► Air flow selection
➡ See "Lower vent" on page 196.
187