EXTERIOR EQUIPMENT
FUEL TANK CAP
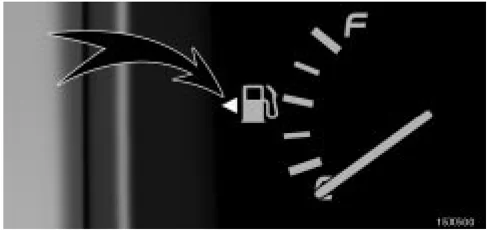
The arrow head next to as shown indicates on which side of your vehicle the fuel filler door is located.
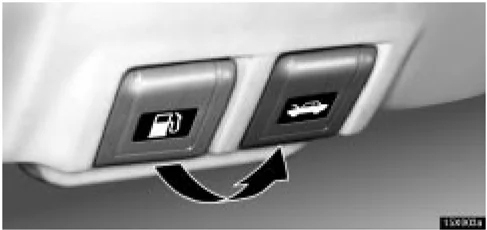
- To open the fuel filler door, pull the lever under the instrument panel. When refueling, turn off the engine.
CAUTION
- Do not smoke, cause sparks or allow open flames when refuelling. The fumes are flammable.
- When opening the cap, do not remove the cap quickly. In hot weather, fuel under pressure could cause injury by spraying out of the filler neck if the cap is suddenly removed.
89
EXTERIOR EQUIPMENT
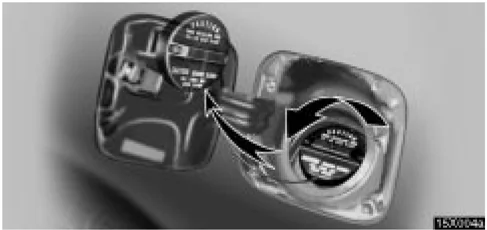
- To remove the fuel tank cap, turn the cap slowly counterclockwise, then pause slightly before removing it. The removed cap can be stored on the back side of the fuel filler door.
It is not unusual to hear a slight swoosh when the cap is opened. When installing the cap, turn the cap clockwise until you hear a click.
If the cap is not tightened securely, the malfunction indicator lamp comes on. Make sure the cap is tightened securely.
The indicator lamp goes off after driving several times. If the indicator lamp does not go off, contact your Lexus dealer as soon as possible.
CAUTION
- Make sure the cap is tightened securely to prevent fuel spillage in case of an accident.
- Use only a genuine Lexus fuel tank cap for replacement. It is designed to regulate fuel tank pressure.
90
EXTERIOR EQUIPMENT
MOON ROOF
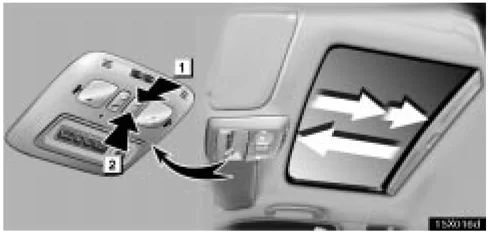
▶ 1 Open 2 Close
To slide open the moon roof, push the switch on the rear side. The moon roof will open and stop partway 30 mm (1.2 in.) from the fully opened position. When you push the switch again, the moon roof will open fully. To stop partway, push the same switch or push the "TILT" switch while the moon roof is moving.
As driving with the moon roof opened fully will cause wind throbs, we recommend you to drive with the moon roof partway 30 mm (1.2 in.) from the fully opened position.
To operate the moon roof, the ignition key must be in the "ON" position.
The sun shade can be opened or closed manually. However, if you open the moon roof, the sun shade will be opened with the moon roof.
To close the moon roof, push the switch on the front side. The moon roof will fully close. To stop partway, push the same switch or "TILT" switch.
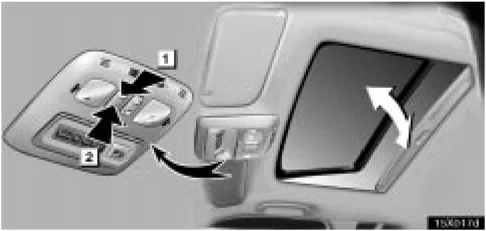
▶ 1 Tilt up 2 Lower
To tilt up the rear end of the moon roof, push the switch on the rear side. The rear end of the moon roof will tilt up fully. To stop partway, push the same switch or "SLIDE" switch.
To lower it, push the switch on the front side. The rear end of the moon roof will fully close. To stop partway, push the same switch or "SLIDE" switch.
Key off operation: Even if the ignition key is turned to the "ACC" or "LOCK" position with all the doors closed, the moon roof can be operated until either of the front doors is opened (or for about 45 seconds).
91
EXTERIOR EQUIPMENT
Operating the moon roof from outside the vehicle The moon roof can be closed or opened using a key.* Insert the ignition key into the key hole on the driver's door. To close the moon roof: Turn the key in the locking direction and hold it. After the door is locked, the moon roof begins to close. To stop in the middle, return the key. To open the moon roof: Turn the key in the unlocking direction and hold it. After the door is unlocked, the moon roof begins to open. To stop in the middle, return the key. NOTE: *This feature can be deactivated, or sliding open/close or tilting up/down can be selected. Ask your Lexus dealer for details.
Jam protection function During closing operation, the moon roof stops and is open if something gets caught into the roof opening. If the moon roof receives a strong impact, this function may work even if nothing is caught.
CAUTION To avoid serious personal injury, you must do the following. • While the vehicle is moving, always keep the heads, hands and other parts of the bodies of all occupants away from the roof opening. Otherwise, they could be seriously injured if the vehicle stops suddenly or if the vehicle is involved in an accident. • Before you close the moon roof, always make sure there is nobody around the moon roof. You must also make sure nobody places his or her head, hands and other parts of the body in the roof opening. If someone's neck, head or hands get caught in the closing roof, it could result in a serious injury. When anyone closes the moon roof, first make sure it is safe to do so. • Be sure to remove the ignition key when you leave your vehicle.
92
EXTERIOR EQUIPMENT
- Never leave anyone (particularly a small child) alone in your vehicle, especially with the ignition key still inserted. Otherwise, he/she could use the moon roof switches and get trapped in a moon roof. Unattended person (particularly a small child) can be involved in a serious accident.
- Never sit on top of the vehicle around the roof opening.
- Never try jamming any part of your body to activate the jam protection function intentionally.
- The jam protection function may not work if something gets caught just before the moon roof fully closed.
REAR STEP BUMPER
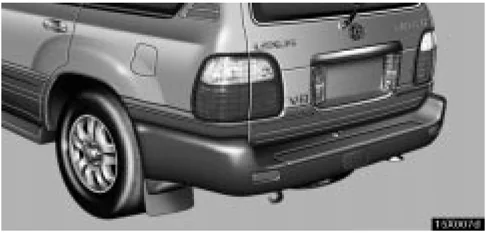
The rear step bumper is for rear end protection and easier step-up loading.
⚠ CAUTION
- Do not allow more than one person to get on the rear step bumper at a time. It is designed for only one person.
- Never drive the vehicle with anyone on the rear step bumper.
93

EXTERIOR EQUIPMENT
RUNNING BOARD LIGHTS
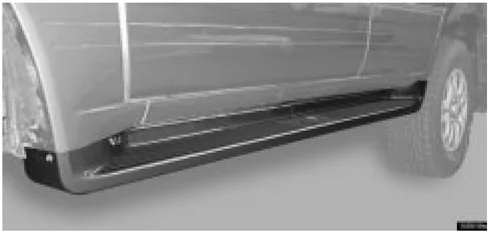
Lighting the running board and the ground helps you easily to get in and out of the vehicle in the night. When you unlock any door with a key or wireless remote control, the lights come on and go out after about 15 seconds automatically. Opening any door lights up the lights and closing it goes out them after 15 seconds. However, if the door remains open, the lights automatically go out after about 30 minutes.
Cleaning ground lights
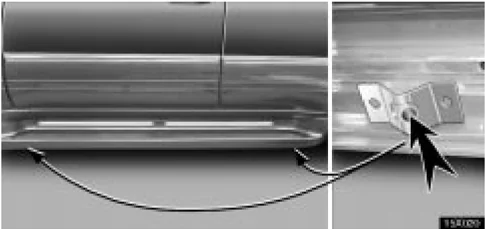
►Ground light If the mud or debris are sticking on the lense covers of the ground lights, the lights will dim. Wipe off them from the lens covers with a soft moist cloth periodically.
94
SECTION 1 – 6
INSTRUMENTS AND CONTROLS
Comfort adjustment
- Seats . . . . . . . . . . . . . . . . . . . . . . . . . . . . . . . . . . . . . . . . . . . . . . . . . . . . . . . . . . . . . . . . . . . . . . . . . . . . . . . . . . . . . . . . . . . . . . . . . . . . . . . . . . . . . . . . . . . . . . . . . . . . . . . . . . . . . . . . . . . . . . . . . . . . . . . . . . . . . . . . . . . . . . . . . . . . . . . . . . . . . . . . . . . . . . . . . . . . . . . . . . . . . . . . . . . . . . . . . . . . ........ 96
- Front seats . . . . . . . . . . . . . . . . . . . . . . . . . . . . . . . . . . . . . . . . . . . . . . . . . . . . . . . . . . . . . . . . . . . . . . . . . . . . . . . . . . . . . . . . . . . . . . . . . . . . . . . . . . . . . . . . . . . . . . ........ 96
- Rear seats . . . . . . . . . . . . . . . . . . . . . . . . . . . . . . . . . . . . . . . . . . . . . . . . . . . . . . . . . . . . . . . . . . . . . . . . . . . . . . . . . . . . . . . . . . . . . . . . . . . . . . . . . . . . . . . . . . . . . . . . . ........

COMFORT ADJUSTMENT
SEATS
While the vehicle is being driven, all vehicle occupants should have the seatback upright, sit well back in the seat and properly wear the seat belts provided.
CAUTION
- Do not drive the vehicle unless the occupants are properly seated. Do not allow passengers to sit in the luggage compartment or cargo area. Persons not properly seated and/or properly restrained by seat belts can be severely injured in the event of emergency braking or a collision.
- During driving, do not allow passengers to stand up or move around between seats. Otherwise, severe injuries can occur in the event of emergency braking or a collision.
FRONT SEATS
Front seat precautions Driver seat
CAUTION The driver airbag deploys with considerable force, and can cause death or serious injury especially if the driver is very close to the airbag. The National Highway Traffic Safety Administration ("NHTSA") advises:
Since the risk zone for driver airbag is the first 50–75 mm (2–3 in.) of inflation, placing yourself 250 mm (10 in.) from your driver airbag provides you with a clear margin of safety. This distance is measured from the center of the steering wheel to your breastbone. If you sit less than 250 mm (10 in.) away now, you can change your driving position in several ways:
- Move your seat to the rear as far as you can while still reaching the pedals comfortably.
- Slightly recline the back of the seat. Although vehicle designs vary, many drivers can achieve the 250 mm (10 in.) distance, even with the driver seat all the way forward, simply by reclining the back of the seat somewhat. If reclining the back of your seat makes it hard to see the road, raise yourself by using a firm, non-slippery cushion, or raise the seat if your vehicle has that feature.
96
COMFORT ADJUSTMENT
- If your steering wheel is adjustable, tilt it downward. This points the airbag toward your chest instead of your head and neck. The seat should be adjusted as recommended by NHTSA above, while still maintaining control of the foot pedals, steering wheel, and your view of the instrument panel controls.
Front passenger seat
CAUTION The front passenger airbag also deploys with considerable force, and can cause death or serious injury especially if the front passenger is very close to the airbag. The front passenger seat should be as far from the airbag as possible with the seatback adjusted, so the front passenger sits upright.
Front seats
CAUTION The side airbags are installed in the driver and front passenger seats. Observe the following precautions.
- Do not lean against the front door when the vehicle is in use, since the side airbag inflates with considerable speed and force. Otherwise, you may be killed or severely injured.
- Do not use seat accessories which cover the area where the side airbags inflate. Such accessories may prevent the side airbags from activating correctly, causing death or serious injury.
- Do not modify or replace the seats or upholstery of front seats equipped with side airbags. Such changes may prevent the side airbags from activating correctly, disable the system, or cause the side airbags to inflate accidentally, resulting in death or serious injury.
97
COMFORT ADJUSTMENT
Seat adjustment precautions
CAUTION
- Do not adjust the seat while the vehicle is moving as the seat may unexpectedly move and cause the driver to lose control of the vehicle.
- Be careful that the seat does not hit a passenger, luggage or the rear seat.
NOTICE
Do not operate the control switch in more than one dimension at a time. It may cause electrical overload.
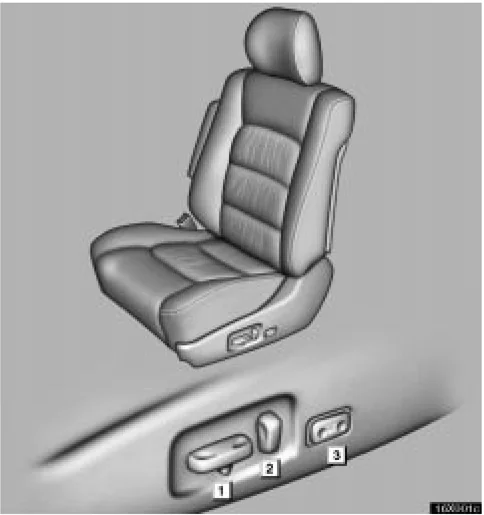
Adjusting front seats

1 Seat position control switch, seat cushion angle and height control switch 2 Seatback angle control switch 3 Lumbar support control switch
98
COMFORT ADJUSTMENT
Adjusting seat position
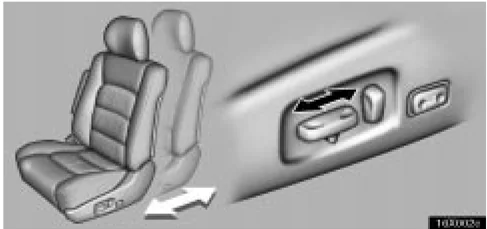
Move the control switch in the desired direction. Releasing the switch will stop the seat in that position. Do not place anything under the seat, as this might interfere with the seat movement.
Adjusting seatback angle
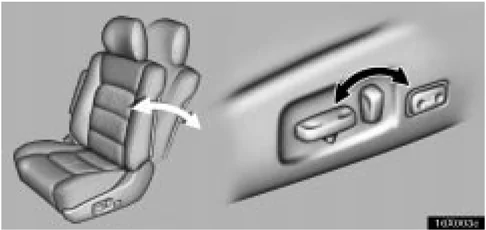
Move the control switch in the desired direction. Releasing the switch will stop the seatback in that position.
CAUTION
To reduce the risk of sliding under the lap belt during a collision, avoid reclining the seatback any more than needed. The seat belts provide maximum protection in a frontal or rear collision when the driver and the passenger are sitting up straight and well back in the seats. If you are reclined, the lap belt may slide past your hips and apply restraint forces directly to the abdomen. In the event of a frontal collision, the more the seat is reclined, the greater the risk of personal injury.
99
COMFORT ADJUSTMENT
Adjusting seat cushion angle and height
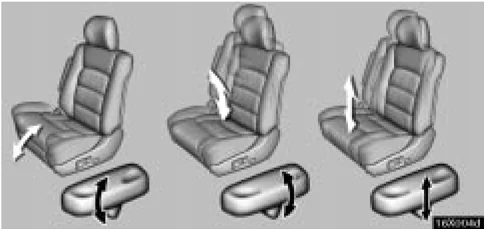
Move the control switch in the desired direction. Releasing the switch will stop the seat cushion in that position.
Adjusting lumbar support (Driver’s seat only)
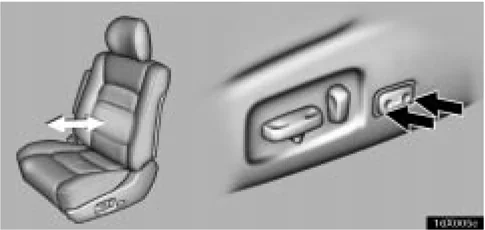
Push the control switch on either side. The amount of lumbar support will change while the switch is pushed.
100
COMFORT ADJUSTMENT
REAR SEATS
Rear seat precautions
CAUTION
- Adjustment should not be made while the vehicle is moving.
- When folding the seat, secure the seat by adjusting the length of the anchorage strap to prevent the seat from falling down.
- When returning the seat to its original position, observe the following precautions in order to prevent personal injury in a collision or sudden stop.
There is no person or luggage around the seat and operate slowly by supporting the seat with your hands.
The seat is securely locked by pushing forward and rearward on the top of the seatback and by trying to pull up the edge of the bottom cushion. Failure to do so will prevent seat belt from operating properly.
The seat belts are not twisted or caught under the seat and are arranged in their proper position and are ready to use.
- When using the seat, make sure the seat is securely locked.
NOTICE
Avoid putting heavy loads on the removed seat. The metallic tips of the seat legs may be damaged and the seat cannot be reinstalled.
Tumbling or removing the seats will enlarge the luggage compartment. See "Luggage stowage precautions" on page 82 for precautions to observe for loading luggage.
Adjusting rear seats

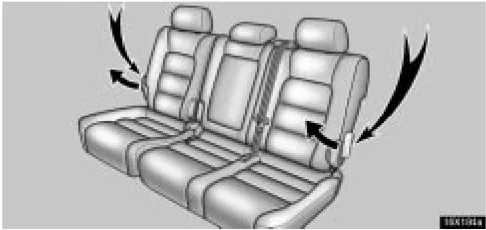
▶Second seat
101
COMFORT ADJUSTMENT
 ►Third seat
Lean forward and pull the lock release lever. Then lean back to the desired angle and release the lever.
CAUTION
To reduce the risk of sliding under the lap belt during a collision, avoid reclining the seatback any more than needed. The seat belts provide maximum protection when the passengers are sitting up straight and well back in the seats. If you are reclined, the lap belt may slide past your hips and apply restraint forces directly to the abdomen. In the event of a frontal collision, the more the seat is reclined, the greater the risk of personal injury.
Tumbling second seat for third seat entry

For easy access to the third seat, tumble the second seat in accordance with the following procedure.
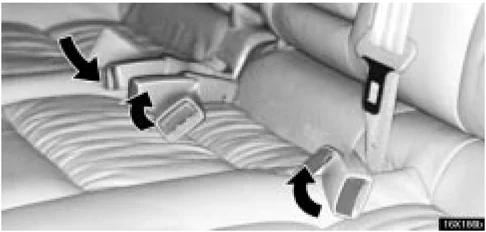
Before tumbling the second seat, stow the second seat buckles as shown in the illustration.
This prevents the buckles from falling out when you tumble the second seat.
NOTICE
The seat belt buckles must be stowed before you tumble the second seat.
102
COMFORT ADJUSTMENT
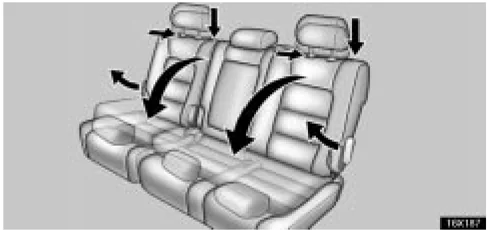
- Lower the head restraints to the lowest position, unlock the seatback by pulling the lever on the side of the seatback and fold it down.
 2. Pull the lever under the seat cushion or pull the strap on the rear end of the seat cushion and swing the whole seat forward.
- To return it to the original position, reverse the steps above.
 If you cannot raise the seatback because of the locked seat belt, do not try it hard. Release the lock of the seat belt in the following way.
[1] Push in the lower front edge of the seatback cushion to slacken the seat belt.
[2] Let the seat belt retract a little.
⚠ CAUTION
- Do not sit on or place anything on the tumbled seatback while driving.
- Make sure the seat is securely locked by pushing forward and rearward on the top of the seatback and by trying to pull up the edge of the bottom cushion. Failure to do so will prevent seat belt from operating properly.
103
COMFORT ADJUSTMENT
Tumbling second seat
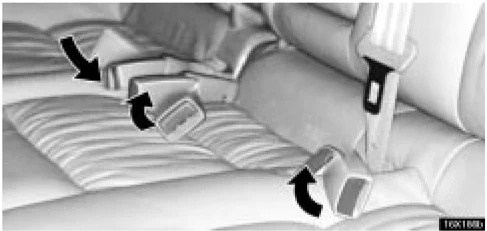
Before tumbling the second seat, stow the second seat buckles as shown in the illustration. This prevents the buckles from falling out when you tumble the second seat.
NOTICE The seat belt buckles must be stowed before you tumble the second seat.
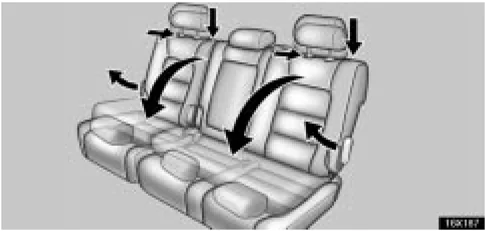
- Lower the head restraints to the lowest position, unlock the seatback by pulling the lever on the side of the seatback and fold it down.
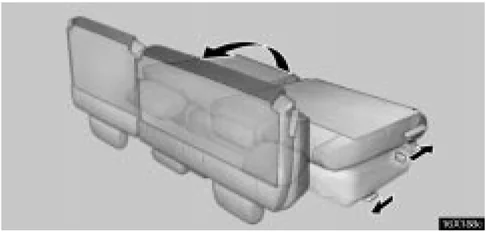
- Pull the lever under the seat cushion or pull the strap on the rear end of the seat cushion and swing the whole seat forward.
104
COMFORT ADJUSTMENT
 3. Hook the holding strap to the assist grip and secure the seat by pulling its free end.
When returning the second seat to its original position, put the holding strap into the pocket.
 4. Remove the seat hook covers from the back of the seat cushion, and install them on the seat hooks.
CAUTION Be sure to install the seat hook covers on the seat hooks, or you may get burned when they become hot.
When returning the second seat to its original position, remove the seat hook covers from the floor and install them in the back of the seat cushion.
- To return it to the original position, reverse the steps above.
105
COMFORT ADJUSTMENT
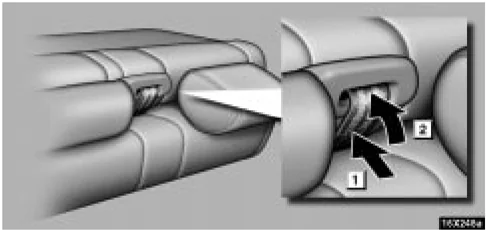
If you cannot raise the seatback because of the locked seat belt, do not try it hard. Release the lock of the seat belt in the following way.
1 Push in the lower front edge of the seatback cushion to slacken the seat belt.
2 Let the seat belt retract a little.
⚠ CAUTION
- Do not sit on or place anything on the tumbled seatback while driving.
- Make sure the seat is securely locked by pushing forward and rearward on the top of the seatback and by trying to pull up the edge of the bottom cushion. Failure to do so will prevent seat belt from operating properly.
Tumbling third seat

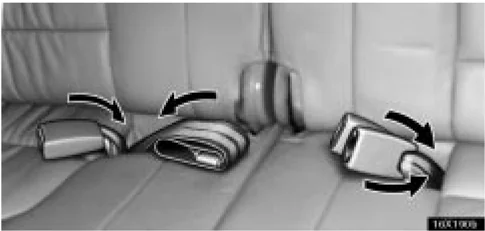
Before tumbling the third seats, stow the third seat belt and buckles as shown in the illustration.
This prevents the belt and buckles from falling out when you tumble the third seat.
106
COMFORT ADJUSTMENT
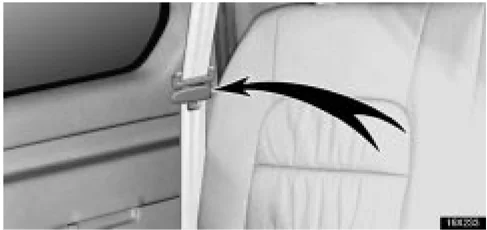
►Seat belt hanger For the outer seat belts, use the seat belt hangers to prevent the belts from being tangled.
NOTICE
- The seat belts must be stowed before you tumble the third seat.
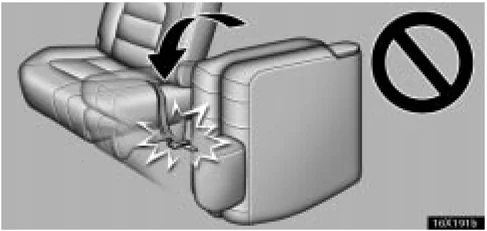
- Make sure to stow the third center seat belt in order not to cause damage on the seat belt by pinching it between the third seat inner leg and seat striker.
107
COMFORT ADJUSTMENT
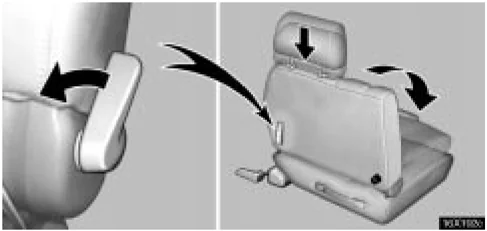
- Lower the head restraint to the lowest position. Pull the reclining lever up and fold down the seatback.
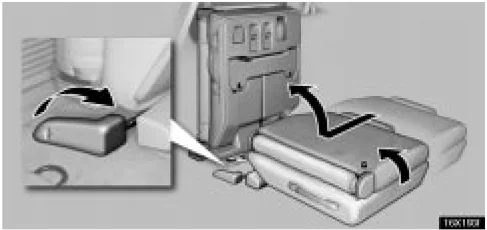
- While turning the lever, lift and slide the whole seat backward.
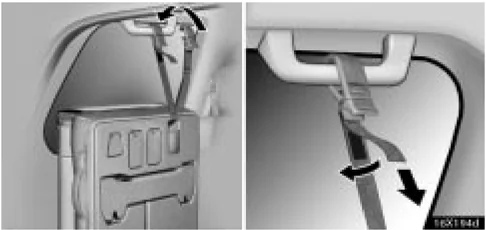
- Hook the holding strap to the assist grip and secure the seat by pulling its free end.
108
COMFORT ADJUSTMENT
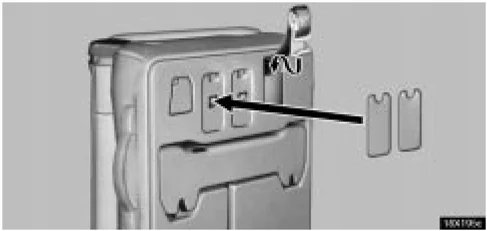
 4. Remove the seat hook covers from the back of the seat cushion and install them onto the seat anchor brackets.
CAUTION Be sure to install the seat hook covers on the seat hooks, or you may get burned when they become hot.
 When returning the third seat to its original position, stow the holding strap and the seat hook covers into the holder facing the direction shown in the illustration.
- To return it to the original position, reverse the steps above.
CAUTION
- Do not sit on or place anything on the tumbled seatback while driving.
- Make sure the seat is securely locked by pushing forward and rearward on the top of the seatback and by trying to pull up the edge of the bottom cushion. Failure to do so will prevent seat belt from operating properly.
109
COMFORT ADJUSTMENT
Removing third seats
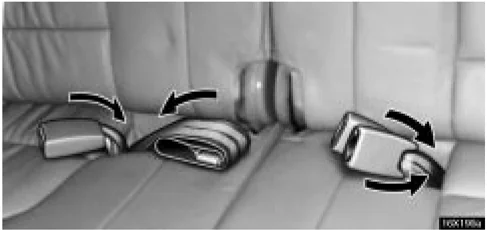
Before removing the third seats, stow the third seat belt and buckles as shown in the illustration.
This prevents the belt and buckles from falling out when you tumble the third seat.
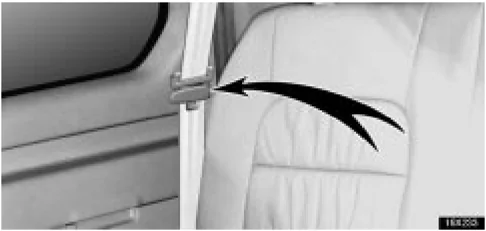
▶Seat belt hanger
For the outer seat belts, use the seat belt hangers to prevent the belts from being tangled.
NOTICE
- The seat belts must be stowed before you tumble the third seat.
110
COMFORT ADJUSTMENT
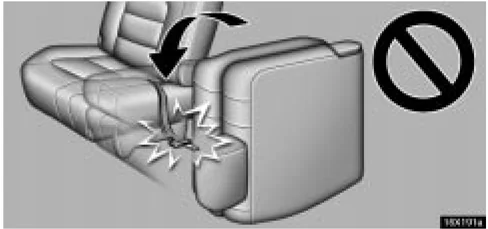
- Make sure to stow the third center seat belt in order not to cause damage on the seat belt by pinching it between the third seat inner leg and seat striker.
- Lower the head restraint to the lowest position. Pull the reclining lever up and fold down the seatback.
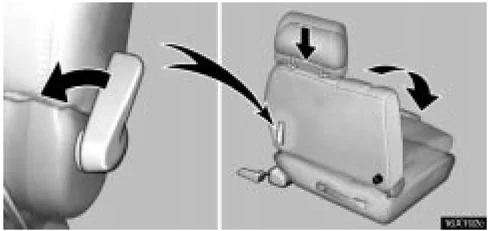
- While turning the lever, lift and slide the whole seat backward.
111
COMFORT ADJUSTMENT
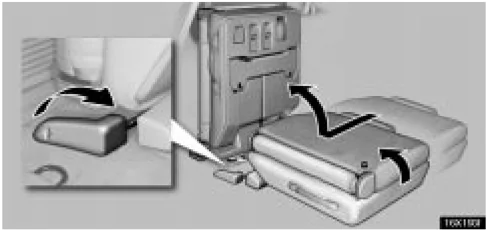
 3. Remove the lever cover and pull the lock release lever. Lift up the rear side of the seat and pull the whole seat backward.
 4. Remove the seat hook covers from the back of the seat cushion and install them onto the seat anchor brackets.
CAUTION Be sure to install the seat hook covers on the seat hooks, or you may get burned when they become hot.
- To reinstall it, reverse the steps above.
CAUTION When removing or reinstalling the seat, observe the following precautions to prevent personal injury:
- Be careful not to get your hands or feet pinched in the seat.
- Be careful not to hit the removed seat against a person or drop it on yourself.
112
COMFORT ADJUSTMENT
CAUTION
To prevent personal injury in a collision or sudden stop;
- You must install the removed seat back in its original position.
- Do not sit on or place anything on the tumbled seatback while driving.
- Do not leave the removed seat loose in the vehicle.
- Do not try to sit on or place anything on the removed seat.
Make sure the seat is securely locked by pushing forward and rearward on the top of the seatback and by trying to pull up the edge of the bottom cushion. Failure to do so will prevent seat belt from operating properly.
NOTICE
Avoid putting heavy loads on the removed seat. The metallic tips of the seat legs may be damaged and the seat cannot be reinstalled.
HEAD RESTRAINTS
Front seat
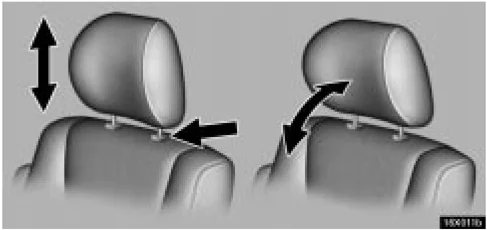
 To raise the head restraint, pull it up. To lower it, press the lock release button and push the head restraint down. To move the head restraint forward or rearward, pull or push on the top.
The head restraint is most effective when it is close to your head. Therefore, using a cushion on the seatback is not recommended.
113
COMFORT ADJUSTMENT
CAUTION
- Adjust the center of the head restraint so that it is closest to the top of your ears.
- After adjusting the head restraint, make sure it is locked in position.
- Do not drive with the head restraints removed.
Second and third seats
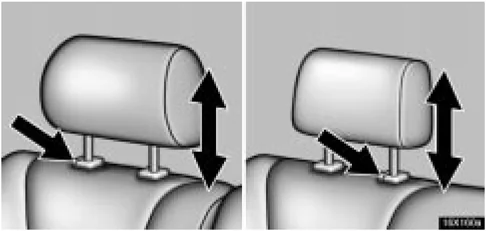
►Second seat ►Third seat
To raise the head restraint, pull it up. To lower it, press the lock release button and push the head restraint down.
The head restraint is most effective when it is close to your head. Therefore, using a cushion on the seatback is not recommended.
CAUTION
- Adjust the center of the head restraint so that it is closest to the top of your ears.
- After adjusting the head restraint, make sure it is locked in position.
- Do not drive with the head restraints removed.
114
COMFORT ADJUSTMENT
ARMREST
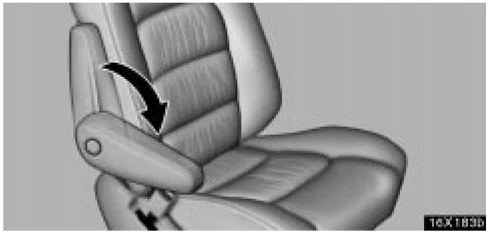
To use the armrest, pull it down as shown above.
NOTICE To prevent damage to the armrest, avoid putting heavy loads on it.
TILT AND TELESCOPIC STEERING WHEEL
Adjustment of steering wheel tilt
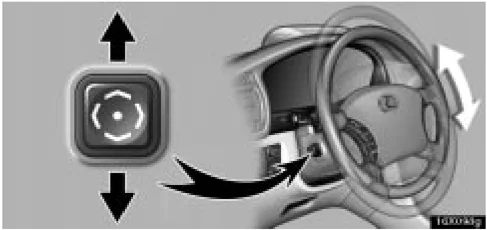
To adjust the tilt of the steering wheel, push the control switch upward or downward to set it to the desired position.
CAUTION Do not adjust the steering wheel while the vehicle is moving. Doing so may cause the driver to mishandle the vehicle and an accident may occur resulting in death or serious injuries.
115

COMFORT ADJUSTMENT
Adjustment of telescopic steering column
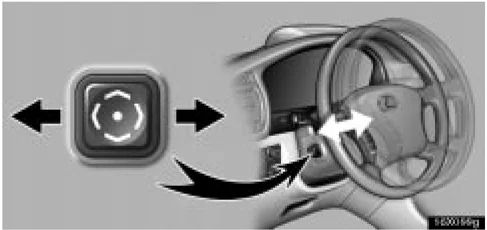
To adjust the steering column length, push the control switch forward or backward to set the steering wheel to the desired position.
CAUTION Do not adjust the steering column while the vehicle is moving. Doing so may cause the driver to mishandle the vehicle and an accident may occur resulting in death or serious injuries.
Auto tilt away*
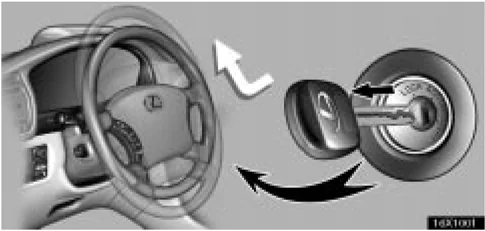
When the ignition key is removed, the steering column moves forward away from the driver and also tilts up for easy exit and entry.
When the key is inserted in the ignition switch, the steering column returns to the previously set position.
NOTE: This feature can be deactivated. Ask your Lexus dealer for details.
116
COMFORT ADJUSTMENT
OUTSIDE REAR VIEW MIRRORS
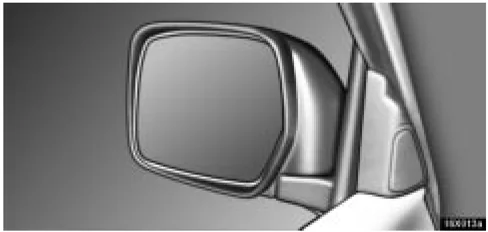
Adjust the mirror so that you can just see the side of your vehicle in the mirror.
Be careful when judging the size or distance of any object seen in the outside rear view mirror on the passenger's side because it is a convex mirror. Any object seen in a convex mirror will look smaller and farther away than if seen in a normal flat mirror.
When the inside rear view mirror darkens in "AUTO" mode, the outside rear view mirrors also darken to reduce the reflection of the headlights of the following vehicle. For details, see "Inside rear view mirror" on page 119.
When you push the outside rear view mirror defogger switch, the heater panels in the outside rear view mirrors will quickly clear the mirror surface. (See "Outside rear view mirror defogger switch" on page 34.)
CAUTION
- Do not adjust the mirror while the vehicle is moving. Doing so may cause the driver to mishandle the vehicle and an accident may occur, resulting in death or serious injuries.
- Since the mirror surfaces can get hot, do not touch them when the outside rear view mirror defogger switch is on.
117
COMFORT ADJUSTMENT
Power rear view mirror control
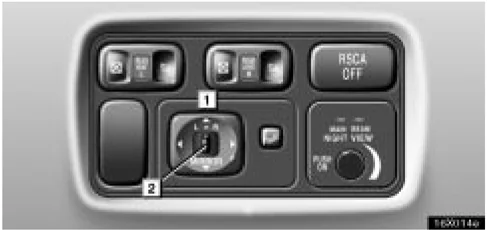
▶ 1 Control switch 2 Master switch
To adjust the power rear view mirror, first place the master switch at "L" (left) or "R" (right), and push the control switch on the desired side.
The power rear view mirrors can be adjusted when the key is in the "ACC" or "ON" position.
When you are backing up, you can adjust the mirrors down quickly by the following operations with the ignition ON.
- Put the selector lever in the "R" position.
- Place the master switch at "L" (left) or "R" (right).
The mirrors return to the previous position by any of the following operations.
- Put the selector lever in a position other than "R".
- Place the master switch in the neutral position.
- Turn the ignition key to the "ACC" position.
NOTICE
If ice should jam the mirror, do not operate the control or scrape the mirror face. Use a spray de-icer to free the mirror.
118
COMFORT ADJUSTMENT
Folding rear view mirrors
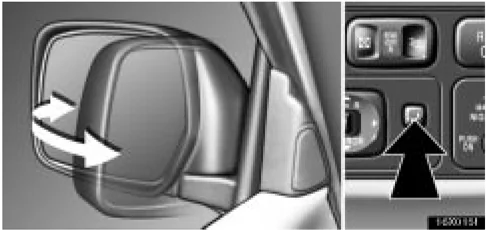
To fold the rear view mirrors, push the switch. To return to their original position, push the switch again.
The rear view mirrors can be folded backward for parking in compact areas.
CAUTION
- To avoid personal injury and any mirror malfunction, do not touch the mirror while it is moving.
- Do not drive with the mirrors folded backward. Both the driver and passenger side rear view mirrors must be extended and properly adjusted before driving.
INSIDE REAR VIEW MIRROR
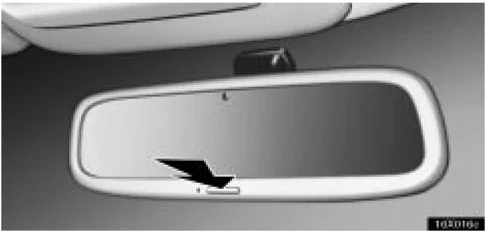
Adjust the mirror so that you can just see the rear of your vehicle in the mirror.
Pushing the switch changes the mode between "AUTO" and "DAY".
The indicator comes on when the "AUTO" mode is selected.
"DAY" mode: The mirror surface is normal.
"AUTO" mode: If the mirror detects light from the headlights of the vehicle behind you, the mirror surface darkens slightly to reduce the reflected light.
When the inside rear view mirror surface changes, the outside rear view mirror surfaces will also become darker.
When the ignition key is inserted and turned on, the inside rear view mirror always turns on in the "AUTO" mode.
119
COMFORT ADJUSTMENT
When the outside air temperature is low, it may take a little longer for the mirror to darken in response to the detection of headlights.
CAUTION
Do not adjust the mirror while the vehicle is moving. Doing so may cause the driver to mishandle the vehicle and an accident may occur resulting in death or serious injuries.

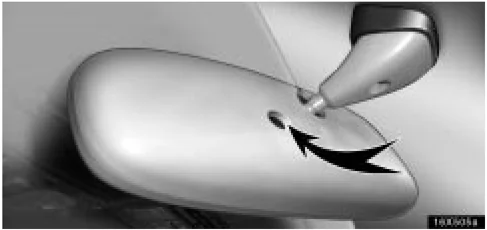
To ensure correct functioning of an anti-glare mirror sensor located on the back side of the mirror, do not touch or cover the sensor with your finger or a piece of cloth, etc.
Compass (Without Navigation system)
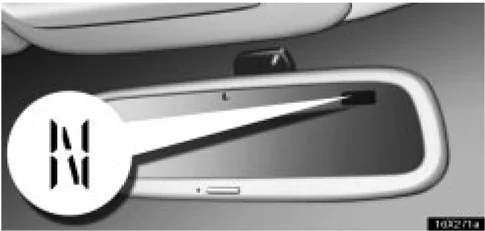
The compass indicates the direction in which the vehicle is heading. The illustration shown above indicates that the vehicle is heading north.
| Displays | Directions |
|---|---|
| N | North |
| NE | Northeast |
| E | East |
| SE | Southeast |
| S | South |
| SW | Southwest |
| W | West |
| NW | Northwest |
120
COMFORT ADJUSTMENT
Pushing the “AUTO” button for longer than 3 seconds turns on or off the compass display.
The compass may not show the correct direction in the following conditions:
- The vehicle is stopped immediately after turning. The compass does not adjust while the vehicle is stopped.
- The ignition switch is turned off immediately after turning.
- The vehicle is on an inclined surface.
- The vehicle is in a place where the earth’s magnetic field is subject to interference by artificial magnetic fields (underground parking, under a steel tower, between buildings, roof parking, near a crossing, near a large vehicle, etc.).
- The vehicle is magnetized. (There is a magnet or a metal object on or near the inside rear view mirror.)
- The battery has been disconnected.
- Any door is open.
The compass works to calibrate the direction automatically while the vehicle in motion, if deviation is small.
For obtaining additional precision or for complete calibrating, see “CALIBRATING THE COMPASS” below.
NOTICE Do not put magnets or a metal object near the inside rear view mirror. Doing this may cause malfunction of the compass sensor.
CALIBRATING THE COMPASS (deviation calibration)
The direction display on the compass deviates from the true direction determined by the earth’s magnetic field. The amount of deviation varies according to the geographic position of the vehicle.
To adjust for this deviation, stop the vehicle and push the button for longer than about 6 seconds until the number (1–15) appears on the display. Then push the button again, referring to the following map to select the number of the zone where the vehicle is.
121
COMFORT ADJUSTMENT
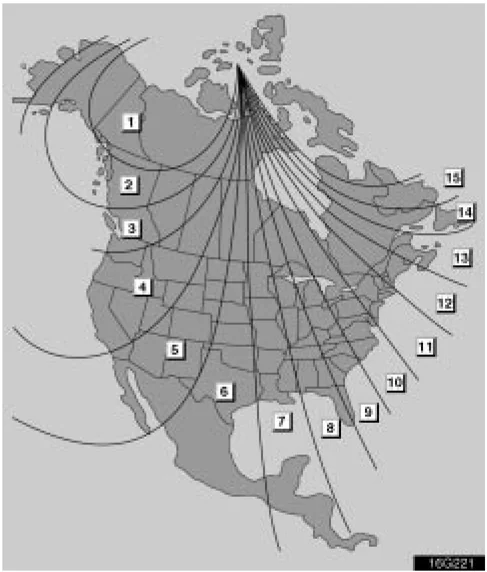
►Zone number If the direction is displayed several seconds after adjustment, the calibration is finished.
122
CAUTION Do not adjust the display while the vehicle is moving. Be sure to adjust the display only when the vehicle is stopped.
CALIBRATING THE COMPASS (circling calibration)
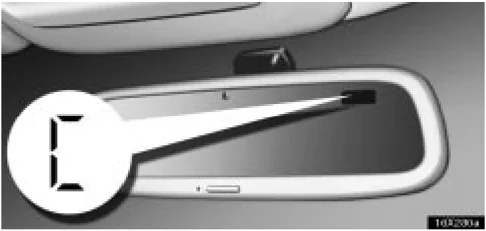
“C” appears on the display in case the circling calibration is required due to a drastic change in the magnetic field. To rectify this, follow the calibration procedure below.
COMFORT ADJUSTMENT
 16X370
Drive the vehicle slowly (at 8 km/h (5 mph) or lower) in a circle until the direction is displayed. If there is not enough space to drive in a circle, drive around the block until the direction is displayed.
After driving in 1 to 3 circles in the above method, calibration is complete with the direction shown on the display.
If calibration cannot be performed because of the magnetized vehicle, etc., take your vehicle to Lexus dealer.
- Do not perform circling calibration of the compass in a place where the earth's magnetic field is subject to interference by artificial magnetic fields (underground parking, under a steel tower, between buildings, roof parking, near a crossing, near a large vehicle, etc.).
- During calibration, do not operate electric systems (moon roof, power windows, etc.) as they may interfere with the calibration.
CAUTION
- When doing the circling calibration, be sure to secure a wide space, and watch out for people and vehicles in the neighborhood. Do not violate any local traffic rules while performing circling calibration.
- Do not adjust the display while the vehicle is moving. Be sure to adjust the display only when the vehicle is stopped.
123
COMFORT ADJUSTMENT
SEAT BELTS
Seat belt precautions
Lexus strongly urges that the driver and passengers in the vehicle be properly restrained at all times with the seat belts provided. Failure to do so could increase the chance of injury and/or the severity of injury in accidents.
The seat belts provided for your vehicle are designed for people of adult size, large enough to properly wear them.
Child. Use a child restraint system appropriate for the child until the child becomes large enough to properly wear the vehicle's seat belts. See "Child restraint" on page 155 for details.
If a child is too large for a child restraint system, the child should sit in the rear seat and must be restrained using the vehicle's seat belt. According to accident statistics, the child is safer when properly restrained in the rear seat than in the front seat.
If a child must sit in the front seat, the seat belts should be worn properly. Do not let the child sit on your lap. It does not provide sufficient restraint. If an accident occurs and the seat belts are not worn properly, the force of the rapid inflation of the airbag may cause severe injury to the child.
Do not allow the child to stand up or kneel on either rear or front seats. An unrestrained child could suffer serious injury or death during emergency braking or a collision.
Pregnant woman. Lexus recommends the use of a seat belt. Ask your doctor for specific recommendations. The lap belt should be worn securely and as low as possible over the hips and not on the waist.
Injured person. Lexus recommends the use of a seat belt. Depending on the injury, first check with your doctor for specific recommendations.
CAUTION Persons should ride in their seats properly wearing their seat belts whenever the vehicle is moving. Otherwise, they are much more likely to suffer serious bodily injury or death in the event of sudden braking or a collision.
When using the seat belts, observe the following:
- Use the belt for only one person at a time. Do not use a single belt for two or more people – even children.
- Avoid reclining the seatbacks too much. The seat belts provide maximum protection when the seatbacks are in the upright position. (See "Adjusting seatback angle" on page 99.)
- Be careful not to damage the belt webbing or hardware. Take care that they do not get caught or pinched in the seat or doors.
- Inspect the belt system periodically. Check for cuts, fraying, and loose parts. Damaged parts should be replaced. Do not disassemble or modify the system.
- Keep the belts clean and dry. If they need cleaning, use a mild soap solution or lukewarm water. Never use bleach, dye, or abrasive cleaners – they may severely weaken the belts. (See "Cleaning the interior" on page 395 for instructions.)
124