4 Display screen, heater, air conditioner and audio systems
-
Safety note ........ 4-2
-
Control panel buttons — with navigation system ........ 4-2
-
Names of the components ........ 4-2
-
How to use joystick and “ENTER” button ........ 4-3
-
How to use “BACK” button ........ 4-3
-
Setting up the start-up screen ........ 4-3
-
How to use “INFO” button ........ 4-3
-
How to use “SETTING” button ........ 4-5
-
How to use the “☀/☾” button ........ 4-8
-
Ventilators ........ 4-8
-
Center ventilators ........ 4-8
-
Side ventilators ........ 4-8
-
Heater and air conditioner (Automatic) ........ 4-9
-
Automatic operation ........ 4-10
-
Manual operation ........ 4-10
-
Operating tips ........ 4-11
-
Servicing air conditioner ........ 4-12
-
Audio system ........ 4-12
-
Radio ........ 4-12
-
FM radio reception ........ 4-13
-
AM radio reception ........ 4-13 Satellite (SAT) radio reception
-
(if so equipped) ........ 4-13
-
Audio operation precautions ........ 4-13
-
FM-AM radio with compact disc (CD) player ........ 4-19 FM-AM-SAT radio with compact disc (CD)
-
changer ........ 4-23
-
CD care and cleaning ........ 4-29 Steering wheel switch for audio control (if so
-
equipped) ........ 4-29
-
Antenna ........ 4-30
-
Car phone or CB radio ........ 4-30
SAFETY NOTE
WARNING
- Positioning of the heating or air conditioning controls and display controls should not be done while driving, in order that full attention may be given to driving operation.
- Do not disassemble or modify this system. If you do, it may result in accidents, fire, or electric shock.
- Do not use this system if you notice any abnormality, such as a frozen screen or lack of sound. Continued use of the system may result in accident, fire or electric shock.
- In case you notice any foreign object in the system hardware, spill liquid on it, or notice smoke or smell coming from it, stop using the system immediately and contact a NISSAN dealer. Ignoring such conditions may lead to accidents, fire, or electric shock.
CONTROL PANEL BUTTONS — WITH NAVIGATION SYSTEM

When you use this system, make sure the engine is running.
If you use the system with the engine not running (ignition ON or ACC) for a long time, it will use up all the battery power, and the engine will not start.
Reference symbols:
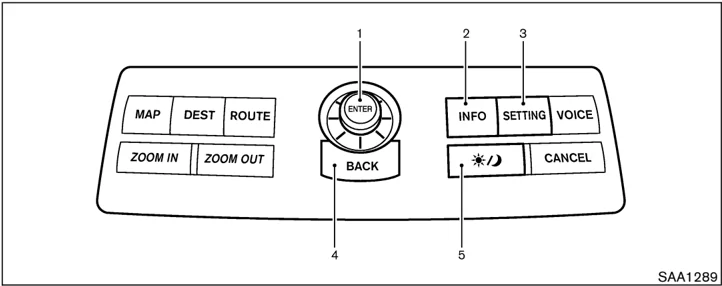
“ENTER” button This is a button on the control panel.
“Display” key This is a select key on the screen. By selecting this key you can proceed to the next function.
NAMES OF THE COMPONENTS
- JOYSTICK and “ENTER” button
- “INFO” button
- “SETTING” button
- “BACK” button
- “☀/☾” brightness control button
For Navigation System control buttons (other than above), refer to the separate Navigation System Owner’s Manual.
4-2 Display screen, heater, air conditioner and audio systems
HOW TO USE JOYSTICK AND “ENTER” BUTTON
Choose an item on the display using the joystick and push the ENTER button for operation.
HOW TO USE “BACK” BUTTON
This button has two functions.
To return to the previous screen:
When this button is pushed during setup, setup will be canceled, and the screen will return to the previous screen.
To finish the set-up:
When this button is pushed after setup is com- pleted, the settings will be renewed as directed, and the screen will return to the map.
INFO:
When the “BACK” button must be pushed, (for example, after the setup is finished) instructions are given in the operation procedure of each section in this manual. If the “BACK” button is pushed when not finished with the setup, the setting will be canceled, and the screen will return to the previous screen.
SETTING UP THE START-UP SCREEN
When you turn the ignition key to the ACC position, the SYSTEM START-UP warning is displayed on the screen. Read the warning and select the “OK” key then push the “ENTER” button.
If you do not push the ENTER button, this system will not proceed to the next step display.
To proceed to the next step, refer to the separate Navigation System Owner’s Manual.
SAA1290
HOW TO USE “INFO” BUTTON
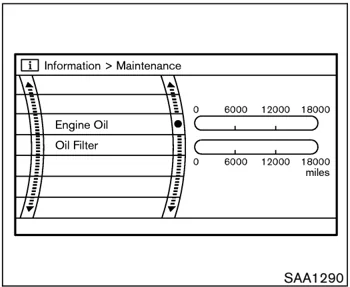
When the “INFO” button is pushed, the “Main- tenance” screen will be displayed.
Maintenance information
To set the maintenance interval for the Engine Oil or Oil Filter, choose an item using the joystick and push the “ENTER” button.
You can also set to display a message to remind you that the maintenance needs to be per- formed.
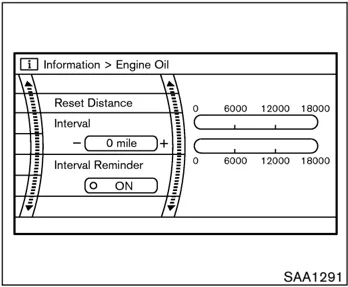
The following example shows how to set the engine oil change interval. Use the same steps
Display screen, heater, air conditioner and audio systems 4-3
to set the other maintenance information.
SAA1291
“Maintenance” display cannot be operated when the vehicle is moving. Stop the vehicle in a safe place to see the information.
- Reset the driving distance to the new maintenance schedule.
- Set the interval (mileage) of the maintenance schedule. To determine the recommended maintenance interval, refer to your “NISSAN Service and Maintenance Guide”.
- To display the MAINTENANCE INFORMATION automatically when the set trip distance is reached, highlight the “Interval Reminder” key with the joystick and push the “ENTER” button.
- To return the display to the “Maintenance” screen, push the “BACK” button.
4 -4 Display screen, heater, air conditioner and audio systems
 SAA1332
Maintenance notice
The “Maintenance Notice” screen (“ENGINE OIL” or “OIL FILTER”) will be automatically displayed as shown when both of the following conditions are met:
- the vehicle is driven the set distance and the ignition switch is turned OFF.
- the ignition switch is turned ON the next time the vehicle will be driven.
To return to the previous display after the “Maintenance Notice” screen is displayed, push the “BACK” button.
 Engine Oil ①/Oil Filter ②
SAA1292
The “Maintenance Notice” screen displays each time the ignition switch is turned ON until one of the following conditions are met:
- “Reset Distance” is selected.
- “Interval Reminder” is set OFF.
- the maintenance interval is set again.
 SAA1293
*: Refer to the separate Navigation System Owner’s Manual.
HOW TO USE “SETTING” BUTTON
The “Settings” screen will appear when the “SETTING” button is pushed.
Display screen, heater, air conditioner and audio systems 4-5
and turn on the “ON” indicator.
Brightness/Contrast/Background Color:
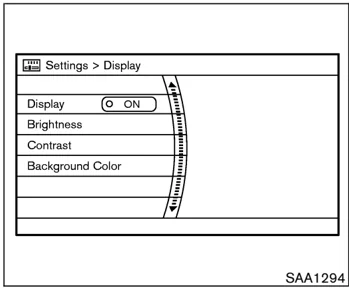
To adjust the brightness and contrast of the screen, select the “Brightness” or “Contrast” key and push the “ENTER” button. Then you can adjust the brightness to darker or brighter and the contrast to lower or higher using the joystick.
For information on the “Background Color” key, refer to the separate Navigation System Owner’s Manual.
SAA1294
Display settings
The following menu will appear when pushing the “SETTING” button, selecting “Display” key and pushing the “ENTER” button.
Display:
To turn off the screen, select the “Display” key and push the “ENTER” button to turn off the “ON” indicator. When any mode button is pushed with the screen off, the screen turns on for further operation. The screen will turn off automatically 5 seconds after the operation is finished on the map display.
To turn on the screen, select the “Display” key
4-6 Display screen, heater, air conditioner and audio systems
SAA1091
Clock settings
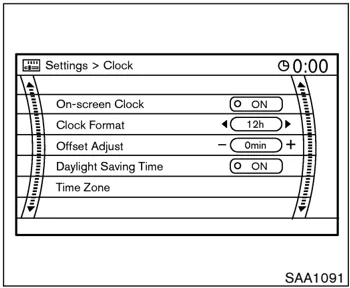
The following display will appear when pushing the “SETTING” button, selecting the “Clock” key and pushing the “ENTER” button.
On-screen Clock:
When this item is turned to ON, a clock is always displayed in the upper right corner of the screen.
This clock will indicate the time almost exactly because it is always adjusted by the GPS system.
Clock Format: Choose either the 12-hour clock display or the 24-hour clock display.
Offset Adjust: Adjust the time by increasing or decreasing per minute.
Daylight Saving Time: Turn this item to ON for daylight saving time application.
Time Zone: Choose the time zone from the following
- Pacific
- Mountain
- Central
- Eastern
- Atlantic
- Newfoundland
 SAA1295
Language/Units settings
The Language/Units settings screen will appear when selecting the “Language/Units” key and pushing the “ENTER” button.
 SAA1296
Display of Select Language Select the “Select Language” or “Select Units” key and push the “ENTER” button.
Language: “English” or “Français”
Unit: “US” — Mile, °F, MPG “Metric” — km, °C, L/100 km
Select the “ON” key of the desired language or units and push the “ENTER” button.
Display screen, heater, air conditioner and audio systems 4-7
VENTILATORS
HOW TO USE THE “☀/☾” BUTTON
To change the display brightness, push the “☀/☾” (DAY/NIGHT) button. Pushing the button again will change the display to DAY or NIGHT display. Then, adjust the brightness moving the joystick right or left.
If no operation is done within 10 seconds, or if the “BACK” button is pushed, the display will return to the previous display.
SAA0600
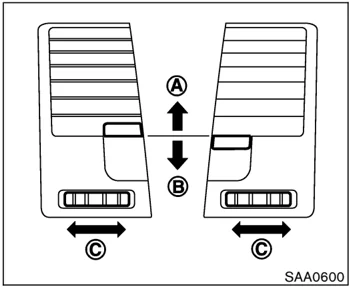
CENTER VENTILATORS
Adjust the air flow direction of ventilators.
Moving the lever up or down will open Ⓐ or close Ⓑ the vents.
To change the air flow direction, turn the dial Ⓒ.
SAA0601
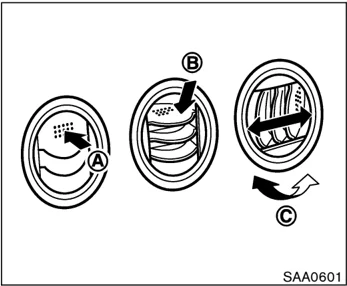
SIDE VENTILATORS
Adjust the air flow direction of ventilators by Ⓐ opening, Ⓑ closing or Ⓒ rotating as illustrated.
4-8 Display screen, heater, air conditioner and audio systems
HEATER AND AIR CONDITIONER
(Automatic)
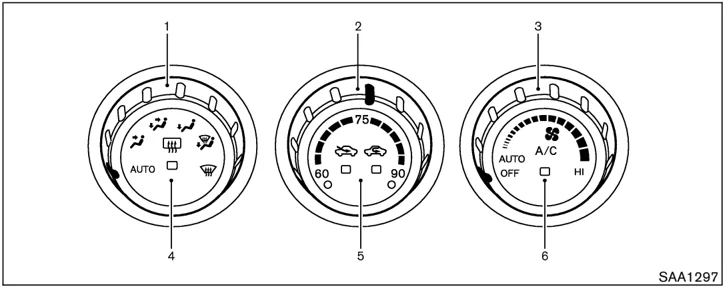
- Air flow control dial
- Temperature control dial*
- The display of degrees: "60-75-90" is used for °F (US). "18-25-32" is used for °C (Canada).
- Fan speed control dial
- Rear window defroster button (See the "2. Instruments and controls" section.)
- Air intake button (Air recirculation and Fresh air)
- A/C (air conditioner) button
WARNING
- The air conditioner cooling function operates only when the engine is running.
- On hot, sunny days, temperatures in a closed vehicle could quickly become high enough to cause severe or possibly fatal injuries to people or animals. Do not leave children or adults who would normally require the assistance of others in your vehicle. Unattended pets should also not be left alone.
- Do not use the recirculation mode for long periods as it may cause the interior air to become stale and the windows to fog up.
- Positioning of the heater or air conditioner controls should not be done while driving, so full attention may be given to vehicle operation.
Start the engine and operate the controls to activate the air conditioner.
NOTE: In your vehicle, the air conditioner system is designed to automatically activate the cooling function when operating the air flow control dial, the fan speed control dial or the air intake button. (The indicator light on the A/C button will illuminate.) Push the A/C button off when the cooling function is not necessary.
Display screen, heater, air conditioner and audio systems 4-9
AUTOMATIC OPERATION
Cooling and/or dehumidified heating (AUTO)
This mode may be normally used all year round as the system automatically works to keep a constant temperature. Air flow distribution and fan speed are also controlled automatically.
- Turn the fan speed control dial and air flow control dial to the AUTO position. The air conditioner will automatically turn on. (The A/C button indicator light illuminates.)
- Turn the temperature control dial to set the desired temperature.
- Adjust the temperature to about 75°F (24°C) for normal operation.
- The temperature of the passenger compartment will be maintained automatically. Air flow distribution and fan speed are also controlled automatically.
Heating (AUTO; A/C off)
The air conditioner does not activate. When you need to heat only, use this mode.
- Turn the fan speed control dial and air flow control dial to the AUTO position. (The air conditioner will turn on.)
- Push the A/C button to turn off the air conditioner. (The A/C button indicator light will turn off.)
- Turn the temperature control dial to set the desired temperature.
- The temperature of the passenger compartment will be maintained automatically. Air flow distribution and fan speed are also controlled automatically.
- Do not set the temperature lower than the outside air temperature. Otherwise the system may not work properly.
- Not recommended if windows fog up.
Dehumidified defrosting or defogging
- Turn the fan speed control dial to the desired position.
- Turn the air flow control dial to the DEF position.
- Turn the temperature control dial to set the desired temperature.
- To quickly remove ice from the outside of the windows, turn the fan speed control dial to the maximum position.
- As soon as possible after the windshield is clean, turn the air flow control dial to the AUTO position to return to the auto mode.
- When the air flow control dial is turned to the or position, the air conditioner will automatically be turned on at outside temperatures above 23°F (-5°C) to defog the windshield, and the air recirculation mode will automatically be turned off.
Outside air is drawn into the passenger compartment to improve the defogging performance.
MANUAL OPERATION
Fan speed control
Turn the fan speed control dial to manually control the fan speed.
Turn the dial to the AUTO position to return to automatic control of the fan speed.
Air recirculation/Fresh air
Each time the air intake button is pushed, the indicator light on the button will alternate (Air recirculation) and (Fresh air).
When the indicator light is on, the interior air is recirculated. (When the air recirculation mode is selected with the A/C indicator off while the fan speed control dial is in the AUTO position, the air conditioner will turn on.)
When the indicator light is on, the outside air is drawn into the passenger compartment.
4-10 Display screen, heater, air conditioner and audio systems
- When the air intake button is pushed for longer than 1.5 seconds, both indicator lights ( and ) will flash twice, and then the intake air will be controlled automatically. During this AUTO mode, the indicator light of the currently selected mode illuminates.
- When the air flow control dial is in the or position, the air recirculation mode does not activate.
Air flow control
Turning the air flow control dial selects the air outlet to:
: Air flows from center and side ventilators.
: Air flows from center and side ventilators and foot outlets.
: Air flows mainly from foot outlets.
: Air flows from defroster and foot outlets.
: Air flows mainly from defroster outlets.
To turn the system off
Turn the fan speed control dial to the OFF position.
OPERATING TIPS
When the engine coolant temperature and outside air temperature are low, the air flow from the foot outlets may not operate for a maximum of 150 seconds. However, this is not a malfunction. After the coolant temperature warms up, the air flow from the foot outlets will operate normally.
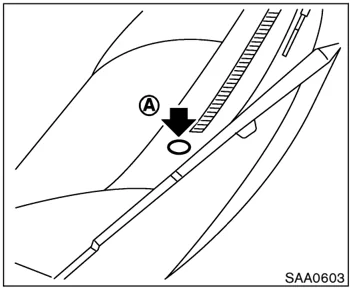
Sensor A on the instrument panel helps maintain a constant temperature; do not put anything on or around this sensor.
Display screen, heater, air conditioner and audio systems 4-11
SERVICING AIR CONDITIONER
The air conditioning system in your NISSAN vehicle is charged with a refrigerant designed with the environment in mind. This refrigerant will not harm the earth's ozone layer. However, special charging equipment and lubricant are required when servicing your NISSAN air conditioner. Using improper refrigerants or lubricants will cause severe damage to your air conditioning system. See "Capacities and recommended fuel/lubricants" in the "9. Technical and consumer information" section for air conditioning system refrigerant and lubricant recommendations.
A NISSAN dealer will be able to service your environmentally friendly air conditioning system.
⚠ WARNING
The air conditioner system contains refrigerant under high pressure. To avoid personal injury, any air conditioner service should be done only by an experienced technician with proper equipment.
AUDIO SYSTEM
RADIO
Turn the ignition key to ACC or ON and press the POWER, FM or AM button to turn on the radio. If you listen to the radio with the engine not running, the key should be turned to the ACC position.
Radio reception is affected by station signal strength, distance from radio transmitter, buildings, bridges, mountains and other external influences. Intermittent changes in reception quality normally are caused by these external influences.
Using a cellular phone in or near the vehicle may influence radio reception quality.
Radio reception
Your radio system is equipped with state-of-the-art electronic circuits to enhance radio reception. These circuits are designed to extend reception range, and to enhance the quality of that reception.
However there are some general characteristics of FM, AM and SAT (satellite — if so equipped) radio signals that can affect radio reception quality in a moving vehicle, even when the finest equipment is used. These characteristics are completely normal in a given reception area, and do not indicate any malfunction in your radio system.
Remember that a moving vehicle is not the ideal place to listen to a radio. Because of the movement, reception conditions will constantly change. Buildings, terrain, signal distance and interference from other vehicles can work against ideal reception. Described below are some of the factors that can affect your radio reception.
4-12 Display screen, heater, air conditioner and audio systems
MAXIMUM SIGNAL DISTANCES
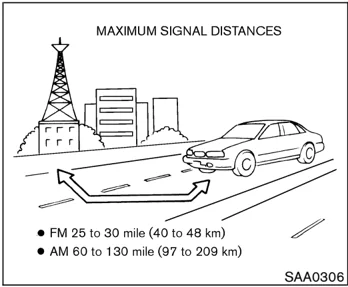
● FM 25 to 30 mile (40 to 48 km) ● AM 60 to 130 mile (97 to 209 km)
SAA0306
FM RADIO RECEPTION
Range: FM range is normally limited to 25 to 30 miles (40 to 48 km), with monaural (single channel) FM having slightly more range than stereo FM. External influences may sometimes interfere with FM station reception even if the FM station is within 25 miles (40 km). The strength of the FM signal is directly related to the distance between the transmitter and receiver. FM signals follow a line-of-sight path, exhibiting many of the same characteristics as light. For example they will reflect off objects.
Fade and drift: As your vehicle moves away from a station transmitter, the signals will tend to fade and/or drift.
Static and flutter: During signal interference from buildings, large hills or due to antenna position, usually in conjunction with increased distance from the station transmitter, static or flutter can be heard. This can be reduced by adjusting the treble control counterclockwise to reduce treble response.
Multipath reception: Because of the reflective characteristics of FM signals, direct and reflected signals reach the receiver at the same time. The signals may cancel each other, resulting in momentary flutter or loss of sound.
AM RADIO RECEPTION
AM signals, because of their low frequency, can bend around objects and skip along the ground. In addition, the signals can be bounced off the ionosphere and bent back to earth. Because of these characteristics, AM signals are also subject to interference as they travel from transmitter to receiver.
Fading: Occurs while the vehicle is passing through freeway underpasses or in areas with many tall buildings. It can also occur for several seconds during ionospheric turbulence even in areas where no obstacles exist.
Static: Caused by thunderstorms, electrical power lines, electric signs and even traffic lights.
SATELLITE (SAT) RADIO RECEPTION (if so equipped)
When the satellite radio is first installed or the battery has been replaced, the satellite radio may not work properly. This is not a malfunction. Wait more than 10 minutes with the satellite radio ON for the satellite radio to receive all of the necessary data.
No satellite radio reception is available when the SAT band option is selected unless optional satellite receiver and antenna are installed, and an XM® or SIRIUS™ satellite radio service subscription is active.
Satellite radio performance may be affected if cargo carried on the roof blocks the satellite radio signal.
If possible, do not put cargo over the satellite antenna.
Satellite radio is not available in Alaska and Hawaii.
AUDIO OPERATION PRECAUTIONS
Compact Disc (CD) player
- During cold weather or rainy days, the player may malfunction due to the humidity. If this occurs, remove the CD and
Display screen, heater, air conditioner and audio systems 4-13
dehumidify or ventilate the player completely.
- The player may skip while driving on rough roads.
- The CD player sometimes cannot function when the passenger compartment temperature is extremely high. Decrease the temperature before use.
SAA0480
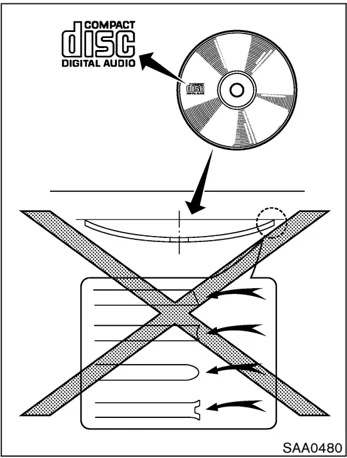
- Only use high quality 4.7 inches (12 cm) round discs that have the “COMPACT disc DIGITAL AUDIO” logo on the disc or packaging.
- Do not expose the CD to direct sunlight.
- CDs that are of poor quality, dirty, scratched, covered with fingerprints, or that have pin holes may not work properly.
- The following CDs may not work properly:
- Copy control compact discs (CCCD)
- Recordable compact discs (CD-R)
- Rewritable compact discs (CD-RW)
- Do not use the following CDs as they may cause the CD player to malfunction.
- 3.1 in (8 cm) discs
- CDs that are not round
- CDs with a paper label
- CDs that are warped, scratched, or have abnormal edges
- This audio system can only play prerecorded CDs. CDs with MP3 or WMA format cannot be written in this audio system.
- If the CD cannot be played, one of the following messages will be displayed.
4-14 Display screen, heater, air conditioner and audio systems
CHECK DISC:
- Confirm that the CD is inserted correctly (the label side is facing up, etc.).
- Confirm that the CD is not bent or warped and it is free of scratches.
PUSH EJECT:
This is a malfunction due to excessive temperature inside the player. Remove the CD by pushing the EJECT button. After a short time, reinsert the CD. The CD can be played when the temperature of the player returns to normal.
UNPLAYABLE:
The file is unplayable in this audio system (only MP3 or WMA CD in the audio system with a CD changer).
Compact Disc (CD) with MP3 or WMA (for the audio system with a 6CD changer)
Explanation of terms:
-
MP3 — MP3 is short for Moving Pictures Experts Group Audio Layer 3. MP3 is the most well-known compressed digital audio file format. This format allows for near “CD quality” sound, but at a fraction of the size of normal audio files. MP3 conversion of an audio track from CD-ROM can reduce the file size by approximately 10:1 ratio (Sampling: 44.1 kHz, Bit rate: 128 kbps) with virtually no perceptible loss in quality. MP3 compression removes the redundant and irrelevant parts of a sound signal that the human ear doesn’t hear.
-
WMA — Windows Media Audio (WMA) is a compressed audio format created by Microsoft as an alternative to MP3. The WMA codec offers greater file compression than the MP3 codec, enabling storage of more digital audio tracks in the same amount of space when compared to MP3s at the same level of quality.
-
Bit rate — Bit rate denotes the number of bits per second used by a digital music file. The size and quality of a compressed digital audio file is determined by the bit rate used when encoding the file.
-
Sampling frequency — Sampling frequency is the rate at which the samples of a signal are converted from analog to digital (A/D conversion) per second.
-
Multisession — Multisession is one of the methods for writing data to media. Writing data once to the media is called a single session, and writing more than once is called a multisession.
-
ID3/WMA Tag — The ID3/WMA tag is the part of the encoded MP3 or WMA file that contains information about the digital music file such as song title, artist, album title, encoding bit rate, track time duration, etc. ID3 tag information is displayed on the Album/Artist/Track title line on the display.
-
Windows® and Windows Media® are either registered trademarks and trademarks of Microsoft Corporation in the United States and/or other countries.
Display screen, heater, air conditioner and audio systems 4-15
10% 20% 30% 40% 50% 60% 70% 80% 90%
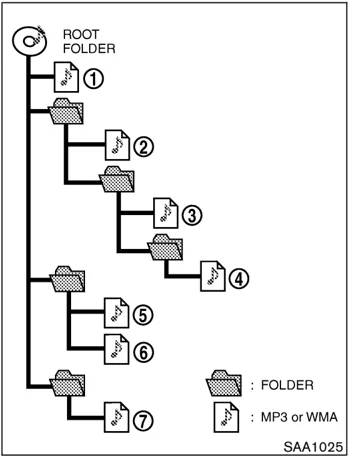
- If there is a file in the top level of the disc, “ROOT” is displayed.
- The playback order is the order in which the files were written by the writing software. Therefore, the files might not play in the desired order.
Playback order:
Playback order of the CD with compressed files (MP3/WMA) is as illustrated above.
- The names of folders not containing MP3/WMA files are not shown in the display.
4-16 Display screen, heater, air conditioner and audio systems
!
Specification chart:
| Supported media | CD, CD-R, CD-RW | ||
|---|---|---|---|
| Supported file systems | ISO9660 LEVEL1, ISO9660 LEVEL2, Romeo, Joliet* ISO9660 Level 3 (packet writing) is not supported. | ||
| Supported versions*1 | MP3 | Version | MPEG1, MPEG2, MPEG2.5 |
| Sampling frequency | 8 kHz - 48 kHz | ||
| Bit rate | 8 kbps - 320 kbps, VBR | ||
| WMA | Version | WMA7, WMA8, WMA9 | |
| Sampling frequency | 32 kHz - 48 kHz | ||
| Bit rate | 48 kbps - 192 kbps, VBR | ||
| Tag information (Song title and Artist name) | ID3 tag VER1.0, VER1.1, VER2.2, VER2.3 (MP3 only) | ||
| Folder levels | Folder levels: 8, Folders: 255 (including root folder),Files: 512 (Max. 255 files for one folder) | ||
| Text character number limitation | 128 characters | ||
| Displayable character codes*2 | 01: ASCII, 02: ISO-8859-1, 03: UNICODE(UTF-16 BOM Big Endian), 04: UNICODE (UTF-16 Non-BOM Big Endian), 05: UNICODE (UTF-8), 06: UNICODE (Non-UTF-16 BOM Little Endian) |
*1 Files created with a combination of 48 kHz sampling frequency and 64 kbps bit rate cannot be played.
*2 Available codes depend on what kind of media, versions and information are going to be displayed.
Display screen, heater, air conditioner and audio systems 4-17
Troubleshooting guide:
| Symptom | Cause and Countermeasure |
|---|---|
| Cannot play | Check if the disc was inserted correctly. |
| Check if the disc is scratched or dirty. | |
| Check if there is condensation inside the player. If there is, wait until the condensation is gone (about 1 hour) before using the player. | |
| If there is a temperature increase error, the CD player will play correctly after it returns to the normal temperature. | |
| If there is a mixture of music CD files (CD-DA data) and MP3/WMA files on a CD, only the music CD files (CD-DA data) will be played. | |
| Files with extensions other than “.MP3”, “.WMA”, “.mp3” or “.wma” cannot be played. In addition, the character codes and number of characters for folder names and file names should be in compliance with the specifications. | |
| Check if the disc or the file is generated in an irregular format. This may occur depending on the variation or the setting of MP3/WMA writing applications or other text editing applications. | |
| Check if the finalization process, such as session close and disc close, is done for the disc. | |
| Check if the disc is protected by copyright. | |
| Poor sound quality | Check if the disc is scratched or dirty. |
| Bit rate may be too low. | |
| It takes a relatively long time before the music starts playing. | If there are many folder or file levels on the MP3/WMA disc, or if it is a multisession disc, some time may be required before the music starts playing. |
| Music cuts off or skips | The writing software and hardware combination might not match, or the writing speed, writing depth, writing width, etc., might not match the specifications. Try using the slowest writing speed. |
| Skipping with high bit rate files | Skipping may occur with large quantities of data, such as for high bit rate data. |
| Move immediately to the next song when playing. | When a non-MP3/WMA file has been given an extension of “.MP3”, “.WMA”, “.mp3” or “.wma”, or when play is prohibited by copyright protection, there will be approximately 5 seconds of no sound and then the player will skip to the next song. |
| The songs do not play back in the desired order. | The playback order is the order in which the files were written by the writing software. Therefore, the files might not play in the desired order. |
4-18 Display screen, heater, air conditioner and audio systems
 SAA1298
FM-AM RADIO WITH COMPACT DISC (CD) PLAYER
- MUTE button
- SEEK/APS REW, APS FF/TRACK CHANGE button
- DISP (Display) CHANGE button
- SCAN tuning button
- CD play button
- RADIO (FM/AM) band select button
- MIX play button
- RPT (Repeat) play button
- CD EJECT button
- TUNE/FF-REW button
- ON-OFF/VOL (Volume) control knob
- Audio/Clock display
- Station and preset select button
- AUDIO button
Audio main operation
ON-OFF/Volume control:
Turn the ignition key to ACC or ON, and then push the ON-OFF/VOL (Volume) control knob while the system is off to call up the mode (radio or CD) which was playing immediately before the system was turned off. When no CD is loaded, the radio will come on. While the system is on, pushing the ON-OFF/VOL control knob turns the system off.
Turn the ON-OFF/VOL control knob to adjust the volume.
AUDIO button (BASS, TREBLE, FADER, BALANCE):
Press the AUDIO button to change the selecting mode as follows.
BASS → TREBLE → FADE → BALANCE
To adjust Bass, Treble, Fader and Balance, push
Display screen, heater, air conditioner and audio systems 4-19
the AUDIO button until the desired mode (BASS, TREBLE, FADER or BALANCE) appears in the display. Push the TUNE ( , ) or SEEK ( , ) button to adjust Bass and Treble to the desired level. Use the TUNE or SEEK button also to adjust Fader or Balance modes. Fader adjusts the sound level between the front and rear speakers and Balance adjusts the sound between the right and left speakers.
After 10 seconds, the radio or CD display reappears. Once the sound quality is set to the desired level, push the AUDIO button repeatedly until the radio or CD display appears.
MUTE MUTE button: Push the MUTE button to mute the audio sound. Push the MUTE button again to release the mute.
DISP DISPLAY CHANGE: Push the DISP button for more than 1.5 seconds to adjust the digital clock display. See "Clock" in the "2. Instruments and controls" section for the clock adjustment operation.
When the DISP button is pushed for less than 1.5 seconds while the compact disc is being played, the display will show the CD play time.
FM-AM radio operation RADIO RADIO (FM/AM) band select: Pushing the RADIO band select button will change the band as follows: AM → FM1 → FM2 → AM
When RADIO band select button is pushed while the ignition switch is in the ACC or ON, the radio will come on at the station last played.
The last station played will also come on when the power knob is turned to ON.
If a compact disc is playing when the RADIO band select button is pushed, the compact disc will automatically be turned off and the last radio station played will come on.
The FM stereo indicator ST will glow during FM stereo reception. When the stereo broadcast signal is weak, the radio will automatically change from stereo to monaural reception.
( ) ( ) TUNE (Tuning):
 WARNING
The radio should not be tuned while driving so full attention may be given to vehicle operation.
Push the TUNE button or for manual tuning. To move quickly through the channels, push and hold either side of the TUNE button down for more than 0.5 seconds.
( ) ( ) SEEK tuning: Push the SEEK button or to tune from high to low or low to high frequencies and stops at the next broadcasting station.
SCAN SCAN tuning: Push the SCAN tuning button to tune from low to high frequencies and stops at each broadcasting station for 5 seconds. Pushing the button again during this 5 second period will stop SCAN tuning and the radio will remain tuned to that station.
If the SCAN tuning button is not pushed within 5 seconds, SCAN tuning moves to the next station.
Station memory operations: Twelve stations can be set for the FM band (six for FM1, six for FM2) and six stations can be set for the AM band.
4-20 Display screen, heater, air conditioner and audio systems
- Tune to the desired station using the SEEK, SCAN or TUNE button.
- Select the desired station and keep pushing any of the desired station select buttons (1 to 6) until a beep sound is heard. (The radio mutes when the select button is pushed.)
- The channel indicator will then come on and the sound will resume. Memorizing is now complete.
- Other buttons can be set in the same manner.
If the battery cable is disconnected, or if the fuse blows, the radio memory will be erased. In that case, reset the desired stations.
Compact disc (CD) player operation
Turn the ignition key to the ACC or ON position and insert the compact disc into the slot with the label side facing up. The compact disc will be guided automatically into the slot and start playing.
After loading the disc, the number of tracks on the disc will appear on the display.
If the radio is already operating, it will automatically turn off and the compact disc will play.
CAUTION
Do not force the compact disc into the slot. This could damage the player.
If the system has been turned off while the compact disc was playing, pushing the ON-OFF/VOL control knob will start the compact disc.
3.1 in (8 cm) diameter compact discs can also be used without an adapter.
CD CD PLAY:
When the CD (CD play) button is pushed with the system off and the compact disc loaded, the system will turn on and the compact disc will start to play.
When the CD button is pushed with the compact disc loaded but the radio playing, the radio will automatically be turned off and the compact disc will start to play.
DISP CD PLAY TIME:
Push the DISP button for less than 1.5 seconds while the compact disc is being played to show the play time on the display.
FF (Fast Forward), REW (Rewind):
When the (fast forward) or (rewind) button is pushed while the compact disc is being played, the compact disc will play while fast forwarding or rewinding. When the button is released, the compact disc will return to normal play speed.
APS (Automatic Program Search) FF, APS REW/ TRACK CHANGE:
When the (APS FF) button is pushed while the compact disc is being played, the program next to the present one will start to play from its beginning. Push several times to skip through programs. The compact disc will advance the number of times the button is pushed. (When the last program on the compact disc is skipped through, the first program will be played.) When the (APS REW) button is pushed, the program being played returns to its beginning. Push several times to skip back through programs. The compact disc will go back the number of times the button is pushed.
SCAN SCAN tuning:
When the SCAN tuning button is pushed while the CD is being played, the beginning of all the
Display screen, heater, air conditioner and audio systems 4-21
tracks of CD will be played for 10 seconds in sequence.
Pushing the button again during this 10 second period will stop SCAN tuning. If the SCAN tuning button is not pushed within 10 seconds, SCAN tuning moves to the next CD program.
MIX MIX play:
When the MIX button is pushed while the compact disc is being played, programs will be played at random, not following the sequence on the compact disc. The same program may be repeated twice. Push the MIX button again to return to the normal play mode.
RPT REPEAT (RPT) play:
When the RPT button is pushed while the compact disc is being played, the play pattern can be changed as follows:

The display shows the following symbol; (no mark): 1 CD RPT (Repeat) 1: 1 TR (Track) RPT
CD EJECT:
When the CD EJECT button is pushed with the compact disc loaded, the compact disc will be ejected.
When this button is pushed while the compact disc is being played, the compact disc will come out and the system will turn off.
If the compact disc comes out and is not removed, it will be pulled back into the slot to protect it. (except for 3.1 in [8 cm] diameter compact discs)
If the following message appears on the display, push the EJECT button:
- CHECK DISC — Eject the disc, and check whether it is damaged or inserted upside-down.
- CD ERR F * — Eject the disc, and check whether it is a proper audio CD. (* shows a different number according to the audio condition.)
CD IN indicator:
CD IN indicator appears on the display when the CD is loaded.
4-22 Display screen, heater, air conditioner and audio systems


 SAA1299
FM-AM-SAT RADIO WITH COMPACT DISC (CD) CHANGER
- CD LOAD button
- SEEK/APS REW, APS FF/TRACK CHANGE button
- DISP (Display) CHANGE button
- SCAN tuning button
- CD PLAY button
- RADIO (FM/AM/SAT*) band select button
- PTY (Program type), CAT (Category)* select button
- RPT (Repeat) play/CLOCK button
- CD EJECT button
- TUNE/FF-REW button
- ON-OFF/VOL (Volume) control knob
- Audio/Clock display
- Station and preset (FM/AM/SAT*)/CD insert or CD play select button
- AUDIO button
- No satellite radio reception is available when the SAT band option is selected unless optional satellite receiver and antenna are installed, and an XM® or SIRIUS™ satellite radio service subscription is active.
It may take some time to receive the activation signal after subscribing to the XM® or SIRIUS™ satellite radio provider. After receiving the activation signal, an available channel list will be automatically updated in the radio. For XM®, turn the ignition switch from the LOCK to ACC position to update the channel list.
Satellite radio is not available in Alaska and Hawaii.
Audio main operation
Head unit:
The auto loudness circuit enhances the low frequency range automatically in both radio reception and CD playback.
Display screen, heater, air conditioner and audio systems 4-23
This audio system has an active noise compensation feature called “Audio Pilot”. The Audio Pilot uses a microphone to detect external road noise and automatically adjusts the amplifier to compensate for any competing high, midrange, or low frequency noise.
ON-OFF/Volume control:
Turn the ignition key to ACC or ON, and then push the ON-OFF/VOL (Volume) control knob while the system is off to call up the mode (radio or CD) which was playing immediately before the system was turned off. When no CD is loaded, the radio will come on. While the system is on, pushing the ON-OFF/VOL control knob turns the system off.
Turn the ON-OFF/VOL control knob to adjust the volume.
AUDIO button:
Push the AUDIO button to change the selecting mode as follows.
BASS → TREBLE → FADE → BALANCE → AUDIOP
To adjust Bass, Treble, Fader and Balance, push the AUDIO button until the desired mode (BASS, TREBLE, FADER or BALANCE) appears in the display. Push the TUNE ( ⌄ , ⌃ ) or SEEK ( ⌄ , ⌃ ) button to adjust Bass and Treble to the desired level. Use the TUNE or SEEK button also to adjust Fader or Balance modes. Fader adjusts the sound level between the front and rear speakers and Balance adjusts the sound between the right and left speakers.
To change the AUDIOP (Audio Pilot) mode to OFF or ON, push the TUNE or SEEK button.
Once you have adjusted the sound quality to the desired level, push the AUDIO button repeatedly until the radio or CD display reappears. Otherwise, the radio or CD display will automatically reappear after about 10 seconds.
RPT CLOCK adjusting:
Push the RPT button for more than 1.5 seconds to adjust the digital clock display.
When the clock adjusting display is selected, the time (hour or minute) will start flashing. See “Clock” in the “2. Instruments and controls” section for the detailed clock adjustment operation.
DISP DISPLAY CHANGE:
This button will work during satellite radio (if so equipped) and CD operation. Find the detailed function in the description of each item.
FM-AM-SAT radio operation
RADIO RADIO (FM/AM/SAT) band select:
Pushing the RADIO band select button will change the band as follows:
(Without satellite radio) AM → FM1 → FM2 → AM
(With satellite radio) AM → FM1 → FM2 → SAT1 → SAT2 → AM
No satellite operation is available during scrolling of modes, unless optional satellite receiver and antenna are installed, and an XM® or SIRIUS™ satellite radio service subscription is active.
When RADIO band select button is pushed while the ignition switch is in the ACC or ON, the radio will come on at the station last played.
The last station/channel played will also come on when the ON-OFF/VOL control knob is pushed to ON.
If a compact disc is playing when the RADIO band select button is turned to ON, the compact disc will automatically be turned off and the last radio station/channel played will come on.
The FM stereo indicator ST will glow during FM stereo reception. When the stereo broadcast signal is weak, the radio will automatically
4-24 Display screen, heater, air conditioner and audio systems
change from stereo to monaural reception.
If the satellite radio signal is lost due to interference while driving, in a parking structure or tunnel for example, “NO SIGNAL” will be displayed and no satellite radio station will be available.
TUNE (Tuning):
 The radio should not be tuned while driving so full attention may be given to vehicle operation.
Push the TUNE button or for manual tuning. To move quickly through the channels, push and hold either side of the TUNE button down for more than 0.5 seconds.
SEEK tuning:
(For FM and AM radio)
Push the SEEK button or to tune from high to low or low to high frequencies and stops at the next broadcasting station.
(For satellite radio)
Push the SEEK button or to seek channels of the next or previous category.
SCAN SCAN tuning:
Push the SCAN tuning button to tune from low to high frequencies and stops at each broadcasting station for 5 seconds. Pushing the button again during this 5 second period will stop SCAN tuning and the radio will remain tuned to that station.
If the SCAN tuning button is not pushed within 5 seconds, SCAN tuning moves to the next station.
DISP SAT radio display change (if so equipped):
• Pushing the DISP button will display additional information (for example: Title, Artist name) about the satellite radio broadcast.
• Pushing the DISP button for more than 1.5 seconds will change the display mode as follows:
Channel number → Channel name → Artist name → Song title → Channel number
Station memory operations:
Twelve stations/channels can be set for the FM band (6 for FM1, 6 for FM2) and the SAT radio (6 for SAT1, 6 for SAT2), and 6 stations can be set for the AM band.
-
Tune to the desired station/channel using the SEEK, SCAN or TUNE button.
-
Select the desired station/channel and keep pushing any of the desired station/channel and preset buttons (1 to 6) until a beep sound is heard. (The radio mutes when the station and preset button is pushed.)
-
The channel indicator will then come on and the sound will resume. Memorizing is now complete.
-
Other buttons can be set in the same manner.
If the battery cable is disconnected, or if the fuse blows, the radio memory will be erased. In that case, reset the desired stations.
Radio data system (RDS):
RDS stands for Radio Data System, and is a data information service transmitted by some radio stations on the FM band (not AM band) and/or SAT encoded within a regular radio broadcast. Currently, most RDS stations are in large cities, but many stations are now considering broadcasting RDS data.
RDS can display:
• Station call sign, such as “WHFR 98.3”.
• Station name, such as “The Groove”.
Display screen, heater, air conditioner and audio systems 4-25
- Music or programming type such as “Classical”, “Country”, or “Rock”.
- Traffic reports about delays or construction.
If the station broadcasts RDS information, the RDS icon is displayed.
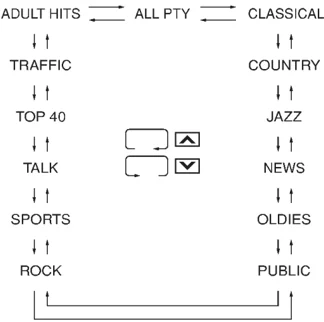
PTY Program type (PTY)/Category (CAT) select:
When PTY button is pushed during FM mode, the PTY (CAT) name of the current tuned station is displayed. When the PTY (CAT) button is pushed during satellite radio mode (if so equipped), the category name of the current channel is displayed. During this time if the PTY data code is zero, or the data is unreadable, the display will show "NONE".
1. PTY (CAT) selection mode
PTY (CAT) name selection can be done by the up/down TUNE button \wedge or \vee in the PTY (CAT) selection mode.
It is possible to shift the PTY (CAT) name by one step, with one push of the up/down TUNE button \wedge or \vee.
After selecting a PTY (CAT) name, push the SEEK button or SCAN button within 10 seconds. Tuning to the PTY (CAT) station will start. If you do not push the TUNE button within the 10 second period, the PTY (CAT) mode will be cancelled.
PTY (CAT) name selection can also be achieved by pushing the preset buttons.
Initial PTY (CAT) names are stored in the preset buttons, but these can be changed by pushing the preset buttons for more than 1.5 seconds when the desired PTY (CAT) name is in the display.

2. PTY (CAT) SEEK tuning mode
After selecting a PTY (CAT) name, push the SEEK button \searrow or \nearrow within 10 seconds. Tuning to the PTY (CAT) station will start. If you do not push the SEEK button within the 10 second period, the PTY (CAT) mode will be cancelled.
3. PTY (CAT) SCAN tuning mode
Push the SCAN tuning button to tune the PTY (CAT) name station, and stop at each broadcasting station for 5 seconds. Pushing the button again during this 5 second period will stop SCAN tuning and the radio will remain tuned to that station. If the SCAN tuning button is not pushed within 5 seconds, SCAN tuning moves to the next station.
Compact disc (CD) changer operation
Turn the ignition key to the ACC or ON position, push the LOAD button and insert the compact disc into the slot with the label side facing up. The compact disc will be guided automatically into the slot and start playing.
After loading the disc, the number of tracks on the disc will appear on the display.
If the radio is already operating, it will automatically turn off and the compact disc will play.
4-26 Display screen, heater, air conditioner and audio systems

CAUTION
- Do not force the compact disc into the slot. This could damage the player.
- Do not use 3.1 in (8 cm) discs.
If the system has been turned off while the compact disc was playing, pushing the ON-OFF/VOL control knob will start the compact disc.
LOAD CD LOAD:
To insert a CD in the CD changer, push the LOAD button for less than 1.5 seconds. Select the loading slot by pushing the CD insert select button (1 to 6), then insert the CD.
To insert 6 CDs to the CD changer in succession, push the LOAD button for more than 1.5 seconds.
The inserted slot numbers will illuminate on the display.
CD6 CD PLAY:
When the CD6 (CD play) button is pushed with the system off and the compact disc loaded, the system will turn on and the compact disc will start to play.
When the CD6 button is pushed with the compact disc loaded but the tape or the radio playing, the tape or radio will automatically be turned off and the compact disc will start to play.
DISP CD PLAY INFORMATION:
When the DISP button is pushed for less than 1.5 seconds while the compact disc is being played, the play time will be displayed.
When the DISP button is pushed for more than 1.5 seconds while the CD is being played, the disc information display will change.
CD:

CD with MP3 or WMA:

FF (Fast Forward), REW (Rewind):
CD:
When the (fast forward) or (rewind) button is pushed while the compact disc is being played, the compact disc will play while fast forwarding or rewinding. When the button is released, the compact disc will return to normal play speed.
CD with MP3 or WMA:
When the or button is pushed for less than 1.5 seconds while the compact disc is being played, the folders in the compact disc will change.
When the or button is pushed for more than 1.5 seconds while the compact disc is being played, the compact disc will play while forwarding or rewinding. When the button is released, the compact disc will return to the normal play speed.
APS (Automatic Program Search) FF, APS REW:

When the (APS FF) button is pushed while the compact disc is being played, the program next to the present one will start to play from its beginning. Push several times to skip through programs. The compact disc will advance the number of times the button is pushed. (When the last program on the compact disc is skipped through, the first program will be played.) When the (APS REW) button is pushed, the program being played returns to its beginning. Push several times to skip back through programs. The compact disc will go back the number of times the button is pushed.
Display screen, heater, air conditioner and audio systems 4-27
CD PLAY select button:
To change CD, push the CD play select button (1 to 6).
SCAN SCAN tuning:
When the SCAN tuning button is pushed for less than 1.5 seconds while the CD is being played, the beginning of all the tracks of CDs will be played for 10 seconds in sequence.
When the SCAN tuning button is pushed for more than 1.5 seconds while the CD is being played, the first program in all the CDs will be played for 10 seconds.
Pushing the button again during this 10 second period will stop SCAN tuning.
If the SCAN tuning button is not pushed within 10 seconds, SCAN tuning moves to the next disc program.
RPT REPEAT (RPT):
When the RPT play button is pushed while the compact disc is played, the play pattern can be changed.
CD:
ALL CD RPT \rightarrow 1 CD RPT \rightarrow 1 TR RPT 1 CD MIX \leftarrow ALL CD MIX
CD with MP3 or WMA:
 ALL CD RPT \rightarrow 1 CD RPT \rightarrow 1 FLDR RPT \rightarrow 1 TR RPT
1 FLDR MIX \leftarrow 1 CD MIX \leftarrow ALL CD MIX
The display shows the following symbols.
(no mark): ALL CD RPT (Repeat) 1 DISC: 1 CD RPT 1: 1 TR (Track) RPT or 1 FLDR (Folder) RPT MIX: ALL CD MIX 1 DISC MIX: 1 CD MIX 1 MIX: 1 FLDR MIX
CD EJECT:
When the CD EJECT button is pushed with the compact disc loaded, the compact disc will be ejected.
To eject the discs selected by the CD select button, push the EJECT button for less than 1.5 seconds.
To eject all the discs in succession, push the EJECT button for more than 1.5 seconds.
When this button is pushed while the compact disc is being played, the compact disc will come out and the system will turn off.
If the compact disc comes out and is not removed, it will be pulled back into the slot to protect it.
If either of the following messages appear on the display, push the EJECT button:
- PUSH EJECT — Eject the disc, and insert it again.
- CHECK DISC — Eject the disc, and check whether it is damaged or inserted upside-down.
- CD ERR F* — Eject the disc, and check whether it is a proper audio CD. (* shows a different number according to the audio condition.)
CD IN indicator:
CD IN indicator (inserted slot number 1 - 6) appears on the display when the CD is loaded.
4-28 Display screen, heater, air conditioner and audio systems
 SAA0451
CD CARE AND CLEANING
- Handle a CD by its edges. Never touch the surface of the disc. Do not bend the disc.
- Always place the discs in the storage case when they are not being used.
- To clean a disc, wipe the surface from the center to the outer edge using a clean, soft cloth. Do not wipe the disc using a circular motion. Do not use a conventional record cleaner or alcohol intended for industrial use.
- A new disc may be rough on its inner and outer edges. Remove the rough edges using the side of a pen or pencil as illustrated.
 SAA1300
- VOLUME control switch
- MODE select switch
- POWER on/off switch
- Tuning switch
STEERING WHEEL SWITCH FOR AUDIO CONTROL (if so equipped)
The audio system can be operated using the controls on the steering wheel.
POWER on/off switch
With the ignition switch turned to the ACC or ON position, push the POWER on/off switch to turn the audio system on or off.
MODE select switch
Push the MODE select switch to change the mode.
Without satellite radio: AM, FM1, FM2 and CD or CD changer
With satellite radio: AM, FM1, FM2, SAT1, SAT2 and CD changer
VOLUME control switches
Push up or down the VOLUME control switch to increase or decrease the volume.
Tuning switch
Memory change (radio): Push up or down the tuning switch for less than 1.5 seconds to change the radio frequency.
SEEK tuning (radio): Push up or down the tuning switch for more than 1.5 seconds to seek the next or previous radio station.
APS (Automatic Program Search) FF, APS REW (CD or CD changer): Push up or down the tuning switch for less than 1.5 seconds to return to the beginning of the present program or skip to the next program.
Display screen, heater, air conditioner and audio systems 4-29
Push several times to skip back or skip through programs.
This system searches for the blank intervals between selections. If there is a blank interval within one program or there is no interval between programs, the system may not stop in the desired or expected location.
FOLDER change (CD changer/CD with MP3 or WMA):
Push up or down the tuning switch for more than 1.5 seconds to change the folders (if there are any folders).
DISC change (CD changer/CD without MP3 or WMA):
Push up or down the tuning switch for more than 1.5 seconds to change the playing disc up or down.
 SAA0606
ANTENNA
The antenna is located at the rear of the vehicle. To remove the antenna, turn it counterclockwise. To reinstall it, screw it securely into the base.
CAUTION
Be sure to remove the antenna before entering a low-roof garage or an automatic car wash. Otherwise the antenna may be damaged.
CAR PHONE OR CB RADIO
When installing a CB, ham radio or car phone in your NISSAN vehicle, be sure to observe the following cautions, otherwise the new equipment may adversely affect the Engine Control system and other electronic parts.
WARNING
- A cellular telephone should not be used while driving so full attention may be given to vehicle operation. Some jurisdictions prohibit the use of cellular telephones while driving.
- If you must make a call while your vehicle is in motion, the hands free cellular phone operational mode (if so equipped) is highly recommended. Exercise extreme caution at all times so full attention may be given to vehicle operation.
- If a conversation in a moving vehicle requires you to take notes, pull off the road to a safe location and stop your vehicle before doing so.
4-30 Display screen, heater, air conditioner and audio systems
CAUTION
- Keep the antenna as far away as possible from the electronic control modules.
- Keep the antenna wire more than 8 in (20 cm) away from the electronic control system harnesses. Do not route the antenna wire next to any harness.
- Adjust the antenna standing-wave ratio as recommended by the manufacturer.
- Connect the ground wire from the CB radio chassis to the body.
- For details, consult a NISSAN dealer.
Display screen, heater, air conditioner and audio systems 4-31
MEMO
4-32 Display screen, heater, air conditioner and audio systems
10% 20% 30% 40% 50% 60% 70% 80% 90%