- The life of xenon headlights will be shortened by frequent on-off operation. It is generally desirable not to turn off the headlights for short intervals (for example, when the vehicle stops at a traffic signal). Even when the daytime running lights are active (Canada only), the xenon headlights do not turn on. This way the life of the xenon headlights is not reduced.
- If the xenon headlight bulb is close to burning out, the brightness will drastically decrease, the light will start blinking, or the color of the light will become reddish. If one or more of the above signs appear, contact a NISSAN dealer.
SIC1961
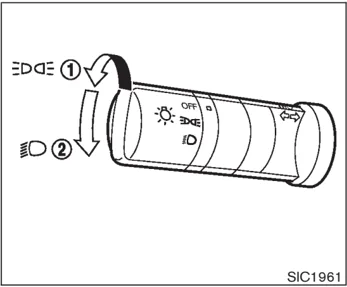
HEADLIGHT SWITCH
Lighting
① Turn the switch to the position:
The front park, side marker, tail, license plate and instrument lights will come on.
② Turn the switch to the position:
Headlights will come on and all the other lights remain on.
CAUTION
Use the headlights with the engine running to avoid discharging the vehicle battery.
Instruments and controls 2-25

 SIC1962A
Headlight beam select
① To select the high beam, push the lever forward. The high beam lights come on and the high beam indicator light illuminates.
② Pull the lever back to select the low beam.
③ Pulling the lever toward you will flash the headlight high beam.
Battery saver system
-
When the headlight switch is in the or position while the ignition switch is in the ON position, the lights will automatically turn off 5 minutes after the ignition switch has been turned to the OFF position.
-
After the headlights automatically turn off with the headlight switch in the or position, the headlights will illuminate again for 5 minutes if the headlight switch is turned to the OFF position and then turned to the or position.
CAUTION
Even though the battery saver feature automatically turns off the headlights after a period of time, you should turn the headlight switch to the OFF position when the engine is not running to avoid discharging the vehicle battery.
If the parking brake is applied before the engine is started, the daytime running lights do not illuminate. The daytime running lights illuminate once the parking brake is released. The daytime running lights will remain on until the ignition switch is turned off.
WARNING
When the daytime running light system is active, tail lights on your vehicle are not on. It is necessary at dusk to turn on your headlights. Failure to do so could cause an accident injuring yourself and others.
DAYTIME RUNNING LIGHT SYSTEM (Canada only)
The headlights automatically illuminate at a reduced intensity when the engine is started with the parking brake released. The daytime running lights operate with the headlight switch in the OFF position or in the position. Turn the headlight switch to the position for full illumination when driving at night.
2-26 Instruments and controls
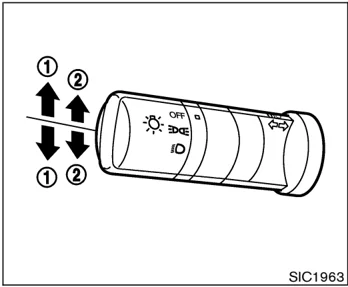
TURN SIGNAL SWITCH
SIC1963
① Turn signal Move the lever up or down to signal the turning direction. When the turn is completed, the turn signals cancel automatically.
② Lane change signal To indicate a lane change, move the lever up or down to the point where lights begin flashing.
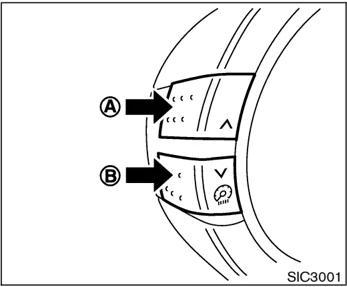
INSTRUMENT BRIGHTNESS CONTROL
SIC3001
The instrument brightness control operates when the light switch is in the ☼ or ☺ position and the ignition switch is in the ON position.
To adjust the brightness of instrument panel lights, press the control switches located on the left side of the meter panel. Pressing the upper switch Ⓐ will brighten the lights. The lower switch Ⓑ will dim the lights. Repeatedly pressing the lower switch will turn the lights off.
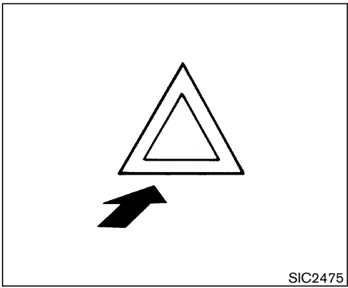
HAZARD WARNING FLASHER SWITCH
SIC2475
Push the switch (located on the front part of the center console) on to warn other drivers when you must stop or park under emergency conditions. All turn signal lights will flash.
Some state or provincial laws may prohibit the use of the hazard warning flasher switch while driving.
WARNING
- If stopping for an emergency, be sure to move the vehicle well off the road.
Instruments and controls 2-27
• Do not use the hazard warning flashers while moving on the highway unless unusual circumstances force you to drive so slowly that your vehicle might become a hazard to other traffic.
• Turn signals do not work when the hazard warning flasher lights are on.
The flasher will operate with the ignition switch in any position.
HORN
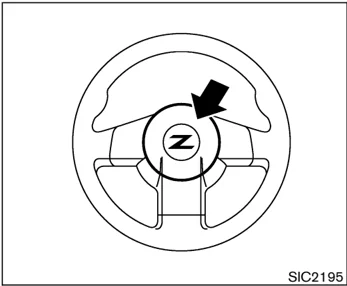
To sound the horn, push the center pad area of the steering wheel.
WARNING
Do not disassemble the horn. Doing so could affect proper operation of the supplemental front air bag system. Tampering with the supplemental front air bag system may result in serious personal injury.
HEATED SEATS (if so equipped)
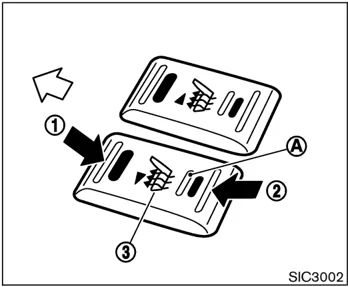
The seats are warmed by built-in heaters. The switches are located on the center console.
-
Start the engine.
-
Select heat range.
① For high heat, push the (High) side of the switch.
② For low heat, push the (Low) side of the switch.
③ For no heat, the switch has a center OFF position between low and high.
The indicator light A in the switch will illuminate when low or high is selected.
2-28 Instruments and controls
The heater is controlled by a thermostat, automatically turning the heater on and off. The indicator light will remain on as long as the switch is on.
- When the vehicle's interior is warmed, or before you leave the vehicle, be sure to turn the switch to the OFF position ③.
An optional ventilated net seat has this built-in heater only in the seat cushion part, not in the seatback.
CAUTION
- The battery could be discharged if the seat heater is operated while the engine is not running.
- Do not use the seat heater for extended periods or when no one is using the seat.
- Do not put anything on the seat which insulates heat, such as a blanket, cushion, seat cover, etc. Otherwise, the seat may become overheated.
- Do not place anything hard or heavy on the seat or pierce it with a pin or similar object. This may result in damage to the heater.
- Any liquid spilled on the heated seat should be removed immediately with a dry cloth.
- When cleaning the seat, never use gasoline, benzine, thinner, or any similar materials.
- If any abnormalities are found or the heated seat does not operate, turn the switch off and have the system checked by a NISSAN dealer.

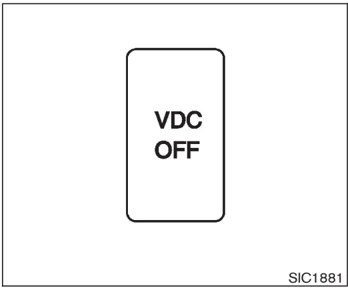
SIC1881
The vehicle should be driven with the Vehicle Dynamic Control (VDC) system on for most driving conditions.
If the vehicle is stuck in mud or snow, the VDC system reduces the engine output to reduce wheel spin. The engine speed will be reduced even if the accelerator is depressed to the floor. If maximum engine power is needed to free a stuck vehicle, turn the VDC system off.
To turn off the Vehicle Dynamic Control (VDC) system, push the VDC OFF switch (located on the lower side of the instrument panel). The VDC OFF indicator light will come on.
Push the VDC OFF switch again or restart the
Instruments and controls 2-29
TRACTION CONTROL SYSTEM (TCS) OFF SWITCH (if so equipped)
engine to turn on the system. See “Vehicle dynamic control (VDC) system” in the “5. Starting and driving” section.
See “Traction control system (TCS)” in the “5. Starting and driving” section.
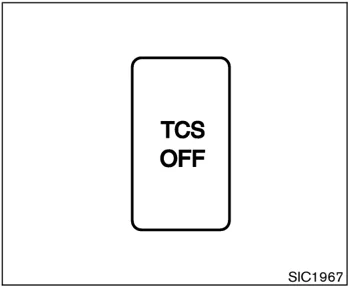
SIC1967
The vehicle should be driven with the Traction Control System (TCS) on for most driving conditions.
If the vehicle is stuck in mud or snow, the TCS reduces the engine output to reduce wheel spin. The engine speed will be reduced even if the accelerator is depressed to the floor. If maximum engine power is needed to free a stuck vehicle, turn the TCS off.
To turn off the Traction Control System (TCS), push the TCS OFF switch (located on the lower side of the instrument panel). The indicator light will come on. Push it again or restart the engine to turn the system back on.
2-30 Instruments and controls
CLOCK
The digital clock (in the audio unit) displays time when the ignition switch is in the ACC or ON position.
If the battery cable is disconnected, the clock will reset its time and the correct time will not be indicated. Readjust the time.
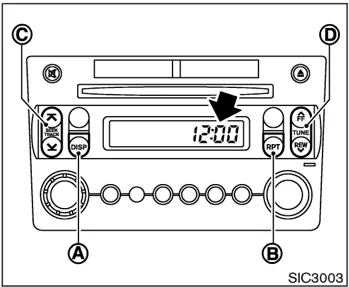
minute. Pushing the \nearrow or \wedge side will advance the time and the \searrow or \vee side will turn back the time.
- Push the DISP button Ⓐ (Type A), or RPT Ⓑ button (Type B) to finish the adjustment.
Resetting
Type A (audio with 1 CD player): Push the DISP Ⓐ and TUNE Ⓓ buttons.
Type B (audio with 6 CD changer): Push the RPT Ⓑ and TUNE Ⓓ buttons.
The time will be set to a time signal.
For example, if these buttons are pushed while the time is between 8:00 and 8:29, the display will be reset to 8:00. If pushed while it is between 8:30 and 8:59, the display will be reset to 9:00. At the same time the display will return to the previous audio mode.
ADJUSTING THE TIME
Adjust the time in the following steps:
-
Switch the display to the clock adjusting mode. Type A (audio with 1 CD player): Push and hold the DISP (Clock) button Ⓐ until the clock display starts to flash. Type B (audio with 6 CD changer): Push and hold the RPT button Ⓑ until the clock display starts to flash.
-
Push the SEEK/TRACK button Ⓒ (\nearrow, \searrow) to adjust the hour. Push the TUNE button Ⓓ (\wedge, \vee) to adjust the
Instruments and controls 2-31
POWER OUTLET
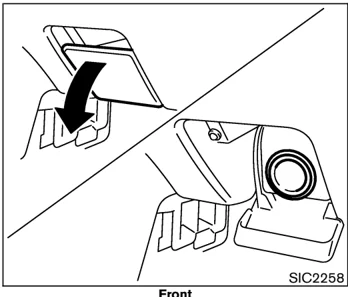
Front SIC2258
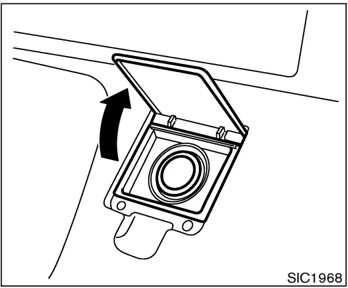
Rear SIC1968
The power outlet is for powering electrical accessories such as cellular telephones.
CAUTION
- The outlet and plug may be hot during or immediately after use.
- This power outlet is not designed for use with a cigarette lighter unit.
- Do not use accessories that exceed a combined power draw of 12 volt, 120W (10A) for both the front and rear power outlets. Do not use double adapters or more than one accessory with a single power outlet.
- Use power outlet with the engine running to avoid discharging the vehicle battery.
- Avoid using power outlets when the air conditioner, headlights or rear window defroster is on.
- Before inserting or disconnecting a plug, be sure to turn off the power switch of electrical accessory being used or the ACC power of the vehicle.
- Push the plug in as far as it will go. If good contact is not made, the plug may overheat or the internal temperature fuse may open.
- Do not allow water to contact the outlet. When not in use, be sure to close the lid.
2-32 Instruments and controls
STORAGE
 SIC3004
INSTRUMENT POCKET (except for navigation system equipped models)
To open the lid, push the knob up ①. To close, pull the lid down ②.
- Keep the pocket lid closed while driving to help prevent injury in an accident or a sudden stop.
WARNING
- The instrument pocket should not be used while driving so full attention may be given to vehicle operation.
 SIC2317
SUNGLASSES HOLDER (Coupe models)
The sunglasses holder can be opened by pushing the button A.
WARNING
- The sunglasses holder should not be used while driving so full attention may be given to vehicle operation.
- Keep the sunglasses holder closed while driving to prevent an accident.
Instruments and controls 2-33
CAUTION
- Do not use for anything other than glasses.
- Do not leave sunglasses in the sun-glasses holder while parking in direct sunlight. The heat may damage the sunglasses.

SIC3005
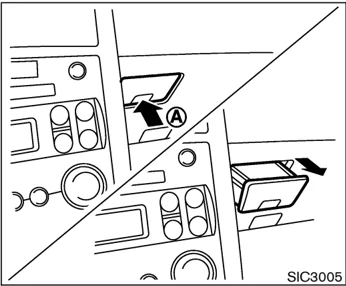
CARD HOLDER
Push the button A to open the card holder.
WARNING
The card holder should not be used while driving so full attention may be given to vehicle operation.
SIC3006
CARGO NET
The net located under the instrument panel (passenger's side) can be used to hold small objects.
The net can be removed when necessary.
WARNING
- Do not place sharp objects in the net. Such objects may become dangerous projectiles and cause injury when the vehicle is moving or if the vehicle is
2-34 Instruments and controls
10% 20% 30% 40% 50% 60% 70% 80% 90%
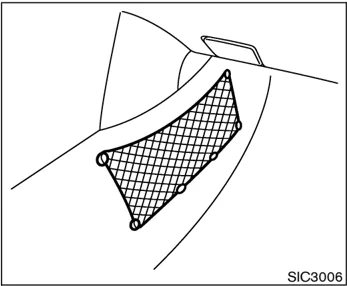
involved in a collision.
- The cargo restrained in the net must not exceed 4 lb (2 kg) or the net may not stay secured.
CUP HOLDERS
WARNING
The cup holder should not be used while driving so full attention may be given to vehicle operation.
CAUTION
- Avoid abrupt starting and braking when the cup holder is being used to prevent spilling the drink. If the liquid is hot, it can scald you or your passenger.
- Use only soft cups in the cup holder. Hard objects can injure you in an accident.

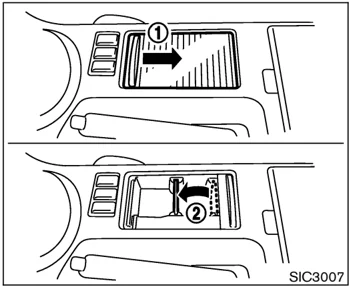
SIC3007
Front
To open the cup holder, slide the lid ①. Install the partition plate into the slit ②.
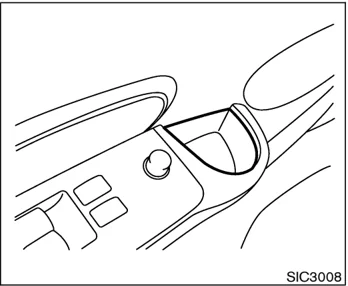
SIC3008
Soft bottle holder
CAUTION
- Do not use bottle holder for any other objects that could be thrown about in the vehicle and possibly injure people during sudden braking or an accident.
- Do not use bottle holder for open liquid containers.
Instruments and controls 2-35
 SIC3009
CONSOLE BOX
Pushing the button ① will open the lid slightly, then pull up the lid manually ②. The center console box is equipped with a card holder A.
WARNING
The center console box should not be used while driving so full attention may be given to vehicle operation.
 SIC3010
If objects (coins, etc.) fall into the rear section of the center console box, remove the rear wall B of the box as shown, and pick up the objects.
CAUTION
Be careful not to pinch your fingers when removing the rear wall B.
 SIC1975A
REAR FLOOR BOX
The rear floor box is located behind the passenger's seat. Fold the seat to use the rear floor box.
The rear floor box may be opened by pulling the handle. The rear floor box light illuminates when the box lid is opened with the headlight switch ON.
When locking ① or unlocking ② the rear floor box, use the master key.
2-36 Instruments and controls
 SIC2377
The rear floor box has another storage space under the bottom plate.
WARNING
Keep rear floor box lid closed while driving to help prevent injury in an accident or a sudden stop.
 SIC1977
REAR PARCEL BOX
Push the upper part of the lid to open the rear parcel box. For models without the Navigation system, two boxes are available.
WARNING
- The rear parcel box should not be used while driving so full attention may be given to vehicle operation.
- Keep rear parcel box lid closed while driving to help prevent injury in an
accident or a sudden stop.
STOWING GOLF BAGS
Follow the instructions here to stow golf bags in the rear cargo space of your vehicle. Normally two bags can be stowed in the luggage area (Coupe models) or one bag in the trunk (Roadster models).
However, in some cases you may not be able to stow the above number of golf bags in your vehicle, depending on their sizes or types.
Instruments and controls 2-37
into left side of the luggage area ① then put the bag down ②.
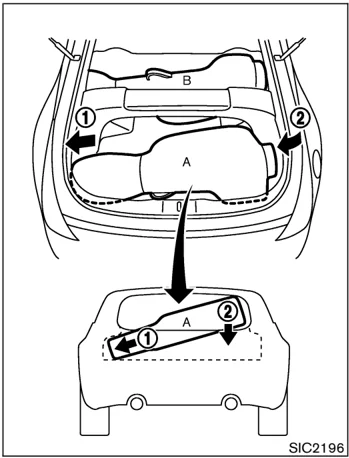
SIC2196
Coupe models
Normally, two standard golf bags can be stowed across the strut tower bar in the luggage area as illustrated (A and B). When stowing a golf bag A in the rear space, insert the top of the golf bag
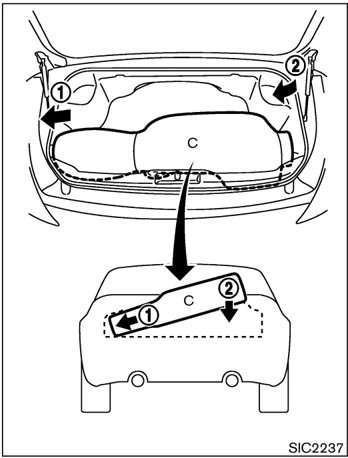
SIC2237
Roadster models
Normally, one standard golf bag C can be stowed in the trunk. Insert the top of the golf bag into left side of the trunk ① then put the bag down ②.
2-38 Instruments and controls
COAT HOOK (Coupe models)
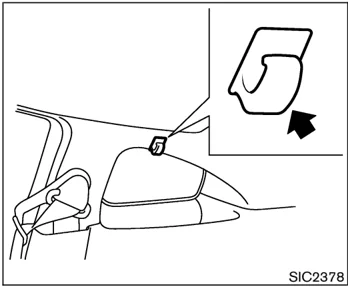
The hooks are located above the side windows as shown in the illustration.
CAUTION Do not place items which are more than 2 lb (1 kg) on the hook.
WINDOWS
POWER WINDOWS
WARNING
- Make sure that all passengers have their hands, etc. inside the vehicle while it is in motion and before closing the windows. Use the window lock switch to prevent unexpected use of the power windows.
- Do not leave children unattended inside the vehicle. They could unknowingly activate switches or controls and become trapped in a window. Unattended children could become involved in serious accidents.

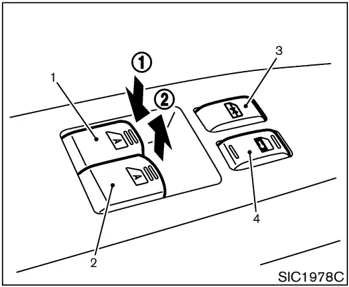
Driver's side power window switch
- Driver side window
- Passenger side window
- Window lock button
- Power door lock switch
To open or close the window, push down ① or pull up ② the switch and hold it. The main switch (driver side switches) will open or close all the windows.
The power windows operate when the ignition key is in the ON position and for about 45 seconds, after the ignition key is turned to the OFF position. If the driver's door or the front passenger's door is opened during this period of about 45 seconds, power to the windows is canceled.
The power window switches will be deactivated during the soft top operation. (Roadster models)
Instruments and controls 2-39
 SIC1892D
Passenger side power window switch
The passenger side switch will open or close only the corresponding window. To open or close the window, hold the switch down or up.
Locking passenger's window
When the lock button is pushed in, only the driver side window can be opened or closed. Push it in again to cancel.
 SIC1979B
Automatic operation
To fully open or close the window, completely press or lift the switch and release it; it need not be held. The window will automatically open or close all the way. To stop the window, just press or lift the switch on the opposite side.
Auto reverse function
If the control unit detects something caught in a window as it moves up, the window will be immediately lowered.
The auto reverse function can be activated when a window is closed by automatic operation when the ignition key is in the ON position or for about 45 seconds after the ignition key is turned to the OFF position.
Depending on the environment or driving conditions, the auto reverse function may be activated if an impact or load similar to something being caught in the window occurs.
WARNING
There are some small distances immediately before the closed position which cannot be detected. Make sure that all passengers have their hands, etc., inside the vehicle before closing the window.
Automatic window lowering (Roadster models)
When the soft top operating switch is pressed, the power windows will automatically be lowered completely. The windows do not rise automatically after the soft top open/close operation is completed. Use the power window switches to raise them.
2-40 Instruments and controls
AUTOMATIC ADJUSTING FUNCTION
CAUTION
When the battery cable is removed from the battery terminal, do not close either of the front doors. The automatic window adjusting function will not work, and the side roof panel/top side rail may be damaged.
The power window has an automatic adjusting function. When the door is being opened, the window is automatically lowered slightly to avoid contact between the window and the side roof panel/top side rail. When the door is closed, the window is automatically raised slightly.
INTERIOR LIGHTS

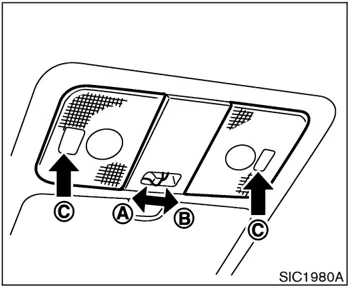
Coupe models SIC1980A
ROOM LIGHT
The interior light has a two-position switch. (A: DOOR, B: OFF)
When the switch is in the DOOR position, the light will illuminate when a door is opened.
The light will stay on for about 30 seconds when:
- The doors are unlocked by the keyfob, a key or the power door lock switch while all doors are closed.
- The driver's door is opened and then closed while the key is removed from the ignition switch.
Roadster models SIC2238
- The key is removed from the ignition switch while all doors are closed.
The interior light will turn off while the 30 second timer is activated, when:
- The driver's door is locked either with the keyfob, a key or the power door lock switch.
- The ignition switch is turned ON.
MAP LIGHTS
To turn on the light, push the plastic surface C of the light. Push it again to turn off the light.
When the map light stays on, it will automatically turn off 30 minutes after the
Instruments and controls 2-41
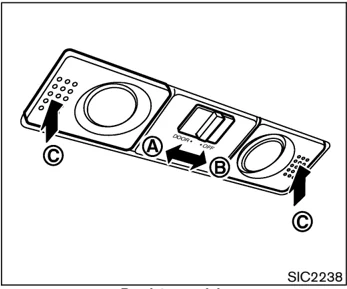
ignition switch has been turned to the OFF position. To turn on the light again, turn the ignition switch to the ON position.
The map and vanity mirror lights will automatically turn off 30 minutes after the latest operation of the following with the ignition switch in the ACC or OFF position:
- Opening or closing any door
- Locking or unlocking with the keyfob, a key or the power door lock switch
- Inserting or removing a key from the ignition switch
These lights will turn on again when any of the above operations is performed after the lights have turned off automatically. (The lights will turn off 30 minutes after the latest operation of the above as well.)
CAUTION
- Turn off the lights when you leave the vehicle.
- Do not use for extended periods of time with the engine stopped. This could result in a discharged battery.
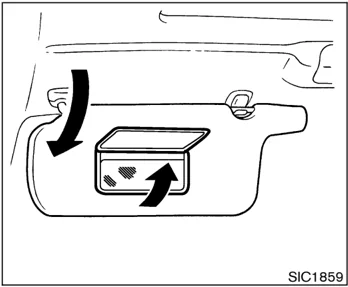
VANITY MIRROR LIGHT

SIC1859
The light on the vanity mirror will turn on when the cover on the vanity mirror is opened.
When the vanity mirror light stays on, it will automatically turn off 30 minutes after the ignition switch has been turned to the OFF position. To turn on the light again, turn the ignition switch to the ON position.
LUGGAGE COMPARTMENT LIGHT (Coupe models)
The light illuminates when the rear hatch is opened. When the rear hatch is closed, the light will go off.
2-42 Instruments and controls
TRUNK LIGHT (Roadster models)
The light illuminates when the trunk lid is opened. When the trunk lid is closed, the light will go off.
HomeLink® UNIVERSAL TRANSCEIVER (if so equipped)
The HomeLink® Universal Transceiver provides a convenient way to consolidate the functions of up to three individual hand-held transmitters into one built-in device.
HomeLink® Universal Transceiver:
- Will operate most Radio Frequency (RF) devices such as garage doors, gates, home and office lighting, entry door locks and security systems.
- Is powered by your vehicle's battery. No separate batteries are required. If the vehicle's battery is discharged or is disconnected, HomeLink® will retain all programming.
Once the HomeLink® Universal Transceiver is programmed, retain the original transmitter for future programming procedures (for example, new vehicle purchases). Upon sale of the vehicle, the programmed HomeLink® Universal Transceiver buttons should be erased for security purposes. For additional information, refer to "Programming HomeLink®" later in this section.
⚠ WARNING
- Do not use the HomeLink® Universal Transceiver with any garage door opener that lacks safety stop and reverse features as required by federal safety standards. (These standards became effective for opener models manufactured after April 1, 1982). A garage door opener which cannot detect an object in the path of a closing garage door and then automatically stop and reverse, does not meet current federal safety standards. Using a garage door opener without these features increases the risk of serious injury or death.
- During the programming procedure, your garage door or security gate will open or close (if the transmitter is within range). Make sure that people and objects are clear of the garage door, gate, etc. that you are programming.
Instruments and controls 2-43
● Your vehicle’s engine should be turned off while programming the HomeLink® Universal Transceiver.
PROGRAMMING HomeLink®
To program your HomeLink® Transceiver to operate a garage door, gate, or entry door opener, home or office lighting, you need to be at the same location as the device. Note: Garage door openers (manufactured after 1996) have “rolling code protection”. To program a garage door opener equipped with “rolling code protection”; you will need to use a ladder to get up to the garage door opener motor to be able to access the training button.
 SIC3012
-
To begin, press and hold the 2 outer HomeLink® buttons (to clear the memory) until the indicator light A blinks (after 20 seconds). Release both buttons.
-
Position the end of the hand-held transmitter 1 - 3 in (26 - 76 mm) away from the HomeLink® surface.
 SIC3011
-
Using both hands, simultaneously press and hold both the HomeLink® button you want to program and the hand-held transmitter button. DO NOT release the buttons until step 4 has been completed.
-
Hold down both buttons until the indicator light on the HomeLink® flashes, changing from a “slow blink” to a “rapid blink”. When the indicator light flashes rapidly, both buttons may be released. The rapidly flashing light indicates successful programming. To activate the garage door or other programmed device, press and hold the programmed HomeLink® button - releasing
2-44 Instruments and controls
when the device begins to activate.
-
If the indicator light on the HomeLink® blinks rapidly for two seconds and then turns solid, HomeLink® has picked up a “rolling code” garage door opener signal. You will need to proceed with the next steps to train the HomeLink® to complete the programming which may require a ladder and another person for convenience.
-
Press and release the training button located on the garage door opener’s motor to activate the “training mode”. This button is usually located near the antenna wire that hangs down from the motor. If the wire originates from under a light lens, you will need to remove the lens to access the training button.
NOTE: Once you have pressed and released the training button on the garage door opener’s motor and the “training light” is lit, you have 30 seconds in which to perform step 7. Use the help of a second person for convenience to assist when performing this step.
-
Quickly within 30 seconds of pressing and releasing the garage door opener program button, firmly press and release the HomeLink® button you’ve just programmed. Press and release the HomeLink® button up to three times to complete the training.
-
Your HomeLink® button should now be pro-grammed.
To program the remaining HomeLink® buttons for additional door or gate openers, follow steps 2-8 only.
NOTE: Do not repeat step 1 unless you want to “clear” all previously programmed HomeLink® buttons.
If you have any questions or are having difficulty programming your HomeLink® buttons, refer to the HomeLink® web site at: www.homelink.com or call 1-800-355-3515.
PROGRAMMING HomeLink® FOR CANADIAN CUSTOMERS
Prior to 1992, D.O.C. regulations required hand-held transmitters to stop transmitting after 2 seconds. To program your hand-held transmitter to HomeLink®, continue to press and hold the HomeLink® button (note steps 2 through 4 under “Programming HomeLink®”) while you press and re-press (“cycle”) your hand-held transmitter every 2 seconds until the indicator light flashes rapidly (indicating successful programming).
NOTE: When programing a garage door opener, etc., it is advised to unplug the device during the “cycling” process to prevent possible damage to the garage door opener components.
OPERATING THE HomeLink® UNIVERSAL TRANSCEIVER
The HomeLink® Universal Transceiver (once programmed) may now be used to activate the garage door, etc. To operate, simply press the appropriate programmed HomeLink® Universal Transceiver button. The red indicator light will illuminate while the signal is being transmitted.
PROGRAMMING TROUBLE DIAGNOSIS
If the HomeLink® does not quickly learn the hand-held transmitter information:
- replace the hand-held transmitter batteries with new batteries.
- position the hand-held transmitter with its battery area facing away from the HomeLink® surface.
- press and hold both the HomeLink® and hand-held transmitter buttons without inter-ruption.
Instruments and controls 2-45
• position the hand-held transmitter 2 to 5 in (50 to 127 mm) away from the HomeLink® surface. Hold the transmitter in that position for up to 15 seconds. If HomeLink® is not programmed within that time, try holding the transmitter in another position - keeping the indicator light in view at all times.
If you continue to have programming difficulties, please contact the NISSAN Consumer Affairs Department. The phone numbers are located in the Foreword of this Owner's Manual.
CLEARING THE PROGRAMMED INFORMATION
Individual buttons cannot be cleared, however to clear all programming, press and hold the two outside buttons and release when the indicator light begins to flash (approximately 20 seconds).
REPROGRAMMING A SINGLE HomeLink® BUTTON
To reprogram a HomeLink® Universal Transceiver button, complete the following.
-
Press and hold the desired HomeLink® button. Do not release the button until step 4 has been completed.
-
When the indicator light begins to flash slowly (after 20 seconds), position the hand-held transmitter 2 to 5 in (50 to 127 mm) away from the HomeLink® surface.
-
Press and hold the hand-held transmitter button.
-
The HomeLink® indicator light will flash, first slowly and then rapidly. When the indicator light begins to flash rapidly, release both buttons.
The HomeLink® Universal Transceiver button has now been reprogrammed. The new device can be activated by pushing the HomeLink® button that was just programmed. This procedure will not affect any other programmed HomeLink® buttons.
IF YOUR VEHICLE IS STOLEN
If your vehicle is stolen, you should change the codes of any non-rolling code device that has been programmed into HomeLink®. Consult the Owner’s Manual of each device or call the manufacturer or dealer of those devices for additional information.
When your vehicle is recovered, you will need to reprogram the HomeLink® Universal Transceiver with your new transmitter information.
FCC Notice:
This device complies with FCC rules part 15. Operation is subject to the following two conditions: (1) This device may not cause harmful interference and (2) This device must accept any interference that may be received, including interference that may cause undesired operation.
The transmitter has been tested and complies with FCC and DOC/MDC rules. Changes or modifications not expressly approved by the party responsible for compliance could void the user's authority to operate the device.
DOC: ISTC 1763K1313 FCC I.D.: CB2V67690
2-46 Instruments and controls
MEMO
Instruments and controls 2-47
MEMO
2-48 Instruments and controls
10% 20% 30% 40% 50% 60% 70% 80% 90%