5 Starting and driving
-
Precautions when starting and driving ........ 5-2
-
Exhaust gas (Carbon monoxide) ........ 5-2
-
Three way catalyst ........ 5-3
-
Tire pressure monitoring system (TPMS) ........ 5-3
-
Avoiding collision and rollover ........ 5-5
-
Drinking alcohol/drugs and driving ........ 5-5
-
Ignition switch ........ 5-6
-
Automatic transmission ........ 5-6
-
Manual transmission ........ 5-7
-
Key positions ........ 5-7
-
NISSAN vehicle immobilizer system ........ 5-8
-
Before starting the engine ........ 5-8
-
Starting the engine ........ 5-9
-
Driving the vehicle ........ 5-9
-
Automatic transmission ........ 5-9
-
Manual transmission ........ 5-13
-
Parking brake ........ 5-15
-
Cruise control (if so equipped) ........ 5-16
-
Precautions on cruise control ........ 5-16
-
Cruise control operations ........ 5-16
-
Break-in schedule ........ 5-18
-
Increasing fuel economy ........ 5-18
-
Parking/parking on hills ........ 5-19
-
Power steering ........ 5-20
-
Brake system ........ 5-20
-
Braking precautions ........ 5-20
-
Anti-lock brake system (ABS) ........ 5-21
-
Traction control system (TCS) (if so equipped) ........ 5-22 Vehicle dynamic control (VDC) system
-
(if so equipped) ........ 5-23
-
Cold weather driving ........ 5-25
-
Freeing a frozen door lock ........ 5-25
-
Anti-freeze ........ 5-25
-
Battery ........ 5-25
-
Draining of coolant water ........ 5-25
-
Tire equipment ........ 5-25
-
Special winter equipment ........ 5-26
-
Driving on snow or ice ........ 5-26
-
Engine block heater (if so equipped) ........ 5-26
PRECAUTIONS WHEN STARTING AND DRIVING
WARNING
- Do not leave children or adults who would normally require the support of others alone in your vehicle. Pets should not be left alone either. They could accidentally injure themselves or others through inadvertent operation of the vehicle. Also, on hot, sunny days, temperatures in a closed vehicle could quickly become high enough to cause severe or possibly fatal injuries to people or animals.
- Properly secure all cargo to help prevent it from sliding or shifting. Do not place cargo higher than the seat-backs. In a sudden stop or collision, unsecured cargo could cause personal injury. (Coupe models)
- Closely supervise children when they are around cars to prevent them from playing and becoming locked in the trunk where they could be seriously injured. Keep the car locked with the trunk closed when not in use, and prevent children's access to car keys. (Roadster models)
EXHAUST GAS (Carbon monoxide)
WARNING
Do not breathe exhaust gases; they contain colorless and odorless carbon monoxide. Carbon monoxide is dangerous. It can cause unconsciousness or death.
- If you suspect that exhaust fumes are entering the vehicle, drive with all windows fully open, and have the vehicle inspected immediately.
- Do not run the engine in closed spaces such as a garage.
- Do not park the vehicle with the engine running for any extended length of time.
- Keep the rear hatch/trunk lid closed while driving, otherwise exhaust gases could be drawn into the passenger compartment. If you must drive with the rear hatch/trunk lid open, follow these precautions:
- Open all the windows.
- Set the air recirculation mode OFF and the fan control at the maximum position to circulate the air.
- If electrical wiring or other cable connections must pass to a trailer through the seal on the rear hatch/trunk lid or the body, follow the manufacturer's recommendation to prevent carbon monoxide entry into the vehicle.
- If a special body, camper, or other equipment is added for recreational or other usage, follow the manufacturer's recommendation to prevent carbon monoxide entry into the vehicle. Some recreational vehicle appliances such as stoves, refrigerators, heaters, etc. may also generate carbon monoxide.
5-2 Starting and driving
• The exhaust system and body should be inspected by a qualified mechanic whenever: • The vehicle is raised for service. • You suspect that exhaust fumes are entering into the passenger compartment. • You notice a change in the sound of the exhaust system. • You have had an accident involving damage to the exhaust system, underbody, or rear of the vehicle.
THREE WAY CATALYST
The three way catalyst is an emission control device installed in the exhaust system. Exhaust gases in the converter are burned at high temperatures to help reduce pollutants.
WARNING
• The exhaust gas and the exhaust system are very hot. Keep people, animals or flammable materials away from the exhaust system components.
• Do not stop or park the vehicle over flammable materials such as dry grass, waste paper or rags. They may ignite and cause a fire.
CAUTION
• Do not use leaded gasoline. Deposits from leaded gasoline will seriously reduce the three-way catalyst’s ability to help reduce exhaust pollutants.
• Keep your engine tuned up. Malfunctions in the ignition, fuel injection, or electrical systems can cause overrich fuel flow into the three-way catalyst, causing it to overheat. Do not keep driving if the engine misfires, or if noticeable loss of performance or other unusual operating conditions are detected. Have the vehicle inspected promptly by a NISSAN dealer.
• Avoid driving with an extremely low fuel level. Running out of fuel could cause the engine to misfire, damaging the three-way catalyst.
• Do not race the engine while warming it up.
• Do not push or tow your vehicle to start the engine.
TIRE PRESSURE MONITORING SYSTEM (TPMS)
Each tire, including the spare (if provided), should be checked monthly when cold and inflated to the inflation pressure recommended by the vehicle manufacturer on the vehicle placard or tire inflation pressure label. (If your vehicle has tires of a different size than the size indicated on the vehicle placard or tire inflation pressure label, you should determine the proper tire inflation pressure for those tires.)
As an added safety feature, your vehicle has been equipped with a tire pressure monitoring system (TPMS) that illuminates a low tire pressure telltale when one or more of your tires is significantly under-inflated. Accordingly, when the low tire pressure telltale illuminates, you should stop and check your tires as soon as
Starting and driving 5-3
possible, and inflate them to the proper pres- sure. Driving on a significantly under-inflated tire causes the tire to overheat and can lead to tire failure. Under-inflation also reduces fuel effi- ciency and tire tread life, and may affect the vehicle’s handling and stopping ability.
Please note that the TPMS is not a substitute for proper tire maintenance, and it is the driver’s responsibility to maintain correct tire pressure, even if under-inflation has not reached the level to trigger illumination of the TPMS low tire pressure telltale.
Your vehicle has also been equipped with a TPMS malfunction indicator to indicate when the system is not operating properly. The TPMS malfunction indicator is combined with the low tire pressure telltale. When the system detects a malfunction, the telltale will flash for approxi- mately one minute and then remain continuously illuminated. This sequence will continue upon subsequent vehicle start-ups as long as the malfunction exists. When the malfunction indica- tor is illuminated, the system may not be able to detect or signal low tire pressure as intended. TPMS malfunctions may occur for a variety of reasons, including the installation of replacement or alternate tires or wheels on the vehicle that prevent the TPMS from functioning properly. Always check the TPMS malfunction telltale after replacing one or more tires or wheels on your
5-4 Starting and driving
vehicle to ensure that the replacement or alter- nate tires and wheels allow the TPMS to con- tinue to function properly.
Additional information
- The TPMS does not monitor the tire pressure of the spare tire.
- The TPMS will activate only when the vehicle is driven at speeds above 16 MPH (25 km/h). Also, this system may not detect a sudden drop in tire pressure (for example a flat tire while driving).
- Tire pressure rises and falls depending on the heat caused by the vehicle’s operation and the outside temperature. Low outside tem- perature can lower the temperature of the air inside the tire which can cause a lower tire inflation pressure. This may cause the low tire pressure warning light to illuminate. If the warning light illuminates in low ambient tem- perature, check the tire pressure for all four tires.
- You can also check the pressure of all tires (except the spare tire) on the trip computer. The order of the tire pressure figures dis- played on the screen does not correspond with the actual order of the tire position. See “Trip computer” in the “2. Instruments and controls” section.
For additional information, see “Low tire pres- sure warning light” in the “2. Instruments and controls” section and “Tire pressure monitoring system (TPMS)” in the “6. In case of emergency” section.
WARNING
- If the low tire pressure warning light illuminates while driving, avoid sud- den steering maneuvers or abrupt braking, reduce vehicle speed, pull off the road to a safe location and stop the vehicle as soon as possible. Serious vehicle damage could occur and may lead to an accident and could result in serious personal in- jury. Check the tire pressure for all four tires. Adjust the tire pressure to the recommended COLD tire pres- sure shown on the Tire and Loading Information label to turn the low tire pressure warning light OFF. If you have a flat tire, replace it with a spare tire as soon as possible. (See “Flat tire” in the “6. In case of emergency” section for changing a flat tire.)
- When a spare tire is mounted or a wheel is replaced, tire pressure will not be indicated, the TPMS will not function and the low tire pressure warning light will flash. Contact your NISSAN dealer as soon as possible for tire replacement and/or system resetting.
- Replacing tires with those not originally specified by NISSAN could affect the proper operation of the TPMS.
- Do not inject any tire liquid or aerosol tire sealant into the tires, as this may cause a malfunction of the tire pressure sensors.
CAUTION
Do not place metalized film or any metal parts (antenna, etc.) on the windows. This may cause poor reception of the signals from the tire pressure sensors, and the TPMS will not function properly.
FCC Notice:
Changes or modifications not expressly approved by the party responsible for compliance could void the user's authority to operate the equipment.
This device complies with Part 15 of the FCC Rules and RSS-210 of Industry Canada.
Operation is subject to the following two conditions: (1) This device may not cause harmful interference, and (2) this device must accept any interference received, including interference that may cause undesired operation of the device.
AVOIDING COLLISION AND ROLLOVER
WARNING
Failure to operate this vehicle in a safe and prudent manner may result in loss of control or an accident.
Be alert and drive defensively at all times. Obey all traffic regulations. Avoid excessive speed, high speed cornering, or sudden steering maneuvers, because these driving practices could cause you to lose control of your vehicle. As with any vehicle, a loss of control could result in a collision with other vehicles or objects, or cause the vehicle to rollover, particularly if the loss of control causes the vehicle to slide sideways. Be attentive at all times, and avoid driving when tired. Never drive when under the influence of alcohol or drugs (including prescription or over-the-counter drugs which may cause drowsiness). Always wear your seat belt as outlined in the "1. Safety — Seats, seat belts and supplemental restraint system" section and also instruct your passengers to do so.
Seat belts help reduce the risk of injury in collisions and rollovers. In a rollover crash, an unbelted or improperly belted person is significantly more likely to be injured or killed than a person properly wearing a seat belt.
DRINKING ALCOHOL/DRUGS AND DRIVING
WARNING
Never drive under the influence of alcohol or drugs. Alcohol in the bloodstream
Starting and driving 5-5
reduces coordination, delays reaction time and impairs judgement. Driving after drinking alcohol increases the likelihood of being involved in an accident injuring yourself and others. Additionally, if you are injured in an accident, alcohol can increase the severity of the injury.
NISSAN is committed to safe driving. You must not drive under the influence of alcohol. Every year thousands of people are injured or killed in alcohol related accidents. Although the local laws vary on what is considered to be legally intoxicated, the fact is that alcohol affects all people differently and most people underestimate the effects of alcohol.
Remember, drinking and driving don't mix! And that is true for drugs, too (over the counter, prescription, and illegal drugs). Don't drive if your ability to operate your vehicle is impaired by alcohol, drugs, or some other physical condition.
I GNITION SWITCH
SSD0392
AUTOMATIC TRANSMISSION
The ignition lock is designed so the key cannot be turned to the LOCK position and removed until the selector lever is moved to the P (Park) position.
When removing the key from the ignition switch, make sure the selector lever is in the P (Park) position.
If the selector lever is not returned to the P (Park) position, the key cannot be moved to the LOCK position.
When the key cannot be turned to the LOCK position, proceed as follows to remove the key:
- Move the selector lever into the P (Park) position.
- Turn the ignition key slightly toward the ON direction.
- Turn the key to the LOCK position.
- Remove the key.
If the key is removed from the ignition switch, the selector lever cannot be moved from P (Park) position. The selector lever can be moved if the ignition switch is in the ON position and the foot brake pedal is depressed.
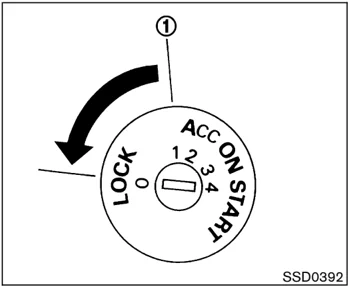
There is an OFF position ① in between the LOCK and ACC positions. The OFF position is indicated by a "1" on the key cylinder. When the ignition switch is in the OFF position, the steering wheel is not locked.
In order for the steering wheel to be locked, it must be turned about 1/6 of a turn counterclockwise from the straight up position.
To lock the steering wheel, turn the key to the LOCK position. Remove the key. To unlock the steering wheel, insert the key and turn it gently while rotating the steering wheel slightly right and left.
5-6 Starting and driving
WARNING
Never remove or turn the key to the LOCK position while driving. The steering wheel will lock. This may cause the driver to lose control of the vehicle and could result in serious vehicle damage or personal injury.
 SSD0503
In order for the steering wheel to be locked, it must be turned about 1/6 of a turn clockwise from the straight up position.
To lock the steering wheel, turn the key to the LOCK position. Remove the key. To unlock the steering wheel, insert the key and turn it gently while rotating the steering wheel slightly right and left.
WARNING
Never remove or turn the key to the LOCK position while driving. The steering wheel will lock. This may cause the driver to lose control of the vehicle and could result in serious vehicle damage or personal injury.
MANUAL TRANSMISSION
The ignition switch includes a device that helps prevent accidental removal of the key while driving.
The key can only be removed when the ignition switch is in the LOCK position.
To turn the ignition switch to the LOCK position from the ACC or ON position, turn the key to the OFF position, push the key in, then turn the key to the LOCK position.
There is an OFF position ① in between the LOCK and ACC positions. The OFF position is indicated by a "1" on the key cylinder.
KEY POSITIONS
The switch includes an anti-theft steering lock device.
LOCK (Normal parking position) (0)
The ignition key can only be removed when the switch is in this position.
OFF (1)
Starting and driving 5-7
The engine can be turned off without locking the steering wheel.
The ignition lock is designed so that the key cannot be turned to LOCK and removed until the selector lever is moved to the P (Park) position.
ACC (Accessories) (2)
This position activates electrical accessories such as the radio when the engine is not running.
ON (Normal operating position) (3)
This position turns on the ignition system and the electrical accessories.
START (4)
This position activates the starter motor, starting the engine.
NISSAN VEHICLE IMMOBILIZER SYSTEM
The NISSAN Vehicle Immobilizer System will not allow the engine to start without the use of the registered key.
If the engine fails to start using a registered key (for example, when interference is caused by another registered key, an automated toll road device or automated payment device on the key ring), restart the engine using the following procedures:
5-8 Starting and driving
- Leave the ignition switch in the ON position for approximately 5 seconds.
- Turn the ignition switch to the OFF or LOCK position and wait approximately 10 seconds.
- Repeat steps 1 and 2.
- Restart the engine while holding the device (which may have caused the interference) separate from the registered key.
If this procedure allows the engine to start, NISSAN recommends placing the registered key on a separate key ring to avoid interference from other devices.
BEFORE STARTING THE ENGINE
- Make sure the area around the vehicle is clear.
- Maintenance items should be checked periodically, for example, each time you check engine oil.
- Check that all windows and lights are clean.
- Visually inspect tires for their appearance and condition. Also check tires for proper inflation.
- Lock all doors.
- Position seat and adjust head restraints.
- Adjust inside and outside mirrors.
- Fasten seat belts and ask all passengers to do likewise.
- Check the operation of warning lights when the ignition key is turned to the ON position. See “Warning/indicator lights and audible reminders” in the “2. Instruments and controls” section.
STARTING THE ENGINE
- Apply the parking brake.
- Automatic transmission: Move the selector lever to P (Park) or N (Neutral). (P preferred.) The starter is designed not to operate if the selector lever is in one of the driving positions. Manual transmission: Move the shift lever to N (Neutral) position, and depress the clutch pedal to the floor while cranking the engine. The starter is designed not to operate unless the clutch pedal is fully depressed.
- Crank the engine with your foot off the accelerator pedal by turning the ignition key to START. Release the key when the engine starts. If the engine starts, but fails to run, repeat the above procedure.
- If the engine is very hard to start in extremely cold weather or when restarting, depress the accelerator pedal a little (approximately 1/3 to the floor) and hold it then crank the engine. Release the key and the accelerator pedal when the engine starts.
- If the engine is very hard to start because it is flooded, depress the accelerator pedal all the way to the floor and hold it. Crank the engine for 5 to 6 seconds. After cranking the engine, release the accelerator pedal. Crank the engine with your foot off the accelerator pedal by turning the ignition key to START. Release the key when the engine starts. If the engine starts, but fails to run, repeat the above procedure.
CAUTION Do not operate the starter for more than 15 seconds at a time. If the engine does not start, turn the key off and wait 10 seconds before cranking again, otherwise the starter could be damaged.
- Warm-up Allow the engine to idle for at least 30 seconds after starting. Do not race the engine while warming it up. Drive at moderate speed for a short distance first, especially in cold weather. In cold weather, keep the engine running for a minimum of 2 to 3 minutes before shutting it off. Starting and stopping the engine over a short period of time may make the vehicle more difficult to start.
DRIVING THE VEHICLE
AUTOMATIC TRANSMISSION
5-speed automatic transmission
The automatic transmission in your vehicle is electronically controlled by a transmission control module to produce maximum power and smooth operation. Shown on the following pages are the recommended operating procedures for this transmission. Follow these procedures for maximum vehicle performance and driving enjoyment.
Starting the vehicle
After starting the engine, fully depress the foot brake pedal and push the selector lever button before shifting the selector lever to the R (Reverse), N (Neutral), D (Drive) or Manual shift mode position. Be sure the vehicle is fully stopped before attempting to shift the selector lever. This automatic transmission model is designed so that the foot brake pedal must be depressed before shifting from P (Park) to any drive position while the ignition switch is ON. The selector lever cannot be moved out of P (Park) position and into any of the other gear positions if the ignition key is turned to the LOCK, OFF or ACC position or if the
Starting and driving 5-9
key is removed from the ignition switch.
- Keep the foot brake pedal depressed and push the selector lever button to shift into a driving gear.
- Release the parking brake and foot brake, then gradually start the vehicle in motion.
WARNING
- Do not depress the accelerator pedal while shifting from P (Park) or N (Neutral) to R (Reverse), D (Drive) or manual shift mode. Always depress the brake pedal until shifting is completed. Failure to do so could cause you to lose control and have an accident.
- Cold engine idle speed is high, so use caution when shifting into a forward or reverse gear before the engine has warmed up.
- On slippery roads, do not downshift. This may cause a loss of control.
- Never shift to P (Park) or R (Reverse) while the vehicle is moving forward.
Never shift to P (Park) or D (Drive) while vehicle is moving backward. These could cause an accident.
CAUTION
When stopping the vehicle on an uphill grade, do not hold the vehicle by depressing the accelerator pedal. The foot brake should be used for this purpose.

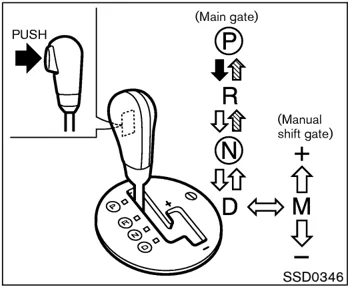
To move the selector lever,
: Push the button while depressing the brake pedal,
: Push the button,
: Just move the selector lever.
Shifting
After starting the engine, fully depress the brake pedal and shift the selector lever from P (Park) to R (Reverse), N (Neutral), D (Drive), or Manual shift mode position.
Push the button to shift into P (Park) or R (Reverse). All other positions can be selected without pushing the button.
5-10 Starting and driving
WARNING
Apply the parking brake if the selector lever is in any position while the engine is not running. Failure to do so could cause the vehicle to move unexpectedly or roll away and result in serious personal injury or property damage.
If the key is turned to OFF or ACC for any reason while the vehicle is in R (Reverse), N (Neutral), or any D (Drive) position, the key cannot be turned to LOCK and be removed from the ignition switch. Move the selector lever to the P (Park) position, then the key can be turned to LOCK.
P (Park): Use this selector position when the vehicle is parked or when starting the engine. Make sure the vehicle is completely stopped. The brake pedal must be depressed and the selector lever button pushed in to move the selector lever from N (Neutral) or any drive position to P (Park). Apply the parking brake. When parking on a hill, first depress the foot brake pedal, apply the parking brake, then shift into the P (Park) position.
CAUTION
Use this position only when the vehicle is completely stopped.
R (Reverse): Use this position to back up. Always be sure the vehicle is completely stopped before selecting R (Reverse). The brake pedal must be depressed and the selector lever button pushed in to move the selector lever from P (Park), N (Neutral) or any drive position to R (Reverse).
N (Neutral): Neither forward nor reverse gear is engaged. The engine can be started in this position. You may shift to N (Neutral) and restart a stalled engine while the vehicle is moving.
D (Drive): Use this position for all normal forward driving.
Manual shift mode When the selector lever is shifted from D to the manual shift gate with the vehicle stopped or while driving, the transmission enters the manual shift mode. Shift range can be selected manually.
In the manual shift mode, the shift range is displayed on the position indicator in the meter. Shift ranges up or down one by one as follows:
M¹ \rightarrow M² \rightarrow M³ \rightarrow M⁴ \rightarrow M⁵ \leftarrow \leftarrow \leftarrow \leftarrow \leftarrow
M⁵ (5th): Use this position for all normal forward driving.
M⁴ (4th): For driving up or down long slopes where engine braking would be advantageous.
M³ (3rd) and M² (2nd): Use for hill climbing or engine braking on downhill grades.
M¹ (1st): Use this position when climbing steep hills slowly or driving slowly through deep snow, sand or mud, or for maximum engine braking on steep downhill grades.
- Remember not to drive at high speeds for extended periods of time in lower than M⁴ range. This reduces fuel economy.
- When shifting up, move the selector lever to the + (up) side. (Shifts to higher range.)
Starting and driving 5-11
When shifting down, move the selector lever to the – (down) side. (Shifts to lower range.)
-
Moving the selector lever to the same side twice will shift the ranges in succession. However, if this motion is rapidly done, the second shifting may not be completed properly.
-
In the manual shift mode, the transmission automatically shifts down to 1st gear before the vehicle comes to a stop. When accelerating again, it is necessary to shift up to the desired range.
-
When canceling the manual shift mode, return the selector lever to the D position. The transmission returns to the normal driving mode.
-
In the manual shift mode, the transmission may not shift to the selected gear. This helps maintain driving performance and reduces the chance of vehicle damage or loss of control.
Accelerator downshift — In D position —
For passing or hill climbing, fully depress the accelerator pedal to the floor. This shifts the transmission down into the lower gear, depending on the vehicle speed.
5-12 Starting and driving
Fail-safe
When fail-safe operation occurs, the automatic transmission will be locked in 4th gear.
If the vehicle is driven under extreme conditions, such as excessive wheel spinning and subsequent hard braking, the fail-safe system may be activated. This will occur even if all electrical circuits are functioning properly. In this case, turn the ignition key OFF and wait for 3 seconds. Then turn the key back to the ON position. The vehicle should return to its normal operating condition. If it does not return to its normal operating condition, have a NISSAN dealer check the transmission and repair if necessary.
 SSD0347
Shift lock release
If the battery charge is low or discharged, the select lever may not be moved from the P (Park) position even with the brake pedal depressed.
To move the selector lever, depress the brake pedal, apply the parking brake, and push the shift lock release button by using a suitable tool as shown. Push the selector lever button, then the selector lever can be moved to N (Neutral). This allows the vehicle to be moved if the battery is discharged.
If the lever cannot be moved out of P (Park), have a NISSAN dealer check the automatic transmission system as soon as possible.
MANUAL TRANSMISSION
Shifting
To change gears, or when upshifting or downshifting, fully depress the clutch pedal, shift into the appropriate gear then slowly and smoothly release the clutch.
This vehicle is equipped with a short throw shifter manual transmission. To ensure smooth gear changes, fully depress the clutch pedal before operating the shift lever. If the clutch pedal is not fully depressed before the transmission is shifted, a gear noise may be heard. Transmission damage could occur.
 SSD0536
Start the vehicle in 1st gear and shift to 2nd, 3rd, 4th and 5th up to 6th gear in sequence according to the vehicle speed.
To back up, depress the shift lever and then move it to the R (Reverse) position after stopping the vehicle completely.
If it is difficult to move the shift lever into R (Reverse) or 1 (Low gear), shift to N (Neutral), then release the clutch pedal. Fully depress the clutch pedal again and shift into R or 1.
WARNING
- Do not downshift abruptly on slippery roads. This may cause a loss of control.
- Do not over-rev the engine when shifting to a lower gear. This may cause a loss of control or engine damage.
CAUTION
-
Do not rest your foot on the clutch pedal while driving. This may damage the clutch.
-
Fully depress the clutch pedal before shifting to help prevent transmission damage.
-
Stop your vehicle completely before shifting into R (Reverse).
-
When the vehicle is stopped with the engine running (for example, at a stop light), shift to N (Neutral) and release the clutch pedal with the foot brake applied.
Starting and driving 5-13
SSD0278
Up-shift indicator
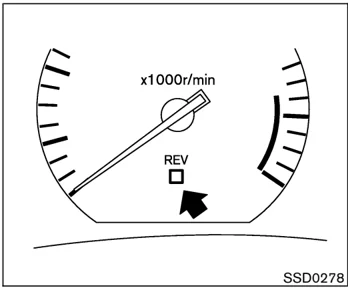
The manual transmission up-shift indicator is located in the tachometer and shows the driver the timing to shift into a higher gear by illuminating. The use of the up-shift indicator will help you to upshift at a constant engine speed (rpm) from any gear.
The up-shift indicator will start flashing when the engine speed is within about 500 rpm of the set figure while driving, and then illuminate after the engine speed reaches the set figure.
The engine speed in revolutions per minute (rpm) for upshifting can be set on the trip computer display. See “Trip computer” in the “2. Instruments and controls” section for the display setting information.
Use the up-shift indicator when driving as follows:
- If the maximum engine speed is desired, set the figure at 6,600 rpm. (The indicator starts flashing from about 6,100 rpm and comes on steady at 6,600 rpm.)
- If the maximum engine torque is desired, set the figure at 4,800 rpm. (The indicator starts flashing from about 4,300 rpm and comes on steady at 4,800 rpm.)
- If you want to break in your vehicle, use of the up-shift indicator with a rather low figure will help you to avoid the high engine speed.
To make the up-shift indicator not come on, set the figure at above 7,600 rpm.
There may be a slight difference between the timing of the up-shift indicator illumination and the tachometer indication.
Suggested up-shift speeds
Shown below are suggested vehicle speeds for shifting into a higher gear. These suggestions relate to fuel economy and vehicle performance. Actual up-shift speeds will vary according to road conditions, the weather and individual driving habits.
For normal acceleration in low altitude areas [less than 4,000 ft (1,219 m)]:
| Gear change | MPH (km/h) |
|---|---|
| 1st to 2nd | 8 (13) |
| 2nd to 3rd | 16 (26) |
| 3rd to 4th | 25 (40) |
| 4th to 5th | 30 (50) |
| 5th to 6th | 33 (53) |
For quick acceleration in low altitude areas or in high altitude areas [over 4,000 ft (1,219 m)]:
| Gear change | MPH (km/h) |
|---|---|
| 1st to 2nd | 15 (24) |
| 2nd to 3rd | 25 (40) |
| 3rd to 4th | 40 (64) |
| 4th to 5th | 45 (72) |
| 5th to 6th | 50 (80) |
5-14 Starting and driving
10% 20% 30% 40% 50% 60% 70% 80% 90%
PARKING BRAKE
Suggested maximum speed in each gear
Downshift to a lower gear if the engine is not running smoothly, or if you need to accelerate.
Do not exceed the maximum suggested speed (shown below) in any gear. For level road driving, use the highest gear suggested for that speed. Always observe posted speed limits, and drive according to the road conditions, which will ensure safe operation. Do not over-rev the engine when shifting to a lower gear as it may cause engine damage or loss of vehicle control.
| Gear | MPH (km/h) |
|---|---|
| 1st | 35 (56) |
| 2nd | 60 (96) |
| 3rd | 90 (144) |
| 4th | — |
| 5th | — |
| 6th | — |
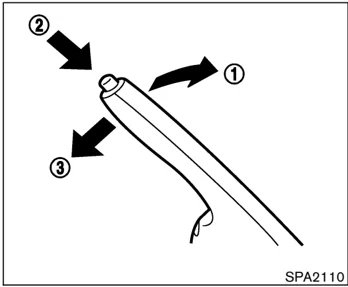
To apply: pull the parking brake lever up ①.
To release:
- Firmly apply the foot brake.
- Automatic transmission models:
Move the selector lever to the P (Park) position.
Manual transmission models:
Place the shift lever in the N (Neutral) position. - While pulling up on the parking brake lever slightly, push the button ② and lower the lever completely ③.
- Before driving, be sure the brake warning light goes out.
WARNING
- Be sure the parking brake is fully released before driving. Failure to do so can cause brake failure and lead to an accident.
- Do not release the parking brake from outside the vehicle.
- Do not use the gear shift in place of the parking brake. When parking, be sure the parking brake is fully engaged.
- Do not leave children unattended in a vehicle. They could release the parking brake and cause an accident.
Starting and driving 5-15
CRUISE CONTROL (if so equipped)
WARNING
Do not use the cruise control when driving under the following conditions:
- When it is not possible to keep the vehicle at a set speed.
- In heavy traffic or in traffic that varies in speed.
- On winding or hilly roads.
- On slippery roads (rain, snow, ice, etc.).
- In very windy areas.
Doing so could cause a loss of vehicle control and result in an accident.
CAUTION
On manual transmission models, do not shift into N (Neutral) without depressing the clutch pedal when the cruise control is set. Should this occur, depress the clutch pedal and turn the main switch off immediately. Failure to do so may cause engine damage.
PRECAUTIONS ON CRUISE CONTROL
- If the cruise control system malfunctions, it cancels automatically. The SET indicator light on the meter panel then blinks to warn the driver.
- If the engine coolant temperature becomes excessively high, the cruise control system will be canceled automatically.
- If the SET indicator light blinks, turn the cruise control MAIN (ON-OFF) switch off and have the system checked by a NISSAN dealer.
- The SET indicator light may blink when the cruise control MAIN switch is turned on while pushing the RES/ACCEL, COAST/SET, or CANCEL switch. To properly set the cruise control system, perform the preceding steps in the order indicated.
 SSD0528
- ACCEL or RESUME switch
- COAST or SET switch
- CANCEL switch
- MAIN (ON-OFF) switch
CRUISE CONTROL OPERATIONS
The cruise control allows driving at a speed between 25 to 89 MPH (40 to 144 km/h) without keeping your foot on the accelerator pedal.
To turn on the cruise control, push the MAIN switch on. The CRUISE indicator light on the meter panel will come on.
5-16 Starting and driving
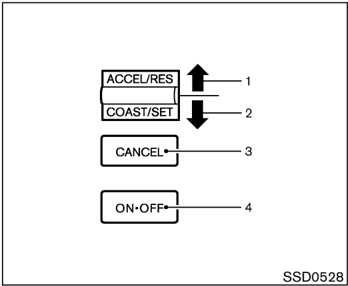
To set cruising speed, accelerate the vehicle to the desired speed, push the COAST/SET switch and release it. (The SET indicator light will come on.) Take your foot off the accelerator pedal. Your vehicle will maintain the set speed.
- To pass another vehicle, depress the accelerator pedal. When you release the pedal, the vehicle will return to the previously set speed.
- The vehicle may not maintain the set speed when going up or down steep hills. If this happens, drive without the cruise control.
To cancel the preset speed, use one of the following three methods:
a) Push the CANCEL switch; The SET indicator light will go out.
b) Tap the brake pedal; The SET indicator light will go out.
c) Turn the MAIN switch off. Both the CRUISE indicator and SET indicator lights will go out.
-
If you depress the brake pedal while pushing the ACCEL/RES set switch and reset at the cruising speed, turn the MAIN switch off once and then turn it on again.
-
The cruise control will automatically be cancelled if the vehicle slows down more than approximately 8 MPH (13 km/h) below the set speed.
-
If you depress the clutch pedal (manual transmission) or move the selector lever to N (Neutral) position (automatic transmission), the cruise control will be canceled.
To reset at a faster cruising speed, use one of the following three methods:
a) Depress the accelerator pedal. When the vehicle attains the desired speed, push and release the COAST/SET switch.
b) Push and hold the ACCEL/RES set switch. When the vehicle attains the speed you desire, release the switch.
c) Push, then quickly release the ACCEL/RES set switch. Each time you do this, the set speed will increase by about 1 MPH (1.6 km/h).
To reset at a slower cruising speed, use one of the following three methods:
a) Lightly tap the brake pedal. When the vehicle attains the desired speed, push the COAST/SET switch and release it.
b) Push and hold the COAST/SET switch. Release the switch when the vehicle slows down to the desired speed.
c) Push, then quickly release the COAST/SET switch. Each time you do this, the set speed will decrease by about 1 MPH (1.6 km/h).
To resume the preset speed, push and release the ACCEL/RES set switch. The vehicle will resume the last set cruising speed when the vehicle speed is over 25 MPH (40 km/h).
Starting and driving 5-17
BREAK-IN SCHEDULE
CAUTION
During the first 1,200 miles (2,000 km), follow these recommendations to obtain maximum engine performance and ensure the future reliability and economy of your new vehicle. Failure to follow these recommendations may result in shortened engine life and reduced engine performance.
- Avoid driving for long periods at constant speed, either fast or slow. Do not run the engine over 4,000 rpm.
- Do not accelerate at full throttle in any gear.
- Avoid quick starts.
- Avoid hard braking as much as possible.
- Do not tow a trailer for the first 500 miles (800 km).
INCREASING FUEL ECONOMY
-
Accelerate slowly and smoothly. Maintain cruising speeds with a constant accelerator position.
-
Drive at moderate speeds on the highway. Driving at high speed will lower fuel economy.
-
Avoid unnecessary stopping and braking. Maintain a safe distance behind other vehicles.
-
Use a proper gear range which suits road conditions. On level roads, shift into high gear as soon as possible.
-
Avoid unnecessary engine idling.
-
Keep your engine tuned up.
-
Follow the recommended periodic maintenance schedule.
-
Keep the tires inflated to the correct pressure. Low tire pressure will increase tire wear and lower fuel economy.
-
Keep the front wheels in correct alignment. Improper alignment will increase tire wear and lower fuel economy.
-
Air conditioner operation lowers fuel economy. Use the air conditioner only when necessary.
-
When cruising at highway speeds, it is more economical to use the air conditioner and leave the windows closed to reduce drag.
-
Use the recommended viscosity engine oil. See "Engine oil and oil filter recommendation" in the "9. Technical and consumer information" section.
5-18 Starting and driving
PARKING/PARKING ON HILLS
MSD0002
- Firmly apply the parking brake.
- Automatic transmission models: Move the selector lever to the P (Park) position. Manual transmission models: Place the shift lever in the R (Reverse) position. When parking on an uphill grade, place the shift lever in the 1 (Low gear) position.
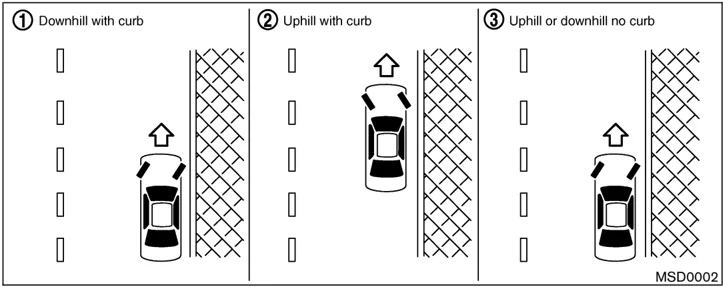
- To help prevent the vehicle from rolling into the street when parked on a sloping drive way, it is a good practice to turn the wheels as illustrated.
- HEADED DOWNHILL WITH CURB: ① Turn the wheels into the curb and move the vehicle forward until the curb side wheel gently touches the curb.
WARNING
- Do not stop or park the vehicle over flammable materials such as dry grass, waste paper or rags. They may ignite and cause a fire.
- Never leave the engine running while the vehicle is unattended.
- Do not leave children unattended inside the vehicle.
WARNING
- Safe parking procedures require that both the parking brake be set and the transmission placed into P (Park) for automatic transmission models or in an appropriate gear for manual transmission models. Failure to do so could cause the vehicle to move unexpectedly or roll away and result in an accident.
- Make sure the automatic transmission selector lever has been pushed as far forward as it can go and cannot be moved without depressing the button at the end of the lever.
Starting and driving 5-19
● HEADED UPHILL WITH CURB: ② Turn the wheels away from the curb and move the vehicle back until the curb side wheel gently touches the curb.
● HEADED UPHILL OR DOWNHILL, NO CURB: ③ Turn the wheels toward the side of the road so the vehicle will move away from the center of the road if it moves.
- Turn the ignition key to the LOCK position and remove the key.
POWER STEERING
The power assisted steering uses a hydraulic pump, driven by the engine, to assist steering.
If the engine stops or drive belt breaks, you will still have control of the vehicle. However, much greater steering effort is needed, especially in sharp turns or at low speeds.
WARNING
If the engine is not running or is turned off while driving, the power assist for the steering will not work. Steering will be much harder to operate.
BRAKE SYSTEM
BRAKING PRECAUTIONS
The brake system has two separate hydraulic circuits. If one circuit malfunctions, you will still have braking at two wheels.
Vacuum assisted brakes
The brake booster aids braking by using engine vacuum. If the engine stops, you can stop the vehicle by depressing the brake pedal. However, greater foot pressure on the brake pedal will be required to stop the vehicle and the stopping distance will be longer.
Using the brakes
Avoid resting your foot on the brake pedal while driving. This overheats the brakes, increases wear on the brakes and pads, and reduces gas mileage.
To help save the brakes and to prevent the brakes from overheating, reduce speed and downshift to a lower gear before going down a slope or long grade. Overheated brakes may reduce braking performance and could result in loss of vehicle control.
5-20 Starting and driving
WARNING
- While driving on a slippery surface, be careful when braking, accelerating or downshifting. Abrupt braking or accelerating could cause the wheels to skid and result in an accident.
- If the engine is not running or is turned off while driving, the power assist for the brakes will not work. Braking will be harder.
Wet brakes
When the vehicle is washed or driven through water, the brakes may get wet. As a result, your braking distance will be longer and the vehicle may pull to one side during braking.
To dry brakes, drive the vehicle at a safe speed while lightly pressing the brake pedal to heat-up the brakes. Do this until the brakes return to normal. Avoid driving the vehicle at high speeds until the brakes function correctly.
Parking brake break-in
Break in the parking brake shoes whenever the stopping effect of the parking brake is weakened or whenever the parking brake shoes and/or drums/rotors are replaced, in order to assure the best braking performance.
This procedure is described in the vehicle service manual and can be performed by a NISSAN dealer.
ANTI-LOCK BRAKE SYSTEM (ABS)
The anti-lock brake system controls the brakes so the wheels will not lock when braking abruptly or when braking on slippery surfaces. The system detects the rotation speed at each wheel and varies the brake fluid pressure to prevent each wheel from locking and sliding. By preventing wheel lockup, the system helps the driver maintain steering control and helps to minimize swerving and spinning on slippery surfaces.
Using the system
Depress the brake pedal and hold it down.
WARNING
Do not pump the brake pedal. Doing so may result in increased stopping distances.
Normal operation
The anti-lock brake system will not operate at speeds below 3 to 6 MPH (5 to 10 km/h) to completely stop the vehicle. (The speeds will vary according to road conditions.) When the anti-lock system senses that one or more wheels are close to locking up, the actuator (under the hood) rapidly applies and releases hydraulic pressure (like pumping the brakes very quickly). While the actuator is working, you may feel a pulsation in the brake pedal and hear a noise or vibration from the actuator under the hood. This is normal and indicates that the anti-lock system is working properly. However, the pulsation may indicate that road conditions are hazardous and extra care is required while driving.
Self-test feature
The anti-lock brake system consists of electronic sensors, electric pumps, and hydraulic solenoids controlled by a computer. The computer has a built-in diagnostic feature that tests the system each time you start the engine and move the vehicle at a low speed in forward or reverse. When the self-test occurs, you may hear a clunk noise and/or feel a pulsation in the brake pedal. This is normal and is not an indication of any malfunction. If the computer senses any malfunction, it switches the anti-lock brake system off and turns on the ABS warning light in the
Starting and driving 5-21
instrument panel. The brake system then oper- ates normally, but without anti-lock assistance.
If the light comes on during the self-test or while driving, take the vehicle to a NISSAN dealer for repair.
WARNING
The anti-lock brake system is a sophis- ticated device, but it cannot prevent ac- cidents resulting from careless or dan- gerous driving techniques. It can help maintain vehicle control during braking on slippery surfaces but remember that the stopping distance on slippery sur- faces will be longer than on normal surfaces even with the anti-lock brake system. Stopping distances may also be longer on rough, gravel or snow covered roads, or if you are using tire chains. Always maintain a safe distance from the vehicle in front of you. Ultimately, the responsibility for safety of self and others rests in the hands of the driver.
Tire type and condition of tires may also affect braking effectiveness.
- When replacing tires, install the specified size of tires to the front and rear.
- When installing a spare tire, make sure it is the proper size and type as specified on the Tire and Loading Information label. See “Vehicle iden- tification” in the “9. Technical and consumer information” section for the Tire and Loading Information la- bel location.
TRACTION CONTROL SYSTEM
(TCS) (if so equipped)
On slippery surfaces such as wet asphalt roads, vehicle wheels may spin when the vehicle is accelerated. This wheel spin reduces accelera- tion, or causes the vehicle to swerve, thus decreasing vehicle stability.
When the vehicle drive wheels begin to spin, the traction control system (TCS) controls the en- gine torque using an electronic control system, and it also controls automatic control shifting if necessary (for automatic transmission models). This reduces spinning of the drive wheels, and result in improved vehicle acceleration perfor- mance. It also improves the vehicle stability by swerving motion.
- When the traction control system is operat- ing, the slip indicator light in the meter panel blinks.
- If the slip indicator light blinks, the vehicle is under slippery conditions. Be sure to drive carefully. See “Slip indicator light” and “Trac- tion control system (TCS) off indicator light” in the “2. Instruments and controls” section.
- Indicator light If a malfunction occurs in the traction control system, the SLIP and TCS OFF indicator lights come on in the meter panel. As long as these indicator lights are on, the traction control function (except the ABS) is canceled. The vehicle will behaves like a
5-22 Starting and driving
model without the traction control system.
WARNING
The traction control system is designed to prevent the wheels from spinning. However, it does not prevent vehicle slipping or spinning due to abrupt steering operation at high speeds or by careless or dangerous driving techniques. Be especially careful when driving on slippery surfaces and always drive safely.
VEHICLE DYNAMIC CONTROL (VDC) SYSTEM (if so equipped)
When accelerating or driving on a slippery surfaces, the tires may spin or slide. With the Vehicle Dynamic Control (VDC) system, sensors detect these movements and control the braking and engine output to help improve vehicle stability.
- When the VDC system is operating, the “SLIP” indicator in the instrument panel blinks.
- When only the Traction Control System (TCS) portion of the VDC system is operating, the “SLIP” indicator in the instrument panel blinks.
- If the “SLIP” indicator blinks, the road conditions are slippery. Be sure to adjust your speed and driving to these conditions. Be sure to drive carefully. See “Slip indicator light”, and “Vehicle Dynamic Control (VDC) OFF indicator light” in the “2. Instruments and controls” section.
- Indicator light If a malfunction occurs in the system, the “SLIP” and “VDC OFF” indicator lights illuminate in the instrument panel. As long as these indicators are illuminated, the VDC system function is canceled.
The VDC system uses an Active Brake Limited Slip (ABLS) system to improve vehicle traction. The ABLS system works when one of the driving wheels is spinning on a slippery surface. The ABLS system brakes the spinning wheel, which distributes the driving power to the other driving wheel. If the vehicle is operated with the VDC system turned off, all VDC system functions and TCS functions will be turned off. The ABLS system and ABS will still operate with the VDC system off. When the ABLS system is activated, the “SLIP” indicator light will blink and you may hear a clunk noise and/or feel a pulsation in the brake pedal. This is normal and is not an indication of a malfunction.
While the VDC system is operating, you may feel a pulsation in the brake pedal and hear a noise or feel a vibration from under the hood. This is normal and indicates that the VDC system is working properly.
The VDC system computer has a built-in diagnostic feature that tests the system each time you start the engine and move the vehicle forward or backward. When the self-test occurs, you may hear a clunk noise and/or feel a pulsation in the brake pedal. This is normal and is not an indication of a malfunction.
Starting and driving 5-23
WARNING
-
The VDC system is designed to help improve driving stability but does not prevent accidents due to abrupt steering operation at high speeds or due to careless or dangerous driving techniques. Reduce vehicle speed and be especially careful when driving and cornering on slippery surfaces and always drive carefully.
-
If engine related parts such as a muffler are not standard equipment or are extremely deteriorated, the “VDC OFF” indicator or “SLIP” indicator or both indicator lights may illuminate.
-
Do not modify the vehicle’s suspension. If suspension parts such as shock absorbers, struts, springs, stabilizer bars and bushings are not NISSAN-approved or are extremely deteriorated the VDC system may not operate properly. This could adversely affect vehicle handling performance, and the “VDC OFF” indica- tor or “SLIP” indicator or both indicator lights may illuminate.
-
If brake related parts such as brake pads, rotors and calipers are not standard equipment or are extremely deteriorated, the “VDC OFF” indicator or “SLIP” indicator or both indicator lights may illuminate.
-
When driving on extremely inclined surfaces such as higher banked corners, the VDC system may not operate properly and the “VDC OFF” indicator or “SLIP” indicator or both indicator lights may illuminate. Do not drive on these types of roads.
-
When driving on an unstable surface such as a turntable, ferry, elevator or ramp, the “VDC OFF” indicator or “SLIP” indicator or both indicator lights may illuminate. This is not a malfunction. Restart the engine after driving onto a stable surface.
-
If wheels or tires other than those recommended are used, the VDC system may not operate properly and the “VDC OFF” indicator or “SLIP” indicator or both indicator lights may illuminate.
-
The VDC system is not a substitute for winter tires or tire chains on a snow-covered road.
5-24 Starting and driving
COLD WEATHER DRIVING
FREEING A FROZEN DOOR LOCK
To prevent a door lock from freezing, apply deicer or glycerin to it through the key hole. If the lock becomes frozen, heat the key before inserting it into the key hole.
ANTI-FREEZE
In the winter when it is anticipated that the temperature will drop below 32°F (0°C), check anti-freeze to assure proper winter protection. For additional information, see “Engine Cooling System” in the “8. Maintenance and do-it-yourself” section.
BATTERY
If the battery is not fully charged during extremely cold weather conditions, the battery fluid may freeze and damage the battery. To maintain maximum efficiency, the battery should be checked regularly. For additional information, see “Battery” in the “8. Maintenance and do-it-yourself” section.
DRAINING OF COOLANT WATER
If the vehicle is to be left outside without anti-freeze, drain the cooling system by opening the drain plug located under the radiator. Refill before operating the vehicle. See “Engine cooling system” in the “8. Maintenance and do-it-yourself” section for changing engine coolant.
TIRE EQUIPMENT
- SUMMER tires are of a tread design to provide superior performance on dry pavement. However, the performance of these tires will be substantially reduced in snowy and icy conditions. If you operate your vehicle on snowy or icy roads, NISSAN recommends the use of MUD & SNOW or ALL SEASON tires on all four wheels. Consult a NISSAN dealer for the tire type, size, speed rating and availability information.
- For additional traction on icy roads, studded tires may be used. However, some provinces and states prohibit their use. Check local, state and provincial laws before installing studded tires.
Skid and traction capabilities of studded snow tires, on wet or dry surfaces, may be poorer than that of non-studded snow tires.
- Tire chains may be used.
CAUTION Tire chains/cables cannot be installed on 265/35R19 size tires. Installation of the tire chains/cables on 265/35R19 size tires will cause damage to the vehicle. If you plan to use tire chains/cables, you should install 245/45R18 size tires on your vehicle.
Use of tire chains may be prohibited according to location. Check the local laws before installing tire chains. When installing tire chains, make sure they are of proper size for the tires on your vehicle and are installed according to the chain manufacturer’s suggestions. Use only SAE Class S chains. Class “S” chains are used on vehicles with restricted tire to vehicle clearance. Vehicles that can use Class “S” chains are designed to meet the SAE standard minimum clearances between the tire and the closest vehicle suspension or body component required to accommodate the use of a winter traction device (tire chains or cables). The minimum clearances are determined using the factory equipped tire size. Other types may damage your vehicle. Use chain tensioners when recommended by the tire chain manufacturer to ensure a tight fit. Loose end links of the tire chain must be secured or removed to prevent the possibility of whipping action damage to the fenders or underbody. If possible, avoid fully loading your vehicle when using tire chains. In addition, drive at a reduced speed. Otherwise, your vehicle may
Starting and driving 5-25
be damaged and/or vehicle handling and perfor- mance may be adversely affected.
- Never install the tire chains on a T-type spare tire.
- Do not use the tire chains on dry roads.
- Tire chains must be installed only on the rear wheels and not on the front wheels.
SPECIAL WINTER EQUIPMENT
It is recommended that the following items be carried in the vehicle during winter:
- a scraper and stiff-bristled brush to remove ice and snow from the windows and wiper blades.
- a sturdy, flat board to be placed under the jack to give it firm support.
- a shovel to dig the vehicle out of snow-drifts.
- extra window washer fluid to refill the reser- voir tank.
DRIVING ON SNOW OR ICE
WARNING
- Wet ice (32°F, 0°C and freezing rain), very cold snow or ice can be slick and very hard to drive on. The vehicle will have much less traction or “grip” under these conditions. Try to avoid driving on wet ice until the road is salted or sanded.
- Whatever the condition, drive with caution. Accelerate and slow down with care. If accelerating or down-shifting too fast, the drive wheels will lose even more traction.
- Allow more stopping distance under these conditions. Braking should be started sooner than on dry pavement.
- Allow greater following distances on slippery roads.
- Watch for slippery spots (glare ice). These may appear on an otherwise clear road in shaded areas. If a patch of ice is seen ahead, brake before reaching it. Try not to brake while on the ice, and avoid any sudden steering maneuvers.
- Do not use cruise control on slippery roads.
- Snow can trap dangerous exhaust gases under your vehicle. Keep snow clear of the exhaust pipe and from around your vehicle.
ENGINE BLOCK HEATER (if so equipped)
An engine block heater to assist extreme cold temperature starting is available through a NISSAN dealer.
WARNING
Do not use your heater with an ungrounded electrical system or two-pronged (cheater) adapters. You can be injured by an electrical shock if you use an ungrounded connection.
5-26 Starting and driving
10% 20% 30% 40% 50% 60% 70% 80% 90%
MEMO
Starting and driving 5-27
10% 20% 30% 40% 50% 60% 70% 80% 90%
MEMO
5-28 Starting and driving