2 Instruments and controls
- Instrument panel ........ 2-2
- Meters and gauges ........ 2-3
- Speedometer and odometer ........ 2-4
- Tachometer ........ 2-5
- Engine coolant temperature gauge ........ 2-6
- Fuel gauge ........ 2-6
- Engine oil pressure gauge ........ 2-7
- Volt meter ........ 2-8
- Trip computer ........ 2-8
- Warning/indicator lights and audible reminders ........ 2-12
- Checking bulbs ........ 2-12
- Warning lights ........ 2-12
- Indicator lights ........ 2-16
- Audible reminders ........ 2-18
- Security systems ........ 2-19
- Vehicle security system ........ 2-19
- NISSAN vehicle immobilizer system ........ 2-20
- Windshield wiper and washer switch ........ 2-22 Rear window wiper and washer switch
- (Coupe models) ........ 2-23 Rear window and outside mirror defroster switch ... 2-24
- Headlight and turn signal switch ........ 2-24
- Xenon headlights ........ 2-24
- Headlight switch ........ 2-25
- Daytime running light system (Canada only) ........ 2-26
- Turn signal switch ........ 2-27
- Instrument brightness control ........ 2-27
- Hazard warning flasher switch ........ 2-27
- Horn ........ 2-28
- Heated seats (if so equipped) ........ 2-28 Vehicle dynamic control (VDC) off switch
- (if so equipped) ........ 2-29 Traction control system (TCS) off switch
- (if so equipped) ........ 2-30
- Clock ........ 2-31
- Adjusting the time ........ 2-31
- Power outlet ........ 2-32
- Storage ........ 2-33 Instrument pocket (except for navigation system
- equipped models) ........ 2-33
- Sunglasses holder (Coupe models) ........ 2-33
- Card holder ........ 2-34
- Cargo net ........ 2-34
- Cup holders ........ 2-35
- Console box ........ 2-36
- Rear floor box ........ 2-36
- Rear parcel box ........ 2-37
- Stowing golf bags ........ 2-37
10% 20% 30% 40% 50% 60% 70% 80% 90%
- Coat hook (Coupe models) ........ 2-39
- Windows ........ 2-39
- Power windows ........ 2-39
- Automatic adjusting function ........ 2-41
- Interior lights ........ 2-41
- Room light ........ 2-41
- Map lights ........ 2-41
- Vanity mirror light ........ 2-42
- Luggage compartment light (Coupe models) ........ 2-42
- Trunk light (Roadster models) ........ 2-43
- HomeLink® universal transceiver (if so equipped) ........ 2-43
- Programming HomeLink® ........ 2-44 Programming HomeLink® for Canadian
- customers ........ 2-45 Operating the HomeLink® universal transceiver... 2-45
- Programming trouble diagnosis ........ 2-45
- Clearing the programmed information ........ 2-46
- Reprogramming a single HomeLink® button ........ 2-46
- If your vehicle is stolen ........ 2-46
10% 20% 30% 40% 50% 60% 70% 80% 90%
INSTRUMENT PANEL
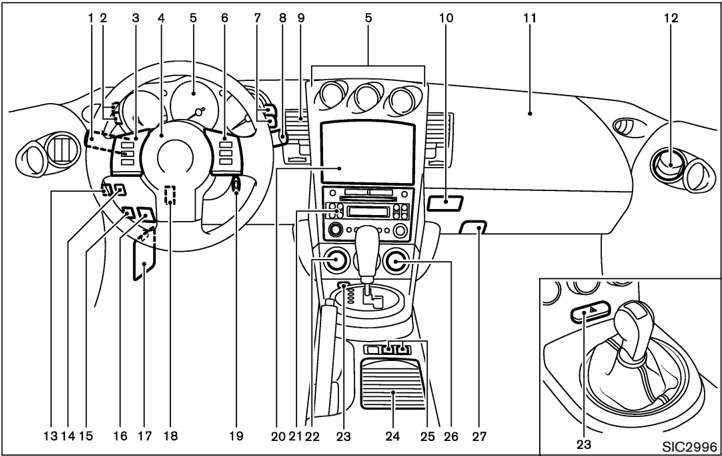
- Headlight/turn signal switch
- Instrument brightness control switch
- Steering wheel switch for audio control (if so equipped)
- Driver supplemental air bag/Horn
- Meters/gauges
- Cruise control main/set switch (if so equipped)
- Trip computer mode/setting switch
- Wiper/washer switch
- Center ventilator
- Card holder
- Passenger supplemental air bag
- Side ventilator
- VDC (Vehicle dynamic control) OFF switch or TCS (Traction control system) OFF switch
- Soft top operating switch (for Roadster models)
- Fuel-filler door opener switch
- Hood lock release handle
- Fuse box
- Tilting steering wheel lock lever
- Ignition switch/steering lock
- Navigation system display* or Instrument pocket
- Audio system/Clock
- Rear window and outside mirror defroster switch
- Hazard warning flasher switch
- Cup holder
- Heated seat switch (if so equipped)
- Heater/air conditioner control
- Power outlet
*: Refer to the separate Navigation System Owner's Manual.
2 - 2 Instruments and controls
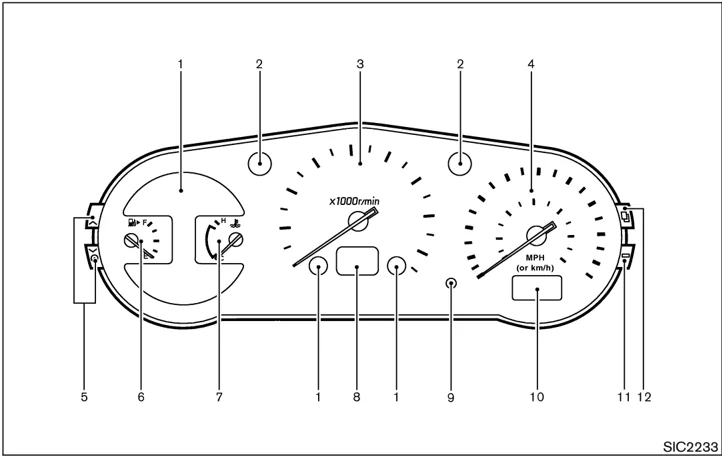
METERS AND GAUGES
SIC2233
Combination meter:
- Warning/Indicator lights
- Turn signal/hazard indicator lights
- Tachometer
- Speedometer
- Instrument brightness control switch (See “Headlight and turn signal switch” later in this section.)
- Fuel gauge
- Engine coolant temperature gauge
- Automatic transmission position indicator or Manual transmission shift up indicator (See “Driving the vehicle” in the “5. Starting and driving” section.)
- Reset knob for trip odometer
- Odometer (Total/Twin trip)
- Trip computer setting switch (See “Trip computer” later in this section.)
- Trip computer mode switch (See “Trip computer” later in this section.)
Instruments and controls 2-3
The odometer records the total distance the vehicle has been driven.
The twin trip odometer records the distance of individual trips.
SIC1948
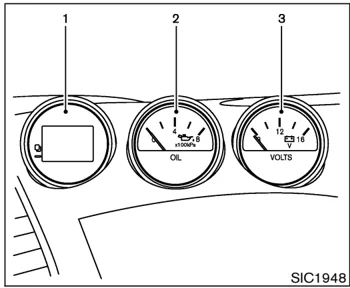
Triple meter:
- Trip computer
- Engine oil pressure gauge
- Volt meter
SIC1949A
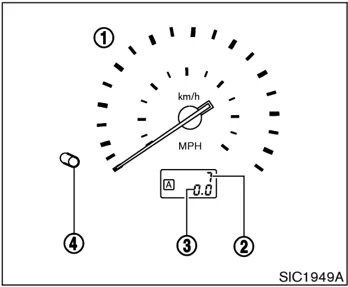
① Speedometer ② Odometer ③ Twin trip odometer ④ Reset knob for trip odometer
SPEEDOMETER AND ODOMETER
Speedometer
The speedometer indicates vehicle speed in miles per hour (MPH) and kilometers per hour (km/h).
Odometer/Twin trip odometer
The odometer/twin trip odometer are displayed when the ignition switch is in the ON position.
2-4 Instruments and controls
Changing the display: Pushing the reset knob changes the display as follows: TRIP A → TRIP B → TRIP A
Resetting the trip odometer: Pushing the reset knob for more than 1 second resets the trip odometer to zero.
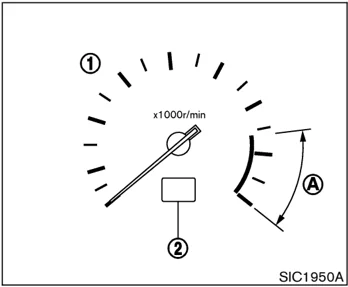
① Tachometer ② Transmission indicator
TACHOMETER
The tachometer indicates engine speed in revolutions per minute (rpm). Do not rev engine into the red zone A.
CAUTION
When engine speed approaches the red zone, shift to a higher gear. Operating the engine in the red zone may cause serious engine damage.
Instruments and controls 2-5

 SIC2371A
ENGINE COOLANT TEMPERATURE GAUGE
The gauge indicates the engine coolant temperature.
The engine coolant temperature is within the normal range Ⓐ when the gauge needle points within the zone shown in the illustration.
The engine coolant temperature will vary with the outside air temperature and driving conditions.
CAUTION
If the gauge indicates engine coolant temperature near the hot (H) end of the normal range, reduce vehicle speed to decrease temperature. If the gauge is over the normal range, stop the vehicle as soon as safely possible. If the engine is overheated, continued operation of the vehicle may seriously damage the engine. See "If your vehicle overheats" in the "6. In case of emergency" section for immediate action required.
 SIC2556
FUEL GAUGE
The gauge indicates the approximate fuel level in the tank.
The gauge may move slightly during braking, turning, acceleration, or going up or down hill.
The gauge needle is designed to move to the E (Empty) position when the ignition key is turned to the OFF position.
Refill the fuel tank before the gauge registers the E (Empty) position.
2-6 Instruments and controls
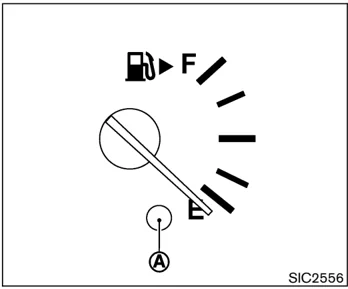
The low fuel warning light comes on when the fuel tank is getting low. Refuel as soon as it is convenient, preferably before the gauge reaches the E position. There will be a small reserve of fuel in the tank when the fuel gauge needle reaches the E position.
The indicates that the fuel-filler door is located on the passenger’s side of the vehicle.
CAUTION
- If the vehicle runs out of fuel, the malfunction indicator lamp (MIL) may come on. Refuel as soon as possible. After a few driving trips, the lamp should turn off. If the lamp remains on after a few driving trips, have the vehicle inspected by a NISSAN dealer.
- For additional information, see “Malfunction indicator lamp (MIL)” later in this section.

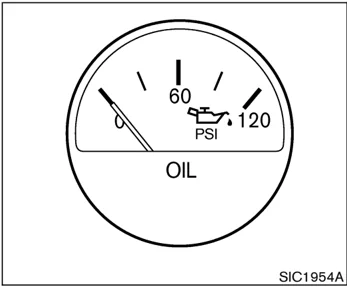
Type A ENGINE OIL PRESSURE GAUGE
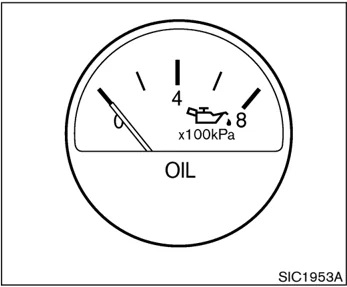
The gauge indicates the engine lubrication system oil pressure while the engine is running. When the engine speed is high, the engine oil pressure is also high. When it is low, the gauge indicates the low oil pressure.
Type B
CAUTION
- This gauge is not designed to indicate low engine oil level. Use the dipstick to check the oil level. (See “Engine oil” in the “8. Maintenance and do-it-yourself” section.)
- If the gauge needle does not move with the proper amount of engine oil, have the vehicle checked by a NISSAN dealer. Continued vehicle
Instruments and controls 2-7
operation in such a condition could cause serious damage to the engine.
SIC1955
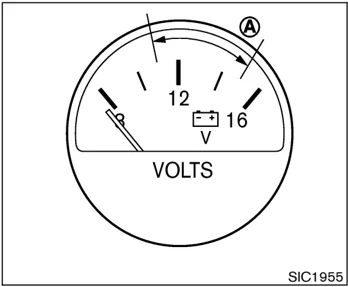
VOLT METER
When the ignition switch is turned to the ON position, the volt meter indicates the battery voltage; while the engine is running, it indicates the alternator voltage of 11 - 15 volts (normal range A). However, while cranking the engine, the volts drop below the normal range.
If the needle is not in the normal range A while the engine is running, it may indicate that the charging system is not functioning properly. Have the system checked by a NISSAN dealer.
SIC2234
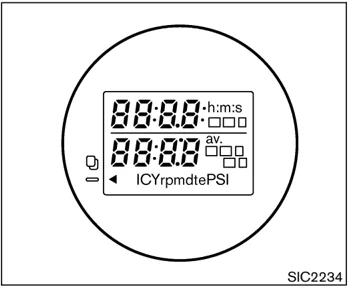
TRIP COMPUTER
The display of the trip computer is situated in the triple meter. When the ignition switch is turned to ON, the display scrolls all the modes of the trip computer and then shows the mode chosen before the ignition switch is turned OFF.
2-8 Instruments and controls
SIC2997
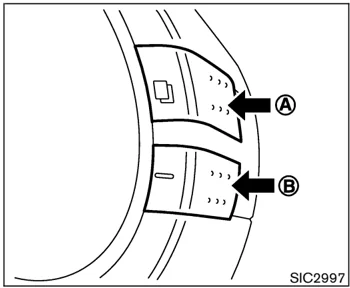
Switches for the trip computer are located on the side of the combination meter panel. To operate the trip computer, push the side of the switches as shown above.
Ⓐ: Trip computer mode switch Ⓑ: Trip computer setting switch
When the ignition switch is turned to ON, modes of the trip computer can be selected by pushing the trip computer mode switch Ⓐ.
Each time the mode switch Ⓐ is pushed, the display will change as follows:
Speed indicator → Outside air temperature (ICY) → Distance to empty (dte) → Average fuel consumption and speed → Elapsed time and trip odometer → Stopwatch → Tire pressure indicator (PSI) → Up-shift indicator setting (for M/T models) → Speed indicator
Speed indicator (mph or km/h)
The vehicle speed is displayed in MPH or km/h while driving.
The speed indicator in the trip computer indicates the reference speed. The actual speed indicated by the speedometer (combination meter) may differ from the one in the trip computer.
Outside air temperature (ICY — °F or °C)
The outside air temperature is displayed in °F or °C in the range of −22 to 131°F (−30 to 55°C).
The outside air temperature mode includes a low temperature warning feature: below 37°F (3°C), the outside air temperature mode is automatically selected and the ICY indicator will illuminate in order to draw the driver's attention. Push the mode switch Ⓐ if you wish to return to the mode that was selected before the warning occurred. The ICY indicator will continue blinking as long as the temperature remains below 39°F (4°C).
The ambient temperature sensor is located in front of the radiator. The sensor may be affected by road or engine heat, wind directions and other driving conditions. The display may differ from the actual ambient temperature or the temperature displayed on various signs or billboards.
Distance to empty (dte — mls or km)
The distance to empty (dte) mode provides you with an estimation of the distance that can be driven before refueling. The dte is constantly being calculated, based on the amount of fuel in the fuel tank and the actual fuel consumption.
The display is updated every 30 seconds.
The dte mode includes a low range warning feature: when the fuel level is low, the dte mode is automatically selected and the digits blink in order to draw the driver's attention. Press the mode switch Ⓐ if you wish to return to the mode that was selected before the warning occurred. The dte indicator will remain blinking until the vehicle is refuelled.
When the fuel level drops even lower, the dte display will change to (----).
NOTE:
- If the amount of fuel added while the ignition switch is OFF is small, the display just before the ignition switch is
Instruments and controls 2-9
turned OFF may continue to be displayed.
- When driving uphill or rounding curves, the fuel in the tank shifts, which may momentarily change the display.
Average fuel consumption (mpg or l (liter)/100 km) and speed (av. mph or av. km/h)
Fuel consumption: The average fuel consumption mode shows the average fuel consumption since the last reset. Resetting is done by pushing the trip computer setting switch Ⓑ for more than approximately 1 second. (The average speed is also reset at the same time.)
The display is updated every 30 seconds. At about the first 1/3 miles (500 m) after a reset, the display shows (----).
Speed: The average speed mode shows the average vehicle speed since the last reset. Resetting is done by pushing the setting switch Ⓑ for more than approximately 1 second. (The average fuel consumption is also reset at the same time.)
The display is updated every 30 seconds. The first 30 seconds after a reset, the display shows (----).
Elapsed time (h:m:s) and trip odometer (mls or km)
Elapsed time: The elapsed time mode shows the time since the last reset. The displayed time can be reset by pushing the trip computer setting switch Ⓑ for more than approximately 1 second. (The trip odometer is also reset at the same time.)
Trip odometer: The trip odometer mode shows the total distance the vehicle has been driven since the last reset. Resetting is done by pushing the setting switch Ⓑ for more than approximately 1 second. (The elapsed time is also reset at the same time.)
Stopwatch (h:m:s) You can use the trip computer as a stopwatch. Each time the trip computer setting switch Ⓑ is pushed, the stopwatch will be operated as follows:
After 100 hours, the time will start from the reset display again.
Even if the display is switched to the other mode while the time is starting, the stopwatch continues to advance until you stop the time in the stopwatch mode. When the ignition switch is turned to the OFF position, the time is reset.
Tire pressure indicator (PSI) The tire pressure indicator shows tire pressure (0 - 63 psi) of all tires (except the spare tire) by sending a signal from a sensor that is installed in each wheel. Push the trip computer setting switch Ⓑ to change the display to F (front) or R (rear).
The tire pressure sensor will activate only when the vehicle is driven at speeds above 16 MPH (25 km/h). If the tire pressure signal cannot be received correctly, the display shows (----).
The tire pressure indicator mode includes a low tire pressure warning feature. If the vehicle is being driven with low tire pressure, the tire pressure indicator mode is automatically selected and the PSI indicator will blink in order to attract the driver's attention. Push the trip computer mode switch Ⓐ if you wish to return to the mode that was selected before the warning occurred. The PSI indicator will continue blinking until the tire pressure of each tire is properly adjusted.
2-10 Instruments and controls
10% 20% 30% 40% 50% 60% 70% 80% 90%

For additional information, see “Tire pressure monitoring system (TPMS)” in the “5. Starting and driving” section and “Flat tire” in the “6. In case of emergency” section.
Tire pressure shown in the display may rise or fall while driving depending on the driving conditions (heat, etc.) and/or the outside temperature. This does not indicate a system malfunction.
⚠ WARNING
The TPMS is not a substitute for the regular tire pressure check. Be sure to check the tire pressure regularly and adjust it to the COLD tire pressure shown in the tire placard.
Up-shift indicator setting (rpm) (for manual transmission models)
The up-shift indicator setting mode is used to set the desired engine speed (rpm) for the up-shift indicator (situated in the tachometer) to illuminate. When the engine speed approaches or reaches the set figure, the up-shift indicator will flash or illuminate to show the driver the timing for shifting into a higher gear. See “Driving the vehicle” in the “5. Starting and driving” section for the use of the up-shift indicator.
When the up-shift indicator setting mode is selected, the rpm indicator blinks and the engine speed currently set is displayed. (The initial factory setting is 6,600 rpm.) The figure can be changed between 2,000 and 8,000 rpm by pushing trip computer setting switch Ⓑ. Pressing the switch for less than approximately 1 second will add the figure by 100 rpm. If pushing for more than approximately 1 second, the figure will increase by 500 rpm.
If the battery cable is disconnected, the set engine speed will be returned to the initial figure (6,600 rpm).
Display priority
If a low outside air temperature warning, low dte (distance to empty) range warning and low tire pressure warning occur simultaneously, other display modes switch automatically to the outside air temperature display.
When trip computer mode switch Ⓐ is pressed, the display switches to the mode chosen before the warning display, but the ICY indicator will continue blinking.
Instruments and controls 2-11
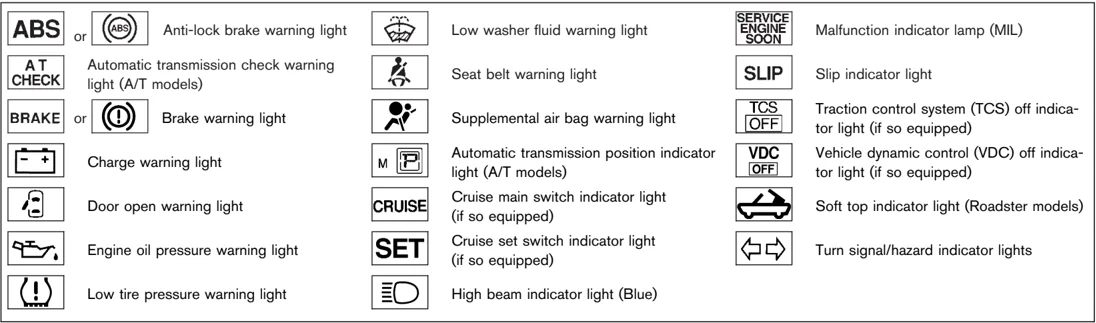
WARNING/INDICATOR LIGHTS AND AUDIBLE REMINDERS
| Icon | Description |
|---|---|
| ABS or | Anti-lock brake warning light |
| AT CHECK | Automatic transmission check warning light (A/T models) |
| BRAKE or | Brake warning light |
| Charge warning light | |
| Door open warning light | |
| Engine oil pressure warning light | |
| Low tire pressure warning light | |
| Low washer fluid warning light | |
| Seat belt warning light | |
| Supplemental air bag warning light | |
| M | Automatic transmission position indicator light (A/T models) |
| CRUISE | Cruise main switch indicator light (if so equipped) |
| SET | Cruise set switch indicator light (if so equipped) |
| High beam indicator light (Blue) | |
| Malfunction indicator lamp (MIL) | |
| SLIP | Slip indicator light |
| TCS OFF | Traction control system (TCS) off indicator light (if so equipped) |
| VDC OFF | Vehicle dynamic control (VDC) off indicator light (if so equipped) |
| Soft top indicator light (Roadster models) | |
| Turn signal/hazard indicator lights |
CHECKING BULBS
Apply the parking brake and turn the ignition key to ON without starting the engine. The following lights will come on:
, BRAKE or , ,
The following lights come on briefly and then go off:
, ABS or , , SLIP, TCS OFF, VDC OFF, AT CHECK
If any light fails to come on, it may indicate a burned-out bulb or an open circuit in the electrical system. Have the system repaired promptly.
WARNING LIGHTS
ABS or Anti-lock brake warning light
When the ignition switch is turned to the ON position, the anti-lock brake warning light will illuminate and then turn off. This indicates the anti-lock brake system (ABS) is operational.
If the light comes on while the engine is running, it may indicate the anti-lock brake system is not functioning properly. Have the system checked by a NISSAN dealer.
If a malfunction occurs in the system, the anti-lock function of the brake will cease operation but the ordinary brakes will continue to operate. See “Anti-lock brake system (ABS)” in the “5. Starting and driving” section for further details.
If the light comes on while you are driving, contact a NISSAN dealer for repair.
2-12 Instruments and controls
AT CHECK Automatic transmission check warning light (A/T models)
When the ignition switch is turned to the ON position, the automatic transmission check warning light comes on and then turns off. This indicates that the automatic transmission system is operational.
If the light comes on while the engine is running or while driving, it may indicate that the automatic transmission system is not functioning properly. Have a NISSAN dealer check and repair the transmission.
BRAKE or (P) Brake warning light
This light functions for both the parking brake and the foot brake systems.
Parking brake indicator:
When the ignition switch is in the ON position, the light comes on when the parking brake is applied.
Low brake fluid warning light:
The light warns of a low brake fluid level. If the light comes on while the engine is running with the parking brake not applied, stop the vehicle and perform the following:
- Check the brake fluid level. Add brake fluid as necessary. See “Brake and clutch fluid” in the “8. Maintenance and do-it-yourself” section.
WARNING
- Your brake system may not be working properly if the warning light is on. Driving could be dangerous. If you judge it to be safe, drive carefully to the nearest service station for repairs. Otherwise, have your vehicle towed because driving it could be dangerous.
- Pressing the brake pedal with the engine stopped and/or a low brake fluid level may increase your stopping distance and braking will require greater pedal effort as well as pedal travel.
- If the brake fluid level is below the MINIMUM or MIN mark on the brake fluid reservoir, do not drive until the brake system has been checked at a NISSAN dealer.
- If the brake fluid level is correct, have the warning system checked by a NISSAN dealer.
Anti-lock brake system warning indicator:
When the parking brake is released and the brake fluid level is sufficient, if both the brake warning light and the anti-lock brake warning light illuminate, it may indicate the anti-lock brake system is not functioning properly. Have the brake system checked by a NISSAN dealer. See “Anti-lock brake warning light” earlier in this section.
Charge warning light
If the light comes on while the engine is running, it may indicate that the charging system is not functioning properly. Turn the engine off and check the alternator belt. If the belt is loose, broken, missing or if the light remains on, see a NISSAN dealer immediately.
CAUTION
Do not continue driving if the belt is loose, broken or missing.
Door open warning light
This light comes on when any of the doors and/or rear hatch are not closed securely while the ignition switch is in the ON position.
Instruments and controls 2-13

Engine oil pressure warning light
This light warns of low engine oil pressure. If the light flickers or comes on during normal driving, pull off the road in a safe area, stop the engine immediately and call a NISSAN dealer or other authorized repair shop.
The engine oil pressure warning light is not designed to indicate a low oil level. Use the dipstick to check the oil level. See "Engine oil" in the "8. Maintenance and do-it-yourself" section.
CAUTION
Running the engine with the engine oil pressure warning light on could cause serious damage to the engine almost immediately. Turn off the engine as soon as it is safe to do so.
Low tire pressure warning light
Your vehicle is equipped with a tire pressure monitoring system (TPMS) that monitors the tire pressure of all tires except the spare.
The low tire pressure warning light warns of low tire pressure or indicates that the TPMS is not functioning properly.
After the ignition switch is turned ON, this light illuminates for about 1 second and turns off.
Low tire pressure warning:
If the vehicle is being driven with low tire pressure, the warning light will illuminate. The PSI indicator will also flash in the trip computer display.
When the low tire pressure warning light illuminates, you should stop and adjust the tire pressure to the recommended COLD tire pressure shown on the Tire and Loading Information label to turn the light OFF.
For additional information, see "Tire pressure monitoring system (TPMS)" in the "5. Starting and driving" section and in the "6. In case of emergency" section.
TPMS malfunction:
If the TPMS is not functioning properly, the low tire pressure warning light will flash for approximately 1 minute when the ignition switch is turned ON. The light will remain on after the 1 minute. Have the system checked by a NISSAN dealer.
For additional information, see "Tire pressure monitoring system (TPMS)" in the "5. Starting and driving" section.
WARNING
- If the light does not illuminate with the ignition switch turned ON, have the vehicle checked by a NISSAN dealer as soon as possible.
- If the light illuminates while driving, avoid sudden steering maneuvers or abrupt braking, reduce vehicle speed, pull off the road to a safe location and stop the vehicle as soon as possible. Serious vehicle damage could occur and may lead to an accident and could result in serious personal injury. Check the tire pressure for all four tires. Adjust the tire pressure to the recommended COLD tire pressure shown on the Tire and Loading Information label to turn the low tire pressure warning light OFF. If the light still comes on while driving after adjusting the tire pressure, a tire may be flat. If you have a flat tire, replace
2-14 Instruments and controls
it with a spare tire as soon as possible.
- When a spare tire is mounted or a wheel is replaced, tire pressure will not be indicated, the TPMS will not function and the low tire pressure warning light will flash. Contact your NISSAN dealer as soon as possible for tire replacement and/or system resetting.
- Replacing tires with those not originally specified by NISSAN could affect the proper operation of the TPMS.
CAUTION
- The TPMS is not a substitute for the regular tire pressure check. Be sure to check the tire pressure regularly.
- If the vehicle is being driven at speeds of less than 16 MPH (25 km/h), the TPMS may not operate correctly.
- Be sure to install the specified size of tires to the front and rear.
Low washer fluid warning light This light comes on when the washer fluid is at a low level. Add washer fluid as necessary. See “Window washer fluid” in the “8. Maintenance and do-it-yourself” section.
Seat belt warning light The seat belt warning light and chime remind you to fasten seat belts. The light illuminates whenever the ignition key is turned to ON, and will remain illuminated until the driver’s seat belt is fastened.
See “Seat belts” in the “1. Safety — Seats, seat belts and supplemental restraint system” section for precautions on seat belt usage.
Supplemental air bag warning light After turning the ignition key to the ON position, the supplemental air bag warning light will illuminate. The supplemental air bag warning light will turn off after about 7 seconds if the system is operational.
If any of the following conditions occur, the supplemental front air bag, supplemental side air bag (if so equipped) and curtain side-impact air bag (if so equipped), and pre-tensioner seat belt systems need servicing and your vehicle must be taken to a NISSAN dealer.
- The supplemental air bag warning light remains on after approximately 7 seconds.
- The supplemental air bag warning light flashes intermittently.
- The supplemental air bag warning light does not come on at all.
Unless checked and repaired, the supplemental restraint system (air bag system) and/or the pre-tensioner seat belt may not function properly. For additional information, see “Supplemental restraint system” in the “1. Safety — Seats, seat belts and supplemental restraint system” section.
WARNING
If the supplemental air bag warning light is on, it could mean that the supplemental front air bag, supplemental side air bag, curtain side-impact air bag systems and/or pre-tensioner seat
Instruments and controls 2-15
belt systems will not operate in an accident. To help avoid injury to yourself or others, have your vehicle checked by a NISSAN dealer as soon as possible.
INDICATOR LIGHTS
Automatic transmission position indicator light (A/T models)
When the ignition key is turned to the ON position, the indicator in the tachometer shows the automatic transmission selector lever position. See "Driving the vehicle" (automatic transmission) in the "5. Starting and driving" section.
Cruise main switch indicator light (if so equipped)
The light comes on when the cruise control main switch is pushed. The light goes out when the main switch is pushed again. When the cruise main switch indicator light comes on, the cruise control system is operational.
SET Cruise set switch indicator light (if so equipped)
The light comes on while the vehicle speed is controlled by the cruise control system. If the light blinks while the engine is running, it may indicate the cruise control system is not functioning properly. Have the system checked by a NISSAN dealer.
High beam indicator light (Blue)
This light comes on when the headlight high beam is on and goes out when the low beam is selected.
Malfunction indicator lamp (MIL)
If the malfunction indicator lamp (MIL) comes on steady or blinks while the engine is running, it may indicate a potential emission control malfunction.
The malfunction indicator lamp may also come on steady if the fuel-filler cap is loose or missing, or if the vehicle runs out of fuel. Check to make sure the fuel-filler cap is installed and closed tightly, and that the vehicle has at least 3 US gallons (14 liters) of fuel in the fuel tank.
After a few driving trips, the SERVICE ENGINE SOON lamp should turn off if no other potential emission control system malfunction exists.
If this indicator lamp comes on steady for 20 seconds and then blinks for 10 seconds when the engine is not running, it indicates that the vehicle is not ready for an emission control system inspection/maintenance test. See "Readiness for inspection/maintenance (I/M) test" in the "9. Technical and consumer information" section of this manual.
Operation
The malfunction indicator lamp will come on in one of two ways:
• Malfunction indicator lamp on steady — An emission control system malfunction has been detected. Check the fuel-filler cap. If the fuel-filler cap is loose or missing, tighten or install the cap and continue to drive the vehicle. The SERVICE ENGINE SOON lamp should turn off after a few driving trips. If the SERVICE ENGINE SOON lamp does not turn off after a few driving trips, have the vehicle inspected by a NISSAN dealer. You do not need to have your vehicle towed to the dealer.
• Malfunction indicator lamp blinking — An engine misfire has been detected which may damage the emission control system. To reduce or avoid emission control system damage: a) Do not drive at speeds above 45 MPH (72 km/h). b) Avoid hard acceleration or deceleration.
2-16 Instruments and controls
c) Avoid steep uphill grades. d) If possible, reduce the amount of cargo being hauled or towed.
The malfunction indicator lamp may stop blinking and come on steady.
Have the vehicle inspected by a NISSAN dealer. You do not need to have your vehicle towed to the dealer.
CAUTION
Continued vehicle operation without having the emission control system checked and repaired as necessary could lead to poor driveability, reduced fuel economy, and possible damage to the emission control system.
SLIP Slip indicator light
The light will blink when the vehicle dynamic control (VDC) system or the traction control system (TCS) is operating, thus alerting the driver to the fact that the road surface is slippery and the vehicle is nearing its traction limits.
This light also comes on when the ignition switch is turned to the ON position. The light will turn off if the VDC or TCS is operational.
TCS OFF Traction control system (TCS) off indicator light (if so equipped)
The light comes on when the traction control system (TCS) off switch is pushed to OFF. This indicates the traction control system is not operating.
This light also comes on when the ignition key is turned to the ON position. The light will turn off if the traction control system (TCS) is operational.
When the traction control system off indicator light and slip indicator light come on with the traction control system turned on, this light alerts the driver to the fact that the traction control system's fail-safe mode is operating, that is the system may not be functioning properly. Have the system checked by a NISSAN dealer. If a malfunction occurs in the system, the traction control function will be canceled but the vehicle is still driveable. For additional information, see "Traction control system (TCS)" in the "5. Starting and driving" section of this manual.
VDC OFF Vehicle dynamic control (VDC) off indicator light (if so equipped)
The light comes on when the vehicle dynamic control (VDC) off switch is pushed to OFF. This indicates the vehicle dynamic control system and traction control system are not operating.
This light also comes on when the ignition key is turned to the ON position. The light will turn off if the vehicle dynamic control (VDC) system is operational.
When the vehicle dynamic control off indicator light and slip indicator light come on with the vehicle dynamic control system turned on, this light alerts the driver to the fact that the vehicle dynamic control system's fail-safe mode is operating, that is the system may not be functioning properly. Have the system checked by a NISSAN dealer. If a malfunction occurs in the system, the vehicle dynamic control system function will be canceled but the vehicle is still driveable. For additional information, see "Vehicle dynamic control (VDC) system" in the "5. Starting and driving" section of this manual.
Soft top indicator light (Roadster models)
This light illuminates when the soft top is being operated or it is stopped before reaching a full open/close state. When the top is fully opened, the light will turn off. When the top is fully closed, the light will flash.
The soft top can be moved with the soft top
Instruments and controls 2-17
operating switch only under all of the following conditions:
- When the vehicle is stopped.
- When the foot brake pedal is depressed.
- When the ignition switch is ON.
CAUTION
Operate the soft top with the engine running to prevent a discharged battery.
When the soft top is in motion, and any of the above conditions are discontinued or the passenger power seat switches (on the cushion or the seatback) are operated, the top will stop moving. Remove your hand from the operating switch, and push it again under the above conditions until the top is fully opened or closed. The soft top indicator light will turn off when the top open operation is completely finished. When closing the top, the light, which is illuminated, will begin to flash when the top close operation is completely finished. Securely engage the top to the vehicle by operating the top latch lever. The light will turn off.
If the soft top indicator light flashes with the ignition switch ON (whether the top is operated or not, and when the top is engaged), it may indicate the electric soft top control unit is not functioning properly. Have your vehicle checked by a NISSAN dealer as soon as possible.
For more details about the electric soft top operation, see "Soft top" in the "3. Pre-driving checks and adjustments" section.
Turn signal/hazard indicator lights
The light flashes when the turn signal switch lever or hazard switch is turned on.
AUDIBLE REMINDERS
Key reminder chime
The chime will sound if the driver's side door is opened while the key is left in the ignition switch (ignition switch is turned off). Remove the key and take it with you when leaving the vehicle.
Light reminder chime
The chime will sound when the driver's door is opened with the headlight switch on unless the key is in the ignition switch. Make sure to turn the light switch off when you leave the vehicle.
Seat belt warning chime
The chime will sound for about 6 seconds unless the driver's seat belt is securely fastened.
Brake pad wear warning
The disc brake pads have audible wear warnings. When a brake pad requires replacement, it will make a high pitched scraping sound when the vehicle is in motion whether or not the brake pedal is depressed. Have the brakes checked as soon as possible if the warning sound is heard.
2-18 Instruments and controls
SECURITY SYSTEMS
 SIC2132
Your vehicle has two types of security systems, as follows:
- Vehicle Security System
- NISSAN Vehicle Immobilizer System
The security condition will be shown by the security indicator light.
VEHICLE SECURITY SYSTEM
The vehicle security system provides visual and audible alarm signals if someone opens the doors or rear hatch/trunk lid when the system is armed. It is not, however, a motion detection type system that activates when a vehicle is moved or when a vibration occurs.
The system helps deter vehicle theft but cannot prevent it, nor can it prevent the theft of interior or exterior vehicle components in all situations. Always secure your vehicle even if parking for a brief period. Never leave your keys in the vehicle, and always lock the vehicle when unattended. Be aware of your surroundings, and park in secure, well-lit areas whenever possible.
Many devices offering additional protection, such as component locks, identification markers, and tracking systems, are available at auto supply stores and specialty shops. A NISSAN dealer may also offer such equipment. Check with your insurance company to see if you may be eligible for discounts for various theft protection features.
 SIC1699A
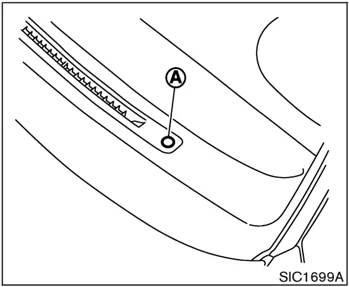
Security indicator light
This light (A) blinks whenever the ignition switch is in the LOCK, OFF or ACC position. This is normal.
How to arm the vehicle security system
- Close all windows.
The system can be activated even if the windows are open.
- Remove the key from the ignition switch.
Instruments and controls 2-19
- Close and lock all doors and rear hatch/trunk lid.
Lock all doors by using the key or the keyfob. When using the keyfob, the hazard indicators flash twice to indicate all doors are locked.
- Confirm that the security indicator light comes on. The security indicator light glows for about 30 seconds and then blinks. The system is now activated. If, during this 30 second time period, the door is unlocked by the key or the keyfob, or the ignition key is turned to ACC or ON, the system will not activate.
Even when the driver and/or passengers are in the vehicle, the system will activate with all doors and rear hatch/trunk lid locked and ignition key off. Turn the ignition key to ACC to turn the system off.
Vehicle security system activation
The security system will give the following alarm:
- The headlights blink and the horn sounds intermittently.
- The alarm automatically turns off after approximately 50 seconds. However, the alarm reactivates if the vehicle is tampered with again. The alarm can be shut off by unlocking a door with the key, or by pushing the UNLOCK button on the keyfob.
The alarm is activated by:
- Opening the door without using the key or keyfob.
- Opening the rear hatch or the trunk lid without using the keyfob.
How to stop an activated alarm
The alarm will stop only by unlocking a door with the key, or by pushing the UNLOCK button on keyfob. The alarm will not stop if the ignition key is turned to ACC or ON.
If the system does not operate as described above, have it checked by a NISSAN dealer.
NISSAN VEHICLE IMMOBILIZER SYSTEM
The NISSAN Vehicle Immobilizer System will not allow the engine to start without the use of the registered key.
If the engine fails to start using the registered key (for example, when interference is caused by another registered key, an automated toll road device or automated payment device on the key ring), restart the engine using the following procedures:
- Leave the ignition switch in the ON position for approximately 5 seconds.
- Turn the ignition switch to the OFF or LOCK position and wait approximately 10 seconds.
- Repeat steps 1 and 2.
- Restart the engine while holding the device (which may have caused the interference) separate from the registered key.
If this procedure allows the engine to start, NISSAN recommends placing the registered key on a separate key ring to avoid interference from other devices.
Statement related to section 15 of FCC rules for NISSAN Vehicle Immobilizer System (CONT ASSY-BCM, ANT ASSY-IMMOBILIZER)
This device complies with part 15 of the FCC Rules and RSS-210 of Industry Canada. Operation is subject to the following two conditions;
(1) This device may not cause harmful interference, and (2) this device must accept any interference received, including interference that may cause undesired operation of the device.
CHANGES OR MODIFICATIONS NOT EXPRESSLY APPROVED BY THE PARTY RE-
2-20 Instruments and controls
SPONSIBLE FOR COMPLIANCE COULD VOID THE USER’S AUTHORITY TO OPER- ATE THE EQUIPMENT.
SIC1699A
Security indicator light
This light A blinks whenever the ignition switch is in the LOCK, OFF or ACC position. This function indicates the security system equipped on the vehicle is operational.
If the NISSAN Vehicle Immobilizer System is malfunctioning, this light will remain on while the ignition switch is in the ON position.
If the light still remains on and/or the engine will not start, see a NISSAN dealer for NISSAN Vehicle Immobilizer System service as soon as possible. Bring all reg- istered keys that you have when visiting a
NISSAN dealer for service.
Instruments and controls 2-21
WINDSHIELD WIPER AND WASHER SWITCH
 SIC2998
The windshield wiper and washer operates when the ignition switch is in the ON position.
Push the lever down to operate the wiper at the following speed:
① Intermittent (INT) — intermittent operation can be adjusted by turning the knob toward Ⓐ (Slower) or Ⓑ (Faster). The intermittent operation speed varies in accordance with the vehicle speed. (For example, when the vehicle speed is high, the intermittent operation speed will be faster.)
② Low (LO) — continuous low speed operation
③ High (HI) — continuous high speed operation
Push the lever up ④ to have one sweep operation (MIST) of the wiper.
Pull the lever toward you ⑤ to operate the washer. Then the wiper will also operate several times.
WARNING
In freezing temperatures the washer solution may freeze on the windshield and obscure your vision which may lead to an accident. Warm the windshield with the defroster before you wash the windshield.
CAUTION
- Do not operate the washer continuously for more than 30 seconds.
- Do not operate the washer if the reservoir tank is empty.
- Do not fill the window washer reservoir tank with washer fluid concentrates at full strength. Some methyl alcohol based washer fluid concentrates may permanently stain the grille if spilled while filling the window washer reservoir tank.
- Pre-mix washer fluid concentrates with water to the manufacturer's recommended levels before pouring the fluid into the window washer reservoir tank. Do not use the window washer reservoir tank to mix the washer fluid concentrate and water.
2-22 Instruments and controls
REAR WINDOW WIPER AND WASHER SWITCH (Coupe models)
 SIC2999
The rear window wiper and washer operate when the ignition switch is in the ON position. Turn the switch clockwise from the OFF position to operate the wiper. ① Intermittent (INT) — intermittent operation (not adjustable) ② Low (ON) — continuous low speed operation Push the switch forward ③ to operate the washer. Then the wiper will also operate several times.
WARNING
In freezing temperatures the washer solution may freeze on the rear window and obscure your vision. Warm the rear window with the defroster before you wash the rear window.
CAUTION
- If the rear window wiper operation is interrupted by snow or ice, the wiper may stop moving to protect its motor. If this occurs, turn the wiper switch to OFF and remove the snow or ice on and around the wiper arms. After about 1 minute, turn the switch ON again to operate the wiper.
- Do not operate the washer continuously for more than 30 seconds.
- Do not operate the washer if the reservoir tank is empty.
- Do not fill the window washer reser- voir tank with washer fluid concentrates at full strength. Some methyl alcohol based washer fluid concentrates may permanently stain the grille if spilled while filling the window washer reservoir tank.
- Pre-mix washer fluid concentrates with water to the manufacturer's recommended levels before pouring the fluid into the window washer reservoir tank. Do not use the window washer reservoir tank to mix the washer fluid concentrate and water.
Instruments and controls 2-23
REAR WINDOW AND OUTSIDE MIRROR DEFROSTER SWITCH
 SIC3000
To defog/defrost the rear window glass and outside mirrors, start the engine and push the switch on. The indicator light (A) will come on. Push the switch again to turn the defroster off.
It will automatically turn off in approximately 15 minutes.
CAUTION
- When cleaning the inner side of the rear window, be careful not to scratch or damage the rear window de-
froster.
- Do not use the rear window defroster switch while the soft top is being operated or fully opened. The heat may damage the top material and/or components. (for Roadster models)
2-24 Instruments and controls
HEADLIGHT AND TURN SIGNAL SWITCH
XENON HEADLIGHTS
WARNING
HIGH VOLTAGE
- When xenon headlights are on, they produce a high voltage. To prevent an electric shock, never attempt to modify or disassemble. Always have your xenon headlights replaced at a NISSAN dealer.
- Xenon headlights provide considerably more light than conventional headlights. If they are not correctly aimed, they might temporarily blind an oncoming driver or the driver ahead of you and cause a serious accident. If headlights are not aimed correctly, immediately take your vehicle to a NISSAN dealer and have the headlights adjusted correctly.
When the xenon headlight is initially turned on, its brightness or color varies slightly. However, the color and brightness will soon stabilize.