Automatic operation
Cooling and/or dehumidified heating (AUTO):
This mode may be used all year round. The system works automatically to control the inside temperature, air flow distribution and fan speed after the preferred temperature is set manually.
- Turn the “ ” fan speed control dial and air flow control dial to the “AUTO” position. The air conditioner will automatically turn on. (The “A/C” button indicator light illuminates.)
- Turn the temperature control dial to set the desired temperature.
- The temperature can be set within the following range. — For U.S.: 60 to 90°F (16 to 32°C) — For Canada: 64 to 90°F (18 to 32°C)
- The temperature of the passenger compartment will be maintained automatically. Air flow distribution and fan speed are also controlled automatically.
A visible mist may be seen coming from the ventilators in hot, humid conditions as the air is cooled rapidly. This does not indicate a malfunction.
Heating (A/C OFF):
The air conditioner does not activate. When you need to heat only, use this mode.
- Turn the “ ” fan speed control dial and air flow control dial to the “AUTO” position. (The air conditioner will turn on.)
- Push the “A/C” button to turn off the air conditioner. (The “A/C” button indicator light will turn off.)
- Turn the temperature control dial to set the desired temperature.
- The temperature of the passenger compartment will be maintained automatically. Air flow distribution and fan speed are also controlled automatically.
- Do not set the temperature lower than the outside air temperature. Otherwise the system may not work properly.
- Not recommended if windows fog up.
Dehumidified defrosting or defogging:
- Turn the “ ” fan speed control dial to the desired position.
- Turn the air flow control dial to the “ ” position.
- Turn the temperature control dial to set the desired temperature.
- To quickly remove ice from the outside of the windows, turn the “ ” fan speed control dial to the maximum position.
- As soon as possible after the windshield is clean, turn the air flow control dial to the “AUTO” position to return to the auto mode.
- When the air flow control dial is turned to the “ ” or “ ” position, the air conditioner will automatically be turned on at outside temperatures above 23°F (-5°C) to defog the windshield, and the air recirculation mode will automatically be turned off.
Outside air is drawn into the passenger compartment to improve the defogging performance.
Manual operation
Fan speed control:
Turn the “ ” fan speed control dial clockwise (+) or counterclockwise (-) to manually control the fan speed.
Turn the dial to the “AUTO” position to return to automatic control of the fan speed.
Center display, heater, air conditioner, audio, phone and voice recognition systems 4-19
Air recirculation: Push the “ ” intake air control button to recirculate interior air inside the vehicle. The indicator light on the “ ” side will come on.
The air recirculation mode cannot be activated when the air conditioner is in the front defrosting mode “ ”.
Outside air circulation: Push the “ ” intake air control button to draw outside air into the passenger compartment. The indicator light on the “ ” side will come on.
Automatic intake air control: In the AUTO mode, the intake air will be controlled automatically. To manually control the intake air, push the “ ” intake air control button. To return to the automatic control mode, push the “ ” intake air control button for approximately 2 seconds. The indicator lights (both air recirculation and outside air circulation sides) will flash twice, and then the intake air will be controlled automatically.
Air flow control: Turning the air flow control dial selects the air outlet to:
: Air flows from center and side ventilators.
: Air flows from center and side ventilators and foot outlets.
: Air flows mainly from foot outlets.
: Air flows from defroster and foot outlets.
: Air flows mainly from defroster outlets.
To turn the system off Turn the “ ” fan speed control dial to the “OFF” position.
4-20 Center display, heater, air conditioner, audio, phone and voice recognition systems
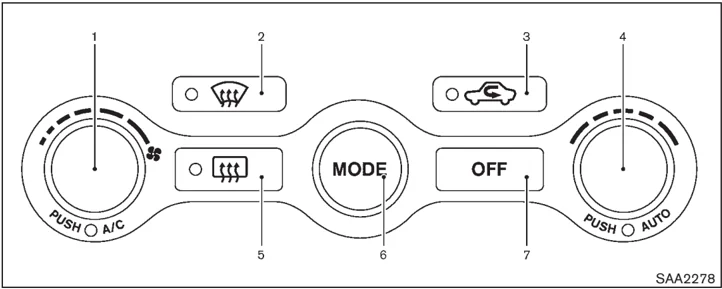
SAA2278 Type B
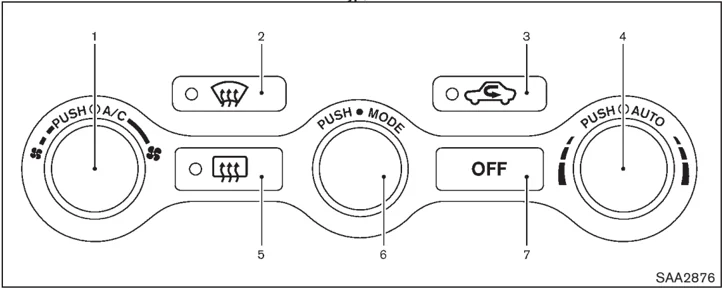
SAA2876 Type C
- “A/C” air conditioner ON/OFF button/“ ” fan speed control dial
- “ ” front defroster button
- “ ” intake air control button
- “AUTO” automatic air conditioner ON button/ Temperature control dial
- “ ” rear window defroster button (See “REAR WINDOW DEFROSTER SWITCH” in the “2. Instruments and controls” section.)
- “MODE” manual air flow control button
- “OFF” button
AUTOMATIC AIR CONDITIONER (Type B/Type C)
Automatic operation
Cooling and/or dehumidified heating (AUTO):
This mode may be used all year round. The system works automatically to control the inside temperature, air flow distribution and fan speed after the preferred temperature is set manually.
- Push the “AUTO” button on. (The indicator on the button will illuminate and AUTO will be displayed.)
- Turn the temperature control dial to set the desired temperature.
• The temperature can be set within the following range.
Center display, heater, air conditioner, audio, phone and voice recognition systems 4-21
— For U.S.: 60 to 90°F (16 to 32°C) — For Canada: 64 to 90°F (18 to 32°C)
• The temperature of the passenger compartment will be maintained automatically. Air flow distribution and fan speed will also be controlled automatically.
A visible mist may be seen coming from the ventilators in hot, humid conditions as the air is cooled rapidly. This does not indicate a malfunction.
Heating (A/C OFF):
The air conditioner does not activate in this mode. When you need to heat only, use this mode.
- Push the “AUTO” button on.
- Push the “A/C” button. (The A/C indicator will turn off.)
- Turn the temperature control dial to set the desired temperature.
• The temperature of the passenger compartment will be maintained automatically. Air flow distribution and fan speed are also controlled automatically.
• Do not set the temperature lower than the outside air temperature. Otherwise the system may not work properly.
• Not recommended if windows fog up.
Dehumidified defrosting or defogging:
- Push the “☰” front defroster button. (The indicator light on the button will come on.)
- Turn the temperature control dial to set the desired temperature.
• To quickly remove ice from the outside of the windows, turn the “ ” fan speed control dial and set it to the maximum position.
• As soon as possible after the windshield is clean, push the “AUTO” button to return to the auto mode.
• When the “☰” front defroster button is pushed, the air conditioner will automatically be turned on at outside temperatures above 23°F (-5°C) to defog the windshield, and the air recirculate mode will automatically be turned off.
Outside air is drawn into the passenger compartment to improve the defogging performance.
Manual operation
Fan speed control:
Turn the “ ” fan speed control dial to manually control the fan speed.
Push the “AUTO” button to return to automatic control of the fan speed.
Air recirculation:
Push the “ ” intake air control button to recirculate interior air inside the vehicle. The indicator light “ ” will come on.
The air recirculation mode cannot be activated when the air conditioner is in the front defrosting mode “☰”.
Outside air circulation:
Push the “ ” intake air control button to change the air circulation from the intake air to the outside air. The indicator light “ ” will turn off.
Automatic air intake control:
In the AUTO mode, the intake air will be controlled automatically. To manually control the intake air, push the “ ” intake air control button. To return to the automatic control mode, push the “ ” intake air control button for approximately 2 seconds. The indicator lights will flash twice, and then the intake air will be controlled automatically.
Air flow control:
Pushing the “MODE” manual air flow control button selects the air outlet to:
4-22 Center display, heater, air conditioner, audio, phone and voice recognition systems
: Air flows from center and side ventilators. : Air flows from center and side ventilators and foot outlets. : Air flows mainly from foot outlets. : Air flows from defroster and foot outlets.
To turn the system off Push the “OFF” button.
SAA2324
SAA2315
OPERATING TIPS
When the engine coolant temperature and outside air temperature are low, the air flow from the foot outlets may not operate for a maximum of 150 seconds. This is not a malfunction. After the coolant temperature warms up, air will flow normally from the foot outlets.
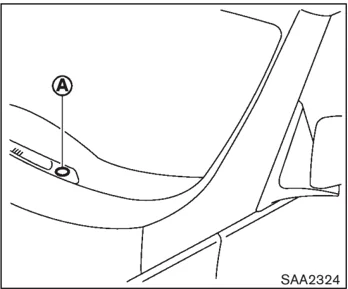
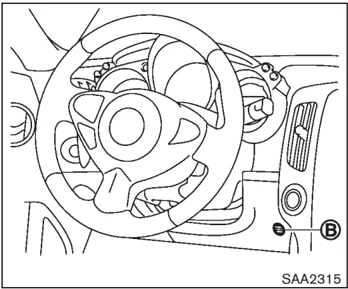
The sensors A and B on the instrument panel helps maintain a constant temperature. Do not put anything on or around this sensor.
I N-CABIN MICROFILTER
The air conditioning system is equipped with an in-cabin microfilter which collects dirt, pollen, dust, etc. To make sure the air conditioner heats, defogs, and ventilates efficiently, replace the filter in accordance with the maintenance schedule in the NISSAN Service and Maintenance Guide. To replace the filter, contact a NISSAN dealer.
The filter should be replaced if air flow is extremely decreased or when windows fog up easily when operating heater or air conditioning system.
Replacement interval: Every 15,000 miles (24,000 km) or 1 year
Center display, heater, air conditioner, audio, phone and voice recognition systems 4-23
AUDIO SYSTEM
SERVICING AIR CONDITIONER
The air conditioning system in your NISSAN is charged with a refrigerant designed with the environment in mind. This refrigerant will not harm the earth's ozone layer. However, special charging equipment and lubricant are required when servicing your NISSAN air conditioner. Using improper refrigerants or lubricants will cause severe damage to your air conditioning system. (See "CAPACITIES AND RECOMMENDED FUEL/LUBRICANTS" in the "9. Technical and consumer information" section for air conditioning system refrigerant and lubricant recommendations.)
Your NISSAN dealer will be able to service your environmentally friendly air conditioning system.
WARNING The system contains refrigerant under high pressure. To avoid personal injury, any air conditioner service should be done only by an experienced technician with the proper equipment.
AUDIO OPERATION PRECAUTIONS
Radio
Push the ignition switch to the ACC or ON position and push the radio band select button to turn on the radio. If you listen to the radio with the engine not running, the ignition switch should be pushed to the ACC position.
Radio reception is affected by station signal strength, distance from radio transmitter, buildings, bridges, mountains and other external influences. Intermittent changes in reception quality normally are caused by these external influences.
Using a cellular phone in or near the vehicle may influence radio reception quality.
Radio reception:
Your NISSAN radio system is equipped with state-of-the-art electronic circuits to enhance radio reception. These circuits are designed to extend reception range, and to enhance the quality of that reception.
However there are some general characteristics of both FM and AM radio signals that can affect radio reception quality in a moving vehicle, even when the finest equipment is used. These characteristics are completely normal in a given reception area, and do not indicate any malfunction in your NISSAN radio system.
Reception conditions will constantly change because of vehicle movement. Buildings, terrain, signal distance and interference from other vehicles can work against ideal reception. Described below are some of the factors that can affect your radio reception.
Some cellular phones or other devices may cause interference or a buzzing noise to come from the audio system speakers. Storing the device in a different location may reduce or eliminate the noise.
4-24 Center display, heater, air conditioner, audio, phone and voice recognition systems
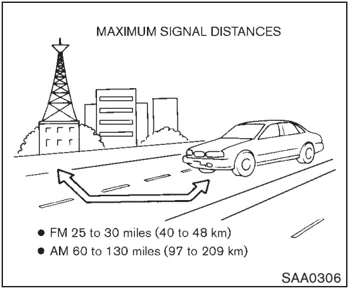
FM radio reception:
Range: FM range is normally limited to 25 to 30 miles (40 to 48 km), with monaural (single channel) FM having slightly more range than stereo FM. External influences may sometimes interfere with FM station reception even if the FM station is within 25 miles (40 km). The strength of the FM signal is directly related to the distance between the transmitter and receiver. FM signals follow a line-of-sight path, exhibiting many of the same characteristics as light. For example they will reflect off objects.
Fade and drift: As your vehicle moves away from a station transmitter, the signals will tend to fade and/or drift.
Static and flutter: During signal interference from buildings, large hills or due to antenna position, usually in conjunction with increased distance from the station transmitter, static or flutter can be heard. This can be reduced by lowering the treble setting to reduce the treble response.
Multipath reception: Because of the reflective characteristics of FM signals, direct and reflected signals reach the receiver at the same time. The signals may cancel each other, resulting in momentary flutter or loss of sound.
AM radio reception:
AM signals, because of their low frequency, can bend around objects and skip along the ground. In addition, the signals can be bounced off the ionosphere and bent back to earth. Because of these characteristics. AM signals are also subject to interference as they travel from transmitter to receiver.
Fading: Occurs while the vehicle is passing through freeway underpasses or in areas with many tall buildings. It can also occur for several seconds during ionospheric turbulence even in areas where no obstacles exist.
Static: Caused by thunderstorms, electrical power lines, electric signs and even traffic lights.
Satellite radio reception (if so equipped):
When the satellite radio is used for the first time or the battery has been replaced, the satellite radio may not work properly. This is not a malfunction. Wait more than 10 minutes with the satellite radio ON and the vehicle outside of any metal or large building for the satellite radio to receive all of the necessary data.
The satellite radio mode requires an active XM® Satellite Radio subscription. The satellite radio is not available in Alaska, Hawaii and Guam.
The satellite radio performance may be affected if cargo carried on the roof blocks the satellite radio signal.
If possible, do not put cargo near the satellite antenna.
A build up of ice on the satellite radio antenna can affect satellite radio performance. Remove the ice to restore satellite radio reception.
Center display, heater, air conditioner, audio, phone and voice recognition systems 4-25
 SAA0480
Compact Disc (CD) player
- Do not force a compact disc into the CD insert slot. This could damage the CD and/ or CD changer/player.
- Trying to load a CD with the CD door closed could damage the CD and/or CD changer.
- During cold weather or rainy days, the player may malfunction due to the humidity. If this occurs, remove the CD and dehumidify or ventilate the player completely.
- The player may skip while driving on rough roads.
- The CD player sometimes cannot function when the passenger compartment temperature is extremely high. Decrease the temperature before use.
- Only use high quality 4.7 in (12 cm) round discs that have the "COMPACT disc DIGITAL AUDIO" logo on the disc or packaging.
- Do not expose the CD to direct sunlight.
- CDs that are of poor quality, dirty, scratched, covered with fingerprints, or that have pin holes may not work properly.
- The following CDs may not work properly: — Copy control compact discs (CCCD) — Recordable compact discs (CD-R) — Rewritable compact discs (CD-RW)
- Do not use the following CDs as they may cause the CD player to malfunction. — 3.1 in (8 cm) discs — CDs that are not round — CDs with a paper label — CDs that are warped, scratched, or have abnormal edges
- This audio system can only play prerecorded CDs. It has no capabilities to record or burn CDs.
- If the CD cannot be played, one of the following messages will be displayed.
CHECK DISC: — Confirm that the CD is inserted correctly (the label side is facing up, etc.). — Confirm that the CD is not bent or warped and it is free of scratches.
PUSH EJECT: This is an error due to the temperature inside the player is too high. Remove the CD by pushing the EJECT button, and after a short time reinsert the CD. The CD can be played when the temperature of the player returns to normal.
UNPLAYABLE: The file is unplayable in this audio system (only MP3 or WMA CD).
4-26 Center display, heater, air conditioner, audio, phone and voice recognition systems
 LHA0484
DVD (Digital Versatile Disc) player (models with navigation system)
-
Do not force a compact disc into the CD/DVD insert slot. This could damage the CD/DVD player.
-
During cold weather or rainy days, the player may malfunction due to humidity. If this occurs, remove the CD/DVD and dehumidify or ventilate the player completely.
-
The player may skip while driving on rough roads.
-
The CD/DVD player sometimes cannot function when the passenger compartment temperature is extremely high. Decrease the temperature before use.
-
Only use high quality 4.7 in (12 cm) round discs that have the "COMPACT disc DIGITAL AUDIO" or "DVD Video" logo on the disc or packaging.
-
Do not expose the CD/DVD to direct sunlight.
-
CD/DVDs that are of poor quality, dirty, scratched, covered with fingerprints, or that have pinholes may not work properly.
-
The following CD/DVDs are not guaranteed to play:
- Copy control compact discs (CCCD)
- Recordable compact discs (CD-R)
- Rewritable compact discs (CD-RW)
- Recordable DVDs (DVD±R, DVD±R DL)
- Rewritable DVDs (DVD±RW, DVD±RW DL)
-
Do not use the following CD/DVDs as they may cause the CD/DVD player to malfunction.
- 3.1 in (8 cm) discs
- CD/DVDs that are not round
- CD/DVDs with a paper label
- CD/DVDs that are warped, scratched or have abnormal edges
- This audio system can only play prerecorded CD/DVDs. It has no capabilities to record or burn CD/DVDs.
-
If the CD/DVD cannot be played, one of the following messages will be displayed.
Disc Read Error:
- Confirm that the CD/DVD is inserted correctly (the label side is facing up, etc.).
- Confirm that the CD/DVD is not bent or warped and it is free of scratches.
Please Eject Disc:
- This may be an error due to the temperature inside the player being too high. Remove the CD/DVD by pushing the EJECT button, and after a short time reinsert the CD/DVD. The CD/DVD can
Center display, heater, air conditioner, audio, phone and voice recognition systems 4-27
be played when the temperature of the player returns to normal. If the error persists, consult your local dealership.
Unplayable File: — The file may be copy protected. — The file is not MP3, WMA, AAC, M4A or DivX® type.
Region Invalid: — The DVD is not for region 1 or all regions. Use DVDs with a region code “1”, “ALL” or “1 included” for your DVD entertainment system. (The region code Ⓐ is displayed as a small symbol printed on the top of the DVD Ⓑ .) This vehicle-installed DVD player cannot play DVDs with a region code other than “1” or “ALL”.
Copyright and trademark: • The technology protected by the U.S. patent and other intellectual property rights owned by Macrovision Corporation and other right holders is adopted for this system. • This copyright protected technology cannot be used without a permit from Macrovision Corporation. It is limited to be personal use, etc., as long as the permit from Macrovision Corporation is not issued.
• Modifying or disassembling is prohibited. • Dolby digital is manufactured under license from Dolby Laboratories, Inc. • Dolby and the double D mark “DOLBY DIGITAL” are trademarks of Dolby Laboratories, Inc. • DTS and DTS Digital Surround “dts” are registered trademarks of Digital Theater Systems, Inc.
Parental level (parental control): DVDs with the parental control setting can be played with this system. Please use your own judgement to set the parental control with the system.
Disc selection: The following disc formats can be played with the DVD drive. • DVD-VIDEO • VIDEO-CD • CD-DA (Conventional Compact Disc) • DTS-CD
USB (Universal Serial Bus) (models with navigation system) This system supports various USB memory sticks, USB hard drives and iPod® players.
There are some USB devices which may not be supported with this system. • Make sure that the USB device is connected correctly into the USB connector. • Do not force the memory stick or USB cable into the USB connector. This could damage the connector. • During cold weather or rainy days, the player may malfunction due to humidity. If this occurs, remove the USB device and dehumidify or ventilate the USB player completely. • The USB player sometimes cannot function when the passenger compartment temperature is extremely high. Decrease the temperature before use. • Do not leave USB memory in a place prone to static electricity or where the air conditioner blows directly. The data in the USB memory may be damaged. • The vehicle is not equipped with a USB memory stick. • A USB device cannot be formatted with this system. To format a USB device, use a personal computer. • Partitioned USB devices may not be played correctly.
4-28 Center display, heater, air conditioner, audio, phone and voice recognition systems
- Some characters used in other languages (Chinese, Japanese, etc.) are not displayed properly on the vehicle center screen. Using English language characters with a USB device is recommended.
- Do not connect a USB device if a connector or cable is wet. Allow the cable and/or connectors to dry completely before connecting the USB device. If the connector is exposed to fluids other than water, evaporative residue may cause a short between the connector pins.
- Large video podcast files cause slow responses in an iPod®. The vehicle center display may momentarily black out, but it will soon recover.
- If an iPod® automatically selects large video podcast files while in the shuffle mode, the vehicle center display may momentarily black out, but it will soon recover.
- Audiobooks may not play in the same order as they appear on an iPod®.
- An iPod® nano (1st Generation) may remain in fast forward or rewind mode if it is connected during a seek operation. In this case, please manually reset the iPod®.
- An iPod® nano (2nd Generation) will continue to fast forward or rewind if it is disconnected during a seek operation.
- An incorrect song title may appear when the Play Mode is changed while using the iPod® nano (2nd Generation)
iPod® is a trademark of Apple Inc., registered in the U.S. and other countries.
Compressed Audio Files (MP3/WMA/ AAC/ATRAC3)
Explanation of terms:
- MP3 — MP3 is short for Moving Pictures Experts Group Audio Layer 3. MP3 is the most well known compressed digital audio file format. This format allows for near "CD quality" sound, but at a fraction of the size of normal audio files. MP3 conversion of an audio track can reduce the file size by approximately a 10:1 ratio (Sampling: 44.1 kHz, Bit rate: 128 kbps) with virtually no perceptible loss in quality. The compression reduces certain parts of sound that seem inaudible to most people.
- WMA — Windows Media Audio (WMA) is a compressed audio format created by Microsoft as an alternative to MP3. The WMA codec offers greater file compression than the MP3 codec, enabling storage of more digital audio tracks in the same amount of space when compared to MP3s at the same level of quality.
- AAC/M4A — Advanced Audio Coding (AAC) is a lossy audio compression format. Audio files that have been encoded with AAC are generally smaller in size and deliver a higher quality of sound than MP3.
- ATRAC3, ATRAC3 Plus - Adaptive Transform Acoustic Coding (ATRAC) is a lossy audio compression format developed by Sony.
- Bit rate — Bit rate denotes the number of bits per second used by a digital music file. The size and quality of a compressed digital audio file is determined by the bit rate used when encoding the file.
- Sampling frequency — Sampling frequency is the rate at which the samples of a signal are converted from analog to digital (A/D conversion) per second.
- Multisession — Multisession is one of the methods for writing data to media. Writing data once to the media is called a single session, and writing more than once is called a multisession.
- ID3/WMA Tag — The ID3/WMA tag is the part of the encoded MP3 or WMA file that contains information about the digital music file such as song title, artist, album title, encoding bit rate, track time duration, etc. ID3 tag information is displayed on the
Center display, heater, air conditioner, audio, phone and voice recognition systems 4-29
Album/Artist/Track title line on the display.
- Windows® and Windows Media® are registered trademarks or trademarks of Microsoft Corporation in the United States of America and/or other countries.
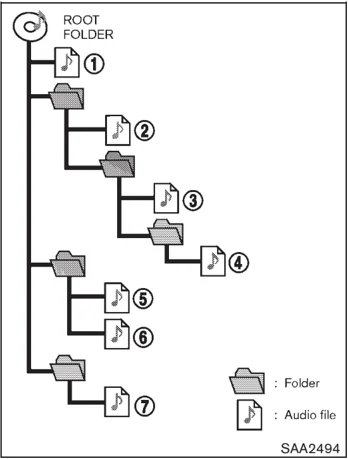
The playback order is the order in which the files were written by the writing software, so the files might not play in the desired order.
Music playback order of compressed audio files is as illustrated in the next figure.
Playback order:
- The folder names of folders not containing compressed audio files are not shown in the display.
- If there is a file in the top level of a disc/USB, "Root Folder" is displayed.
4-30 Center display, heater, air conditioner, audio, phone and voice recognition systems
Specification chart:
| Supported media | CD, CD-R, CD-RW, DVD-ROM, DVD±R, DVD±RW, DVD±R DL, USB2.0 | ||
| Supported file systems | CD, CD-R, CD-RW, DVD-ROM, DVD±R, DVD±RW, DVD±R DL: ISO9660 LEVEL1, ISO9660 LEVEL2, Romeo, Joliet* ISO9660 Level 3 (packet writing) is not supported.* Files saved using the Live File System component (on a Windows Vista-based computer) are not supported.UDF Bridge (UDF1.02+ISO9660), UDF1.5, UDF2.0* VDF1.5/VDF2.0 (packet writing) is not supported. | ||
| USB memory: FAT16, FAT32 | |||
| Supported versions*1 | MP3 | Version | MPEG1 Audio Layer 3 |
| Sampling frequency | 8 kHz - 48 kHz | ||
| Bit rate | 8 kbps - 320 kbps, VBR*4 | ||
| WMA*2 | Version | WMA7, WMA8, WMA9 | |
| Sampling frequency | 32 kHz - 48 kHz | ||
| Bit rate | 32 kbps - 192 kbps, VBR*4 | ||
| AAC | Version | MPEG-AAC | |
| Sampling frequency | 8 kHz - 96 kHz | ||
| Bit rate | 16 kbps - 320 kbps, VBR*4 | ||
| ATRAC | Version | ATRAC3, ATRAC3 Plus | |
| Tag information (Song title and Artist name) | ID3 tag VER1.0, VER1.1, VER2.2, VER2.3, VER2.4 (MP3 only) | ||
| WMA tag (WMA only) | |||
| Folder levels | With navigation system:Folder levels: 8, Folders: 255 (including root folder), Files: 512 (Max. 255 files for one folder)Without navigation system:Folder levels: 8, Folders and files: 999 (Max. 255 files for one folder) |
Center display, heater, air conditioner, audio, phone and voice recognition systems 4-31
| Text character number limitation | With navigation system: 100 charactersWithout navigation system: 64 characters |
|---|---|
| Displayable character codes*3 | 01: ASCII, 02: ISO-8859-1, 03: UNICODE (UTF-16 BOM Big Endian), 04: UNICODE (UTF-16 Non-BOM Big Endian), 05: UNICODE (UTF-8), 06: UNICODE (Non-UTF-16 BOM Little Endian), 07: SHIFT-JIS |
*1 Files created with a combination of 48 kHz sampling frequency and 64 kbps bit rate cannot be played.
*2 Protected WMA files (DRM) cannot be played.
*3 Available codes depend on what kind of media, versions and information are going to be displayed.
*4 When VBR files are played, the playback time may not be displayed correctly.
4-32 Center display, heater, air conditioner, audio, phone and voice recognition systems
Troubleshooting guide:
| Symptom | Cause and Countermeasure |
|---|---|
| Cannot play | Check if the disc or USB device was inserted correctly. |
| Check if the disc is scratched or dirty. | |
| Check if there is condensation inside the player, and if there is, wait until the condensation is gone (about 1 hour) before using the player. | |
| If there is a temperature increase error, the player will play correctly after it returns to the normal temperature. | |
| If there is a mixture of music CD files (CD-DA data) and compressed audio files on a CD, only the music CD files (CD-DA data) will be played. | |
| Files with extensions other than ".MP3 (.mp3)", ".WMA (.wma)", ".AAC (.aac)", ".M4A (.m4a)", or ".AA3 (.aa3)" cannot be played. In addition, the character codes and number of characters for folder names and file names should be in compliance with the specifications. | |
| Check if the disc or the file is generated in an irregular format. This may occur depending on the variation or the setting of compressed audio writing applications or other text editing applications. | |
| Check if the finalization process, such as session close and disc close, is done for the disc. | |
| Check if the disc or USB device is protected by copyright. | |
| Poor sound quality | Check if the disc is scratched or dirty. |
| It takes a relatively long time before the music starts playing. | If there are many folder or file levels on the disc or USB device, some time may be required before the music starts playing. |
| Music cuts off or skips | The writing software and hardware combination might not match, or the writing speed, writing depth, writing width, etc., might not match the specifications. Try using the slowest writing speed. |
| Skipping with high bit rate files | Skipping may occur with large quantities of data, such as for high bit rate data. |
| Move immediately to the next song when playing. | If an unsupported compressed audio file has been given a supported extension like .MP3, or when play is prohibited by copyright protection, the player will skip to the next song. |
| The songs do not play back in the desired order. | The playback order is the order in which the files were written by the writing software, so the files might not play in the desired order. |
| Random/Shuffle may be active on the audio system or on a USB device. |
Center display, heater, air conditioner, audio, phone and voice recognition systems 4-33
Compressed Video Files (models with navigation system)
Explanation of terms:
- DivX® - DivX® refers to the DivX® codec owned by DivX, Inc. used for a lossy compression of video based on MPEG-4.
- AVI - AVI stands for Audio Video Interleave. It is a standard file format originated by Microsoft Corporation. A ".divx" encoded file can be saved into the ".avi" file format for playback on this system if it meets the requirements stated in the table in this section. However, not all the ".avi" files are playable on this system since different encodings can be used than the DivX® codec.
- ASF - ASF stands for Advanced Systems Format. It is a file format owned by Microsoft Corporation. Note: Only ".asf" files that meet the requirements stated in the table in this section can be played.
- Bit rate — Bit rate denotes the number of bits per second used by a digital video file. The size and quality of a compressed digital audio file is determined by the bit rate used when encoding the file.
Requirement for Supporting Video Play-back:
4-34 Center display, heater, air conditioner, audio, phone and voice recognition systems
Bluetooth® Audio player (models with navigation system)
-
Some Bluetooth® audio devices may not be recognized by the in-vehicle audio system.
-
It is necessary to set up the wireless connection between a compatible Bluetooth® audio device and the in-vehicle Bluetooth® module before using the Bluetooth® audio player.
-
Operating procedure of the Bluetooth® audio player will vary depending on the device. Make sure it is understood how to operate an audio device before using it with this system.
-
The Bluetooth® audio player may be stopped under the following conditions: — Receiving a hands-free call. — Checking the connection to the hands-free phone.
-
Do not place a Bluetooth® audio device in an area surrounded by metal or far away from the in-vehicle Bluetooth® module to prevent tone quality degradation and wireless connection disruption.
-
While an audio device is connected through a Bluetooth® wireless connection, the battery power of the device may discharge quicker than usual.
-
This system supports the Bluetooth® Audio Distribution Profile (A2DP, AVRCP).
-
BLUETOOTH® is a trademark owned by Bluetooth SIG, Inc. and licensed to Clarion Co., Ltd.
Music Box hard drive
Recording:
- Note that data that is lost and not stored to the hard disk drive due to system damage, improper operation or malfunction is not under warranty.
- Vehicle owners are not permitted to record music without permission of the owner of the copyright except for personal use.
- Check if the music is appropriately recorded to the hard disk drive after recording when the compact disc cannot be rerecorded.
- Some music cannot be recorded depending on the disc condition due to high-speed recording.
- Jumping sounds may be recorded when a compact disc is recorded while driving on rough roads and excessive vibration occurs.
- A mark indicating jumping sounds is displayed if jumping sounds are recorded.
- No sounds may be recorded if jumping sounds occurs or the disc is in poor condition.
- Tracks that include Serial Copy Management System (SCMS) are not recorded.
- If a compact disc is scratched or dirty, it may not be recorded, jumping sounds may occur or it may take a long time to record.
Automatic title download:
- The title information that is automatically downloaded may differ from the actual title.
- When newly released compact discs are recorded, their title information may not be downloaded.
- The title information in the hard disk can be updated. (See “Playing recorded songs” later in this section.)
Center display, heater, air conditioner, audio, phone and voice recognition systems 4-35
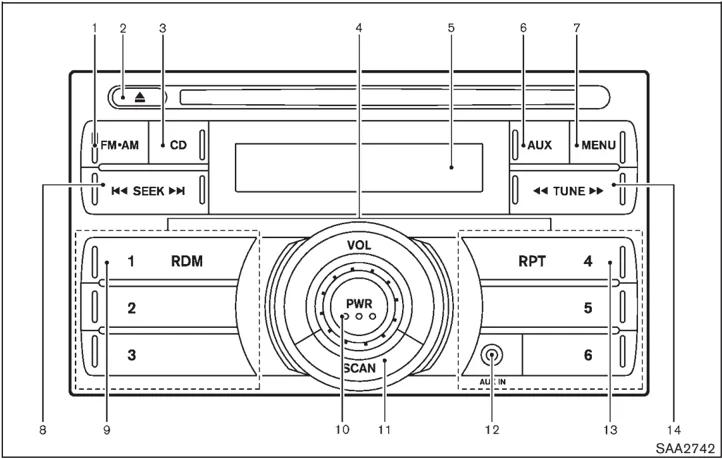
- FM-AM radio band select button
- CD EJECT button
- CD button
- Station and preset select buttons
- Audio display
- AUX (auxiliary) button
- MENU button
- SEEK/APS (automatic program search) FF (fast forward)-APS REW (rewind) button
- RDM (random) button
- PWR (power) button/VOL (volume) control knob
- SCAN tuning button
- AUX IN jack
- RPT (repeat) button
- TUNE/FF-REW button
FM-AM RADIO WITH COMPACT DISC (CD) PLAYER
For all operation precautions, see “AUDIO OPERATION PRECAUTIONS” earlier in this section.
Audio main operation
Head unit:
The auto loudness circuit enhances the low and high frequency ranges automatically in both radio reception and CD playback.
ON-OFF/Volume control:
Place the ignition switch in the ACC or ON position, and then push the PWR button while the system is off to call up the mode (radio, CD or AUX) which was playing immediately before the system was turned off. While the system is on, pushing the PWR button turns the system off.
Turn the VOL control knob to adjust the volume.
MENU MENU button:
Push the MENU button to change the selecting mode as follows.
4-36 Center display, heater, air conditioner, audio, phone and voice recognition systems
\rightarrow BAS (Bass) \rightarrow TRE (Treble) \rightarrow FAD (Fade) \rightarrow BAL (Balance) Normal mode \leftarrow CLOCK \leftarrow
Push the TUNE ◀◀ or ▶▶ or SEEK ◀◀ or ▶▶ button to adjust Bass, Treble, Fade and Balance to the desired level. Fade adjusts the sound level between the front and rear speakers and Balance adjusts the sound between the right and left speakers.
Once you have adjusted the sound quality to the desired level, push the MENU button repeatedly until the radio or CD display reappears (normal mode). Otherwise, the radio or CD display will automatically reappear after approximately 10 seconds.
For information about adjusting the clock display, see "TRIPLE METER" in the "2. Instruments and controls" section.
FM-AM radio operation
Radio (FM/AM) band select:
Pushing the radio band select button will change the band as follows:
AM \rightarrow FM1 \rightarrow FM2 \rightarrow AM
When the radio band select button is pushed while the ignition switch is in the ACC or ON position, the radio will come on at the station last played.
The last station played will also come on when the PWR button is pushed to ON.
If another audio source is playing when the radio band select button is pushed, the audio source will automatically be turned off and the last radio station played will come on.
When the stereo broadcast signal is weak, the radio will automatically change from stereo to monaural reception.
TUNE (Tuning):
Push the TUNE button ◀◀ or ▶▶ for manual tuning.
SEEK tuning:
Push the SEEK button ◀◀ or ▶▶ to tune from low to high or high to low frequencies and to stop at the next broadcasting station.
SCAN tuning:
Push the SCAN tuning button to tune from low to high frequencies and stops at each broadcasting station for 5 seconds. Pushing the button again during this 5 seconds period will stop SCAN tuning and the radio will remain tuned to that station.
If the SCAN tuning button is not pushed within 5 seconds, SCAN tuning moves to the next station.
1 to 6 Station memory operations:
Twelve stations can be set for the FM band (6 each for FM1 and FM2) and 6 stations can be set for the AM band.
- Choose the radio band AM, FM1 or FM2 using the radio band select button.
- Tune to the desired station using the SEEK, SCAN or TUNE button.
- Select the desired station and push and hold the desired station preset buttons 1 to 6 until a beep sound is heard. (The radio mutes when the select button is pushed.)
- The station indicator will then come on and the sound will resume. Memorizing is now complete.
- Other buttons can be set in the same manner.
If the battery cable is disconnected, or if the fuse blows, the radio memory will be erased. In that case, reset the desired stations.
Compact Disc (CD) player operation
Place the ignition switch in the ACC or ON position, and insert the CD into the slot with the label side facing up. The CD will be guided automatically into the slot and start playing.
Center display, heater, air conditioner, audio, phone and voice recognition systems 4-37

After loading the disc, the number of tracks on the disc will appear on the display.
If the radio is already operating, it will automatically turn off and the CD will play.
If the system has been turned off while the CD was playing, pushing the PWR button will start the CD.
MP3 or WMA CDs are not supported with this CD player. If an MP3 or WMA CD is inserted into the slot, the counter on the audio display automatically advances without sound. However this is a specification of the CD mechanism and not a malfunction.
Do not use 3.1 in (8 cm) discs.
CD CD PLAY:
When the CD button is pushed with the system off and the CD loaded, the system will turn on and the CD will start to play.
When the CD button is pushed with the CD loaded and the radio playing, the radio will automatically be turned off and the CD will start to play.
◀◀ TUNE ▶▶ FF (Fast Forward), REW (Rewind):
When the ▶▶ (fast forward) or ◀◀ (rewind) of the TUNE button is pushed while the CD is being played, the CD will play while fast forwarding or rewinding.
When the button is released, the CD will return to normal play speed.
◀◀ SEEK ▶▶ APS (Automatic Program Search) FF, APS REW:
When the ▶▶| (APS FF) of the SEEK button is pushed while the CD is being played, the next track or the current track on the CD will start to play from its beginning. Push several times to skip through tracks. The CD will advance the number of times the button is pushed. (When the last track on the CD is skipped through, the first track will be played.)
When the |◀◀ (APS REW) button is pushed, the track being played returns to its beginning. Push several times to skip back through tracks. The CD will go back the number of times the button is pushed.
RPT RDM REPEAT (RPT)/RANDOM (RDM) play:
When the RPT or RDM button is pushed while a CD is being played, the play pattern can be changed as follows:
RPT button: 1 Disc Repeat (Normal play) ↔ 1 Track Repeat
RDM button: 1 Disc Repeat (Normal play) ↔ 1 Disc Random
The display shows the following symbols: (No mark): 1 Disc Repeat 1: 1 Track Repeat RDM: 1 Disc Random
▲ CD EJECT:
When the CD EJECT button is pushed with the CD loaded, the CD will be ejected.
When this button is pushed while the CD is being played, the CD will come out and the system will turn off.
If the CD comes out and is not removed, it will be pulled back into the slot to protect it.
SCAN SCAN tuning:
When the SCAN tuning button is pushed while the CD is being played, the beginning of all the tracks of the CDs will be played for 10 seconds in sequence.
4-38 Center display, heater, air conditioner, audio, phone and voice recognition systems
Pushing the button again during this 10 second period will stop SCAN tuning.
If the SCAN tuning button is not pushed within 10 seconds, SCAN tuning continues to move to the next CD track.
AUX (Auxiliary) input
AUX IN jack:
The AUX IN jack is located on the audio unit. The AUX IN audio input jack accepts any standard analog audio input such as from a portable cassette tape/CD player, MP3 player or laptop computer.
AUX AUX (Auxiliary) button:
Push the AUX button to play a compatible device when it is plugged into the AUX IN jack.
When the AUX button is pushed with no device plugged into the jack, the audio system does not change to the AUX mode (the AUX button is invalid).
Center display, heater, air conditioner, audio, phone and voice recognition systems 4-39
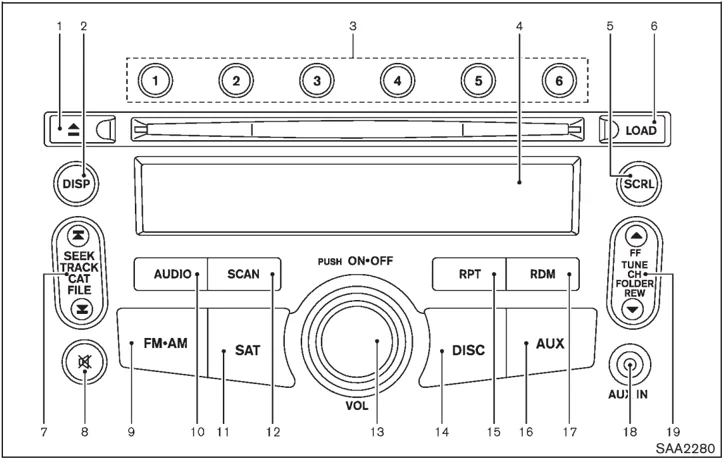
- CD EJECT button
- DISP (display) button
- Radio station preset/CD select buttons
- Audio display
- SCRL (scroll) button
- LOAD button
- SEEK the TRACK, CAT (category) or FILE/APS (automatic program search) FF (fast forward)-APS REW (rewind) button
- MUTE button
- FM-AM band select button
- AUDIO button
- SAT (satellite) band select button
- SCAN tuning button
- ON-OFF button/ VOL (volume) control knob
- DISC button
- RPT (repeat) button
- AUX (auxiliary) button
- RDM (random) button
- AUX IN jack
- TUNE the CH (channel) or FOLDER/FF-REW button
SAA2280
4-40 Center display, heater, air conditioner, audio, phone and voice recognition systems
FM-AM-SAT RADIO WITH COMPACT DISC (CD) CHANGER (models without navigation system)
For all operation precautions, see “AUDIO OPERATION PRECAUTIONS” earlier in this section.
The satellite radio mode requires an active XM Satellite Radio subscription. The satellite radio is not available in Alaska, Hawaii and Guam.
It may take some time to receive the activation signal after subscribing to the XM Satellite Radio. After receiving the activation signal, an available channel list will be automatically updated in the radio. For XM, push the ignition switch from LOCK to ACC to update the channel list.
Audio main operation
Head unit:
The auto loudness circuit enhances the low and high frequency ranges automatically in both radio reception and CD playback.
ON-OFF/Volume control:
Push the ignition switch to the ACC or ON position, and then push the ON-OFF button while the system is off to call up the mode (radio, CD or AUX) which was playing immediately before the system was turned off. While the system is on, pushing the ON-OFF button turns the system off.
Turn the VOL control knob to adjust the volume.
MUTE button:
Push the button to mute the audio sound.
Push the button again to release the mute.
Adjusting tone quality and speaker balance:
To adjust Bass, Treble, Balance and Fade, push the Audio button. When the display shows the setting you want to change (Bass, Treble, Balance and Fade), push the SEEK or TUNE button to set the desired setting.
These items can also be adjusted by pushing the AUDIO button.
• Speed Sensitive Vol.
Sound volume is increased according to the vehicle speed. Choose the effect level from “HIGH”, “MID”, “LOW” or “OFF”.
• Beep tuning
When this item is turned to ON, you will hear a beep sound when you use a button.
FM-AM-SAT radio operation
radio (FM/AM) band select:
Pushing the radio band select button will change the band as follows:
AM → FM1 → FM2 → AM
radio (SAT) band select:
Pushing the radio band select button will change the band as follows:
XM1 → XM2 → XM3 → XM1
When the radio band select button is pushed while the ignition switch is in the ACC or ON position, the radio will come on at the channel last played.
The last channel played will also come on when the ON-OFF button is pushed to ON.
The satellite radio mode requires an active XM Satellite Radio subscription. The satellite radio is not available in Alaska, Hawaii and Guam.
If another audio source is playing when the radio band select button is turned to ON, the audio source will automatically be turned off and the last radio channel played will come on.
When the stereo broadcast signal is weak, the radio will automatically change from stereo to
Center display, heater, air conditioner, audio, phone and voice recognition systems 4-41
monaural reception.
TUNE (Tuning):
- For AM and FM radio Push the TUNE button or for manual tuning.
- For XM Satellite Radio Push the TUNE button or to seek channels from all of the categories when any CAT is not selected.
SEEK tuning/CATEGORY (CAT):
- For AM and FM radio Push the SEEK button or to tune from low to high or high to low frequencies and to stop at the next broadcasting station.
- For XM Satellite Radio Push the SEEK button or to tune to the first channel of the next or previous category.
During satellite radio reception, the following notices will be displayed under certain conditions.
-
NO SIGNAL (No signal is received while the SAT tuner is connected.)
-
OFF AIR (Broadcasting signed off)
-
CHECK ANTENNA (Antenna connection error)
-
LOADING (When the initial setting is performed)
-
UPDATING (When the satellite radio subscription is not active)
Push the SCAN tuning button to tune from low to high frequencies and stop at each broadcasting station/channel for 5 seconds. Pushing the button again during this 5 seconds period will stop SCAN tuning and the radio will remain tuned to that station/channel.
If the SCAN tuning button is not pushed within 5 seconds, SCAN tuning moves to the next station/channel.
① to Station memory operations:
Eighteen stations/channels can be set for the SAT band (6 each for XM1, XM2 and XM3), twelve can be set for the FM band (6 each for FM1 and FM2), and 6 can be set for the AM band.
- Choose the radio band using the radio band select button.
- Tune to the desired station/channel using the SEEK, SCAN or TUNE button.
- Push and hold the desired radio station preset button ① to ⑥ until a beep sound is heard. (The radio mutes when the select button is pushed.)
- The station indicator will then come on and the sound will resume. Memorizing is now complete.
- Other buttons can be set in the same manner.
If the battery cable is disconnected, or if the fuse opens, the radio memory will be erased. In that case, reset the desired stations.
DISP RADIO DISPLAY change:
When the DISP button is pushed while the radio is being played, the audio display will change as follows:
Compact Disc (CD) changer operation
Push the ignition switch to the ACC or ON position, push the LOAD button and insert the CD into the slot with the label side facing up. The CD will be guided automatically into the slot
4-42 Center display, heater, air conditioner, audio, phone and voice recognition systems

and start playing.
After loading the CD, the number of tracks on the CD and the play time will appear on the display.
If the radio is already operating, it will automatically turn off and the CD will play.
If the system has been turned off while the CD was playing, pushing the ON-OFF button will start the CD.
LOAD CD LOAD:
To insert a CD in the CD changer, push the LOAD button for less than 1.5 seconds. Select the loading position by pushing the CD insert select button ① to ⑥, then insert the CD.
To insert 6 CDs to the CD changer in succession, push the LOAD button for more than 1.5 seconds.
The inserted slot numbers will illuminate on the display.
DISC PLAY:
When the DISC (CD play) button is pushed with the system off and the CD loaded, the system will turn on and the CD will start to play.
When the DISC button is pushed with the CD loaded and the radio playing, the radio will automatically be turned off and the CD will start to play.
When the DISC button is pushed while a CD is loaded and a medium is played using the auxiliary input jacks, you can toggle back and forth between CD and medium.
DISP CD DISPLAY information:
When the DISP button is pushed while the CD is being played, the audio display will change as follows:
CD:

CD with MP3 or WMA:

FF (Fast Forward), REW (Rewind):
CD:
When the (fast forward) or (rewind) button is pushed while the CD is being played, the CD will play while fast forwarding or rewinding. When the button is released, the CD will return to normal play speed.
CD with MP3 or WMA:
When the or button is pushed for less than 1.5 seconds while the CD is being played, the folders in the CD will change.
When the or button is pushed for more than 1.5 seconds while the CD is being played, the CD will play while forwarding or rewinding. When the button is released, the CD will return to the normal play speed.
APS (Automatic Program Search) FF, APS REW:
When the (APS FF) button is pushed while the CD is being played, the program next to the present one will start to play from its beginning. Push several times to skip through programs. The CD will advance the number of times the button is pushed. (When the last program on the CD is skipped through, the first program will be
Center display, heater, air conditioner, audio, phone and voice recognition systems 4-43


played.) When the ⌫ (APS REW) button is pushed, the program being played returns to its beginning. Push several times to skip back through programs. The CD will go back the number of times the button is pushed.
CD PLAY selection:
To change to another CD already loaded into the player, push the CD play select buttons ① to ⑥.
RPT REPEAT (RPT) play:
When the RPT button is pushed while the CD is played, the play pattern can be changed as follows:
(CD)
→ ALL DISCS RPT ——————→ 1 DISC RPT | 1 TRK (Track) RPT ←———————
(CD with MP3 or WMA)
→ ALL DISCS RPT → 1 DISC RPT → 1 FOLDER RPT | 1 TRK (Track) RPT ←———————
RDM RANDOM (RDM) play:
When the RDM button is pushed while the CD is played, the play pattern can be changed as follows:
(CD)
→ ALL DISCS RDM ——————→ 1 DISC RDM | ALL DISCS RPT ←———————
(CD with MP3 or WMA)
→ ALL DISCS RDM → 1 DISC RDM → 1 FOLDER RDM | ALL DISCS RPT ←———————
SCRL Scroll (SCRL) button:
When the title is displayed but it is a long one, the whole title is not shown in the display. In this case, push the SCRL button to scroll the title. When the title is scrolled to the end of it, the display will stop moving and return to the first condition.
CD EJECT:
When the CD EJECT button is pushed with the CD loaded, the CD will be ejected.
To eject the discs selected by the CD select button, push the EJECT button for less than 1.5 seconds.
To eject all the discs, push the EJECT button for more than 1.5 seconds.
When this button is pushed while the CD is being played, the CD will come out and the system will turn off.
If the CD comes out and is not removed, it will be pulled back into the slot to protect it.
AUX (Auxiliary) input
AUX IN jack:
The AUX IN jack is located on the audio unit.
The AUX IN audio input jack accepts any standard analog audio input such as from a portable cassette tape/CD player, MP3 player or laptop computer.
AUX AUX (Auxiliary) button:
Push the AUX button to play a compatible device when it is plugged into the AUX IN jack.
When the AUX button is pushed with no device plugged into the jack, the audio system does not change to the AUX mode (the AUX button is invalid).
4-44 Center display, heater, air conditioner, audio, phone and voice recognition systems





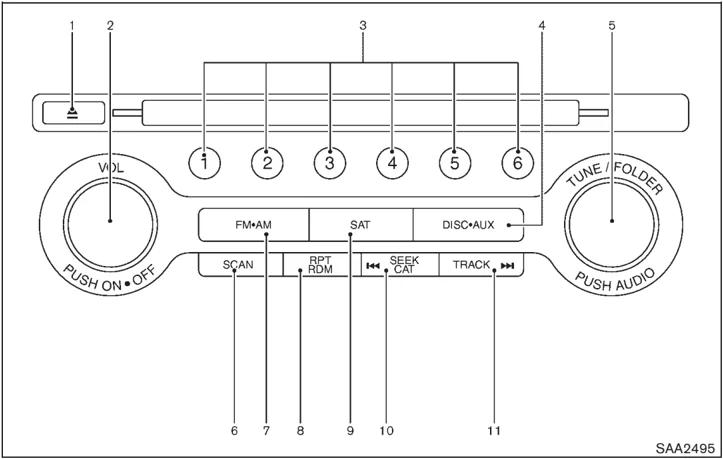
FM-AM-SAT RADIO WITH COMPACT DISC (CD) PLAYER (models with navigation system)
For all operation precautions, see “AUDIO OPERATION PRECAUTIONS” earlier in this section.
The satellite radio mode requires an active XM Satellite Radio subscription. The satellite radio is not available in Alaska, Hawaii and Guam.
It may take some time to receive the activation signal after subscribing the XM Satellite Radio. After receiving the activation signal, an available channel list will be automatically updated in the radio. For XM, push the ignition switch from LOCK to ACC to update the channel list.
Audio main operation
Head unit:
The auto loudness circuit enhances the low and high frequency ranges automatically in both radio reception and CD playback.
- CD EJECT button
- ON-OFF button/VOL (volume) control knob
- Radio station preset select buttons
- DISC•AUX (auxiliary) button
- Radio TUNE (tuning) folder selector/AUDIO control knob
- Radio SCAN tuning button
- FM•AM band select button
- CD RPT (repeat)/RDM (random) play button
- SAT (satellite) button
- Radio CAT (category)/REW (rewind) button for SEEK/TRACK
- FF (fast forward) button for SEEK/TRACK
Center display, heater, air conditioner, audio, phone and voice recognition systems 4-45
ON-OFF/Volume control: Push the ignition switch to the ACC or ON position, and then push the ON-OFF button while the system is off to turn on the last audio source (i.e. FM or CD), which was playing immediately before the system was turned off. While the system is on, pushing the ON-OFF button turns the system off.
Turn the VOL control knob to adjust the volume.
Adjusting tone quality and speaker balance: To adjust Bass, Treble, Balance and Fade, push the Audio control knob. When the display shows the setting you want to change (Bass, Treble, Balance and Fade), rotate the Audio control knob to set the desired setting. For the other setting methods, see "HOW TO USE SETTING BUTTON" earlier in this section.
This vehicle has some sound effect functions as follows:
- Speed Sensitive Vol.
For more details, see "VEHICLE INFORMATION AND SETTINGS (models with navigation system)" earlier in this section.
Switching the display: Pushing the DISC-AUX button will switch the displays as follows: iPod®/USB → CD/DVD → Music Box → Bluetooth® Audio → AUX → iPod®/USB
FM-AM-SAT radio operation
radio (FM/AM) band select: Pushing the radio band select button will change the band as follows: AM → FM1 → FM2 → AM
radio (SAT) band select: Pushing the radio band select button will change the band as follows: XM1 → XM2 → XM3 → XM1
When the radio band select button is pushed while the ignition switch is in the ACC or ON position, the radio will come on at the channel last played.
The last channel played will also come on when the ON-OFF button is pushed to ON.
The satellite radio is not available in Alaska, Hawaii and Guam.
If another audio source is playing when the radio band select button is turned to ON, the audio source will automatically be turned off and the last radio channel played will come on.
When the stereo broadcast signal is weak, the radio will automatically change from stereo to monaural reception.
TUNE (Tuning):
- For AM and FM radio Turn the radio TUNE knob for manual tuning.
- For XM Satellite Radio Turn the radio TUNE knob to seek channels from all of the categories when any category is not selected.
- For AM and FM radio Push the SEEK button or to tune from low to high or high to low frequencies and to stop at the next broadcasting station.
- For XM Satellite Radio Push the SEEK button or to tune to the first channel of the next or previous category.
4-46 Center display, heater, air conditioner, audio, phone and voice recognition systems
During satellite radio reception, the following notices will be displayed under certain conditions.
- NO SIGNAL (No signal is received while the SAT tuner is connected.)
- OFF AIR (Broadcasting signed off)
- CHECK ANTENNA (Antenna connection error)
- LOADING (When the initial setting is performed)
- UPDATING (When the satellite radio subscription is not active)
SCAN tuning:
Push the SCAN tuning button to tune from low to high frequencies and stop at each broadcasting station/channel for 5 seconds. Pushing the button again during this 5 seconds period will stop SCAN tuning and the radio will remain tuned to that station/channel.
If the SCAN tuning button is not pushed within 5 seconds, SCAN tuning moves to the next station/channel.
① to ⑥ Station memory operations:
12 stations/channels can be set for the FM band (6 each for FM1 and FM2), 18 for XM radio (6 each for XM1, XM2 and XM3) and 6 stations can be set for the AM band.
- Choose the radio band using the radio band select button.
- Tune to the desired station/channel using the SEEK/TRACK, SCAN button or the radio TUNE knob.
- Push and hold the desired station preset button ① to ⑥ until the radio mutes.
- The station indicator will then come on and the sound will resume. Memorizing is now complete.
- Other buttons can be set in the same manner.
If the battery cable is disconnected, or if the fuse opens, the radio memory will be erased. In that case, reset the desired stations/channels.
List (AM and FM radio):
When the "List" key on the display is selected while the FM or AM radio is being played, the preset station list will be displayed.
If 1 of the 6 preset stations listed is touched and held, the current station will be stored as the new preset.
Menu (XM Satellite Radio):
When the "Menu" key on the display is selected while the XM Satellite Radio is being played, the menu list will be displayed.
The following items are available.
- Preset List Displays the preset channel list. If 1 of the 6 preset stations listed is touched and held, the current station will be stored as the new preset.
- Customize Channel List Selects specific channels to skip while using the TUNE, SEEK/CATEGORY or Menu-Categories feature.
- Favorite Artists & Songs Stores the current artist or song that is being played. Touch the "Alert" key to be reminded when the stored artist or song is playing on a station while listening to XM.
- Categories Selecting a category will go to the first channel in that category as defined by XM Radio.
Center display, heater, air conditioner, audio, phone and voice recognition systems 4-47