3 Pre-driving checks and adjustments
- Keys ........ 3-2
- Intelligent Key ........ 3-2
- Valet hand-off ........ 3-3
- Doors ........ 3-4
- Locking with mechanical key ........ 3-4
- Opening and closing windows with the mechanical key ........ 3-4
- Locking with inside lock knob ........ 3-5
- Locking with power door lock switch ........ 3-5
- Automatic door locks ........ 3-5
- Intelligent Key system ........ 3-6
- Intelligent Key operating range ........ 3-8
- Door locks/unlocks precaution ........ 3-8
- Intelligent Key operation ........ 3-9
- Battery saver system ........ 3-11
- Warning signals ........ 3-11
- Troubleshooting guide ........ 3-12
- Remote keyless entry system ........ 3-13
- How to use remote keyless entry system ........ 3-13
- Hood ........ 3-16
- Rear hatch (Coupe models) ........ 3-17
- Rear hatch opener switch ........ 3-17
- Secondary rear hatch release ........ 3-18
- Trunk lid (Roadster models) ........ 3-19
- Trunk lid opener switch ........ 3-19
- Trunk release power cancel switch ........ 3-19
- Interior trunk lid release ........ 3-20
- Secondary trunk lid release ........ 3-21
- Soft top (Roadster models) ........ 3-21
- Before operating the top ........ 3-21
- When operating the top ........ 3-23
- Opening the top ........ 3-25
- Closing the top ........ 3-26
- Opening the top using the Intelligent Key ........ 3-26
- Troubleshooting guide ........ 3-27
- If the top does not open or close electrically ........ 3-28
- Care of the soft top and the vehicle body ........ 3-32
- Front, side and rear unique parts (NISMO models) ........ 3-32
- Fuel-filler door ........ 3-34
- Opening the fuel-filler door ........ 3-34
- Fuel-filler cap ........ 3-34
- Tilt steering ........ 3-35
- Manual operation ........ 3-36
- Sun visors ........ 3-36
- Mirrors ........ 3-36
- Inside mirror ........ 3-36
- Outside mirrors ........ 3-38
- Vanity mirror ........ 3-39
KEYS
A key number plate is supplied with your keys. Record the key number and keep it in a safe place (such as your wallet), not in the vehicle. If you lose your keys, see a NISSAN dealer for duplicates by using the key number. NISSAN does not record any key numbers so it is very important to keep track of your key number plate.
A key number is only necessary when you have lost all keys and do not have one to duplicate from. If you still have a key, this key can be duplicated by a NISSAN dealer.
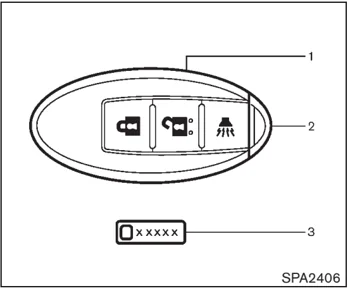
- Intelligent Keys (2 sets)
- Mechanical keys (inside the Keys) (2 sets)
- Key number plate (1 set)
INTELLIGENT KEY
Your vehicle can only be driven with the Intelligent Keys which are registered to your vehicle's Intelligent Key system components and NISSAN Vehicle Immobilizer System components. As many as 4 Intelligent Keys can be registered and used with one vehicle. The new keys must be registered by a NISSAN dealer prior to use with the Intelligent Key system and NISSAN Vehicle Immobilizer System of your vehicle. Since the registration process requires erasing all memory in the Intelligent Key components when registering new keys, be sure to take all Intelligent Keys that you have to the NISSAN dealer.
It is possible that the Intelligent Key functions become canceled. Contact a NISSAN dealer.
CAUTION
- Be sure to carry the Intelligent Key with you when driving. The Intelligent Key is a precision device with a built-in transmitter. To avoid damaging it, please note the following.
- — The Intelligent Key is water resistant; however, wetting may damage the Intelligent Key. If the Intelligent Key gets wet, immediately wipe until it is completely dry.
- — Do not bend, drop or strike it against another object.
- — Do not place the Intelligent Key for an extended period in a place where temperatures exceed 140°F (60°C).
- — Do not change or modify the Intelligent Key.
- — Do not use a magnet key holder.
- — Do not place the Intelligent Key
3-2 Pre-driving checks and adjustments
near an electric appliance such as a television set, personal computer or cellular phone. — Do not allow the Intelligent Key to come into contact with water or salt water, and do not wash it in a washing machine. This could affect the system function. • If an Intelligent Key is lost or stolen, NISSAN recommends erasing the ID code of that Intelligent Key. This will prevent the Intelligent Key from unauthorized use to unlock the vehicle. For information regarding the erasing procedure, please contact a NISSAN dealer.
SPA2033
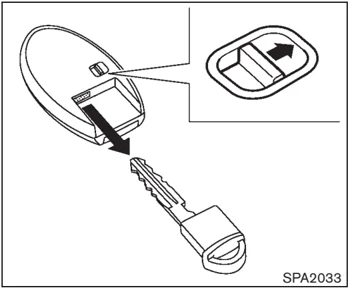
Mechanical key To remove the mechanical key, release the lock knob at the back of the Intelligent Key.
To install the mechanical key, firmly insert it into the Intelligent Key until the lock knob returns to the lock position.
Use the mechanical key to lock or unlock the doors, and glove box.
See “DOORS” later in this section and “STORAGE” in the “2. Instruments and controls” section.
CAUTION Always carry the mechanical key installed in the Key.
VALET HAND-OFF When you have to leave a key with a valet, give them the Intelligent Key itself and keep the mechanical key with you to protect your belongings.
To prevent the glove box from being opened during valet hand-off, follow the procedures below.
- Push the trunk release power cancel switch to the OFF side (Roadster models).
- Remove the mechanical key from the Intelligent Key.
- Lock the glove box with the mechanical key.
- Hand the Intelligent Key to the valet, keeping the mechanical key in your pocket or bag for insertion into the Intelligent Key when you retrieve your vehicle.
See “STORAGE” in the “2. Instruments and controls” section.
Pre-driving checks and adjustments 3-3
DOORS
WARNING
- Always have the doors locked while driving. Along with the use of seat belts, this provides greater safety in the event of an accident by helping to prevent persons from being thrown from the vehicle. This also helps keep children and others from unintentionally opening the doors, and will help keep out intruders.
- Before opening any door, always look for and avoid oncoming traffic.
- Do not leave children unattended inside the vehicle. They could unknowingly activate switches or controls. Unattended children could become involved in serious accidents.

SPA2565
LOCKING WITH MECHANICAL KEY
The power door lock system allows you to lock or unlock all doors simultaneously using the mechanical key.
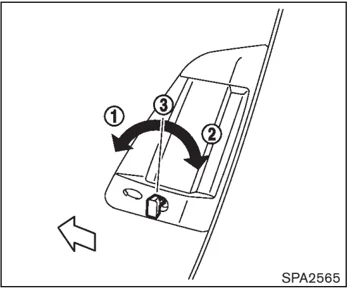
- Turning the driver's door key cylinder to the front of the vehicle ① will lock all doors.
- Turning the driver's door key cylinder once to the rear of the vehicle ② will unlock the driver's door. After returning the key to the neutral position ③, turning it to the rear again within 60 seconds will unlock all doors.
- You can switch the lock system to the mode that allows you to open all the doors when the key is turned once. (See "HOW TO USE SETTING BUTTON" in the "4. Center display, heater, air conditioner, audio, phone and voice recognition systems" section.)
OPENING AND CLOSING WINDOWS WITH THE MECHANICAL KEY
The driver's door key operation also allows you to open and close the window that is equipped with the automatic open/close function. (See "POWER WINDOWS" in the "2. Instruments and controls" section.)
To open the window, turn the driver's door key cylinder to the rear of the vehicle for longer than 1 second. The door is unlocked and the window keeps opening while turning the key.
This function can also be performed by pushing and holding the UNLOCK button on the Intelligent Key. (See "REMOTE KEYLESS ENTRY SYSTEM" later in this section.)
To close the window, turn the driver's door key cylinder to the front of the vehicle for longer than 1 second. The door is locked and the window keeps closing while turning the key.
3-4 Pre-driving checks and adjustments
 SPA2566
LOCKING WITH INSIDE LOCK KNOB
To lock the door individually, move the inside lock knob to the lock position ① then close the door.
To unlock, move the inside lock knob to the unlock position ②.
When locking the door without an Intelligent Key, be sure not to leave the Intelligent Key inside the vehicle.
 SPA2300
LOCKING WITH POWER DOOR LOCK SWITCH
Operating the power door lock switch will lock or unlock all the doors and trunk lid. The switches are located on the driver's and front passenger's door armrests.
To lock the doors and trunk lid, push the power door lock switch to the lock position ① with the driver's or front passenger's door open, then close the door and trunk lid.
When locking the door this way, be certain not to leave the Intelligent Key inside the vehicle.
To unlock the doors, the fuel-filler door and the trunk, push the power door lock switch to the unlock position ②.
Lockout protection
When the power door lock switch (driver or front passenger) is moved to the lock position with the Intelligent Key in the port and any door open, all doors and the trunk lid will lock and unlock automatically. With the Intelligent Key left in the vehicle (not in the Intelligent Key port) and any door open, all doors and the trunk lid will unlock automatically and a chime will sound after the door and/or the trunk lid are closed.
These functions help to prevent the Intelligent Key from being accidentally locked inside the vehicle.
AUTOMATIC DOOR LOCKS
- All doors lock automatically when the vehicle speed reaches 15 MPH (24 km/h).
- All doors unlock automatically when the ignition switch is placed in the OFF position.
The automatic unlock function can be deactivated or activated. To deactivate or activate the automatic door unlock system, perform the following procedure:
- Close all doors.
- Place the ignition switch in the ON position.
Pre-driving checks and adjustments 3-5
INTELLIGENT KEY SYSTEM
- Within 20 seconds of performing Step 2, push and hold the power door lock switch to the [lock icon] position (UNLOCK) for more than 5 seconds.
- When activated, the hazard indicator will flash twice. When deactivated, the hazard indicator will flash once.
- The ignition switch must be placed in the OFF and ON position again between each setting change.
When the automatic door unlock system is deactivated, the doors do not unlock when the ignition switch is placed in the OFF position. To unlock the door manually, use the inside lock knob or the power door lock switch (driver's or front passenger's side).
⚠ WARNING
- Radio waves could adversely affect electric medical equipment. Those who use a pacemaker should contact the electric medical equipment manufacturer for the possible influences before use.
- The Intelligent Key transmits radio waves when the buttons are pushed. The FAA advises that the radio waves may affect aircraft navigation and communication systems. Do not operate the Intelligent Key while on an airplane. Make sure the buttons are not operated unintentionally when the unit is stored during a flight.
The Intelligent Key system can operate all the door and rear hatch/trunk lid locks using the remote controller function or pushing the request switch on the vehicle without taking the key out from a pocket or purse. The operating environment and/or conditions may affect the Intelligent Key system operation.
Be sure to read the following before using the Intelligent Key system.
⚠ CAUTION
- Be sure to carry the Intelligent Key with you when operating the vehicle.
- Never leave the Intelligent Key in the vehicle when you leave the vehicle.
The Intelligent Key is always communicating with the vehicle as it receives radio waves. The Intelligent Key system transmits weak radio waves. Environmental conditions may interfere with the operation of the Intelligent Key system under the following operating conditions.
- When operating near a location where strong radio waves are transmitted, such as a TV tower, power station and broadcasting station.
- When in possession of wireless equipment, such as a cellular telephone, transceiver, and CB radio.
- When the Intelligent Key is in contact with or covered by metallic materials.
- When any type of radio wave remote control is used nearby.
- When the Intelligent Key is placed near an electric appliance such as a personal
3-6 Pre-driving checks and adjustments
computer.
- When the vehicle is parked near a parking meter.
In such cases, correct the operating conditions before using the Intelligent Key function or use the mechanical key.
Although the life of the battery varies depending on the operating conditions, the battery's life is approximately 2 years. If the battery is discharged, replace it with a new one.
When the Intelligent Key battery is almost discharged, insert the Intelligent Key into the Intelligent Key port to start the engine. Replace the discharged battery with a new one as soon as possible. For more details, see "PUSH-BUTTON IGNITION SWITCH" in the "5. Starting and driving" section.
Since the Intelligent Key is continuously receiving radio waves, if the key is left near equipment which transmits strong radio waves, such as signals from a TV and personal computer, the battery life may become shorter.
For information regarding replacement of a battery, see "INTELLIGENT KEY BATTERY REPLACEMENT" in the "8. Maintenance and do-it-yourself" section.
Because the steering wheel is locked electrically, unlocking the steering wheel with the ignition switch in the LOCK position is impossible when the vehicle battery is completely discharged. Pay special attention that the vehicle battery is not completely discharged.
As many as 4 Intelligent Keys can be registered and used with one vehicle. For information about the purchase and use of additional Intelligent Keys, contact a NISSAN dealer.
CAUTION
- Do not allow the Intelligent Key, which contains electrical components, to come into contact with water or salt water. This could affect the system function.
- Do not drop the Intelligent Key.
- Do not strike the Intelligent Key sharply against another object.
- Do not change or modify the Intelligent Key.
- Wetting may damage the Intelligent Key. If the Intelligent Key gets wet, immediately wipe until it is completely dry.
- Do not place the Intelligent Key for an extended period in an area where temperatures exceed 140°F (60°C).
- Do not attach the Intelligent Key with a key holder that contains a magnet.
- Do not place the Intelligent Key near equipment that produces a magnetic field, such as a TV, audio equipment, personal computer or cellular phone.
If an Intelligent Key is lost or stolen, NISSAN recommends erasing the ID code of that Intelligent Key from the vehicle. This may prevent the unauthorized use of the Intelligent Key to operate the vehicle. For information regarding the erasing procedure, contact a NISSAN dealer.
The Intelligent Key function can be disabled. For information about disabling the Intelligent Key function, contact a NISSAN dealer.
Pre-driving checks and adjustments 3-7
 INTELLIGENT KEY OPERATING RANGE
The Intelligent Key functions can only be used when the Intelligent Key is within the specified operating range from the request switch ①.
When the Intelligent Key battery is discharged or strong radio waves are present near the operating location, the Intelligent Key system's operating range becomes narrower, and the Intelligent Key may not function properly.
The operating range is within 31.50 in (80 cm) from each request switch ①.
If the Intelligent Key is too close to the door glass, handle or rear bumper the request switches may not function.
When the Intelligent Key is within the operating range, it is possible for anyone who does not carry the Intelligent Key to push the request switch to lock/unlock the doors including the rear hatch/trunk lid.
 DOOR LOCKS/UNLOCKS PRECAUTION
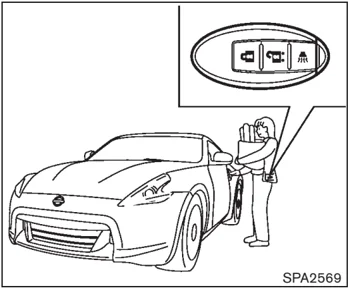
- Do not push the door handle request switch with the Intelligent Key held in your hand as illustrated. The close distance to the door handle will cause the Intelligent Key system to have difficulty recognizing that the Intelligent Key is outside the vehicle.
- After locking with the door handle request switch, verify the doors are securely locked by testing them.
- To prevent the Intelligent Key from being left inside the vehicle, make sure you carry the key with you and then lock the doors.
3-8 Pre-driving checks and adjustments
- Do not pull the door handle before pushing the door handle request switch. The door will be unlocked but will not open. Release the door handle once and pull it again to open the door.
- The Intelligent Key system (opening/closing doors with the door handle request switch) can be set to remain inactive. (See “VEHICLE INFORMATION AND SETTINGS (models with navigation system)” in the “4. Center display, heater, air conditioner, audio, phone and voice recognition systems” section.)
Coupe models SPA2569
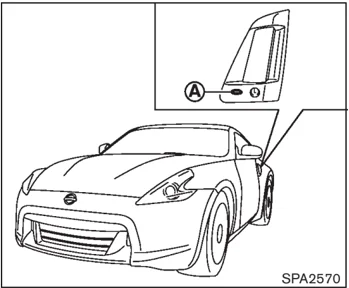
A SPA2570
INTELLIGENT KEY OPERATION
You can lock or unlock the doors without taking the key out from your pocket or bag.
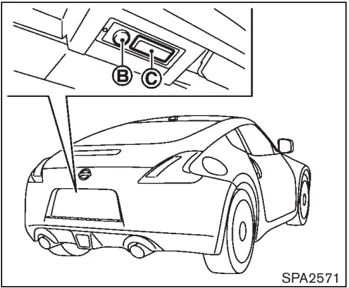
B C SPA2571
Coupe models Pre-driving checks and adjustments 3-9
 SPA2680
Roadster models
When you carry the Intelligent Key with you, you can lock or unlock all doors and the rear hatch/ trunk lid by pushing the door handle request switch (driver's or front passenger's) A or the rear hatch/trunk request switch B within the range of operation.
When you lock or unlock the doors and the rear hatch/trunk lid, the hazard indicator will flash and the horn (or the outside chime) will sound as a confirmation. For details, see "Setting hazard indicator and horn mode" later in this section.
Locking doors, rear hatch/trunk lid and fuel-filler door
- Push the ignition switch to the OFF position and make sure you carry the Intelligent Key with you.*1
- Close all the doors and the rear hatch/trunk lid.*2
- Push the door handle request switch (driver's or front passenger's) or the rear hatch/ trunk request switch while carrying the Intelligent Key with you.*3
- All the doors, rear hatch/trunk lid and fuel- filler door will lock.
- The hazard indicator flashes twice and the outside chime sounds twice.
*1: Doors and the rear hatch/trunk lid will lock with the Intelligent Key while the ignition switch is in the ACC or ON position.
*2: Doors and the rear hatch/trunk lid will not lock with the Intelligent Key while any door or the rear hatch/trunk lid is open.
*3: Doors and the rear hatch/trunk lid will not lock by pushing the door handle request switch or the rear hatch/trunk request switch with the Intelligent Key inside the vehicle. However, when an Intelligent Key is inside the vehicle, doors and the rear hatch/trunk lid can be locked with another registered Intelligent Key.
Unlocking doors, rear hatch/trunk lid and fuel-filler door
- Push the door handle request switch (dri- ver's or front passenger's) or the rear hatch/ trunk request switch once while carrying the Intelligent Key with you.
- The hazard indicator flashes once and out- side chime sounds once. The corresponding door and the fuel-filler door or the rear hatch/trunk lid will unlock.
- Push the door handle request switch or the rear hatch/trunk request switch again within 60 seconds.
- The hazard indicator flashes once and out- side chime sounds once again. All the doors and the rear hatch/trunk lid will unlock.
All doors, the rear hatch/trunk lid and the fuel- filler door will be locked automatically unless one of the following operations is performed within 1 minute after pushing the request switch while the doors are locked.
- Opening any door and/or the rear hatch/ trunk lid
- Pushing the ignition switch
- Inserting the Intelligent Key into the Intelli-
3-10 Pre-driving checks and adjustments
gent Key port.
During this 1-minute time period, if the UNLOCK button on the Intelligent Key is pushed, all doors will be locked automatically after another 1 minute.
Opening rear hatch/trunk lid
To open only the rear hatch/trunk lid, perform the following procedure.
-
Carry the Intelligent Key.
-
Push the rear hatch/trunk lid opener switch .
-
The rear hatch/trunk lid will open.
Lockout protection:
To prevent the Intelligent Key from being accidentally locked in the trunk, lockout protection is equipped with the Intelligent Key system.
When the trunk lid is closed with the Intelligent Key inside the trunk, the outside buzzer will sound and all doors and the rear hatch/trunk lid will unlock.
BATTERY SAVER SYSTEM
When all the following conditions are met for 60 minutes, the battery saver system will cut off the power supply to prevent battery discharge.
-
The ignition switch is in the ACC position, and
-
All doors are closed, and
-
The selector lever is in the P (Park) position (Automatic Transmission models).
WARNING SIGNALS
To help prevent the vehicle from moving unexpectedly by erroneous operation of the Intelligent Key listed on the following chart or to help prevent the vehicle from being stolen, chime or beep sounds inside and outside the vehicle and a warning displays in the vehicle information display.
When a chime or beep sounds or the warning displays, be sure to check the vehicle and Intelligent Key.
See “TROUBLESHOOTING GUIDE” later in this section and “VEHICLE INFORMATION DISPLAY” in the “2. Instruments and controls” section.
Pre-driving checks and adjustments 3-11
TROUBLESHOOTING GUIDE
| Symptom | Possible cause | Action to take | |
|---|---|---|---|
| When pushing the ignition switch to stop the engine | The SHIFT P warning appears on the display and the inside warning chime sounds continuously (Automatic Transmission models). | The selector lever is not in the P (Park) position. | Shift the selector lever to the P (Park) position. |
| When opening the driver's door to get out of the vehicle | The inside warning chime sounds continuously. | The ignition switch is in the ACC position. | Push the ignition switch to the OFF position. |
| The Intelligent Key is in the Intelligent Key port. | Remove the Intelligent Key from the Intelligent Key port. | ||
| When closing the door after getting out of the vehicle | The NO KEY warning appears on the display, the outside chime sounds 3 times and the inside warning chime sounds for approximately a few seconds. | The ignition switch is in the ACC or ON position. | Push the ignition switch to the OFF position. |
| The SHIFT P warning appears on the display and the outside chime sounds continuously (Automatic Transmission models). | The ignition switch is in the ACC or OFF position and the selector lever is not in the P (Park) position. | Move the selector lever to the P (Park) position and push the ignition switch to the OFF position. | |
| When closing the door with the inside lock knob turned to LOCK | The outside chime sounds for a few seconds and all the doors unlock. | The Intelligent Key is inside the vehicle and cargo/trunk room area. | Carry the Intelligent Key with you. |
| When pushing the door handle request switch to lock the door | The outside chime sounds for a few seconds. | The Intelligent Key is inside the vehicle and cargo/trunk room area. | Carry the Intelligent Key with you. |
| A door is not closed securely. | Close the door securely. | ||
| When closing the trunk lid (Roadster models) | The outside chime sounds for a few seconds and all doors unlock. | The Intelligent Key is inside the trunk. | Carry the Intelligent Key with you. |
| When shifting the selector lever to the P (Park) position | The inside warning chime sounds continuously. | The ignition switch is in the ON position. | The ignition switch is in the OFF position. |
3-12 Pre-driving checks and adjustments
Model "Z34-D" EDITED: □□□□/□/10
REMOTE KEYLESS ENTRY SYSTEM
WARNING
The Intelligent Key transmits radio waves when the buttons are pushed. The FAA advises that the radio waves may affect aircraft navigation and communication systems. Do not operate the Intelligent Key while on an airplane. Make sure the buttons are not operated unintentionally when the unit is stored during a flight.
It is possible to lock/unlock all doors, fuel-filler door, activate the panic alarm and open the windows by pushing the buttons on the Intelligent Key from outside the vehicle.
Before locking the doors, make sure the Intelligent Key is not left in the vehicle.
The LOCK/UNLOCK button on the Intelligent Key can operate at a distance of approximately 33 ft (10 m) from the vehicle. (The effective distance depends upon the conditions around the vehicle.)
As many as 4 Intelligent Keys can be used with one vehicle. For information concerning the purchase and use of additional Intelligent Keys, contact a NISSAN dealer.
The lock and unlock buttons on the Intelligent Key will not operate when:
- the distance between the Intelligent Key and the vehicle is over 33 ft (10 m).
- the Intelligent Key battery is discharged.
After locking with the remote keyless entry function, pull the door handle to make sure the doors are securely locked.
The LOCK/UNLOCK operating range varies depending on the environment. To securely operate the lock and unlock buttons, approach the vehicle to about 3 ft (1 m) from the door.
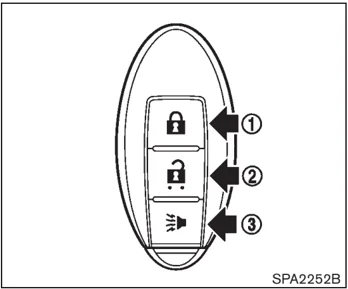
SPA2252B
- LOCK button
- UNLOCK button
- PANIC button
HOW TO USE REMOTE KEYLESS ENTRY SYSTEM
When you lock or unlock the doors and rear hatch/trunk lid, the hazard indicator will flash and the horn (or the outside chime) will sound as a confirmation. For details, see "Setting hazard indicator and horn mode" later in this section.
Pre-driving checks and adjustments 3-13
Locking doors, rear hatch/trunk lid and fuel-filler door
- Push the ignition switch to the OFF position and make sure you carry the Intelligent Key with you.*1
- Close all the doors and the rear hatch/trunk lid.*2
- Push the LOCK 🔒 button ① on the Intelligent Key.
- All the doors, the rear hatch/trunk lid and fuel-filler door will lock.
- The hazard indicator flashes twice and the horn chirps once.
*1: Doors and the rear hatch/trunk lid will lock with the Intelligent Key while the ignition switch is in the ACC or ON position. *2: Doors and the rear hatch/trunk lid will not lock with the Intelligent Key while any door or the rear hatch/trunk lid is open.
Unlocking doors, rear hatch/trunk lid and fuel-filler door
- Push the UNLOCK 🔓 button ② on the Intelligent Key once.
- The hazard indicator flashes once. The driver's door and fuel-filler door will unlock.
- Push the UNLOCK 🔓 button on the Intelligent Key again within 60 seconds.
- The hazard indicator flashes once again. All the doors and the rear hatch/trunk lid will unlock.
All doors and the rear hatch/trunk lid will be locked automatically unless one of the following operations is performed within 1 minute after pushing the UNLOCK 🔓 button on the Intelligent Key while the doors are locked. If during this 1-minute time period, the UNLOCK 🔓 button on the Intelligent Key is pushed, all doors and the rear hatch/trunk lid will be locked automatically after another 1 minute.
- Opening any door
- Pushing the ignition switch
- Inserting the Intelligent Key into the Intelligent Key port
Opening windows The UNLOCK 🔓 button operation also allows you to open a window that is equipped with the automatic open/close function. (See "POWER WINDOWS" in the "2. Instruments and controls" section.)
To open the window, push the door UNLOCK 🔓 button ② on the Intelligent Key for about 3 seconds after the door is unlocked.
To stop opening, release the UNLOCK 🔓 button.
Window cannot be closed using the Intelligent Key.
The door window can be opened or closed by turning the metal key in a door lock. (See "DOORS" earlier in this section.)
Using panic alarm If you are near your vehicle and feel threatened, you may activate the alarm to call attention as follows:
- Push the PANIC 🔊 button on the Key for more than 1 second.
- The theft warning alarm and headlights will stay on for 25 seconds.
- The panic alarm stops when:
- It has run for 25 seconds, or
- Any of the buttons on the Intelligent Key are pushed. (Note: Panic button should be pushed for more than 1 second.)
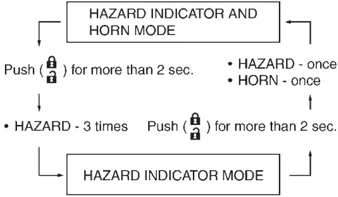
Setting hazard indicator and horn mode This vehicle is set in hazard indicator and horn mode when you first receive the vehicle.
In hazard indicator and horn mode, when the LOCK 🔒 button ① is pushed, the hazard
3-14 Pre-driving checks and adjustments
indicator flashes twice and the horn chirps once. When the UNLOCK button ② is pushed, the hazard indicator flashes once.
If horns are not necessary, the system can be switched to the hazard indicator mode.
In hazard indicator mode, when the LOCK button is pushed, the hazard indicator flashes twice. When the UNLOCK button is pushed, neither the hazard indicator nor the horn operates.
Hazard indicator and horn mode:
Hazard indicator mode:
Pre-driving checks and adjustments 3-15
HOOD
Switching procedure:
To switch the hazard indicator and horn (chime) operation, push the LOCK ❶ and UNLOCK ❷ buttons on the Intelligent Key simultaneously for more than 2 seconds.
- When the hazard indicator mode is set, the hazard indicator flashes 3 times.
- When the hazard indicator and horn mode is set, the hazard indicator flashes once and the horn chirps once.
SPA2572
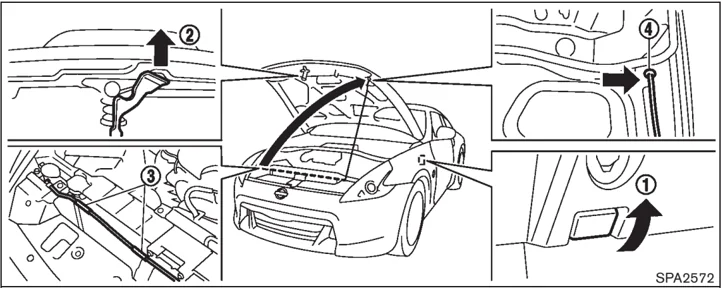
- Pull the hood lock release handle ❶ located below the instrument panel; the hood will then spring up slightly.
- Pull the lever ❷ up at the front of the hood with your fingertips and raise the hood.
- Hold the insulator ❸ of the support rod and insert its end into the slot ❹ on the front edge of the hood.
- When closing the hood, store the support rod to its original position, then slowly close the hood and make sure it locks into place.
⚠ WARNING
- Make sure the hood is completely closed and latched before driving. Failure to do so could cause the hood to fly open and result in an accident.
- If you see steam or smoke coming from the engine compartment, to avoid injury do not open the hood.
3-16 Pre-driving checks and adjustments
REAR HATCH (Coupe models)
! WARNING Do not drive with the rear hatch open. This could allow dangerous exhaust gases to be drawn into the vehicle. See “EXHAUST GAS (carbon monoxide)” in the “5. Starting and driving” section of this manual.
 SPA2573
REAR HATCH OPENER SWITCH
The rear hatch can be opened by pushing the rear hatch opener switch when the Intelligent Key is within the operating range of the rear hatch lock/unlock function regardless of the inside lock knob position. (See “INTELLIGENT KEY SYSTEM” earlier in this section.)
To close the rear hatch, push it down securely.
 SPA2646
Pre-driving checks and adjustments 3-17
NISMO models
CAUTION
Do not use the rear spoiler Ⓐ to open or close the rear hatch. Doing so may damage the rear spoiler.
Always hold area Ⓑ to open or close the rear hatch.

- Firmly pull the release handle until the rear hatch releases.
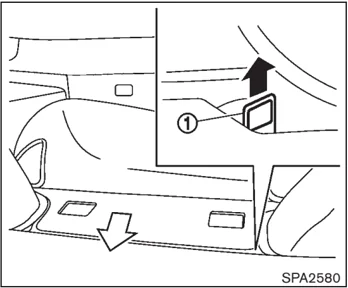
SECONDARY REAR HATCH RELEASE
The secondary rear hatch release mechanism allows opening the rear hatch in the event of discharged battery or emergency.
The release handle is located under the cargo room floor. To open the rear hatch from the passenger compartment, perform the following procedure.
- Remove the cargo floor mat.
- Find the rear hatch release handle ① as shown in the illustration.
- Free the release handle that is fixed with velcro.
3-18 Pre-driving checks and adjustments
TRUNK LID (Roadster models)
WARNING
- Do not drive with the trunk lid open. This could allow dangerous exhaust gases to be drawn into the vehicle. See “EXHAUST GAS (carbon mon-oxide)” in the “5. Starting and driv-ing” section of this manual.
- Closely supervise children when they are around cars to prevent them from playing and becoming locked in the trunk where they could be seriously injured. Keep the car locked, with the trunk closed, when not in use, and prevent children’s access to Intelligent Keys.
SPA2692
TRUNK LID OPENER SWITCH
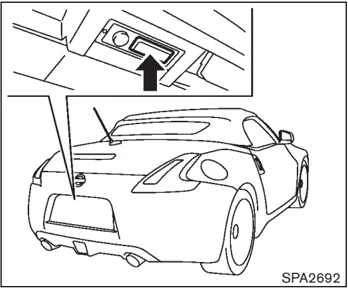
The trunk lid can be opened by pushing the trunk lid opener switch when the Intelligent Key is within the operating range of the trunk lock/unlock function regardless of the inside lock knob position. (See “INTELLIGENT KEY SYS-TEM” earlier in this section.)
SPA2681
TRUNK RELEASE POWER CANCEL SWITCH
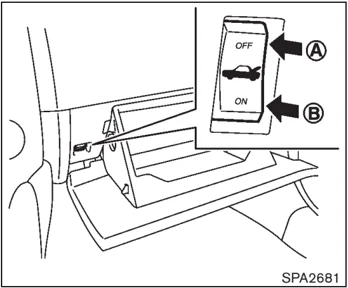
When the switch located inside the glove box is in the OFF position Ⓐ , the power to the trunk lid will be canceled and the trunk lid cannot be opened by the trunk lid opener or trunk request switch.
When you have to leave the vehicle with a valet and want to keep your belongings safe in the glove box and the trunk, push this switch to OFF and lock the glove box with the mechanical key. Then leave the vehicle and the Intelligent Key with the valet and keep the mechanical key with you.
Pre-driving checks and adjustments 3-19
See “KEYS” earlier in this section.
To connect the power to the trunk lid, push the switch to the ON Ⓑ position.
INTERIOR TRUNK LID RELEASE
WARNING
Closely supervise children when they are around cars to prevent them from playing and becoming locked in the trunk where they could be seriously injured. Keep the car locked, with the trunk lid securely latched, when not in use, and prevent children’s access to Intelligent Keys.
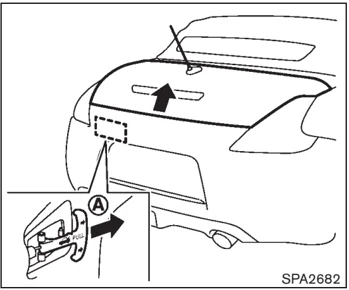
The interior trunk lid release mechanism allows opening of the trunk lid in the event that people become locked inside the trunk.
Releasing inside the trunk To open the trunk lid from the inside, pull the release handle Ⓐ until the lock releases and push up on the trunk lid. The release lever is made of a material that glows in the dark after a brief exposure to ambient light.
The handle Ⓐ is located inside the trunk compartment as illustrated.
3-20 Pre-driving checks and adjustments
SOFT TOP (Roadster models)
 SPA2683
SECONDARY TRUNK LID RELEASE
The secondary trunk lid release mechanism allows opening the trunk lid in the event of discharged battery or emergency.
- Open the rear parcel box.
- Remove the cap ① with a suitable tool ②.
- Insert the key into the key cylinder and turn it counterclockwise. The trunk lid will open.
 Interior/exterior view
SPA2685
- Soft top indicator light (on the combination meter)
- Soft top operating switch
- Top lock hole
- Soft top
- Top storage lid
- Trunk lid
- Rear window
BEFORE OPERATING THE TOP
The soft top of this vehicle is electrically operated. You can fully open or close the top only by pressing the operating switch located on the center console.
The soft top operating switch must be operated under all of the following conditions:
- When the trunk is closed.
- When the vehicle is stopped.
- When the engine is running.
- When the ignition switch is in the ON position.
Pre-driving checks and adjustments 3-21
- When the selector lever or shift lever is in a position other than the R (Reverse) position.
CAUTION
Always keep the engine running while operating the soft top. The top will also operate when the ignition switch is in the ON position, but run the engine to prevent a discharged battery.
Be sure to follow the operating instructions, and all the warnings and cautions in this section. Improper operation of the top could cause a system malfunction, damage, or deterioration of the top material and related parts.
WARNING
-
Park the vehicle in a safe and level place and apply the parking brake.
-
Make sure the area is clear of obstacles and there is enough clearance over the top (for example, in a garage or a covered area). More than approximately 6.6 ft (2 m) from the ground is required to open or close the top safely. Otherwise, the top may damage any objects above it while moving. The top operating system could also be damaged.
-
Do not operate the top in a strong wind. It could be blown by the wind, striking someone or damage the top.
-
Do not allow anyone to stand up or extend any portion of their body out of the opening while the vehicle is in motion or while the top is being operated.
-
In an accident you could be thrown from the vehicle with an open top. Always use seat belts and proper child restraints.
CAUTION
-
Do not operate the top when the temperature is below 32°F (0°C). This may result in damage to the top material or operating system.
-
Remove water drops, snow, ice or sand from the top, and dry the surface of the top completely before opening it.
-
Do not open the top when it is wet or damp. This may cause interior water damage, stains or mildew on the top material.
-
Be sure to turn off the rear window defroster switch. Never turn it on while the top is being operated or fully opened. The heat may damage the top material.
3-22 Pre-driving checks and adjustments
 SPA2691
CAUTION
-
Do not place any objects between the top cloth and the structure. Doing so could interfere with top operation and cause damage to the top operating system or the objects.
-
Do not place anything on the top and the storage lid. Even small items may interfere with the top operation and could cause damage to the top or the vehicle body.
-
Do not place anything in the top storage area. The top will not fit there properly, and this could damage the top and/or the vehicle body.
-
Do not sit or place excessive weight on the top and the storage lid, especially when the top is being operated. The top may be damaged.
-
Do not drive the vehicle with the top partially opened. Always make sure the top is either fully opened or closed before driving.
-
Secure items so that they cannot be blown from the vehicle while driving with the top open.
-
Do not operate the top manually except for emergency cases. Manual operation may damage the top.
-
Be sure to fully open or fully close the top. Do not release the switch half way through the roof opening or closing process. If the top is only partially opened, significant damage to the top could occur.
Make sure the trunk lid is securely closed before operating the top.
 SPA2706
WHEN OPERATING THE TOP
WARNING
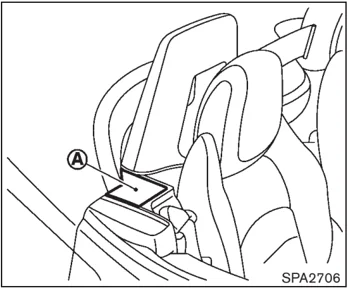
Keep hands and other parts of the body away from moving parts such as the top, storage lid, side flap A and power windows.
CAUTION
Keep all parts of the top linkage clear of obstructions, or the top latch may not be securely locked.
Pre-driving checks and adjustments 3-23
NOTE:
- In case of low battery or low temperature, the top may temporarily stop moving during the operation. This functions to protect the top control mechanism, and it is not a malfunction.
- If the top is opened and closed repeatedly in a short period of time or the top operation is stopped while opening or closing, the top operation may be automatically stopped to protect the system. Wait for approximately 5 minutes before operating the top again.
SPA1691
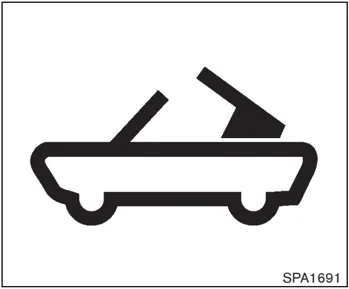
Soft top indicator light The soft top indicator light in the instrument panel shows the conditions of top operation. The light illuminates when the soft top is being operated or if it is stopped before reaching the fully opened or closed position. When the top is fully opened or closed, the light will turn off.
The light blinks while the soft top is not fully opened or closed under the following conditions:
- When the vehicle is driven.
- When the selector lever or shift lever is in the R (Reverse) position.
Be sure to fully open or close the soft top when driving the vehicle.
When the soft top is operating, and any of the following conditions occur, the top will stop operating.
- When the selector lever or shift lever is in the R (Reverse) position.
- When the vehicle moves at a speed of 3 MPH (5 km/h) or more.
- When the battery voltage is extremely low.
- When the temperature of the soft top system becomes extremely high.
Release the soft top operating switch, and push the switch again to move the top to the fully opened or closed position. The soft top indicator light will turn off when the top operation is completely finished.
If the soft top indicator light illuminates with the ignition switch ON (whether the top is operated or not, and when the top is engaged), it may indicate the top operating system is not functioning properly. Have your vehicle checked by a NISSAN dealer as soon as possible.
Automatic window lowering When the soft top operating switch is pressed, the power windows will automatically be lowered completely. The windows do not rise
3-24 Pre-driving checks and adjustments
automatically after the top operation is completed. Use the power window switches to raise them.
SPA2632
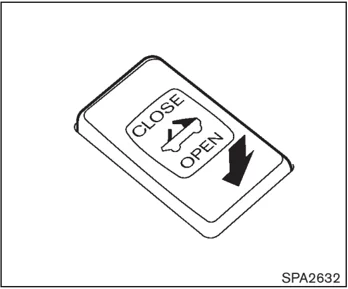
OPENING THE TOP
- Start the engine.
- Push OPEN on the soft top operating switch and hold it until the top is fully opened.
- The soft top indicator light will illuminate while the top is in motion. (In about 20 seconds, the opening movement will finish and the indicator light turns off.)
- Windows will automatically be fully opened.
- Release the switch when the top is fully opened. (The indicator light turns off.)
NOTE: If you release the switch and press it again while the top is being opened, the top will slightly move to the closing direction, then start moving to the opening direction again. The top is designed to move in this way. It is not a malfunction.
Pre-driving checks and adjustments 3-25
 SPA2633
CLOSING THE TOP
- Start the engine.
- Push CLOSE on the soft top operating switch and hold it until the top is fully closed.
- The soft top indicator light will illuminate while the top is in motion. (In about 20 seconds, the closing movement will finish.)
- Windows will automatically be fully opened.
- Release the switch when the top is fully closed. (The indicator light will turn off.)
 SPA2570
OPENING THE TOP USING THE INTELLIGENT KEY
The soft top can be opened using the request switch.
Opening the soft top
Push the ignition switch to the OFF position and make sure to carry the Intelligent Key with you. Push the door handle request switch (driver's or passenger's) A and hold it until the soft top is fully open.
3-26 Pre-driving checks and adjustments
TROUBLESHOOTING GUIDE
If the soft top stops halfway during operation or does not operate normally, follow the procedures shown in the following table. If the procedures in the following table do not solve the symptom, immediately contact a NISSAN dealer for the inspection.
| Symptom | Beep | Possible cause | Possible solution |
|---|---|---|---|
| The OPEN side of the soft top operating switch is pushed, but the soft top does not operate. | Sounds twice | The OPEN side of the soft top operating switch is pushed while the soft top is fully open, or the CLOSE side of the soft top operating switch is pushed while the soft top is fully closed. | Push the CLOSE side of the soft top operating switch when the soft top is fully open. Push the OPEN side of the soft top operating switch when the soft top is fully closed. |
| Sounds twice | The selector lever (automatic transmission models only) or the shift lever (manual transmission models only) is in the R (Reverse) position. | Shift the selector lever (automatic transmission models only) to the P (Park) or N (Neutral) position, or shift the shift lever (manual transmission models only) to the N (Neutral) position, and then operate the soft top. | |
| Sounds twice | The trunk lid is opened. | Fully close the trunk lid. | |
| Does not sound | The battery voltage is low. | Start the engine again and operate the soft top. | |
| Does not sound | The operation stops to protect the system. | Wait for approximately 5 minutes. | |
| The soft top stops halfway during operation. | Sounds twice | Objects are trapped in the moving structure of the soft top. | Check that an object is not trapped inside the rear parcel shelf, side flap and soft top. After the check, turn the ignition switch to the OFF position, start the engine again and then operate the soft top. |
| Sounds twice | The battery voltage is low. | Start the engine again and operate the soft top. | |
| When the vehicle is being driven, the beep sounds. | Sounds continuously | The soft top is partially opened. | Immediately park the vehicle in a safe location and fully open or fully close the soft top. |
Pre-driving checks and adjustments 3-27
IF THE TOP DOES NOT OPEN OR CLOSE ELECTRICALLY
If you cannot operate the soft top with the operating switch, first check whether all the following operating conditions are met.
- vehicle is stopped
- ignition switch is ON (Run the engine when operating the top.)
- the trunk is closed
- the selector lever or shift lever is in a position other than the R (Reverse) position
If the top still does not move under the above conditions or has any system malfunction, see a NISSAN dealer as soon as possible. When you must close the top by yourself, in the event of emergency or when an immediate dealer service is not available, close the top manually according to the procedures shown in this section.
When closing the soft top manually:
- Move the vehicle to a safe place, away from traffic.
- Two people should perform this procedure, as some of the top parts are extremely heavy.
The top cannot be opened manually.
WARNING
- Do not drive with the top partially opened.
- If the top cannot be operated properly, see a NISSAN dealer as soon as possible to have your vehicle checked.
CAUTION
The storage lid is extremely heavy. The storage lid should be manually opened or closed by two people.

SPA2715
- Open the trunk lid. In the event of a discharged battery, the secondary trunk release mechanism should be operated. (See "SECONDARY TRUNK LID RELEASE" earlier in this section.)
- Open the top storage lid a. Remove the board ② inside of the trunk by removing the clips ①. b. Pull the lock release cables (right and left) ③ as illustrated, then close the trunk lid.
NOTE: Use a cloth or other tool to protect your hands when pulling on the lock release
3-28 Pre-driving checks and adjustments
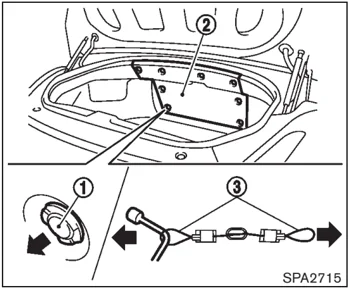
cables ③ .

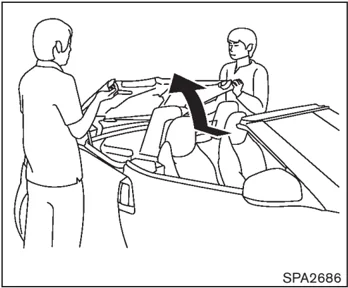
SPA2686
c. Pull up the storage lid from the left and right side of the vehicle by hand.
CAUTION
Make sure to close the trunk lid before opening the storage lid. The storage lid may contact the trunk lid and damage it.
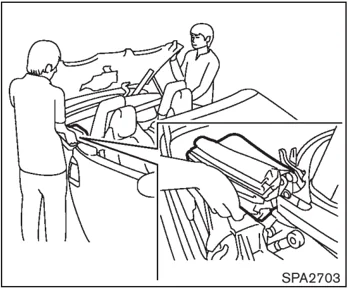
SPA2703
- Close the soft top. a. Pull up the top simultaneously from the right and left side of the vehicle while holding the storage lid.
Pre-driving checks and adjustments 3-29
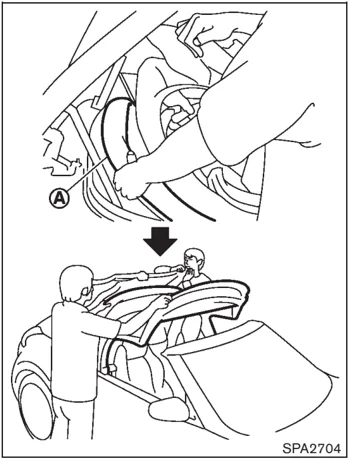
SPA2704
b. When the rear top Ⓐ is pulled up from the storage area, one person must hold the storage lid and another person must pull up the soft top.
c. Pull up the top using both hands, holding the rear top Ⓐ as illustrated.
CAUTION
Make sure to hold the rear top Ⓐ to avoid the front and rear parts separating. Otherwise the top may be damaged.
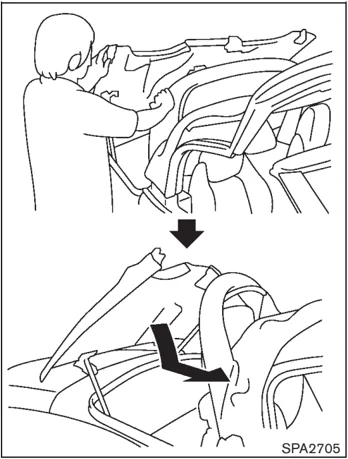
SPA2705
d. Pull down and slide the storage lid to close while holding the rear soft top from the right and left side of the vehicle.
3-30 Pre-driving checks and adjustments
CAUTION Make sure to close the storage lid completely. The storage lid may contact the soft top and damage it.
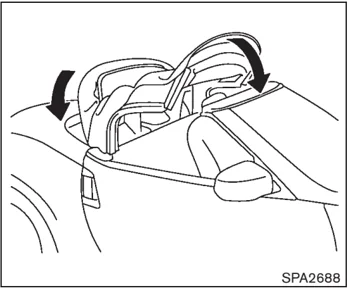
SPA2688
e. Close the front and rear parts of the soft top at the same time as illustrated.
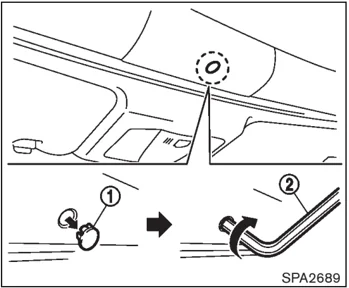
SPA2689
- Lock the front part of the soft top. a. Remove the cap ① as illustrated. b. Insert a suitable tool ② (located in the trunk) into the hole and turn clockwise.
CAUTION
- After closing the top manually, have the system checked and/or repaired by a NISSAN dealer as soon as possible.
- Avoid leaving the vehicle outside for long periods or driving at high speeds. The rear of the top is not
Pre-driving checks and adjustments 3-31
locked completely, and this may allow wind and rain to get into your vehicle.
CARE OF THE SOFT TOP AND THE VEHICLE BODY
To use your Roadster safely and comfortably, you need to observe all the warnings and cautions shown in the previous pages. Also, to maintain a good appearance of the soft top and the vehicle body, you need to care for them by cleaning and/or washing properly.
CAUTION
- Do not use an automatic car wash or a high-pressure car wash to clean your vehicle. The top may be damaged and water may leak into the inside of the vehicle.
- Store the vehicle with the top closed if it is not to be used for long periods. Keeping the top stowed for long periods may cause wrinkles on the surface of the top.
See “CLEANING EXTERIOR” in the “7. Appearance and care” section for detailed instructions.
3-32 Pre-driving checks and adjustments
Black plate (144,1)
FRONT, SIDE AND REAR UNIQUE PARTS (NISMO models)

SPA2647
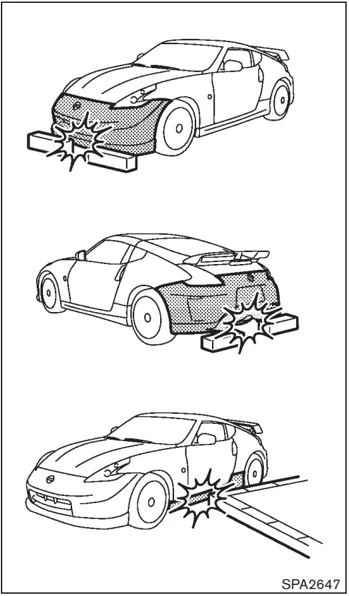
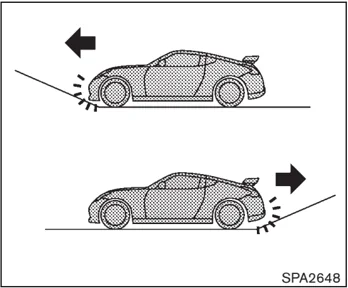
The NISMO models have the following unique parts on the front, side and rear of the vehicle. — Front bumper with an aerodynamic splitter — Side sill extensions — Rear bumper with an aerodynamic diffuser — Large-diameter exhaust pipes
These parts are close to the ground and may be damaged if they contact objects such as curbs, parking blocks, etc.
CAUTION
Reduce vehicle speed to decrease the possibility of damaging these parts when:
- driving on bumpy or rutted roads
- entering or exiting parking garages and driveways
- driving over speed bumps

SPA2648
CAUTION
The approach and departure angles are small. Reduce vehicle speed when the vehicle approaches or leaves a steep hill. Otherwise, the front bumper with an aerodynamic splitter, rear bumper with an aerodynamic diffuser and exhaust pipes may contact the road surface and be damaged.
SPA2649
CAUTION
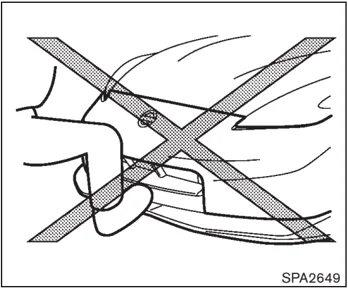
Do not step on the front bumper with an aerodynamic splitter. Doing so could damage it.
Pre-driving checks and adjustments 3-33
FUEL-FILLER DOOR
OPENING THE FUEL-FILLER DOOR
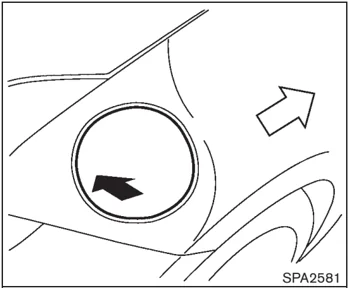
To open the fuel-filler door, unlock the fuel-filler door by using one of the following operations, then push the left side of the door.
- Push the door handle request switch with the Intelligent Key carried with you.
- Push the UNLOCK button on the Intelligent Key.
- Insert the mechanical key into the door lock cylinder and turn it to the rear of the vehicle.
- Push the power door lock switch to the UNLOCK position.
To lock, close the fuel-filler door securely and lock all doors by operating the door handle request switch, the LOCK button on the Intelligent Key, the mechanical key or the power door lock switch.
FUEL-FILLER CAP
WARNING
- Gasoline is extremely flammable and highly explosive under certain conditions. You could be burned or seriously injured if it is misused or mishandled. Always stop engine and do not smoke or allow open flames or sparks near the vehicle when refueling.
- Do not attempt to top off the fuel tank after the fuel pump nozzle shuts off automatically. Continued refueling may cause fuel overflow, resulting in fuel spray and possibly a fire.
- Use only an original equipment type fuel-filler cap as a replacement. It has a built-in safety valve needed for proper operation of the fuel system and emission control system. An incorrect cap can result in a serious malfunction and possible injury. It could also cause the malfunction indicator light to come on.
- Never pour fuel into the throttle body to attempt to start your vehicle.
- Do not fill a portable fuel container in the vehicle or trailer. Static electricity can cause an explosion of flammable liquid, vapor or gas in any vehicle or trailer. To reduce the risk of serious injury or death when filling portable fuel containers:
- — Always place the container on the ground when filling.
- — Do not use electronic devices when filling.
- — Keep the pump nozzle in contact with the container while you are filling it.
- — Use only approved portable fuel containers for flammable liquid.
CAUTION
- If fuel is spilled on the vehicle body, flush it away with water to avoid paint damage.
- Insert the cap straight into the fuel-
3-34 Pre-driving checks and adjustments
filler tube, then tighten until the fuel-filler cap clicks. Failure to tighten the fuel-filler cap properly may cause the SERVICE ENGINE SOON malfunction indicator light (MIL) to illuminate. If the SERVICE ENGINE SOON light illuminates because the fuel-filler cap is loose or missing, tighten or install the cap and continue to drive the vehicle. The SERVICE ENGINE SOON light should turn off after a few driving trips. If the SERVICE ENGINE SOON light does not turn off after a few driving trips, have the vehicle inspected by a NISSAN dealer.
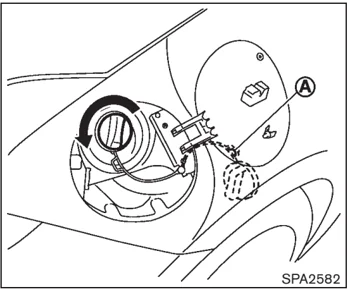
The fuel-filler cap is a ratcheting type. Turn the cap counterclockwise to remove. To tighten, turn the cap clockwise until ratcheting clicks are heard.
Use the fuel-filler cap holder on the hook A while refueling.
TILT STEERING
WARNING
- Do not adjust the steering wheel while driving. You could lose control of your vehicle and cause an accident.
- Do not adjust the steering wheel any closer to you than is necessary for proper steering operation and comfort. The driver's air bag inflates with great force. If you are unrestrained, leaning forward, sitting sideways or out of position in any way, you are at greater risk of injury or death in a crash. You may also receive serious or fatal injuries from the air bag if you are up against it when it inflates. Always sit back against the seatback and as far away as practical from the steering wheel. Always use the seat belts.
Pre-driving checks and adjustments 3-35
SUN VISORS
 SPA2583
MANUAL OPERATION
Tilt operation
Push the lock lever ① down and adjust the steering wheel up or down to the desired position.
Pull the lock lever up securely to lock the steering wheel in place.
 SIC2872
- To block out glare from the front, swing down the main sun visor ① .
- To block glare from the side, remove the main sun visor from the center mount and swing it to the side ② .
MIRRORS
 SPA2447
INSIDE MIRROR
Adjust the height and the angle of the inside mirror to the desired position.
3-36 Pre-driving checks and adjustments
SPA2143
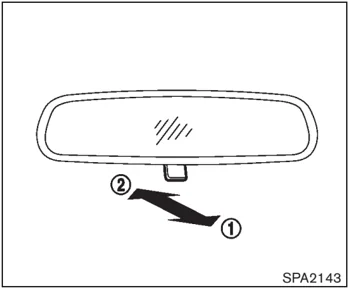
Manual anti-glare type The night position ① will reduce glare from the headlights of vehicles behind you at night. Use the day position ② when driving in daylight hours.
⚠ WARNING Use the night position only when necessary, because it reduces rear view clarity.
SPA2450
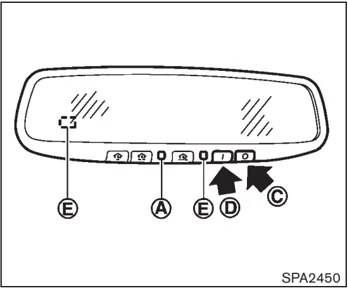
Automatic anti-glare type The inside mirror is designed so that it automatically changes reflection according to the intensity of the headlights of the following vehicle.
The anti-glare system will be automatically turned on when the ignition switch is pushed to the ON position.
When the anti-glare system is turned on, the indicator light Ⓐ will illuminate and excessive glare from the headlights of the vehicle behind you will be reduced.
Push the “○” switch Ⓒ to make the inside rearview mirror operate normally. The indicator light will turn off. Push the “I” switch Ⓓ to turn the system on.
Do not allow any object to cover the sensors Ⓔ or apply glass cleaner on them. Doing so will reduce the sensitivity of the sensor, resulting in improper operation.
For the HomeLink® Universal Transceiver operation, see “HomeLink® UNIVERSAL TRANSCEIVER” in the “2. Instruments and controls” section.
Pre-driving checks and adjustments 3-37
 SPA2319
OUTSIDE MIRRORS
WARNING
Objects viewed in the outside mirror on the passenger side are closer than they appear. Be careful when moving to the right. Using only this mirror could cause an accident. Use the inside mirror or glance over your shoulder to properly judge distances to other objects.
Adjusting outside mirrors The outside mirror control switch is located on the armrest.
The outside mirror will operate only when the ignition switch is in the ACC or ON position.
Turn the switch right or left to select the right or left side mirror ①, then adjust using the control switch ②.
Defrosting outside mirrors The outside mirrors will be heated when the rear window defroster switch is operated.
 SPA1829
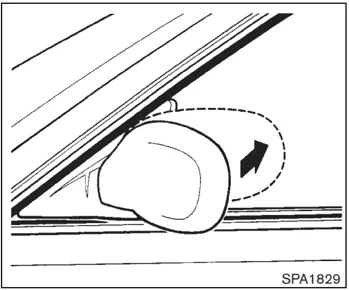
Foldable outside mirrors Fold the outside mirror by pushing it toward the rear of the vehicle.
3-38 Pre-driving checks and adjustments
 SIC3869
VANITY MIRROR To use the front vanity mirror, pull down the sun visor and pull up the cover.
Pre-driving checks and adjustments 3-39