- Direct Tune Inputs the channel number by using a keypad.
Compact Disc (CD) player operation
Push the ignition switch to the ACC or ON position and insert the Compact Disc (CD) into the slot with the label side facing up. The CD will be guided automatically into the slot and start playing.
After loading the CD, the number of tracks on the CD and the play time will appear on the display.
If the radio is already operating, it will automatically turn off and the CD will play.
If the system has been turned off while the CD was playing, pushing the ON-OFF button will start the CD.
Do not use 3.1 in (8 cm) discs.
DISC AUX PLAY: When the DISC-AUX (CD play) button is pushed with the system off and the CD loaded, the system will turn on and the CD will start to play.
When the DISC-AUX button is pushed with the CD loaded and the radio playing, the radio will automatically be turned off and the CD will start to play.
Menu: When the "Menu" key on the display is selected while the CD is being played, the menu screen will be displayed. The following menu options are available.
-
Folder List (for CD with compressed audio files) Displays the folder list.
-
Track List Displays the track list.
-
Play Mode Select a play mode from the following items. — Normal — 1 Folder Repeat (for CD with compressed audio files) — 1 Track Repeat — 1 Disc Random — 1 Folder Random (for CD with compressed audio files)
-
Record to Music Box (for CD) Select to choose specific songs on the CD to record to the Music Box.
-
Title Text Priority (for CD) Set the priority to CDDB (Compact Disc Data Base) to acquire track information from the Gracenote Database, or set the priority to CD-TEXT to acquire the information from CDs.
-
Automatic Recording (for CD) When this item is turned to ON, the Music Box hard drive automatically starts recording when a CD is inserted.
-
Recording Quality (for CD) The larger number (132) will increase the recorded sound quality while taking up more space on the Music Box leaving less room for more songs.
For the details of Music Box, see "MUSIC BOX HARD-DISK DRIVE (models with navigation system)" later in this section.
TRACK ▶▶|◀◀ SEEK CAT Next/Previous Track and Fast Forward/Rewind: When the TRACK▶▶ (fast forward) or ◀◀ SEEK CAT (rewind) button is pushed for more than 1.5 seconds while the CD is being played, the CD will play while fast forwarding or rewinding. When the button is released, the CD will return to normal play speed.
4-48 Center display, heater, air conditioner, audio, phone and voice recognition systems
When the \blacktriangleright\blacktriangleright or \blacktriangleleft\blacktriangleleft button is pushed for less than 1.5 seconds while the CD is being played, the next track or the beginning of the current track on the CD will be played.
REPEAT (RPT), RANDOM (RDM): When the RPT button is pushed while the CD is played, the play pattern can be changed as follows:
(CD)
 (CD with compressed audio files)

CD EJECT: When the CD EJECT button is pushed with the CD loaded, the CD will be ejected.
When this button is pushed while the CD is being played, the CD will be ejected.
If the CD comes out and is not removed, it will be pulled back into the slot to protect it.
DVD (DIGITAL VERSATILE DISC) PLAYER OPERATION (models with navigation system)
Precautions Start the engine when using the DVD entertainment system.
Movies will not be shown on the front display while the vehicle is in any drive position to reduce driver distraction. Audio is available when a movie is played. To view movies in the front display, stop the vehicle in a safe location, move the selector lever to the P (Park) position and apply the parking brake.
WARNING
- The driver must not attempt to operate the DVD system or wear the headphones while the vehicle is in motion so that full attention may be given to vehicle operation.
- Do not attempt to modify the system to display a movie on the front screen while the vehicle is being driven. Doing so may distract the driver and may cause a collision and serious personal injury or death.
CAUTION
- Only operate the DVD while the vehicle engine is running. Operating the DVD for extended periods of time with the engine OFF can discharge the vehicle battery.
- Do not allow the system to get wet. Excessive moisture such as spilled liquids may cause the system to malfunction.
- While playing VIDEO-CD media, this DVD player does not guarantee complete functionality of all VIDEO-CD formats.
Display settings To adjust the front display mode, push the SETTING button while the DVD is being played, select the "Others" key and then select the "Display" key.
To adjust the display ON/OFF, brightness, tint, color and contrast, select the "Display Adjustment" key and then select each key.
Then you can adjust each item using the multi-function controller. After changes have been made push the BACK button to save the setting.
Center display, heater, air conditioner, audio, phone and voice recognition systems 4-49

 SAA2497
Playing a DVD
DISC-AUX button:
Park the vehicle in a safe location for the front seat occupants to operate the DVD drive while watching the images.
Push the DISC·AUX button on the instrument panel and turn the display to the DVD mode.
When a DVD is loaded, it will be replayed automatically.
The operation screen will be turned on when the DISC·AUX button located on the instrument panel is pushed while a DVD is being played, and it will turn off automatically after a period of time. To turn it on again, push the DISC·AUX button again.
DVD operation keys:
When the DVD is playing without the operation screen being shown, you may use the touch screen to select items from the displayed video. You may also use the multifunction controller to select an item from the displayed video. When the operation screen is being shown, use the multifunction controller or touch screen to select an item from the displayed menus.
II PAUSE:
Select the " II " key to pause the DVD. To resume playing the DVD, use the "PLAY" key.
PLAY:
Select the " ► " key to start playing the DVD, for example, after pausing the DVD.
■ STOP:
Select the " ■ " key to stop playing the DVD.
►►/◄◄ Next/Previous Chapter:
Select the " ►► " or " ◄◄ " key to skip the chapter(s) of the disc forward/backward. The chapters will advance/go back the number of times this key is selected.
|►/◄| Commercial Skip:
This function is only for DVD-VIDEO, DVD-VR. Select the " |► " or " ◄| " key to skip forward or backwards by the set amount as defined in the DVD Settings menu.
➕/➖ Next/Previous Image:
This function is only for DVD-AUDIO. Select the " ➕ " or " ➖ " key to advance or rewind the still image. The still image will advance or rewind the number of times this key is selected.
Top Menu:
When the "Top Menu" key is selected in the screen while a DVD is being played, the top menu specific to each disc will be displayed. For details, see the instructions on the disc.
4-50 Center display, heater, air conditioner, audio, phone and voice recognition systems

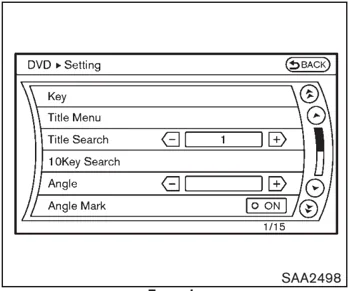
Example SAA2498
DVD settings Select the “Settings” key to adjust the following settings.
Key (DVD-VIDEO, DVD-AUDIO): Keys for the DVD menu operation are displayed. : Move the cursor to select a DVD menu. Enter: Enter the selected menu. Move: Change the display location by moving the operation key. Back: Return to the previous screen. Hide: Hide the operation key.
Title Menu (DVD-VIDEO): Some menus specific to each disc will be shown. For details, see the instructions on the disc.
Title Search (DVD-VIDEO, DVD-VR): The scene with the specified title will be displayed each time the “+” side or “–” side is selected.
Group Search (DVD-AUDIO, VIDEO CD): A scene in the specified group will be displayed each time the “+” side or “–” side is selected.
10 Key Search (DVD-VIDEO, VIDEO-CD,CD-DA, DVD-VR): Select the “10 Key Search” key to open the number entry screen. Input the number to be searched and select the “OK” key. The specified Title/Chapter or Group/Track will be played.
Select No. (VIDEO-CD): Select the “Select No.” key to open the number entry screen. Input the number to be searched and select the “OK” key. The specified scene will be played.
Angle (DVD-VIDEO): If the DVD contains different angles (such as moving images), the current image angle can be switched to another one. Select the “Angle” key. The angle will change each time the “+” side or “–” side is selected.
Angle Mark (DVD-VIDEO): When this item is turned on, an angle mark will be shown on the bottom of the screen if the scene can be seen from a different angle.
Menu Skip (DVD-VIDEO): DVD menus are automatically configured and the contents will be played directly when the “Menu Skip” key is turned on. Note that some discs may not be played directly even if this item is turned on.
CM Skip (DVD-VIDEO): Select the “CM Skip” key. Choose the setting time from 15, 30 or 60 seconds by selecting the “+” side or “–” side.
DRC (DVD-VIDEO, DVD-VR): DRC (Dynamic Range Compression) automatically adjusts the soundtrack volume level to maintain a more even sound to the speakers.
DVD Language (DVD-VIDEO, VIDEO-CD): Select the “DVD Language” key to open the number entry screen. Input the number corresponding to the preferred language and select the “OK” key. The DVD top menu language will
Center display, heater, air conditioner, audio, phone and voice recognition systems 4-51
be changed to the one specified.
Display: To adjust the image quality of the screen, select the preferred adjustment items.
Audio: Select the preferred language for audio.
Subtitle (DVD-VIDEO, DVD-VR): Select the preferred language for subtitles.
Display Mode (DVD-VIDEO, VIDEO-CD, DVD-VR): Select from the “Full”, “Wide”, “Normal” or “Cinema” modes.
Title List (DVD-VR): Select the preferred title from the list.
Play Mode: Select the preferred play mode.
PG/PL Mode (DVD-VR): Select the “PG” or “PL” mode.
SAA2499
USB MEMORY OPERATION (models with navigation system)
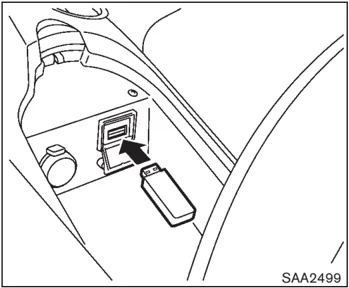
Audio main operation Open the console lid and connect a USB memory as illustrated. Then, push the DISC·AUX button repeatedly to switch to the USB memory mode.
If the system has been turned off while the USB memory was playing, pushing the ON-OFF/VOL control knob will start the USB memory.
SAA2500
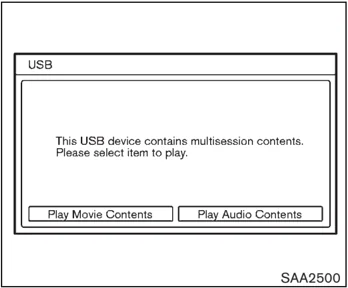
File selection When there are both audio and movie files in the USB memory, the mode select screen is displayed. Select the preferred contents to play.
When there is only one type of file, the audio or movie operation screen is displayed and starts to play.
If a video file restricts the number of playbacks, a pop-up screen will appear to confirm it is ok to play. Answer yes or no as requested by the display.
4-52 Center display, heater, air conditioner, audio, phone and voice recognition systems
 SAA2501
Audio file operation
PLAY:
When the DISC·AUX button is pushed with the system off and the USB memory inserted, the system will turn on.
If another audio source is playing and a USB memory is inserted, push the DISC·AUX button repeatedly until the center display changes to the USB memory mode.
Next/Previous File and Fast Forward/Rewind:
When the TRACK (Rewind) or SEEK CAT (Fast Forward) button is pushed for more than 1.5 seconds while a USB memory is being played, the USB memory will play while forwarding or rewinding. When the button is released, the USB memory will return to normal play speed.
When the TRACK or SEEK CAT button is pushed for less than 1.5 seconds while the USB memory is being played, the next track or the beginning of the current track on the USB memory will be played.
The multi-function controller can also be used to select tracks when the USB memory is being played.
Folder selection:
To change to another folder in the USB memory, turn the folder selector or choose a folder displayed on the screen using the multi-function controller.
REPEAT (RPT), RANDOM (RDM):
When the RPT button is pushed while the USB memory is played, the play pattern can be change as follows.
To change the play mode, push the RPT button repeatedly and the mode will change as follows.
Normal → 1 Folder Repeat → 1 Track Repeat → All Random → 1 Folder Random → Normal
Center display, heater, air conditioner, audio, phone and voice recognition systems 4-53
SAA2502
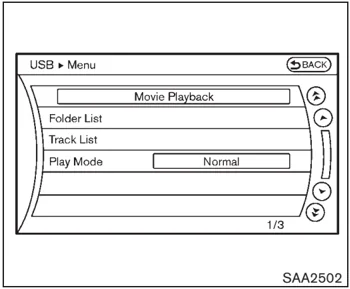
Menu: There are some options available during playback. Select one of the following options that are displayed on the screen if necessary. Refer to the following information for each item.
-
Movie Playback Switch to the movie playback mode. This item is displayed only when a USB memory contains movie files.
-
Folder List/Track List Displays the folder or track list. The “Movie Playback” key is also displayed in this list screen, and enables switching to the movie playback mode.
-
Play Mode Select the preferred play mode.
SAA2503
Movie file operation Park the vehicle in a safe location for the front seat occupants to operate the USB memory while watching the images.
DISC AUX PLAY: When the DISC-AUX button is pushed with the system off and the USB memory inserted, the system will turn on.
If another audio source is playing and a USB memory is inserted, push the DISC-AUX button repeatedly until the center display changes to the USB memory mode.
4-54 Center display, heater, air conditioner, audio, phone and voice recognition systems
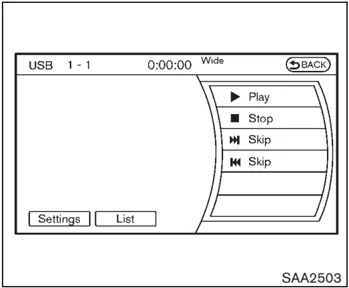
Operation keys: To operate the USB memory, select the desired key displayed on the operation screen using the multi-function controller.
Pause Select the “||” key to pause the movie file. To resume playing the movie file, select the “▶” key.
Play Select the “▶” key to start playing a movie file, for example, after pausing a movie file.
STOP Select the “■” key to stop playing a movie file.
Skip (Next chapter) Select the “⏭” key to skip the chapter(s) of the disc forward. The chapters will advance the number of times the ENTER button is pushed.
Skip (Previous chapter) Select the “⏮” key to skip the chapter(s) of the disc backward. The chapters will go back the number of times the “⏮” key is selected.
List: Select the “List” key on the movie file operation screen to display the file list.
Example SAA2504
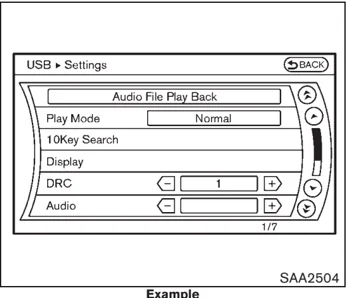
Settings: Select the “Settings” key to adjust the following settings.
- Audio File Playback Switch to the audio playback mode. This item is displayed only when the USB memory contains the audio files.
- Play Mode Select the “Normal” or “1 Track Repeat” play mode.
Center display, heater, air conditioner, audio, phone and voice recognition systems 4-55
-
10 Key Search Select the “10 Key Search” key to open the number entry screen. Input the number to be searched and select the “OK” key. The specified folder/file will be played.
-
Display To adjust the image quality of the screen, select the preferred adjustment items.
-
DRC DRC (Dynamic Range Compression) automatically adjusts the soundtrack volume level to maintain a more even sound to the speakers.
-
Audio Select the preferred language for audio.
-
Subtitle Select the preferred language for subtitle.
-
Display Mode Select the “Normal”, “Wide”, “Cinema” or “Full” mode.
BLUETOOTH® STREAMING AUDIO (models with navigation system)
Your NISSAN is equipped with Bluetooth® Streaming Audio. If you have a compatible Bluetooth® device with streaming audio (A2DP profile), you can set up the wireless connection between your Bluetooth® device and the in-vehicle audio system. This connection allows you to listen to the audio from the Bluetooth® device using your vehicle speakers. It also may allow basic control of the device for playing and skipping audio files using the AVRCP Bluetooth® profile. All Bluetooth® Devices do not have the same level of controls for AVRCP. Please consult the manual for your Bluetooth® Device for more details.
Once your Bluetooth® device is connected to the in-vehicle audio system, it will automatically reconnect whenever the device is present in the vehicle and you select Bluetooth® Audio from your audio system. You do not need to manually reconnect for each usage.
Regulatory information
FCC Regulatory information:
— CAUTION: To maintain compliance with FCC’s RF exposure guidelines, use only the supplied antenna. Unauthorized antenna, modification, or attachments could damage the transmitter and may violate FCC regulations.
— Operation is subject to the following two conditions:
- This device may not cause interference and
- This device must accept any interference, including interference that may cause undesired operation of the device
IC Regulatory information:
— Operation is subject to the following two conditions:
- This device may not cause interference, and
- This device must accept any interference, including interference that may cause undesired operation of the device.
— This Class B digital apparatus meets all requirements of the Canadian Interference-Causing Equipment Regulations.
4-56 Center display, heater, air conditioner, audio, phone and voice recognition systems
Bluetooth trademark:
BLUETOOTH® is a trademark owned by Bluetooth SIG, Inc. and licensed to Clarion Co., Ltd.
 SAA2505
 SAA2506
Connecting procedure
- Push the SETTING button and select the “Bluetooth” key.
- Select the “Connect Bluetooth” key.
Center display, heater, air conditioner, audio, phone and voice recognition systems 4-57
 SAA2507
- A confirmation screen will be displayed. Select “No”.
Note: Selecting “Yes” will only connect the hands free phone portion of a Bluetooth® device.
 SAA2508
- Choose a PIN code to use with the compatible Bluetooth audio device using the number input screen. The PIN code will need to be entered into the Bluetooth® audio device after step 5. Select the “OK” key.
 SAA2509
- The standby message screen will appear. Operate the compatible Bluetooth® audio device. For the connecting procedure of the audio device, see the Bluetooth® audio instructions.
When the connecting is completed, the screen will return to the Bluetooth® setup display.
4-58 Center display, heater, air conditioner, audio, phone and voice recognition systems
 SAA2510
Audio main operation
Push the ignition switch to the ACC or ON position. Then, push the DISC-AUX button repeatedly to switch to the Bluetooth® audio mode. If the system has been turned off while the Bluetooth® audio device was playing, pushing the ON-OFF/VOL control knob will start the Bluetooth® audio device.
The ability to pause, change tracks, fast forward, rewind, randomize and repeat music may be different between devices. Some or all of these functions may not be supported on each device.
DISC-AUX button:
When the DISC-AUX button is pushed with the system off and the Bluetooth® audio device connected, the system will turn on. If another audio source is playing and the Bluetooth® audio device is connected, push the DISC-AUX button repeatedly until the display changes to the Bluetooth® audio mode.
Next/Previous Track and Fast Forward/Rewind:
When the TRACK ▶▶| or |◀◀ SEEK CAT button is pushed for more than 1.5 seconds while a Bluetooth® audio file is being played, the Bluetooth® audio device will play while forwarding or rewinding. When the button is released, the Bluetooth® audio device will return to normal play speed.
When the TRACK ▶▶| or |◀◀ SEEK CAT button is pushed for less than 1.5 seconds while a Bluetooth® audio file is being played, the next track or the beginning of the current track on the Bluetooth® audio device will be played. The multi-function controller can also be used to select tracks when the Bluetooth® audio play mode screen is shown on the display. ("Bluetooth audio" will be indicated on the header of the screen.)
REPEAT (RPT), RANDOM (RDM):
To change the play mode, push the RPT RDM button repeatedly and the mode changes as follows.
Normal → Shuffle All Tracks → Shuffle Group → Repeat 1 Track → Repeat All Tracks → Repeat Group → Normal
Operation keys:
To operate a Bluetooth® audio device, select a key displayed on the operation screen using the multi-function controller.
Play
Select the "▶" key to start playing when pausing. Select this key again to pause the audio play.
Pause
Select the "||" key to pause the Bluetooth® audio device. Select this key again to resume playing.
Play Mode:
The play mode setting display will appear when the "Menu" key is selected.
Choose the preferred play mode from the
Center display, heater, air conditioner, audio, phone and voice recognition systems 4-59



following items.
- Shuffle Choose “Shuffle OFF”, “Shuffle All Tracks” and “Shuffle Group”.
- Repeat Choose from “Repeat OFF”, “Repeat 1 Track”, “Repeat All Tracks” and “Repeat Group”.
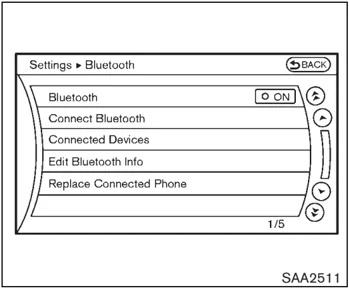
Bluetooth® settings To set up the Bluetooth® device system to the preferred settings, push the SETTING button and select the “Bluetooth” key.
Bluetooth: If this setting is turned off, the connection between the Bluetooth® devices and the in-vehicle Bluetooth® module will be canceled.
Connect Bluetooth: Connects to the Bluetooth® device. See “Connecting procedure” earlier in this section. Up to 5 devices can be registered.
Connected Devices: Registered devices are shown on the list. Select a Bluetooth® device from the list, the following options will be available.
- Select Select “Select” to connect the selected device to the vehicle. If there is a different device currently connected, the selected device will replace the current device.
- Edit Rename the selected Bluetooth® device using the keypad displayed on the screen. (See “HOW TO USE TOUCH SCREEN” earlier in this section.)
- Delete Delete the selected Bluetooth® device.
Edit Bluetooth Info: Change the name broadcasted by this system over Bluetooth®. Change the PIN code that is entered when connecting a hands free device to this system.
Replace Connected Phone: Replace the Bluetooth® connection with a connected Bluetooth® cellular phone. For details about Hands-Free Phone System, see “BLUETOOTH® HANDS-FREE PHONE SYSTEM
4-60 Center display, heater, air conditioner, audio, phone and voice recognition systems
(models with navigation system)" later in this section.
 SAA2512
iPod® PLAYER OPERATION (models with navigation system)
Connecting iPod®
Open the console lid and connect the iPod® cable to the USB connector. If compatible, the battery of the iPod® is charged while the connection to the vehicle.
Depending on the version of the iPod®, the display on the iPod® shows a NISSAN or Accessory Attached screen when the connection is completed. When the iPod® is connected to the vehicle, the iPod® music library can only be operated by the vehicle audio controls.
- iPod® is a trademark of Apple Inc., registered in the U.S. and other countries.
Compatibility
The following models are available:
● Fifth generation iPod® (version 1.2.3 or later)
● iPod Classic® (version 1.1.1 or later)
● First generation iPod touch® (version 2.0.0 or later)
● Second generation iPod touch® (version 1.2.3 or later)
● First generation iPod nano® (version 1.3.1 or later)
● Second generation iPod nano® (version 1.1.3 or later)
● Third generation iPod nano® (version 1.1 or later)
● Fourth generation iPod nano® (version 1.0.2 or later)
Make sure that the iPod® version is updated.
Audio main operation
Push the ignition switch to the ACC or ON position. Then, push the DISC-AUX button repeatedly to switch to the iPod® mode.
If the system has been turned off while the iPod® was playing, pushing the ON-OFF button will
Center display, heater, air conditioner, audio, phone and voice recognition systems 4-61
start the iPod®.
DISC-AUX button:
When the DISC·AUX button is pushed with the system off and the iPod® connected, the system will turn on. If another audio source is playing and the iPod® is connected, push the DISC·AUX button repeatedly until the center display changes to the iPod® mode.
Interface:
The interface for iPod® operation shown on the vehicle center display is similar to the iPod® interface. Use the multi-function controller and the ENTER or BACK button to play the iPod® with your favorite settings.
The following items can be chosen from the menu list screen. For further information about each item, see the iPod® Owner’s Manual.
- Now Playing
- Playlists
- Artists
- Albums
- Songs
- Podcasts
- Genres
- Composers
- Audiobooks
- Shuffle Songs
The following touch-panel buttons shown on the screen are also available:
- MENU : returns to the previous screen.
- ▶II : plays/pauses the music selected.

Next/Previous Track and Fast Forward/Rewind:
When the TRACK ▶▶| or |◀◀ SEEK CAT button is pushed for more than 1.5 seconds while the iPod® is playing, the iPod® will play while fast forwarding or rewinding. When the button is released, the iPod® will return to the normal play speed.
When the TRACK ▶▶| or |◀◀ SEEK CAT button is pushed for less than 1.5 seconds while the iPod® is playing, the next track or the beginning of the current track on the iPod® will be played.
The multi-function controller can also be used to select tracks when the iPod® is playing.
REPEAT (RPT), RANDOM (RDM):
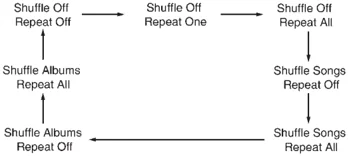
When the RPT button is pushed while a track is being played, the play pattern can be changed as follows:
4-62 Center display, heater, air conditioner, audio, phone and voice recognition systems
MUSIC BOX HARD-DISK DRIVE (models with navigation system)
The "Music Box" hard-disk drive audio system can store songs from CDs being played. The system has a 9.3 gigabyte (GB) storage capacity and can record up to 200 hours (approximately 2,900 songs).
The following CDs can be recorded in the "Music Box" hard-disk drive audio system.
- CDs that contain uncompressed audio files
- Hybrid Compact Disc Digital Audio (Hybrid CD-DA) specification in Super Audio CDs
- Compact Disc Digital Audio (CD-DA) specification in CD-Extras
- First session of multisession disc
Extreme temperature conditions [below –4°F (–20°C) and above 158°F (70°C)] could affect the performance of the hard-disk.
NOTE: If the hard-disk needs to be replaced due to a malfunction, all stored music data will be erased.
Recording CDs
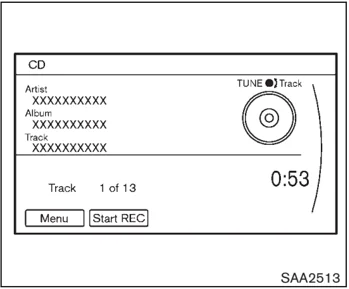
- Operate the audio system to play a CD. For the details of playing CDs, see "Compact Disc (CD) player operation" earlier in this section.
- Select the "Start REC" key.
NOTE:
-
The system starts playing and recording the 1st track on the CD when the "Start REC" key is selected.
-
The recording process can be stopped at any time. All tracks that were played before the CD was stopped are stored.
-
Individual tracks can be deleted from the hard-disk drive after the CD is recorded.
Center display, heater, air conditioner, audio, phone and voice recognition systems 4-63
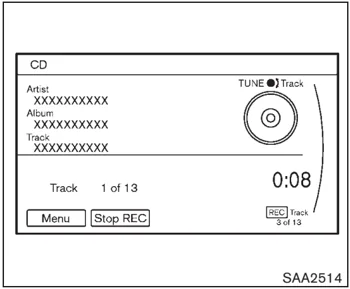
If the title information of the track being recorded is stored either in the hard-disk drive or in the CD, the title is automatically displayed on the screen. For title acquisition from the hard-disk drive, music recognition technology and related data are provided by Gracenote®.
If a track is not recorded successfully due to skipping sounds, the mark is displayed behind the track number.
The “Music Box” hard disk drive cannot perform recording under the following conditions.
- There is not enough space in the hard-disk
- The number of albums reaches the maximum of 500.
- The number of tracks reaches the maximum of 3,000.
Automatic recording:
If the “Automatic Recording” function is turned to ON, recording starts when a CD is inserted. (See “Music Box settings” later in this section.)
Stopping recording:
To stop the recording, select the “Stop REC” key button by touching the screen or using the multi-function controller.
If the CD is ejected, the audio system is turned off or the ignition switch is pushed to the OFF position, the recording also stops.
Playing recorded songs
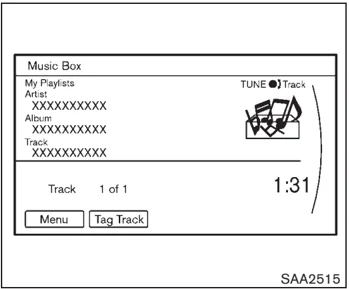
Select the “Music Box” audio system by using one of the following methods.
- Push the audio source switch on the steering wheel repeatedly until the center display changes to the Music Box mode. (See “STEERING-WHEEL-MOUNTED CONTROLS FOR AUDIO” later in this section.)
- Push the DISC-AUX button repeatedly until the center display changes to the Music Box mode.
- Give voice commands. (See “NISSAN VOICE RECOGNITION SYSTEM (models
4-64 Center display, heater, air conditioner, audio, phone and voice recognition systems
with navigation system)” later in this section.)
Stopping playback:
The system stops playing when: a. another mode (radio, CD, DVD, USB memory, iPod or AUX) is selected. b. the audio system is turned off. c. the ignition switch is pushed to the LOCK position.
When the TRACK ▶▶ (fast forward) or ◀◀ SEEK CAT (rewind) button is pushed for more than 1.5 seconds while a track is being played, the track will play while fast forwarding or rewinding. When the button is released, the track will return to the normal play speed.
When the TRACK ▶▶ or ◀◀ SEEK button is pushed for less than 1.5 seconds while a track is being played, the next track or the beginning of the current track will be played.
The multi-function controller can also be used to select tracks when a track is being played.
Play mode selection:
The TUNE/FOLDER knob will skip from album to album unless it is playing “All Songs” from the Music Library menu. When playing “All Songs”, the knob will change the track instead of the album. The upper right corner of the main screen will indicate if the TUNE knob is changing by track or album.
RPT RDM REPEAT (RPT), RANDOM (RDM):
When the RPT-RDM button is pushed while a track is being played, the play pattern can be changed as follows:
(Normal) → 1 Album Repeat → 1 Track Repeat → 1 Album Random → All Random → (Normal)
Tag Track:
Select “Tag Track” key on the screen when a track is being played. A menu will show the 5 available playlists. Select one of the playlists to add the current song to that playlist. If a playlist is not selectable (text is grayed out), it means the song already exists in that playlist.
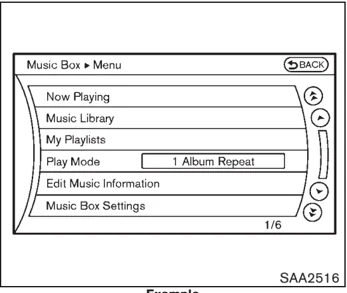
Example SAA2516
There are some options available by selecting the “Menu” key on the screen during playback. Select one of the following options that are displayed on the screen if necessary.
Now Playing:
Displays a track list to choose a preferred track for playback.
Music Library:
There are some options available during playback. Select one of the following options that are displayed on the screen if necessary.
Center display, heater, air conditioner, audio, phone and voice recognition systems 4-65
- Artists Play tracks by an artist whose music is currently being played. The artists are sorted in alphabetical order.
- Albums Play tracks in each album. The albums are sorted in alphabetical order.
- All Songs Play tracks from all recorded tracks. The tracks are sorted in alphabetical order.
- Genres Play tracks by a selected genre.
My Playlists: Displays the Playlist and edits the Playlist if necessary.
Select the "Edit" key.
The following items are available
- Add Current Songs Add a current track to the Playlist.
- Add Songs by Album Displays a list of albums in alphabetical order. Selecting an album displays all of the tracks in the album. Select tracks from the list to add to the Playlist.
- Add Songs by Artist Displays a list of artists in alphabetical order. Selecting an artist displays all of the tracks by the artist. Select tracks from the list to add to the Playlist.
- Edit Songs Order Reorder the tracks in the Playlist by selecting a track and specifying the order.
- Edit Name Edit the name of the Playlist using the keypad displayed on the screen. (See "HOW TO USE MULTI-FUNCTION CONTROLLER" earlier in this section.)
- Delete Songs Delete tracks in the Playlist by selecting from the displayed song list.
Play Mode: Choose the preferred play mode from the following items.
- Normal
- 1 Album Repeat
- 1 Track Repeat
- 1 Playlist Random
- 1 Artist Random
- 1 Album Random
- 1 All Track Random
- 1 All Random
Edit Music Information: Displays the following information about the Music Box hard drive to edit if necessary.
- Edit Information of Current Song Edit the "Track", "Artist" and "Genre" information of the current track using the keypad displayed on the screen. (See "HOW TO USE TOUCH SCREEN" earlier in this section.) Edit the "Mode" information by selecting from the list.
- Edit Information by Album Edit the displayed name and of a selected album and the track information in the album.
- Update Gracenote from USB Device Update the in-vehicle Gracenote Database using a USB memory. Search the title from a information acquired on the Internet. Visit www.nissanusa.com/gracenote/ for details.
4-66 Center display, heater, air conditioner, audio, phone and voice recognition systems
- Transfer Missing Titles to USB Transfer the information of an album recorded without titles to a USB memory. Visit www.nissanusa.com/gracenote/ for details.
- Update Gracenote from HDD Search the title using the database in the hard disk.
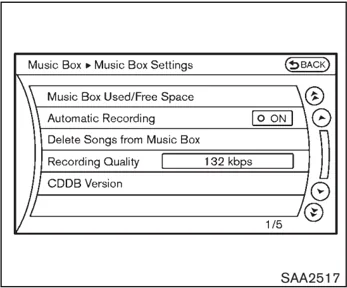
Music Box settings To set the Music box hard drive to your preferred settings, select the "Menu" key during playback, and the "Music Box Settings" key with the multi-function controller, and then push the ENTER button.
Music Box Used/Free Space: Information about "Saved Album", "Saved Track" and "Remaining Time" is displayed.
Automatic Recording: When this item is turned to ON, the Music Box hard drive automatically starts recording when a CD is inserted.
Delete Songs from Music Box: Deletes the current song, selected songs or albums by choosing from the list, or all songs/albums in the Music Box.
Recording Quality: Set the recording quality of 105 kbps or 132 kbps. The default is set to 105 kbps.
CDDB Version: The version of the built-in Gracenote Database is displayed.
Gracenote NOTE:
- The information contained in the Gracenote Database is not fully guaranteed.
- The service of the Gracenote Database on the Internet may be stopped without prior notice for maintenance.
gracenote End-User License Agreement USE OF THIS PRODUCT IMPLIES ACCEPTANCE OF THE TERMS BELOW. Gracenote® MusicID® Terms of Use This application or device contains software
Center display, heater, air conditioner, audio, phone and voice recognition systems 4-67
from Gracenote, Inc. of Emeryville, California ("Gracenote"). The software from Gracenote (the "Gracenote Software") enables this application to perform disc and/or file identification and obtain music-related information, including name, artist, track, and title information ("Gracenote Data") from online servers or embedded databases (collectively, "Gracenote Servers") and to perform other functions. You may use Gracenote Data only by means of the intended End-User functions of this application or device. You agree that you will use Gracenote Data, the Gracenote Software, and Gracenote Servers for your own personal non-commercial use only. You agree not to assign, copy, transfer or transmit the Gracenote Software or any Gracenote Data to any third party. YOU AGREE NOT TO USE OR EXPLOIT GRACENOTE DATA, THE GRACENOTE SOFTWARE, OR GRACENOTE SERVERS, EXCEPT AS EXPRESSLY PERMITTED HEREIN.
You agree that your non-exclusive license to use the Gracenote Data, the Gracenote Software, and Gracenote Servers will terminate if you violate these restrictions. If your license terminates, you agree to cease any and all use of the Gracenote Data, the Gracenote Software, and Gracenote Servers. Gracenote reserves all rights in Gracenote Data, the Gracenote Software, and the Gracenote Servers, including all ownership rights. Under no circumstances will Gracenote become liable for any payment to you for any information that you provide.
You agree that Gracenote, Inc. may enforce its rights under this Agreement against you directly in its own name.
The Gracenote service uses a unique identifier to track queries for statistical purposes. The purpose of a randomly assigned numeric identifier is to allow the Gracenote service to count queries without knowing anything about who you are. For more information, see the web page for the Gracenote Privacy Policy for the Gracenote service.
The Gracenote Software and each item of Gracenote Data are licensed to you "AS IS." Gracenote makes no representations or warranties, express or implied, regarding the accuracy of any Gracenote Data from in the Gracenote Servers. Gracenote reserves the right to delete data from the Gracenote Servers or to change data categories for any cause that Gracenote deems sufficient. No warranty is made that the Gracenote Software or Gracenote Servers are error-free or that functioning of Gracenote Software or Gracenote Servers will be uninterrupted. Gracenote is not obligated to provide you with new enhanced or additional data types or categories that Gracenote may provide in the future and is free to discontinue its services at any time.
GRACENOTE DISCLAIMS ALL WARRANTIES EXPRESS OR IMPLIED, INCLUDING, BUT NOT LIMITED TO, IMPLIED WARRANTIES OF MERCHANTABILITY, FITNESS FOR A PARTICULAR PURPOSE, TITLE, AND NON-INFRINGEMENT. GRACENOTE DOES NOT WARRANT THE RESULTS THAT WILL BE OBTAINED BY YOUR USE OF THE GRACENOTE SOFTWARE OR ANY GRACENOTE SERVER. IN NO CASE WILL GRACENOTE BE LIABLE FOR ANY CONSEQUENTIAL OR INCIDENTAL DAMAGES OR FOR ANY LOST PROFITS OR LOST REVENUES.
Copyright:
Music recognition technology and related data are provided by Gracenote®. Gracenote is the industry standard in music recognition technology and related content delivery. For more information, please visit www.gracenote.com.
CD and music-related data from Gracenote, Inc., copyright © 2000-2009 Gracenote. Gracenote Software, copyright © 2000-2009 Gracenote. This product and service may practice one or more of the following U.S. Patents: #5,987,525; #6,061,680; #6,154,773, #6,161,132, #6,230,192, #6,230,207, #6,240,459, #6,330,593, and other patents issued or pending. Some services supplied under license from Open Globe, Inc. for U.S. Patent: #6,304,523.
Gracenote and CDDB are registered trade-
4-68 Center display, heater, air conditioner, audio, phone and voice recognition systems
marks of Gracenote. The Gracenote logo and logotype, and the “Powered by Gracenote” logo are trademarks of Gracenote.
SAA2282
AUXILIARY INPUT JACKS (models with navigation system)
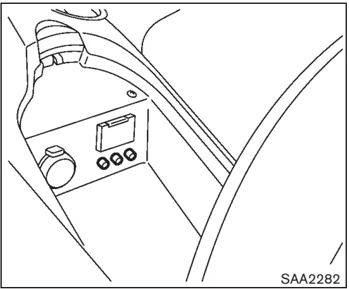
The auxiliary input jacks are located in the center console. NTSC compatible devices such as video games, camcorders and portable video players can be connected to the auxiliary jacks. Compatible audio devices, such as some MP3 players, can also be connected to the system through the auxiliary jacks.
The auxiliary jacks are color coded for identification purposes.
● Yellow - video input
● White - left channel audio input
● Red - right channel audio input
Before connecting a device to a jack, turn off the power of the portable device.
With a compatible device connected to the jacks, push the DISC-AUX button repeatedly until the display switches to the AUX mode. The output from the device will be played through the monitor and audio system.
Center display, heater, air conditioner, audio, phone and voice recognition systems 4-69
SAA2496
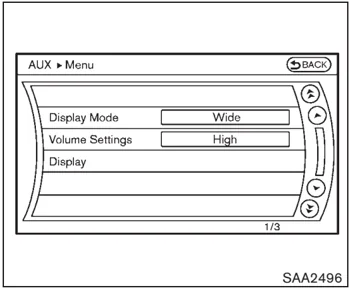
AUX Menu When the “Menu” key on the display is selected while in the AUX mode, the menu screen will be displayed.
Display Mode: Choose the display mode from the following items.
- Normal
- Wide
- Cinema
Volume Settings: Choose the volume setting from the following items.
- Low
- Medium
- High
Display: Adjust the image quality of the screen, select the preferred adjustment items.
SAA0451
CD/DVD/USB MEMORY CARE AND CLEANING
CD/DVD
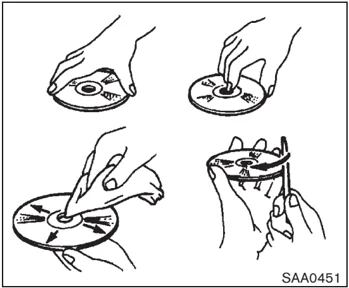
- Handle a CD/DVD by its edges. Never touch the surface of the disc. Do not bend the disc.
- Always place the discs in the storage case when they are not being used.
- To clean a disc, wipe the surface from the center to the outer edge using a clean, soft cloth. Do not wipe the disc using a circular motion.
Do not use a conventional record cleaner or
4-70 Center display, heater, air conditioner, audio, phone and voice recognition systems
alcohol intended for industrial use.
- A new disc may be rough on the inner and outer edges. Remove the rough edges by rubbing the inner and outer edges with the side of a pen or pencil as illustrated.
USB memory
- Never touch the terminal portion of the USB memory.
- Do not place heavy objects on the USB memory.
- Do not store the USB memory in highly humid locations.
- Do not expose the USB memory to direct sunlight.
- Do not spill any liquids on the USB memory.
Refer to the USB memory Owner's Manual for the details.
With navigation system
SAA2555
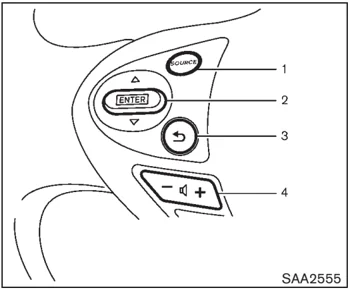
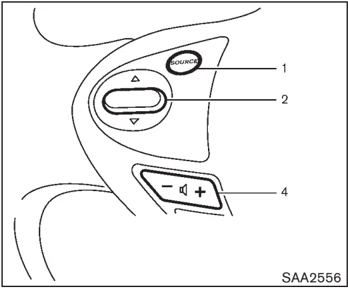
- Audio source switch
- Menu control switch (models with navigation system) or audio tuning switch (models without navigation system)
- Back switch
- Volume control switch
STEERING-WHEEL-MOUNTED CONTROLS FOR AUDIO
Menu control switch (models with navigation system) or audio tuning switch (models without navigation system)
While the display is showing a MAP (navigation systems only), STATUS or Audio screen, tilt the switch upward or downward to select a station, track, CD or folder. For most audio sources, tilting the switch up/down for more than 1.5 seconds provides a different function than tilting up/down for less than 1.5 seconds.
AM and FM radio:
- Tilting up/down for less than 1.5 seconds will increase or decrease the preset station.
- Tilting up/down for more than 1.5 seconds will seek up or down to the next station.
- Pushing the menu control switch (models with navigation system) will show the list of preset stations.
Without navigation system
SAA2556
Center display, heater, air conditioner, audio, phone and voice recognition systems 4-71
XM Satellite Radio (if so equipped):
- Tilting up/down for less than 1.5 seconds will increase or decrease the preset channel.
- Tilting up/down for more than 1.5 seconds will go to the next or previous category.
- Pushing the menu control switch (models with navigation system) will show the XM Menu.
iPod® (models with navigation system):
- Tilting up/down for less than 1.5 seconds will increase or decrease the track number.
- Tilting up/down for more than 1.5 seconds will skip to the next or previous index.
- Pushing the menu control switch will show the iPod Menu.
CD:
- Tilting up/down for less than 1.5 seconds will increase or decrease the track number.
- Tilting up/down for more than 1.5 seconds will increase/decrease the folder number (if playing compressed audio files).
- Pushing the menu control switch (models with navigation system) will show the CD Menu.
DVD (models with navigation system):
- Tilting up/down for less than 1.5 seconds will increase or decrease the track number.
- Tilting up/down for more than 1.5 seconds will increase or decrease the title number.
- Pushing the menu control switch will select an item from the DVD display.
- When the transparent operation menu appears, the switch will control the menu.
USB (models with navigation system):
- Tilting up/down for less than 1.5 seconds will increase or decrease the track number.
- Tilting up/down for more than 1.5 seconds will increase/decrease the folder number
- Pushing the menu control switch will show the USB Menu.
Music Box (models with navigation system):
- Tilting up/down for less than 1.5 seconds will increase or decrease the track number.
- Tilting up/down for more than 1.5 seconds will increase/decrease the album (folder) number (if playing compressed audio files).
- Pushing the menu control switch will show the Music Box Menu.
Bluetooth® Audio (models with navigation system):
- Tilting up/down for less than 1.5 seconds will increase or decrease the track number.
AUX:
- Pushing the menu control switch (models with navigation system) will show the AUX Menu.
BACK switch (models with navigation system) Push this switch to go back to the previous screen or cancel the selection if it is not completed.
Volume control switches Push the upper (+) or lower (-) side switch to increase or decrease the volume.
Audio source switch Push the audio source switch to change the mode as follows.
- Models with navigation system AM → FM → SAT → CD/DVD → Music Box → USB/iPod® → Bluetooth® Audio → AUX
4-72 Center display, heater, air conditioner, audio, phone and voice recognition systems
- Models without navigation system AM \rightarrow FM \rightarrow CD \rightarrow AUX \rightarrow SAT* *: if so equipped
ANTENNA
Window antenna (for Coupe models) The antenna pattern is printed inside the rear window.
CAUTION
- Do not place metalized film near the rear window glass or attach any metal parts to it. This may cause poor reception or noise.
- When cleaning the inside of the rear window, be careful not to scratch or damage the rear window antenna. Lightly wipe along the antenna with a dampened soft cloth.
SAA2374
Trunk mounted antenna (for Roadster models)
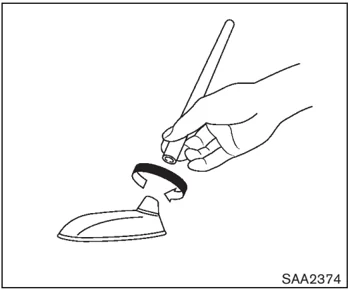
Removing the antenna: You can remove the antenna if necessary. Hold the bottom of the antenna and remove by turning counterclockwise.
CAUTION
-
To avoid damaging or deforming the antenna, be sure to remove the antenna under the following conditions.
-
The vehicle enters an automatic car wash.
-
The vehicle enters a garage with a low ceiling.
-
The vehicle is covered with a car cover.
-
Always properly tighten the antenna rod during installation. Otherwise, the antenna rod may break during vehicle operation.
Center display, heater, air conditioner, audio, phone and voice recognition systems 4-73