2 Instruments and controls
- Cockpit ........ 2-2
- Instrument panel ........ 2-3
- Meters and gauges ........ 2-4
- Speedometer and odometer ........ 2-5
- Tachometer ........ 2-5
- Engine coolant temperature gauge ........ 2-6
- Fuel gauge ........ 2-6
- Triple meter ........ 2-7
- Warning/indicator lights and audible reminders ........ 2-8
- Checking bulbs ........ 2-8
- Warning lights ........ 2-9
- Indicator lights ........ 2-12
- Audible reminders ........ 2-15
- Vehicle information display ........ 2-16
- Indicators for operation ........ 2-16
- Warnings and alerts ........ 2-18
- Indicators for maintenance ........ 2-19
- Trip computer ........ 2-20
- Security systems ........ 2-25
- Vehicle security system ........ 2-25
- NISSAN Vehicle Immobilizer System ........ 2-26
- Windshield wiper and washer switch ........ 2-27
- Rear window defroster switch ........ 2-29
- Headlight and turn signal switch ........ 2-29
- Xenon headlights ........ 2-29
- Headlight switch ........ 2-30
- Turn signal switch ........ 2-33
- Fog light switch (if so equipped) ........ 2-33
- Hazard warning flasher switch ........ 2-33
- Horn ........ 2-34
- Heated seats (if so equipped) ........ 2-34
- Climate controlled seats (if so equipped) ........ 2-36
- Vehicle Dynamic Control (VDC) OFF switch ........ 2-37
- Power outlet ........ 2-37
- Storage ........ 2-38 Instrument pocket (except for navigation system
- equipped models) ........ 2-38
- Cup holders ........ 2-38
- Glove box ........ 2-39
- Console box ........ 2-40
- Rear parcel box ........ 2-40
- Cargo cover (if so equipped) ........ 2-41
- Windows ........ 2-42
- Power windows ........ 2-42
- Interior lights ........ 2-44
- Map lights ........ 2-44
- Interior light control switch ........ 2-44
- Vanity mirror lights ........ 2-45
- Cargo area courtesy light (Roadster models) ........ 2-46
- Cargo light (Coupe models) ........ 2-46
- Trunk light (Roadster models) ........ 2-46
Model "Z34-D" EDITED: □□□□/□/10
-
HomeLink® Universal Transceiver (if so equipped) ........ 2-47
-
Programming HomeLink® ........ 2-47 Programming HomeLink® for Canadian
-
customers ........ 2-49 Operating the HomeLink® Universal
-
Transceiver ........ 2-49
-
Programming trouble-diagnosis ........ 2-49
-
Clearing the programmed information ........ 2-49
-
Reprogramming a single HomeLink® button ........ 2-49
-
If your vehicle is stolen ........ 2-50
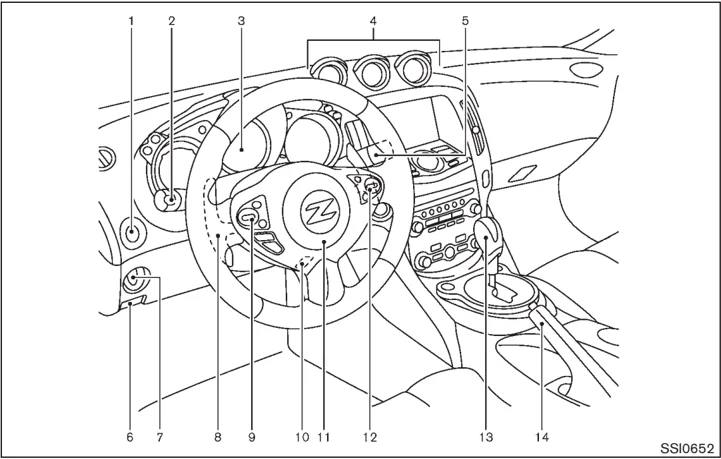
COCKPIT
2-2 Instruments and controls
- Vehicle Dynamic Control (VDC) OFF switch (P.5-27)
- Headlight, fog light and turn signal switch (P.2-29)
- Meters and Gauges (combimeter) (P.2-4)
- Triple meter (P.2-7)
- Windshield wiper and washer switch (P.2-27)
- Hood release handle (P.3-16)
- Intelligent Key port (P.5-10)
- Paddle shifter (if so equipped) (P.5-14)
- Steering-wheel-mounted controls (left side)
- Menu control switch or tuning switch (P.4-71)
- BACK switch (P.4-71)
- Phone switch (if so equipped) (P.4-74)
- Volume control switches (P.4-71)
- Source select switch (P.4-71)
- Tilt steering lever (P.3-35)
- Steering wheel
- Horn (P.2-34)
- Driver supplemental air bag (P.1-27)
- Steering-wheel-mounted controls (right side)
- Cruise control switches (P.5-20)
- Selector lever for automatic transmission (P.5-12)/ Shift lever for manual transmission (P.5-16)
- Parking brake (P.5-20)
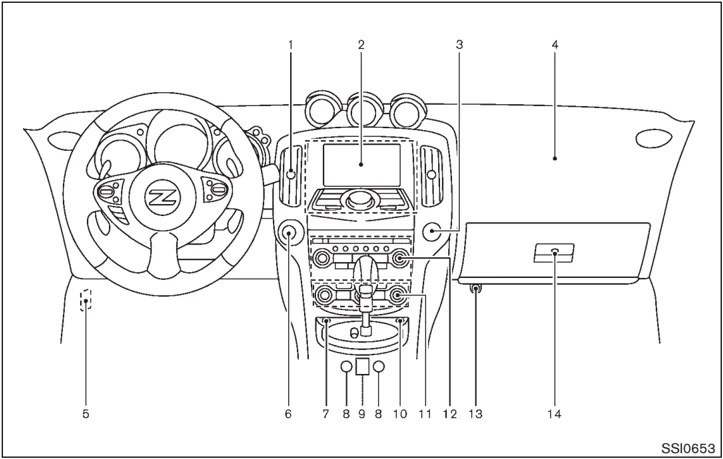
INSTRUMENT PANEL
SSI0653
- Ventilator (P.4-17)
- Center display and multi-function control panel (P.4-2)/Instrument pocket (P.2-38) — Navigation system* (if so equipped) — Vehicle information and setting buttons (if so equipped) (P.4-6) — Bluetooth® Hands-Free Phone System (if so equipped) (P.4-74)
- Front passenger air bag status light (P.1-32)
- Front passenger supplemental air bag (P.1-27)
- Fuse box cover (P.8-20)
- Push-button ignition switch (P.5-7)
- Hazard warning flasher switch (P.2-33)
- Seat heater switch (if so equipped) (P.2-34) or Climate controlled seat switch (if so equipped) (P.2-36)
- Soft top operating switch (for Roadster models) (P.3-21)
- SynchroRev Match mode (S-MODE) switch (if so equipped) (P.5-16)
- Heater and air conditioner (P.4-17) — Rear window defroster switch (P.2-29)
- Audio system (P.4-24)
- Power outlet (P.2-37)
- Glove box (P.2-39)
*: Refer to the separate Navigation System Owner’s Manual.
Instruments and controls 2-3
METERS AND GAUGES
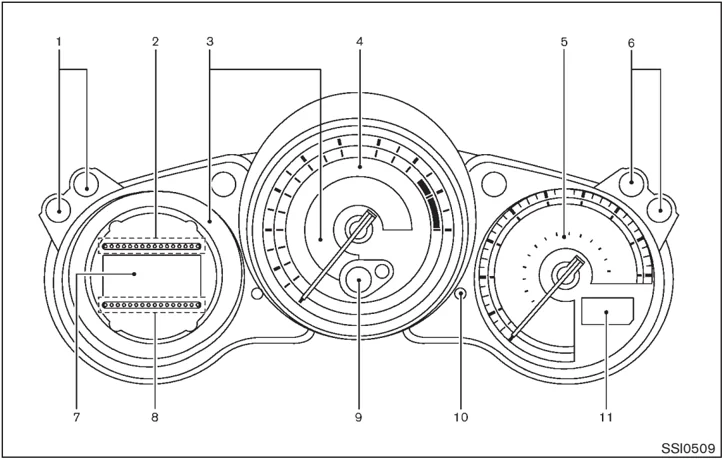
- ENTER/NEXT switch (P.2-20)
- Fuel gauge (P.2-6)
- Warning/Indicator lights (P.2-8)
- Tachometer (P.2-5)
- Speedometer (P.2-5)
- Instrument brightness control switch (P.2-32)
- Vehicle information display (P.2-16)
- Engine coolant temperature gauge (P.2-6)
- Transmission position indicator (if so equipped) (P.2-12) — SynchroRev Match mode (S-MODE) indicator (if so equipped) (P.5-16)
- Odometer/Twin trip odometer control knob (P.2-5)
- Odometer/Twin trip odometer (P.2-5)
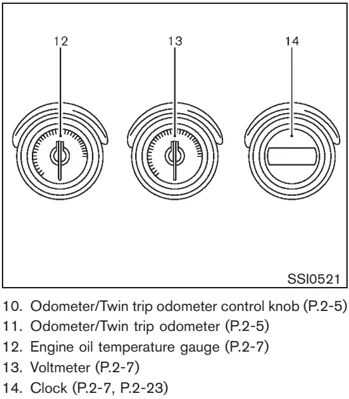
- Engine oil temperature gauge (P.2-7)
- Voltmeter (P.2-7)
- Clock (P.2-7, P.2-23)
2-4 Instruments and controls
 SIC3973
SPEEDOMETER AND ODOMETER
Speedometer
The speedometer indicates vehicle speed in miles per hour (MPH) and kilometers per hour (km/h).
Odometer/twin trip odometer
The odometer ① and twin trip odometer ② are displayed when the ignition switch is in the ON position.
The odometer records the total distance the vehicle has been driven.
The twin trip odometer records the distance of individual trips.
Changing the display: Pushing the TRIP A/B RESET knob ③ changes the display as follows: TRIP A → TRIP B → TRIP A
Resetting the trip odometer: Pushing the TRIP A/B RESET knob ③ for more than 1 second resets the trip odometer to zero.
 SIC3974
TACHOMETER
The tachometer indicates engine speed in revolutions per minute (RPM). Do not rev the engine into the red zone ① .
CAUTION When engine speed approaches the red zone, shift to a higher gear or reduce engine speed. Operating the engine in the red zone may cause serious engine damage.
Instruments and controls 2-5
SIC3975
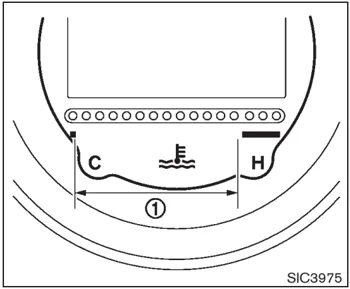
ENGINE COOLANT TEMPERATURE GAUGE
The gauge indicates the engine coolant temperature.
The engine coolant temperature is within the normal range when the gauge points within the zone ① shown in the illustration.
The engine coolant temperature varies with the outside air temperature and driving conditions.
CAUTION
If the gauge indicates engine coolant temperature near the hot (H) end of the normal range, reduce vehicle speed to decrease temperature. If gauge is over the normal range, stop the vehicle as soon as safely possible. If the engine is overheated, continued operation of the vehicle may seriously damage the engine. See "IF YOUR VEHICLE OVERHEATS" in the "6. In case of emergency" section for immediate action required.
SIC3976
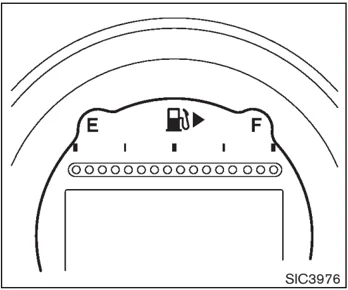
FUEL GAUGE
The gauge indicates the approximate fuel level in the tank.
The gauge may move slightly during braking, turning, acceleration, or going up or down hills.
Refill the fuel tank before the gauge registers "E" (Empty).
The low fuel warning appears on the vehicle information display when the amount of fuel in the tank is getting low. Refuel as soon as it is convenient, preferably before the gauge reaches "E". There will be a small reserve of fuel in the tank when the fuel gauge reaches "E".
2-6 Instruments and controls
The indicates that the fuel-filler door is located on the passenger’s side of the vehicle.
CAUTION
- If the vehicle runs out of fuel, the malfunction indicator light (MIL) may come on. Refuel as soon as possible. After a few driving trips, the light should turn off. If the light remains on after a few driving trips, have the vehicle inspected by a NISSAN dealer.
- For additional information, see “Malfunction Indicator Light (MIL)” later in this section.

SIC4003
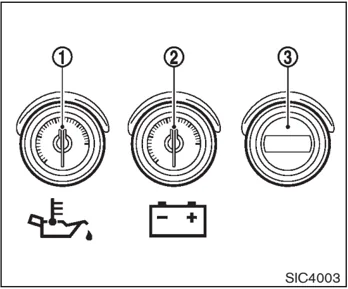
Triple meter
- Engine oil temperature gauge
- Voltmeter
- Clock
TRIPLE METER
Engine oil temperature gauge
If the engine oil temperature gauge ① indicates more than 280°F (140°C) while driving, reduce the engine speed (RPM) and drive at a slow speed.
When the engine oil temperature is high, the engine protection mode, which helps reduce the chance of engine damage, could activate and automatically decrease engine power. Driving while the engine oil temperature is high may result in engine damage.
Voltmeter
When the ignition switch is turned to the ON position, the volt meter ② indicates the battery voltage. When the engine is running, it indicates the generator voltage.
While cranking the engine, the volts drop below the normal range. If the needle is not in the normal range (11 to 15 volts) while the engine is running, it may indicate that the charging system is not functioning properly. Have the system checked by a NISSAN dealer.
Clock
If necessary, adjust the clock ③ on the setting screen of the vehicle information display. (See “CLOCK” later in this section.)
If the power supply is disconnected, the clock will not indicate the correct time. Readjust the time.
Instruments and controls 2-7
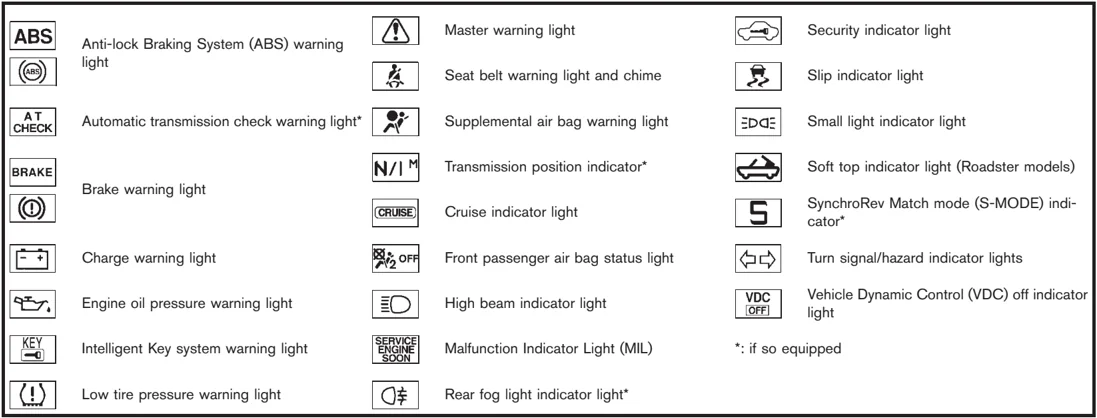
WARNING/INDICATOR LIGHTS AND AUDIBLE REMINDERS
| Icon | Description |
|---|---|
| ABS | Anti-lock Braking System (ABS) warning light |
| (ABS) | |
| AT CHECK | Automatic transmission check warning light* |
| BRAKE | Brake warning light |
| (!) | |
| -+ | Charge warning light |
| Oil can | Engine oil pressure warning light |
| KEY | Intelligent Key system warning light |
| (!) | Low tire pressure warning light |
| ! | Master warning light |
| Seat belt | Seat belt warning light and chime |
| Air bag | Supplemental air bag warning light |
| N/M | Transmission position indicator* |
| CRUISE | Cruise indicator light |
| Air bag OFF | Front passenger air bag status light |
| Headlight | High beam indicator light |
| SERVICE ENGINE SOON | Malfunction Indicator Light (MIL) |
| Rear fog light | Rear fog light indicator light* |
| Car with key | Security indicator light |
| Slip | Slip indicator light |
| Small light | Small light indicator light |
| Soft top | Soft top indicator light (Roadster models) |
| S | SynchroRev Match mode (S-MODE) indicator* |
| Turn signal | Turn signal/hazard indicator lights |
| VDC OFF | Vehicle Dynamic Control (VDC) off indicator light |
*: if so equipped
CHECKING BULBS
With all doors closed, apply the parking brake and push the ignition switch to the ON position without starting the engine. The following lights will come on (if so equipped):
- -+, BRAKE or (!), Oil can, SERVICE ENGINE SOON, Seat belt
The following lights come on briefly and then go off (if so equipped):
- Air bag, ABS or (ABS), AT CHECK, Slip, VDC OFF, (!), KEY
If any light does not come on, it may indicate a burned-out bulb or an open circuit in the electrical system. Have the system checked by a NISSAN dealer.
Some indicators and warnings are also displayed on the vehicle information display. (See “VEHICLE INFORMATION DISPLAY” later in this section.)
2-8 Instruments and controls
Model "Z34-D" EDITED: □□□□/□/10

WARNING LIGHTS
ABS or (ABS) Anti-lock Braking System (ABS) warning light
When the ignition switch is in the ON position, the Anti-lock Braking System (ABS) warning light illuminates and then turns off. This indicates the ABS is operational.
If the ABS warning light illuminates while the engine is running, or while driving, it may indicate the ABS is not functioning properly. Have the system checked by a NISSAN dealer.
If an ABS malfunction occurs, the anti-lock function is turned off. The brake system then operates normally, but without anti-lock assistance. (See “BRAKE SYSTEM” in the “5. Starting and driving” section.)
AT CHECK Automatic transmission check warning light (if so equipped)
When the ignition switch is pushed to the ON position, the light comes on for 2 seconds. If the light comes on at any other time, it may indicate the transmission is not functioning properly. Have your NISSAN dealer check and repair the transmission.
BRAKE or (!) Brake warning light
This light functions for both the parking brake and the foot brake systems.
Parking brake indicator:
When the ignition switch is in the ON position, the light comes on when the parking brake is applied.
Low brake fluid warning light:
When the ignition switch is in the ON position, the light warns of a low brake fluid level. If the light comes on while the engine is running with the parking brake not applied, stop the vehicle and perform the following:
- Check the brake fluid level. Add brake fluid as necessary. (See “BRAKE AND CLUTCH FLUID” in the “8. Maintenance and do-it-yourself” section.)
- If the brake fluid level is correct, have the warning system checked by a NISSAN dealer.
Anti-lock Braking System (ABS) warning indicator:
When the parking brake is released and the brake fluid level is sufficient, if both the brake warning light and the Anti-lock Braking System (ABS) warning light illuminate, it may indicate the ABS is not functioning properly. Have the brake system checked, and if necessary repaired, by a NISSAN dealer promptly. (See “Anti-lock Braking System (ABS) warning light” earlier in this section.)
Instruments and controls 2-9

Charge warning light If the light comes on while the engine is running, it may indicate the charging system is not functioning properly. Turn the engine off and check the alternator belt. If the belt is loose, broken, missing or if the light remains on, see a NISSAN dealer immediately.
CAUTION Do not continue driving if the alternator belt is loose, broken or missing.
Engine oil pressure warning light This light warns of low engine oil pressure. If the light flickers or comes on during normal driving, pull off the road in a safe area, stop the engine immediately and call a NISSAN dealer or other authorized repair shop.
The engine oil pressure warning light is not designed to indicate a low oil level. Use the dipstick to check the oil level. (See "ENGINE OIL" in the "8. Maintenance and do-it-yourself" section.)
CAUTION Running the engine with the engine oil pressure warning light on could cause serious damage to the engine almost immediately. Such damage is not covered by warranty. Turn off the engine as soon as it is safe to do so.
Intelligent Key system warning light After the ignition switch is pushed to the ON position, this light comes on for about 2 seconds and then turns off.
This light warns of a malfunction with the electrical steering lock system or the Intelligent Key system.
If the light comes on while the engine is stopped, it may be impossible to free the steering lock or to start the engine. If the light comes on while the engine is running, you can drive the vehicle. However in these cases, contact a NISSAN dealer for repair as soon as possible.
Low tire pressure warning light Your vehicle is equipped with a Tire Pressure Monitoring System (TPMS) that monitors the tire pressure of all tires except the spare.
The low tire pressure warning light warns of low tire pressure or indicates that the TPMS is not functioning properly.
After the ignition switch is pushed ON, this light illuminates for about 1 second and turns off.
Low tire pressure warning: If the vehicle is being driven with low tire pressure, the warning light will illuminate.
When the low tire pressure warning light illuminates, you should stop and adjust the tire pressure to the recommended COLD tire pressure shown on the Tire and Loading Information label. The low tire pressure warning light does not automatically turn off when the tire pressure is adjusted. After the tire is inflated to the recommended pressure, the vehicle must be driven at speeds above 16 MPH (25 km/h) to activate the TPMS and turn off the low tire pressure warning light. Use a tire pressure gauge to check the tire pressure.
For additional information, see "TIRE PRESSURE MONITORING SYSTEM (TPMS)" in the "5. Starting and driving" section and "TIRE PRESSURE MONITORING SYSTEM (TPMS)" in the "6. In case of emergency" section.
TPMS malfunction: If the TPMS is not functioning properly, the low tire pressure warning light will flash for approximately 1 minute when the ignition switch is pushed ON. The light will remain on after the 1
2-10 Instruments and controls
minute. Have the system checked by a NISSAN dealer.
For additional information, see “TIRE PRESSURE MONITORING SYSTEM (TPMS)” in the “5. Starting and driving” section.
WARNING
-
If the light does not illuminate with the ignition switch pushed ON, have the vehicle checked by a NISSAN dealer as soon as possible.
-
If the light illuminates while driving, avoid sudden steering maneuvers or abrupt braking, reduce vehicle speed, pull off the road to a safe location and stop the vehicle as soon as possible. Driving with under-inflated tires may permanently damage the tires and increase the likelihood of tire failure. Serious vehicle damage could occur and may lead to an accident and could result in serious personal injury. Check the tire pressure for all four tires. Adjust the tire pressure to the recommended COLD tire pressure shown on the Tire and Loading Information label to turn the low tire pressure warning light OFF. If the light still illuminates while driving after adjusting the tire pressure, a tire may be flat. If you have a flat tire, replace it with a spare tire as soon as possible.
-
When a spare tire is mounted or a wheel is replaced, the TPMS will not function and the low tire pressure warning light will flash for approximately 1 minute. The light will remain on after the 1 minute. Contact your NISSAN dealer as soon as possible for tire replacement and/or system resetting.
-
Replacing tires with those not originally specified by NISSAN could affect the proper operation of the TPMS.
CAUTION
-
The TPMS is not a substitute for the regular tire pressure check. Be sure to check the tire pressure regularly.
-
If the vehicle is being driven at speeds of less than 16 MPH (25 km/h), the TPMS may not operate correctly.
-
Be sure to install the specified size of tires to the four wheels correctly.
Master warning light
When the ignition switch is in the ON position, the master warning light illuminates if any of the following are displayed on the vehicle information display:
- No key warning
- Low fuel warning
- Low washer fluid warning
- Parking brake release warning
- Door/rear hatch open warning
See “VEHICLE INFORMATION DISPLAY” later in this section.
Seat belt warning light and chime
The light and chime remind you to fasten seat belts. The light illuminates whenever the ignition switch is pushed to the ON position, and will remain illuminated until the driver’s seat belt is fastened. At the same time, the chime will sound for about 6 seconds unless the driver’s seat belt is securely fastened.
Instruments and controls 2-11
The seat belt warning light for the front passenger will illuminate if the seat belt is not fastened when the front passenger’s seat is occupied. For 5 seconds after the ignition switch is in the ON position, the system does not activate the warning light for the front passenger.
See “SEAT BELTS” in the “1. Safety — Seats, seat belts and supplemental restraint system” section for precautions on seat belt usage.
Supplemental air bag warning light
After pushing the ignition switch to the ON position, the supplemental air bag warning light will illuminate. The air bag warning light will turn off after about 7 seconds if the front air bag, side air bag and curtain air bag systems and/or pretensioner system are operational.
If any of the following conditions occur, the front air bag, side air bag and curtain air bag systems and/or pretensioner system need servicing, and your vehicle must be taken to your nearest NISSAN dealer.
- The supplemental air bag warning light remains on after approximately 7 seconds.
- The supplemental air bag warning light flashes intermittently.
- The supplemental air bag warning light does not come on at all.
Unless checked and repaired, the Supplemental Restraint Systems and/or the pretensioner seat belt may not function properly.
For additional information, see “SUPPLEMENTAL RESTRAINT SYSTEM” in the “1. Safety — Seats, seat belts and supplemental restraint system” section.
WARNING
If the supplemental air bag warning light is on, it could mean that the front air bag, side air bag and curtain air bag systems and/or pretensioner system will not operate in an accident. To help avoid injury to yourself or others, have your vehicle checked by a dealer as soon as possible.
INDICATOR LIGHTS
N/I M Transmission position indicator (if so equipped)
When the ignition switch is pushed to the ON position, the indicator shows the transmission position.
For AT models:
In the manual shift mode, when the transmission does not shift to the selected gear due to the transmission protection mode, the AT position indicator light will blink and a buzzer will sound.
(See “DRIVING THE VEHICLE” in the “5. Starting and driving” section.)
CRUISE Cruise indicator light
Cruise main switch indicator:
This light illuminates when the cruise control main switch is pushed. The light turns off when the main switch is pushed again. When the cruise main switch indicator light illuminates, the cruise control system is operational. (See “CRUISE CONTROL” in the “5. Starting and driving” section.)
Cruise malfunction:
If the cruise indicator light blinks while the engine is running, it may indicate the cruise control system is not functioning properly. Have the system checked by a NISSAN dealer. (See “CRUISE CONTROL” in the “5. Starting and driving” section.)
2-12 Instruments and controls
Front passenger air bag status light
The front passenger air bag status light (OFF), located on the center of the instrument panel, will be lit and the passenger front air bag will be OFF depending on how the front passenger seat is being used.
For front passenger air bag status light operation, see "NISSAN ADVANCED AIR BAG SYSTEM (front seats)" in the "1. Safety — Seats, seat belts and supplemental restraint system" section of this manual.
High beam indicator light
This light comes on when the headlight high beam is on and goes out when the low beam is selected.
Malfunction Indicator Light (MIL)
If the malfunction indicator light comes on steady or blinks while the engine is running, it may indicate a potential emission control malfunction.
The malfunction indicator light may also come on steady if the fuel-filler cap is loose or missing, or if the vehicle runs out of fuel. Check to make sure the fuel-filler cap is installed and closed tightly, and that the vehicle has at least 3 US gallons (14 liters) of fuel in the fuel tank.
After a few driving trips, the SERVICE ENGINE SOON light should turn off if no other potential emission control system malfunction exists.
If this indicator light remains on for 20 seconds and then blinks for 10 seconds when the engine is not running, it indicates that the vehicle is not ready for an emission control system inspection/maintenance test. (See "READINESS FOR INSPECTION/MAINTENANCE (I/M) TEST (US only)" in the "9. Technical and consumer information" section.)
Operation:
The malfunction indicator light will come on in one of two ways:
- Malfunction indicator light on steady — An emission control system malfunction has been detected. Check the fuel-filler cap. If the fuel-filler cap is loose or missing, tighten or install the cap and continue to drive the vehicle. The SERVICE ENGINE SOON light should turn off after a few driving trips. If the SERVICE ENGINE SOON light does not turn off after a few driving trips, have the vehicle inspected by a NISSAN dealer. You do not need to have your vehicle towed to the dealer.
- Malfunction indicator light blinking — An engine misfire has been detected which may damage the emission control system.
To reduce or avoid emission control system damage:
a) Do not drive at speeds above 45 MPH (72 km/h).
b) Avoid hard acceleration or deceleration.
c) Avoid steep uphill grades.
d) If possible, reduce the amount of cargo being hauled or towed.
The malfunction indicator light may stop blinking and remain on.
Have the vehicle inspected by a NISSAN dealer. You do not need to have your vehicle towed to the dealer.
CAUTION
Continued vehicle operation without having the emission control system checked and repaired as necessary could lead to poor driveability, reduced fuel economy, and possible damage to the emission control system.
Instruments and controls 2-13
Rear fog light indicator light (if so equipped)
The rear fog light indicator light illuminates when the rear fog light is on. (See “FOG LIGHT SWITCH” later in this section.)
Security indicator light
The light blinks when the ignition switch is in the ACC, OFF or LOCK position. This function indicates the security system equipped on the vehicle is operational.
If the security system is malfunctioning, this light will remain on while the ignition switch is in the ON position. For additional information, see “SECURITY SYSTEMS” later in this section.
Slip indicator light
This indicator will blink when the VDC system or the traction control system is operating, thus alerting the driver that the vehicle is nearing its traction limits. The road surface may be slippery.
Small light indicator light
The light illuminates when the headlight switch is turned to the [icon] position.
2-14 Instruments and controls
Soft top indicator light (Roadster models)
This light illuminates when the soft top is being operated or it is stopped before reaching a full open/close state. When the top is fully opened or closed, the light will turn off.
The light blinks while the soft top is not fully opened or closed under the following conditions:
- When the vehicle is driven.
- When the selector lever or shift lever is in the R (Reverse) position.
Be sure to fully open or close the soft top when driving the vehicle.
The soft top can be moved with the soft top operating switch only under all of the following conditions:
- When the vehicle is stopped.
- When the ignition switch is ON.
- When the trunk is closed.
- When the selector lever or shift lever is in a position other than the R (Reverse) position.
CAUTION
Operate the soft top with the engine running to prevent a discharged battery.
When the soft top is operating, if any of the above conditions are discontinued or any of the following conditions are met, the top will stop operating.
- When the selector lever or shift lever is in the R (Reverse) position.
- When the vehicle moves at a speed of 3 MPH (5 km/h) or more.
- When the battery voltage is extremely low.
- When the temperature of the soft top system becomes extremely high.
Release the operating switch, and push it again under the above conditions until the top is fully opened or closed. The soft top indicator light will turn off when the top operation is completely finished.
If the soft top indicator light illuminates with the ignition switch ON, it may indicate the electric soft top control unit is not functioning properly. Have your vehicle checked by a NISSAN dealer as soon as possible.
For more details about the electric soft top operation, see “SOFT TOP (Roadster models)” in the “3. Pre-driving checks and adjustments” section.
S SynchroRev Match mode (S-MODE) indicator (if so equipped)
This indicator will illuminate when the SynchroRev Match mode (S-MODE) is activated. (“SynchroRev Match mode (S-MODE) (if so equipped for Manual Transmission models)” in the “5. Starting and driving” section)
Turn signal/hazard indicator lights
The light flashes when the turn signal switch lever or hazard switch is turned on.
VDC OFF Vehicle Dynamic Control (VDC) off indicator light
The light comes on when the vehicle dynamic control off switch is pushed to OFF. This indicates that the vehicle dynamic control system and traction control system are not operating. When the vehicle dynamic control off indicator light and slip indicator light come on with the vehicle dynamic control system turned on, this light alerts the driver to the fact that the vehicle dynamic control system’s fail-safe mode is operating, for example the vehicle dynamic control system may not be functioning properly. Have the system checked by a NISSAN dealer. If an abnormality occurs in the system, the vehicle dynamic control system function will be canceled but the vehicle is still driveable. For additional information, see “VEHICLE DYNAMIC CONTROL (VDC) SYSTEM” in the “5. Starting and driving” section of this manual.
AUDIBLE REMINDERS
Key reminder chime
A chime will sound if the driver side door is opened while the ignition switch is pushed to the ACC position or pushed to the OFF or LOCK position with the Intelligent Key left in the Intelligent Key port. Make sure the ignition switch is pushed to the OFF position, and take the Intelligent Key with you when leaving the vehicle.
Light reminder chime
A chime will sound when the driver side door is opened with the light switch in the ☞☏ or ☏ position and the ignition switch in the ACC, OFF or LOCK position.
Turn the light switch off when you leave the vehicle.
Parking brake reminder chime
A chime will sound if the vehicle speed is above 4 MPH (7 km/h) with the parking brake applied. Stop the vehicle and release the parking brake.
Brake pad wear warning
The disc brake pads have audible wear warnings. When a brake pad requires replacement, it will make a high pitched scraping sound when the vehicle is in motion. This scraping sound will first occur only when the brake pedal is depressed. After more wear of the brake pad the sound will always be heard even if the brake pedal is not depressed. Have the brakes checked as soon as possible if the warning sound is heard.
Instruments and controls 2-15