Auxiliary Function
Auxiliary (AUX) Input
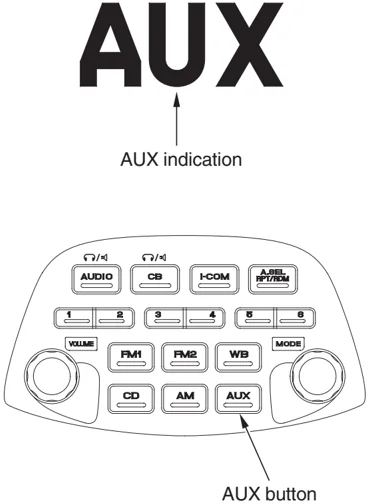
Use this function to listen to other audio such as a portable CD player:
• To turn the function on — push the AUX button. (AUX appears on the display.)
• To turn the function off — push the AM, FM 1, or FM 2 button.
The following functions operate the same as they do with the AM/FM radio: Switch output, Tone control, Fader control, Muting, AMB, AVC.
Audio Systems 95
Auxiliary Function
I nput Jack Setup
The auxiliary input jack connector is located under the left fairing pocket. To use it:
- Open the left fairing pocket cover and remove the four clips and grommet A.
- Lift out the fairing pocket.
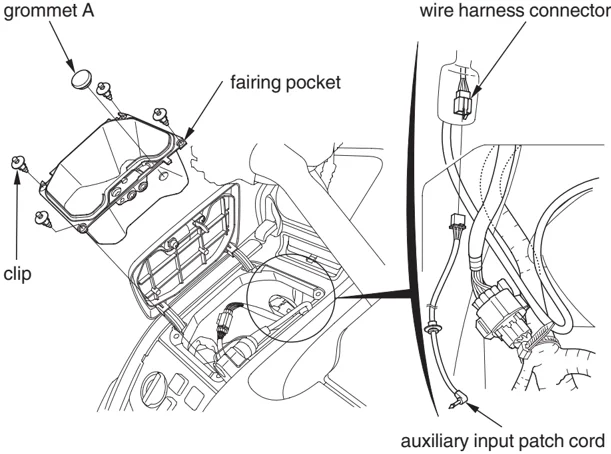
- Remove the auxiliary input patch cord from the owner’s manual pouch.
- Plug the auxiliary input patch cord into the wire harness connector.
96 Audio Systems
Auxiliary Function
- Route the auxiliary input patch cord through the hole in the bottom of the fairing pocket.
- Install the grommet B to left fairing pocket. Do not pull on the auxiliary cord as the wires could be damaged.
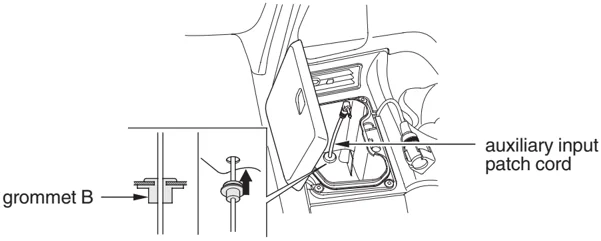
grommet B auxiliary input patch cord
• Some portable audio systems may pick up noise from the ignition. • Adjust the volume of the portable audio system so that it is about the same level as the GL's radio volume. If the volume of the portable audio system is set too high, the sound coming out from the speakers or headset may be distorted.
Audio Systems 97
Intercom System
System Control
Some local governments prohibit the use of a headset by the operator of a motor vehicle. Always obey applicable laws and regulations.
The intercom system may be used to communicate with your passenger. (If you want to use this system, you must have headsets.)
• To turn the system on — push the I-COM button. (I-COM appears on the display.)
• To turn the system off — push and hold the I-COM button until you hear a beep. (I-COM disappears.)
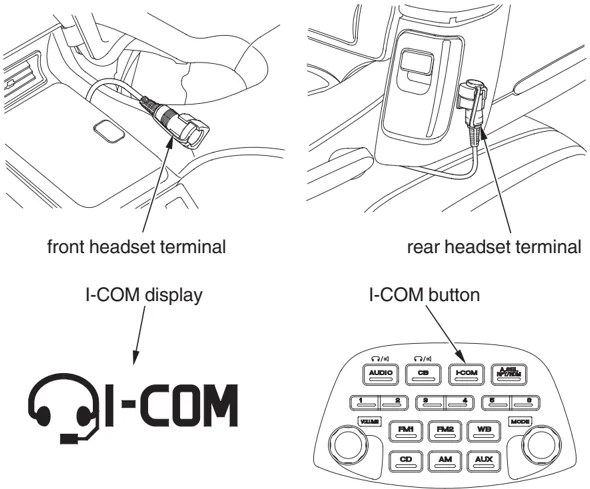
front headset terminal rear headset terminal
I-COM display I-COM button
98 Audio Systems
Intercom System
V OLUME Control
Refer to AM/FM Radio VOLUME Control on page 85.
I ntercom Muting
The intercom mute system automatically lowers (does not silence) the music/ program volume when you speak through the intercom.
The sensitivity of the intercom microphone to your voice or ambient sound sets the level at which the intercom system mutes the music/program volume.
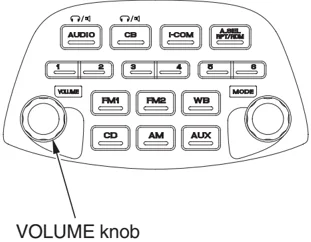
To adjust this system — push the VOLUME knob two times. “INTERCOM MUTE” will display.
• To increase microphone sensitivity — turn the VOLUME knob clockwise.
• To decrease microphone sensitivity — turn the VOLUME knob counterclockwise. (control range: 0 from 20.)
Audio Systems 99

100 Audio Systems
Servicing Your Honda
To help keep your motorcycle in good shape, this section includes a Maintenance Schedule for required service, a list of periodic checks you should perform at least once a month, and step-by-step instructions for specific maintenance tasks. You’ll also find important safety precautions, information on fuels and oils, and tips for keeping your Honda looking great.
For information about the exhaust emission and noise emission requirements of the U.S. Environmental Protection Agency (EPA) and the California Air Resources Board (CARB), see page 209.
For information about replacing fuses, see page 193.
USA only Maintenance, replacement or repair of the emission control devices and systems may be performed by any motorcycle repair establishment or individual using parts that are “certified” to EPA standards.
Before You Service Your Honda
- The Importance of Maintenance ........ 104
- Maintenance Safety ........ 105
- Important Safety Precautions ........ 106
- Periodic Maintenance ........ 107
- Maintenance Schedule ........ 108
- Maintenance Record ........ 112
(cont’d)
Servicing Your Honda 101
Servicing Your Honda
Service Preparations
- Component Locations ........ 113
- Tool Kit ........ 116
- Owner’s Manual Storage ........ 117
- Cover Removal ........ 118
Service Procedures
Fluids & Filters
- Fuel ........ 123
- Engine Oil & Filter ........ 126
- Coolant ........ 133
- Crankcase Breather ........ 136
- Final Drive Oil ........ 137
Engine
- Clutch System ........ 139
- Spark Plugs ........ 141
Chassis
- Suspension ........ 143
- Brakes ........ 147
- Tires ........ 152
- Side Stand ........ 157
Electrical
-
Battery ........ 158
-
Appearance Care ........ 162
102 Servicing Your Honda
Servicing Your Honda
The following table summarizes the three types of inspections and servicing recommendations for your motorcycle. Both the pre-ride inspection and the scheduled maintenance at the recommended intervals are necessary to assure safe and dependable performance. The periodic checks provide additional confidence in your motorcycle’s performance.
| Type of Inspection/Service | Refer to page: | When Performed | Who Performs |
|---|---|---|---|
| Pre-ride Inspection | 41 | before every ride | you |
| Periodic Maintenance | 107 | monthly* | you |
| Maintenance Schedule | 108 | interval on schedule | your Honda dealer** |
- more often if you ride frequently or long distances; or anytime you clean your motorcycle ** unless you have the proper tools and service data and are mechanically qualified
Servicing Your Honda 103
The Importance of Maintenance
Keeping your motorcycle well-maintained is absolutely essential to your safety. It’s also a good way to protect your investment, get maximum performance, avoid breakdowns, and have more fun. A properly maintained motorcycle will also help to reduce air pollution.
Remember, proper maintenance is the owner’s responsibility. Be sure to inspect your motorcycle before each ride, perform the periodic checks, and follow the Maintenance Schedule in this section.
⚠ WARNING
Improperly maintaining this motorcycle or failing to correct a problem before you ride can cause a crash in which you can be seriously hurt or killed.
Always follow the inspection and maintenance recommendations and schedules in this owner’s manual.
If your motorcycle overturns or is involved in a crash, be sure your Honda dealer inspects all major parts, even if you are able to make some repairs.
104 Servicing Your Honda
Maintenance Safety
This section includes instructions on how to perform some important maintenance tasks. If you have basic mechanical skills, you can perform many of these tasks with the tools provided with your motorcycle.
Other tasks that are more difficult and require special tools are best performed by professionals. Wheel removal should normally be handled only by a Honda technician or other qualified mechanic. Instructions are included in this manual only to assist in emergency service.
Some of the most important safety precautions follow. However, we cannot warn you of every conceivable hazard that can arise in performing maintenance. Only you can decide whether or not you should perform a given task.
⚠ WARNING
Failure to properly follow maintenance instructions and precautions can cause you to be seriously hurt or killed.
Always follow the procedures and precautions in this owner’s manual.
Servicing Your Honda 105
Maintenance Safety
I mportant Safety Precautions
• Make sure the engine is off before you begin any maintenance or repairs. This will help eliminate several potential hazards: Carbon monoxide poisoning from engine exhaust. Be sure there is adequate ventilation whenever you operate the engine. Burns from hot motorcycle parts. Let the engine and exhaust system cool before touching. Injury from moving parts. Do not run the engine unless instructed to do so. • Read the instructions before you begin, and make sure you have the tools and skills required. • To help prevent the motorcycle from falling over, park it on a firm, level surface, using the side stand or a maintenance stand to provide support. • To reduce the possibility of a fire or explosion, be careful when working around gasoline. Use only non-flammable solvent, not gasoline, to clean parts. Keep cigarettes, sparks, and flames away from all fuel-related parts.
Remember that your Honda dealer knows your motorcycle best and is fully equipped to maintain and repair it. To ensure the best quality and reliability, use only new genuine Honda parts or their equivalents for repair and replacement. If you have the tools and skills required for additional maintenance jobs, you can purchase an official Honda Service Manual (page 218 ).
106 Servicing Your Honda
Periodic Maintenance
In addition to the regularly scheduled maintenance (page108) and daily pre-ride inspection (page 41 ), consider performing the periodic checks on the following page at least once a month, even if you haven’t ridden your motorcycle, or as often as once a week if you ride frequently or for long distances. It’s a good idea to perform this maintenance any time you clean your motorcycle.
Check the odometer reading and perform any scheduled maintenance checks that are needed (page108). Remember, more frequent checks may be needed for riding in severe conditions.
| Tires & Wheels | Check the air pressure with a gauge and add air if needed (page 153 ). Examine the tread for wear (page 153 ). Look closely for nails, embedded objects, cuts, and other types of damage (page 153 ). Rotate the rear wheel so you can inspect the entire surface. Check the condition of the wheels. |
|---|---|
| Fluids | Check the levels of the engine oil (page129), coolant (page134), brake fluid (page148), clutch fluid (page140), and final drive oil (page137). Add the correct fluid as necessary, and investigate the cause of any low fluid level. |
| Lights | Make sure the headlight, brake light, taillight, and turn signals are working properly. |
| Freeplay | Check the freeplay of the brake lever (page147). |
| Fuses | Make sure you have a full supply of spare fuses. |
| Nuts & Bolts | Check the major fasteners and tighten as needed. |
Servicing Your Honda 107
Maintenance Schedule
The required Maintenance Schedule that follows specifies how often you should have your motorcycle serviced, and what things need attention. It is essential to have your motorcycle serviced as scheduled to maintain safe, dependable performance and proper emission control.
The service intervals in this Maintenance Schedule are based on average riding conditions. Some items will need more frequent service if you ride in unusually wet or dusty areas or at full throttle. Consult your Honda dealer for recommendations applicable to your individual needs and use.
Some items in the Maintenance Schedule can be performed with basic mechanical skills and hand tools. Procedures for these items are provided in this manual. Other items involve more extensive procedures and may require special training, tools, and equipment. We recommend that you have your Honda dealer perform these tasks unless you have advanced mechanical skills and the required tools and equipment. Procedures for such items in this schedule are provided in an official Honda Service Manual available for purchase (page 218 ).
108 Servicing Your Honda
Maintenance Schedule
If you do not feel capable of performing a given task or need assistance, remember that your Honda dealer knows your motorcycle best and is fully equipped to maintain and repair it. If you decide to do your own maintenance, use only genuine Honda parts or their equivalents for repair or replacement to ensure the best quality and reliability.
Perform the pre-ride inspection (page 41) and owner maintenance (page 110) at each scheduled maintenance period.
Each item on the maintenance schedule requires some mechanical knowledge. Certain items (particularly those marked * and **) may require more technical information and tools. Consult your Honda dealer.
- Should be serviced by your Honda dealer, unless you have the proper tools and service data and are mechanically qualified. Refer to the official Honda Service Manual (page 218). ** In the interest of safety, we recommend these items be serviced only by your Honda dealer.
Summary of Maintenance Schedule Notes & Procedures:
NOTES:
- At higher odometer readings, repeat at the frequency interval established here.
- Service more frequently if the motorcycle is ridden in unusually wet or dusty areas.
- Service more frequently if the motorcycle is ridden often at full throttle or in the rain.
- Service more frequently if noisy.
- Replace every 2 years, or at indicated odometer interval, whichever comes first. Replacement requires mechanical skill. Refer to the official Honda service manual.
Maintenance Procedures: I: inspect and clean, adjust, lubricate, or replace, if necessary C: clean A: adjust L: lubricate R: replace
Servicing Your Honda 109
Maintenance Schedule
\begin{tabular}{|l|l|c|c|c|c|c|c|c|c|c|c|} \hline \multicolumn{2}{|c|}{\multirow{2}{}{ITEM}} & \multirow{2}{}{NOTE} & \multicolumn{8}{c|}{FREQUENCY ODOMETER READING (Note 1)} & \multirow{2}{}{Refer to page} \ \cline{4-11} \multicolumn{2}{|c|}{} & & × 1,000 mi & 4 & 8 & 12 & 16 & 20 & 24 & & \ \multicolumn{2}{|c|}{} & & × 1,000 km & 6.4 & 12.8 & 19.2 & 25.6 & 32.0 & 38.4 & & \ \hline \multirow{12}{}{EMISSION RELATED ITEMS} & * FUEL LINE & & & & I & & I & & I & — \ \cline{2-12} & * THROTTLE OPERATION & & & & I & & I & & I & — \ \cline{2-12} & * AIR CLEANER & 2 & & & & R & & & R & — \ \cline{2-12} & CRANKCASE BREATHER & 3 & & C & C & C & C & C & C & 136 \ \cline{2-12} & SPARK PLUGS & & \multicolumn{8}{c|}{EVERY 16,000 mi (25,600 km) R} & 141 \ \cline{2-12} & * VALVE CLEARANCE & 4 & \multicolumn{8}{c|}{EVERY 32,000 mi (51,200 km) I} & — \ \cline{2-12} & ENGINE OIL & & & R & & R & & R & & 126 \ \cline{2-12} & ENGINE OIL FILTER & & & R & & R & & R & & 130 \ \cline{2-12} & RADIATOR COOLANT & 5 & & & I & & I & & R & 133 \ \cline{2-12} & * COOLING SYSTEM & & & & I & & I & & I & — \ \cline{2-12} & * SECONDARY AIR SUPPLY SYSTEM & & & & I & & I & & I & — \ \cline{2-12} & * EVAPORATIVE EMISSION CONTROL SYSTEM & & & & & I & & & I & — \ \hline \end{tabular}
- Should be serviced by your Honda dealer, unless you have the proper tools and service data and are mechanically qualified. Refer to the official Honda Service Manual (page 218 ).
110 Servicing Your Honda
Maintenance Schedule
- Should be serviced by your Honda dealer, unless you have the proper tools and service data and are mechanically qualified. Refer to the official Honda Service Manual (page 218). ** In the interest of safety, we recommend these items be serviced only by your Honda dealer.
Servicing Your Honda 111
Maintenance Record
Keeping an accurate maintenance record will help ensure that your motorcycle is properly maintained. Retain detailed receipts to verify the maintenance was performed. If the motorcycle is sold, these receipts should be transferred with the motorcycle to the new owner. Make sure whoever performs the maintenance completes this record. All scheduled maintenance is considered a normal owner operating cost and will be charged for by your dealer. Use the space under Notes to record anything you want to remind yourself about or mention to your dealer.
| Miles (km) | Odometer | Date | Performed By: | Notes |
|---|---|---|---|---|
| 4,000 (6,400) | ||||
| 8,000 (12,000) | ||||
| 12,000 (19,200) | ||||
| 16,000 (25,600) | ||||
| 20,000 (32,000) | ||||
| 24,000 (38,400) | ||||
| 28,000 (44,800) | ||||
| 32,000 (51,200) | ||||
| 36,000 (57,600) | ||||
| 40,000 (64,000) | ||||
| 44,000 (70,400) | ||||
| 48,000 (76,800) | ||||
| 52,000 (83,200) |
112 Servicing Your Honda