Component Locations
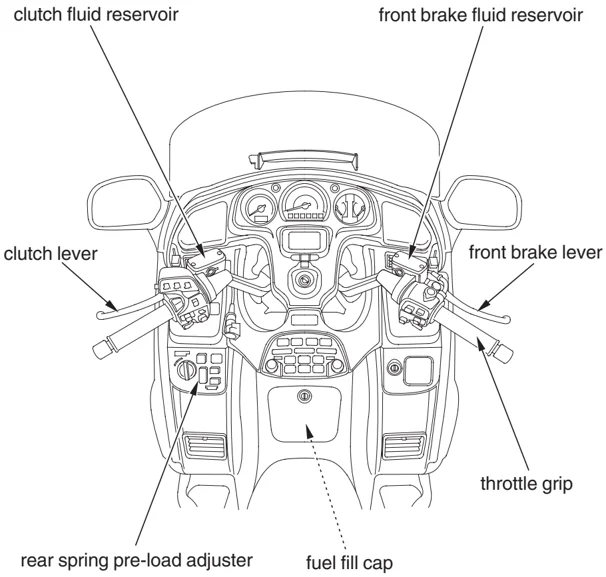
clutch fluid reservoir front brake fluid reservoir clutch lever front brake lever throttle grip rear spring pre-load adjuster fuel fill cap
Servicing Your Honda 113
Component Locations
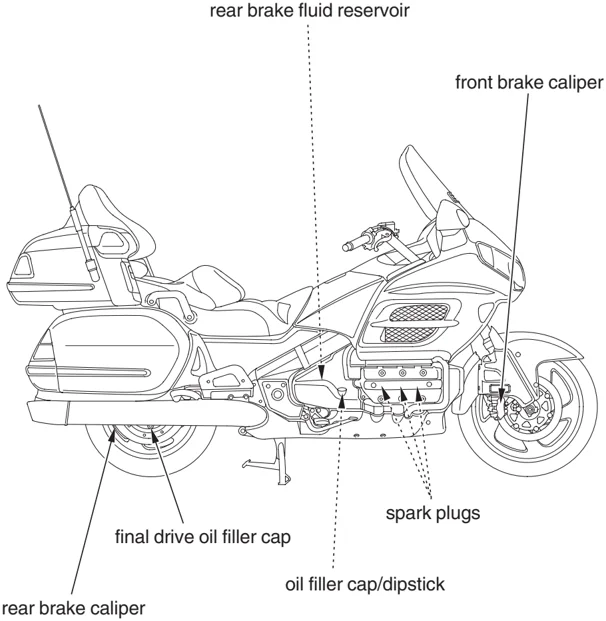
rear brake fluid reservoir front brake caliper spark plugs final drive oil filler cap oil filler cap/dipstick rear brake caliper
114 Servicing Your Honda
Component Locations
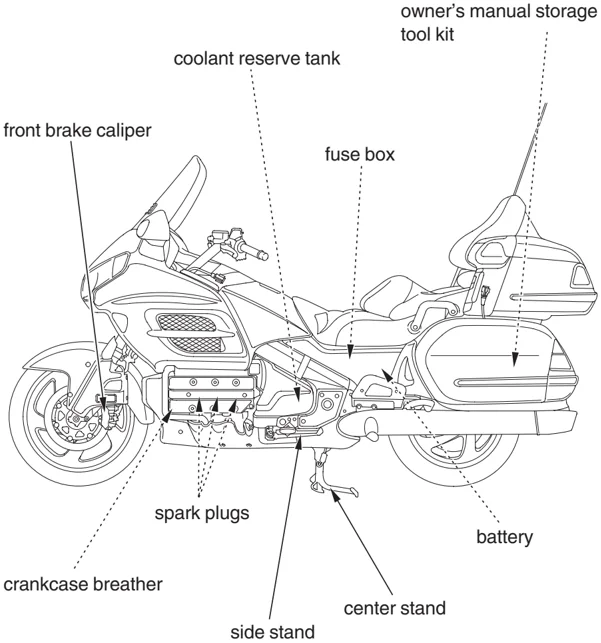
owner's manual storage tool kit
coolant reserve tank
front brake caliper
fuse box
spark plugs
crankcase breather
side stand
center stand
battery
Servicing Your Honda 115
Tool Kit
The tool kit is located in the left saddlebag (page 45). Some roadside repairs, minor adjustments, and parts replacement can be performed with the tools contained in the kit.
LEFT SIDE
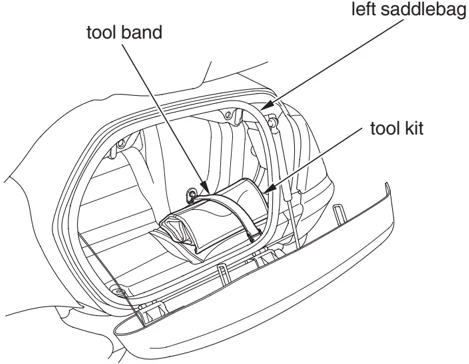
- spark plug wrench
- 8 mm open end wrench
- 10 × 12 mm open end wrench
- 14 × 17 mm open end wrench
- 10 × 12 mm box end wrench
- 14 × 17 mm box end wrench
- pliers
- screwdriver handle
- No. 1 screwdriver
- No. 3 screwdriver
- 5 mm hex wrench
- 6 mm hex wrench
- 8 mm box wrench
- 0.7 mm feeler gauge
- tool bag
116 Servicing Your Honda
Owner’s Manual Storage
Your motorcycle provides storage for the owner’s manual so you’ll have it with you for easy reference. Store your owner’s manual (and other documents) in the plastic storage bag in the left saddlebag (page 45).
Be careful not to flood this area when washing your motorcycle.
LEFT SIDE
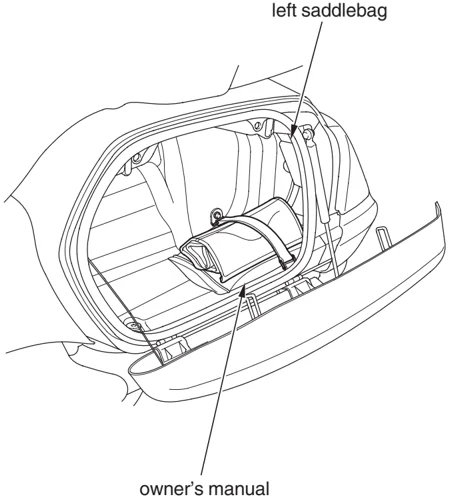
left saddlebag
owner's manual
Servicing Your Honda 117
Cover Removal
Refer to Safety Precautions on page 106.
Left side shown; right side similar
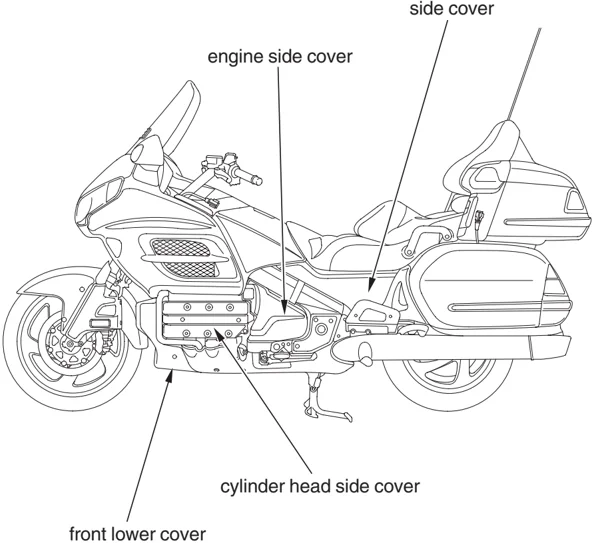
side cover engine side cover cylinder head side cover front lower cover
118 Servicing Your Honda
Cover Removal
Side Cover Removal
Refer to Safety Precautions on page 106.
The left side cover must be removed for battery and fuse maintenance.
NOTICE
Failure to use extreme care removing or installing the side covers may damage the side cover hooks.
Removal
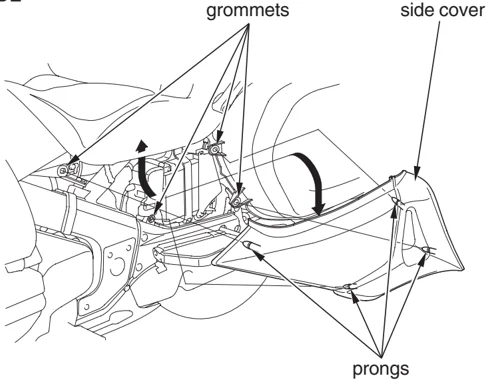
- Carefully pull the side cover out until the prongs are clear of the frame grommets.
- Remove the side cover.
Installation
- Insert the top edge of the side cover under the seat.
- Position the side cover so the prongs on the inside of the cover are lined up above their securing grommets.
- Push the cover in place.
LEFT SIDE
Servicing Your Honda 119
Cover Removal
Engine Side Cover Removal
Refer to Safety Precautions on page 106.
The left engine side cover must be removed for coolant maintenance. The right engine side cover must be removed for engine oil and rear brake fluid maintenance.
NOTICE
Failure to use extreme care removing or installing the side covers may damage the side cover hooks.
Removal
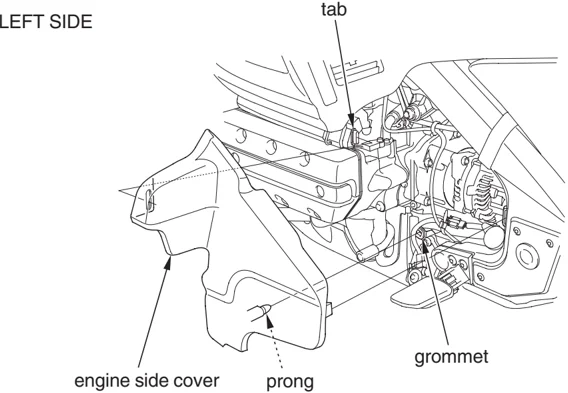
- Carefully pull the rear of the engine side cover out until the prongs are clear of their securing grommets.
- Carefully slide the engine side cover to the rear until the hook is clear of the tab in the hole of the engine side cover.
Installation
• Installation can be done in the reverse order of removal.
120 Servicing Your Honda
Cover Removal
Cylinder Head Side Cover Removal
Refer to Safety Precautions on page 106.
Both cylinder head side covers must be removed for spark plug maintenance. The left cylinder head side cover must be removed for crankcase breather maintenance.
Removal
- Remove the rubber plugs.
- Remove the bolts.
Installation • Installation can be done in the reverse order of removal.
LEFT SIDE
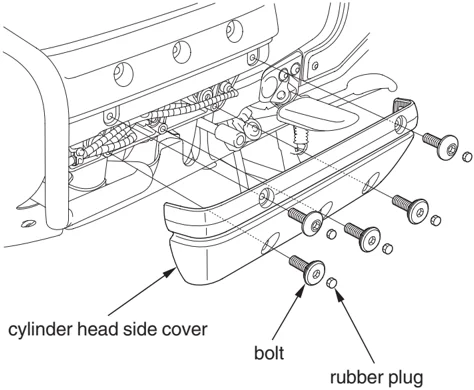
cylinder head side cover bolt rubber plug
Servicing Your Honda 121
Cover Removal
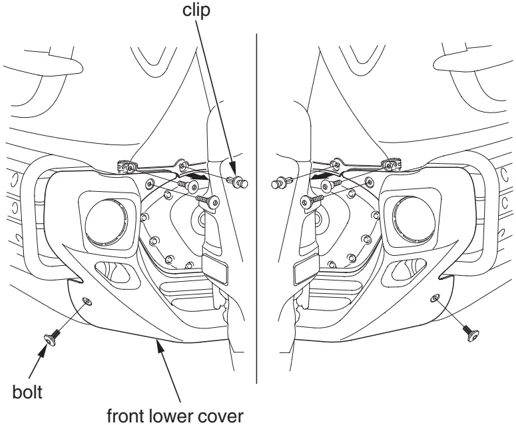
Front Lower Cover Removal
Refer to Safety Precautions on page 106.
Removal
- Remove the clips.
- Remove the bolts.
Installation • Installation can be done in the reverse order of removal.
FRONT
122 Servicing Your Honda
Fuel
Refer to Safety Precautions on page 106.
Fuel Recommendation
We recommend that you use unleaded fuel because it produces fewer engine deposits and extends the life of exhaust system components.
The use of leaded gas will damage the catalytic converter.
Your engine is designed to use any gasoline that has a pump octane number of 86 or higher. Gasoline pumps at service stations normally display the pump octane number. For information on the use of oxygenated fuels, see page 214.
Use of lower octane gasoline can cause persistent “pinging” or “spark knock” (a loud rapping noise) which, if severe, can lead to engine damage. Light pinging experienced while operating under a heavy load, such as climbing a hill, is no cause for concern.
If pinging or spark knock occurs at a steady engine speed under normal load, change brands of gasoline. If pinging or spark knock persists, consult your Honda dealer.
Servicing Your Honda 123
Fuel
Never use stale or contaminated gasoline or an oil/gasoline mixture. Avoid getting dirt, dust, or water in the fuel tank.
Fuel Capacity
Fuel tank capacity, including reserve: 6.74 US gal (25.5 l)
The tank should be refilled as soon as possible when the fuel gauge needle enters the red band.
Refueling Procedure
Refer to Safety Precautions on page 106.
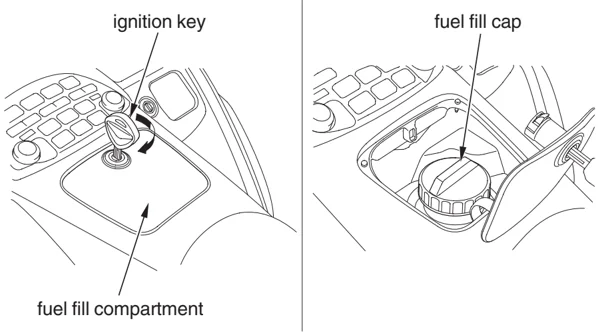
- Insert the ignition key in the fuel fill compartment and turn it clockwise.
- Open the fuel fill compartment.
- Turn the fuel fill cap counterclockwise and remove it.
124 Servicing Your Honda
Fuel
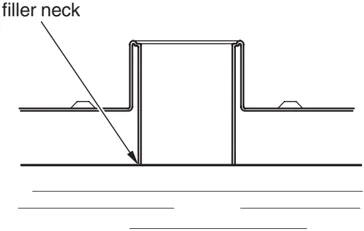
- Add fuel until the level reaches the bottom of the filler neck. Avoid overfilling the tank. There should be no fuel in the filler neck.
WARNING Gasoline is highly flammable and explosive. You can be burned or seriously injured when handling fuel.
- Stop the engine and keep heat, sparks and flame away.
- Handle fuel only outdoors.
- Wipe up spills immediately.
- After refueling, be sure to tighten the fuel fill cap firmly by turning it clockwise until it clicks.
- Close the fuel fill compartment and turn the ignition key counterclockwise.
- Remove the key from the fuel fill compartment.
Servicing Your Honda 125
Engine Oil & Filter
Engine oil quality is a major factor that affects both the performance and the service life of the engine.
Using the proper oil (page 127 ) and filter, and regularly checking, adding, and changing oil will help extend your engine’s life. Even the best oil wears out. Changing oil helps get rid of dirt and deposits in the engine. Operating the engine with old or dirty oil can damage your engine. Running the engine with insufficient oil can cause serious damage to the engine and transmission.
Change the engine oil as specified in the maintenance schedule on page110.
When running in very dusty conditions, oil changes should be performed more frequently than specified in the maintenance schedule.
126 Servicing Your Honda
Engine Oil & Filter
Oil Recommendation
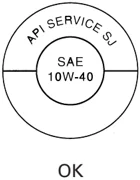
| API classification | SG or higher except oils labeled as energy conserving on the circular API service label |
|---|---|
| viscosity (weight) | SAE 10W-40 |
| JASO T 903 standard | MA |
| suggested oil* | Pro Honda GN4 or HP4 (without molybdenum additives) 4-stroke oil (USA & Canada), or Honda 4-stroke oil (Canada only), or an equivalent motorcycle oil. |
- Suggested oils are equal in performance to SJ oils that are not labeled as energy conserving on the circular API service label.
- Your motorcycle does not need oil additives. Use the recommended oil.
- Do not use oils with graphite or molybdenum additives. They may adversely affect clutch operation.
- Do not use API SH or higher oils displaying a circular API “energy conserving” service label on the container. They may affect lubrication and clutch performance.
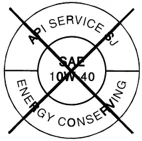
- Do not use non-detergent, vegetable, or castor based racing oils.
Servicing Your Honda 127
Engine Oil & Filter
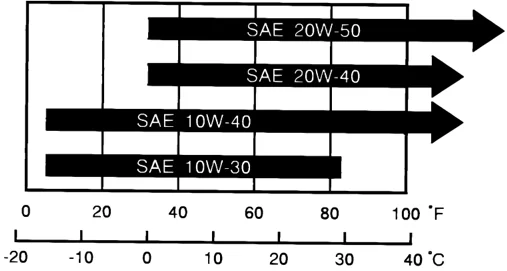
Other viscosities shown in the following chart may be used when the average temperature in your riding area is within the indicated range.
JASO T 903 standard
The JASO T 903 standard is an index to choose engine oils for 4-stroke motorcycle engines. There are two classes: MA and MB. Oil conforming to the standard has the following classification on the oil container.
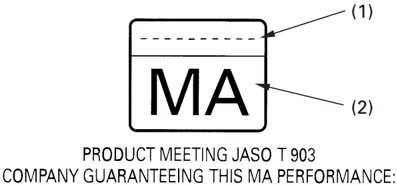
(1) code number of the sales company of the oil (2) oil classification
128 Servicing Your Honda
Engine Oil & Filter
Checking & Adding Oil
Refer to Safety Precautions on page 106.
RIGHT SIDE
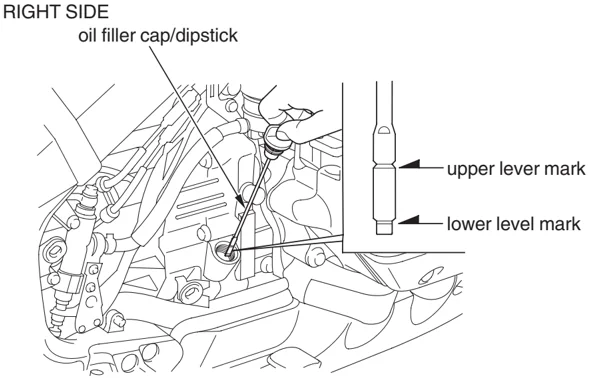
- Park your motorcycle on its center stand on a firm, level surface.
- Remove the right engine side cover (page 120).
- Start the engine and let it idle for 3 – 5 minutes. Make sure the low oil pressure indicator goes off. If the indicator remains on, stop the engine immediately.
- Stop the engine and wait 2 – 3 minutes.
- Remove the oil filler cap/dipstick and wipe it clean.
- Insert the oil filler cap/dipstick until it seats, but don’t screw it in.
- Remove the oil filler cap/dipstick and check the oil level.
- If the oil is at or near the upper level mark — you do not have to add oil.
- If the oil is below or near the lower level mark — add the recommended oil until it reaches the upper level mark. (Do not overfill.)
- Reinstall the oil filler cap/dipstick.
- Reinstall the right engine side cover.
- Check for oil leaks.
Servicing Your Honda 129
Engine Oil & Filter
Changing Engine Oil & Filter
Refer to Safety Precautions on page 106.
Your motorcycle’s oil filter has very specific performance requirements. Use a new genuine Honda oil filter or a filter of equal quality specified for your model.
NOTICE
Using the wrong oil filter may result in leaks or premature engine damage.
This procedure requires mechanical skill and professional tools such as a torque wrench and oil filter wrench, as well as a means for disposing of the drained fluid (page 173). If you do not have the skills or the tools, see your Honda dealer.
Drain the Engine Oil:
- Park your motorcycle on its center stand on a firm, level surface.
- If the engine is cold, start it and let it idle for 3–5 minutes. Turn the engine off. Wait 2–3 minutes for the oil to settle.
- Remove the front lower cover (page 122 ).
- Place a drain pan under the crankcase drain bolt.
- To drain the oil, remove the oil filler cap/dipstick, crankcase drain bolt, and sealing washer.
FRONT, UNDER ENGINE
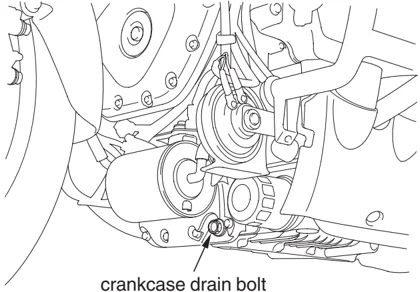
crankcase drain bolt
130 Servicing Your Honda
Engine Oil & Filter
Install a New Oil Filter: 6. Remove the oil filter with a filter wrench and let the remaining oil drain out. Discard the oil filter in an approved manner (page 173 ). 7. Pour the drained oil into a suitable container and dispose of it in an approved manner (page 173 ).
NOTICE Improper disposal of drained fluids is harmful to the environment.
- Apply a thin coat of engine oil to the rubber seal of a new oil filter.
LEFT FRONT, UNDER ENGINE
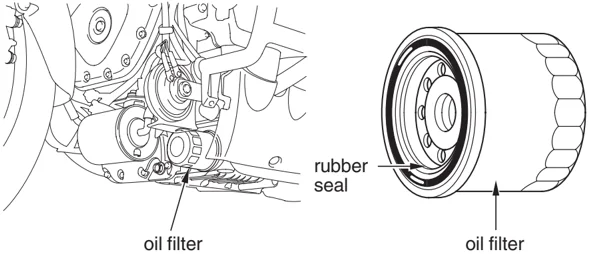
- Install the new oil filter and tighten it by hand.
- Using an oil filter wrench attachment and a torque wrench, tighten the new oil filter to the specified torque: 19 lbf·ft (25 N·m , 2.6 kgf·m)
- Check the condition of the sealing washer on the drain bolt. Replace the washer every other time the oil is changed. Install the drain bolt and tighten it to the specified torque: 25 lbf·ft (34 N·m , 3.5 kgf·m)
Servicing Your Honda 131
Engine Oil & Filter
Add Engine Oil: 12. Fill the crankcase with the recommended oil (page 127 ), approximately: 3.9 US qt (3.7 l) 13. Install the oil filler cap/dipstick securely. 14. Start the engine and let it idle for a few minutes. 15. Stop the engine. Wait several minutes. 16. Check that the oil level is at upper level mark on the dipstick (page 129 ). 17. Check that there are no oil leaks.
If a torque wrench is not used for installation, see your Honda dealer as soon as possible to verify proper assembly.
132 Servicing Your Honda