Riding with Cruise Control
Cruise Control
The cruise control system allows you to maintain a steady speed between 30 – 100 mph (48 – 161 km/h). When cruise control is on, your speed will still vary slightly, particularly going up and down hills.
Cruise control is intended for use only on straight, uncongested highways. Do not use cruise control on city streets, winding roads, during bad weather, or at any other time when you need total control of the throttle.
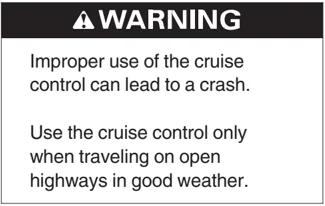
⚠ WARNING
Improper use of the cruise control can lead to a crash.
Use the cruise control only when traveling on open highways in good weather.
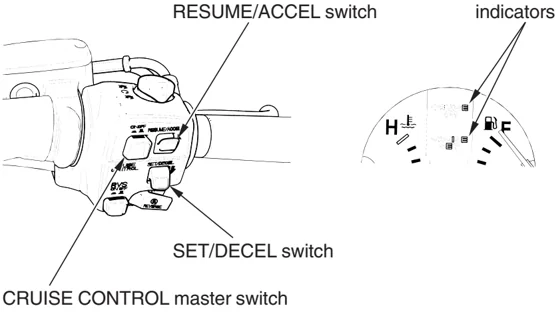
RIGHT HANDLEBAR
RESUME/ACCEL switch indicators SET/DECEL switch CRUISE CONTROL master switch
Basic Operation & Riding 77
Riding with Cruise Control
To Set Cruise Control
- Make sure you are in 4th gear or OD (5th gear), and that your speed is between 30 and 100 mph (48 and 161 km/h). Any speed above 100 mph (161 km/h) will be memorized as 100 mph (161 km/h).
- Push the cruise control master switch. (The CRUISE ON indicator will come on.)
- Accelerate to the desired speed.
- Push the SET/DECEL switch. (The CRUISE SET indicator will come on.)
To Change the Set Speed
To Fine Tune the Set Speed
- To increase the set speed — tap the RESUME/ACCEL switch.
- To decrease the set speed — tap the SET/DECEL switch. Each quick tap (brief push and release) on either switch will change your speed by approximately 1 mph (1.6 km/h).
To Automatically Change the Set Speed
- To increase the set speed — hold the RESUME/ACCEL switch in. The system will accelerate your motorcycle automatically. When you reach the desired speed, release the switch.
- To decrease speed — hold the SEL/DECEL switch in. The system will automatically slow your motorcycle. When you reach the desired speed, release the switch.
78 Basic Operation & Riding
Riding with Cruise Control
To Manually Increase the Set Speed
- Use the throttle to accelerate until you reach the desired speed.
- Push and release the SET/DECEL switch.
To Manually Increase Vehicle Speed
- Use the throttle in the normal manner to accelerate.
- To return to the set speed, close the throttle and coast without applying the brakes. The cruise system will maintain the speed you previously set.
To Cancel Cruise Control
To Disengage the System
- Push the cruise control master switch until the CRUISE ON indicator goes off. (The set speed will be erased from memory.)
To Temporarily Disengage the System
- Pull the brake lever or clutch lever, or step on the brake pedal slightly, or close the throttle. (The set speed will remain in memory.)
- To resume cruise control:
- If you are still over 30 mph (48 km/h) — push the RESUME/ACCEL switch.
- If you are under 30 mph (48 km/h) — use the throttle to increase road speed above 30 mph (48 km/h) and then push the RESUME/ACCEL switch.
Basic Operation & Riding 79
Riding in Bad Weather
If you decide to ride your motorcycle in the rain, fog, or other bad-weather conditions, ride carefully. Wet road surfaces reduce traction, especially in turns, and increase stopping distances when you brake.
If the weather turns bad while you are riding, take extra care and do not use cruise control.
When riding in the rain, we recommend you adjust your windshield height below eye level, if possible, for better visibility (page 56).
Avoid using any kind of water-dispersing product on the windshield. It will damage the plastic.
80 Basic Operation & Riding
Audio Systems
This section gives information about the controls and displays that make up your audio system. All essential controls are within easy reach.
As required by FCC (USA only): Changes or modifications not expressly approved by the party responsible for compliance could void the user’s authority to operate the equipment.
- AM/FM Radio ........ 82
- Radio Antenna ........ 82
- Controls Locations ........ 83
- AUDIO System ........ 84
- Switch Output ........ 84
- VOLUME Control ........ 85
- Select Band ........ 86
- Select Station ........ 87
- Preset Stations ........ 88
- Auto Select ........ 89
- Tone Control ........ 90
- Fader Control ........ 91
- Muting ........ 91
- Ambience (AMB) ........ 92
- Beep Set ........ 92
- Auto Volume Control (AVC) ........ 93
- Weather Infomation ........ 94
- Weather Band (WB) ........ 94
- Auxiliary Function ........ 95
- Auxiliary (AUX) Input ........ 95
- Input Jack Setup ........ 96
- Intercom System ........ 98
- System Control ........ 98
- VOLUME Control ........ 99
- Intercom Muting ........ 99
Audio Systems 81
AM/FM Radio
Radio Antenna
To fold the AM/FM radio antenna, pull up on the knurled coupling.
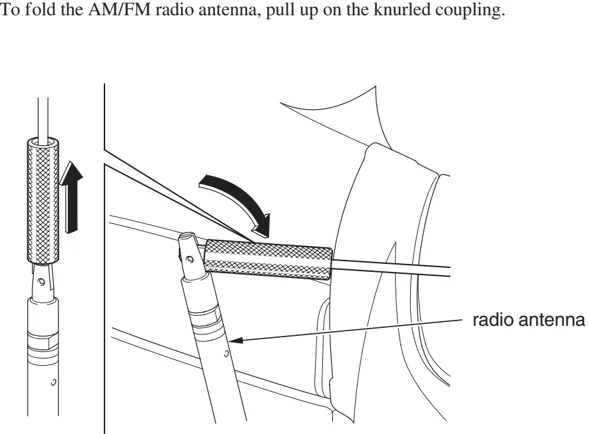
radio antenna
82 Audio Systems
AM/FM Radio
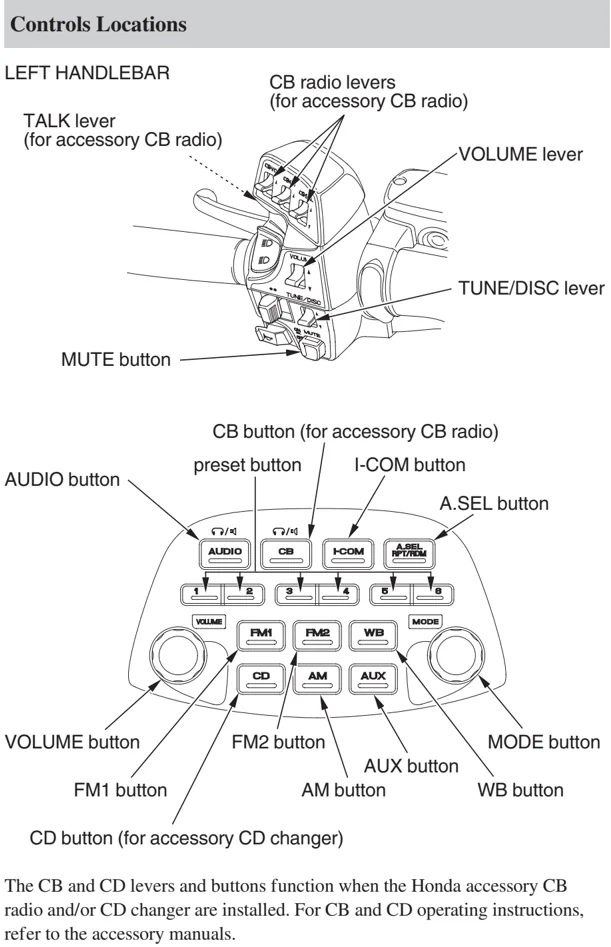
Controls Locations
LEFT HANDLEBAR
TALK lever (for accessory CB radio)
CB radio levers (for accessory CB radio)
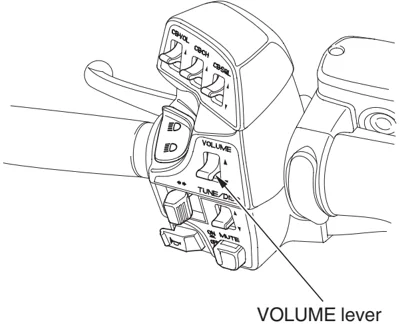
VOLUME lever
TUNE/DISC lever
MUTE button
AUDIO button
CB button (for accessory CB radio)
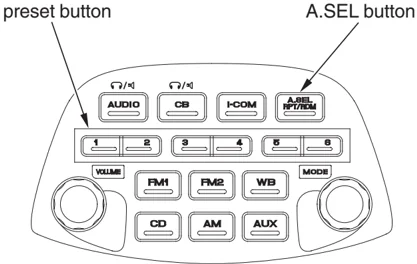
preset button
I-COM button
A.SEL button
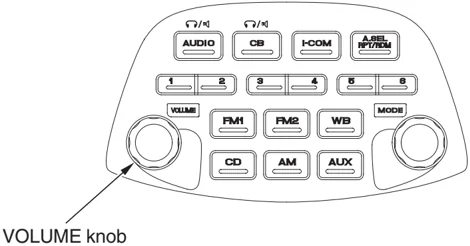
VOLUME button
FM1 button
CD button (for accessory CD changer)
FM2 button
AM button
AUX button
MODE button
WB button
The CB and CD levers and buttons function when the Honda accessory CB radio and/or CD changer are installed. For CB and CD operating instructions, refer to the accessory manuals.
Audio Systems 83
AM/FM Radio
AUDIO System
To turn the audio system on — push the AUDIO button.
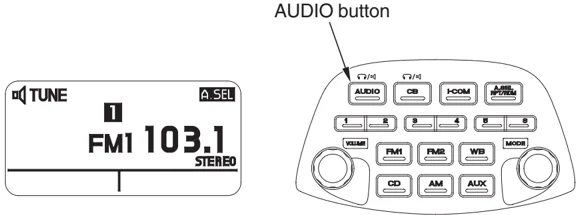
To turn the audio system off — push and hold the AUDIO button until you hear a beep. The display will show the Odometer/Tripmeter only.
CB and CD are optional equipment. They are only indicated if installed.
Switch Output
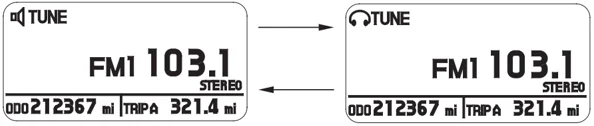
When the audio system is turned on, you can switch its output between Speaker and Headset. (Headset is optional equipment.)
• Pushing the AUDIO button switches the output.
84 Audio Systems
AM/FM Radio
V OLUME Control
• To increase the volume — push the VOLUME lever up or turn the VOLUME knob clockwise.
• To decrease the volume — push the VOLUME lever down or turn the VOLUME knob counterclockwise.
To increase or decrease the volume rapidly — push the VOLUME lever up or down and hold it down after you hear a beep. (VOLUME level range : from 0 to 32)
VOLUME lever
VOLUME knob
Audio Systems 85
AM/FM Radio
Select Band
To change to AM or FM when you are in the radio mode — push the AM button, FM1 button or FM2 button.
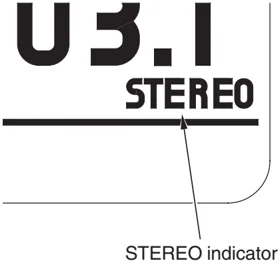
Reception of a stereo signal is indicated when the STEREO indicator appears in the display. (Stereo reception is available only for FM stereo broadcasts.) As FM stereo reception becomes weaker, special circuits in the radio gradually blend the sound toward mono to maintain some sound quality, even though the STEREO indicator remains ON.
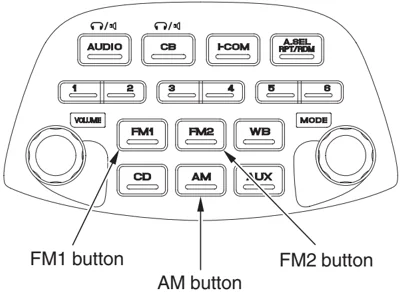
FM1 button AM button FM2 button
U 3.1 STEREO
STEREO indicator
86 Audio Systems
AM/FM Radio
Select Station
To raise the radio frequency — push the TUNE/DISC lever up. To lower the radio frequency — push the TUNE/DISC lever up.
To move up or down the radio frequencies in sequence, move the lever one click at a time. The AM frequency display moves in 10 kHz steps. The FM frequency moves in 0.2 kHz steps.
The SEEK function searches the band for a station with a strong signal. To activate it, push the TUNE/DISC lever up or down and release it as soon as you hear a beep. The frequency display will begin moving. Depending on which way you push the switch, the system scans upward or downward from the current frequency.
It stops when it finds a station with a strong signal. When the frequency display reaches either end, it transitions to the other end of the band and continues in the same direction.
To reach a known frequency rapidly — push the TUNE/DISC lever up or down and continue to hold it down after you hear a beep until you see the desired frequency.
LEFT HANDLEBAR
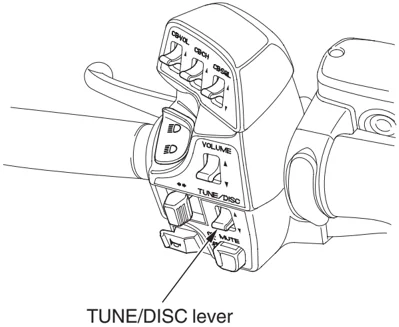
TUNE/DISC lever
Audio Systems 87
AM/FM Radio
Preset Stations
You can store the frequencies of your favorite radio stations in the six preset buttons. Each button will store one frequency on the AM band, and two frequencies on the FM band.
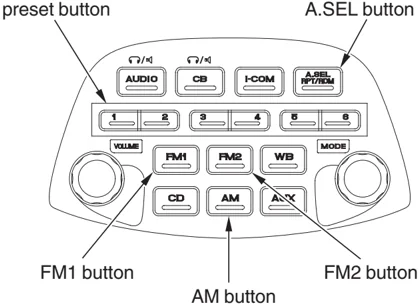
- Check that A.SEL is not turned on. If it is on, push the A.SEL button to turn it off.
- Select the desired band, AM or FM. FM1 and FM2 let you store two frequencies with each Preset button.
- Use the TUNE or SEEK function to tune the radio to a desired station.
- Pick the Preset button you want for that station. Press the button and hold it until you hear a beep.
- Repeat steps 1 to 3 to store a total of six stations on AM and twelve on FM.
Once a station’s frequency is stored, simply press and release the proper Preset button to tune to it. The preset frequencies will be lost if your motorcycle’s battery goes dead or is disconnected, or if the radio fuse is removed.
88 Audio Systems
AM/FM Radio
Auto Select
If you are traveling far from home and can no longer receive the stations you preset, you can use the Auto Select feature to find stations in the local area.
To activate Auto Select, push the A.SEL button. A.SEL will appear in the display, and the system will go into scan mode for several seconds. It automatically scans both bands, looking for stations with strong signals. It stores the frequencies of six AM stations and twelve FM stations in the preset buttons. You can then use the preset buttons to select those stations.
If you are in a remote area, Auto Select may not find six strong AM stations or twelve strong FM stations. If this happens, you will see a "0" displayed when you push any preset button that does not have a station stored.
With Auto Select on, you cannot manually store any frequencies in the preset buttons. If you do not like the stations found by Auto Select, you can use the TUNE and SEEK functions to find other stations.
Auto Select does not erase the frequencies that you preset previously. When you return home, turn off Auto Select by pressing the A.SEL button. The preset buttons will then select the frequencies you originally set.
AM/FM Radio
Tone Control
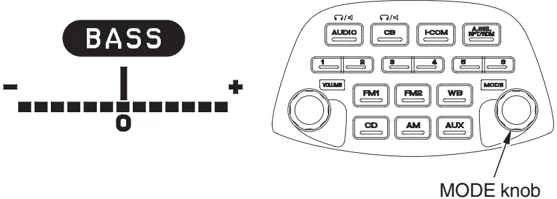
To select the Bass control, push the MODE knob once, and “BASS” will appear on the display. Then, within five seconds, change the bass control.
• To emphasize bass — turn the MODE knob clockwise. • To reduce bass — turn the MODE knob counterclockwise (Bass level ranges from 6 down to −6.)
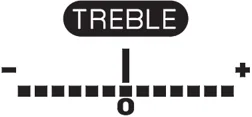
To select the Treble control, push the MODE knob two times, and “TREBLE” will appear on the display. Then, within five seconds, change the treble control.
• To emphasize treble — turn the MODE knob clockwise. • To reduce treble — turn the MODE knob counterclockwise. (Treble level ranges from 6 down to −6.)
90
AM/FM Radio
Fader Control
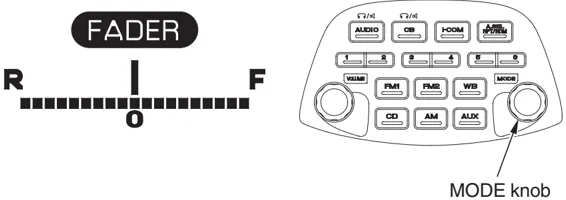
To balance the sound between the front and optional rear speakers — push the MODE knob three times, and “FADER” will appear on the display. Then, within five seconds, change the fader control. (The control range: F (front) and R (rear) each have 9 segments.)
Muting
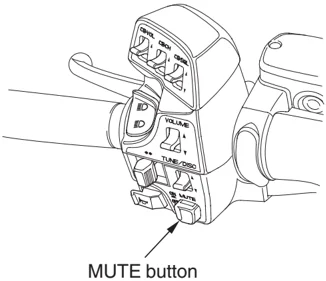
To instantly lower the radio’s volume so you may hear surrounding sounds more clearly — push the MUTE button. The display will indicate “MUTE”. To restore the original volume — push the MUTE button again to restore the original volume.
Audio Systems 91

AM/FM Radio
Ambience (AMB)
The "ambience" circuit blends and boosts certain frequencies from both channels, for a "live performance" effect. AMB may be used for stereo programs from the FM radio. However, the ambience circuit may make weak FM stereo signals sound worse.
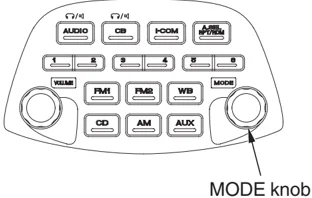
• To use the circuit — push the MODE knob four times, and "AMB" will appear on the display. Then, within five seconds, change the ambience setting.
• To change the setting — turn the MODE knob (There are three settings: HI (high), LO (low), OFF.)
Beep Set
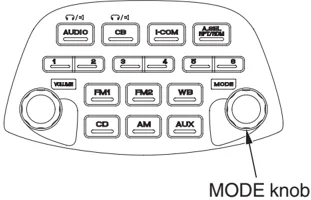
• To use the circuit — push the MODE knob five times, and "BEEP" will appear on the display. Then, within five seconds, change the beep setting.
• To change the setting — turn the MODE knob. (ON or OFF)
92 Audio Systems


AM/FM Radio
Auto Volume Control (AVC)
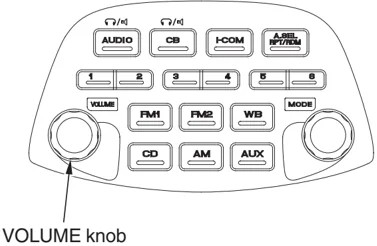
To automatically increase volume as the speed of the motorcycle increases. Push the VOLUME knob once, and “AUTO VOL SPK” will appear on the display. Then, within five seconds, change the AVC setting. When audio system output is Headset, the display will indicate “AUTO VOL HS”.
AUTO VOL SPK has four settings — HI (high), MID (middle), LO (low), and OFF. AUTO VOL HS has three settings — HI (high), LO (low), and OFF.
VOLUME knob
AUTO VOL SPK MID
AUTO VOL HS OFF
Audio Systems 93
Weather Information
Weather Band (WB)
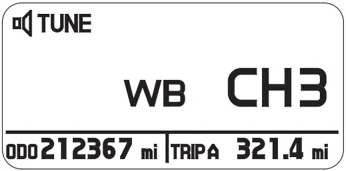
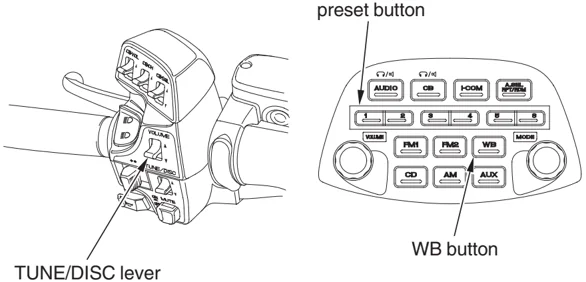
To listen to the Weather Band — push the WB button. To cancel the Weather Band — push another band button. (AM, FM 1 or FM 2 button.)
To select channels 1—6 — push the desired preset button. To select channel 7 — push the TUNE/DISC lever up or down until channel 7 is selected. (The TUNE/DISC lever may be used to select any of the 7 channels. The lever must be used to select channel 7.)
LEFT HANDLEBAR
94 Audio Systems