Tires
To safely operate your motorcycle, your tires must be the proper type and size, in good condition with adequate tread, and correctly inflated for the load you are carrying.
⚠ WARNING
Using tires that are excessively worn or improperly inflated can cause a crash in which you can be seriously hurt or killed.
Follow all instructions in this owner’s manual regarding tire inflation and maintenance.
The following pages give detailed information on how and when to check your air pressure, how to inspect your tires for wear and damage, and our recommendations for tire repair and replacement.
Air Pressure
Refer to Safety Precautions on page 106.
Properly inflated tires provide the best combination of handling, tread life, and riding comfort. Generally, underinflated tires wear unevenly, adversely affect handling, and are more likely to fail from being overheated. Overinflated tires make your motorcycle ride more harshly, are more prone to damage from road hazards, and wear unevenly.
We recommend that you visually check your tires before every ride and use an air pressure gauge to measure the air pressure at least once a month or any time you think the tires might be low. Even tires that are in good condition may lose one to two psi per month if not checked and adjusted regularly.
152 Servicing Your Honda
Tires
Tubeless tires have some degree of self-sealing ability if they are punctured. However, because leakage is often very slow, you should look closely for punctures whenever a tire is not fully inflated.
Always check air pressure when your tires are “cold” — after the motorcycle has been parked for at least three hours. If you check air pressure when your tires are “warm” — even if your motorcycle has only been ridden for a few miles — the readings will be higher. If you let air out of warm tires to match the recommended cold pressures, the tires will be underinflated.
The recommended “cold” tire pressures are:
I nspection
Refer to Safety Precautions on page 106.
Whenever you check the tire pressures, you should also look for:
- Bumps or bulges in the side of the tire or the tread. Replace any tire that has a bump or bulge.
- Cuts, slits, or cracks in the tires. Replace the tire if you can see fabric or cord.
- Nails or other foreign objects embedded in the side of the tire or tread.
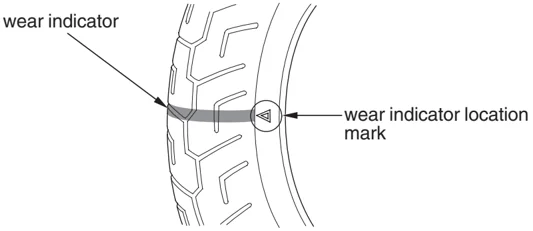
- Excessive tread wear.
Servicing Your Honda 153
Tires
Also, if you hit a pothole or hard object while riding, pull to the side of the road as soon as you safely can and carefully inspect the tires for damage.
For the best performance, you should replace a tire before the tread depth at the center reaches the following limits:
If the wear indicators are visible, replace the tire immediately as it is no longer safe.
Tire Repair
Refer to Safety Precautions on page 106.
We strongly recommend that you replace, not repair, any tire that is punctured or damaged. As discussed below, a tire that is repaired, either temporarily or permanently, will have lower speed and performance limits than a new or undamaged tire.
A temporary repair can sometimes be made in an emergency situation. However, since a temporary repair may not hold, you must ride very slowly, preferably without any cargo or passenger, and have the tire replaced or permanently repaired as soon as possible.
(For more information on temporary repairs, see If You Have a Flat Tire, page 180.)
154 Servicing Your Honda
Tires
A permanent repair, such as an internal plug patch, can be made if a tire has only a small puncture in the tread area. With such a repair, you should not exceed 50 mph (80 km/h) for the first 24 hours, or 80 mph (130 km/h) at any time thereafter. In addition, you may not be able to safely carry as much weight. If you choose to have a tire repaired, be sure the repair work is performed by a professional and that the wheel is balanced before you ride.
If you have a tire professionally repaired at a non-Honda facility, we recommend that you have the work checked by your Honda dealer.
Tire Replacement
Refer to Safety Precautions on page 106.
The tires that came on your motorcycle were designed to match the performance capabilities of your motorcycle and provide the best combination of handling, braking, durability, and comfort.
You should replace the tires with tires of the same size, load range, and speed rating as the originals.
⚠ WARNING
Installing improper tires on your motorcycle can affect handling and stability. This can cause a crash in which you can be seriously hurt or killed.
Always use the size and type of tires recommended in this owner's manual.
Servicing Your Honda 155
Tires
The recommended tires for your motorcycle are:
| front | DUNLOP D250FBRIDGESTONE G709 RADIAL | 130/70R18M/C 63H |
|---|---|---|
| rear | DUNLOP D250BRIDGESTONE G704 RADIAL | 180/60R16M/C 74H |
| type | radial, tubeless |
Whenever you replace a tire, remember:
- Have the wheel balanced after the tire is installed.
- Have the tire replaced by your Honda dealer if possible.
If you have a tire professionally replaced at a non-Honda facility, we recommend that you have the work checked by your Honda dealer.
Important Safety Reminders
- Do not install a tube inside a tubeless tire on this motorcycle. Excessive heat build-up can cause the tube to burst.
- Use only tubeless tires on this motorcycle. The rims are designed for tubeless tires, and during hard acceleration or braking, a tube-type tire could slip on the rim and cause the tire to rapidly deflate.
- Do not install a bias-ply tire on this motorcycle. Mixing bias-ply and radial tires can adversely affect handling and stability.
- Do not install car tires on this motorcycle. During installation the tire may separate from the rim with enough force to cause serious injury or death.
- When replacing tires, use only the recommended tires as shown above and on the tire information label. Use of other tires on the model equipped with ABS may impair proper ABS function. The ABS computer works by comparing wheel speed. Non-recommended tires can affect wheel speed and may confuse the ABS computer.
156 Servicing Your Honda
Side Stand
Refer to Safety Precautions on page 106.
LEFT SIDE
spring
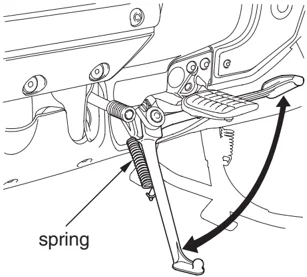
• Check that the side stand assembly is working properly. If the side stand is stiff or squeaky, clean the pivot area and lubricate the pivot bolt with clean grease. • Check the spring for damage or loss of tension. • Check the side stand ignition cut-off system: 1. Sit astride the motorcycle and put the transmission in neutral. 2. Raise the side stand. 3. Start the engine. 4. Pull the clutch lever in. 5. Shift the transmission into gear. 6. Lower the side stand all the way.
The engine should stop as you lower the side stand. If the engine doesn’t stop, see your Honda dealer for service.
Servicing Your Honda 157
Battery
Your motorcycle has a maintenance-free type battery. You do not have to check the battery electrolyte level or add distilled water as you would with a conventional-type battery.
NOTICE
Your battery is a maintenance-free type and can be permanently damaged if the cap strip is removed.
Electrical accessories use current from the battery — even when the ignition is OFF. Limited operation also allows the battery to discharge. If you have electrical accessories on your motorcycle — or do not ride frequently, we recommend that you charge the battery frequently (see Battery Charging, page 161 ).
If you do not expect to ride your motorcycle for at least two weeks, we recommend you remove the battery — or at least disconnect the battery cables (negative cable first).
If you plan to store your motorcycle, see Battery Storage, page 159 .
If your battery seems weak and/or is leaking electrolyte (causing slow starting or other electrical problems), see your Honda dealer.
WARNING: Battery posts, terminals and related accessories contain lead and lead compounds. Wash hands after handling.
158 Servicing Your Honda
Battery
Battery Storage
Refer to Safety Precautions on page 106.
If you plan to store your motorcycle, we recommend you remove the battery and store it where it can be charged at least every 30 days to maintain its service life.
If you do not remove the battery, we recommend disconnecting the battery cables (negative cable first).
You will get the best storage results from removing the battery and slow (trickle) charging it every 30 days (see Battery Charging, page 161 ).
Before you remove the battery, be sure to read all the information that follows, as well as the information on the battery label.
⚠ WARNING
The battery gives off explosive hydrogen gas during normal operation.
A spark or flame can cause the battery to explode with enough force to kill or seriously hurt you.
Wear protective clothing and a face shield, or have a skilled mechanic do the battery maintenance.
Servicing Your Honda 159
Battery
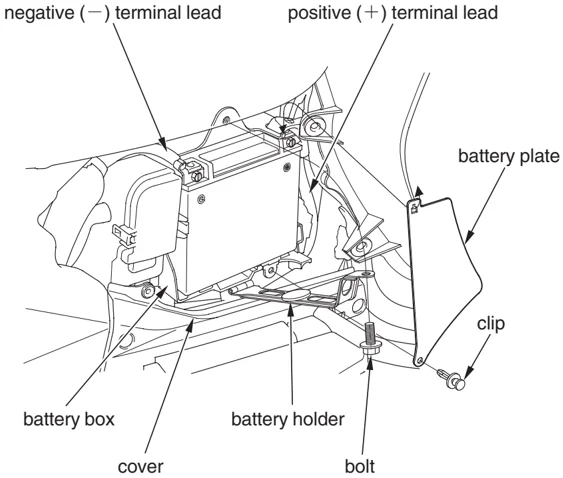
The battery is located in the battery box behind the left side cover.
- Remove the left side cover (page 119).
- Remove the clip and battery plate.
- Disconnect the negative (−) terminal lead from the battery first.
- Remove the bolt and open the battery holder.
- Disconnect the positive (+) terminal lead.
- Pull the battery out of the battery box. Be careful to avoid damaging the cover under the battery box when you remove the battery.
- Charge the battery (see following section), unless you have been riding regularly.
- Store your battery in an easy-to-reach location off the floor, in an area protected from freezing temperatures and direct sunlight.
- Clean the battery box after removing the battery for storage. Dry the battery box and, if paint is missing, re-paint the area.
- Slow charge the battery (see following section) once every 30 days.
LEFT SIDE
negative (−) terminal lead positive (+) terminal lead battery plate clip battery box battery holder cover bolt
160 Servicing Your Honda
Battery
Battery Charging
Refer to Safety Precautions on page 106.
Be sure to read the information that came with your battery charger and follow the instructions on the battery. Improper charging may damage the battery.
We recommend using a “trickle” charger for home charging. These units can be left connected for long periods without risking damage to the battery. However, do not intentionally leave the charger connected longer than the time period recommended in the charger’s instructions.
Avoid using an automotive-type battery charger. An automotive charger can overheat a motorcycle battery and cause permanent damage.
 “trickle” charger
Servicing Your Honda 161
Appearance Care
Frequent cleaning and polishing will keep your Honda looking newer longer. Frequent cleaning also identifies you as an owner who values your motorcycle. A clean motorcycle is also easier to inspect and service.
General Recommendations
Refer to Safety Precautions on page 106.
• To clean your motorcycle, you may use: — water — a mild, neutral detergent and water — a mild spray and wipe cleaner/polisher — a mild spray and rinse cleaner/degreaser and water • Avoid products that contain harsh detergents or chemical solvents that could damage the metal, paint, and plastic on your motorcycle. • If your motorcycle is still warm from recent operation, give the engine and exhaust system time to cool off. • Park in a shady area. Washing your motorcycle in bright sunlight may cause the finish to fade because water droplets intensify the sun’s brightness. Spotting is also more likely because surface water can dry before you have time to wipe it off. • Clean your motorcycle regularly to protect surface finishes. • We recommend the use of a garden hose to wash your motorcycle. High pressure washers (like those at coin-operated car washes) can damage certain parts of your motorcycle.
The audio system is designed to be weatherproof unless it is sprayed directly with hose.
NOTICE
High pressure water (or air) can damage certain parts of your motorcycle.
• After cleaning, inspect for damage, wear, and leaks (fuel, oil, coolant, brake, and clutch fluid).
162 Servicing Your Honda
Appearance Care
Washing Your Motorcycle with a Mild Detergent
Refer to Safety Precautions on page 106.
- Rinse your motorcycle thoroughly with cool water to remove loose dirt.
- Fill a bucket with cool water. Mix in a mild, neutral detergent, such as dish washing liquid or a product made especially for washing motorcycles or automobiles.
- Wash your motorcycle with a sponge or a soft towel. As you wash, check for heavy grime. If necessary, use a mild cleaner/degreaser to remove the grime.
If the inside of the headlight lens appears clouded immediately after washing, it should clear after a few minutes of riding.
- After washing, rinse your motorcycle thoroughly with plenty of clean water to remove any residue. Detergent residue can corrode alloy parts.
- Dry your motorcycle with a chamois or a soft towel. Leaving water on the surface to air dry can cause dulling and water spots. As you dry, inspect for chips and scratches.
- Start the engine and let it idle for several minutes. The engine heat will help dry moist areas.
- As a precaution, ride your motorcycle at a slow speed and apply the brakes several times. This will help dry the brakes and restore normal braking performance.
Servicing Your Honda 163
Appearance Care
Cleaning Your Windshield
Refer to Safety Precautions on page 106.
Using plenty of water, clean the windshield with a soft cloth or sponge. (Avoid using detergents or any kind of chemical cleaner on the windshield.) Dry with a soft, clean cloth.
NOTICE
To avoid possible scratching or other damage, use only water and a soft cloth or sponge to clean the windshield.
For a dirtier windshield, use a diluted neutral detergent with a sponge and plenty of water. Make sure to wash off all the detergent. (Detergent residue may cause windshield cracks.)
Replace the windshield if scratches cannot be removed and they obstruct clear vision.
Take care to keep battery electrolyte, brake fluid, or other chemical solvents off the windshield and screen garnish. They will damage the plastic.
164 Servicing Your Honda
Appearance Care
Spray Cleaning Your Motorcycle
Refer to Safety Precautions on page 106.
Avoid using spray cleaner products on the tires or suspension components.
Suggestions for using spray cleaner(s) follow:
| Motorcycle Condition | Recommended Cleaning |
|---|---|
| General cleaning. Polishing paint, chrome, glass, and clear plastic. Dust. Fingerprint smudges. | Apply a spray cleaner/polish and wipe with a non-abrasive cloth. |
| Light road grime. | Spray any difficult-to-reach or very dirty areas with a spray cleaner/degreaser. Rinse and dry. Apply a spray cleaner/polish and wipe with a non-abrasive cloth. |
| Heavy grime. Oil leaks. Brake dust. | Use a spray cleaner/degreaser. If necessary, rub with a sponge. Rinse and dry. Apply a spray cleaner/polish and wipe with a non-abrasive cloth. |
| Dull, corroded chrome or aluminum. | Apply a high quality chrome/aluminum polish and wipe with a non-abrasive cloth. |
Servicing Your Honda 165
Appearance Care
Aluminum Wheel Maintenance
Aluminum may corrode from contact with dirt, mud, or road salt. Clean the wheels after riding through any of these substances. Use a wet sponge and mild detergent, or a commercially-available spray cleaner/degreaser designed for use on aluminum. Avoid stiff brushes, steel wool, or cleaners containing abrasives or harsh chemical compounds.
After washing, rinse with plenty of water and dry with a clean cloth. Then apply a mild, commercially-available spray cleaner/polish or wax.
For stained or dull-looking wheels, use a quality chrome/aluminum polish to restore the finish.
After you finish cleaning the wheels, it’s important to check for and remove any cleaner or polish residue found on the brake discs or pads. Use Honda Contact/Brake Cleaner or an equivalent brake degreasing agent.
166 Servicing Your Honda
Appearance Care
Finishing Touches
After washing your motorcycle, consider using a commercially-available spray cleaner/polish or quality liquid or paste wax to finish the job. Use only a non-abrasive polish or wax made specifically for motorcycles or automobiles. Apply the polish or wax according to the instructions on the container.
If a surface on your motorcycle is chipped or scratched, your Honda dealer has touch-up paint to match your motorcycle’s color. Be sure to use your motorcycle’s color code (page 201) when you buy touch-up paint.
If the frame has a chip that exposes the metal, first apply primer (to prevent corrosion) and then apply the touch-up paint. Several thin layers of touch-up paint are better than one thick coat.
Servicing Your Honda 167
168 Servicing Your Honda
Tips
Here’s a few helpful tips on how to store and transport your Honda, and how to be an environmentally responsible motorcycle owner.
- Storing Your Honda ........ 170
- Transporting Your Motorcycle ........ 172
- You & the Environment ........ 173
Tips 169