If Your Engine Overheats
Normally, the needle on your temperature gauge will rise to a point about midway between C (cold) and H (hot) and then level off. Hot weather may cause the needle to rise higher than normal. So will temporary stress such as climbing a hill. If you’re stuck in stop-and-go traffic, the needle may climb some, but the radiator fan is designed to prevent overheating. Be aware of these variations as you monitor the gauge.
• If your vehicle is operated at sustained speeds between 10 and 15 miles per hour in high ambient temperature conditions, you may experience high temperature gauge readings.
• If the temperature gauge rises, shifting to second gear or altering your speed (either faster or slower) may reduce the temperature reading. If the indicator reaches the red zone, as soon as it is safe to do so, pull over and let the engine idle until the indicator drops.
NOTICE
Continuing to ride with an overheated engine can cause serious engine damage.
• A steaming engine indicates a coolant leak. Shut the engine off and wait until the steaming stops. Look for a leak, but don’t touch the engine or radiator system. Let everything cool off first.
• If there’s no obvious problem, leave the engine on so the fan and coolant circulating system can continue working. Monitor the temperature gauge. The needle may drop to the normal range after a brief stop with no load on the engine.
• Check the radiator fan. If the fan is not working, turn the engine off. Open the fuse box (page 193) and check the radiator fan fuse. If the fuse is blown, replace it with the proper (same rating) spare fuse. Start the engine. If the needle climbs to the red zone and stays there, turn the engine off. If the radiator fan is working, visually check the coolant level in the reserve tank, located behind the left engine side cover. It isn’t necessary to touch the radiator system.
190 Taking Care of the Unexpected
If Your Engine Overheats
• If the reserve tank is low or empty, don’t ride without adding coolant (page 134). After adding coolant, turn the engine on and check the temperature gauge. If the needle doesn’t drop, do not ride. The engine needs repair. Transport your motorcycle to a Honda dealer (page 172 ). If the temperature drops to normal, check the coolant level. If it has gone down, add more coolant.
If you are able to resume riding, continue to monitor the gauge frequently.
If there’s a mild leak, you can ride for awhile, carefully watching the gauge. Be prepared to stop and add more coolant or water. If the leak is bad, transport your motorcycle to a Honda dealer (page 172 ).
Taking Care of the Unexpected 191
If the Low Oil Pressure Indicator Lights
If you check your engine oil level regularly, you should never see the low oil pressure indicator while riding. Normally, it will only light momentarily when you turn the ignition switch ON. Occasionally, it may flicker at or near idling speed.
Low oil pressure may be caused by an oil leak, a low oil level, or some problem in the engine’s lubrication system.
If the indicator comes on while you’re riding, don’t ignore it. Pull safely to the side of the road. If possible, pull the clutch lever in and coast to a stop. Stop the engine as soon as it’s safe to do so.
NOTICE
Continuing to ride with low oil pressure can cause serious engine damage.
• Check for an oil leak.
• Then check the oil level. If necessary, add the recommended oil (page 127 ) to the upper level mark. If you must leave your motorcycle to get oil, secure it as much as possible.
• After adding oil, start the engine, and check that the low oil pressure indicator goes off. Check for a possible leak.
If the indicator goes off and there is no leak — resume riding. If there is a leak — do not ride the motorcycle until the leak is repaired by a Honda dealer.
192 Taking Care of the Unexpected
If a Fuse Blows
All of the electrical circuits on your motorcycle have fuses to protect them from damage caused by excess current flow (short circuit or overload).
If something electrical on your motorcycle stops working, the first thing you should check for is a blown fuse. Determine from the chart on the circuit fuse box cover which fuse or fuses control that component. Check those fuses first, but check all the fuses before looking elsewhere for another possible cause of the problem. Replace any blown fuses and check component operation.
- The circuit fuse box (including spare fuses) is located behind the left side cover.
- The main fuse is located in the fuse box.
Recommended Fuses
- To prevent an accidental short circuit, turn the ignition switch OFF before checking or replacing the fuses.
- Remove the left side cover (page 119).
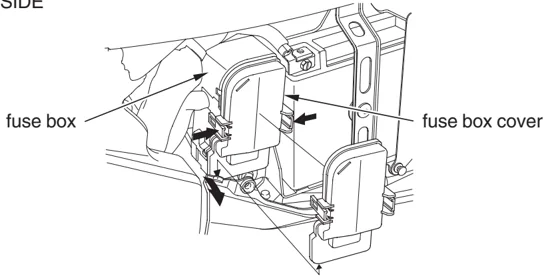
- Remove the fuse box cover.
LEFT SIDE
If a Fuse Blows
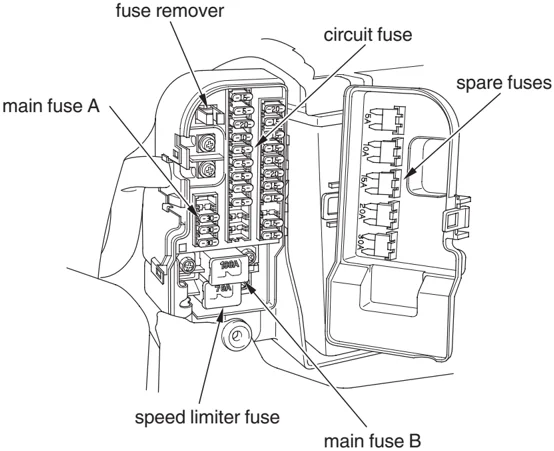
Main Fuse Access: 4. Check the two main fuses (A & B) to see if they are blown. To replace main fuse A, pull it out of its retaining clips with the fuse remover. To replace main fuse B, see your Honda dealer for this service.
Speed Limiter Fuse Access: 5. Check the speed limiter fuse to see if it's blown, see your Honda dealer for this service.
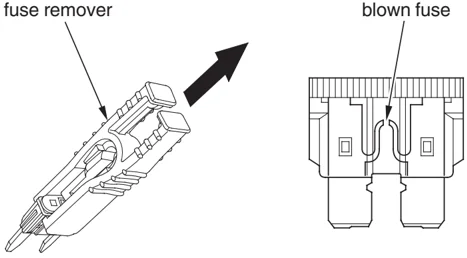
Circuit Fuses Access: 6. To check or replace a circuit fuse, pull the old fuse out of its retaining clips with the fuse remover. Look for a burned wire inside the fuse. If the fuse is blown, replace it with a spare fuse of the same rating or lower.
LEFT SIDE
- Close the fuse box cover.
- Install the left side cover.
194 Taking Care of the Unexpected
If a Fuse Blows
If you do not have a replacement fuse with the proper rating for the circuit, install one with a lower rating.
NOTICE
Replacing a fuse with one that has a higher rating greatly increases the chance of damage to the electrical system.
If you do not have a spare fuse and you cannot ride the motorcycle without fixing the problem, take a fuse of the same rating or a lower rating from one of the other circuits that you can do without temporarily.
If you replace a blown fuse with a spare fuse that has a lower rating, replace the fuse with the correct rating as soon as you can. Also remember to replace any spare fuses that were installed.
If the replacement fuse of the same rating burns out in a short time, there is probably a serious electrical problem on your motorcycle. Leave the blown fuse in that circuit and have your motorcycle checked by your Honda dealer.
Taking Care of the Unexpected 195
If You Crash
Personal safety is your first priority after any accident. If you or anyone else has been injured, take time to assess the severity of the injuries and whether it is safe to continue riding. Call for emergency assistance if needed. Also follow applicable laws and regulations if another person or vehicle is involved in the accident.
If you decide you are capable of riding safely, carefully inspect your motorcycle for damage and determine if it is safe to ride. Check the tightness of critical nuts and bolts securing such parts as the handlebar, control levers, brakes, and wheels.
If there is minor damage, or you are unsure about possible damage, ride slowly and cautiously. Sometimes, crash damage is hidden or not immediately apparent, so you should have your motorcycle thoroughly checked at a qualified service facility as soon as possible. Also, be sure to have your Honda dealer check the frame and suspension after any serious crash.
If your motorcycle cannot be ridden, see Transporting Your Motorcycle, page 172.
196 Taking Care of the Unexpected
If You Lose Your Key
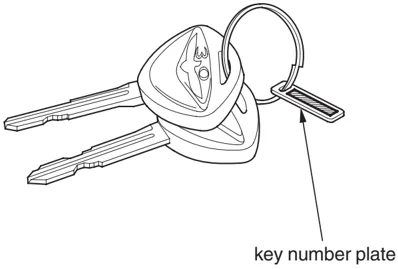
You should receive a key number plate with your keys. Store this plate in a safe place.
Be sure to record your key number in the Quick Reference section at the rear of the manual. You’ll need this number to have a duplicate key made.
A lost key won’t be a problem if you take preventative action. Store one duplicate key in a safe place at home and carry a second duplicate in your wallet.
If you lose your key and aren’t carrying a duplicate, either get your spare or have one made. If you don’t know your key number, call the dealer you purchased your Honda from. They may have it listed in their records. If they don’t, transport your motorcycle to them or the nearest Honda dealer. The dealer will probably have to remove the ignition switch assembly to find the key number so they can make a key for you.
key number plate
Taking Care of the Unexpected 197
If Your Battery Is Low (or Dead)
Jump starting is not recommended, especially if you use an automobile battery. The greater amperage of an automobile battery when the car engine is running can damage your motorcycle’s electrical system.
Bump starting is also not recommended.
If you can’t charge the battery or it appears unable to hold a charge, contact your Honda dealer.
198 Taking Care of the Unexpected
Technical Information
This section contains dimensions, capacities, and other technical data, plus information on government requirements and how to break-in your motorcycle.
- Vehicle Identification ........ 200
- Specifications ........ 202
- Break-in Guidelines ........ 208
- Emission Control Systems ........ 209
- Catalytic Converters ........ 213
- Oxygenated Fuels ........ 214
Technical Information 199
Vehicle Identification
Serial Numbers
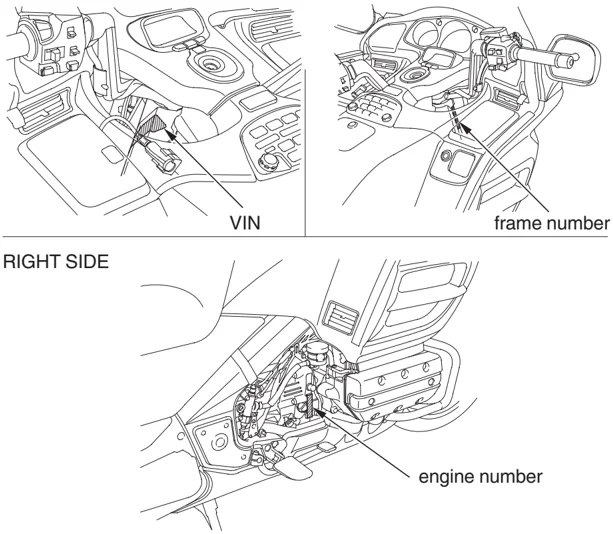
The frame, VIN, and engine serial numbers are required when you register your motorcycle. They may also be required when ordering replacement parts. You may record these numbers in the Quick Reference section at the rear of this manual.
The VIN (vehicle identification number) appears on the Safety Certification Label attached to the left side of the steering head.
The frame number is stamped on the right side of the steering head.
The engine number is stamped on the right side of the crankcase.
LEFT SIDE
RIGHT SIDE
VIN
frame number
RIGHT SIDE
engine number
200 Technical Information
Vehicle Identification
Color Label & Code
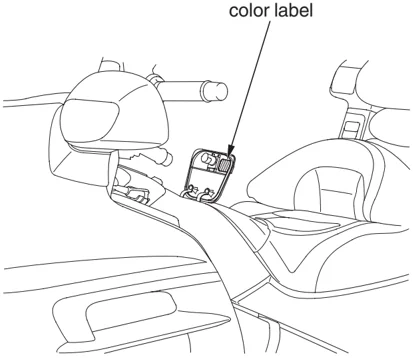
The color label is attached inside the fuel filler compartment lid.
The color code is helpful when ordering replacement parts. You may record the color and code in the Quick Reference section at the rear of this manual.
Technical Information 201
Specifications
Dimensions
| overall length | 103.7 in (2,635 mm) |
|---|---|
| overall width | 37.2 in (945 mm) |
| overall height | 57.3 in (1,455 mm) |
| wheelbase | 66.5 in (1,690 mm) |
| ground clearance | 4.9 in (125 mm) |
Weight
| dry weight | 791 lbs (359 kg) |
|---|---|
| dry weight (model equipped with ABS) | 798 lbs (362 kg) |
Fuel & Lubricants
| fuel recommendation | unleaded gasoline, pump octane number of 86 or higher |
|---|---|
| fuel tank capacity | 6.74 US gal (25.5 ℓ) |
| engine oil capacity | after disassembly: 4.9 US qt (4.6 ℓ) after draining: 3.8 US qt (3.6 ℓ) after draining & oil filter change: 3.9 US qt (3.7 ℓ) |
| engine oil recommendation | API Service Classification SG or higher except oils labeled as energy conserving on the circular API service label, SAE 10W-40, JASO T 903 standard MA, Pro Honda GN4 or HP4 (without molybdenum additives) 4-stroke oil (USA & Canada) or Honda 4-stroke oil (Canada only), or an equivalent motorcycle oil |
202 Technical Information
Specifications
Fuel & Lubricants (Cont'd)
| drive chain lubricant | after draining: 4.1 US oz (120 cm³) |
|---|---|
| cooling system, recommendation | Pro Honda HP Coolant or an equivalent high quality ethylene glycol antifreeze containing corrosion protection inhibitors specifically recommended for use in aluminum engines |
| cooling system, capacity | 3.73 US qt (3.53 ℓ) |
Capacities
| passenger capacity | Operator and one passenger |
|---|---|
| maximum weight capacity | 417 lbs (189 kg) 425 lbs (193 kg) Canada type rider, passenger, all cargo and accessories |
| cargo capacity | travel trunk: 20.0 lbs (9.0 kg) each saddlebag: 20.0 lbs (9.0 kg) each fairing pocket: 4.5 lbs (2.0 kg) each trunk side pocket: 1.0 lbs (0.5 kg) total of all cargo: 71 lbs (32 kg) |
Technical Information 203
Specifications
Engine Specifications
| displacement | 111.8 cu-in (1,832 cm³) |
|---|---|
| bore & stroke | 2.90 × 2.80 in (74.0 mm × 71.0 mm) |
| compression ratio | 9.8 : 1 |
| spark plug (standard) | BKR6E-11 (NGK) or K20PR-U11 (DENSO) |
| spark plug (cold climate) | BKR5E-11 (NGK) or K16PR-U11 (DENSO) |
| spark plug (high speed riding) | BKR7E-11 (NGK) or K22PR-U11 (DENSO) |
| valve clearance (cold) | intake 0.006 in (0.15 mm) exhaust 0.009 in (0.22 mm) |
| spark plug gap | 0.039–0.043 in (1.00–1.10 mm) |
| idle speed | 700 ± 70 rpm |
Power Transmission
| primary reduction | 1.591 |
|---|---|
| gear ratio, 1st | 2.375 |
| 2nd | 1.454 |
| 3rd | 1.068 |
| 4th | 0.843 |
| OD | 0.686 |
| final reduction | 2.750 |
| final drive | shaft |
204 Technical Information
Specifications
Chassis & Suspension
| caster | 29°15′ |
|---|---|
| trail | 4.3 in (109 mm) |
| tire size, front | 130/70R18M/C 63H |
| tire size, rear | 180/60R16M/C 74H |
| tire type | radial, tubeless |
| tire pressure, front (cold) | 36 psi (250 kPa , 2.50 kgf/cm²) |
| tire pressure, rear (cold) | 41 psi (280 kPa , 2.80 kgf/cm²) |
Electrical
| battery | 12 V—18 AH |
|---|---|
| generator | 0.959 kW/5,000 rpm |
Technical Information 205
Specifications
| Lights | |
|---|---|
| headlight | 12 V–55 W × 2 (high) 12 V–55 W × 2 (low) |
| brake/tail light | 12 V–21/5 W × 6 |
| turn signal lights | 12 V–21/5 W × 2 (front) 12 V–21 W × 2 (rear) |
| instrument light | LED |
| neutral indicator | LED |
| turn signal indicator | LED |
| high beam indicator | LED |
| low oil pressure indicator | LED |
| side stand indicator | LED |
| low fuel indicator | LED |
| PGM-FI indicator | LED |
| reverse indicator | LED |
| overdrive indicator | LED |
| CRUISE ON indicator | LED |
| CRUISE SET indicator | LED |
| ABS indicator (For model equipped with ABS) | LED |
206 Technical Information
Specifications
Fuses
| Fuses | |
|---|---|
| main A | 30 A |
| main B | 100 A |
| speed limit fuse | 70 A |
| other fuses | 20 A, 15 A, 10 A, 5 A |
| 30 A (GL1800A) |
Torque Specifications
| oil drain bolt | 25 lbf·ft (34 N·m , 3.5 kgf·m) |
| oil filter | 19 lbf·ft (25 N·m , 2.6 kgf·m) |
| front wheel axle bolt | 43 lbf·ft (59 N·m , 6.0 kgf·m) |
| front wheel caliper fixing bolts | 23 lbf·ft (31 N·m , 3.2 kgf·m) |
| front wheel caliper socket bolts | 23 lbf·ft (31 N·m , 3.2 kgf·m) |
| front wheel axle pinch bolts | 16 lbf·ft (22 N·m , 2.2 kgf·m) |
| rear wheel nuts | 80 lbf·ft (108 N·m , 11.0 kgf·m) |
| final drive drain bolt | 14 lbf·ft (20 N·m , 2.0 kgf·m) |
Technical Information 207
Break-in Guidelines
Help assure your motorcycle’s future reliability and performance by paying extra attention to how you ride during the first 300 miles (500 km).
During this period, avoid full-throttle starts and rapid acceleration.
208 Technical Information