Starting & Stopping the Engine
Always follow the proper starting procedure described below.
For your safety, avoid starting or operating the engine in an enclosed area such as a garage. Your motorcycle’s exhaust contains poisonous carbon monoxide gas which can collect rapidly in an enclosed area and cause illness or death.
Your motorcycle can be started with the transmission in gear by pulling in the clutch lever before operating the starter.
Your motorcycle is equipped with a side stand ignition cut-off system. If the side stand is down—the engine cannot be started unless the transmission is in neutral. If the side stand is up—the engine can be started in neutral, or in gear with the clutch lever pulled in. After starting with the side stand down, the engine will stop if the transmission is put in gear before raising the side stand.
Preparation
Before starting, insert the key, turn the ignition switch ON, and confirm the following:
• The transmission is in NEUTRAL (neutral indicator light ON). • The engine stop switch is set to RUN. • The low oil pressure indicator is ON. • The PGM-FI malfunction indicator lamp is OFF. • The ABS indicator light is ON. (GL1800A)
The low oil pressure indicator should go off a few seconds after the engine starts. If the low oil pressure indicator lights during operation, stop the engine immediately and check the engine oil level.
Basic Operation & Riding 61
Starting & Stopping the Engine
Starting Procedure
This motorcycle has a fuel-injected engine with an automatic fast idle. Follow the procedure indicated below.
Any Air Temperature • Press the start button with the throttle completely closed.
The engine will not start if the throttle is fully open (because the electronic control module cuts off the fuel supply).
Flooded Engine
If the engine fails to start after repeated attempts, it may be flooded with excess fuel. To clear a flooded engine:
- Leave the engine stop switch set to RUN.
- Open the throttle fully.
- Press the start button for 5 seconds.
- Follow the normal starting procedure.
- If the engine starts, then open the throttle slightly if idling is unstable. If the engine does not start, wait 10 seconds, then follow steps 1 – 4 again.
If the engine still won’t start, refer to If Your Engine Quits or Won’t Start, page 175.
62 Basic Operation & Riding
Starting & Stopping the Engine
Bank Angle Sensor Ignition Cut-off System
Your motorcycle’s banking (lean angle) sensor system is designed to automatically stop the engine and fuel pump if the motorcycle is overturned.
Before restarting the engine, you must turn the ignition switch to the OFF position and then back to ON. The engine will not restart until you perform this procedure.
How to Stop the Engine
Normal Engine Stop To stop the engine, shift into neutral and turn the ignition switch OFF.
The engine stop switch should normally remain in the RUN position even when the engine is OFF.
If your motorcycle is stopped with the ignition switch ON and the engine stop switch OFF, the headlight and taillight will remain on, resulting in battery discharge.
Emergency Engine Stop To stop the engine in an emergency, use the engine stop switch. To operate, press the switch to the OFF position.
Basic Operation & Riding 63
Shifting Gears
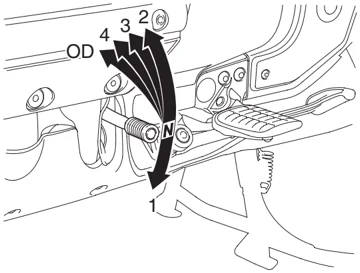
Your motorcycle has five forward gears in a one-down, four-up shift pattern which is coordinated with a hydraulically actuated clutch system.
Learning when to shift gears comes with experience. Keep the following tips in mind:
• As a general rule, shift while moving in a straight line.
• Close the throttle and pull the clutch lever in completely before shifting. Improper shifting may damage the engine, transmission, and drive train.
• Learn to recognize the engagement point as you release the clutch lever. It is at this point the transmission of power to the rear wheel resumes.
• Upshift to a higher gear or reduce throttle before engine rpm (speed) gets too high. Learn the relationship between engine sound and the normal shifting points.
• Downshift to a lower gear before you feel the engine laboring (lugging) at low rpm.
• Avoid downshifting to help slow your motorcycle when engine rpm is near its allowable maximum (near the tachometer red zone). In this situation, the rev limiter in the engine ignition control module may not prevent excessive engine speed which could damage the engine.
• To prevent transmission damage, do not coast or tow the motorcycle for long distances with the engine off.
64 Basic Operation & Riding
Shifting Gears
Recommended Shift Points
Ride in the highest gear that lets the engine run and accelerate smoothly. This will give you good fuel economy and effective emissions control. When changing gears under normal conditions, use these recommended shift points:
Shifting Up: From 1st to 2nd: 12 mph (20 km/h) From 2nd to 3rd: 19 mph (30 km/h) From 3rd to 4th: 25 mph (40 km/h) From 4th to OD: 31 mph (50 km/h)
Shifting Down: From OD to 4th: 22 mph (35 km/h) From 4th to 3rd: 16 mph (25 km/h)
Pull the clutch lever in when speed drops below 12 mph (20 km/h), when engine roughness is evident, or when engine stalling is imminent; and shift down to 1st gear for acceleration.
While You Are Riding
While you are riding, occasionally check your gauges and indicators. Continuing to ride with the low oil pressure indicator (red) on or the coolant temperature gauge needle at the H (hot) mark can cause serious engine damage. Also keep an eye on the fuel gauge and the low fuel indicator.
Basic Operation & Riding 65
Reverse Riding
Your motorcycle’s reverse system allows you to back out of a parking position at slow speed.
Make sure there are no obstacles or people in the area. Avoid steep or uneven surfaces. Carrying a passenger while reversing is not recommended because it makes balance and control more difficult to maintain.
- Sit astride the motorcycle, in your normal riding position, with both feet on the ground.
- Make sure the transmission is in neutral (neutral indicator ON) and the side stand is up.
- Start the engine. (Make sure RVS switch is OFF.)
- Push the RVS switch to ON, then make sure the reverse system indicator comes on.
RIGHT HANDLEBAR
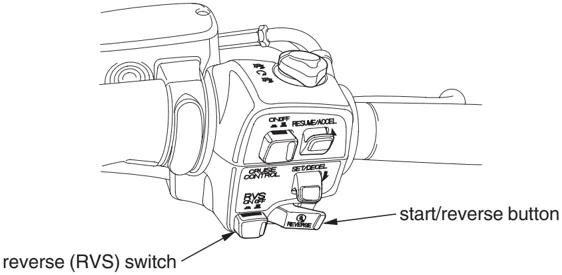
- When you are ready to back up, push the start/reverse button and hold it in. The motorcycle will move in reverse as long as you hold the button in. To prevent battery discharge, do not push the start/reverse button more than a minute.
- Guide the motorcycle backward cautiously, using your legs to maintain balance.
Use extreme care to maintain balance while reversing on loose surfaces (sand, dirt, gravel) or grease-covered pavement.
66 Basic Operation & Riding
Reverse Riding
- Release the start/reverse button, and the motorcycle will stop.
- After your motorcycle is stopped, push the RVS switch to OFF. Make sure the reverse gear indicator goes off and the neutral indicator comes on.
NOTICE
To avoid damaging the reverse system, do not engage or disengage reverse when the motorcycle is moving.
If the reverse switch is in the ON position with the engine off, the engine cannot be started.
Reverse System Overload
The reverse system is designed to move the motorcycle at a constant slow speed. If the motorcycle begins moving slower or faster than this speed, because of obstacles or a steep pavement angle, the system will shut off and the reverse system indicator will turn OFF.
To resume reverse operation or normal forward operation, push the RVS switch to the OFF position and carefully roll the motorcycle to a more level, unobstructed surface, then start again.
Basic Operation & Riding 67
Braking
Your motorcycle is equipped with a Linked Braking System. Operating the front brake lever applies the front brake and a portion of the rear brake. Operating the rear brake pedal applies the rear brake and a portion of the front brake. For full braking effectiveness, use both the lever and pedal simultaneously, as you would with a conventional motorcycle braking system.
As with a conventional motorcycle braking system, excessively hard application of the brake controls may cause wheel lock, reducing control of the motorcycle.
To slow or stop, apply the brake lever and brake pedal smoothly, while downshifting to match your speed.
Gradually increase braking as you feel the brakes slowing your speed. The increase in engine compression from downshifting will help slow your motorcycle.
To prevent stalling the engine, pull the clutch lever in before coming to a complete stop. For support, put your left foot down first, then your right foot when you are through using the brake pedal.
Applying the brakes too hard may cause the wheels to lock and slide, reducing control of your motorcycle. If this happens, release the brake controls, steer straight ahead until you regain control, then reapply the brakes more gently.
When possible, reduce your speed or complete braking before entering a turn. Avoid braking or closing the throttle quickly while turning. Either action may cause one or both wheels to slip and reduce your control of your motorcycle.
Your ability to brake in a turn and to brake hard in an emergency situation are important riding skills. We suggest attending a Motorcycle Safety Foundation experienced rider training course (page 40 ) to retain these skills.
68 Basic Operation & Riding
Braking
When riding in wet or rainy conditions, or on loose surfaces, the ability to maneuver and stop will be reduced. All of your actions should be smooth under these conditions. Rapid acceleration, braking or turning may cause loss of control. For your safety, exercise extreme caution when braking, accelerating or turning.
When descending a long, steep grade, use engine compression braking by downshifting, with intermittent use of both brakes. Continuous brake application can overheat the brakes and reduce their effectiveness.
Riding with your foot resting on the brake pedal or your hand on the brake lever may actuate the brakelight, giving a false indication to other drivers. It may also overheat the brakes, reducing effectiveness.
Basic Operation & Riding 69
Braking
Anti-Lock Brake System (ABS)
(GL1800A)
This model is also equipped with an Anti-lock Brake System (ABS) designed to help prevent wheel lock up during hard braking on uneven or other poor surfaces while running straight. Although the wheel may not lock up—if you are braking too hard in a turn the motorcycle can still lose traction, causing a loss of control.
In some situations, a motorcycle with ABS may require a longer stopping distance to stop on loose or uneven surfaces than an equivalent motorcycle without ABS.
ABS cannot make up for road conditions, bad judgment, or improper operation of the brakes. It is still your responsibility to ride at reasonable speeds for weather, road surface, and traffic conditions, and to leave a margin of safety.
ABS is self-checking and always on.
ABS may also be activated by braking while riding over a sharp drop or rise in the road level.
70 Basic Operation & Riding
Braking
It is important to follow the tire recommendations (see page 156). The ABS computer works by comparing wheel speed. Non-recommended tires can affect wheel speed and may confuse the ABS computer.
ABS does not function at very low speeds (approximately 5 mph (8km/h) or below).
ABS does not function if the battery is discharged.
ABS Indicator Light
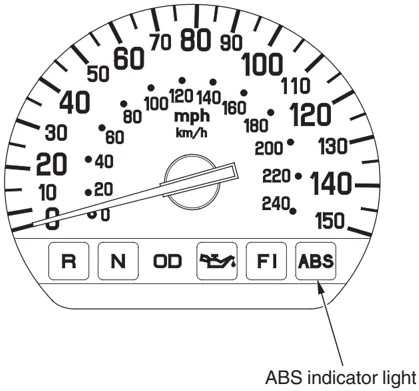
(GL1800A) Normally, this light comes on when the ignition is turned ON and goes off after starting to ride. If there is an ABS problem, the indicator light comes on and remains on or blinks. The ABS system does not operate when the ABS indicator light is on or blinking.
Basic Operation & Riding 71
Braking
If the ABS indicator light blinks while riding, stop the motorcycle in a safe place and turn off the engine. Turn the ignition ON again. The light should come on, and then go off after starting to ride. If it does not go off or if it blinks again, ABS is not functioning.
However, the Linked Braking System will still provide normal stopping ability, but you should have the ABS system checked by your Honda dealer as soon as possible.
The ABS indicator may blink if you place the motorcycle on its center stand and turn the rear wheel. This is normal. Turn the ignition OFF to stop the blinking.
A red bulb is used for the ABS indicator light. Be sure that the bulb lights when the ignition is ON. If the bulb fails to light, see your Honda dealer.
72 Basic Operation & Riding
Parking
- Look for a level parking area. If you can’t park on a paved surface, make sure the ground surface is firm. If you must park on a hill, leave the transmission in gear and position the rear tire against the curb at a 45 degree angle.
Make sure flammable materials such as dry grass or leaves do not come in contact with the exhaust system when parking your motorcycle. Refer to Catalytic Converters, page 213 .
-
Use the side or center stand to support the motorcycle while parked. • To lower the side stand, use your foot to guide it down. Remember that lowering the side stand with the transmission in gear will stop the engine, even if the clutch lever is pulled in. That is a function of the side stand ignition cut-off system. • Check that the side stand is down all the way. The side stand indicator only indicates that the side stand ignition cut-off system (page 61 ) is activated. • To lower the center stand, stand on the left side of the motorcycle. Hold the passenger handgrip attached to the seat. Press down on the tip of the stand with your right foot and, simultaneously, pull up and back on the passenger handgrip.
-
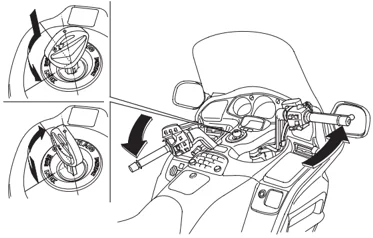
Use the steering lock, which locks the handlebar in place. Turn the handlebar all the way to the left or right. Push in on the ignition key and turn it to LOCK. Remove the key. (To unlock the steering lock, insert and push down on the key and turn it to the right to the OFF position.)
Basic Operation & Riding 73
Parking
- Use the helmet holder(s) to secure your helmet(s) with your motorcycle: Open the travel trunk (page 45). Turn the knob in the trunk to unlock the helmet holders. Hang your helmet(s), using the D-ring on the helmet strap. Push the holder in to lock it.
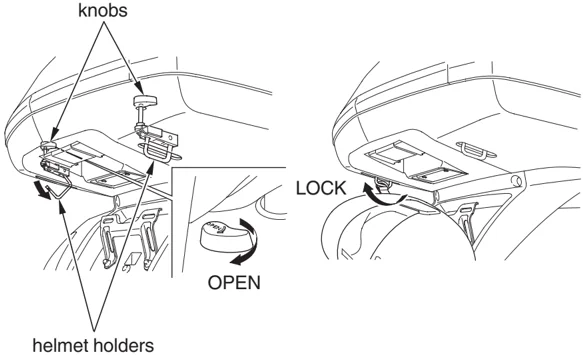
NOTICE Riding with a helmet attached to the helmet holder can cause damaging to the helmet, or damage to the paint or finish of your motorcycle.
74 Basic Operation & Riding
Parking
Theft-Prevention Tips
• Park your motorcycle in a locked garage whenever possible. If a garage isn’t available, park in a concealed area or in a well-lit area with enough pedestrian traffic to discourage a thief. • Always take the ignition key with you. • Always use the steering lock (page 73 ), even if you’re parking for just a minute or two. A thief can easily push an unlocked motorcycle to a waiting truck. • If you decide to use an anti-theft device, select one of good quality and be sure to follow the manufacturer’s instructions. • Keep your owner’s manual, current registration, and insurance information with your motorcycle. This will make it easier for the authorities to find you if your motorcycle is stolen and recovered.
Basic Operation & Riding 75
Riding with a Passenger or Cargo
Your motorcycle is designed to carry you and one passenger. Whenever you add a passenger or cargo, you must be careful not to exceed the total load limits for this vehicle (Load Limits, page 44 ). Make sure your cargo is properly secured (Loading Guidelines, page 44 ).
Also consider adjusting the suspension (page 143 ) for the extra load.
Be aware that carrying a passenger or heavy cargo can affect acceleration, braking, and handling.
Before riding with a passenger, make sure your passenger is wearing the proper protective apparel (page 38 ).
Tell your passenger to hold the passenger handgrip, lean with you in the turns, and keep their feet on the passenger footrests at all times, even when the motorcycle is stopped at a traffic light.
76 Basic Operation & Riding