Cruise Control
Cruise control allows you to maintain a set speed above 25 mph (40 km/h) without keeping your foot on the accelerator pedal. It should be used for cruising on straight, open highways. It is not recommended for city driving, winding roads, slippery roads, heavy rain, or bad weather.
⚠ WARNING
Improper use of the cruise control can lead to a crash.
Use the cruise control only when traveling on open highways in good weather.
Using the Cruise Control
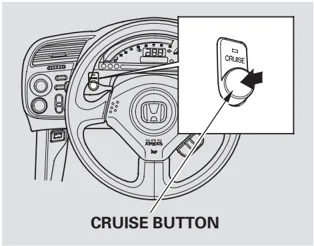
CRUISE BUTTON
- Push in the CRUISE button. The indicator over the button comes on.
- Accelerate to the desired cruising speed above 25 mph (40 km/h).
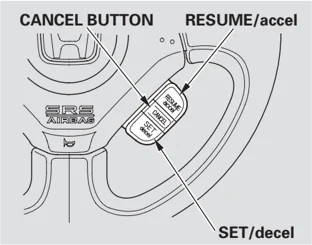
CANCEL BUTTON RESUME/accel
SET/decel
- Press and release the SET/decel button on the steering wheel. The indicator on the instrument panel comes on to show the system is now activated.
106
Cruise Control
Cruise control may not hold the set speed when you are going up and down hills. If your speed increases going down a hill, use the brakes to slow down. This will cancel the cruise control. To resume the set speed, press the RESUME/accel button. The indicator on the instrument panel will come back on.
Changing the Set Speed
You can increase the set cruising speed in any of these ways:
- Press and hold the RESUME/ accel button. When you reach the desired cruising speed, release the button.
- Push on the accelerator pedal. Accelerate to the desired cruising speed, and press the SET/decel button.
- To increase the speed in very small amounts, tap the RESUME/ accel button. Each time you do this, your vehicle speeds up about 1 mph (1.6 km/h).
You can decrease the set cruising speed in any of these ways:
- Press and hold the SET/decel button. Release the button when you reach the desired speed.
- To slow down in very small amounts, tap the SET/decel button. Each time you do this, your vehicle will slow down about 1 mph (1.6 km/h).
- Tap the brake or clutch pedal lightly with your foot. The CRUISE CONTROL indicator on the instrument panel goes out. When the vehicle slows to the desired speed, press the SET/ decel button.
Features
CONTINUED
107
Cruise Control
Even with the cruise control turned on, you can still use the accelerator pedal to speed up for passing. After completing the pass, take your foot off the accelerator pedal. The vehicle will return to the set cruising speed.
Resting your foot on the brake or clutch pedal causes the cruise control to cancel.
Canceling Cruise Control
You can cancel cruise control in any of these ways:
• Tap the brake or clutch pedal.
• Push the CANCEL button on the steering wheel.
• Push the CRUISE button.
Resuming the Set Speed
When you push the CANCEL button, or tap the brake or clutch pedal, the system will remember the previously set cruising speed. To return to that speed, accelerate to above 25 mph (40 km/h), then press and release the RESUME/accel button. The CRUISE CONTROL indicator comes on. The vehicle will accelerate to the same cruising speed as before.
Pressing the CRUISE button turns the system off and erases the previous cruising speed.
108
Main Menu
Before Driving
Before you begin driving your vehicle, you should know what gasoline to use and how to check the levels of important fluids. You also need to know how to properly store luggage or packages. The information in this section will help you. If you plan to add any accessories to your vehicle, please read the information in this section first.
- Break-in Period ........ 110
- Fuel Recommendation ........ 110
- Service Station Procedures ........ 111
- Refueling ........ 111 Opening and Closing the
- Hood ........ 112
- Oil Check ........ 113
- Engine Coolant Check ........ 114
- Fuel Economy ........ 114
- Accessories and Modifications ........ 115
- Carrying Cargo ........ 117
Before Driving
109
Main Menu | Table of Contents
Break-in Period, Fuel Recommendation
Break-in Period
Help assure your vehicle’s future reliability and performance by paying extra attention to how you drive during the first 600 miles (1,000 km). During this period:
- Avoid full-throttle starts and rapid acceleration. Do not exceed 5,500 rpm for the first 600 miles (1,000 km) of operation.
- Do not change the oil until the scheduled maintenance time.
- Avoid hard braking for the first 200 miles (300 km).
You should also follow these recommendations with an overhauled or exchanged engine, or when the brakes are replaced.
Fuel Recommendation
Your vehicle is designed to operate on premium unleaded gasoline with a pump octane number of 91 or higher. Use of a lower octane gasoline can cause occasional metallic knocking noises in the engine and will result in decreased engine performance. Use of a gasoline with a pump octane number less than 87 can lead to engine damage.
We recommend quality gasoline containing detergent additives that help prevent fuel system and engine deposits.
In addition, in order to maintain good performance, fuel economy, and emissions control, we strongly recommend, in areas where it is available, the use of gasoline that does NOT contain manganese-based fuel additives such as MMT.
Use of gasoline with these additives may adversely affect performance, and cause the malfunction indicator lamp on your instrument panel to come on. If this happens, contact your authorized dealer for service.
Some gasoline today is blended with oxygenates such as ethanol or MTBE. Your vehicle is designed to operate on oxygenated gasoline containing up to 10% ethanol by volume and up to 15% MTBE by volume. Do not use gasoline containing methanol.
If you notice any undesirable operating symptoms, try another service station or switch to another brand of gasoline.
For further important fuel-related information, please refer to your Quick Start Guide.
110
Service Station Procedures
Refueling
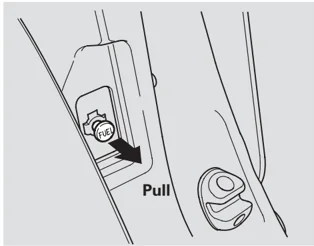
Pull
- Park with the driver’s side closest to the service station pump.
- Open the fuel fill door by pulling on the knob on the driver’s door jamb.
⚠WARNING
Gasoline is highly flammable and explosive. You can be burned or seriously injured when handling fuel.
- Stop the engine, and keep heat, sparks, and flame away.
- Handle fuel only outdoors.
- Wipe up spills immediately.
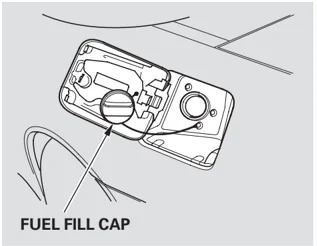
FUEL FILL CAP
- Remove the fuel fill cap slowly. You may hear a hissing sound as pressure inside the tank escapes. Place the cap in the holder on the fuel fill door.
- Stop filling the tank after the fuel nozzle automatically clicks off. Do not try to “top off” the tank. Leave some room for the fuel to expand with temperature changes.
If the fuel nozzle keeps clicking off even though the tank is not full, there may be a problem with your vehicle’s fuel vapor recovery system. The system helps keep fuel vapor from going into the atmosphere. Try filling at another pump. If this does not fix the problem, consult your dealer.
Before Driving
CONTINUED
111
Service Station Procedures
-
Screw the fuel fill cap back on until it clicks at least once. If you do not properly tighten the cap, the malfunction indicator lamp may come on (see page 187). You will also see a "CHECK FUEL CAP" message on the information display.
-
Push the fuel fill door closed until it latches.
Opening and Closing the Hood
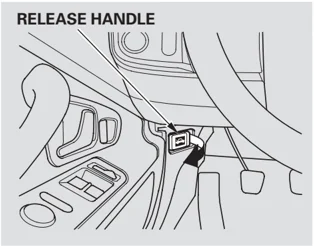
RELEASE HANDLE
-
Park the vehicle, and set the parking brake. Pull the hood release handle located under the lower left corner of the dashboard. The hood will pop up slightly.
-
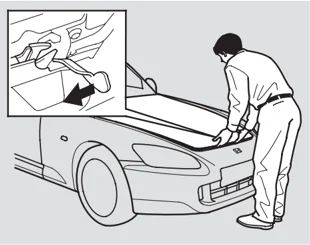
Put your fingers under the front edge of the hood near the center. Slide your hand to the left until you feel the hood latch handle. Push this handle to the left to release the hood. Lift up the hood.
If the hood latch handle moves stiffly, or if you can open the hood without lifting the handle, the mechanism should be cleaned and lubricated.
112
Service Station Procedures
GRIP SUPPORT ROD CLIP
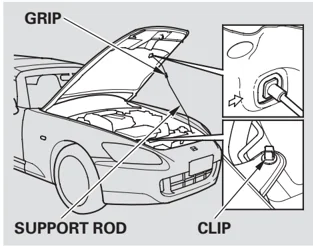
- Holding the grip, pull the support rod out of its clip. Insert the end into the designated hole in the hood.
To close the hood, lift it up slightly to remove the support rod from the hole. Put the support rod back into its holding clip. Lower the hood to about a foot (30 cm) above the fender, then let it drop. Make sure it is securely latched.
Oil Check
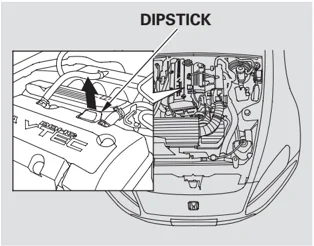
DIPSTICK
Wait a few minutes after turning the engine off before you check the oil.
- Remove the dipstick (black handle).
- Wipe off the dipstick with a clean cloth or paper towel.
- Insert the dipstick all the way back into its hole.
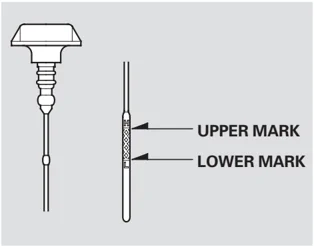
UPPER MARK LOWER MARK
Before Driving
- Remove the dipstick again, and check the level. It should be between the upper and lower marks.
If it is near or below the lower mark, see Adding Engine Oil on page 146.
113
Main Menu Table of Contents
Service Station Procedures, Fuel Economy
Engine Coolant Check
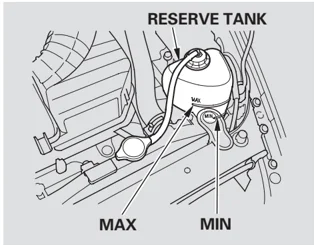
Look at the coolant level in the radiator reserve tank. Make sure it is between the MAX and MIN lines. If it is below the MIN line, see Adding Engine Coolant on page 149 for information on adding the proper coolant.
Refer to Owner's Maintenance Checks on page 141 for information about checking other items on your vehicle.
Fuel Economy
Improving Fuel Economy
- Always maintain your vehicle according to the maintenance messages displayed on the information display. See Owner's Maintenance Checks on page 141.
For example, an underinflated tire causes more "rolling resistance," which uses more fuel.
The build-up of snow or mud on your vehicle's underside adds weight and rolling resistance. Frequent cleaning helps your fuel mileage and reduces the chance of corrosion.
- Drive moderately. Rapid acceleration, abrupt cornering, and hard braking use more fuel.
- Always drive in the highest gear possible.
- Try to maintain a constant speed. Every time you slow down and speed up, your vehicle uses extra fuel. Use cruise control when appropriate.
- Combine several short trips into one.
- The air conditioning puts an extra load on the engine which makes it use more fuel. Use the fresh-air ventilation when possible.
114
Main Menu Table of Contents
Accessories and Modifications
Modifying your vehicle, or installing some non-Honda accessories, can make it unsafe. Before you make any modifications or add any accessories, be sure to read the following information.
Accessories Your dealer has Honda accessories that allow you to personalize your vehicle. These accessories have been designed and approved for your vehicle, and are covered by warranty.
Although non-Honda accessories may fit on your vehicle, they may not meet factory specifications, and could adversely affect your vehicle's handling and stability.
⚠WARNING
Improper accessories or modifications can affect your vehicle's handling, stability, and performance, and cause a crash in which you can be hurt or killed.
Follow all instructions in this owner's manual regarding accessories and modifications.
When properly installed, cellular phones, alarms, two-way radios, and low-powered audio systems should not interfere with your vehicle's computer controlled systems, such as your airbags and anti-lock brakes.
Before installing any accessory:
- Make sure the accessory does not obscure any lights, or interfere with proper vehicle operation or performance.
- Be sure electronic accessories do not overload electrical circuits (see page 190) or interfere with the proper operation of your vehicle.
- Before installing any electronic accessory, have the installer contact your dealer. If possible, have your dealer inspect the final installation.
Before Driving
115
Accessories and Modifications
Modifying Your Vehicle
Removing parts from your vehicle, or replacing components with non-Honda components could seriously affect your vehicle’s handling, stability, and reliability.
Here are some examples:
- Lowering the vehicle with a non-Honda suspension kit that significantly reduces ground clearance can allow the undercarriage to hit speed bumps or other raised objects, which could cause the airbags to deploy.
- Raising your vehicle with a non-Honda suspension kit can affect the handling and stability.
- Non-Honda wheels can cause excessive stress on suspension components.
- Larger or smaller wheels and tires can interfere with the operation of your vehicle’s anti-lock brakes and other systems.
- Modifying your steering wheel or any other part of your vehicle’s safety systems could make the systems ineffective.
If you plan to modify your vehicle, consult your dealer.
116
Carrying Cargo
UPPER AND LOWER CONSOLE COMPARTMENTS DOOR POCKETS TRUNK SEAT-BACK POCKET CONSOLE SIDE NET DASHBOARD LOWER POCKET
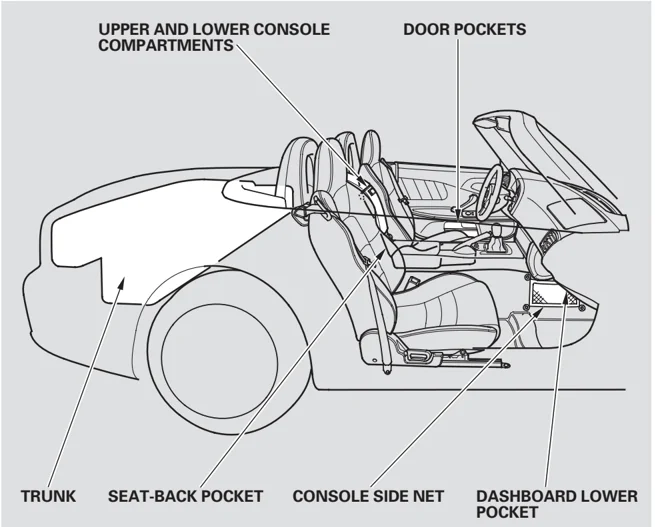
Your vehicle has several convenient storage areas:
• Upper and lower console compartments • Dashboard lower pocket • Door pockets • Console side net • Seat-back pocket • Trunk
However, carrying too much cargo, or improperly storing it, can affect your vehicle’s handling, stability, stopping distance, and tires, which may make it unsafe. Before carrying any type of cargo, be sure to read the following pages.
Before Driving
117
Carrying Cargo
Load Limits
The maximum load for your vehicle is 400 lbs (181 kg) for U.S. vehicles, and 185 kg for Canadian vehicles. This figure includes the total weight of all occupants, cargo, and accessories.
WARNING Overloading or improper loading can affect handling and stability and cause a crash in which you can be hurt or killed.
Follow all load limits and other loading guidelines in this manual.
Steps for Determining Correct Load Limit:
- Locate the statement, “the combined weight of occupants and cargo should never exceed 400 lbs” on your vehicle’s placard. [The placard is on the driver’s doorjamb.]
- Determine the combined weight of the driver and passenger that will be riding in your vehicle.
- Subtract the combined weight of the driver and passenger from 400 lbs.
- The resulting figure equals the available amount of cargo and luggage load capacity. For example, if the maximum load is 400 lbs and there will be two 150 lb. passengers in your vehicle, the amount of available cargo and luggage load capacity is 100 lbs. [400 − 300 (2 × 150) = 100 lbs.]
- Determine the combined weight of luggage and cargo being loaded on the vehicle. That weight may not safely exceed the available cargo and luggage load capacity calculated in step 4.
In addition, the total weight of the vehicle, all occupants, accessories and cargo must not exceed the gross vehicle weight rating (GVWR) or the gross axle weight rating (GAWR). Both are on a label on the driver’s doorjamb.
118
Carrying Cargo
Carrying Items in the Passenger Compartment
- Store or secure all items that could be thrown around and hurt someone during a crash.
- Be sure items placed on the floor behind the front seats cannot roll under the seats and interfere with the driver’s ability to operate the pedals, the proper operation of the seats, or proper operation of the sensors under the seats.
Carrying Cargo in the Trunk
- Distribute cargo evenly on the floor of the trunk, placing the heaviest items on the bottom and as far forward as possible.
Before Driving
119
Main Menu
Main Menu
Driving
This section gives you tips on starting the engine under various conditions, and how to operate the manual transmission. It also includes important information on parking your vehicle and the braking system.
- Driving Guidelines ........ 122
- Preparing to Drive ........ 123
- Starting the Engine ........ 124
- Manual Transmission ........ 125
- Parking ........ 127
- Braking System ........ 127
- Anti-lock Brakes (ABS) ........ 128 Vehicle Stability Assist (VSA)
- System ........ 130
- Towing a Trailer ........ 131
121
Driving Guidelines
Your vehicle is designed to give you optimum handling and performance on well-maintained roads. As part of this design, your vehicle has a minimum of ground clearance and very low-profile tires.
• Use caution if you ever drive your vehicle on very rough or rutted roads. You could damage the suspension and underbody by bottoming out. Going too fast over parking lot “speed bumps” can also cause damage.
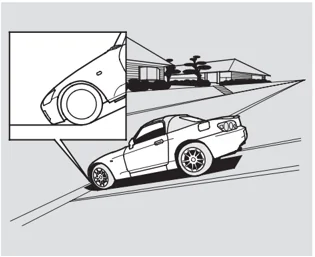
• Curbs and steep inclines could damage the front and rear bumpers. Low curbs that do not affect the average vehicle may be high enough to hit the bumper on your vehicle. The front or rear bumper may scrape when trying to drive onto an incline, such as a steep driveway or trailer ramps.
• Because of the low-profile tires fitted to your vehicle, the alloy wheels are closer to the ground. Driving over a pothole or road debris at too high a speed can seriously damage a wheel. Slow down under these conditions.
122
Preparing to Drive
You should do the following checks and adjustments before you drive your vehicle.
- Make sure all windows, mirrors, and outside lights are clean and unobstructed. Remove frost, snow, or ice.
- Check that the hood is fully closed.
- Check that the trunk is fully closed.
- Visually check the tires. If a tire looks low, use a gauge to check its pressure.
- Check that any items you may be carrying are stored properly or fastened down securely.
- Check the seat adjustment (see page 67 ).
- Check the adjustment of the inside and outside mirrors (see page 75 ).
- Make sure the doors are securely closed and locked.
- Fasten your seat belt. Check that your passenger has fastened his or her seat belt (see page 12 ).
- When you start the engine, check the gauges and indicators in the instrument panel (see page 45 ).
Driving
123
Starting the Engine
- Apply the parking brake.
- In cold weather, turn off all electrical accessories to reduce the drain on the battery.
- Push the clutch pedal down all the way. The ENGINE START button has no effect unless the clutch pedal is pressed.
- Turn the ignition key to the ON (II) position.
- Without touching the accelerator pedal, push the ENGINE START button. Do not hold the ENGINE START button for more than 15 seconds at a time. If the engine does not start right away, pause for at least 10 seconds before trying again.
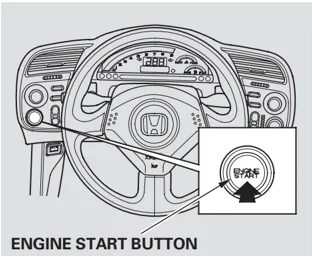
ENGINE START BUTTON
NOTICE
The immobilizer system protects your vehicle from theft. If an improperly-coded key (or other device) is used, the engine’s fuel system is disabled. For more information, see page 61.
- If the engine does not start within 15 seconds, or starts but stalls right away, repeat step 5 with the accelerator pedal pressed halfway down. If the engine starts, release pressure on the accelerator pedal so the engine does not race.
- If the engine fails to start, press the accelerator pedal all the way down and hold it there while starting to clear flooding. If the engine still does not start, return to step 6.
NOTICE
The engine is harder to start in cold weather. Also, the thinner air found at altitudes above 8,000 feet (2,400 meters) adds to this problem.
124