Manual Transmission
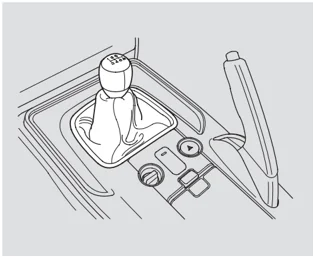
The manual transmission is synchronized in all forward gears for smooth operation. It has a lockout so you cannot shift directly from fifth to reverse instead of sixth (see page 126). When shifting up or down, make sure you push the clutch pedal down all the way, shift to the next gear, and let the pedal up gradually. When you are not shifting, do not rest your foot on the clutch pedal. This can cause your clutch to wear out faster.
Come to a full stop before you shift into reverse. You can damage the transmission by trying to shift into reverse with the vehicle moving. Push down the clutch pedal, and pause for a few seconds before shifting into reverse, or shift into one of the forward gears for a moment. This stops the gears so they won’t “grind.”
When slowing down, you can get extra braking from the engine by shifting to a lower gear. This extra braking can help you maintain a safe speed and prevent your brakes from overheating while going down a steep hill. Before downshifting, make sure the engine speed will not go into the tachometer’s red zone in the lower gear.
⚠ WARNING
Rapid slowing or speeding up can cause loss of control on slippery surfaces. If you crash, you can be injured.
Use extra care when driving on slippery surfaces.
Your vehicle is equipped with an aluminum shift lever. If you leave the vehicle parked outside for a long time on a hot day, be careful before moving the shift lever. Because of the heat, the shift lever may be extremely hot. If the outside temperature is low, the shift lever feels cold.
125
Manual Transmission
Recommended Shift Points
Drive in the highest gear that lets the engine run and accelerate smoothly. This will give you good fuel economy and effective emissions control. The following shift points are recommended:
| Shift Up | Normal Acceleration |
|---|---|
| 1st to 2nd | 15 mph (24 km/h) |
| 2nd to 3rd | 25 mph (40 km/h) |
| 3rd to 4th | 40 mph (64 km/h) |
| 4th to 5th | 47 mph (75 km/h) |
| 5th to 6th | 52 mph (83 km/h) |
Engine Speed Limiter
If you exceed the maximum speed for the gear you are in, the engine speed will enter into the tachometer’s red zone. If this occurs, you may feel the engine cut in and out. This is caused by a limiter in the engine’s computer controls. The engine will run normally when you reduce the rpm below the red zone.
Before downshifting, make sure the engine will not go into the tachometer’s red zone.
Reverse Lockout
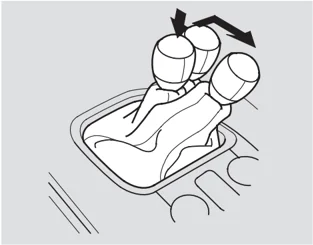
The manual transmission has a lockout so you cannot accidentally shift from fifth to reverse instead of sixth while the vehicle is moving.
With the clutch pedal pressed, move the shift lever to the reverse side of the neutral gate. Then push the shift lever down, and shift to reverse.
Parking, Braking System
Parking
Always use the parking brake when you park your vehicle. Make sure the parking brake is set firmly, or your vehicle may roll if it is parked on an incline.
Parking Tips
-
Make sure the convertible top and the windows are closed.
-
Turn off the lights.
-
Place any packages, valuables, etc., in the trunk or take them with you.
-
Lock the doors.
-
Never park over dry leaves, tall grass, or other flammable materials. The hot three way catalytic converter could cause these materials to catch on fire.
-
If the vehicle is facing uphill, turn the front wheels away from the curb, and put the transmission in first gear.
-
If the vehicle is facing downhill, turn the front wheels toward the curb, and put the transmission in reverse gear.
-
Make sure the parking brake is fully released before driving away. Driving with the parking brake partially set can overheat or damage the rear brakes.
Braking System
Your vehicle is equipped with disc brakes at all four wheels. A power assist helps reduce the effort needed on the brake pedal. The anti-lock brake system (ABS) helps you retain steering control when braking very hard.
Resting your foot on the pedal keeps the brakes applied lightly, builds up heat, and reduces their effectiveness. It also keeps your brake lights on all the time, confusing drivers behind you.
Constant application of the brakes when going down a long hill builds up heat and reduces their effectiveness. Use the engine to assist the brakes by taking your foot off the accelerator and downshifting to a lower gear.
Driving
CONTINUED
127
Braking System, Anti-lock Brakes (ABS)
Check the brakes after driving through deep water. Apply the brakes moderately to see if they feel normal. If not, apply them gently and frequently until they do. Be extra cautious in your driving.
Braking System Design
The hydraulic system that operates the brakes has two separate circuits. Each circuit works diagonally across the vehicle (the left-front brake is connected with the right-rear brake, etc.). If one circuit should develop a problem, you will still have braking at two wheels.
Brake Pad Wear Indicators
If the brake pads need replacing, you will hear a distinctive, metallic screeching sound when you apply the brake pedal. If you do not have the brake pads replaced, they will screech all the time. It is normal for the brakes to occasionally squeal or squeak when you apply them.
Anti-lock Brakes (ABS)
The anti-lock brake system (ABS) helps prevent the brakes from locking up, and helps you retain steering control by pumping the brakes rapidly, much faster than a person can do it.
The ABS also balances the front-to-rear braking distribution according to vehicle loading.
You should never pump the brake pedal. Let the ABS work for you by always keeping firm, steady pressure on the brake pedal. This is sometimes referred to as “stomp and steer.”
You will feel a pulsation in the brake pedal when the ABS activates, and may hear some noise. This is normal: it is the ABS rapidly pumping the brakes. On dry pavement, you will need to press on the brake pedal very hard before the ABS activates. However, you may feel the ABS activate immediately if you are trying to stop on snow or ice.
128
Anti-lock Brakes (ABS)
ABS Indicator
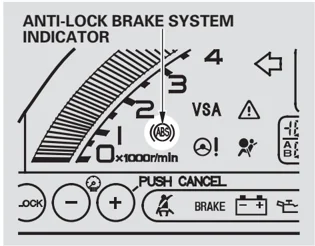
If this indicator comes on, the anti-lock function of the braking system has shut down. The brakes still work like a conventional system, but without anti-lock. You should have your dealer inspect your vehicle as soon as possible.
Important Safety Reminders ABS does not reduce the time or distance it takes to stop the vehicle; it only helps with steering control during braking.
ABS will not prevent a skid that results from changing direction abruptly, such as trying to take a corner too fast or making a sudden lane change.
ABS cannot prevent a loss of stability. Always steer moderately when you are braking hard. Severe or sharp steering wheel movement can still cause your vehicle to veer into oncoming traffic or off the road.
A vehicle with ABS may require a longer distance to stop on loose or uneven surfaces, such as gravel or snow, than a vehicle without anti-lock.
129
Vehicle Stability Assist (VSA) System
The vehicle stability assist (VSA) system helps to stabilize the vehicle during cornering if the vehicle turns more or less than desired. It also assists you in maintaining traction while accelerating on loose or slippery road surfaces. It does this by regulating the engine’s output and by selectively applying the brakes.
When VSA activates, you may notice that the engine does not respond to the accelerator in the same way it does at other times.
The VSA system cannot enhance the vehicle’s driving stability in all situations and does not control your vehicle’s entire braking system. It is still your responsibility to drive and corner at reasonable speeds and to leave a sufficient margin of safety.
VSA Activation Indicator When VSA activates, you will see the VSA activation indicator blink (see page 50 ).
Without VSA, your vehicle still has normal braking and cornering ability, but it does not have VSA traction and stability enhancement.
VSA VSA System Indicator If this indicator comes on while driving, pull to the side of the road when it is safe, and turn off the engine. Reset the system by restarting the engine. If the VSA system indicator stays on, or comes back on while driving, have the VSA system inspected by your dealer.
If the indicator does not come on when the ignition switch is turned to the ON (II) position, there may be a problem with the VSA system. Have your dealer inspect your vehicle as soon as possible (see page 50 ).
130
Vehicle Stability Assist (VSA) System, Towing a Trailer
VSA Off Switch
 VSA OFF SWITCH
In certain unusual conditions when your vehicle gets stuck in shallow mud or fresh snow, it may be easier to free it with the VSA temporarily switched off. When the VSA system is off, the traction control system is also off. You should only attempt to free your vehicle with the VSA off if you are not able to free it when the VSA is on.
Immediately after freeing your vehicle, be sure to switch the VSA on again. We do not recommend driving your vehicle with the VSA and traction control systems switched off.
This switch is at the left side of the right vent. Press it to turn VSA on and off.
When VSA is off, the VSA activation indicator comes on as a reminder.
VSA is turned on every time you start the engine, even if you turned it off the last time you drove the vehicle.
VSA and Tire Sizes
Driving with varying tire or wheel sizes may cause the VSA to malfunction. When replacing tires, make sure they are of the same size and type as your original tires (see page 165).
Deactivate the VSA system if you need to drive with the compact spare tire installed (see page 174).
If you install winter tires, make sure they are the same size as those that were originally supplied with your vehicle. Exercise the same caution during winter driving as you would if your vehicle was not equipped with VSA.
Towing a Trailer
Your vehicle is not designed to tow a trailer; Attempting to do so can void your warranties.
131
Main Menu
Main Menu
Maintenance
This section explains why it is important to keep your vehicle well maintained and how to follow basic maintenance safety precautions.
This section also includes instructions on how to read the maintenance minder messages on the information display, a maintenance record, and instructions for simple maintenance tasks you may want to take care of yourself.
If you have the skills and tools to perform more complex maintenance tasks on your vehicle, you may want to purchase the service manual. See page 215 for information on how to obtain a copy, or see your dealer.
- Maintenance Safety ........ 134
- Maintenance Minder ........ 135
- Maintenance Record ........ 143
- Fluid Locations ........ 145
- Adding Engine Oil ........ 146
- Changing the Oil and Filter ........ 147
- Engine Coolant ........ 149
- Windshield Washers ........ 151
- Manual Transmission Fluid ........ 152
- Differential Fluid ........ 153
- Brake and Clutch Fluid ........ 154
- Lights ........ 155
- Cleaning the Seat Belts ........ 160
- Floor Mats ........ 161
- Dust and Pollen Filter ........ 161
- Audio Antenna ........ 161
- Wiper Blades ........ 162
- Wheels ........ 163
- Tires ........ 163
- Checking the Battery ........ 169
- Vehicle Storage ........ 171
133
Maintenance Safety
All service items not detailed in this section should be performed by a certified technician or other qualified mechanic.
Important Safety Precautions To eliminate potential hazards, read the instructions before you begin, and make sure you have the tools and skills required.
- Make sure your vehicle is parked on level ground, the parking brake is set, and the engine is off.
- To clean parts, use a commercially available degreaser or parts cleaner, not gasoline.
- To reduce the possibility of fire or explosion, keep cigarettes, sparks, and flames away from the battery and all fuel-related parts.
- Wear eye protection and protective clothing when working with the battery or compressed air.
⚠ WARNING Improperly maintaining this vehicle, or failing to correct a problem before driving can cause a crash in which you can be seriously hurt or killed.
Always follow the inspection and maintenance recommendations and schedules in this owner’s manual.
Potential Vehicle Hazards
-
Carbon Monoxide poison from engine exhaust. Be sure there is adequate ventilation whenever you operate the engine.
-
Burns from hot parts. Let the engine and exhaust system cool down before touching any parts.
-
Injury from moving parts. Do not run the engine unless instructed to do so.
⚠ WARNING Failure to properly follow maintenance instructions and precautions can cause you to be seriously hurt or killed.
Always follow the procedures and precautions in this owner’s manual.
Some of the most important safety precautions are given here. However, we cannot warn you of every conceivable hazard that can arise in performing maintenance. Only you can decide whether or not you should perform a given task.
134
Main Menu Table of Contents
Maintenance Minder
Your vehicle displays engine oil life and maintenance service items on the information display to show you when you should have your dealer do engine oil replacement and indicated maintenance service.
Based on the engine operating conditions and accumulated engine revolutions, the onboard computer in your vehicle calculates the remaining engine oil life and displays it as a percentage.
Engine Oil Life Display
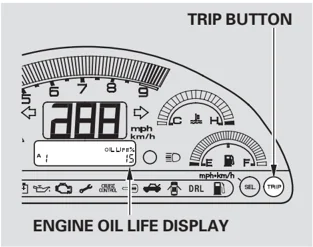
To see the current engine oil life, turn the ignition switch to the ON (II) position, and push and release the TRIP button repeatedly until the engine oil life display appears (see page 51 ).
The remaining engine oil life is shown on the display according to this table:
CONTINUED
135
Maintenance Minder
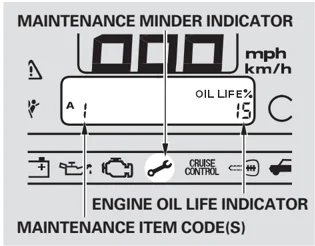
If the remaining engine oil life is 15 to 6 percent, you will see the engine oil life indicator every time you turn the ignition switch to the ON (II) position. The maintenance minder indicator will also come on, and the maintenance item code(s) for other scheduled maintenance items needing service will be displayed next to the engine oil life indicator.
The maintenance item code or codes indicate the main and sub items required at the time of the oil change (see page 142 ).
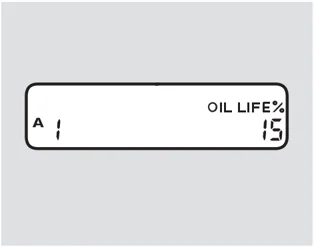
The 15 and 10 percent oil life indicator reminds you that the time is coming soon to take your vehicle in for the required maintenance.
136
Maintenance Minder
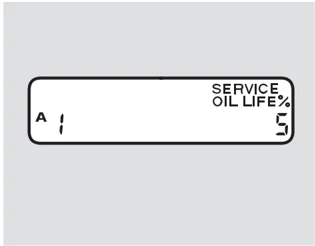
When the remaining engine oil life is 5 to 1 percent, you will see a “SERVICE OIL LIFE” message along with the same maintenance item code(s), every time you turn the ignition switch to the ON (II) position. The maintenance minder indicator ( ) also comes on and remains on in the instrument panel.
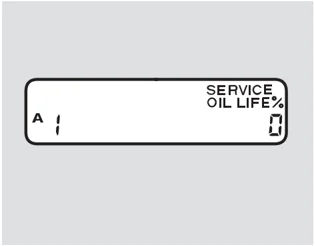
When the remaining engine oil life is 0 percent, the engine oil life indicator will blink. The display comes on every time you turn the ignition switch to the ON (II) position. The maintenance minder indicator ( ) also comes on and remains on in the instrument panel. When you see this message, immediately have the indicated maintenance done by your dealer.
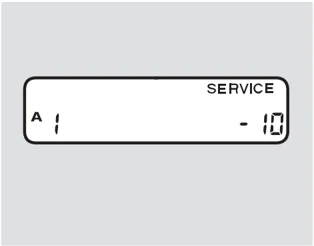
If you do not perform the indicated maintenance, negative mileage is displayed and begins to blink after the vehicle has been driven 10 miles (10 km) or more.
Negative mileage means your vehicle has passed the maintenance required point. Immediately have the indicated maintenance done by your dealer.
CONTINUED
Maintenance
137
Maintenance Minder
The maximum total mileage shown is “–9999.”
You can change the information display from the engine oil life display to the odometer, the trip meter, or the outside temperature every time you press and release the TRIP button.
When the engine oil life is 0 percent or negative mileage, the maintenance minder indicator ( ) remains on even if you change the information display.
Immediately have the service done, and make sure to reset the display as described on the next page.
Maintenance Main Items and Sub Items
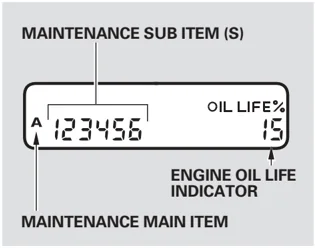
All maintenance items displayed in the information display are in code. For an explanation of these maintenance codes, see page 142.
138
Maintenance Minder
Resetting the Engine Oil Life Indicator
Your dealer will reset the display after completing the required maintenance service. You will see “OIL LIFE 100%” on the information display the next time you turn the ignition switch to the ON (II) position.
If maintenance service is done by someone other than your dealer, reset the maintenance minder as follows:
- Turn the ignition switch to the ON (II) position.
- Press the TRIP button until the engine oil life indicator is displayed.
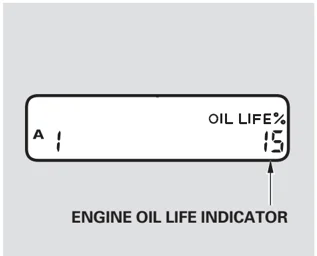
- Press the TRIP button for about 10 seconds. The engine oil life indicator and the maintenance item code(s) will blink.
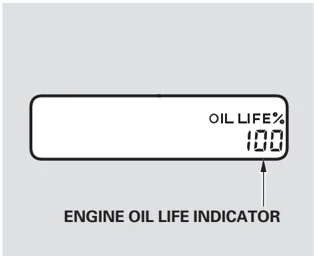
- Press the TRIP button for about 5 seconds. The maintenance items code(s) will disappear, and the engine oil life will reset to “100.”
Maintenance
139
Maintenance Minder
Important Maintenance Precautions If you have the required service done but do not reset the display, or reset the display without doing the service, the system will not show the proper maintenance intervals. This can lead to serious mechanical problems because you will no longer have an accurate record of when maintenance is needed.
Your authorized Honda dealer knows your vehicle best and can provide competent, efficient service.
However, service at a dealer is not mandatory to keep your warranties in effect. Maintenance may be done by any qualified service facility or person who is skilled in this type of automotive service. Make sure to have the service facility or person reset the display as previously described. Keep all receipts as proof of completion, and have the person who does the work fill out the maintenance record. Check your warranty booklet for more information.
We recommend using Honda parts and fluids whenever you have maintenance done. These are manufactured to the same high quality standards as the original components, so you can be confident of their performance and durability.
140
Maintenance Minder
U.S. Vehicles: Maintenance, replacement, or repair of emissions control devices and systems may be done by any automotive repair establishment or individual using parts that are “certified” to EPA standards.
According to state and federal regulations, failure to perform maintenance on the items marked with # will not void your emissions warranties. However, all maintenance services should be performed in accordance with the intervals indicated by the information display.
Owner’s Maintenance Checks You should check the following items at the specified intervals. If you are unsure of how to perform any check, turn to the appropriate page listed.
• Engine oil level — Check every time you fill the fuel tank. See page 113.
• Engine coolant level — Check the radiator reserve tank every time you fill the fuel tank. See page 114.
• Brakes and clutch — Check the fluid level monthly. See page 154.
• Tires — Check the tire pressure monthly. Examine the tread for wear and foreign objects. See page 164.
• Lights — Check the operation of the headlights, parking lights, taillights, high-mount brake light, and license plate lights monthly. See page 155.
CONTINUED
141
Maintenance
Maintenance Minder
Maintenance Main Items
| Symbol | Maintenance Main Items |
|---|---|
| A | • Replace engine oil*¹ |
| B | • Replace engine oil and oil filter• Inspect front and rear brakes• Check parking brake adjustment• Inspect these items: • Tie rod ends, steering gear box, and boots • Suspension components • Driveshaft boots • Brake hoses and lines (including ABS) • All fluid levels and condition of fluids • Exhaust system# • Fuel lines and connections# |
Maintenance Sub Items
| Symbol | Maintenance Sub Items |
|---|---|
| 1 | • Check tire inflation and condition |
| 2 | • Replace air cleaner element If you drive in dusty conditions, replace every 15,000 miles (24,000 km).• Replace dust and pollen filter If you drive primarily in urban areas that have high concentrations of soot in the air from industry and from diesel-powered vehicles, replace every 15,000 miles (24,000 km).• Inspect drive belt |
| 3 | • Replace transmission fluid |
| 4 | • Replace spark plugs• Inspect valve clearance |
| 5 | • Replace engine coolant |
| 6 | • Replace rear differential fluid Driving in mountainous areas results in higher level of mechanical (shear) stress to fluid. This requires differential fluid changes more frequently than recommended by the maintenance minder. If you regularly drive your vehicle under these conditions, have the differential fluid changed every 15,000 miles (24,000 km). |
*¹: If the message “SERVICE” does not appear more than 12 months after the display is reset, change the engine oil every year.
: See information on maintenance and emissions warranty on page 141.
NOTE:
- Independent of the maintenance minder messages, replace the brake fluid every 3 years.
- Inspect idle speed every 160,000 miles (256,000 km).
- Adjust the valves during services A, B, 1, 2, or 3 if they are noisy.
Maintenance Record
You or the servicing dealer can record all completed maintenance here. When maintenance is performed, record the mileage, circle the coded item(s) completed, and write in any other non-coded items (such as brake fluid replacement) below the codes. Keep the receipts for all work done on your vehicle. Maintenance can also be recorded in your Honda service history booklet.
| Mileage | Maintenance Performed | Signature Date |
|---|---|---|
| mi km | A B 1 2 3 4 5 6 | |
| mi km | A B 1 2 3 4 5 6 | |
| mi km | A B 1 2 3 4 5 6 | |
| mi km | A B 1 2 3 4 5 6 | |
| mi km | A B 1 2 3 4 5 6 | |
| mi km | A B 1 2 3 4 5 6 | |
| mi km | A B 1 2 3 4 5 6 |
| Mileage | Maintenance Performed | Signature Date |
|---|---|---|
| mi km | A B 1 2 3 4 5 6 | |
| mi km | A B 1 2 3 4 5 6 | |
| mi km | A B 1 2 3 4 5 6 | |
| mi km | A B 1 2 3 4 5 6 | |
| mi km | A B 1 2 3 4 5 6 | |
| mi km | A B 1 2 3 4 5 6 | |
| mi km | A B 1 2 3 4 5 6 |
CONTINUED 143
Main Menu
Table of Contents
Maintenance Record
| Mileage | Maintenance Performed | Signature Date |
|---|---|---|
| mi km | A B 1 2 3 4 5 6 | |
| mi km | A B 1 2 3 4 5 6 | |
| mi km | A B 1 2 3 4 5 6 | |
| mi km | A B 1 2 3 4 5 6 | |
| mi km | A B 1 2 3 4 5 6 | |
| mi km | A B 1 2 3 4 5 6 | |
| mi km | A B 1 2 3 4 5 6 |
| Mileage | Maintenance Performed | Signature Date |
|---|---|---|
| mi km | A B 1 2 3 4 5 6 | |
| mi km | A B 1 2 3 4 5 6 | |
| mi km | A B 1 2 3 4 5 6 | |
| mi km | A B 1 2 3 4 5 6 | |
| mi km | A B 1 2 3 4 5 6 | |
| mi km | A B 1 2 3 4 5 6 | |
| mi km | A B 1 2 3 4 5 6 |
144
Fluid Locations
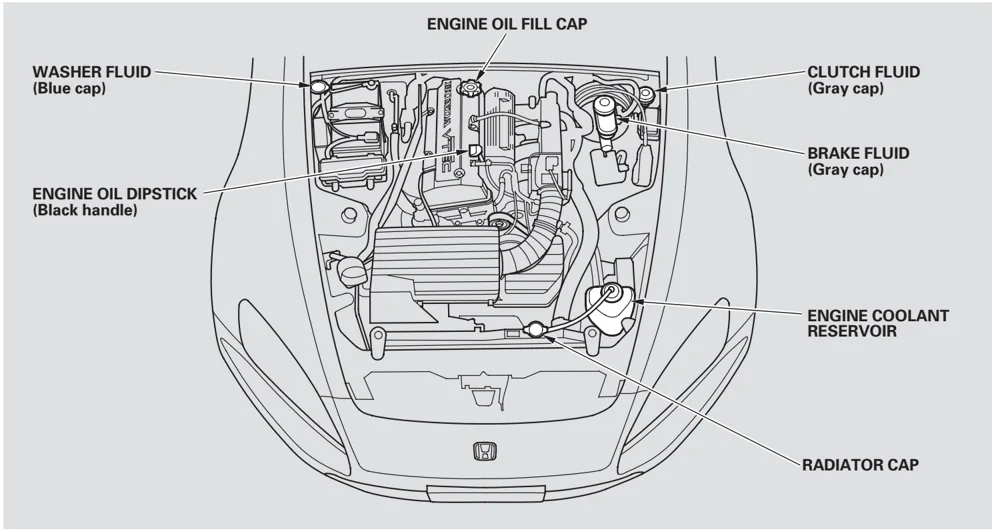
WASHER FLUID (Blue cap)
ENGINE OIL FILL CAP
CLUTCH FLUID (Gray cap)
BRAKE FLUID (Gray cap)
ENGINE OIL DIPSTICK (Black handle)
ENGINE COOLANT RESERVOIR
RADIATOR CAP
Maintenance
145
Adding Engine Oil
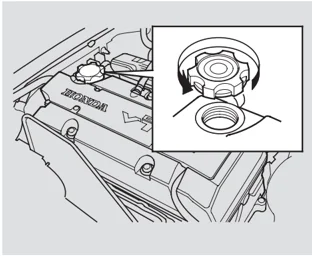
Unscrew and remove the engine oil fill cap on the valve cover. Pour in the oil slowly and carefully so you do not spill any. Clean up any spills immediately. Spilled oil could damage components in the engine compartment. Reinstall the engine oil fill cap, and tighten it securely. Wait a few minutes, and recheck the oil level on the engine oil dipstick. Do not fill above the upper mark; you could damage the engine.
Recommended Engine Oil
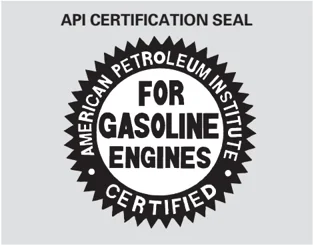
Oil is major contributor to your engine’s performance and longevity. Always use a premium-grade detergent oil displaying the API certification seal. This seal indicates the oil is energy conserving, and that it meets the American Petroleum Institute’s latest requirements. It is highly recommended that you use Honda motor oil in your vehicle for as long as you own it.
Make sure the API Certification Seal says “For Gasoline Engines.”
API CERTIFICATION SEAL
AMERICAN PETROLEUM INSTITUTE FOR GASOLINE ENGINES CERTIFIED
146
Adding Engine Oil, Changing the Oil and Filter
The oil’s viscosity or weight is provided on the container’s label. Select the oil for your vehicle according to this chart.
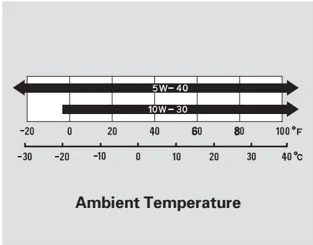
An oil with a viscosity of 10W-30 is preferred for optimum fuel economy and year-round protection in your vehicle. You may use 5W-40 oil if the temperature in your area goes below 0°F (-20°C).
Synthetic Oil You may use a synthetic motor oil if it meets the same requirements given for a conventional motor oil: it displays the API Certification Seal, and it is the proper weight. You must follow the oil and filter change intervals shown on the information display.
Engine Oil Additives Your vehicle does not require any oil additives. Additives may adversely affect the engine or transmission performance and durability.
Changing the Oil and Filter Always change the oil and filter according to the maintenance messages shown on the information display. The oil and filter collect contaminants that can damage your engine if they are not removed regularly.
Changing the oil and filter requires special tools and access from underneath the vehicle. The vehicle should be raised on a service station-type hydraulic lift for this service. Unless you have the knowledge and proper equipment, you should have this maintenance done by a skilled mechanic.
- Run the engine until it reaches normal operating temperature, then shut it off.
CONTINUED
147
Changing the Oil and Filter
-
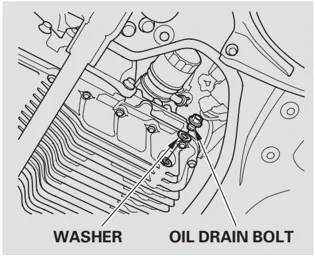
Open the hood, and remove the engine oil fill cap. Remove the oil drain bolt and washer from the bottom of the engine. Drain the oil into an appropriate container.
-
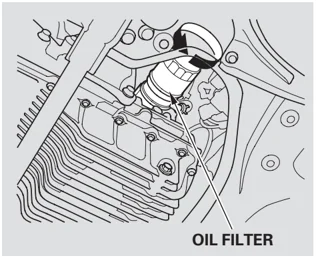
Remove the oil filter, and let the remaining oil drain. A special wrench (available from your dealer) is required.
Make sure the oil filter gasket is not stuck to the engine block. If it is, remove it before installing a new oil filter.
-
Install a new oil filter according to the instructions that come with it.
-
Put a new washer on the drain bolt, then reinstall the drain bolt. Tighten the drain bolt to: 29 lbf·ft (39 N·m , 4.0 kgf·m)
-
Refill the engine with the recommended oil.
Engine oil change capacity (including filter): 5.1 US qt (4.8 ℓ)
- Install the engine oil fill cap. Start the engine. The oil pressure indicator should go out within 5 seconds. If it does not, turn off the engine, and check your work.
148
Changing the Oil and Filter, Engine Coolant
-
Let the engine run for several minutes, then check the drain bolt and oil filter for leaks.
-
Turn off the engine and let it sit for several minutes, then check the oil level on the dipstick. If necessary, add more oil.
NOTICE
Improper disposal of engine oil can be harmful to the environment. If you change your own oil, please dispose of the used oil properly. Put it in a sealed container and take it to a recycling center. Do not discard it in a trash bin or dump it on the ground.
Adding Engine Coolant
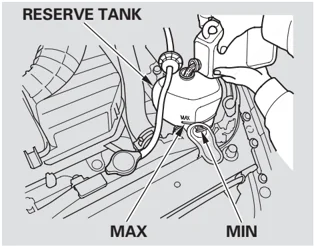
If the coolant level in the reserve tank is at or below the MIN line, add coolant to bring it up to the MAX line. Inspect the cooling system for leaks.
Always use Honda Long-Life Antifreeze/Coolant Type 2. This coolant is pre-mixed with 50 % antifreeze and 50 % water. Never add straight antifreeze or plain water.
If Honda antifreeze/coolant is not available, you may use another major-brand non-silicate coolant as a temporary replacement. Make sure it is a high-quality coolant recommended for aluminum engines. Continued use of any non-Honda coolant can result in corrosion, causing the cooling system to malfunction or fail. Have the cooling system flushed and refilled with Honda antifreeze/coolant as soon as possible.
CONTINUED 149 Maintenance
Engine Coolant
If the reserve tank is completely empty, you should also check the coolant level in the radiator.
WARNING Removing the radiator cap while the engine is hot can cause the coolant to spray out, seriously scalding you.
Always let the engine and radiator cool down before removing the radiator cap.
 RADIATOR CAP
-
When the radiator and engine are cool, relieve any pressure in the cooling system by turning the radiator cap counterclockwise, without pressing down.
-
Remove the radiator cap by pushing down and turning counterclockwise.
-
The coolant level should be up to the base of the filler neck. Add coolant if it is low.
Pour the coolant slowly and carefully so you do not spill any. Clean up any spill immediately; it could damage components in the engine compartment.
-
Put the radiator cap on, and tighten it fully.
-
Pour coolant into the reserve tank. Fill it to halfway between the MAX and MIN marks. Put the cap back on the reserve tank.
Do not add any rust inhibitors or other additives to your vehicle’s cooling system. They may not be compatible with the coolant or engine components.
150
Windshield Washers
Check the fluid level in the windshield washer reservoir at least monthly during normal use.
RESERVOIR CAP
LEVEL GAUGE
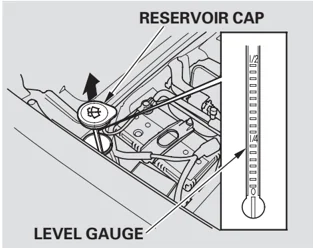
Check the fluid level by looking at the level gauge attached to the cap.
Fill the reservoir with a good-quality windshield washer fluid. This increases the cleaning capability and prevents freezing in cold weather.
When you refill the reservoir, clean the edges of the windshield wiper blades with windshield washer fluid on a clean cloth. This will help to condition them.
NOTICE Do not use engine antifreeze or a vinegar/water solution in the windshield washer reservoir. Antifreeze can damage your vehicle’s paint, while a vinegar/water solution can damage the windshield washer pump. Use only commercially-available windshield washer fluid.
151 Maintenance
Manual Transmission Fluid
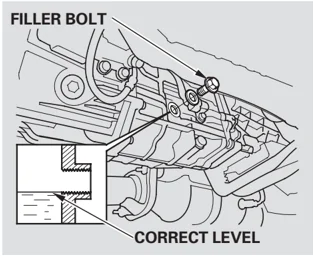
Check the fluid level with the transmission at normal operating temperature and the vehicle sitting on level ground. Remove the transmission filler bolt, and carefully feel inside the bolt hole with your finger. The fluid level should be up to the edge of the bolt hole. If it is not, add Honda Manual Transmission Fluid (MTF) until it starts to run out of the hole. Install the filler bolt, and tighten it securely.
Put a new washer on the filler bolt, then reinstall the filler bolt and tighten it securely.
If Honda MTF is not available, you may use an SAE 10W-30 or 10W-40 viscosity motor oil with the API Certification seal that says “FOR GASOLINE ENGINES” as a temporary replacement. However, motor oil does not contain the proper additives, and continued use can cause stiffer shifting. Replace as soon as it is convenient.
The transmission should be drained and refilled with new fluid according to the intervals shown on the information display.
If you are not sure how to check and add fluid, contact your dealer.
152
Differential Fluid
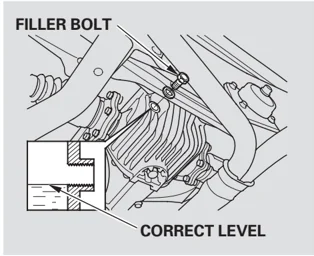
FILLER BOLT
CORRECT LEVEL
Check the fluid level with the differential at normal operating temperature and the vehicle sitting on level ground. Remove the differential fluid filler bolt and washer, and carefully feel inside the bolt hole with your finger. The fluid level should be up to the edge of the bolt hole. If it is not, slowly add fluid until it starts to run out of the hole.
Use an SAE 90 viscosity hypoid gear oil, API service classified GL5 or GL6 only.
Put a new washer on the filler bolt, then reinstall the filler bolt. Tighten it securely. Tightening torque: 33 lbf·ft (45 N·m , 4.6 kgf·m)
The differential should be drained and refilled with new fluid according to the intervals shown on the information display.
If you are not sure how to check and add fluid, contact your dealer.
Maintenance
153
Brake and Clutch Fluid
Check the brake fluid level in the reservoirs monthly.
Replace the brake fluid according to the time recommendation in the maintenance schedule.
Always use Honda Heavy Duty Brake Fluid DOT 3. If it is not available, you should use only DOT 3 or DOT 4 fluid, from a sealed container, as a temporary replacement.
Using any non-Honda brake fluid can cause corrosion and decrease the life of the system. Have the brake system flushed and refilled with Honda Heavy Duty Brake Fluid DOT 3 as soon as possible.
Brake fluid marked DOT 5 is not compatible with your vehicle's braking system and can cause extensive damage.
Brake Fluid
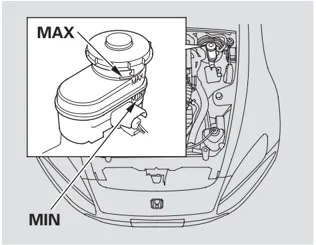
The fluid level should be between the MIN and MAX marks on the side of the reservoir. If the level is at or below the MIN mark, your brake system needs attention. Have the brake system inspected for leaks or worn brake pads.
Clutch Fluid
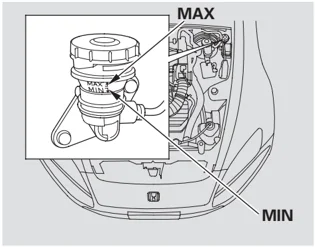
The fluid level should be between the MIN and MAX marks on the side of the reservoir. If it is not, add brake fluid to bring it up to that level. Use the same fluid specified for the brake system.
A low fluid level can indicate a leak in the clutch system. Have this system inspected as soon as possible.
154