Power Windows
Turn the ignition switch to the ON (II) position to raise or lower either window. To open the window, push the switch down and hold it. Release the switch when you want the window to stop. Pull back on the switch and hold it to close the window.
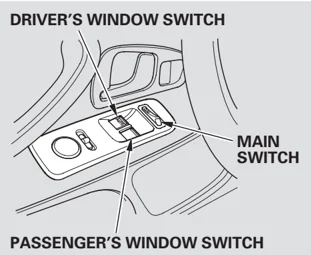
DRIVER’S WINDOW SWITCH
MAIN SWITCH
PASSENGER’S WINDOW SWITCH
The driver’s armrest has a master power window control panel. To open the passenger’s window, push down on the switch and hold it until the window reaches the desired position. To close the window, pull back on the window switch. Release the switch when the window gets to the position you want.
⚠ WARNING
Closing a power window on someone’s hands or fingers can cause serious injury.
Make sure your passenger is away from the window before closing it.
68
Power Windows
The master control panel also contains these extra features:
AUTO — To open the driver’s window fully, push the window switch firmly down to the second detent, and release it. The window automatically goes all the way down. To stop the window, pull back on the window switch briefly.
To open the driver’s window only partially, push the window switch down lightly and hold it. The window will stop as soon as you release the switch.
The AUTO function only works to lower the driver’s window. To raise the window, you must pull back on the window switch and hold it until the window reaches the desired position.
If the MAIN switch is OFF, the passenger’s window cannot be raised or lowered. Keep the MAIN switch off when you have a child in the vehicle so the child does not get injured by operating the window unintentionally.
69
Instruments and Controls
Convertible Top
The convertible top on your vehicle lowers and raises electrically.
It is advisable to raise the top whenever you park the vehicle. This helps to protect the vehicle from unexpected weather changes, and from theft of your valuables.
NOTICE
- Do not operate the convertible top in freezing weather. You can damage the material and the mechanism.
- Do not operate the top if it is wet, dirty, or covered with ice or snow.
- Never drive the vehicle with the convertible top half open.
- Do not operate the convertible top if the vehicle is on a jack, a hoist, or on jack stands.
- Park your vehicle in the shade whenever possible. Extended exposure to sunlight can cause the convertible top to deteriorate.
Lowering the Convertible Top
Before operating the convertible top, make sure the vehicle is parked on level ground, the rear defogger is off, and there is enough clearance above the top.
- Apply the parking brake. The convertible top will not operate unless the parking brake is fully engaged.
- Turn the ignition switch to the ON (II) position.
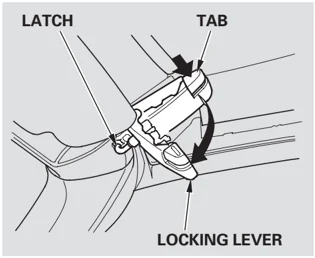
- There is a latch on each side. Push in the tabs, and pull the locking levers down.
70
Convertible Top
 LOCKING LEVER
- With the latches released, push the locking levers up until they latch.
 ROOF SWITCH
- Pull back and hold the ROOF switch. The windows lower and the roof folds back. Release the ROOF switch when the roof is retracted completely into the rear shelf.
NOTICE
Do not sit on the folded convertible top, or place any items on top of it. You could damage the top or the rear window.
⚠WARNING
Operating the convertible top while any part of a passenger is in the way of the convertible top can cause serious injury.
Make sure that you, your passenger, or any other people around the vehicle are clear of the moving convertible top.
Instruments and Controls
71
Main Menu | Table of Contents
Convertible Top
Convertible Top Cover Use the convertible top cover when the top is folded to help prevent foreign objects, dirt, etc., from getting into the material and the mechanism.
The cover is attached to the body with four snaps: two behind the roll bars, and one on the side of each seat. To install or remove the convertible top cover correctly, do this:
 SNAPS
- Remove the convertible top cover from the trunk, and lay it into position behind the roll bar.
 PIN
SNAP
-
Hold the cover in place with its snap on the driver’s side of the roll bar aligned with the pin on the roll bar. Press on both sides of the snap to attach it to the pin. Do not push or pull the snap button when installing the snap.
-
Align the snap on the passenger’s side of the roll bar with the pin. Press on both sides of the snap to attach it to the pin.
72
Convertible Top
 FASTENER STRAP
PIN
SNAP
-
Pull down the strap on the passenger’s side of the cover, and align its snap with the pin on the trim panel behind the door. Press on both sides of the snap to attach it to the pin.
-
Pull down the strap on the driver’s side of the cover, and align its snap with the pin on the trim panel behind the door. Press on both sides of the snap to attach it to the pin.
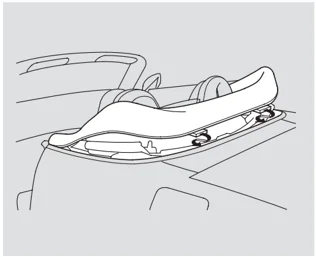
-
Fit the rear of the cover into the space between the convertible top and its molding.
-
To remove the cover, reverse the procedure.
Raising the Convertible Top
-
Apply the parking brake. The convertible top will not operate unless the parking brake is fully engaged.
-
Turn the ignition switch to the ON (II) position.
-
Push the ROOF switch forward and hold it. The windows, if raised, will lower automatically.
The convertible top will rise. Release the ROOF switch when the top reaches the windshield header.
Instruments and Controls
CONTINUED
73
Main Menu Table of Contents
Convertible Top
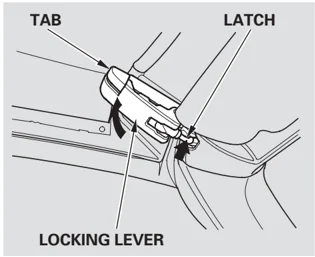
TAB LATCH LOCKING LEVER
-
Push in the tab to release the locking levers, and pull them down. Note the movement of the latch when you push in the tab.
-
While holding the lever down, push in the tab to engage the latch in the windshield header. Pull the top down and forward if necessary.
-
Push the locking levers up while holding the tab. When the latch is in place, release the tab. Make sure the convertible top is securely latched.
WARNING Operating the convertible top while any part of a passenger is in the way of the convertible top can cause serious injury.
Make sure that you, your passenger, or any other people around the vehicle are clear of the moving convertible top.
NOTICE Do not put any heavy items on the folded convertible top. You could damage the material and the mechanism.
Maintenance Dust is the main cause of creaks or other sounds coming from the convertible top.
Regularly clean the body seals with glass cleaner and a soft cloth. Do not use a scraper or de-icing chemicals to remove frost, snow, or ice from the top or the rear window.
Every 3 to 6 months, depending on how often the top is folded, rub a thin film of Shin-Etsu Silicon Grease (available from your dealer, P/N 08798-9013) onto the seals wherever they touch the convertible top or each other.
74
Convertible Top, Mirrors
To reduce the possibility of leaks: • Do not lean or sit on an open door. • Do not push or pull the door glass to open and close the door. • The convertible top seals are designed to promote the flow of water off the roof. Spraying high-pressure water directly on the seals can distort them, causing a leak. Use only a low-pressure water stream when using a hose, and avoid commercial car washes.
Mirrors
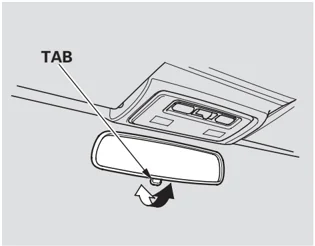
Keep the inside and outside mirrors clean and adjusted for best visibility. Be sure to adjust the mirrors before you start driving.
The inside mirror has day and night positions. The night position reduces glare from headlights behind you. Flip the tab on the bottom edge of the mirror to select the day or night position.
Adjusting the Power Mirrors
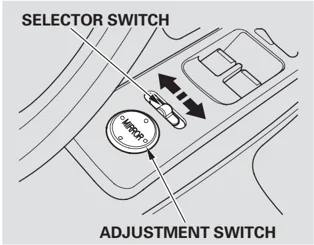
- Turn the ignition switch to the ON (II) position.
- Move the selector switch to L (driver’s side) or R (passenger’s side).
- Push the appropriate edge of the adjustment switch to move the mirror right, left, up, or down.
CONTINUED
Instruments and Controls
75
Mirrors, Parking Brake
- When you finish, move the selector switch to the center (off) position. This turns the adjustment switch off to keep your settings.
Parking Brake
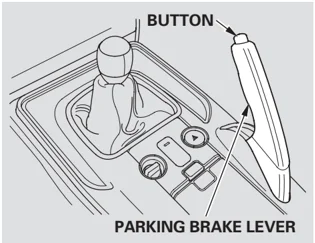
To apply the parking brake, pull the lever up fully. To release it, pull up slightly, push the button, and lower the lever. The parking brake indicator on the instrument panel should go out when the parking brake is fully released (see page 46 ).
NOTICE
Driving the vehicle with the parking brake applied can damage the rear brakes and axles. A beeper will sound if the vehicle is driven with the parking brake on.
76
I nterior Convenience Items
 CONSOLE COMPARTMENT
ACCESSORY POWER SOCKET
VANITY MIRROR/SUNVISOR
AUDIO PANEL
DRIVER’S SEAT-BACK POCKET
BEVERAGE HOLDER
DASHBOARD LOWER POCKET
Instruments and Controls
77
Interior Convenience Items
Beverage Holder
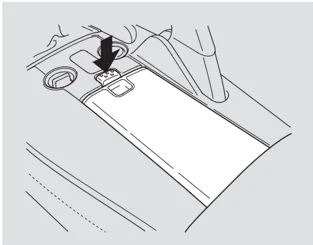
Open the beverage holder by pushing on the tab. The lid will slide open.
Accessory Power Socket
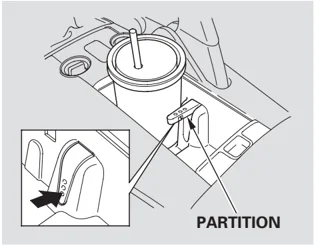
PARTITION
To hold two cups in the beverage holder, flip the partition up.
Be careful when you are using the beverage holder. A spilled liquid that is very hot can scald you or your passenger. Spilled liquids can also damage the upholstery, carpeting, and electrical components in the interior.
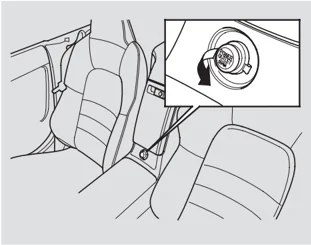
This socket is intended to supply power for 12 volt DC accessories that are rated 120 watts or less (10 amps). It will not power an automotive type cigarette lighter element.
78
Interior Convenience Items
Console Compartments
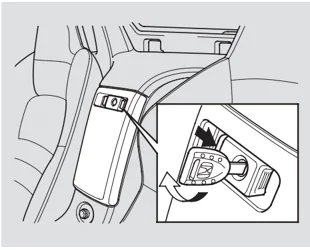
The area between the seats has two compartments. Open the lower compartment by squeezing the handle. Close it with a firm push. You can lock or unlock the lower compartment with the master key.
Audio Panel
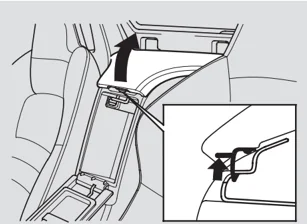
The lever to open the upper compartment is inside the lower compartment. Push up the lever, and lift the lid. To close, lower the lid, and push it down until it latches.
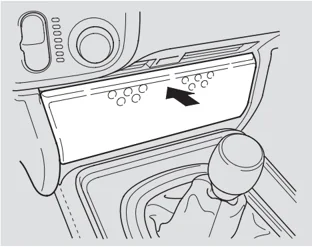
To open the audio panel, push on the top center, and let the panel swing down. To close, pivot the panel up, and push on it until it latches.
Instruments and Controls
79
Interior Convenience Items, Interior Light
Dashboard Lower Pocket
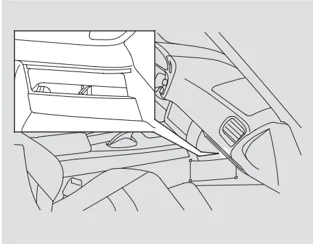
The dashboard lower pocket is located next to the audio panel.
Interior Light
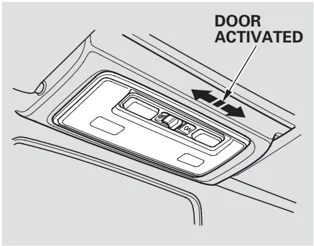
The interior light has a three-position switch; ON, Door Activated, and OFF. In the Door Activated (center) position, the light comes on when you:
- Open either door.
- Unlock the doors with the key or the remote transmitter.
If the switch is in the center position, the interior light will come on when you remove the key from the ignition switch.
80
Interior Light
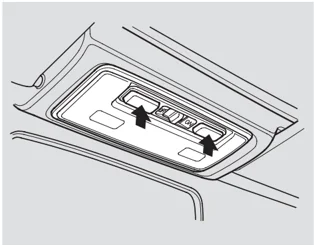
When the switch is in the center position with both doors closed, the two bulbs in the interior light can each be turned on and off with the button next to it.
Instruments and Controls
81
Main Menu
Main Menu
Features
The heating and air conditioning system in your vehicle provides a comfortable driving environment in all weather conditions.
The standard audio system has many features. This section describes those features and how to use them. (If you have an optional audio system, refer to the operating instructions that came with it.)
Your vehicle has an anti-theft audio system that requires a code number to enable it.
- Vents, Heating, and A/C ........ 84
- Playing the AM/FM Radio ........ 88
- AM/FM Radio Reception ........ 91
- Playing the XM® Satellite Radio ........ 93
- Playing a CD ........ 98
- CD Changer ........ 100
- Protecting Your CDs ........ 101
- CD Player Error Messages ........ 102
- CD Changer Error Messages ........ 103
- Remote Audio Controls ........ 104
- Radio Theft Protection ........ 105
- Cruise Control ........ 106
Features
83