Gauges
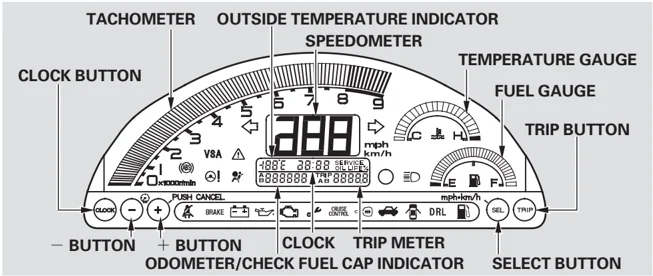
Odometer The odometer shows the total distance your vehicle has been driven. It measures miles in U.S. models and kilometers in Canadian models. It is illegal under U.S. federal law and Canadian provincial regulations to disconnect, reset, or alter the odometer with the intent to change the number of miles or kilometers indicated.
Trip Meter The trip meter shows the number of miles or kilometers driven since you last reset it.
There are two trip meters: Trip A and Trip B. Switch between these displays by pressing the TRIP button repeatedly. Each trip meter works independently, so you can keep track of two different distances.
To reset a trip meter, display it, and then press and hold the TRIP button until you hear a beep and the number resets to "0.0".
Select Button The select button switches the speedometer reading between miles per hour and kilometers per hour. It also changes the odometer and trip meters to read in miles or kilometers correspondingly. To change the readings, push the SELECT button, and hold it until you hear a beep.
51
Gauges
Fuel Gauge
This shows how much fuel you have. It may show slightly more or less than the actual amount.
NOTICE Avoid driving with an extremely low fuel level. Running out of fuel could cause the engine to misfire, damaging the catalytic converter.
Check Fuel Cap Message
Your vehicle’s on board diagnostic system will detect a loose or missing fuel fill cap as an evaporative system leak. The first time a leak is detected a “CHECK FUEL CAP” message appears on the information display. Turn the engine off, and confirm the fuel fill cap is installed. If it is, loosen it, then retighten it until it clicks at least once. The message should go off after several days of normal driving once you tighten or replace the fuel fill cap. To scroll to another display, press the trip button. The “CHECK FUEL CAP” message will appear each time you restart the engine until the system turns the message off.
If the system still detects a leak in the vehicle’s evaporative emissions system, the malfunction indicator lamp (MIL) comes on. If the fuel fill cap was not already tightened, turn the engine off, and check or retighten the fuel fill cap until it clicks at least once. The MIL should go off after several days of normal driving once the cap is tightened or replaced. If the MIL does not go off, have your vehicle inspected by a dealer. For more information, see page 187.
52
Gauges
Temperature Gauge This shows the temperature of the engine’s coolant. During normal operation, the reading should be in the middle of the gauge. In severe driving conditions, such as very hot weather or a long period of uphill driving, the reading may reach near the red mark. If it reaches the red (Hot) mark, pull safely to the side of the road. See page 183 for instructions and precautions on checking the engine’s cooling system.
Outside Temperature Indicator This indicator displays the outside temperature in Fahrenheit (U.S. models) or Centigrade (Canadian models).
The temperature sensor is in the front bumper. Therefore, the temperature reading can be affected by heat reflection from the road surface, engine heat, and the exhaust from surrounding traffic. This can cause an incorrect temperature reading when your speed is under 19 mph (30 km/h).
The sensor delays the indicator update until it reaches the correct outside temperature. This may take several minutes.
If the outside temperature is incorrectly displayed, you can adjust it up to ±5°F in U.S. models (±3°C in Canadian models) warmer or cooler.
NOTE: The temperature must be stabilized before doing this procedure.
To adjust the outside temperature indicator, make sure the outside temperature indicator is shown in the display, then press and hold the TRIP button for 10 seconds (the TRIP A or B is also reset). The following sequence will appear for 1 second each: 0, 1, 2, 3, 4, 5, −5, −4, −3, −2, −1, 0 (U.S.) or 0, 1, 2, 3, −3, −2, −1, 0 (Canada).
When it reaches the desired value, release the TRIP button. You should see the new outside temperature displayed.
In certain weather conditions, temperature readings near freezing (32°F, 0°C) could mean that ice is forming on the road surface.
Instruments and Controls
53
Main Menu Table of Contents
Gauges
Maintenance Minder The information display in the instrument panel shows you the engine oil life and maintenance service items when the ignition switch is in the ON (II) position. This information helps to keep you aware of the periodic maintenance your vehicle needs for continued trouble-free driving. Refer to page 135 for more information.
Clock The clock displays the time with the ignition switch in the ON (II) position.
To set the clock:
-
Turn the ignition switch to the ON (II) position.
-
Press and hold the CLOCK button until the minute display blinks. Adjust the minute by pressing the + or − button.
-
When you finish the minute adjustment, press and release the CLOCK button. The hour display will blink. Adjust the hour by pressing the + or − button.
-
When you finish your adjustments, press the CLOCK button again.
54
Controls Near the Steering Wheel
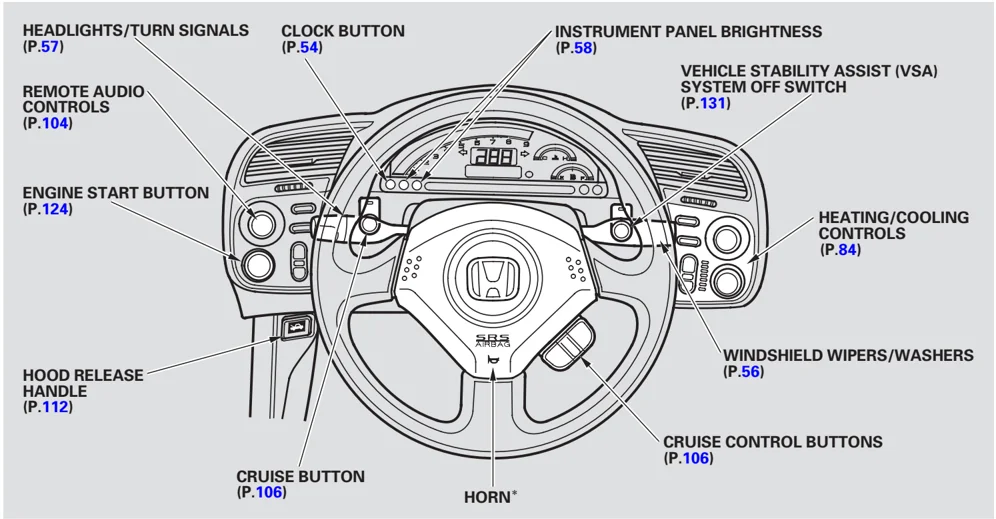
HEADLIGHTS/TURN SIGNALS (P.57)
CLOCK BUTTON (P.54)
INSTRUMENT PANEL BRIGHTNESS (P.58)
REMOTE AUDIO CONTROLS (P.104)
VEHICLE STABILITY ASSIST (VSA) SYSTEM OFF SWITCH (P.131)
ENGINE START BUTTON (P.124)
HEATING/COOLING CONTROLS (P.84)
HOOD RELEASE HANDLE (P.112)
WINDSHIELD WIPERS/WASHERS (P.56)
CRUISE BUTTON (P.106)
HORN*
CRUISE CONTROL BUTTONS (P.106)
Instruments and Controls
- To use the horn, press the pad around the “H” logo.
55
Windshield Wipers and Washers
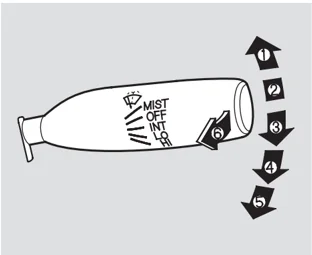
- MIST
- OFF
- INT — Intermittent
- LO — Low speed
- HI — High speed
- Windshield washers
Push the right lever up or down to select a position.
MIST — The wipers run at high speed until you release the lever.
OFF — The wipers are not activated.
INT — The wipers operate every few seconds. In low speed and high speed, the wipers run continuously.
LO — The wipers run at low speed.
HI — The wipers run at high speed.
Windshield Washers — Pull the wiper control lever toward you, and hold it. The washers spray until you release the lever. The wipers run at low speed, then complete one more sweep after you release the lever.
56
Turn Signal and Headlights
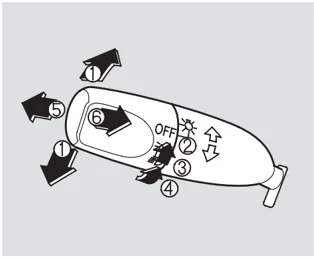
- Turn Signal
- Off
- Parking and indicator lights
- Headlights on
- High beams
- Flash high beams
Turn Signal — Push down on the lever to signal a left turn and up to signal a right turn. To signal a lane change, push lightly on the lever, and hold it. The lever will return to center when you release it or complete a turn.
Headlights On — Turning the switch to the “☼” position turns on the parking lights, taillights, instrument panel lights, side-marker lights, and rear license plate lights.
Turning the switch to the “≡D” position turns on the headlights. If you leave the lights on with the key removed from the ignition switch, you will hear a reminder buzzer when you open the driver’s door.
High Beams — Push the lever forward until you hear a click. The high beam indicator will come on (see page 49). Pull the lever back to return to the low beams.
To flash the high beams, pull the lever back lightly, then release it. The high beams will stay on as long as you hold the lever back.
Daytime Running Lights With the headlight switch off, the high beam headlights and the high beam indicator come on with reduced brightness when you turn the ignition switch to the ON (II) position and release the parking brake. They remain on until you turn the ignition switch off, even if you set the parking brake.
The headlights revert to normal operation when you turn them on with the switch.
Instruments and Controls
57
Instrument Panel Brightness, Hazard Warning Button
Instrument Panel Brightness
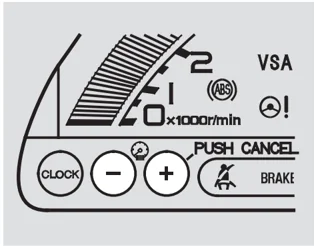
The buttons in the lower left corner of the instrument panel adjust the brightness of the display in five steps. Push the + or − button five times to see the full range.
To reduce glare at night, the instrument panel illumination dims when you turn the light switch to the ☼ or ☾ position. Adjust the brightness to the desired level with the headlight switch off, and also with the headlight switch on. Both settings will remain at those levels until you change them.
With the headlight switch on, you can switch the display to full daytime brightness by pushing and holding the + button. Push the − button to return the display to the original brightness.
Hazard Warning Button
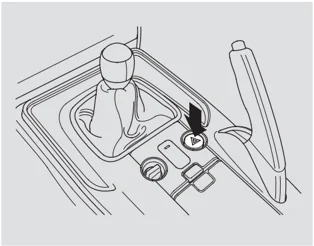
Push the red button next to the parking brake to turn on the hazard warning lights (four-way flashers). This causes all four outside turn signals and both indicators in the instrument panel to flash. Use the hazard warning lights if you need to park in a dangerous area near heavy traffic, or if your vehicle is disabled.
58
Rear Window Defogger
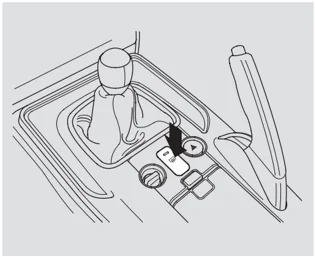
The rear window defogger will clear fog, frost, and thin ice from the window. Push the defogger button to turn it on and off. The indicator in the button comes on to show the defogger is on. If you do not turn it off, the defogger will shut itself off after about 15 minutes. It also shuts off when you turn off the ignition switch. You have to turn the defogger on again when you restart the vehicle.
Do not push the defogger button when the convertible top is folded.
Make sure the rear window is clear and you have good visibility before starting to drive.
The defogger wires on the inside of the rear window can be accidentally damaged. When cleaning the glass, always wipe side-to-side.
Instruments and Controls
59
Keys and Locks
 MASTER KEYS (BLACK) VALET KEY (GREY) KEY NUMBER TAG
The master key fits all the locks on your vehicle.
The valet key works only in the ignition and the door locks. You can keep the trunk and the lower console compartment locked when you leave your vehicle and the valet key at a parking facility.
You should have received a key number tag with your keys. You will need this key number if you ever have to get a key replaced. Use only Honda-approved key blanks.
These keys contain electronic circuits that are activated by the immobilizer system. They will not work to start the engine if the circuits are damaged.
• Protect the keys from direct sunlight, high temperature, and high humidity.
• Do not drop the keys or set heavy objects on them.
• Keep the keys away from liquids. If they get wet, dry them immediately with a soft cloth.
The keys do not contain batteries. Do not try to take them apart.
60
Main Menu Table of Contents
Immobilizer System
The immobilizer system protects your vehicle from theft. If an improperly-coded key (or other device) is used, the engine’s fuel system is disabled.
When you turn the ignition switch to the ON (II) position, the immobilizer system indicator should come on for a few seconds, then go off. If the indicator starts to blink, it means the system does not recognize the coding of the key. Turn the ignition switch to the LOCK (0) position, remove the key, reinsert it, and turn the ignition switch to the ON (II) position again.
The system may not recognize your key’s coding if another immobilizer key or other metal object (i.e. key fob) is near the ignition switch when you insert the key.
If the system repeatedly does not recognize the coding of your key, contact your dealer.
Do not attempt to alter this system or add other devices to it. Electrical problems could result that may make your vehicle undrivable.
If you lose your key and cannot start the engine, contact your dealer.
As required by the FCC: This device complies with Part 15 of the FCC rules. Operation is subject to the following two conditions: (1) This device may not cause harmful interference, and (2) this device must accept any interference received, including interference that may cause undesired operation.
Changes or modifications not expressly approved by the party responsible for compliance could void the user’s authority to operate the equipment.
This device complies with Industry Canada Standard RSS-210. Operation is subject to the following two conditions: (1) this device may not cause interference, and (2) this device must accept any interference that may cause undesired operation of the device.
Instruments and Controls
61
Ignition Switch
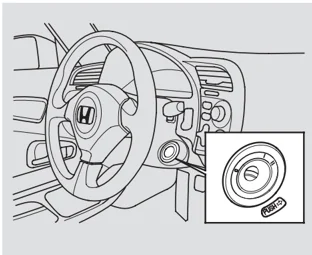
The ignition switch has three positions: LOCK (0), ACCESSORY (I), and ON (II).
LOCK (0) — You can insert or remove the key only in this position. To turn the key, push it in slightly.
If the front wheels are turned, the anti-theft lock may make it difficult to turn the key. Firmly turn the steering wheel to the left or right as you turn the key.
ACCESSORY (I) — You can operate the audio system and the accessory power socket in this position.
ON (II) — This is the normal key position when driving. Several of the indicators on the instrument panel come on as a test when you turn the ignition switch from the ACCESSORY (I) to the ON (II) position.
The engine can be started with the key in this position by pressing the engine START button (see page 122 ).
You will hear a reminder beeper if you leave the key in the ignition switch in the LOCK (0) or the ACCESSORY (I) position and open the driver’s door. Remove the key to turn off the beeper.
WARNING
Removing the key from the ignition switch while driving locks the steering. This can cause you to lose control of the vehicle.
Remove the key from the ignition switch only when parked.
62
Power Door Locks, Trunk
Power Door Locks
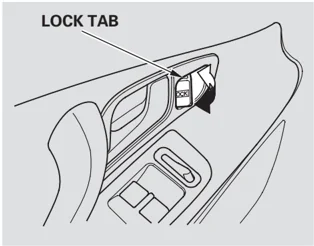
Each door has a lock tab next to the inside door handle. When you push in the lock tab on the driver’s door, both doors lock. Pulling out the lock tab on the driver’s door only unlocks that door. The lock tab on the passenger’s door only locks and unlocks that door.
To lock the passenger’s door when getting out of the vehicle, push the lock tab in and close the door. To lock the driver’s door, remove the key from the ignition switch, pull out either the inside or outside door handle and push the lock tab in, then close the door.
Both doors lock when you use the key in the driver’s door. Using the key in the passenger’s door only locks and unlocks that door.
To unlock only the driver’s door from the outside, insert the key in the driver’s door lock, turn the key and release it. If you turn the key and hold it, both doors will unlock.
Trunk
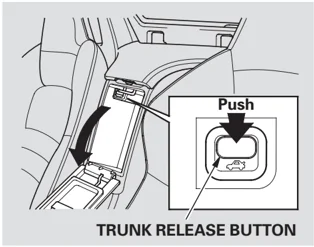
To open the trunk, press the trunk release button in the lower console compartment. To protect items in the trunk when you need to give the key to someone else, lock the lower console compartment with the master key, and give the other person the valet key.
To close the trunk, press down on the trunk lid.
63
Trunk
MASTER KEY
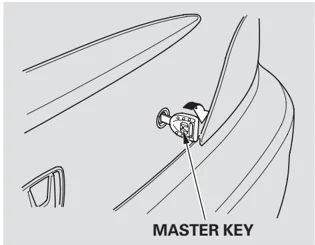
You can also use the master key to open the trunk lock.
To open the trunk with the remote transmitter, press and hold the TRUNK RELEASE button for about 1 second (see page 65).
Keep the trunk lid closed at all times while driving to avoid damaging the lid, and to prevent exhaust gas from getting into the interior. See Carbon Monoxide Hazard on page 41.
Emergency Trunk Opener
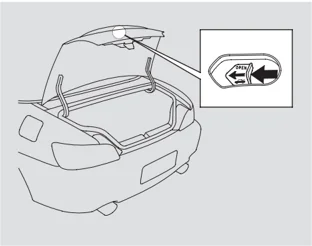
As a safety feature, your vehicle has a release lever on the trunk latch so the trunk can be opened from the inside. To open the trunk, push the release lever to the left.
Parents should decide if their children should be shown how to use this feature. For more information about child safety, see page 32.
64
Remote Transmitter
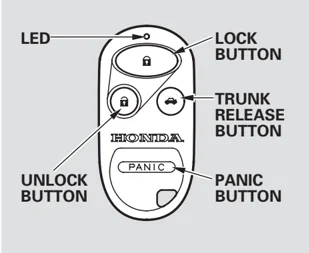
LOCK — Press this button once to lock both doors. Some exterior lights will flash. When you push LOCK twice within 5 seconds, you will hear a beep to verify that the doors are locked.
UNLOCK — Press this button once to unlock the driver’s door. Push it twice to also unlock the passenger’s door.
The interior light (if the interior light switch is in the center position) will come on when you press the UNLOCK button. If you do not open either door within 30 seconds, the light goes out. If you relock the doors with the remote transmitter before 30 seconds have elapsed, the light will go off immediately.
If you do not open either door within 30 seconds, the doors automatically relock.
You cannot lock or unlock the doors with the remote transmitter if either door is not fully closed or the key is in the ignition switch.
TRUNK — Press this button for about 1 second to open the trunk. You cannot open the trunk if the key is in the ignition switch.
PANIC — Press this button for about 1 second to attract attention; the horn will sound and the exterior lights will flash for about 30 seconds. To cancel panic mode, press any other button on the remote transmitter, or turn the ignition switch to the ON (II) position.
Remote Transmitter Care
- Avoid dropping or throwing the transmitter.
- Protect the transmitter from extreme temperature.
- Do not immerse the transmitter in any liquid.
- If you lose a transmitter, the replacement needs to be reprogrammed by your dealer.
65
Instruments and Controls
Remote Transmitter
Replacing the Transmitter Battery
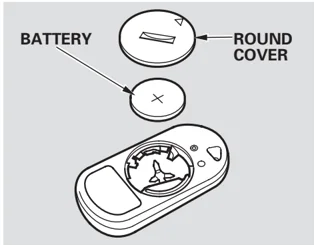
If it takes several pushes on the button to lock or unlock the doors, replace the battery as soon as possible. Battery type: CR2025
To replace the battery, remove the round cover on the back of the transmitter by turning it counterclockwise with a coin. Insert a new battery with the + side facing up. Align the ∇ mark on the cover with the ◎ mark on the transmitter. Set the cover in place, and turn it clockwise.
An improperly disposed of battery can hurt the environment. Always confirm local regulations for battery disposal.
As required by the FCC: This device complies with Part 15 of the FCC rules. Operation is subject to the following two conditions: (1) This device may not cause harmful interference, and (2) this device must accept any interference received, including interference that may cause undesired operation.
Changes or modifications not expressly approved by the party responsible for compliance could void the user's authority to operate the equipment.
This device complies with Industry Canada Standard RSS-210. Operation is subject to the following two conditions: (1) this device may not cause interference, and (2) this device must accept any interference that may cause undesired operation of the device.
66
Seats
See pages 10 – 12 for important safety information and warnings about how to properly position the seats and seat-backs.
Make all seat adjustments before you start driving.
 To adjust the seat forward and backward, pull up on the lever under the seat cushion’s front edge. Then try to move the seat to make sure it is locked in position.
 To change the seat-back angle, pull up on the lever on the outside of the seat bottom.
Instruments and Controls
67