Vents, Heating, and A/C
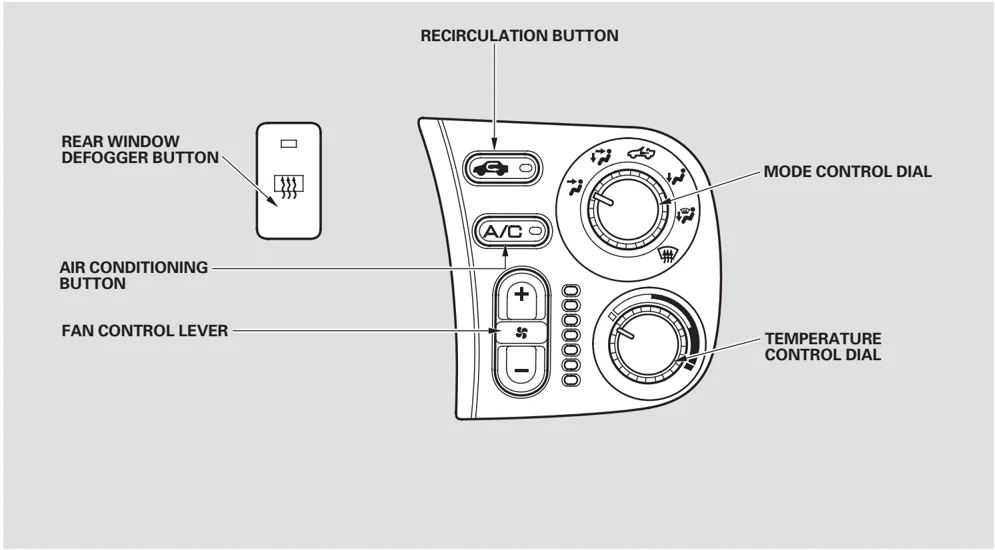
REAR WINDOW DEFOGGER BUTTON
RECIRCULATION BUTTON
MODE CONTROL DIAL
AIR CONDITIONING BUTTON
FAN CONTROL LEVER
TEMPERATURE CONTROL DIAL
84
Vents, Heating, and A/C
Airflow Controls
Fan Control Lever Push this lever up and down to increase or decrease the fan speed and airflow. The indicators next to the lever show you the speed and airflow selected.
Temperature Control Dial Turning this dial clockwise increases the temperature of the airflow.
Air Conditioning (A/C) Button This button turns the air conditioning on and off. The indicator in the button comes on when the A/C is on.
Recirculation Button When the recirculation indicator is on, air from the vehicle’s interior is sent through the system again (recirculation mode). When the indicator is off, air is brought in from the outside of the vehicle (fresh air mode).
The outside air intakes for the heating and cooling system are at the base of the windshield. Keep this area clear of leaves and other debris.
The system should be left in fresh air mode under almost all conditions. Keeping the system in recirculation mode, particularly with the A/C off, can cause the windows to fog up.
Switch to recirculation mode when driving through dusty or smoky conditions, then return to fresh air mode.
Rear Window Defogger Button This button turns the rear window defogger off and on (see page 59).
Do not push the defogger button when the convertible top is folded.
Mode Control Dial Use the mode control dial to select the vents the air flows from. Some air will flow from the dashboard vents in all modes.
Air flows from the vents on both sides of the instrument panel, and from the dashboard vent in front of the passenger.
Airflow is divided between the vents in the dashboard and the floor vents.
Features
CONTINUED
85
Vents, Heating, and A/C
Air flows from the center vents in the dashboard above the audio system, the vents on both sides of the instrument panel, and from the floor vents. Select this position when you drive with the convertible top folded.
Air flows from the floor vents and the vents on both sides of the instrument panel.
Airflow is divided between the floor vents and the defroster vents at the base of the windshield, and the vents on both sides of the instrument panel.
Air flows from the defroster vents at the base of the windshield and the vents on both sides of the instrument panel.
When you select or , the system automatically switches to fresh air mode and turns on the A/C.
Ventilation
The flow-through ventilation system draws in outside air, circulates it through the interior, then exhausts it through vents behind the seat-backs.
- Set the temperature to the lower limit.
- Make sure the A/C is off.
- Select and fresh air mode.
- Set the fan to the desired speed.
Using the Heater
The heater uses engine coolant to warm the air. If the engine is cold, it will be several minutes before you feel warm air coming from the system.
- Select and fresh air mode.
- Set the fan to the desired speed.
- Adjust the warmth of the air with the temperature control dial.
Using the A/C
Air conditioning places an extra load on the engine. Watch the engine coolant temperature gauge (see page 53). If it moves near the red zone, turn off the A/C until the gauge reading returns to normal.
- Turn on the A/C by pressing the button. The indicator in the button comes on when a fan speed is selected.
- Make sure the temperature is set to maximum cool.
- Select .
- If the outside air is humid, select recirculation mode. If the outside air is dry, select fresh air mode.
- Set the fan to the desired speed.
If the interior is very warm, you can cool it down more rapidly by partially opening the windows, turning on the A/C, and setting the fan to maximum speed in fresh air mode.
86
Vents, Heating, and A/C
Dehumidify the Interior Air conditioning, as it cools, removes moisture from the air. When used in combination with the heater, it makes the interior warm and dry and can prevent the windows from fogging up.
- Turn the fan on.
- Turn on the air conditioning.
- Select [icon: airflow to feet] and fresh air mode.
- Adjust the temperature to your preference.
This setting is suitable for all driving conditions whenever the outside temperature is above 32°F (0°C).
To Defog and Defrost To remove fog from the inside of the windows:
- Set the fan to the desired speed, or high for faster defrosting.
- Select [icon: airflow to windshield]. The system automatically switches to fresh air mode and turns on the A/C.
- Adjust the temperature so the airflow feels warm.
- Select [icon: rear window defroster] to help clear the rear window.
- To increase airflow to the windshield, close the corner vents.
When you select [icon: airflow to feet] or [icon: airflow to windshield], the system automatically turns on the A/C. This helps to dehumidify the air and to defog the windshield. In either mode, you cannot turn off the A/C.
When you switch to another mode from [icon: airflow to windshield], the A/C stays on. Press the A/C button to turn it off.
To Remove Exterior Frost or Ice From the Windows
- Select [icon: airflow to windshield]. The system automatically switches to fresh air mode and turns on the A/C.
- Select [icon: recirculation].
- Set the fan and temperature controls to the maximum level.
To clear the windows faster, you can close the dashboard corner vents and the vents on both sides of the instrument panel by rotating the wheel below the vent. This will send more warm air to the windshield defroster vents. Once the windshield is clear, select fresh air mode to avoid fogging the windows.
For your safety, make sure you have a clear view through all the windows before driving.
To Turn Everything Off Push the fan control level down until the indicator goes off. A lack of airflow can cause the windows to fog up. You should keep the fan on at all times so stale air and moisture do not build up in the interior and cause fogging.
Features
87
Playing the AM/FM Radio
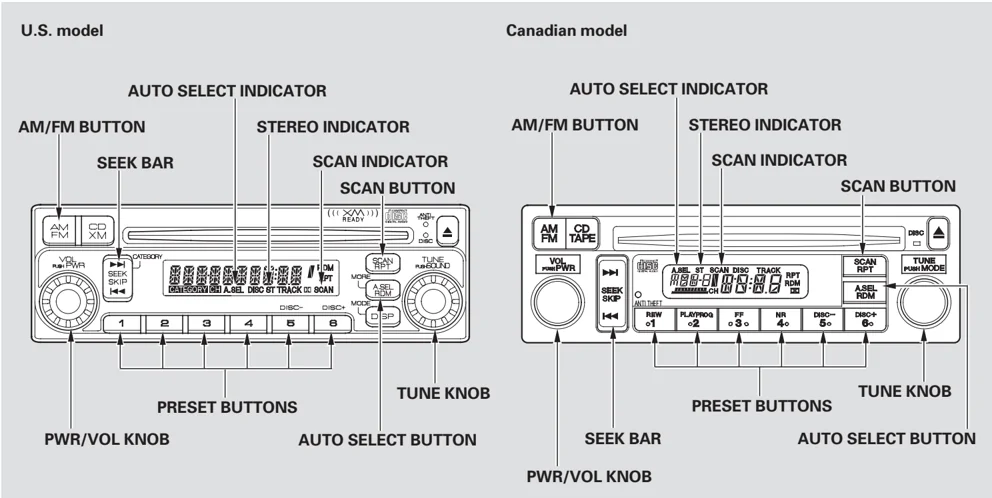
U.S. model
AUTO SELECT INDICATOR AM/FM BUTTON SEEK BAR STEREO INDICATOR SCAN INDICATOR SCAN BUTTON
PWR/VOL KNOB PRESET BUTTONS TUNE KNOB AUTO SELECT BUTTON
Canadian model
AUTO SELECT INDICATOR AM/FM BUTTON STEREO INDICATOR SCAN INDICATOR SCAN BUTTON
PWR/VOL KNOB SEEK BAR PRESET BUTTONS TUNE KNOB AUTO SELECT BUTTON
88
Playing the AM/FM Radio
To Play the Radio The ignition switch must be in the ACCESSORY (I) or the ON (II) position. Turn the system on by pushing the PWR/VOL knob or the AM/FM button. Adjust the volume by turning the same knob.
The band and frequency that the radio was last tuned to is displayed. To change bands, press the AM/FM button. On the FM band, ST will be displayed if the station is broadcasting in stereo. Stereo reproduction in AM is not available.
To Select a Station You can use any of five methods to find radio stations on the selected band: tune, seek, scan, the preset buttons, and auto select.
TUNE — Use the TUNE knob to tune the radio to a desired frequency. Turn the knob right to tune to a higher frequency, or left to tune to a lower frequency.
SEEK — The seek function searches up and down from the current frequency to find a station with a strong signal. To activate it, press the ◀◀ or ▶▶ side of the bar, then release it.
SCAN — The scan function samples all stations with strong signals on the selected band. To activate it, press the SCAN button, then release it. You will see SCAN in the display. The system will scan for a station with a strong signal. When it finds one, it will stop and play that station for about 5 seconds.
If you do nothing, the system will scan for the next strong station and play it for 5 seconds. When it plays a station you want to listen to, press the SCAN button again.
PRESET — Each preset button (1–6) can store one station on AM, and two stations on FM.
- Select the desired band, AM or FM. FM1 and FM2 let you store twelve stations.
- Use the tune, seek, or scan function to tune the radio to a desired station.
- Pick a preset number (1–6), and hold it until you hear a beep.
- Repeat steps 1 through 3 to store a total of six stations on AM and twelve stations on FM.
The preset frequencies may be lost if your vehicle’s battery goes dead, is disconnected, or the radio fuse is removed.
Features
CONTINUED
89
Playing the AM/FM Radio
AUTO SELECT — If you are traveling far from home and can no longer receive your preset stations, you can use the auto select feature to find stations in the local area.
Press the A. SEL button. “A. SEL” flashes in the display, and the system goes into scan mode for several seconds. It stores the frequencies of six AM and twelve FM stations in the preset buttons.
You will see a “0” displayed after pressing a preset button if auto select cannot find a strong station for that preset button.
If you do not like the stations auto select has stored, you can store other frequencies on the preset buttons as previously described.
To turn off auto select, press the A. SEL (auto select) button. This restores the presets you originally set.
Adjusting the Sound BAL — Adjusts the balance, or side-to-side strength of the sound.
FAD — Adjusts the fader, or the front-to-back strength of the sound.
TRE — Adjusts the treble in the sound.
BAS — Adjusts the bass in the sound.
Press the SOUND/MODE (TUNE) knob repeatedly to display the bass (BAS), treble (TRE), fader (FAD), and balance (BAL) setting.
Turn the knob to adjust the setting. When the level reaches the center, you will see a “C” in the display. The system will return to the audio display in about 5 seconds.
Audio System Lighting You can use the instrument panel brightness control buttons to adjust the illumination of the audio system (see page 58). The audio system illuminates when the parking lights are on, even if the radio is off.
90
AM/FM Radio Reception
Radio Frequencies
The radio can receive the complete AM and FM bands. Those bands cover these frequencies:
AM band: 530 to 1,710 kHz FM band: 87.7 to 107.9 MHz
Radio stations on the AM band are assigned frequencies at least 10 kHz apart (530, 540, 550). Stations on the FM band are assigned frequencies at least 0.2 MHz apart (87.9, 88.1, 88.3).
Stations must use these exact frequencies. It is fairly common for stations to round-off the frequency in their advertising, so your radio could display a frequency of 100.9 even though the announcer may identify the station as “FM101.”
Radio Reception
How well the radio receives stations is dependent on many factors, such as the distance from the station’s transmitter, nearby large objects, and atmospheric conditions.
A radio station’s signal gets weaker as you get farther away from its transmitter. If you are listening to an AM station, you will notice the sound volume becoming weaker, and the station drifting in and out. If you are listening to an FM station, you will see the stereo indicator flickering off and on as the signal weakens. Eventually, the stereo indicator will go off and the sound will fade completely as you get out of range of the station’s signal.
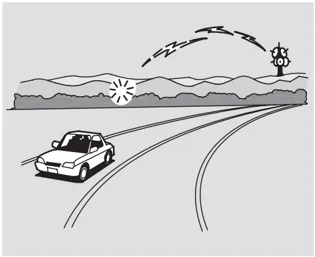
Driving very near the transmitter of a station that is broadcasting on a frequency close to the frequency of the station you are listening to can also affect your radio’s reception. You may temporarily hear both stations, or hear only the station you are close to.
Features
CONTINUED
91
Main Menu Table of Contents
AM/FM Radio Reception
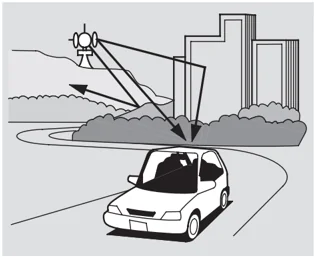
Radio signals, especially on the FM band, are deflected by large objects such as buildings and hills. Your radio then receives both the direct signal from the station’s transmitter, and the deflected signal. This causes the sound to distort or flutter. This is a main cause of poor radio reception in city driving.
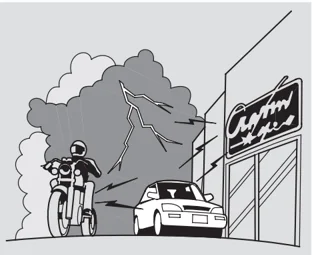
Radio reception can be affected by atmospheric conditions such as thunderstorms, high humidity, and even sunspots. You may be able to receive a distant radio station one day and not receive it the next day because of a change in conditions.
Electrical interference from passing vehicles and stationary sources can cause temporary reception problems.
As required by the FCC: Changes or modifications not expressly approved by the party responsible for compliance could void the user’s authority to operate the equipment.
92
Playing the XM® Satellite Radio (Optional on U.S. Models)
Optional on U.S. models Not available on Canadian models Your vehicle is capable of receiving XM® Satellite Radio anywhere in the United States, except Hawaii and Alaska.
XM® is a registered trademark of XM Satellite Radio, Inc.
Satellite radio receives signals from two satellites to produce clear, high-quality digital reception. It offers many channels in several categories. Along with a large selection of different types of music, satellite radio also allows you to view channel and category selections in the audio display.
Features
93
Playing the XM® Satellite Radio (Optional on U.S. Models)
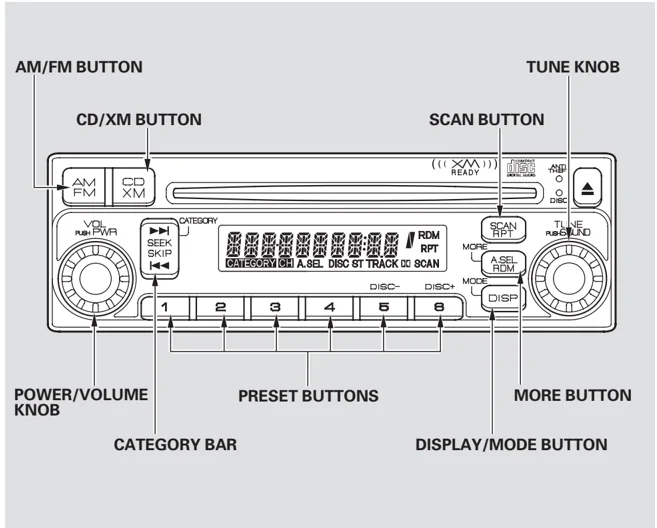
Playing the Satellite Radio To listen to satellite radio, turn the ignition switch to the ACCESSORY (I) or the ON (II) position. Push the PWR/VOL knob to turn on the audio system, and press the CD/XM button. Adjust the volume by turning the PWR/VOL knob. The last channel you listened to will show in the display.
DISPLAY/MODE — Each time the DISP button is pressed and released, the display information changes in the following sequence: channel name, channel number, category, artist name, and music title.
You may experience periods when XM radio does not transmit the artist name and or the song title information. If this happens, there is nothing wrong with your system. This information is not available under certain situations.
If you press and hold the DISP/MODE button for 5 seconds, it will change between category mode and channel mode. The display will show CH for the channel mode or CATEGORY for the category mode.
In the channel mode, you can receive all of the available channels in all of the different categories. In category mode, you will receive only the stations within the selected category.
MORE — Expands the display to show the 6 remaining letters beyond the first 10 letters in an artist’s name or song title. The system is set up so only 16 letters can be displayed for any title or name. Press MORE to view the next 6 letters. The system will return to the original display after 8 seconds.
TUNE — Turn the TUNE knob left to go down the channels or right to go up. In the channel mode, the TUNE knob will tune up or down through all the channels available from the XM radio. In the category mode, the TUNE knob will cycle through only the channels within the category you have currently selected.
CATEGORY (SEEK/SKIP) — Use the CATEGORY bar to select a desired category, such as jazz, rock, classical, etc. In both category mode and channel mode, pressing the category bar will change the category up or down.
94
Playing the XM® Satellite Radio (Optional on U.S. Models)
SCAN — The scan function gives you a sampling of all channels while in the channel mode. In the category mode, only the channels within that category are scanned. To activate scan, press the SCAN button. The system plays each channel in numerical order for a few seconds, then selects the next channel. When you hear a channel you want to continue listening to, press the button again.
To store a channel: Preset — You can store up to 12 preset channels using the six preset buttons. Each button stores one channel from the XM1 band and one channel from the XM2 band.
To store a channel:
-
Press the CD/XM button. Either XM1 or XM2 will show in the display.
-
Use the TUNE knob, the CATEGORY bar, or the SCAN buttons to tune to a desired channel.
In category mode, only channels within that category can be selected. In channel mode, all channels can be selected.
-
Pick the preset button you want for that channel. Press and hold the button until you hear a beep.
-
Repeat steps 2 through 3 to store the first six channels.
-
Press the CD/XM button again. The available XM band will show. Store the next six channels using steps 2 through 3.
Once a channel is stored, simply press and release the proper preset button to tune to it.
The presets may be lost if your vehicle’s battery goes dead, is disconnected, or the radio fuse is removed.
Features
CONTINUED 95
Playing the XM® Satellite Radio (Optional on U.S. Models)
Signal may be blocked by mountains or large obstacles to the south.
Signal is weaker in these areas.
SATELLITE
GROUND REPEATER
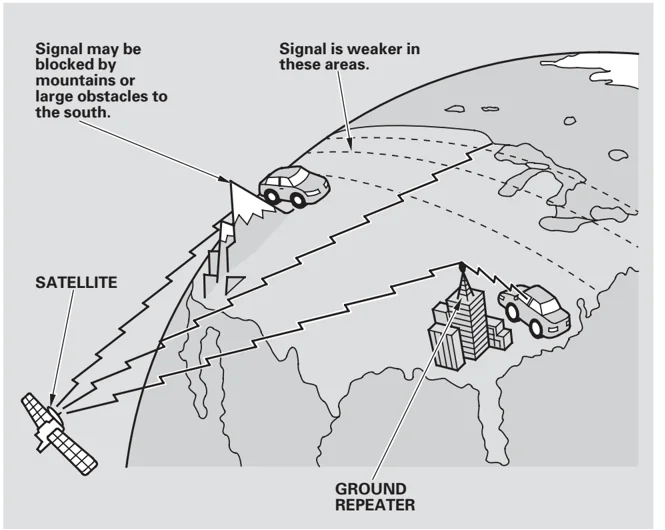
The XM satellites are in orbit over the equator; therefore, objects south of the vehicle may cause satellite reception interruptions. To help compensate for this, ground-based repeaters are placed in major metropolitan areas.
Satellite signals are more likely to be blocked by tall buildings and mountains the farther north you travel from the equator.
96
Playing the XM® Satellite Radio (Optional on U.S. Models)
Depending on where you drive, you may experience reception problems. Interference can be caused by any of these conditions:
- Driving on the south side of an east/west mountain road.
- Driving on the north side of a large commercial truck on an east/west road.
- Driving in tunnels.
- Driving on a road beside a vertical wall, steep cliff, or hill to the south of you.
- Driving on the lower level of a multi-tiered road.
- Driving on a single lane road alongside dense trees taller than 50 ft. (15 m) to the south of you.
There may also be other geographic situations that could affect satellite radio reception.
As required by the FCC: Changes or modifications not expressly approved by the party responsible for compliance could void the user's authority to operate the equipment.
Receiving Satellite Radio Service If your XM Radio service has expired, or you purchased your vehicle from a previous owner, you can listen to a sampling of the broadcasts available on XM Satellite Radio. With the ignition switch in the ACCESSORY (I) or the ON (II) position, push the PWR/VOL knob to turn on the audio system, and press the CD/XM button. A variety of music types and styles will play.
If you decide to purchase XM satellite radio service, contact XM Radio at www.xmradio.com, or at 1-800-852-9696. You will need to give them your radio I.D. number and your credit card number. To get your radio I.D. number, turn the TUNE knob until "0" appears in the display. Your I.D. will appear in the display.
After you've registered with XM Radio, keep your audio system in the Satellite Radio mode while you wait for activation. This should take about 30 minutes.
While waiting for activation, make sure your vehicle remains in an open area with good reception. Once your audio system is activated, "category" or "CH" will appear in the display, and you'll be able to listen to XM Radio broadcasts. XM Radio will continue to send an activation signal to your vehicle for at least 12 hours from the activation request. If the service has not been activated after 36 hours, contact XM Radio.
Features
97
Playing a CD
U.S. model Canadian model
CD BUTTON CD SLOT EJECT BUTTON REPEAT BUTTON REPEAT BUTTON CD BUTTON CD SLOT EJECT BUTTON
SEEK/SKIP BAR RANDOM BUTTON PWR/VOL KNOB
SEEK/SKIP BAR RANDOM BUTTON PWR/VOL KNOB
98
Playing a CD
To Play a CD
To load or play CDs, the ignition switch must be in the ACCESSORY (I) or the ON (II) position.
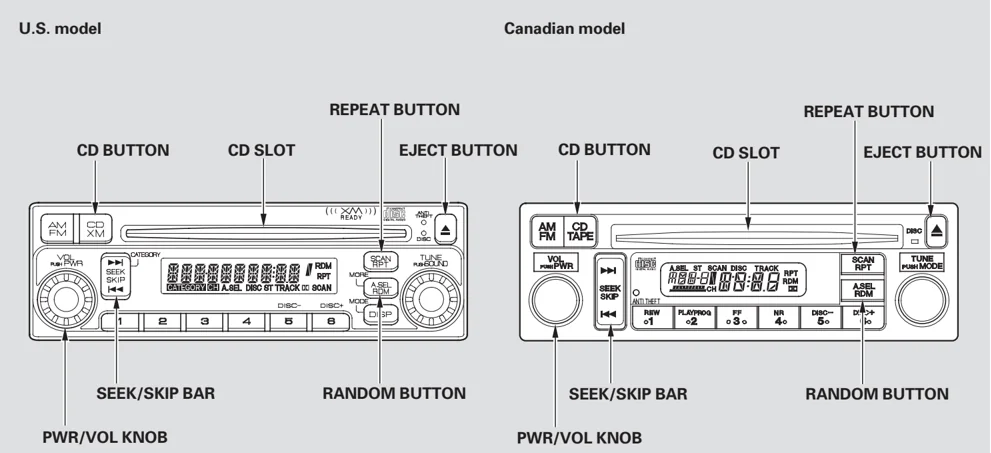
You operate the CD player with the same controls used for the radio. To select the CD player, press the CD button. The number of the track playing is shown in the display. The system will continuously play a CD until you change modes.
Insert a CD about halfway into the CD slot. The drive will pull the CD in the rest of the way and begin to play it. When the system reaches the end of the disc, it will return to the beginning and play the disc again.
NOTICE
Do not use discs with adhesive labels. The label can curl up and cause the disc to jam in the unit.
To play the radio when a CD is playing, press the AM/FM button. Press the CD button again to switch back to the CD player.
If you turn the system off while a CD is playing, either with the PWR/VOL knob or by turning off the ignition switch, the disc will stay in the drive. When you turn the system back on, the CD will begin playing where it left off.
To Change or Select Tracks
SKIP — Each time you press and release the ▶▶| side of the skip bar, the player skips forward to the beginning of the next track. Press and release the |◀◀ side of the bar to skip backward to the beginning of the current track. Press it again to skip to the beginning of the previous track.
To move rapidly within a track, press and hold ▶▶| or |◀◀ .
SEEK — To move rapidly within a track, press and hold the SEEK/SKIP bar. Press and hold ▶▶| to move forward. Press and hold |◀◀ to move backward. Release the bar when the system reaches the point you want.
Features
CONTINUED
99
Playing a CD, CD Changer
REPEAT — To continuously replay a track, press and release the RPT button. You will see RPT in the display. Press it again to turn it off.
RANDOM — This feature plays the tracks in random order. To activate random play, press and release the RDM button. You will see RDM in the display. Press it again to return to normal play.
To Stop Playing a CD
Press the eject button ( ▲ ) to remove the CD. If you eject the CD, but do not remove it from the slot, the system will automatically reload the CD after 15 seconds and put it in pause mode. To begin playing, press the CD button. Press the AM/FM button to switch to the radio while a CD is playing.
If you turn the system off while a CD is playing, either with the PWR/VOL knob or by turning off the ignition switch, the disc will stay in the drive. When you turn the system back on, the CD will begin playing where it left off.
Operating the Optional CD Changer
An optional six disc CD changer is available for your vehicle. This CD changer uses the same controls used for the in-dash CD player.
Load the desired CDs into the magazine, and load the magazine into the changer according to the instructions that came with the unit.
To select the CD changer, press the CD button. The CD and track numbers will be displayed. To select a different CD, use the preset 5 (DISC –) or preset 6 (DISC +) button. If you select an empty slot in the magazine, the changer will, after finding that slot empty, try to load the CD in the next slot.
100
Main Menu | Table of Contents
Protecting Your CDs
Protecting Your CDs
General Information
- When using CD-R discs, use only high quality CDs labeled for audio use.
- When recording a CD-R, the recording must be closed for it to be used by the system.
- CD-RW discs will not work in this unit.
- Play only standard round CDs. Odd-shaped CDs may jam in the drive or cause other problems.
- Handle your CDs properly to prevent damage and skipping.
Protecting CDs
When a CD is not being played, store it in its case to protect it from dust and other contamination. To prevent warpage, keep CDs out of direct sunlight and extreme heat.
To clean a CD, use a clean soft cloth. Wipe across the CD from the center to the outside edge.
A new CD may be rough on the inner and outer edges. The small plastic pieces causing this roughness can flake off and fall on the recording surface of the CD, causing skipping or other problems. Remove these pieces by rubbing the inner and outer edges with the side of a pencil or pen.
Never try to insert foreign objects in the CD player or the magazine.
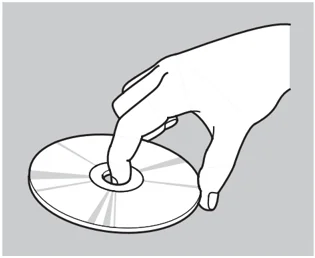
Handle a CD by its edges; never touch either surface. Do not place stabilizer rings or labels on the CD. These, along with contamination from fingerprints, liquids, and felt-tip pens, can cause the CD to not play properly or possibly jam in the drive.
Features
101
Main Menu Table of Contents
CD Player Error Messages
The chart on the right explains the error messages you may see in the display while playing a disc.
If you see an error message in the display while playing a disc, press the eject button. After ejecting the disc, check it for damage or deformation. If there is no damage, insert the disc again.
The audio system will try to play the disc. If there is still a problem, the error message will reappear. Press the eject button, and pull out the disc.
Insert a different disc. If the new disc plays, there is a problem with the first disc. If the error message cycle repeats and you cannot clear it, take your vehicle to a dealer.
CD Player Error Messages
*1 : U.S. model
*2 : Canadian model
102
CD Changer Error Messages
The chart on the right explains the error messages you may see in the display while playing a disc.
If you see an error message in the display while playing a disc, press the eject button. After ejecting the disc, check it for damage or deformation. If there is no damage, insert the disc again.
The audio system will try to play the disc. If there is still a problem, the error message will reappear. Press the eject button, and pull out the disc.
Insert a different disc. If the new disc plays, there is a problem with the first disc. If the error message cycle repeats and you cannot clear it, take your vehicle to a dealer.
\begin{tabular}{|l|l|l|} \hline Error Message & Cause & Solution \ \hline DISC DISC1 & FOCUS Error & Press the magazine eject button, pull out the magazine, and check for an error message. Insert the magazine again. If the error message does not disappear or the magazine cannot be pulled out, see your dealer. \ \hline CD DISC2 & No CD in the CD magazine & Insert CD. \ \hline DISC ERR1 & Mechanical Error & Press the magazine eject button, and pull it out. Check for an error message, and insert the magazine again. If the error message does not disappear or the magazine cannot be pulled out, see your dealer. \ \hline CD ERR2 & & \ \hline DISC HOT1 & High temperature & Will disappear when the temperature returns to normal. \ \hline CD Hot2 & & \ \hline DISC EJECT1 & No CD magazine in the CD changer & Insert CD magazine. \ \hline CD EJEC2 & & \ \hline \end{tabular}
*1: U.S. model *2: Canadian model
Features
103
Remote Audio Controls
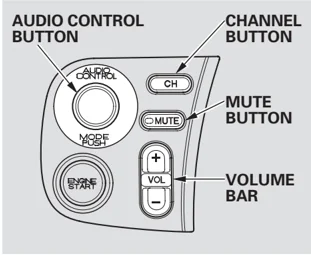
Four controls for the audio system are on the left side of the dashboard by the instrument panel. These let you control basic functions without distracting your attention from driving.
Use the VOLUME bar to adjust the volume. Push + to increase the volume and – to decrease it. Hold the lever until the volume reaches the desired level, then release it.
If you want to mute the sound temporarily, push the MUTE button. The indicator in the button will come on to indicate the mute function is on. Press the button again to cancel mute.
The AUDIO CONTROL button changes the mode. Pressing the button repeatedly selects FM1, FM2, AM, CD (if a CD is loaded), CD changer (if you have the optional CD changer), or XM1 and XM2 (if you have the optional satellite radio feature).
The CHANNEL button has two functions, depending on whether you are listening to the radio, or playing a CD.
If you are listening to the radio, use the CHANNEL button to change stations. Each time you press this button, the system advances to the next preset station on the band you are listening to. You will see the number of the selected preset button in the audio system display.
If you are playing a CD, the system skips to the beginning of the next track each time you push the CHANNEL button.
These controls work only with the factory-installed audio system. They will not function if you install any non-Honda system.
104
Radio Theft Protection
Your vehicle’s audio system will disable itself if it is disconnected from electrical power for any reason. To make it work again, you must enter a specific five-digit code in the preset buttons. Because there are hundreds of number combinations possible from five digits, making the system work without knowing the exact code is nearly impossible.
You should have received a card that lists your audio system’s code and serial numbers. It is best to store this card in a safe place at home. In addition, you should write the audio system’s serial number in this owner’s manual.
If you lose the card, you must obtain the code number from a dealer. To do this, you will need the system’s serial number.
If your vehicle’s battery is disconnected or goes dead, or the radio fuse is removed, the audio system will disable itself. If this happens, you will see “CODE” (U.S. model) or “Code” (Canadian model) in the frequency display the next time you turn on the system. Use the preset buttons to enter the five-digit code. The code is on the radio code card included in your owner’s manual kit. When it is entered correctly, the radio will start playing.
If you make a mistake entering the code, do not start over; complete the five-digit sequence, then enter the correct code. You have 10 tries to enter the correct code. If you are unsuccessful in 10 attempts, you must then leave the system on for 1 hour before trying again.
You will have to store your favorite stations in the preset buttons after the system begins working. Your original settings were lost when the power was disconnected.
Features
105