Fuses
The vehicle’s fuses are contained in three fuse boxes.
INTERIOR
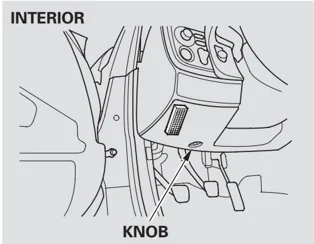
KNOB
The interior fuse box is underneath the dashboard on the driver’s side. To open it, turn the knob.
UNDER-HOOD (PRIMARY)
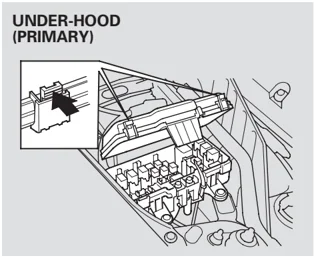
The primary under-hood fuse box is on the passenger’s side next to the battery. To open it, push the two tabs as shown.
UNDER-HOOD (AUXILIARY)
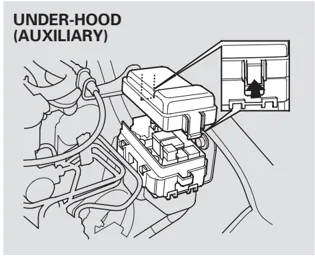
The auxiliary under-hood fuse box is on the driver’s side, near the brake fluid reservoir. To open it, push the tab on each side, and remove the lid.
190
Fuses
Checking and Replacing Fuses If something electrical in your vehicle stops working, check for a blown fuse first. Determine from the chart on pages 194 and 195, or the diagram on the fuse box lid, which fuse or fuses control that device. Check those fuses first, but check all the fuses before deciding that a blown fuse is the cause. Replace any blown fuses, and check if the device works.
- Turn the ignition switch to the LOCK (0) position. Make sure the headlights and all other accessories are off.
- Remove the cover from the fuse box.
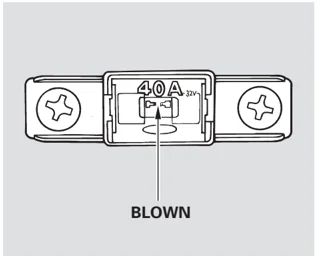
BLOWN
- Check each of the large fuses in the primary under-hood fuse box by looking through the top at the wire inside. Removing these fuses requires a Phillips-head screwdriver.
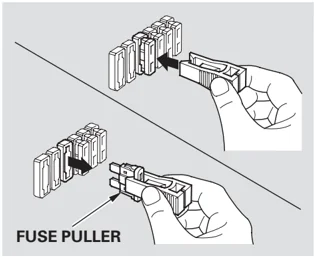
FUSE PULLER
- Check the smaller fuses in the under-hood fuse boxes and all the fuses in the interior fuse box by pulling out each one with the fuse puller provided in the interior fuse box.
Taking Care of the Unexpected
CONTINUED
191
Fuses
 BLOWN
- Look for a blown wire inside the fuse. If it is blown, replace it with one of the spare fuses of the same rating or lower.
If you cannot drive the vehicle without fixing the problem, and you do not have a spare fuse, take a fuse of the same rating or a lower rating from one of the other circuits. Make sure you can do without that circuit temporarily (such as the accessory power socket or radio).
If you replace the blown fuse with a spare fuse that has a lower rating, it might blow out again. This does not indicate anything wrong. Replace the fuse with one of the correct rating as soon as you can.
NOTICE
Replacing a fuse with one that has a higher rating greatly increases the chances of damaging the electrical system. If you do not have a replacement fuse with the proper rating for the circuit, install one with a lower rating.
- If the replacement fuse of the same rating blows in a short time, there is probably a serious electrical problem with your vehicle. Leave the blown fuse in that circuit, and have your vehicle checked by a qualified technician.
192
Fuses
If the radio fuse is removed, the audio system will disable itself. The next time you turn on the radio you will see “CODE” (U.S. model) or “Code” (Canadian model) in the frequency display. Use the preset buttons to enter the five-digit code (see page 105 ).
If the instrument panel fuse is removed, the clock setting in the instrument panel will be canceled. To reset the time, see page 54 .
Taking Care of the Unexpected
193
Fuse Locations
INTERIOR FUSE BOX
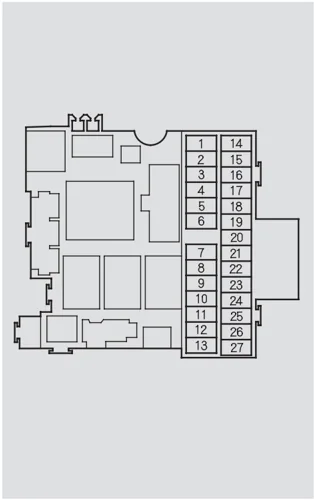
| No. | Amps. | Circuits Protected |
|---|---|---|
| 1 | 7.5 A | Windshield Wiper, |
| Auto Stop Signal | ||
| 2 | 15 A | Washer Motor |
| 3 | 7.5 A | IGP (DBW) |
| 4 | 7.5 A | IGP (LAF) |
| 5 | 10 A | Accessory Socket |
| 6 | 20 A | Windshield Wiper |
| 7 | 7.5 A | Turn Signal Light |
| 8 | 15 A | ACG |
| 9 | 7.5 A | Meter, Backup Lights |
| 10 | — | Not used |
| 11 | 7.5 A | Engine Start |
| 12 | 15 A | Fuel Pump, SRS |
| 13 | 10 A | SRS |
| No. | Amps. | Circuits Protected |
|---|---|---|
| 14 | 10 A | Daytime Running Lights |
| 15 | 15 A | Keyless Entry |
| 16 | 7.5 A | Back-up |
| 17 | 7.5 A | Interior Light |
| 18 | 10 A | Small Lights |
| 19 | 15 A | Radio |
| 20 | — | Not used |
| 21 | 7.5 A | Heater Control, |
| Cooling Fan Relay | ||
| 22 | 7.5 A | Power Mirrors |
| 23 | 20 A | Right Power Window |
| 24 | 20 A | Left Power Window |
| 25 | 15 A | IG Coil |
| 26 | 20 A | LAF |
| 27 | 15 A | DBW |
194
Fuse Locations
UNDER-HOOD FUSE BOXES:
PRIMARY FUSE BOX
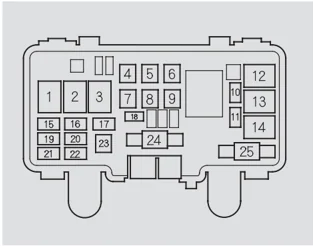
| No. | Amps. | Circuits Protected |
|---|---|---|
| 1 | — | Lighting 1 Relay |
| 2 | — | Lighting 2 Relay |
| 3 | — | Horn Relay |
| 4 | 40 A | Power Window Motor |
| 5 | 20 A | Right Roof Motor |
| 6 | — | Not used |
| 7 | 30 A | Backup ACC |
| 8 | 20 A | Left Roof Motor |
| 9 | 40 A | Heater Motor |
| 10 | 20 A | Condenser Fan |
| 11 | 20 A | DBW |
| 12 | — | Condenser Fan Relay |
| 13 | — | Cooling Fan Relay |
| No. | Amps. | Circuits Protected |
|---|---|---|
| 14 | — | Magnetic Clutch Relay |
| 15 | 20 A | Right Headlight |
| 16 | 15 A | ACG S |
| 17 | 10 A | Hazard Warning Lights |
| 18 | 20 A | Cooling Fan |
| 19 | — | Not used |
| 20 | 15 A | Stop |
| 21 | 20 A | Left Headlight |
| 22 | 30 A | VSA F/S |
| 23 | 30 A | VSA Motor |
| 24 | 100 A | Battery |
| 25 | 40 A | IG1 Main |
AUXILIARY FUSE BOX
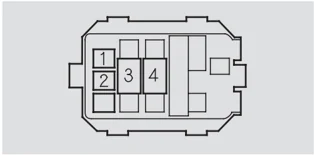
| No. | Amps. | Circuits Protected |
|---|---|---|
| 1 | 20 A | Rear Window Defogger |
| 2 | — | Not used |
| 3 | 70 A | EPS |
| 4 | — | Not used |
Emergency Towing, If Your Vehicle Gets Stuck
Emergency Towing If your vehicle needs to be towed, call a professional towing service or organization. Never tow your vehicle with just a rope or chain. It is very dangerous.
The only way you can safely tow your vehicle is with flat-bed equipment. The operator will load your vehicle on the back of a truck. Any other method of towing will damage the drive system. When you contact the towing agency, inform them a flat-bed is required.
If Your Vehicle Gets Stuck If your vehicle gets stuck in sand, mud, or snow, call a towing service to pull it out (see the previous column).
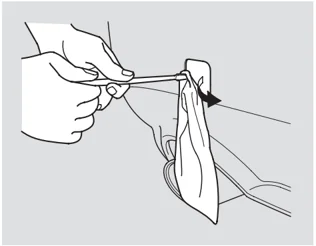
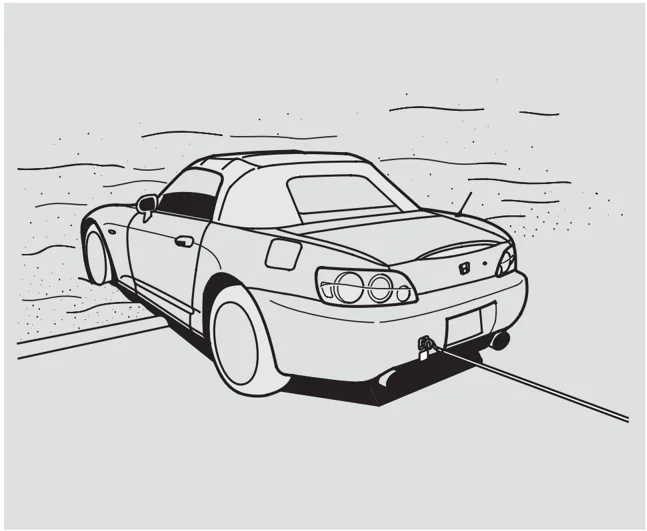
For very short distances, such as freeing the vehicle, you can use the detachable towing hook that mounts on the anchors in the front and rear bumpers.
To use the towing hook:
- Remove the cover from the bumper.
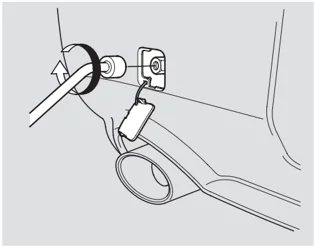
- Remove the towing hook, hook extension, and wheel nut wrench from the tool box.
- Using the wheel nut wrench, fasten the extension into the bolt hole in the anchor.
196
If Your Vehicle Gets Stuck
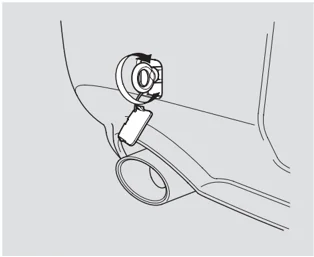
- Screw the towing hook into the extension and tighten it securely by hand.
NOTICE
To avoid damage to your vehicle, use the towing hook for straight, flat ground towing only. Do not tow at an angle. The tow hook should not be used to tow the vehicle onto a flat bed. Do not use it as a tie down.
Taking Care of the Unexpected
197
Main Menu
Main Menu
Technical Information
The diagrams in this section give you the dimensions and capacities of your vehicle and the locations of the identification numbers. It also includes information you should know about your vehicle’s tires and emissions control systems.
-
Identification Numbers ........ 200
-
Specifications ........ 202 DOT Tire Quality Grading
-
(U.S. Vehicles) ........ 204 Uniform Tire Quality
-
Grading ........ 204
-
Treadwear ........ 204
-
Traction ........ 204
-
Temperature ........ 205
-
Tire Labeling ........ 206
-
Emissions Controls ........ 207
-
The Clean Air Act ........ 207 Crankcase Emissions Control
-
System ........ 207 Evaporative Emissions Control
-
System ........ 207 Onboard Refueling Vapor
-
Recovery ........ 207
-
Exhaust Emissions Controls ........ 208
-
PGM-FI System ........ 208 Ignition Timing Control
-
System ........ 208 Three Way Catalytic
-
Converter ........ 208
-
Replacement Parts ........ 208 Three Way Catalytic Converter... 209
-
State Emissions Testing ........ 210
Technical Information
199
Identification Numbers
Your vehicle has several identifying numbers located in various places.
The vehicle identification number (VIN) is the 17-digit number your dealer uses to register your vehicle for warranty purposes. It is also necessary for licensing and insuring your vehicle. The easiest place to find the VIN is on a plate fastened to the top of the dashboard. You can see it by looking through the windshield on the driver’s side. It is also on the certification label attached to the driver’s doorjamb, and is stamped on the engine compartment bulkhead. The VIN is also provided in bar code on the certification label.
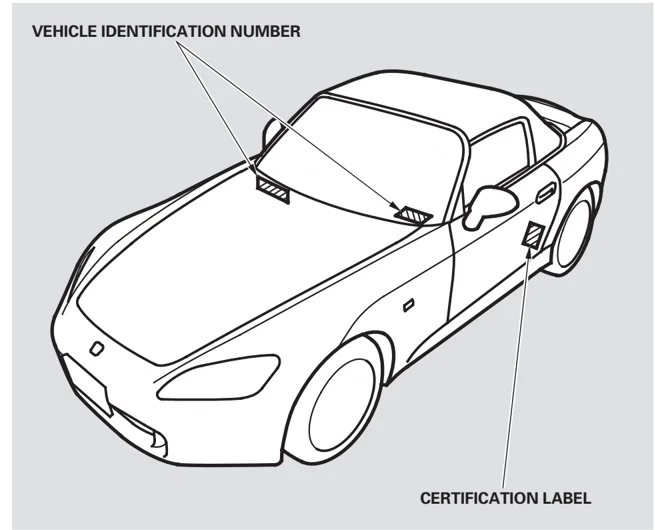
200
Identification Numbers
The engine number is stamped on the front right corner of the engine block, below the valve cover.
The transmission number is on a label underneath the transmission.
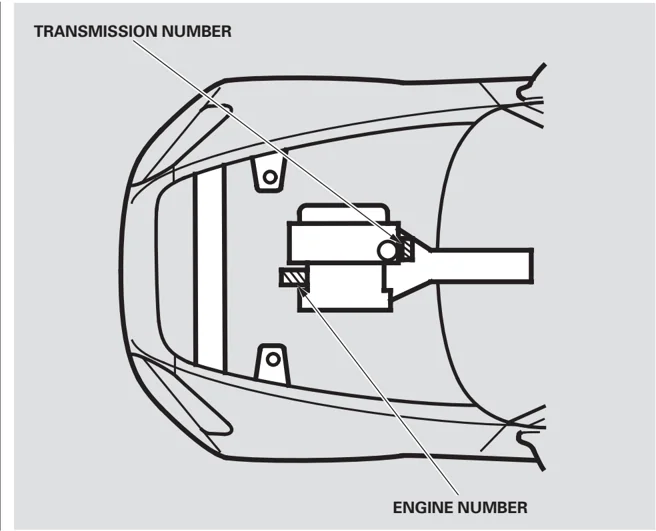
TRANSMISSION NUMBER
ENGINE NUMBER
Technical Information
201
Specifications
Dimensions
| Length | 162.0 in (4,115 mm) |
|---|---|
| Width | 68.9 in (1,750 mm) |
| Height | 50.6 in (1,285 mm) |
| Wheelbase | 94.5 in (2,400 mm) |
| Track | Front 57.9 in (1,470 mm) |
| Rear 59.4 in (1,510 mm) |
Weights
| Gross vehicle weight rating (GVWR) | See the certification label attached to the driver’s doorjamb. |
Engine
| Type | Water cooled 4-stroke DOHC VTEC 4-cylinder gasoline engine |
|---|---|
| Bore x Stroke | 3.43 x 3.57 in (87.0 x 90.7 mm) |
| Displacement | 132 cu-in (2,157 cm³) |
| Compression ratio | 11.1 : 1 |
| Spark plugs | NGK: PFR7G-11SDENSO: PK22PR-L11S |
| Spark Plug Gap | 0.04 in (1.1 mm) ^+0\ mm_-0.1\ mm |
Capacities
| Fuel tank | 13.2 US gal (50 ℓ) |
|---|---|
| Engine coolant | |
| Change*¹ 1.72 US gal (6.5 ℓ) | |
| Total 2.01 US gal (7.6 ℓ) | |
| Engine oil | Change*² |
| Including filter 5.1 US qt (4.8 ℓ) | |
| Without filter 4.8 US qt (4.5 ℓ) | |
| Total 5.9 US qt (5.6 ℓ) | |
| Manual transmission fluid | Change 1.6 US qt (1.5 ℓ) |
| Total 1.7 US qt (1.6 ℓ) | |
| Differential fluid | Change 0.78 US qt (0.74 ℓ) |
| Total 0.81 US qt (0.77 ℓ) | |
| Windshield washer reservoir | U.S. Vehicles 2.6 US qt (2.5 ℓ) |
| Canadian Vehicles 6.3 US qt (6.0 ℓ) |
*1: Including the coolant in the reserve tank and that remaining in the engineReserve tank capacity:0.16 US gal (0.6 ℓ)*2: Excluding the oil remaining in the engine
202
Specifications
Lights
| Headlights | High | 12 V — 55 W (H1) |
|---|---|---|
| Low* | 12 V — 35 W | |
| Front turn signal lights | 12 V — 21 W | |
| Rear turn signal lights | 12 V — 21 W | |
| Front side marker/parking lights | 12 V — 5 W (AMBER) | |
| Back-up lights | 12 V — 21 W | |
| License plate light | 12 V — 5 W | |
| Interior light | 12 V — 5 W | |
| Trunk light | 12 V — 5 W | |
| Side turn signal lights | 12 V — 5 W |
- : High voltage discharge type
Air conditioning
| Refrigerant type | HFC-134a (R-134a) |
|---|---|
| Charge quantity | 21.2 — 22.9 oz (600 — 650 g)*¹ |
| 24.7 — 26.5 oz (700 — 750 g)*² | |
| Lubricant type | SP-10 |
*¹ : U. S. model
*² : Canadian model
Battery
| Capacity | 12 V — 36 AH/5 HR |
|---|
Fuses
| Under-hood | See page 195 or the fuse box cover. |
|---|---|
| Interior | See page 194 or the fuse label attached to the inside of the fuse box door under the dashboard. |
Alignment
| Toe | Front | 0.00 in (0.0 mm) |
|---|---|---|
| Rear | in 0.15 in (3.7 mm) | |
| Camber | Front | —0°30′ |
| Rear | —1°30′ | |
| Caster | Front | 6° |
Tires
| Size | Front | 215/45R17 87W |
|---|---|---|
| Rear | 245/40R17 91W | |
| Spare Tire | T125/70D16 96M | |
| Pressure | Front | 32 psi (220 kPa , 2.2 kgf/cm²) |
| Rear | 32 psi (220 kPa , 2.2 kgf/cm²) | |
| Spare Tire | 60 psi (420 kPa , 4.2 kgf/cm²) |
Technical Information
203
DOT Tire Quality Grading (U.S. Vehicles)
The tires on your vehicle meet all U.S. Federal Safety Requirements. All tires are also graded for treadwear, traction, and temperature performance according to Department of Transportation (DOT) standards. The following explains these gradings.
Uniform Tire Quality Grading Quality grades can be found where applicable on the tire sidewall between the tread shoulder and the maximum section width. For example: Treadwear 200 Traction AA Temperature A
All passenger car tires must conform to Federal Safety Requirements in addition to these grades.
Treadwear The treadwear grade is a comparative rating based on the wear rate of the tire when tested under controlled conditions on a specified government test course. For example, a tire graded 150 would wear one and one-half (1 1/2) times as well on the government course as a tire graded 100. The relative performance of tires depends upon the actual conditions of their use, however, and may depart significantly from the norm due to variations in driving habits, service practices, and differences in road characteristics and climate.
Traction — AA, A, B, C The traction grades, from highest to lowest, are AA, A, B, and C. Those grades represent the tire’s ability to stop on wet pavement as measured under controlled conditions on specified government test surfaces of asphalt and concrete. A tire marked C may have poor traction performance.
Warning: The traction grade assigned to this tire is based on straight-ahead braking traction tests, and does not include acceleration, cornering, hydroplaning, or peak traction characteristics.
204
DOT Tire Quality Grading (U.S. Vehicles)
Temperature — A, B, C The temperature grades are A (the highest), B, and C, representing the tire’s resistance to the generation of heat and its ability to dissipate heat when tested under controlled conditions on a specified indoor laboratory test wheel. Sustained high temperature can cause the material of the tire to degenerate and reduce tire life, and excessive temperature can lead to sudden tire failure. The grade C corresponds to a level of performance which all passenger car tires must meet under the Federal Motor Vehicle Safety Standard No. 109. Grades B and A represent higher levels of performance on the laboratory test wheel than the minimum required by law.
Warning: The temperature grade for this tire is established for a tire that is properly inflated and not overloaded. Excessive speed, underinflation, or excessive loading, either separately or in combination, can cause heat buildup and possible tire failure.
205 Technical Information
Tire Labeling
The tires that came on your vehicle have a number of markings. Those you should be aware of are described below.
Tire Size Whenever tires are replaced, they should be replaced with tires of the same size. The following is an example of tire size with an explanation of what each component means.
245/40R17 91W
245 — Tire width in millimeters. 40 — Aspect ratio (the tire’s section height as a percentage of its width). R — Tire construction code (R indicates radial). 17 — Rim diameter in inches.
91 — Load index (a numerical code associated with the maximum load the tire can carry). W — Speed symbol (an alphabetical code indicating the maximum speed rating).
Tire Identification Number The tire identification number (TIN) is a group of numbers and letters that look like the following example TIN. TIN is located on the sidewall of the tire.
DOT B97R FW6X 2202
DOT — This indicates that the tire meets all requirements of the U.S. Department of Transportation. B97R — Manufacturer’s identification mark. FW6X — Tire type code. 2202 — Date of manufacture.
Maximum Tire Pressure Max Press — The maximum air pressure the tire can hold.
Maximum Tire Load Max Load — The maximum load the tire can carry at maximum air pressure.
206
Main Menu Table of Contents
Emissions Controls
The burning of gasoline in your vehicle’s engine produces several by-products. Some of these are carbon monoxide (CO), oxides of nitrogen (NOx), and hydrocarbons (HC). Gasoline evaporating from the tank also produces hydrocarbons. Controlling the production of NOx, CO, and HC is important to the environment. Under certain conditions of sunlight and climate, NOx and HC react to form photochemical “smog.” Carbon monoxide does not contribute to smog creation, but it is a poisonous gas.
The Clean Air Act
The United States Clean Air Act* sets standards for automobile emissions. It also requires that automobile manufacturers explain to owners how their emissions controls work and what to do to maintain them. This section summarizes how the emissions controls work.
- In Canada, Honda vehicles comply with the Canadian emission requirements, as specified in an agreement with Environment Canada, at the time they are manufactured.
Crankcase Emissions Control System
Your vehicle has a positive crankcase ventilation system. This keeps gasses that build up in the engine’s crankcase from going into the atmosphere. The positive crankcase ventilation valve routes them from the crankcase back to the intake manifold. They are then drawn into the engine and burned.
Evaporative Emissions Control System
As gasoline evaporates in the fuel tank, an evaporative emissions control canister filled with charcoal adsorbs the vapor. It is stored in this canister while the engine is off. After the engine is started and warmed up, the vapor is drawn into the engine and burned during driving.
Onboard Refueling Vapor Recovery
The onboard refueling vapor recovery (ORVR) system captures the fuel vapors during refueling. The vapors are adsorbed in a canister filled with activated carbon. While driving, the fuel vapors are drawn into the engine and burned off.
Technical Information
207
Emissions Controls
Exhaust Emissions Controls The exhaust emissions controls include three systems: PGM-FI, ignition timing control, and three way catalytic converter. These three systems work together to control the engine’s combustion and minimize the amount of HC, CO, and NOx that comes out the tailpipe. The exhaust emissions control systems are separate from the crankcase and evaporative emissions control systems.
PGM-FI System The PGM-FI System uses sequential multiport fuel injection. It has three subsystems: air intake, engine control, and fuel control. The engine control module (ECM) uses various sensors to determine how much air is going into the engine. It then controls how much fuel to inject under all operating conditions.
Ignition Timing Control System This system constantly adjusts the ignition timing, reducing the amount of HC, CO, and NOx produced.
Three Way Catalytic Converter The three way catalytic converter is in the exhaust system. Through chemical reactions, it converts HC, CO, and NOx in the engine’s exhaust to carbon dioxide (CO₂), nitrogen (N₂), and water vapor.
Replacement Parts The emissions control systems are designed and certified to work together in reducing emissions to levels that comply with the Clean Air Act. To make sure the emissions remain low, you should use only new Honda replacement parts or their equivalent for repairs. Using lower quality parts may increase the emissions from your vehicle.
The emissions control systems are covered by warranties separate from the rest of your vehicle. Read your warranty manual for more information.
208
Three Way Catalytic Converter
The three way catalytic converter contains precious metals that serve as catalysts, promoting chemical reactions to convert the exhaust gasses without affecting the metals. The catalytic converter is referred to as a three-way catalyst, since it acts on HC, CO, and NOx. A replacement unit must be an original Honda part or its equivalent.
The three way catalytic converter must operate at a high temperature for the chemical reactions to take place. It can set on fire any combustible materials that come near it. Park your vehicle away from high grass, dry leaves, or other flammables.
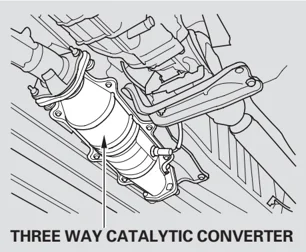
THREE WAY CATALYTIC CONVERTER
A defective three way catalytic converter contributes to air pollution, and can impair your engine’s performance. Follow these guidelines to protect your vehicle’s three way catalytic converter.
• Always use unleaded gasoline. Even a small amount of leaded gasoline can contaminate the catalyst metals, making the three way catalytic converter ineffective.
• Keep the engine well maintained.
• Have your vehicle diagnosed and repaired if it is misfiring, back-firing, stalling, or otherwise not running properly.
Technical Information
209
State Emissions Testing
Testing of Readiness Codes If you take your vehicle for a state emissions test shortly after the battery has been disconnected or gone dead, it may not pass the test. This is because of certain “readiness codes” that must be set in the on-board diagnostics for the emissions systems. These codes are erased when the battery is disconnected, and set again only after several days of driving under a variety of conditions.
If the testing facility determines that the readiness codes are not set, you will be requested to return at a later date to complete the test. If you must get the vehicle retested within the next two or three days, you can condition the vehicle for retesting by doing the following.
• Make sure the gas tank is nearly, but not completely, full (around 3/4).
• Make sure the vehicle has been parked with the engine off for 6 hours or more.
• Make sure the ambient temperature is between 40° and 95° F.
• Without touching the accelerator pedal, start the engine, and let it idle for 20 seconds.
• Keep the vehicle in Neutral. Increase the engine speed to 2,000 rpm, and hold it there until the temperature gauge rises to at least 1/4 of the scale (about 3 minutes).
• Select a nearby lightly traveled major highway where you can maintain a speed of 50 to 60 mph (80 to 97 km/h) for at least 20 minutes. Drive on the highway in 6th. Do not use the cruise control. When traffic allows, drive for 90 seconds without moving the accelerator pedal. (Vehicle speed may vary slightly; this is okay.) If you cannot do this for a continuous 90 seconds because of traffic conditions, drive for at least 30 seconds, then repeat it two more times (for a total of 90 seconds).
• Then drive in city/suburban traffic for at least 10 minutes. When traffic conditions allow, let the vehicle coast for several seconds without using the accelerator pedal or the brake pedal.
• Stop the vehicle, turn off the ignition switch, and leave it off for 30 minutes.
If the testing facility determines the readiness codes are still not set, see your dealer.
210
Main Menu
Warranty and Customer Relations
Customer Service
- Information ........ 212
- Warranty Coverages ........ 213 Reporting Safety Defects
- (U.S. Vehicles) ........ 214
- Authorized Manuals ........ 215
Warranty and Customer Relations
211
Customer Service Information
Honda dealership personnel are trained professionals. They should be able to answer all your questions. If you encounter a problem that your dealership does not solve to your satisfaction, please discuss it with the dealership’s management. The service manager or general manager can help. Almost all problems are solved in this way.
If you are dissatisfied with the decision made by the dealership’s management, contact your Honda Customer Service Office.
U.S. Owners: American Honda Motor Co., Inc. Automobile Customer Service Mail Stop 500-2N-7A 1919 Torrance Boulevard Torrance, California 90501-2746
Tel: (800) 999-1009
Canadian Owners: CUSTOMER RELATIONS RELATIONS AVEC LA CLIENTÉLE Honda Canada Inc. 715 Milner Avenue Toronto, ON M1B 2K8
Tel: 1-888-9-HONDA-9 Fax: Toll-free 1-877-939-0909 Toronto (416) 287-4776
In Puerto Rico and the U.S. Virgin Islands: Vortex Motor Corp. Bella International P.O. Box 190816 San Juan, PR 00919-0816
Tel: (787) 620-7546
When you call or write, please give us this information:
- Vehicle identification number (see page 200)
- Name and address of the dealer who services your vehicle
- Date of purchase
- Mileage on your vehicle
- Your name, address, and telephone number
- A detailed description of the problem
- Name of the dealer who sold the vehicle to you
212
Warranty Coverages
U.S. Owners Your new vehicle is covered by these warranties:
New Vehicle Limited Warranty — covers your new vehicle, except for the battery, emissions control systems, and accessories, against defects in materials and workmanship.
Emissions Control Systems Defects Warranty and Emissions Performance Warranty — these two warranties cover your vehicle’s emissions control systems. Time, mileage, and coverage are conditional. Please read your warranty booklet for exact information.
Original Equipment Battery Limited Warranty — this warranty gives up to 100 % credit toward a replacement battery.
Seat Belt Limited Warranty — a seat belt that fails to function properly is covered by a limited warranty. Please read your warranty booklet for details.
Rust Perforation Limited Warranty — all exterior body panels are covered for rust-through from the inside for the specified time period with no mileage limit.
Accessory Limited Warranty — Honda accessories are covered under this warranty. Time and mileage limits depend on the type of accessory and other factors. Please read your warranty booklet for details.
Replacement Parts Limited Warranty — covers all Honda replacement parts against defects in materials and workmanship.
Replacement Battery Limited Warranty — provides prorated coverage for a replacement battery purchased from your dealer.
Replacement Muffler Lifetime Limited Warranty — provides coverage for as long as the purchaser of the muffler owns the vehicle.
Restrictions and exclusions apply to all these warranties. Please read the 2007 Honda warranty information booklet that came with your vehicle for precise information on warranty coverages. Your vehicle’s original tires are covered by their manufacturer. Tire warranty information is in a separate booklet.
Canadian Owners Please refer to the 2007 warranty manual that came with your vehicle.
Warranty and Customer Relations
213
Main Menu Table of Contents
Reporting Safety Defects (U.S. Vehicles)
If you believe that your vehicle has a defect which could cause a crash or could cause injury or death, you should immediately inform the National Highway Traffic Safety Administration (NHTSA) in addition to notifying American Honda Motor Co., Inc.
If NHTSA receives similar complaints, it may open an investigation, and if it finds that a safety defect exists in a group of vehicles, it may order a recall and remedy campaign. However, NHTSA cannot become involved in individual problems between you, your dealer, or American Honda Motor Co., Inc.
To contact NHTSA, you may call the Vehicle Safety Hotline toll-free at 1-888-327-4236 (TTY: 1-800-424-9153); go to http://www.safercar.gov; or write to: Administrator, NHTSA, 400 Seventh Street, SW., Washington, DC 20590. You can also obtain other information about motor vehicle safety from http://www.safercar.gov.
214
Authorized Manuals
Purchasing Factory Authorized Manuals (U.S. only)
The publications shown below can be purchased from Helm Incorporated. You can order in any of three ways:
- Detach and mail the order form on the right half of this page
- Call Helm Inc. at 1-800-782-4356 (credit card orders only)
- Go online at www.helminc.com
If you are interested in other years or models, contact Helm Inc. at 1-800-782-4356.
| Publication Form Number | Form Description | Price Each* |
|---|---|---|
| 61S2A07 | 2000-2007 Honda S2000 Service Manual | $75.00 |
| 61S2A07EL | 2000-2007 Honda S2000 Electrical Troubleshooting Manual | $50.00 |
| 61S2A30 | 2000-2007 Honda S2000 Body Repair Manual | $44.00 |
| 31S2A670 | 2007 Honda S2000 Owner’s Manual | $35.00 |
| 31S2AM20 | 2007 Honda S2000 Honda Service History | $12.00 |
| 31S2AQ40 | 2007 Honda S2000 Quick Start Guide | $12.00 |
| HON-R | Order Form for Previous Years-Indicate Year and Model Desired | FREE |
*Prices are subject to change without notice and without incurring obligation.
Valid only for sales within the United States. Canadian owners should contact their authorized Honda dealer.
ORDER TOLL FREE: 1-800-782-4356
(NOTE: For Credit Card Holder Orders Only)
Monday-Friday 8:00 A.M. — 6:00 P.M. EST
MINIMUM CREDIT CARD PURCHASE $10.00
OR
By completing this form you can order the materials desired. You can pay by check or money order, or charge to your credit card. Mail to Helm Incorporated at the address shown on the back of the order form.
| 2007 HON | PUBLICATION NUMBER | VEHICLE MODEL | Qty | Price Each* | Total Price |
|---|---|---|---|---|---|
| Name | Year | ||||
*Prices are subject to change without notice and without incurring obligation.
Orders are mailed within 10 days. Please allow adequate time for delivery.
| TOTAL MATERIAL | |
|---|---|
| Mich. Purchases Add 6% Sales Tax | |
| HANDLING CHARGE | $6.95 |
| GRAND TOTAL |
215
Authorized Manuals
NOTE: Dealers and Companies please provide dealer or company name, and also the name of the person to whose attention the shipment should be sent. For purchases outside U.S.A. please write to the address shown below for a quotation.
SHIP TO
Customer Name Attention
Street Address — No P.O. Box Number Apartment Number
City State & Zip Code
Daytime Telephone Number ( )
PAYMENT
☐ Check or money order enclosed payable to Helm Inc — U.S. funds only. Do not send cash
☐ Master ☐ VISA ☐ Check here if your billing address is different Card from the shipping address shown above.
Account Number Expiration: Mo. Yr.
CUSTOMER SIGNATURE DATE
These Publications cannot be returned for credit without receiving advance authorization within 14 days of delivery. On returns, a restocking fee may be applied against the original order.
Helm P.O. BOX 07280-DETROIT, MICHIGAN 48207-1-800-782-4356
Service Manual:
This manual covers maintenance and recommended procedures for repair to engine and chassis components. It is written for the journeyman mechanic, but is simple enough for most mechanically-inclined owners to under- stand.
Electrical Troubleshooting Manual:
This manual complements the service manual by providing in-depth troubleshooting information for each electrical circuit in your vehicle.
Body Repair Manual:
This manual describes the procedures involved in the replacement of damaged body parts.
216

Main Menu
Index
A
- Accessories ........ 115
- ACCESSORY (Ignition Key Position) ........ 62
- Accessory Power Socket ........ 78
- Additives, Engine Oil ........ 146
- Airbag (SRS) ........ 9, 20
- Air Conditioning System ........ 84
- Usage ........ 86
- Air Pressure, Tires ........ 165
- Alcohol in Gasoline ........ 110 AM/FM Stereo Radio
- Reception ........ 91
- Antifreeze ........ 149 Anti-lock Brakes (ABS)
- Indicator ........ 45, 129
- Operation ........ 128 Anti-theft Steering Column Lock .. 62
- Anti-theft System ........ 61
- Audio Panel ........ 79
- Audio System ........ 88
- Automatic Seat Belt Tensioners ........ 18
- Automatic Speed Control ........ 106
B
- Back-up Light Replacement ........ 159 Battery Charging System
- Indicator ........ 46, 186
- Jump Starting ........ 182
- Maintenance ........ 169
- Specifications ........ 203
- Before Driving ........ 109
- Belts, Seat ........ 8, 16
- Beverage Holder ........ 78
- Booster Seats ........ 38
- Brakes ........ 127
- Anti-lock System (ABS) ........ 128
- Break-in, New Linings ........ 110
- Fluid ........ 154
- Parking ........ 76
- System Design ........ 128
- System Indicator ........ 46, 188
- Wear Indicators ........ 128
- Braking System ........ 127
- Break-in, New Vehicle ........ 110 Brightness Control, Instruments... 58
- Brights, Headlights ........ 57
- Bulb Replacement ........ 155
- Back-up Lights ........ 159
- Headlights ........ 155
- Side Turn Signal Lights ........ 158
- Specifications ........ 203
- Turn Signal Lights ........ 157
- Bulbs, Halogen ........ 155
C
- Capacities Chart ........ 202
- Carbon Monoxide Hazard ........ 41
- Cargo, How to Carry ........ 117
- CAUTION, Explanation of ........ iii
- CD Care ........ 101
- CD Changer ........ 100
- CD Changer Error Messages ........ 103
- CD Player Error Messages ........ 102
- CD Player ........ 98
- Certification Label ........ 200
- Chains, Tires ........ 168
- Changing a Flat Tire ........ 175
CONTINUED
Main Menu
Index
Changing Oil
- How to ........ 147
- When to ........ 135
- Charging System Indicator ........ 46, 186
- Checklist, Before Driving ........ 123
- Child Safety ........ 29
- Booster Seats ........ 38
- Child Seats ........ 34
- Important Safety Reminders ........ 32
- Larger Children ........ 37
- Risk with Airbags ........ 30
- Small Children ........ 33
- Child Seats ........ 34
- Cleaning Seat Belts ........ 160
- Clock ........ 54
- Clutch Fluid ........ 154
- CO in the Exhaust ........ 207
- Cold Weather, Starting in ........ 124
- Compact Spare Tire ........ 174
- Consumer Information* ........ 212
- Controls, Instruments and ........ 43
- Convertible Top ........ 70
- Convertible Top Cover ........ 72 Lowering the Convertible Top... 70
- Maintenance ........ 74
- Raising the Convertible Top ........ 73
Coolant
- Adding ........ 149
- Checking ........ 114
- Proper Solution ........ 149
- Temperature Gauge ........ 53 Crankcase Emission Control
- System ........ 207
- Cruise Control Indicator ........ 47
- Cruise Control Operation ........ 106
- Cup Holder ........ 78
- Customer Service Office ........ 212
D
-
DANGER, Explanation of ........ iii
-
Dashboard ........ 3, 44
-
Dashboard Lower Pocket ........ 80
-
Daytime Running Lights ........ 57 Daytime Running Lights
-
Indicator ........ 48
-
Dead Battery ........ 182
-
Defects, Reporting Safety* ........ 214
-
Defogger, Rear Window ........ 59
-
Defrosting the Windows ........ 87
-
Differential Fluid ........ 153
-
Dimensions ........ 202
-
Dimming the Headlights ........ 57 Dipstick
-
Engine Oil ........ 113
-
Directional Signals ........ 57
-
Disc Brake Wear Indicators ........ 128
-
Disposal of Used Oil ........ 149
-
Do Not Tow a Trailer ........ 131 Doors
-
Locking and Unlocking ........ 63
-
Monitor Indicator ........ 47
-
Power Door Locks ........ 63
-
DOT Tire Quality Grading* ........ 204 Downshifting, Manual
-
Transmission ........ 126
-
Driver and Passenger Safety ........ 5
-
Driving ........ 121
-
Economy ........ 114
-
Driving Guidelines ........ 122
-
Dust and Pollen Filter ........ 161
E
- Economy, Fuel ........ 114
- Emergencies ........ 173
- Battery, Jump Starting ........ 182
- Brake System Indicator ........ 188
Main Menu
Index
- Changing a Flat Tire ........ 175
- Charging System Indicator ........ 186
- Checking the Fuses ........ 191
- Closing the Convertible Top ........ 189
- Hazard Warning Flashers ........ 58
- Jump Starting ........ 182
- Low Oil Pressure Indicator ........ 186 Malfunction Indicator Lamp ... 187
- Overheated Engine ........ 183
- Towing ........ 196
- Emergency Brake ........ 76
- Emergency Flashers ........ 58
- Emergency Towing ........ 196
- Emergency Trunk Opener ........ 64
- Emissions Controls ........ 207
- Emissions Testing, State ........ 210 Engine
- Adding Engine Coolant ........ 149
- Coolant Temperature Gauge ........ 53
- If It Won’t Start ........ 180 Malfunction Indicator
- Lamp ........ 47, 187
- Oil Life Indicator ........ 136
- Oil Pressure Indicator ........ 46, 186
- Oil, What Kind to Use ........ 146
- Overheating ........ 183
- Specifications ........ 202
- Speed Limiter ........ 126
- Start Button ........ 124
- Starting ........ 124
- Ethanol in Gasoline ........ 110 Evaporative Emission Controls... 207
- Exhaust Fumes ........ 41 Expectant Mothers, Use of Seat
- Belts by ........ 14
F
- Fan, Interior ........ 85
- Features ........ 83
- Filling the Fuel Tank ........ 111 Filters
- Dust and Pollen ........ 161
- Oil ........ 147
- Flashers, Hazard Warning ........ 58
- Flat Tire, Changing a ........ 175 Fluids
- Brake ........ 154
- Clutch ........ 154
- Manual Transmission ........ 152
- Windshield Washer ........ 151
- Four-way Flashers ........ 58
- Fuel ........ 110
- Fill Door and Cap ........ 111
- Gauge ........ 52
- Low Fuel Indicator ........ 49
- Octane Requirement ........ 110
- Oxygenated ........ 110
- Tank, Refueling ........ 111
- Fuel Economy ........ 114
- Fuel Station Procedures ........ 111
- Fuses, Checking the ........ 191
G
- Gas Mileage, Improving ........ 114
- Gasoline ........ 110
- Gauge ........ 52
- Low Fuel Indicator ........ 49
- Octane Requirement ........ 110
- Tank, Refueling ........ 111
- Gauges ........ 51
- Engine Coolant Temperature ........ 53
- Fuel ........ 52 Gearshift Lever Positions
- Manual Transmission ........ 126
CONTINUED
III
Main Menu
Index
- Gross Vehicle Weight Rating (GVWR) ........ 118, 202
H
- Halogen Headlight Bulbs ........ 155
- Hazard Warning Flashers ........ 58 Headlights
- Aiming ........ 155
- Daytime Running Lights ........ 57
- High Beam Indicator ........ 49
- Reminder Tone ........ 57
- Replacing Halogen Bulbs ........ 155
- Turning on ........ 57
- Heating and Cooling System ........ 85
- High Beam Lever ........ 57
- Hood, Opening the ........ 112
- Horn ........ 55
- Hydraulic Clutch ........ 154
I
Identification Number,
- Vehicle ........ 200 Ignition
- Keys ........ 60
IV
- Switch ........ 62
- Timing Control System ........ 208
- Immobilizer System ........ 61
- Important Safety Precautions ........ 6 Indicators
- ABS (Anti-Lock Brake) ........ 47 Brake (Parking and Brake
- System) ........ 46, 188
- Charging System ........ 46, 186
- Cruise Control ........ 47
- Door-open ........ 47 DRL (Daytime Running
- Lights) ........ 48 EPS (Electrical Power
- Steering) ........ 48
- High Beam ........ 49
- Key (Immobilizer System) ........ 49
- Low Fuel ........ 49
- Low Oil Pressure ........ 46, 186
- Maintenance Required ........ 50 Malfunction Indicator
- Lamp ........ 47, 187
- Seat Belt ........ 46
- SRS ........ 47
- Trunk-open ........ 47
Turn Signal and Hazard
- Warning ........ 48 VSA (Vehicle Stability Assist) ... 50
- Indicators, Instrument Panel ........ 46
- Inflation, Proper Tire ........ 164
- Recommended Pressures ........ 165
- Inside Mirror ........ 75
- Inspection, Tire ........ 165
- Installing a Child Seat ........ 34
- Instrument Panel ........ 45
- Instrument Panel Brightness ........ 58
- Interior Lights ........ 80
- Introduction ........ i
J
- Jacking Up the Vehicle ........ 176
- Jack, Tire ........ 175
- Jump Starting ........ 182
K
- Keys ........ 60
Main Menu
Index
L
- Label, Certification ........ 200
- Lane Change, Signaling ........ 57
- Lap/Shoulder Belts ........ 12, 17 Lights
- Bulb Replacement ........ 155
- Turn Signal ........ 57
- Load Limits ........ 118
- LOCK (Ignition Key Position) ........ 62 Locks
- Anti-theft Steering Column ........ 62
- Fuel Fill Door ........ 111
- Power Door ........ 63
- Trunk ........ 63
- Low Coolant Level ........ 114
- Low Fuel Indicator ........ 49
- Low Oil Pressure Indicator ........ 46, 186
- Lubricant Specifications Chart ........ 202
- Luggage, Storing (Cargo) ........ 117
M
- Maintenance ........ 133
- Minder ........ 135
- Minder Indicator ........ 50
Owner's Maintenance
- Checks ........ 141
- Record ........ 143
- Safety ........ 134 Malfunction Indicator Lamp .. 47, 187
- Manual Transmission ........ 125
- Manual Transmission Fluid ........ 152
- Meters, Gauges ........ 51
- Methanol in Gasoline ........ 110
- Mirrors, Adjusting ........ 75
- Modifying Your Vehicle ........ 116
N
- New Vehicle Break-in ........ 110
- Normal Shift Speeds ........ 126
- NOTICE, Explanation of ........ i
- Numbers, Identification ........ 200
O
- Octane Requirement, Gasoline ........ 110
- Odometer ........ 51
- Odometer, Trip ........ 51 Oil
- Change, How to ........ 147
- Change, When to ........ 135
- Checking Engine ........ 113
- Pressure Indicator ........ 46, 186 Selecting Proper Viscosity
- Chart ........ 147
- ON (Ignition Key Position) ........ 62 Onboard Refueling Vapor
- Recovery ........ 207
- Opening the Trunk ........ 63
- Outside Mirrors ........ 75
- Outside Temperature Indicator ........ 53
- Overheating, Engine ........ 183
- Owner's Maintenance Checks ........ 141
- Oxygenated Fuels ........ 110
P
- Panel Brightness Control ........ 58
- Parking ........ 127
- Parking Brake ........ 76 Parking Brake and Brake System
- Indicator ........ 188
- Parking Lights ........ 57
- PGM-FI System ........ 208
CONTINUED
V
Main Menu
Index
- Pollen Filter ........ 161
- Power Door Locks ........ 63
- Power Socket Location ........ 78
- Power Windows ........ 68
- Pregnancy, Using Seat Belts ........ 14
- Preparing to Drive ........ 123
- Protecting Adults and Teens ........ 10
- Additional Safety Precautions ........ 15
- Advice for Pregnant Women ........ 14
- Protecting Children ........ 29
- General Guidelines ........ 29
- Protecting Larger Children ........ 37
- Protecting Small Children ........ 33
R
- Radiator Overheating ........ 183
- Radio/CD Sound System ........ 88
- Radio Theft Protection ........ 105
- Readiness Codes ........ 187, 210 Rear Lights, Bulb Replacement... 159
- Rear View Mirror ........ 75
- Rear Window Defogger ........ 59
- Reclining the Seat-backs ........ 67
- Recommended Shift Speeds ........ 126
Recovery Vehicle, Emergency
- Towing ........ 196
- Refueling ........ 111
- Reminder Indicators ........ 45
- Remote Transmitter ........ 65 Replacement Information
- Dust and Pollen Filter ........ 161
- Engine Oil and Filter ........ 147
- Fuses ........ 190
- Light Bulbs ........ 155
- Schedule ........ 142
- Tires ........ 167
- Wiper Blades ........ 162 Replacing Seat Belts After a
- Crash ........ 18
- Reporting Safety Defects* ........ 214 Reserve Tank, Engine
- Coolant ........ 114, 149
- Restraint, Child ........ 29
- Reverse Lockout ........ 126
- Rotation, Tire ........ 166
S
-
Safety Belts ........ 8, 16
-
Safety Defects, Reporting* ........ 214
-
Safety Features ........ 7
-
Airbags ........ 9
-
Seat Belts ........ 8
-
Safety Labels, Location of ........ 42
-
Safety Messages ........ iii
-
Satellite Radio* ........ 93
-
Seat Belts ........ 8, 16
-
Additional Information ........ 16
-
Advice for Pregnant Women ........ 14 Automatic Seat Belt
-
Tensioners ........ 18
-
Cleaning ........ 160
-
Lap/Shoulder Belt ........ 17
-
Maintenance ........ 18 Reminder Indicator and
-
Beeper ........ 16, 46
-
System Components ........ 16
-
Use During Pregnancy ........ 14
-
Seats, Adjusting the ........ 67
-
Serial Number ........ 200
-
Service Intervals ........ 141, 142
-
Service Manual* ........ 215
-
Service Station Procedures ........ 111
-
Setting the Clock ........ 54 Shifting
-
Manual Transmission ........ 125
VI
Main Menu
Index
Side Turn Signal, Bulb
- Replacement ........ 158
- Signaling Turns ........ 57
- Snow Tires ........ 168
- Sound System ........ 88 Spare Tire
- Inflating ........ 165
- Specifications ........ 203
- Spark Plugs ........ 202
- Specifications ........ 202
- Speed Control ........ 106
- Speed Limiter ........ 126
- SRS, Additional Information ........ 20 Additional Safety Precautions... 28
- Airbag Service ........ 27
- Airbag System Components ........ 20 How the SRS Indicator
- Works ........ 25 How Your Airbags
- Work ........ 22
- SRS Indicator ........ 25, 47
- Start Button ........ 124
- Starting the Engine ........ 124 In Cold Weather at High
- Altitude ........ 124
- With a Dead Battery ........ 182
- State Emissions Testing ........ 210
- Steam Coming from Engine ........ 183 Steering Wheel
- Anti-theft Column Lock ........ 62
- Stereo Sound System ........ 88
- Storing Your Vehicle ........ 171
- Stuck Vehicle ........ 196 Supplemental Restraint System
- Servicing ........ 27
- SRS Indicator ........ 25, 47
- System Components ........ 20
- Synthetic Oil ........ 147
T
- Taillights, Changing Bulbs ........ 159 Taking Care of the Unexpected .. 173 Technical Descriptions DOT Tire Quality Grading* ... 204
- Emissions Control Systems ........ 207 Three Way Catalytic
- Converter ........ 209
- Temperature Gauge ........ 53
- Tensioners, Seat Belts ........ 18
- Theft Protection, Radio ........ 105 Three Way Catalytic Converter... 209
- Time, Setting the ........ 54
- Tire Chains ........ 168
- Tire, How to Change a Flat ........ 175
- Tire Labeling ........ 206
- Tires ........ 163
- Air Pressure ........ 165
- Balancing ........ 166
- Chains ........ 168
- Checking Wear ........ 165, 166
- Compact Spare Tire ........ 174
- DOT Tire Quality Grading* ........ 204
- Inflation ........ 164
- Inspection ........ 165
- Replacing ........ 167
- Rotation, Do not ........ 166
- Snow ........ 168
- Specifications ........ 203
- Wear ........ 165, 166
- Tools, Tire Changing ........ 175 Towing
- A Trailer, Do Not ........ 131
- Emergency Wrecker ........ 196
- Trailer, Do Not Tow a ........ 131
CONTINUED
VII
Main Menu
Index
Transmission Checking Fluid Level, Manual
- Transmission ........ 152
- Fluid Selection ........ 152
- Identification Number ........ 201 Shifting the Manual
- Transmission ........ 125
- Treadwear ........ 204
- Trip Meter ........ 51
- Trunk ........ 63
- Emergency Trunk Opener ........ 64
- Opening the ........ 63
- Open Monitor Indicator ........ 47
- Turn Signals ........ 57
U
Unexpected, Taking Care
- of the ........ 173 Uniform Tire Quality Grading* ... 204
- Unleaded Gasoline ........ 110
- Used Oil, How to Dispose of ........ 149
V
-
Vehicle Capacity Load ........ 118
-
Vehicle Dimensions ........ 202
-
Vehicle Identification Number ........ 200 Vehicle Stability Assist (VSA)
-
System ........ 130
-
VSA System Indicator ........ 50
-
VSA Activation Indicator ........ 50
-
VSA Off Switch ........ 131
-
Vehicle Storage ........ 171
-
Ventilation ........ 86
-
VIN ........ 200
-
Viscosity, Oil ........ 147
W
- WARNING, Explanation of ........ iii
- Warning Labels, Location of ........ 42
- Warranty Coverages* ........ 213 Washer, Windshield
- Checking the Fluid Level ........ 151
- Operation ........ 56
- Wheels ........ 163
- Alignment and Balance ........ 166
- Wrench, Nut ........ 176
- Windows, Operating the Power ........ 68 Windshield
- Cleaning ........ 56
- Defroster ........ 87
- Washers ........ 56 Wipers, Windshield
- Changing Blades ........ 162
- Operation ........ 56
- Worn Tires ........ 167
- Wrecker, Emergency Towing ........ 196
X
- XM Satellite Radio* ........ 94 *: U.S. only
VIII
Main Menu
Service Information Summary
Gasoline: Premium unleaded gasoline, pump octane number of 91 or higher.
Fuel Tank Capacity: 13.2 US gal (50 ℓ)
Recommended Engine Oil: API premium grade 10W-30 detergent oil (see page 146).
Oil change capacity (including filter): 5.1 US qt (4.8 ℓ)
Manual Transmission Fluid: Honda Manual Transmission Fluid preferred, or an SAE 10W-30 or 10W-40 motor oil as a temporary replacement (see page 152).
Capacity: 1.7 US qt (1.6 ℓ)
Brake Fluid: Honda Heavy Duty Brake Fluid DOT 3 preferred, or a DOT 3 or DOT 4 brake fluid as a temporary replacement (see page 154).
Tire Pressure (measured cold): Front: 32 psi (220 kPa , 2.2 kgf/cm²)
Rear: 32 psi (220 kPa , 2.2 kgf/cm²)
Spare Tire Pressure: Front: 60 psi (420 kPa , 4.2 kgf/cm²)