SECTION 1 - 2
OPERATION OF INSTRUMENTS AND CONTROLS
Keys and Doors
- Keys ........ 10
- Engine immobilizer system ........ 13
- Wireless remote control ........ 14
- Side doors ........ 19
- Power windows ........ 21
- Back door ........ 24
- Hood ........ 25
- Fuel tank cap ........ 26
- Electric moon roof ........ 27
9

Keys (without engine immobilizer system)
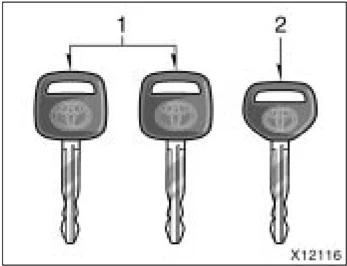
Your vehicle is supplied with two kinds of keys.
- Master keys—These keys work in every lock.
- Sub key—This key will not work in the glove box.
To protect items locked in the glove box when using valet parking, leave the sub key with the attendant.
Since the side doors can be locked without a key, you should always carry a spare key in case you accidentally lock your keys inside the vehicle.
KEY NUMBER PLATE
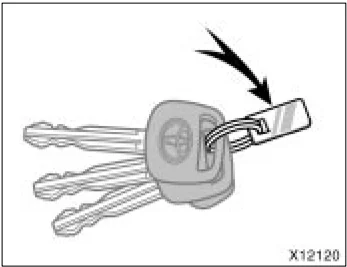
Your key number is shown on the plate. Keep the plate in a safe place such as your wallet, not in the vehicle.
If you should lose your keys or if you need additional keys, duplicates can be made by a Toyota dealer using the key number.
We recommend writing down the key number and storing it in a safe place.
Keys (with engine immobilizer system)
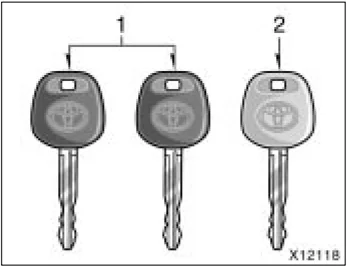
Your vehicle is supplied with two kinds of keys.
- Master keys (black)—These keys work in every lock. Your Toyota dealer will need one of them to make a new key with a built-in transponder chip.
- Sub key (gray)—This key will not work in the glove box.
10
A transponder chip for engine immobilizer system has been placed in the head of the master and sub keys. These chips are needed to enable the system to function correctly, so be careful not to lose these keys. If you make your own duplicate key, you will not be able to cancel the system or start the engine.
To protect items locked in the glove box when using valet parking, leave the sub key with the attendant.
Since the side doors can be locked without a key, you should always carry a spare key in case you accidentally lock your keys inside the vehicle.
 X12122
NOTICE
When using a key containing a transponder chip, observe the following precautions:
◆When starting the engine, do not use the key with a key ring resting on the key grip and do not press the key ring against the key grip. Otherwise the engine may not start, or may stop soon after it starts.
 X12123
◆When starting the engine, do not use the key with other transponder keys around (including keys of other vehicles) and do not press other key plates against the key grip. Otherwise the engine may not start, or may stop soon after it starts. If this happens, remove the key once and then insert it again after removing other transponder keys (including keys of other vehicles) from the ring or while gripping or covering them with your hand to start the engine.
11
 X12124
◆Do not bend the key grip.
◆Do not cover the key grip with any material that cuts off electromagnetic waves. ◆Do not knock the key hard against other objects. ◆Do not leave the key exposed to high temperatures for a long period, such as on the dashboard and hood under direct sunlight. ◆Do not put the key in water or wash it in an ultrasonic washer. ◆Do not use the key with electromagnetic materials.
 X12121
KEY NUMBER PLATE Your key number is shown on the plate. Keep the plate in a safe place such as your wallet, not in the vehicle.
If you should lose your keys or if you need additional keys, duplicates can be made by a Toyota dealer using the key number.
We recommend writing down the key number and storing it in a safe place.
12
Engine immobilizer system
 X12125
The engine immobilizer system is a theft prevention system. When you insert the key in the ignition switch, the transponder chip in the key's head transmits an electronic code to the vehicle. The engine will start only when the electronic code in the chip corresponds to the registered ID code for the vehicle.
 X12202
The system is automatically set when the key is removed from the ignition switch. The indicator light will start flashing to show the system is set.
In the following cases, contact your Toyota dealer.
- The indicator light stays on.
- The indicator light does not start flashing when the key is removed from the ignition switch.
- The indicator light flashes inconsistently.
Inserting the registered key in the ignition switch automatically cancels the system, which enables the engine to start. The indicator light will go off.
For your Toyota dealer to make you a new key with built-in transponder chip, your dealer will need your key number and master key. However, there is a limit to the number of additional keys your Toyota dealer can make for you.
If you make your own duplicate key, you will not be able to cancel the system or start the engine.
NOTICE
Do not modify, remove or disassemble the engine immobilizer system. If any unauthorized changes or modifications are made, proper operation of the system cannot be guaranteed.
13
For vehicles sold in U.S.A.
This device complies with Part 15 of the FCC Rules. Operation is subject to the following two conditions: (1) This device may not cause harmful interference, and (2) this device must accept any interference received, including interference that may cause undesired operation.
CAUTION Changes or modifications not expressly approved by the party responsible for compliance could void the user's authority to operate the equipment.
For vehicles sold in Canada
This device complies with RSS-210 of industry Canada. Operation is subject to the following two conditions: (1) This device may not cause interference, and (2) this device must accept any interference, including interference that may cause undesired operation of the device.
Wireless remote control—

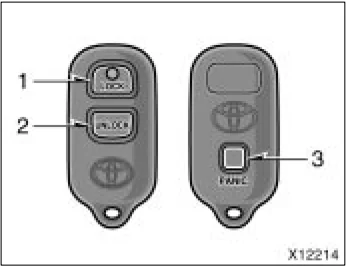
- “LOCK” switch
- “UNLOCK” switch
- “PANIC” switch
The wireless remote control system is designed to lock or unlock all the side doors and back door or activate the “PANIC” mode from a distance within approximately 1 m (3 ft.) of the vehicle. When you operate any switch, push it slowly and securely.
The wireless remote control transmitter is an electronic component. Observe the following instructions in order not to cause damage to the transmitter.
- Do not leave the transmitter in places where the temperature becomes high such as on the dashboard.
- Do not disassemble it.
- Avoid knocking it hard against other objects or dropping it.
- Avoid putting it in water.
You can use up to 4 wireless remote control transmitters for the same vehicle. Contact your Toyota dealer for detailed information.
If the wireless remote control transmitter does not actuate the side doors and back door or alarm, or operate from a normal distance:
- Check for closeness to a radio transmitter such as a radio station or an airport which can interfere with normal operation of the transmitter.
14
● The battery may have been consumed. Check the battery in the transmitter. To replace the battery, see “—Replacing transmitter battery” on page 17.
If you lose your transmitter, contact your Toyota dealer as soon as possible to avoid the possibility of theft, or an accident. (See “If you lose your wireless remote control transmitter” on page 263 in Section 4.)
For vehicles sold in U.S.A.
This device complies with Part 15 of the FCC Rules. Operation is subject to the following two conditions: (1) This device may not cause harmful interference, and (2) this device must accept any interference received, including interference that may cause undesired operation.
NOTICE: This equipment has been tested and found to comply with the limits for a Class B digital device, pursuant to Part 15 of the FCC Rules. These limits are designed to provide reasonable protection against harmful interference in a residential installation. This equipment generates, uses and can radiate radio frequency energy and, if not installed and used in accordance with the instructions, may cause harmful interference to radio communications. However, there is no guarantee that interference will not occur in a particular installation. If this equipment does cause harmful interference to radio or television reception, which can be determined by turning the equipment off and on, the user is encouraged to try to correct the interference by one or more of the following measures:
● Reorient or relocate the receiving antenna. ● Increase the separation between the equipment and receiver. ● Connect the equipment into an outlet on a circuit different from that to which the receiver is connected. ● Consult the dealer or an experienced radio/TV technician for help.
FCC WARNING: Changes or modifications not expressly approved by the party responsible for compliance could void the user’s authority to operate the equipment.
For vehicles sold in Canada
Operation is subject to the following two conditions: (1) this device may not cause interference, and (2) this device must accept any interference, including interference that may cause undesired operation of the device.
15
'05 Rav4_U (L/O 0409)
—Locking and unlocking doors
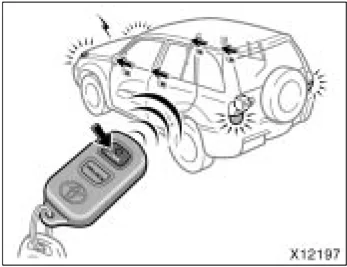
X12197 Locking operation
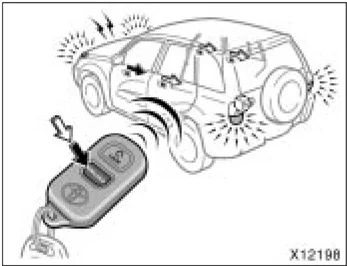
X12198 Unlocking operation
To lock and unlock all the side doors and back door, push the switches of the transmitter slowly and securely.
To lock: Push the "LOCK" switch. All the side doors and back door are locked simultaneously. At this time one beep will be heard, and the turn signal lights flash once.
Check to see that all the side doors and back door are securely locked.
If any of the side doors or the back door is not securely closed, locking cannot be performed by the "LOCK" switch and a beep will sound continuously for 10 seconds. However, if the key is in the ignition switch, a beep will not sound.
To stop the beep, close all the side doors and back door securely or push the "UNLOCK" switch.
To unlock: Push the "UNLOCK" switch once to unlock the driver's door alone. Pushing the switch twice within 3 seconds unlocks all the side doors and back door simultaneously. Each time the "UNLOCK" switch is pushed, two beeps will be heard, and the turn signal lights flash twice.
When all the side doors and back door are unlocked simultaneously using a wireless remote control transmitter, the interior lights and ignition switch light will come on and remain on for about 15 seconds before fading out. (For further information, see "Interior lights" on page 100 and "Ignition switch light" on page 102 in Section 1-5.)
You have 30 seconds to open a door after using the wireless remote unlock feature. If a door is not opened by then, all the side doors and back door will be automatically locked again.
If the "LOCK" or "UNLOCK" switch is kept pressed in, the locking or unlocking operation is not repeated. Release the switch and then push again.
16
—Activating panic mode
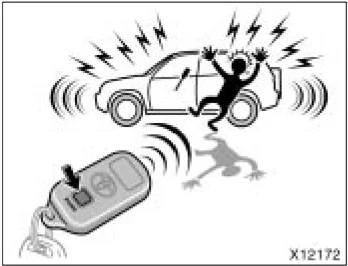
The “PANIC” mode does not work when the ignition key is in the “ON” position.
Pushing the “PANIC” switch blows the horn intermittently and flashes the headlights and tail lights.
The “PANIC” switch is used to deter vehicle theft when you witness anyone attempting to break into or damage your vehicle.
The alarm will last for one minute. To stop alarm midway, do the following:
- Push the “PANIC” switch once again.
- Unlock any of side door or back door with the key or wireless remote control transmitter.
- Turn the ignition key from the “LOCK” to “ON” position.
—Replacing transmitter battery
For replacement, use a CR2016 lithium battery or equivalent.
CAUTION
Special care should be taken to prevent small children from swallowing the removed transmitter battery or components.
NOTICE
During replacing the transmitter battery, do not push the “LOCK” and “UNLOCK” switches many times.
When replacing the transmitter battery, be careful not to lose the components.
Replace only with the same or equivalent type recommended by a Toyota dealer.
Dispose of used batteries according to the local laws.
Replace the transmitter battery by following these procedures:
17
 X12173
- Using a coin or equivalent, open the transmitter case.
 X12212
- Remove the discharged transmitter battery by ballpoint pen.
Insert the tip of ballpoint pen at the guide groove and lift as shown in the above illustration.
NOTICE Do not bend the terminals.
 X12213
- Put in a new transmitter battery with positive (+) side up.
Close the transmitter case securely.
NOTICE ◆Make sure the positive side and negative side of the transmitter battery are faced correctly. ◆Do not replace the battery with wet hands. Water may cause unexpected rust. ◆Do not touch or move any components inside the transmitter, or it may interfere with proper operation.
18
◆Be careful not to bend the electrode when inserting the transmitter battery and that dust or oils do not adhere to the transmitter case. ◆Close the transmitter case securely.
After replacing the battery, check that the transmitter operates properly. If the transmitter still does not operate properly, contact your Toyota dealer.
Side doors
When all the side doors and back door are unlocked simultaneously using a key, the interior lights and ignition switch light will come on and remain on for about 15 seconds before fading out. (For further information, see “Interior lights” on page 100 and “Ignition switch light” on page 102 in Section 1-5.)
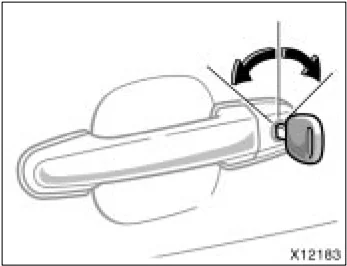
LOCKING AND UNLOCKING WITH KEY Insert the key into the keyhole and turn it. To lock: Turn the key forward. To unlock: Turn the key backward. Vehicles with the power door lock system— All the side doors and back door lock and unlock simultaneously with either front door. In the driver’s door lock, turning the key once will unlock the driver’s door and twice in succession will unlock all the side doors and back door simultaneously.
19
'05 Rav4_U (L/O 0409)
 X12150
LOCKING AND UNLOCKING WITH INSIDE LOCK KNOB
Move the lock knob.
To lock: Push the knob forward.
To unlock: Pull the knob backward.
Closing the door with the lock knob in the lock position will also lock the door. Be careful not to lock your keys in the vehicle.
 X12215
Driver's side
 X12216
Passenger's side
LOCKING AND UNLOCKING WITH POWER DOOR LOCK SWITCH
Push the switch.
To lock: Push the switch down on the front side.
To unlock: Push the switch down on the rear side.
Operating the switch simultaneously locks or unlocks all the side doors and back door.
20
 X12180
REAR DOOR CHILD- PROTECTORS Move the lock lever to the “LOCK” position as shown on the label. When the child-protector is locked, you cannot open the rear door by the inside door handle. We recommend using this feature whenever small children are in the vehicle.
CAUTION Before driving, be sure that the doors are closed and locked, especially when small children are in the vehicle. Along with the proper use of seat belts, locking the doors helps prevent the driver and passengers from being thrown out from the vehicle during an accident. It also helps prevent the doors from being opened unintentionally.
Power windows
 X12156
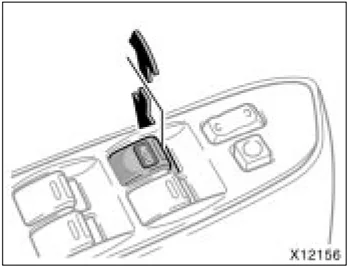
The windows can be operated with the switch on each side door. The power windows work when the ignition switch is in the “ON” position. Key off operation: If the either front door is closed, they work for 43 seconds even after the ignition switch is turned off. They stop working when the either front door is opened.
OPERATING THE DRIVER’S WINDOW Use the switch on the driver’s door. Normal operation: The window moves as long as you hold the switch. To open: Lightly push down the switch. To close: Lightly pull up the switch.
21
 X12157
Automatic operation: Push the switch completely down or pull it completely up, and then release it. The window will fully open or close. To stop the window part-way, lightly move the switch in the opposite direction and then release it.
Jam protection function: During automatic closing operation, the window stops and opens half way if something gets caught between the window and window frame.
If the window receives a strong impact, this function may work even if nothing is caught.
CAUTION
- Never try jamming any part of your body to activate the jam protection function intentionally.
- The jam protection function may not work if something gets caught just before the window is fully closed.
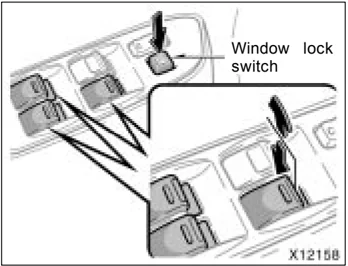
 Window lock switch
X12158
OPERATING THE PASSENGERS' WINDOWS
Use the switch on each passenger's door or the switches on the driver's door that control each passenger's window.
The window moves as long as you hold the switch.
To open: Push down the switch. To close: Pull up the switch.
If you push in the window lock switch on the driver's door, the passengers' windows cannot be operated.
22
 X12193
CAUTION
To avoid serious personal injury, you must do the following.
-
Before you close the power windows, always make sure there is nobody around the power windows. You must also make sure the heads, hands and other parts of the bodies of all occupants are kept completely inside the vehicle. If someone's neck, head or hands get caught in a closing window, it could result in a serious injury. When anyone closes the power windows, make sure he or she operates the windows safely.
-
When small children are in the vehicle, never let them use the power window switches without supervision. Use the window lock switch to prevent them from making unexpected use of the switches.
-
Be sure to remove the ignition key when you leave your vehicle.
-
Never leave anyone (particularly a small child) alone in your vehicle, especially with the ignition key still inserted. Otherwise, he/she could use the power window switches and get trapped in a window. Unattended person (particularly a small child) can be involved in a serious accident.
23
Back door
 X12141
LOCKING AND UNLOCKING WITH KEY Insert the key into the keyhole and turn it.
To lock: Turn the key clockwise. To unlock: Turn the key counterclockwise. To open the back door, pull the lock release lever.
Vehicles with the power door lock system— All the side doors and back door lock and unlock simultaneously with the back door.
When all the side doors and back door are unlocked simultaneously using a key, the interior lights and ignition switch light will come on and remain on for about 15 seconds before fading out. (For further information, see “Interior lights” on page 100 and “Ignition switch light” on page 102 in Section 1-5.)
Operating the power door lock switch or wireless remote control transmitter simultaneously locks or unlocks the back door. (See “—Locking and unlocking doors” on page 16 and “Side doors” on page 19 in this Section.)
When closing the back door, make sure it is fully closed.
See “—Stowage precautions” on page 221 in Section 2 for precautions when loading luggage.
CAUTION
- Keep the back door closed while driving. This not only keeps the luggage from being thrown out but also prevents exhaust gases from entering the vehicle.
- If the open back door hides the stop, tail or rear turn signal lights while you are parked, other road users must be warned of the presence of your vehicle by a warning triangle or other device.
24
Hood
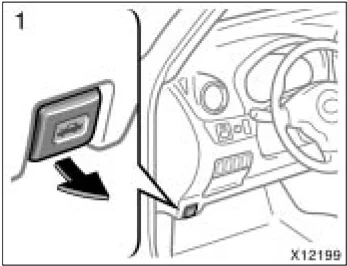
To open the hood:
- Pull the hood lock release lever. The hood will spring up slightly.
CAUTION Before driving, be sure that the hood is closed and securely locked. Otherwise, the hood may open unexpectedly while driving and an accident may occur.
-
In front of the vehicle, pull up the auxiliary catch lever and lift the hood.
-
Hold the hood open by inserting the support rod into the slot. To insert the support rod into the slot, move it straight up. If it is moved to the side or toward the inside of the vehicle, it may become detached. Before closing the hood, check to see that you have not forgotten any tools, rags, etc. and return the support rod to its clip—this prevents rattles. Then lower the hood and make sure it locks into place. If necessary, press down gently on the front edge to lock it.
25
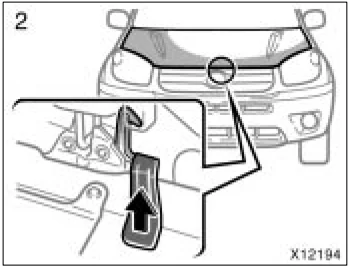
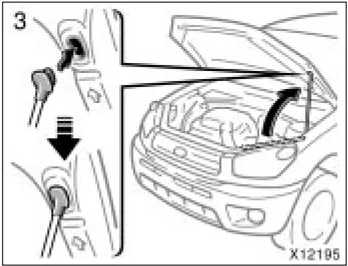
CAUTION After inserting the support rod into the slot, make sure the rod supports the hood securely from falling down on to your head or body.
NOTICE Be sure to return the support rod to its clip before closing the hood. Closing the hood with the support rod up could cause the hood to bend.
Fuel tank cap
 X12192
This indicates that the fuel filler door is on the left side of your vehicle.
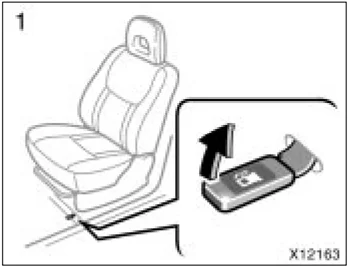
- To open the fuel filler door, pull the lever up. When refueling, turn off the engine.
 X12163
CAUTION
- Do not smoke, cause sparks or allow open flames when refueling. The fumes are flammable.
- When opening the cap, do not remove the cap quickly. In hot weather, fuel under pressure could cause injury by spraying out of the filler neck if the cap is suddenly removed.
26
2
 X121B7
- To remove the fuel tank cap, turn the cap slowly counterclockwise, then pause slightly before removing it. After removing the cap, hang it on the cap hanger.
It is not unusual to hear a slight swoosh when the cap is opened. When installing, turn the cap clockwise till you hear a click.
If the cap is not tightened securely, the malfunction indicator lamp comes on. Make sure the cap is tightened securely.
The indicator lamp goes off after driving several times. If the indicator lamp does not go off, contact your Toyota dealer as soon as possible.
CAUTION
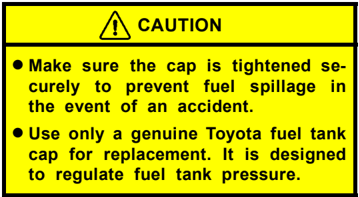
- Make sure the cap is tightened securely to prevent fuel spillage in the event of an accident.
- Use only a genuine Toyota fuel tank cap for replacement. It is designed to regulate fuel tank pressure.
Electric moon roof
 X12147
Sliding operation
 X12148
Tilting operation
27
To operate the moon roof, use the switch beside the personal light. The key must be in the "ON" position. The sun shade can be opened or closed by hand.
Sliding operation— To open: Push the switch on the "SLIDE OPEN" side. The roof will fully open. To stop the roof partway, push the switch on either the "SLIDE OPEN" or "TILT UP" side briefly. The sun shade will be opened together with the roof. To close: Push the switch on the "TILT UP" side. As a precaution when closing, the roof stops at the three-quarters closed position before fully closing. Therefore, release the switch and then push it again to close it completely.
Tilting operation— To tilt up: Push the switch on the "TILT UP" side. To lower: Push the switch on the "SLIDE OPEN" side. You may stop the moon roof at any desired position. The roof will move while the switch is being pushed and stop when released except to slide open.
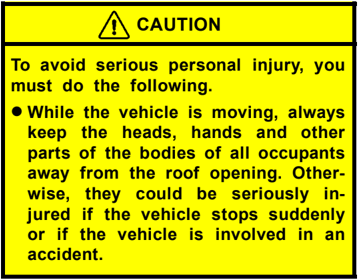
CAUTION To avoid serious personal injury, you must do the following. • While the vehicle is moving, always keep the heads, hands and other parts of the bodies of all occupants away from the roof opening. Otherwise, they could be seriously injured if the vehicle stops suddenly or if the vehicle is involved in an accident.
• Before you close the moon roof, always make sure there is nobody around the moon roof. You must also make sure nobody places his or her head, hands and other parts of the body in the roof opening. If someone's neck, head or hands get caught in the closing roof, it could result in a serious injury. When anyone closes the moon roof, first make sure it is safe to do so. • Be sure to remove the ignition key when you leave your vehicle. • Never leave anyone (particularly a small child) alone in your vehicle, especially with the ignition key still inserted. Otherwise, he/she could use the moon roof switch and get trapped in the roof opening. Unattended person (particularly a small child) can be involved in a serious accident. • Never sit on top of the vehicle around the roof opening.
28