SECTION 1 - 3
OPERATION OF INSTRUMENTS AND CONTROLS
Occupant restraint systems
- Seats ........ 30
- Front seats ........ 30
- Rear seats ........ 33
- Flattening seatbacks ........ 41
- Head restraints ........ 43
- Seat heaters ........ 43
- Seat belts ........ 44
- SRS driver airbag and front passenger airbag ........ 55
- SRS side airbags and curtain shield airbags ........ 61
- Child restraint ........ 69
29

Seats
While the vehicle is being driven, all vehicle occupants should have the seatback upright, sit well back in the seat and properly wear the seat belts provided.
CAUTION
- Do not drive the vehicle unless the occupants are properly seated. Do not allow any passengers to sit on top of a folded-down seatback, or in the luggage compartment or cargo area. Persons not properly seated and/or not properly restrained by seat belts can be severely injured in the event of emergency braking or a collision.
- During driving, do not allow any passengers to stand up or move around between seats. Otherwise, severe injuries can occur in the event of emergency braking or a collision.
Front seats— —Front seat precautions
Driver seat
CAUTION
The SRS driver airbag deploys with considerable force, and can cause death or serious injury especially if the driver is very close to the airbag. The National Highway Traffic Safety Administration (“NHTSA”) advises:
Since the risk zone for driver airbag is the first 50–75 mm (2–3 in.) of inflation, placing yourself 250 mm (10 in.) from your driver airbag provides you with a clear margin of safety. This distance is measured from the center of the steering wheel to your breastbone. If you sit less than 250 mm (10 in.) away now, you can change your driving position in several ways:
-
Move your seat to the rear as far as you can while still reaching the pedals comfortably.
-
Slightly recline the back of the seat. Although vehicle designs vary, many drivers can achieve the 250 mm (10 in.) distance, even with the driver seat all the way forward, simply by reclining the back of the seat somewhat. If reclining the back of your seat makes it hard to see the road, raise yourself by using a firm, non-slippery cushion, or raise the seat if your vehicle has that feature.
-
If your steering wheel is adjustable, tilt it downward. This points the airbag toward your chest instead of your head and neck.
The seat should be adjusted as recommended by NHTSA above, while still maintaining control of the foot pedals, steering wheel, and your view of the instrument panel controls.
30
Front passenger seat
CAUTION
The SRS front passenger airbag also deploys with considerable force, and can cause death or serious injury especially if the front passenger is very close to the airbag. The front passenger seat should be as far from the airbag as possible with the seatback adjusted, so the front passenger sits upright.
Front seats (with SRS side airbags)
CAUTION
The SRS side airbags are installed in the driver and front passenger seats. Observe the following precautions.
● Do not lean against the front door when the vehicle is in use, since the side airbag inflates with considerable speed and force. Otherwise, you may be killed or seriously injured.
● Do not use seat accessories which cover the area where the side airbags inflate. Such accessories may prevent the side airbags from activating correctly, causing death or serious injury.
● Do not modify or replace the seats or upholstery of the seats equipped with side airbags. Such change may prevent the side airbag system from activating correctly, disable the system or cause the side airbag system to inflate accidentally, resulting in death or serious injury.
—Seat adjustment precautions
CAUTION
● Do not adjust the seat while the vehicle is moving as the seat may unexpectedly move and cause the driver to lose control of the vehicle.
● Be careful that the seat does not hit a passenger or luggage.
● After adjusting the seat position, try sliding it forward and backward to make sure it is locked in position.
● After adjusting the seatback, push your body back against the seat to make sure the seat is locked in position.
● Do not put objects under the seats. Otherwise, the objects may interfere with the seat-lock mechanism or unexpectedly push up the seat position adjusting lever and the seat may suddenly move, causing the driver to lose control of the vehicle.
● While adjusting the seat, do not put your hands under the seat or near the moving parts. Otherwise, your hands or fingers may be caught and injured.
31
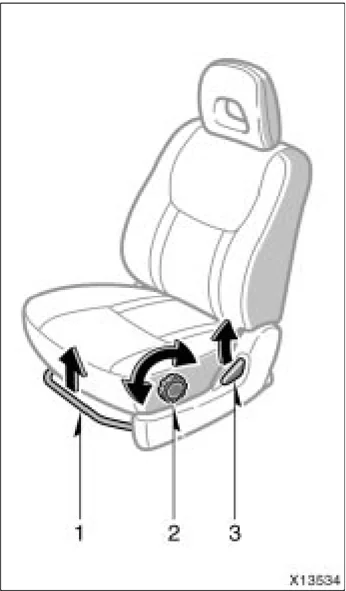
—Adjusting front seats
-
SEAT POSITION ADJUSTING LEVER Hold the center of the lever and pull it up. Then slide the seat to the desired position with slight body pressure and release the lever.
-
SEAT CUSHION ANGLE ADJUSTING KNOB Turn the knob either way.
-
SEATBACK ANGLE ADJUSTING LEVER Lean forward and pull the lever up. Then lean back to the desired angle and release the lever.
CAUTION
Avoid reclining the seatback any more than needed. The seat belts provide maximum protection in a frontal or rear collision when the driver and the front passenger are sitting up straight and well back in the seats. If you are reclined, the lap belt may slide past your hips and apply restraint forces directly to the abdomen or your neck may contact the shoulder belt. In the event of a frontal collision, the more the seat is reclined, the greater the risk of death or personal injury.
32
Rear seats— —Rear seat precautions
CAUTION
-
Do not adjust the seat while the vehicle is moving.
-
Be careful that the seat does not hit a passenger or luggage.
-
Adjust both seat cushions to the same position and align both seatbacks at the same angle when a person sits in the rear center position. Otherwise, the person cannot wear the seat belt properly and this may cause serious injuries in a collision.
-
After adjusting the seat position, try sliding it forward and backward to make sure it is locked in position.
-
After adjusting the seatback, push back your body to make sure it is locked in position.
-
When returning seats to their original position, observe the following precautions in order to prevent personal injury in a collision or sudden stop:
Make sure the seat is securely locked by pushing forward and rearward on the top of the seatback or by trying to pull up the edge of the bottom cushion. Failure to do so will prevent the seat belt from operating properly.
Make sure the seat belts are not twisted or caught under the seat and are arranged in their proper position and are ready to use.
Folding the seats up will enlarge the luggage compartment. See “—Stowage precautions” on page 221 in Section 2 for precautions when loading luggage.
—Adjusting rear seats
33
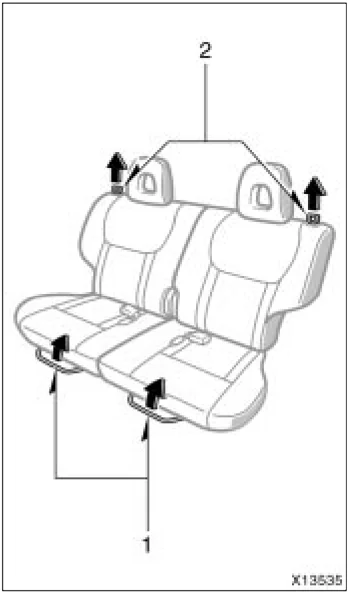
- SEAT POSITION ADJUSTING LEVER Hold the center of the lever and pull it up. Then slide the seat to the desired position with slight body pressure and release the lever.
When a person sits in the rear center position, adjust both seat cushions to the same position.
- SEATBACK ANGLE ADJUSTING STRAP Pull the strap up. Then lean back to the desired angle and release the strap.
When a person sits in the rear center position, align both seatbacks at the same angle.
CAUTION
-
Adjustments should not be made while the vehicle is moving.
-
Adjust both seat cushions to the same position and align both seat-backs at the same angle when a person sits in the rear center posi-tion. Otherwise, the person cannot wear the seat belt properly and this may cause serious injuries in a col-lision.
-
Avoid reclining the seatback any more than needed. The seat belts provide maximum protection in a frontal or rear collision when the passengers are sitting up straight and well back in the seats. If you are reclined, the lap belt may slide past your hips and apply restraint forces directly to the abdomen or your neck may contact the shoulder belt. In the event of a frontal colli-sion, the more the seat is reclined, the greater the risk of death or per-sonal injury.
-
After adjusting the seatback, push back your body to make sure it is locked in position.
NOTICE
Do not fold the seatback forward while the luggage cover is set.
34
—Tumbling rear seats
 X13683
BEFORE TUMBLING REAR SEAT
- Stow the rear seat belt buckles as shown in the illustration. This prevents the buckles from falling out when you tumble the rear seat.
CAUTION Before using the seat belt, pull out the buckle and make sure the belt is not twisted.
NOTICE The seat belt buckles must be stowed before you fold the seatback.
 X13684
- To stow the rear center seat belt, pull the belt out of its cover a little and insert the concave end tab into the higher slot of the cover.
 X13685
- Insert the round end tab into the slot of the cover. You will hear a click when the tabs are locked in the seat belt cover. Make sure the tabs are securely locked in the cover.
NOTICE The seat belt must be stowed before you fold the seatback.
35
 X13335
TUMBLING REAR SEATS
- Hold the center of the lever and pull it up. Then slide the front seat fully forward.
Tumbling the rear seats will enlarge the luggage compartment. See “—Stowage precautions” on page 221 in Section 2 for precautions when loading luggage.
 X13416
- Hold the center of the lever and pull it up. Then slide the rear seat fully backward and pull it forward slightly until it locks.
 X13324
- Lower the head restraint to the lowest position. Pull up the strap to unlock the seatback and fold the seatback forward until it locks.
NOTICE Do not fold the seatback forward while the luggage cover is set.
36
 X13482
4. Pull up the seat cushion lock release lever and swing the whole seat up and forward.
 X13417
5. Make sure the front legs are locked and the seat is securely locked in position.
 X13383
RETURNING REAR SEATS
- To unlock the seat, hold the upper back of the seat with your hand and pull the lock release strap up. Swing the whole seat down and set the rear legs to the hooks on the floor. Make sure the rear legs are securely set to the hooks by trying to pull up the rear part of the seat.
37
2
 X13390
2. Pull the seatback lock release strap and swing the seatback up.
CAUTION
When returning seats to their original position, observe the following precautions in order to prevent personal injury in a collision or sudden stop:
- Make sure the seat is securely locked by pushing forward and rearward on the top of the seatback or by trying to pull up the edge of the bottom cushion. Failure to do so will prevent the seat belt from operating properly.
- Make sure the seat belts are not twisted or caught under the seat and are arranged in their proper position and are ready to use.
—Removing rear seats
1
 X1341B
- Tumble the rear seats. (See “—Tumbling rear seats” on page 35 in this Section for instructions.)
38
 X13354
- Unlock the seat by pulling the lock release lever. Pull the seat toward you slightly and lift.
Removing the rear seats will enlarge the luggage compartment. See “—Stowage precautions” on page 221 in Section 2 for precautions when loading luggage.
CAUTION
When removing the seat, observe the following precautions in order to prevent personal injury:
- Be careful not to get your hands or feet pinched in the seat.
- Be careful not to hit the removed seat against a person or drop it on yourself.
NOTICE
Avoid putting heavy loads on the removed seat. The metallic tips of the seat leg may be damaged and the seat cannot be reinstalled.
—Reinstalling rear seats
 X13419
- While pulling up the lock release lever, place the rear hinge into the rear hook on the floor.
39
 X13420
2. Push the seat forward until it locks.
 X13421
3. To unlock the seat, hold the upper back of the seat with your hand and pull the lock release strap up. Swing the whole seat down and set the rear legs to the hooks on the floor. Make sure the rear legs are securely set to the hooks by trying to pull up the rear part of the seat.
 X13330
4. Pull the seatback lock release strap and swing the seatback up.
40
CAUTION
When returning seats to their original position, observe the following precautions in order to prevent personal injury in a collision or sudden stop:
- Make sure the seat is securely locked by pushing forward and rearward on the top of the seatback or by trying to pull up the edge of the bottom cushion. Failure to do so will prevent the seat belt from operating properly.
- Make sure the seat belts are not twisted or caught under the seat and are arranged in their proper position and are ready to use.
When removing or reinstalling the seat, observe the following precautions in order to prevent personal injury:
-
Do not fold or remove the seat while the vehicle is moving.
-
Be careful not to get your hands or feet pinched in the seat.
-
Be careful not to hit the removed seat against a person or drop it on yourself.
-
After folding or installing the seat, push it forward and backward to make sure it is locked in position.
To prevent personal injury in a collision or sudden stop:
- Do not sit on or place anything on the folded seatback while driving.
- Do not leave the removed seat loose in the vehicle.
- Do not try to sit on or place anything on the removed seat.
- When reinstalling the seat, be careful not to hit the seat against you or inside of the vehicle.
- Install each seat in the same position from which it was removed. Failure to do so will prevent rear seat occupants from using seat belts properly.
Flattening seatbacks (front seat only)

For flattening seatbacks, do the following:
- Hold the center of the lever and pull it up. Then slide the rear seat fully backward and pull it forward slightly until it locks.
41
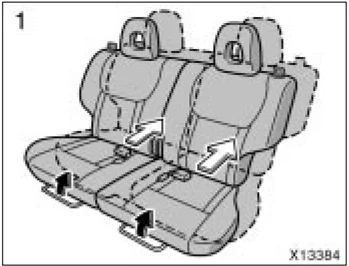
 2. Remove the head restraint. Hold the center of the lever and pull it up. Then slide the front seat further forward than the front-most lock position.
 3. Pull the seatback angle adjusting lever up to unlock and push down the seatback.
When returning the seatback to the upright position, be careful not to make yourself hit by the seatback which will bound with considerable spring force.
After returning the seat to its original position, be certain to replace the head restraint.
CAUTION
- Do not allow passengers to ride on the flattened seat while driving; use the seat in the normal position.
- After returning the seat to its original position, try pushing the seat and seatback forward and rearward to make sure it is secured in place. Be certain to replace head restraint.
42
Head restraints
 X13212
For your safety and comfort, adjust the head restraint before driving.
To raise: Pull it up. To lower: Push it down while pressing the lock release button.
The head restraint is most effective when it is close to your head. Therefore, using a cushion on the seatback is not recommended.
CAUTION
- Adjust the center of the head restraint so that it is closest to the top of your ears.
- After adjusting the head restraint, make sure it is locked in position.
- Do not drive with the head restraints removed.
Seat heaters
 X13549
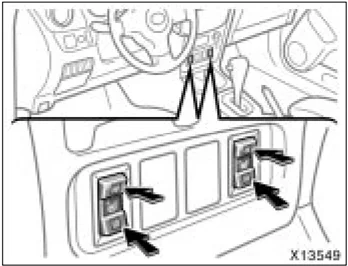
To turn on the seat heater, push the switches ("L" switch for the left front seat and "R" switch for the right front seat).
At this time, the indicator light on either side of each switch will illuminate to indicate the seat heater is operating.
The seat heater switches have the following positions.
"HI"—High heating temperature "LO"—Low heating temperature
The key must be in the "ON" position to operate seat heaters.
Pushing lightly on the opposite side will turn it off.
43
CAUTION Occupants must use caution when operating the seat heater because it may make them feel too hot or cause burns at low temperatures (erythema, varicella). Use extra caution for; ● Babies, small children, elderly persons, sick persons or persons with physical disabilities ● Persons who have delicate skin ● Persons who are exhausted ● Persons who have taken alcohol or drugs which induce sleep (sleeping drug, cold remedy, etc.) To prevent the seat overheating, do not use the seat heater with a blanket, cushion, or other insulating objects which cover the seat.
NOTICE ◆Do not put unevenly weighed objects on the seat and do not stick sharp objects (needles, nails, etc.) into the seat. ◆When cleaning the seats, do not use organic substances (paint thinner, benzine, alcohol, gasoline, etc.). They may damage the heater and seat surface. ◆To prevent the battery from being discharged, turn the switch off when the engine is not running.
Seat belts— —Seat belt precautions Toyota strongly urges that the driver and passengers in the vehicle be properly restrained at all times with the seat belts provided. Failure to do so could increase the chance of injury and/or the severity of injury in accidents.
The seat belts provided for your vehicle are designed for people of adult size, large enough to properly wear them.
Child. Use a child restraint system appropriate for the child until the child becomes large enough to properly wear the vehicle's seat belts. See "Child restraint" on page 69 in this Section for details.
If a child is too large for a child restraint system, the child should sit in the rear seat and must be restrained using the vehicle's seat belt. According to accident statistics, the child is safer when properly restrained in the rear seat than in the front seat.
If a child must sit in the front seat, the seat belts should be worn properly. If an accident occurs and seat belts are not worn properly, the force of the rapid inflation of the airbag may cause death or serious injury to the child.
44
Do not allow any children to stand up or kneel on either rear or front seats. An unrestrained child could suffer serious injury or death during emergency braking or a collision. Also, do not let the child sit on your lap. Holding a child in your arms does not provide sufficient restraint.
Pregnant woman. Toyota recommends the use of a seat belt. Ask your doctor for specific recommendations. The lap belt should be worn securely and as low as possible over the hips and not on the waist.
Injured person. Toyota recommends the use of a seat belt. Depending on the injury, first check with your doctor for specific recommendations.
CAUTION
Persons should ride in their seats properly wearing their seat belts whenever the vehicle is moving. Otherwise, they are much more likely to suffer serious bodily injury or death in the event of sudden braking or a collision.
When using the seat belts, observe the following:
● Use the belt for only one person at a time. Do not use a single belt for two or more people—even children.
● Avoid reclining the seatback any more than needed. The seat belts provide maximum protection in a frontal or rear collision when the driver and the front passenger are sitting up straight and well back in the seats. If you are reclined, the lap belt may slide past your hips and apply restraint forces directly to the abdomen or your neck may contact the shoulder belt. In the event of a frontal collision, the more the seat is reclined, the greater the risk of death or personal injury.
● Be careful not to damage the belt webbing or hardware. Take care that they do not get caught or pinched in the seat or side doors.
● Inspect the belt system periodically. Check for cuts, fraying, and loose parts. Damaged parts should be replaced. Do not disassemble or modify the system.
● Keep the belts clean and dry. If they need cleaning, use a mild soap solution or lukewarm water. Never use bleach, dye, or abrasive cleaners, or allow them to come into contact with the belt—they may severely weaken the belts. (See “Cleaning the interior” on page 269 in Section 5.)
● Replace the belt assembly (including bolts) if it has been used in a severe impact. The entire assembly should be replaced even if damage is not obvious.
45
—Fastening front and rear seat belts
 Tab
Buckle
X13655
Adjust the seat as needed and sit up straight and well back in the seat. To fasten your belt, pull it out of the retractor and insert the tab into the buckle.
You will hear a click when the tab locks into the buckle.
The seat belt length automatically adjusts to your size and the seat position.
The retractor will lock the belt during a sudden stop or on impact. It also may lock if you lean forward too quickly. A slow, easy motion will allow the belt to extend, and you can move around freely.
When a passenger's shoulder belt is completely extended and is then retracted even slightly, the belt is locked in that position and cannot be extended. This feature is used to hold the child restraint system securely. (For details, see "Child restraint" on page 69 in this Section.) To free the belt again, fully retract the belt and then pull the belt out once more.
If the seat belt cannot be pulled out of the retractor, firmly pull the belt and release it. You will then be able to smoothly pull the belt out of the retractor.
CAUTION
- After inserting the tab, make sure the tab and buckle are locked and that the belt is not twisted.
- Do not insert coins, clips, etc. in the buckle as this may prevent you from properly latching the tab and buckle.
- If the seat belt does not function normally, immediately contact your Toyota dealer. Do not use the seat until the seat belt is fixed, because it cannot protect an adult occupant or your child from injury.
 Take up slack
Too high
Keep as low on hips as possible
X13215
Adjust the position of the lap and shoulder belts.
Position the lap belt as low as possible on your hips—not on your waist, then adjust it to a snug fit by pulling the shoulder portion upward through the latch plate.
46
CAUTION
- Both high-positioned lap belts and loose-fitting belts could cause serious injuries due to sliding under the lap belt during a collision or other unintended event. Keep the lap belt positioned as low on hips as possible.
- Do not place the shoulder belt under your arm.
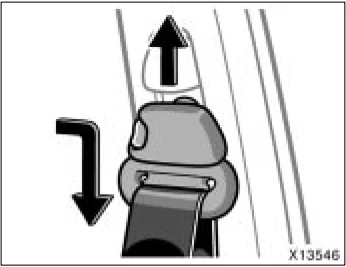
Seat belts with an adjustable shoulder anchor— Adjust the shoulder anchor position to your size. To raise: Slide the anchor up. To lower: Push in the lock release button and slide the anchor down. After adjustment, make sure the anchor is locked in position.
CAUTION Always make sure the shoulder belt is positioned across the center of your shoulder. The belt should be kept away from your neck, but not falling off your shoulder. Failure to do so could reduce the amount of protection in an accident and cause serious injuries in a collision.
47
 X13216
To release the belt, press the buckle release button and allow the belt to retract.
If the belt does not retract smoothly, pull it out and check for kinks or twists. Then make sure it remains untwisted as it retracts.
 X13315
REAR CENTER SEAT BELT
The rear center seat belt is a 3-point type restraint with 2 buckles. Both seat belt buckles must be correctly located and securely latched for proper operation.
Make sure that buckle 1 (with light gray buckle-release button) is securely latched for ready use of the center seat belt.
 X13548
Two buckles and tabs for rear center seat belt
The 2 buckles for the rear center seat belt are distinguished with colors of the buckle release button. Also the 2 tabs have different shape for its end so that the belt is not buckled in the wrong place.
Buckle 1 (with light gray buckle-release button)—Properly matches with concave end tab
Buckle 2 (with red buckle-release button)—Properly matches with round end tab
48
CAUTION Make sure the both buckles are correctly located and securely latched. Failure to properly match the buckle and tab may cause severe injury in case of an accident or a collision.
 X13409
To release the concave end tab, insert the key into the hole on buckle 1 (with light gray buckle-release button) and allow the belt to retract.
 X13317
CAUTION Do not use the rear center seat belt with either buckle released. Fastening only the shoulder belt or lap belt may cause severe personal injury in case of sudden braking or a collision.
49
—Stowing the rear seat belt buckles
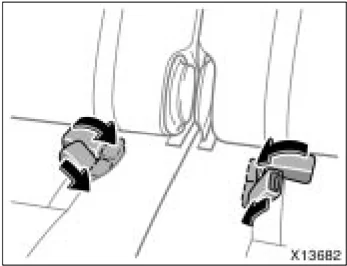
The rear seat belt buckles can be stowed when not in use.
Seat belt buckles must be stowed before you fold the seatback. (See “—Tumbling rear seats” on page 35 or “—Removing rear seats” on page 38 in this Section.)
CAUTION
Before using the seat belt, pull out the buckle and make sure the belt is not twisted.
—Stowing the rear center seat belt
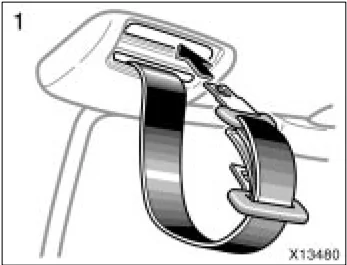
STOWING THE REAR CENTER SEAT BELT
- To stow the rear center seat belt, pull the seat belt out of its cover a little and insert the concave end tab into the higher slot of the cover.
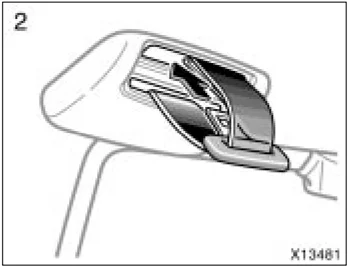
- Insert the round end tab into the cover. You will hear a click when the tabs are locked in the seat belt cover. Make sure the tabs are securely locked in the cover.
Seat belt must be stowed before you fold the seatback. (See “—Tumbling rear seats” on page 35 or “—Removing rear seats” on page 38 in this Section.)
NOTICE
Stow the rear center seat belt when not in use.
50
 X13400
PULLING OUT THE REAR CENTER SEAT BELT
To use the rear center seat belt, pull the belt out a little and then pull the tabs out from the cover.
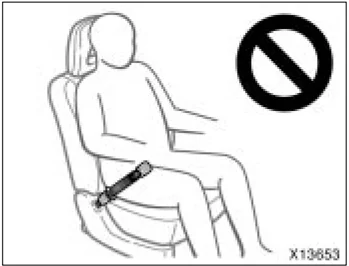
—Seat belt extender If your seat belts cannot be fastened securely because they are not long enough, a personalized seat belt extender is available from your Toyota dealer free of charge. Please contact your local Toyota dealer to order the proper required length for the extender. Bring the heaviest coat you expect to wear for proper measurement and selection of length. Additional ordering information is available at your Toyota dealer.
 X13653
CAUTION When using the seat belt extender, observe the following precautions. Failure to follow these instructions could reduce the effectiveness of the seat belt restraint system in case of an accident, increasing the chance of personal injury. ● Remember that the extender provided for you may not be safe when used on a different vehicle, for another person, or at a different seating position than the one originally intended.
● If the seat belt extender has been connected to the driver's seat belt buckle without wearing the seat belt when using the extender in the driver's seat, the SRS driver's airbag system will judge that the driver wears the seat belt even if not wearing it. In this case, the driver's airbag may not activate correctly, causing death or serious injury in the event of collision. Be sure to wear the seat belt with the seat belt extender.
51
WARNING
- Be sure to wear the seat belt without the seat belt extender if you can fasten the seat belt without the extender.
- Do not use the seat belt extender when installing a child restraint system on the front or rear passenger seat. If installing a child restraint system with the seat belt extender connected to the seat belt, the seat belt will not securely hold the child restraint system, which could cause death or serious injury to the child or other passengers in the event of collision.
 X13391
To connect the extender to the seat belt, insert the tab into the seat belt buckle so that the "PRESS" signs on the buckle release buttons of the extender and the seat belt are both facing outward as shown.
You will hear a click when the tab locks into the buckle.
When releasing the seat belt, press on the buckle release button on the extender, not on the seat belt. This helps prevent damage to the vehicle interior and extender itself.
When not in use, remove the extender and store in the vehicle for future use.
CAUTION
- After inserting the tab, make sure the tab and buckle are locked and that the lap and shoulder portions of the belt and the seat belt extender are not twisted.
- Do not insert coins, clips, etc. in the buckle as this may prevent you from properly latching the tab and buckle.
- If the seat belt does not function normally, immediately contact your Toyota dealer. Do not use the seat until the seat belt is fixed, because it cannot protect an adult occupant or your child from injury.
52
—Seat belt pretensioners
 X13550
The driver and front passenger seat belt pretensioners are designed to be activated in response to a severe frontal impact.
When the sensor detects a severe frontal impact, the front seat belts are quickly drawn back by the retractors so that the belts snugly restrain the occupants.
The seat belt pretensioners are activated even with no passenger in the front seat.
The seat belt pretensioners and SRS airbags may not operate together in all collisions.
 X13670
The seat belt pretensioner system consists mainly of the following components and their locations are shown in the illustration.
- Front airbag sensors
- SRS warning light
- Seat belt pretensioner assemblies
- Airbag sensor assembly
The seat belt pretensioners are controlled by the airbag sensor assembly. The airbag sensor assembly consists of a safing sensor and airbag sensor.
When the seat belt pretensioners are activated, an operating noise may be heard and a small amount of non-toxic gas may be released. This does not indicate that a fire is occurring. This gas is normally harmless.
Once the seat belt pretensioners have been activated, the seat belt retractors remain locked.
CAUTION
Do not modify, remove, strike or open the seat belt pretensioner assemblies, airbag sensor or surrounding area or wiring. Failure to follow these instructions may prevent the seat belt pretensioners from activating correctly, cause sudden operation of the system or disable the system, which could result in death or serious injury. Consult your Toyota dealer about any repair and modification.
53