SECTION 2
INFORMATION BEFORE DRIVING YOUR TOYOTA
Information before driving your Toyota
- Off- road vehicle precautions ........ 198
- Break- in period ........ 199
- Fuel ........ 199
- Fuel pump shut off system ........ 201
- Operation in foreign countries ........ 201
- Three- way catalytic converters ........ 202
- Engine exhaust cautions ........ 203
- Facts about engine oil consumption ........ 203
- Iridium- tipped spark plugs ........ 204
- Brake system ........ 205
- Brake pad wear limit indicators ........ 209
- Limited- slip differential ........ 209
- Your Toyota's identification ........ 210
- Theft prevention labels ........ 211
- Suspension and chassis ........ 212
- Tire information ........ 213
- Vehicle load limits ........ 221
- Cargo and luggage ........ 221
- Types of tires ........ 225
197

Off-road vehicle precautions
 X20045
This vehicle belongs to the utility vehicle class, which has higher ground clearance and narrower tread in relation to the height of its center of gravity to make it capable of performing in a wide variety of off-road applications. Specific design characteristics give it a higher center of gravity than ordinary passenger cars. This vehicle design feature causes this type of vehicle to be more likely to rollover. And, utility vehicles have a significantly higher rollover rate than other types of vehicles. An advantage of the higher ground clearance is a better view of the road allowing you to anticipate problems. It is not designed for cornering at the same speeds as ordinary passenger cars any more than low-slung sports cars designed to perform satisfactorily under off-road conditions. Therefore, sharp turns at excessive speeds may cause rollover.
CAUTION
Always observe the following precautions to minimize the risk of serious personal injury or damage to your vehicle:
● In a rollover crash, an unbelted person is significantly more likely to die than a person wearing a seat belt. Therefore, the driver and all passengers should fasten their seat belts whenever the vehicle is moving.
● Avoid sharp turns or abrupt maneuvers, if at all possible. Failure to operate this vehicle correctly may result in loss of control or vehicle rollover causing death or serious injury.
● Loading cargo on the roof luggage carrier will make the center of the vehicle gravity higher. Avoid high speeds, sudden starts, sharp turns, sudden braking or abrupt maneuvers, otherwise it may result in loss of control or vehicle rollover due to failure to operate this vehicle correctly.
198
Always slow down in gusty cross-winds. Because of its profile and higher center of gravity, your vehicle is more sensitive to side winds than an ordinary passenger car. Slowing down will allow you to have better control.
When driving off-road or in rugged terrain, do not drive at excessive speeds, jump, make sharp turns, strike objects, etc. This may cause loss of control or vehicle rollover causing death or serious injury. You are also risking expensive damage to your vehicle’s suspension and chassis.
Do not drive horizontally across steep slopes. Driving straight up or straight down is preferred. Your vehicle (or any similar off-road vehicle) can tip over sideways much more easily than forward or backward.
Break-in period
Drive gently and avoid high speeds. Your vehicle does not need an elaborate break-in. But following a few simple tips for the first 1600 km (1000 miles) can add to the future economy and long life of your vehicle:
- Avoid full throttle acceleration when starting and driving.
- Avoid racing the engine.
- Try to avoid hard stops during the first 300 km (200 miles).
- Do not drive slowly with the manual transmission in a high gear.
- Do not drive for a long time at any single speed, either fast or slow.
- Do not tow a trailer during the first 800 km (500 miles).
Fuel
FUEL TYPE Your new vehicle must use only unleaded gasoline.
To help prevent gas station mix-ups, your Toyota has a smaller fuel tank opening. The special nozzle on pumps with unleaded fuel will fit it, but the larger standard nozzle on pumps with leaded gas will not.
At a minimum, the gasoline you use should meet the specifications of ASTM D4814 in the U.S.A. and CGSB 3.5-M93 in Canada.
NOTICE Do not use leaded gasoline. Use of leaded gasoline will cause the three-way catalytic converter to lose its effectiveness and the emission control system to function improperly. Also, this can increase maintenance costs.
199
OCTANE RATING Select Octane Rating 87 (Research Octane Number 91) or higher. Use of unleaded gasoline with an octane rating or research octane number lower than stated above will cause persistent heavy knocking. If it is severe, this will lead to engine damage. If your engine knocks... If you detect heavy knocking even when using the recommended fuel, or if you hear steady knocking while holding a steady speed on level roads, consult your Toyota dealer. However, occasionally, you may notice light knocking for a short time while accelerating or driving up hills. This is normal and there is no need for concern.
GASOLINE CONTAINING DETERGENT ADDITIVES Toyota recommends the use of gasoline that contains detergent additives to avoid build-up of engine deposits. However, all gasoline sold in the U.S. contains detergent additives to keep clean and/or clean intake systems.
QUALITY GASOLINE Automotive manufacturers in the U.S., Europe and Japan have developed a specification for quality fuel named World-Wide Fuel Charter (WWFC) that is expected to be applied world wide. The WWFC consists of four categories that depend on required emission levels. In the U.S., category 3 has been adopted. The WWFC improves air quality by providing for better emissions in vehicle fleets, and customer satisfaction through better vehicle performance.
CLEANER BURNING GASOLINE Cleaner burning gasoline, including reformulated gasoline that contains oxygenates such as ethanol or MTBE is available in many areas. Toyota recommends the use of cleaner burning gasoline and appropriately blended reformulated gasoline. These types of gasoline provide excellent vehicle performance, reduce vehicle emissions, and improve air quality.
OXYGENATES IN GASOLINE Toyota allows the use of oxygenate blended gasoline where the oxygenate content is up to 10% ethanol or 15% MTBE. If you use gasohol in your Toyota, be sure that it has an octane rating no lower than 87. Toyota does not recommend the use of gasoline containing methanol.
GASOLINE CONTAINING MMT Some gasoline contain an octane enhancing additive called MMT (Methylcyclopentadienyl Manganese Tricarbonyl). Toyota does not recommend the use of gasoline that contains MMT. If fuel containing MMT is used, your emission control system may be adversely affected. The Malfunction Indicator Lamp on the instrument cluster may come on. If this happens, contact your Toyota dealer for service.
200
GASOLINE QUALITY In a very few cases, you may experience driveability problems caused by the particular gasoline that you are using. If you continue to have unacceptable driveability, try changing gasoline brands. If this does not rectify your problem, then consult your Toyota dealer.
NOTICE
◆Do not use gasohol other than stated above. It will cause fuel system damage or vehicle performance problems. ◆If driveability problems occur (poor hot starting, vaporizing, engine knock, etc.), discontinue the use. ◆Take care not to spill gasohol during refueling. Gasohol may cause paint damage.
FUEL TANK CAPACITY 56 L (14.8 gal., 12.3 Imp. gal.)
Fuel pump shut off system The fuel pump shut off system stops supplying fuel to the engine to minimize the risk of fuel leakage when the engine stalls or an airbag inflates upon collision. To restart the engine after the fuel pump shut off system activates, turn the ignition switch to “ACC” or “LOCK” once and start it.
CAUTION
Inspect the ground under the vehicle before restarting the engine. If you find that liquid has leaked onto the ground, it is the fuel system has been damaged and it is in need of repair. In this case, do not restart the engine.
Operation in foreign countries If you plan to drive your Toyota in another country... First, comply with the vehicle registration laws. Second, confirm the availability of the correct fuel (unleaded and minimum octane number).
201
'05 Rav4_U (L/O 0409)
Three- way catalytic converters
 X20044
The three-way catalytic converter is an emission control device installed in the exhaust system.
The purpose is to reduce pollutants in the exhaust gas.
CAUTION
- Keep people and combustible materials away from the exhaust pipe while the engine is running. The exhaust gas is very hot.
- Do not idle or park your vehicle over anything that might burn easily such as grass, leaves, paper or rags.
NOTICE
A large amount of unburned gases flowing into the three-way catalytic converter may cause it to overheat and create a fire hazard. To prevent this and other damage, observe the following precautions:
-
Use only unleaded gasoline.
-
Do not drive with an extremely low fuel level; running out of fuel could cause the engine to misfire, creating an excessive load on the three-way catalytic converter.
-
Do not allow the engine to run at idle speed for more than 20 minutes.
-
Avoid racing the engine.
-
Do not push-start or pull-start your vehicle.
-
Do not turn off the ignition while the vehicle is moving.
-
Keep your engine in good running order. Malfunctions in the engine electrical system, electronic ignition system/distributor ignition system or fuel systems could cause an extremely high three-way catalytic converter temperature.
-
If the engine becomes difficult to start or stalls frequently, take your vehicle in for a check-up as soon as possible. Remember, your Toyota dealer knows your vehicle and its three-way catalytic converter system best.
-
To ensure that the three-way catalytic converter and the entire emission control system operate properly, your vehicle must receive the periodic inspections required by the Toyota Maintenance Schedule. For scheduled maintenance information, refer to the "Scheduled Maintenance Guide" or "Owner's Manual Supplement".
202
Engine exhaust cautions
CAUTION
-
Avoid inhaling the engine exhaust. It contains carbon monoxide, which is a colorless and odorless gas. It can cause unconsciousness or even death.
-
Make sure the exhaust system has no holes or loose connections. The system should be checked from time to time. If you hit something, or notice a change in the sound of the exhaust, have the system checked immediately.
-
Do not run the engine in a garage or enclosed area except for the time needed to drive the vehicle in or out. The exhaust gases cannot escape, making this a particularly dangerous situation.
-
Do not remain for a long time in a parked vehicle with the engine running. If it is unavoidable, however, do so only in an unconfined area and adjust the heating or cooling system to force outside air into the vehicle.
-
To allow proper operation of your vehicle's ventilation system, keep the inlet grilles in front of the windshield clear of snow, leaves, or other obstructions.
-
Keep the back door closed while driving. An open or unsealed back door may cause exhaust gases to be drawn into the vehicle.
If you smell exhaust fumes in the vehicle, drive with the windows open and the back door closed. Have the cause immediately located and corrected.
Facts about engine oil consumption
FUNCTIONS OF ENGINE OIL
Engine oil has the primary functions of lubricating and cooling the inside of the engine, and plays a major role in maintaining the engine in proper working order.
ENGINE OIL CONSUMPTION
It is normal that an engine should consume some engine oil during normal engine operation. The causes of oil consumption in a normal engine are as follows.
- Oil is used to lubricate pistons, piston rings and cylinders. A thin film of oil is left on the cylinder wall when a piston moves downwards in the cylinder. High negative pressure generated when the vehicle is decelerating sucks some of this oil into the combustion chamber. This oil as well as some part of the oil film left on the cylinder wall is burned by the high temperature combustion gases during the combustion process.
- Oil is also used to lubricate the stems of the intake valves. Some of this oil is sucked into the combustion chamber together with the intake air and is burned along with the fuel. High temperature exhaust gases also burn the oil used to lubricate the exhaust valve stems.
203
The amount of engine oil consumed depends on the viscosity of the oil, the quality of the oil and the conditions the vehicle is driven under.
More oil is consumed by high-speed driving and frequent acceleration and deceleration.
A new engine consumes more oil, since its pistons, piston rings and cylinder walls have not become conditioned.
Oil consumption: Max. 1.0 L per 1000 km (1.1 qt./600 miles, 0.9 Imp. qt./600 miles)
When judging the amount of oil consumption, note that the oil may become diluted and make it difficult to judge the true level accurately.
As an example, if a vehicle is used for repeated short trips, and consumes a normal amount of oil, the dipstick may not show any drop in the oil level at all, even after 1000 km (600 miles) or more. This is because the oil is gradually becoming diluted with fuel or moisture, making it appear that the oil level has not changed.
The diluting ingredients evaporate out when the vehicle is then driven at high speeds, as on an expressway, making it appear that oil is excessively consumed after driving at high speeds.
204
IMPORTANCE OF ENGINE OIL LEVEL CHECK
One of the most important points in proper vehicle maintenance is to keep the engine oil at the optimum level so that oil function will not be impaired. Therefore, it is essential that the oil level be checked regularly. Toyota recommends that the oil level be checked every time you refuel the vehicle.
NOTICE Failure to check the oil level regularly could lead to serious engine trouble due to insufficient oil.
For detailed information on oil level check, see “Checking the engine oil level” on page 286 in Section 7-2.
Iridium-tipped spark plugs
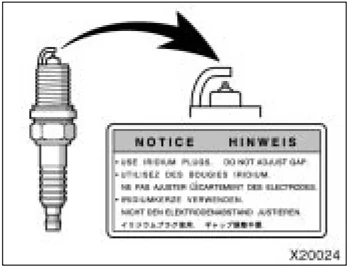
Your engine is fitted with iridium-tipped spark plugs.
NOTICE Use only iridium-tipped spark plugs and do not adjust gaps for your engine performance and smooth driveability.
Brake system
The tandem master cylinder brake system is a hydraulic system with two separate sub-systems. If either sub-system should fail, the other will still work. However, the pedal will be harder to press, and your stopping distance will increase. Also, the brake system warning light may come on.
CAUTION Do not drive your vehicle with only a single brake system. Have your brakes fixed immediately.
BRAKE BOOSTER
The brake booster uses engine vacuum to power-assist the brakes. If the engine should quit while you are driving, you can bring the vehicle to a stop with normal pedal pressure. There is enough reserved vacuum for one or two stops—but no more!
CAUTION
- Do not pump the brake pedal if the engine stalls. Each push on the pedal uses up your reserved vacuum.
- Even if the power assist is completely lost, the brakes will still work. But you will have to push the pedal hard, much harder than normal. And your braking distance will increase.
ANTI-LOCK BRAKE SYSTEM (with "ABS" warning light)
The anti-lock brake system is designed to help prevent lock-up of the wheels during a sudden braking or braking on slippery road surfaces. This assists in providing directional stability and steering performance of the vehicle under these circumstances.
Effective way to press the ABS brake pedal: When the anti-lock brake system function is in action, you may feel the brake pedal pulsating and hear a noise. In this situation, to let the anti-lock brake system work for you, just hold the brake pedal down more firmly. Do not pump the brake in a panic stop. This will result in reduced braking performance.
The anti-lock brake system becomes operative after the vehicle has accelerated to a speed in excess of approximately 10 km/h (6 mph). It stops operating when the vehicle decelerates to a speed below approximately 5 km/h (3 mph).
Depressing the brake pedal on slippery road surfaces such as on a manhole cover, a steel plate at a construction site, joints in a bridge, etc. on a rainy day tends to activate the anti-lock brake system.
You may hear a click or motor sound in the engine compartment for a few seconds when the engine is started or just after the vehicle begins to move. This means that the anti-lock brake system is in the self-check mode, and does not indicate a malfunction.
205
When the anti-lock brake system is activated, the following conditions may occur. They do not indicate a malfunction of the system:
● You may hear the anti-lock brake system operating and feel the brake pedal pulsating and the vibrations of the vehicle body and steering wheel. You may also hear the motor sound in the engine compartment even after the vehicle is stopped.
● At the end of the anti-lock brake system activation, the brake pedal may move a little forward.
CAUTION
Do not overestimate the anti-lock brake system: Although the anti-lock brake system assists in providing vehicle control, it is still important to drive with all due care and maintain a moderate speed and safe distance from the vehicle in front of you, because there are limits to the vehicle stability and effectiveness of steering wheel operation even with the anti-lock brake system on.
If tire grip performance exceeds its capability, or if hydroplaning occurs during high speed driving in the rain, the anti-lock brake system does not provide vehicle control.
Anti-lock brake system is not designed to shorten the stopping distance: Always drive at a moderate speed and maintain a safe distance from the vehicle in front of you. Compared with vehicles without an anti-lock brake system, your vehicle may require a longer stopping distance in the following cases:
● Driving on rough, gravel or snow-covered roads.
● Driving with tire chains installed.
● Driving over the steps such as the joints on the road.
● Driving on roads where the road surface is pitted or has other differences in surface height.
Install all 4 tires of specified size at appropriate pressure: The anti-lock brake system detects vehicle speeds using the speed sensors for respective wheels' turning speeds. The use of tires other than specified may fail to detect the accurate turning speed resulting in a longer stopping distance.
206
 Type A
 Type B
“ABS” warning light (vehicles without vehicle stability control system)
The light comes on when the ignition key is turned to the “ON” position. If the anti-lock brake system works properly, the light turns off after a few seconds. Thereafter, if the system malfunctions, the light comes on again.
When the “ABS” warning light is on (and the brake system warning light is off), the anti-lock brake system does not operate, but the brake system still operates conventionally.
When the “ABS” warning light is on (and the brake system warning light is off), the anti-lock brake system does not operate so that the wheels could lock up during a sudden braking or braking on slippery road surfaces.
If either of the following conditions occurs, this indicates a malfunction somewhere in the components monitored by the warning light system. Contact your Toyota dealer as soon as possible to service the vehicle.
● The light does not come on when the ignition key is turned to the “ON” position, or remains on.
● The light comes on while you are driving.
A warning light turning on briefly during operation does not indicate a problem.
CAUTION
If the “ABS” warning light remains on together with the brake system warning light, immediately stop your vehicle at a safe place and contact your Toyota dealer.
In this case, not only the anti-lock brake system will fail but also the vehicle will become extremely unstable during braking.
207
“ABS” warning light (vehicles with vehicle stability control system) The light comes on when the ignition key is turned to the “ON” position. If the anti-lock brake system and the brake assist system work properly, the light turns off after a few seconds. Thereafter, if the system malfunctions, the light comes on again.
When the “ABS” warning light is on (and the brake system warning light is off), the anti-lock brake system, the brake assist system, the traction control system and the vehicle stability control system do not operate, but the brake system still operates conventionally.
When the “ABS” warning light is on (and the brake system warning light is off), the anti-lock brake system does not operate so that the wheels could lock up during a sudden braking or braking on slippery road surfaces.
If either of the following conditions occurs, this indicates a malfunction somewhere in the components monitored by the warning light. Contact your Toyota dealer as soon as possible to service the vehicle.
- The light does not come on when the ignition key is turned to the “ON” position, or remains on.
- The light comes on while you are driving.
A warning light turning on briefly during operation does not indicate a problem.
CAUTION If the “ABS” warning light remains on together with the brake system warning light, immediately stop your vehicle at a safe place and contact your Toyota dealer.
In this case, not only the anti-lock brake system will fail but also the vehicle will become extremely unstable during braking.
DRUM-IN-DISC TYPE PARKING BRAKE SYSTEM (vehicles with vehicle stability control system) Your vehicle has a drum-in-disc type parking brake system. This type of brake system needs bedding-down of the brake shoes periodically or whenever the parking brake shoes and/or drums are replaced.
Have your Toyota dealer perform the bedding-down.
BRAKE ASSIST SYSTEM (vehicles with vehicle stability control system) When you slam the brakes on, the brake assist system judges as an emergency stop and provides more powerful braking for a driver who cannot hold down the brake pedal firmly.
When you slam the brakes on, more powerful braking will be applied. At this time, you may hear a sound in the engine compartment and feel the vibrations of the brake pedal. This does not indicate a malfunction.
The brake assist system becomes operative after the vehicle has accelerated to a speed in excess of approximately 10 km/h (6 mph). It stops operating when the vehicle decelerates to a speed below approximately 5 km/h (3 mph).
208
For an explanation of this system’s warning light, see “Service reminder indicators and warning buzzers” on page 109 in Section 1-6.
Brake pad wear limit indicators
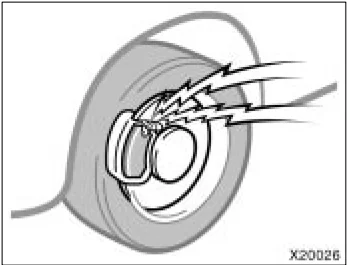
The brake pad wear limit indicators on your disc brakes give a warning noise when the brake pads are worn to where replacement is required.
If you hear a squealing or scraping noise while driving, have the brake pads checked and replaced by your Toyota dealer as soon as possible. Expensive rotor damage can result if the pads are not replaced when necessary.
Limited-slip differential (four-wheel drive models)
Your Toyota is equipped with a limited-slip center differential (transfer). If one wheel begins to spin, the limited-slip center differential (transfer) is designed to aid traction by automatically transmitting driving force to the wheels on the other drive axle. It transmits driving force to the front wheels if a rear wheel spins, and to the rear wheels if a front wheel spins.
Some models are also equipped with a limited-slip rear differential. If one rear wheel begins to spin, the limited-slip rear differential is designed to aid traction by automatically transmitting driving force to the other rear wheel. If you are not sure whether your vehicle is equipped with one, you can ask your Toyota dealer.
CAUTION Do not start or run the engine while your vehicle is supported by a jack. The vehicle could be driven off the jack and could pose a danger or result in serious injury.
209
Your Toyota’s identification— —Vehicle identification number
NOTICE Use only a spare tire of the same brand, size, construction and load capacity as the original tires on your Toyota because damage to the limited-slip differential could possibly occur with another tire type.
 X20041
Under the right front seat
The vehicle identification number (VIN) is the legal identifier for your vehicle. This number is stamped under the right front seat and top left of the instrument panel where it can be seen through the windshield from the outside.
This is the primary identification number for your Toyota. It is used in registering the ownership of your vehicle.
 X20035
Top left of the instrument panel
210
 X20037
The vehicle identification number (VIN) is also on the Certification Regulation Label.
—Engine number
 X20030
The engine number is stamped on the engine block as shown.
Theft prevention labels (except for Canada)
Your new vehicle carries theft prevention labels which are approximately 47 mm (1.85 in.) by 12 mm (0.47 in.).
The purpose of these labels is to reduce the incidence of vehicle thefts by facilitating the tracing and recovery of parts from stolen vehicles. The label is designed so that once it is applied to a surface, any attempt to remove it will result in destroying the integrity of the label. Transferring these labels intact from one part to another, will be impossible.
NOTICE
You should not attempt to remove the theft prevention labels as it may violate certain state or federal laws.
211
Suspension and chassis
CAUTION
Do not modify the suspension/chassis with lift kits, spacers, springs, etc. It can cause dangerous handling characteristics, resulting in loss of control.
212
Tire information— —Tire symbols
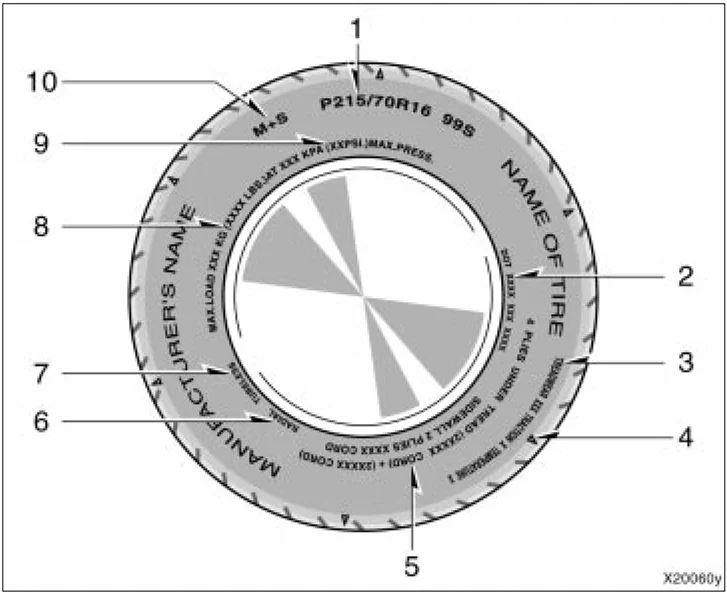
This illustration indicates typical tire symbols.
- Tire size—For details, see “—Tire size” on page 215.
- DOT and Tire Identification Number (TIN)—For details, see “—DOT and Tire Identification Number (TIN)” on page 214.
- Uniform tire quality grading—For details, see “Uniform tire quality grading” that follows.
- The location of the tread wear indicators—For details, see “Checking and replacing tires” on page 293.
- Tire ply composition and materials—Plies mean a layer of rubber-coated parallel cords. Cords mean the strands forming the plies in the tire.
- Radial tire or bias-ply tires—A radial tire has “RADIAL” on the sidewall. A tire not marked with “RADIAL” is a bias- ply tire.
213
- “TUBELESS” or “TUBE TYPE”—A tubeless tire does not have a tube inside the tire and air is directly filled in the tire. A tube type tire has a tube inside the tire and the tube maintains the air pressure.
- Load limit at maximum cold tire inflation pressure—For details, see “Checking and replacing tires” on page 293.
- Maximum cold tire inflation pressure—This means the pressure to which a tire may be inflated. For details about recommended cold tire inflation pressure, see “Tires” on page 316.
- Summer tire or all season tire—An all season tire has “M+S” on the sidewall. The tire not marked with “M+S” is a summer tire. For details, see “Types of tires” on page 225.
—DOT and Tire Identification Number (TIN)
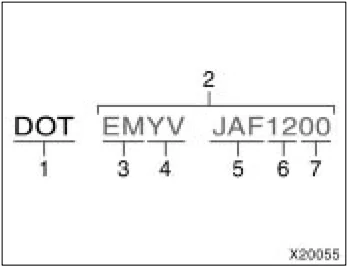
The “DOT” symbol certifies that the tire conforms to applicable Federal Motor Vehicle Safety Standards.
This illustration indicates typical DOT and Tire Identification Number (TIN).
- “DOT” symbol
- Tire Identification Number (TIN)
- Tire manufacturer’s identification mark
- Tire size code
- Manufacturer’s optional tire type code
- Manufacturing week
- Manufacturing year
214
—Tire size
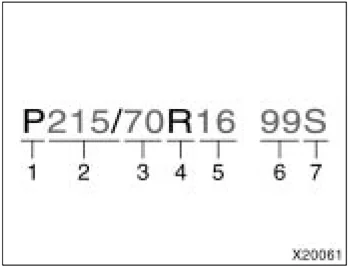
This illustration indicates typical tire size.
- Tire use (P=Passenger car, T=Temporary use)
- Section width (in millimeters)
- Aspect ratio (tire height to section width)
- Tire construction code (R=Radial, D=Diagonal)
- Wheel diameter (in inches)
- Load index (2 digits or 3 digits)
- Speed symbol (alphabet with one letter)
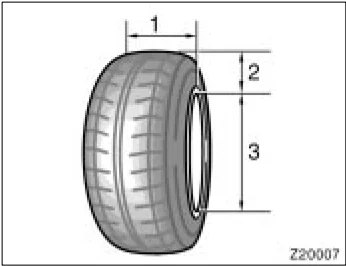
- Section width
- Tire height
- Wheel diameter
—Name of each section of tire
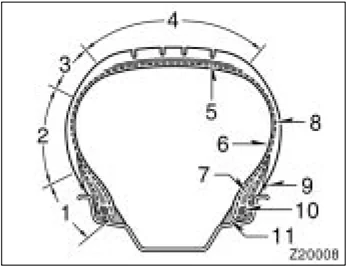
- Bead
- Sidewall
- Shoulder
- Tread
- Belt
- Inner liner
- Reinforcing rubber
- Carcass
- Rim lines
- Bead wires
- Chafer
215
—Uniform tire quality grading
This information has been prepared in accordance with regulations issued by the National Highway Traffic Safety Administration of the U.S. Department of Transportation. It provides the purchasers and/or prospective purchasers of Toyota vehicles with information on uniform tire quality grading.
Your Toyota dealer will help answer any questions you may have as you read this information.
DOT quality grades — All passenger vehicle tires must conform to Federal Safety Requirements in addition to these grades. Quality grades can be found where applicable on the tire sidewall between tread shoulder and maximum section width. For example: Treadwear 200 Traction AA Temperature A
Treadwear — The treadwear grade is a comparative rating based on the wear rate of the tire when tested under controlled conditions on a specified government test course. For example, a tire graded 150 would wear one and a half (1- 1/2) times as well on the government course as a tire graded 100. The relative performance of tires depends upon the actual conditions of their use, however, and may depart significantly from the norm due to variations in driving habits, service practices and differences in road characteristics and climate.
Traction AA, A, B, C — The traction grades, from highest to lowest, are AA, A, B, and C, and they represent the tire’s ability to stop on wet pavement as measured under controlled conditions on specified government test surfaces of asphalt and concrete. A tire marked C may have poor traction performance.
Warning: The traction grade assigned to this tire is based on braking (straight ahead) traction tests and does not include cornering (turning) traction.
216
Temperature A, B, C—The temperature grades are A (the highest), B, and C, representing the tire’s resistance to the generation of heat and its ability to dissipate heat when tested under controlled conditions on a specified indoor laboratory test wheel. Sustained high temperature can cause the material of the tire to degenerate and reduce tire life, and excessive temperature can lead to sudden tire failure. The grade C corresponds to a level of performance which all passenger car tires must meet under the Federal Motor Vehicle Safety Standard No.109. Grades B and A represent higher levels of performance on the laboratory test wheel than the minimum required by law.
Warning: The temperature grades for this tire are established for a tire that is properly inflated and not overloaded. Excessive speed, underinflation, or excessive loading, either separately or in combination, can cause heat buildup and possible tire failure.
217
—Glossary of tire terminology
| Tire related term | Meaning |
|---|---|
| Accessory weight | the combined weight (in excess of those standard items which may be replaced) of automatic transmission, power steering, power brakes, power windows, power seats, radio, and heater, to the extent that these items are available as factory-installed equipment (whether installed or not) |
| Cold tire inflation pressure | tire inflation pressure when the vehicle has been parked for at least 3 hours or more, or it has not been driven more than 1.5 km or 1 mile under that condition |
| Curb weight | the weight of a motor vehicle with standard equipment including the maximum capacity of fuel, oil, and coolant, and, if so equipped, air conditioning and additional weight optional engine |
| Intended outboard sidewall | (A) the sidewall that contains a whitewall, bears white lettering or bears manufacturer, brand, and/or model name molding that is higher or deeper than the same molding on the other sidewall of the tire, or(B) the outward facing sidewall of an asymmetrical tire that has a particular side that must always face outward when mounted on a vehicle |
| Maximum inflation pressure | the maximum cold inflation pressure to which a tire may be inflated and it is shown on the sidewall of the tire |
| Maximum loaded vehicle weight | the sum of—(a) curb weight;(b) accessory weight;(c) vehicle capacity weight; and(d) production options weight |
218
| Tire related term | Meaning |
|---|---|
| Normal occupant weight | 68 kg (150 lb.) times the number of occupants specified in the second column of Table 1 that follows |
| Occupant distribution | distribution of occupants in a vehicle as specified in the third column of Table 1 that follows |
| Production options weight | the combined weight of those installed regular production options weighing over 2.3 kg (5 lb.) in excess of those standard items which they replace, not previously considered in curb weight or accessory weight, including heavy duty brakes, ride levelers, roof rack, heavy duty battery, and special trim |
| Recommended inflation pressure | cold tire inflation pressure recommended by a manufacturer |
| Rim | a metal support for a tire or a tire and tube assembly upon which the tire beads are seated |
| Rim diameter (Wheel diameter) | nominal diameter of the bead seat |
| Rim size designation | rim diameter and width |
| Rim type designation | the industry of manufacturer’s designation for a rim by style or code |
| Rim width | nominal distance between rim flanges |
| Vehicle capacity weight (Total load capacity) | the rated cargo and luggage load plus 68 kg (150 lb.) times the vehicle’s designated seating capacity |
| Vehicle maximum load on the tire | the load on an individual tire that is determined by distributing to each axle its share of the maximum loaded vehicle weight and dividing by two |
219
2005 RAV4 from Sep. ’04 Prod. (OM42570U)
| Tire related term | Meaning |
|---|---|
| Vehicle normal load on the tire | the load on an individual tire that is determined by distributing to each axle its share of the curb weight, accessory weight, and normal occupant weight (distributed in accordance with Table 1 that follows) and dividing by two |
| Weather side | the surface area of the rim not covered by the inflated tire |
Table 1—Occupant loading and distribution for vehicle normal load for various designated seating capacities
| Designated seating capacity, number of occupants | Vehicle normal load, number of occupants | Occupant distribution in a normally loaded vehicle |
|---|---|---|
| 2 through 4 | 2 | 2 in front |
| 5 through 10 | 3 | 2 in front, 1 in second seat |
220
Vehicle load limits
Vehicle load limits include total load capacity, seating capacity, towing capacity and cargo capacity. Follow the load limits shown below.
Total load capacity: Four-wheel drive models With automatic transmission 345 kg (761 lb.) With manual transmission 375 kg (826 lb.) Two-wheel drive models With automatic transmission 417 kg (919 lb.) With manual transmission 447 kg (985 lb.)
Total load capacity means combined weight of occupants, cargo and luggage. Tongue load is included when trailer towing.
Seating capacity: Total 5 (Front 2, Rear 3) Seating capacity means the maximum number of occupants whose estimated average weight is 68 kg (150 lb.) per person. Depending on the weight of each person, the seating capacity given may exceed the total load capacity.
NOTICE Even if the number of occupants are within the seating capacity, do not exceed the total load capacity.
Towing capacity: 680 kg (1500 lb.) Towing capacity means the maximum gross trailer weight (trailer weight plus its cargo weight) that your vehicle is able to tow.
Cargo capacity Cargo capacity may increase or decrease depending on the size (weight) and the number of occupants. For details, see "Capacity and distribution" that follows.
CAUTION Do not apply the load more than each load limit. That may cause not only damage to the tires, but also deterioration to the steering ability and braking ability, which may cause an accident.
Cargo and luggage— —Stowage precautions
When stowing cargo and luggage in the vehicle, observe the following:
- Put cargo and luggage in the luggage compartment when at all possible. Be sure all items are secured in place.
- Be careful to keep the vehicle balanced. Locating the weight as far forward as possible helps maintain balance.
- For better fuel economy, do not carry unneeded weight.
221

CAUTION
-
To prevent cargo and luggage from sliding forward during braking, do not stack anything in the luggage compartment higher than the seatbacks. Keep cargo and luggage low, as close to the floor as possible.
-
Never allow anyone to ride in the luggage compartment. It is not designed for passengers. They should ride in their seats with their seat belts properly fastened. Otherwise, they are much more likely suffer serious bodily injury, in the event of sudden braking or a collision.
-
Do not place anything on the flattened seat, or it may slide forward during braking.
-
Do not place anything on the luggage cover. Such items may be thrown about and possibly injure people in the vehicle during sudden braking or an accident. Secure all items in a safe place.
-
Do not drive with objects left on top of the instrument panel. They may interfere with the driver's field of view. Or they may move during sharp vehicle acceleration or turning, and impair the driver's control of the vehicle. In an accident they may injure the vehicle occupants.
—Capacity and distribution Cargo capacity depends on the total weight of the occupants. (Cargo capacity) = (Total load capacity) – (Total weight of occupants)
STEPS FOR DETERMINING CORRECT LOAD LIMIT
- Locate the statement "The combined weight of occupants and cargo should never exceed XXX pounds" on your vehicle's placard.
- Determine the combined weight of the driver and passengers that will be riding in your vehicle.
- Subtract the combined weight of the driver and passengers from XXX kilograms or XXX pounds.
222
- The resulting figure equals the available amount of cargo and luggage load capacity. For example, if the "XXX" amount equals 1400 lbs. and there will be five 150 lb. passengers in your vehicle, the amount of available cargo and luggage load capacity is 650 lbs. (1400–750 (5x150)=650 lbs).
- Determine the combined weight of luggage and cargo being loaded on the vehicle. That weight may not safely exceed the available cargo and luggage load capacity calculated in Step 4.
- If your vehicle will be towing a trailer, load from your trailer will be transferred to your vehicle. Consult this manual to determine how this reduces the available cargo and luggage load capacity of your vehicle.
For details about trailer towing, see page 234.
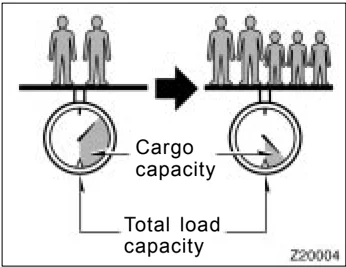
EXAMPLE ON YOUR VEHICLE In case that 2 people with the combined weight of 166 kg (366 lb.) are riding in your vehicle, the available amount of cargo and luggage load capacity will be as follows:
Four-wheel drive models— With automatic transmission Total load capacity: 345 kg (761 lb.) 345 kg – 166 kg = 179 kg. (761 lb. – 366 lb. = 395 lb.)
With manual transmission Total load capacity: 375 kg (826 lb.) 375 kg – 166 kg = 209 kg. (826 lb. – 366 lb. = 460 lb.)
Two- wheel drive models— With automatic transmission Total load capacity: 417 kg (919 lb.) 417 kg – 166 kg = 251 kg. (919 lb. – 366 lb. = 553 lb.)
With manual transmission Total load capacity: 447 kg (985 lb.) 447 kg – 166 kg = 281 kg. (985 lb. – 366 lb. = 619 lb.)
From this condition, if 3 more passengers with the combined weight of 176 kg (388 lb.) get on, the available cargo and luggage load will be reduced as follows:
Four-wheel drive models— With automatic transmission 179 kg – 176 kg = 3 kg. (395 lb. – 388 lb. = 7 lb.)
With manual transmission 209 kg – 176 kg = 33 kg. (460 lb. – 388 lb. = 72 lb.)
223
Two- wheel drive models— With automatic transmission 251 kg – 176 kg = 75 kg. (553 lb. – 388 lb. = 165 lb.) With manual transmission 281 kg – 176 kg = 105 kg. (619 lb. – 388 lb. = 231 lb.)
As shown in the above example, if the number of occupants increases, the cargo and luggage load equaling the combined weight of occupants who got on later must be reduced. In other words, if the increase in the number of occupants causes the excess of the total load capacity (combined weight of occupants plus cargo and luggage load), you have to reduce the cargo and luggage on your vehicle. For details about total load capacity, see “Vehicle load limits” on page 221.
CAUTION Even if the total load of occupant’s weight and the cargo load is less than the total load capacity, do not apply the load unevenly. That may cause not only damage to the tire but also deterioration to the steering ability due to unbalance of the vehicle, causing an accident.
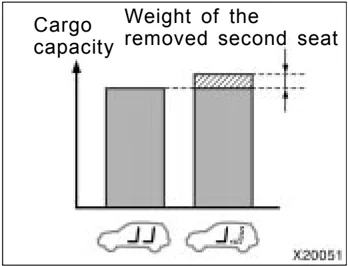
SEATING CONFIGURATION VARIATION In case of removing the rear seats, it is possible to load as much cargo as the weight of the removed seats. (Cargo capacity) = (Total load capacity) - (Total weight of occupants) + (Weight of the removed rear seats) Rear seat weight: Each seat 17 kg (37.5 lb.)
224
Types of tires
Determine what kind of tires your vehicle is originally equipped with.
- Summer tires Summer tires are high- speed capability tires best suited to highway driving under dry conditions.
Since summer tires do not have the same traction performance as snow tires, summer tires are inadequate for driving on snow- covered or icy roads. For driving on snow- covered or icy roads, we recommend using snow tires. If installing snow tires, be sure to replace all four tires.
- All season tires All season tires are designed to provide better traction in snow and to be adequate for driving in most winter conditions, as well as for use all year round.
All season tires, however, do not have adequate traction performance compared with snow tires in heavy or loose snow. Also, all season tires fall short in acceleration and handling performance compared with summer tires in highway driving.
The details about how to distinguish summer tires from all season tires are described on page 213.
CAUTION
- Do not mix summer and all season tires on your vehicle as this can cause dangerous handling characteristics, resulting in loss of control.
- Do not use tire other than the manufacturer's designated tires, and never mix tires or wheels of the sizes different from the originals.
225

226