SECTION 7-2
DO- IT- YOURSELF MAINTENANCE Engine and Chassis
- Checking the engine oil level . . . . . . . . . . . . . . . . . . . . . . . . . . . . . . . . . . . . . . . . . . . . . . . . . . . . . . . . . . . . . . . . . . . . . . . . . . . . . . . . . . . . . . . . . . . . . . . . . . . . . . . . . . . . . . . . . . . . . . . . . . . . . . . . . . . . . . . . . . . . . . . . . . . . . . . . . . . . . . . . . . . . . . . . . . . . . . . . . . . . . . . . . . . . . . . . . . . . ........ 286
- Checking the engine coolant level . . . . . . . . . . . . . . . . . . . . . . . . . . . . . . . . . . . . . . . . . . . . . . . . . . . . . . . . . . . . . . . . . . . . . . . . . . . . . . . . . . . . . . . . . . . . . . . . . . . . . . . . . . ........ 288
- Checking the radiator and condenser . . . . . . . . . . . . . . . . . . . . . . . . . . . . . . . . . . . . . . . . . . . . . . . . . . . . . . . . . . . . . . . . . . . . . . . . . . . . . . . . . . . . . . . . . . . . . . . . . . . . . . . . . ........
Checking the engine oil level
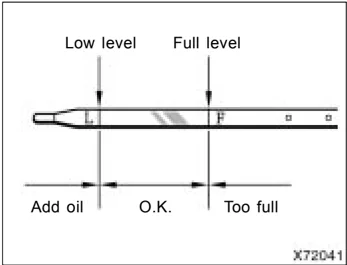
With the engine at operating temperature and turned off, check the oil level on the dipstick.
- To get a correct reading, the vehicle should be on level ground. After turning off the engine, wait a few minutes for the oil to drain back into the bottom of the engine.
- Pull the dipstick out, hold a rag under the end and wipe it clean.
- Reinsert the dipstick—push it in as far as it will go, or the reading will not be correct.
- Pull the dipstick out and look at the oil level while holding a rag under the end.
286
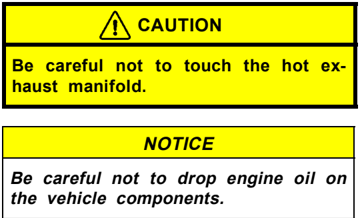
CAUTION Be careful not to touch the hot exhaust manifold.
NOTICE Be careful not to drop engine oil on the vehicle components.
NOTICE ◆ Be careful not to spill engine oil on the vehicle components. ◆ Avoid overfilling, or the engine could be damaged. ◆ Check the oil level on the dipstick once again after adding the oil.
If the oil level is below or only slightly above the low level, add engine oil of the same type as already in the engine.
Remove the oil filler cap and add engine oil in small quantities at a time, checking the dipstick. We recommend that you use a funnel when adding oil.
The approximate quantity of oil needed to raise the level between low and full on the dipstick is indicated below for reference.
When the level reaches within the correct range, install the filler cap hand-tight.
Oil quantity, L (qt., Imp. qt.): 1.0 (1.1, 0.9)
ENGINE OIL SELECTION "Toyota Genuine Motor Oil" is used in your Toyota vehicle. Use Toyota approved "Toyota Genuine Motor Oil" or equivalent to satisfy the following grade and viscosity.
Oil grade: API grade SL "Energy-Conserving" or ILSAC multigrade engine oil
Recommended viscosity: SAE 5W-30
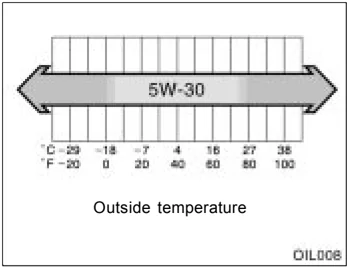
Outside temperature OIL008
SAE 5W-30 is the best choice for good fuel economy and good starting in cold weather.
If SAE 5W-30 is not available, SAE 10W-30 may be used. However, it should be replaced with SAE 5W-30 at the next oil change.
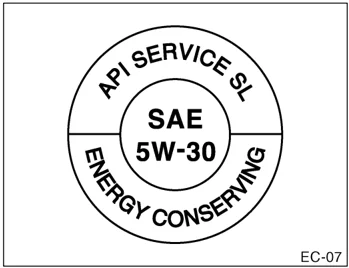
EC-07 API service symbol
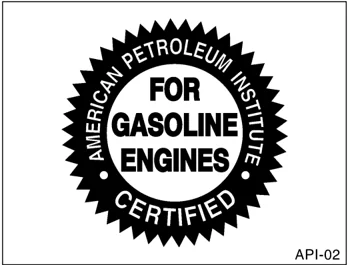
API-02 ILSAC certification mark
287
Oil identification marks
Either or both API registered marks are added to some oil containers to help you select the oil you should use.
The API Service Symbol is located anywhere on the outside of the container.
The top portion of the label shows the oil quality by API (American Petroleum Institute) designations such as SL. The center portion of the label shows the SAE viscosity grade such as SAE 5W-30. "Energy-Conserving" shown in the lower portion, indicates that the oil has fuel-saving capabilities.
The ILSAC (International Lubricant Standardization and Approval Committee) Certification Mark is displayed on the front of the container.
To ensure excellent lubrication performance for your engine, "Toyota Genuine Motor Oil" is available, which has been specifically tested and approved for all Toyota engines.
Please contact your Toyota dealer for further details about "Toyota Genuine Motor Oil".
Checking the engine coolant level
Look at the see-through coolant reservoir when the engine is cold. The coolant level is satisfactory if it is between the "FULL" and "LOW" lines on the reservoir. If the level is low, add the coolant. (For the coolant type, see "Coolant type selection" described below.)
The coolant level in the reservoir will vary with engine temperature. However, if the level is on or below the "LOW" line, add coolant. Bring the level up to the "FULL" line.
If the coolant level drops within a short time after replenishing, there may be a leak in the system. Visually check the radiator, hoses, radiator cap and drain cock and water pump.
If you can find no leak, have your Toyota dealer test the cap pressure and check for leaks in the cooling system.
CAUTION To prevent burning yourself, do not remove the radiator cap when the engine is hot.
288
Coolant type selection Use of improper coolants may damage your engine cooling system.
Only use “Toyota Super Long Life Coolant” or similar high quality ethylene glycol based non-silicate, non-amine, non-nitrite, and non-borate coolant with long-life hybrid organic acid technology. (Coolant with long-life hybrid organic acid technology is a combination of low phosphates and organic acids.)
For the U.S.A.—“Toyota Super Long Life Coolant” is a mixture of 50% coolant and 50% deionized water. This coolant provides protection down to about -35°C (-31°F).
For Canada—“Toyota Super Long Life Coolant” is a mixture of 55% coolant and 45% deionized water. This coolant provides protection down to about -42°C (-44°F).
NOTICE Do not use plain water alone.
Toyota recommends “Toyota Super Long Life Coolant”, which has been tested to ensure that it will not cause corrosion nor result in malfunction of your engine coolant system with proper usage. “Toyota Super Long Life Coolant” is formulated with long-life hybrid organic acid technology and has been specifically designed to avoid engine cooling system malfunction on Toyota vehicles.
Please contact your Toyota dealer for further details.
Checking the radiator and condenser If any of the above parts are extremely dirty or you are not sure of their condition, take your vehicle to a Toyota dealer.
CAUTION To prevent burning yourself, be careful not to touch the radiator or condenser when the engine is hot.
NOTICE To prevent damage to the radiator and condenser, do not perform the work by yourself.
289
Checking brake fluid
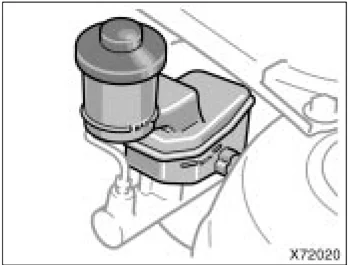
To check the fluid level, simply look at the see-through reservoir. The level should be between the “MAX” and “MIN” lines on the reservoir.
It is normal for the brake fluid level to go down slightly as the brake pads wear. So be sure to keep the reservoir filled.
If the reservoir needs frequent refilling, it may indicate a serious mechanical problem.
If the level is low, add SAE J1703 or FMVSS No.116 DOT 3 brake fluid to the brake reservoir.
Remove and replace the reservoir cap by hand. Fill the brake fluid to the dotted line. This brings the fluid to the correct level when you put the cap back on.
Use only newly opened brake fluid. Once opened, brake fluid absorbs moisture from the air, and excess moisture can cause a dangerous loss of braking.
CAUTION Take care when filling the reservoir because brake fluid can harm your hands or eyes. If fluid gets on your hands or in your eyes, flush the affected area with clean water immediately. If you still feel uncomfortable with your hands or eyes, go to the doctor.
NOTICE If you spill some of the fluid, be sure to wipe it off to prevent it from damaging the parts or paintwork.
Checking power steering fluid
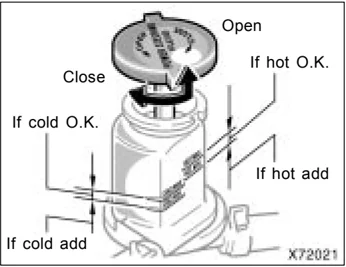
Check the fluid level through the reservoir. If necessary, add automatic transmission fluid DEXRON®II or III.
If the vehicle has been driven around 80 km/h (50 mph) for 20 minutes (a little more in frigid temperatures), the fluid is hot (80°C or 175°F). You may also check the level when the fluid is cold (about room temperature, 10°C—30°C or 50°F—85°F) if the engine has not been run for about five hours.
290
Clean all dirt from the outside of the reservoir tank and look at the fluid level. If the fluid is cold, the level should be in the “COLD” range. Similarly, if it is hot, the fluid level should be in the “HOT” range. If the level is at the low side of either range, add automatic transmission fluid DEXRON®II or III to bring the level within the range.
To remove the reservoir cap, turn it counterclockwise and lift up. To reinstall it, turn it clockwise. After replacing the reservoir cap, visually check the steering box case, vane pump and hose connections for leaks or damage.
CAUTION The reservoir tank may be hot so be careful not to burn yourself.
NOTICE Avoid overfilling, or the power steering could be damaged.
Checking tire inflation pressure
 X72039
Keep your tire inflation pressures at the proper level.
The recommended cold tire inflation pressures, tire sizes and the combined weight of occupants and cargo (vehicle capacity weight) are described on page 312 and 316. They are also on the tire and loading information label.
You should check the tire inflation pressure every two weeks, or at least once a month. And do not forget the spare!
291
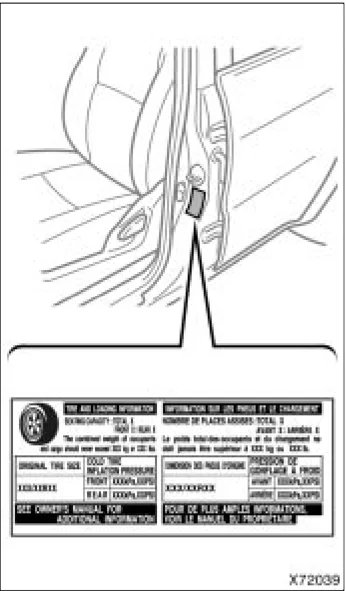
The following instructions for checking tire inflation pressure should be observed:
- The pressure should be checked only when the tires are cold. If your vehicle has been parked for at least 3 hours and has not been driven for more than 1.5 km or 1 mile since, you will get an accurate cold tire inflation pressure reading.
- Always use a tire pressure gauge. The appearance of a tire can be misleading. Besides, tire inflation pressures that are even just a few pounds off can degrade ride and handling.
- Do not bleed or reduce tire inflation pressure after driving. It is normal for the tire inflation pressure to be higher after driving.
- Never exceed the vehicle capacity weight. Passenger and luggage weight should be located so that the vehicle is balanced.
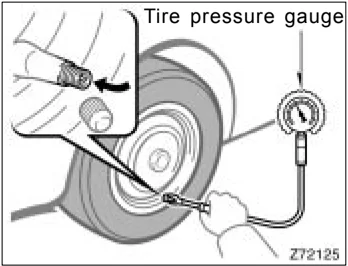
INSPECTION AND ADJUSTMENT PROCEDURE
- Remove the tire valve cap.
- Press the tip of the tire pressure gauge to the tire valve.
- Read the pressure using the graduations of the gauge.
- In case the tire inflation pressure is not within the prescribed range, insert the compressed air from the valve. In case of applying too much air, press the center of the valve and release the air to adjust.
- After completing the tire inflation pressure measurement and adjustment, apply soapy water to the valve and check for leakage.
- Install the tire valve cap.
If a gauge and air pump are not available, have your vehicle checked by your Toyota dealer.
CAUTION
Be sure to reinstall the tire valve caps. Without the valve caps, dirt or moisture could get into the valve core and cause air leakage. If the caps have been lost, have new ones put on as soon as possible.
Incorrect tire inflation pressure may waste fuel, reduce the comfort of driving, reduce tire life and make your vehicle less safe to drive.
If a tire frequently needs refilling, have it checked by your Toyota dealer.
292
CAUTION
Keep your tires properly inflated. Otherwise, the following conditions may occur and cause an accident resulting in death or serious injuries.
Low tire pressure (underinflation)—
- Excessive wear
- Uneven wear
- Poor handling
- Possibility of blowouts from an overheated tire
- Poor sealing of the tire bead
- Wheel deformation and/or tire separation
- A greater possibility of tire damage from road hazards
High tire pressure (overinflation)—
- Poor handling
- Excessive wear
- Uneven wear
- A greater possibility of tire damage from road hazards
Checking and replacing tires
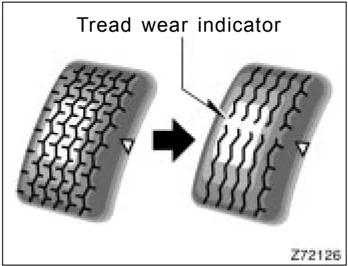
Z72126
CHECKING YOUR TIRES
Check the tire’s tread for tread wear indicators. If the indicators show, replace the tires. The location of tread wear indicators is shown by the “TWI” or “ ” marks, etc., molded on the sidewall of each tire.
293
The tires on your Toyota have built-in tread wear indicators to help you know when the tires need replacement. When the tread depth wears to 1.6 mm (0.06 in.) or less, the indicators will appear. If you can see the indicators in two or more adjacent grooves, the tire should be replaced. The lower the tread, the higher the risk of skidding.
The effectiveness of snow tires is lost if the tread wears down below 4 mm (0.16 in.).
If you have tire damage such as cuts, splits, cracks deep enough to expose the fabric, or bulges indicating internal damage, the tire should be replaced.
If a tire often goes flat or cannot be properly repaired due to the size or location of a cut or other damage, it should be replaced. If you are not sure, consult with your Toyota dealer.
If air loss occurs while driving, do not continue driving. Driving even a short distance can damage a tire beyond repair.
Any tires which are over 6 years old must be checked by a qualified technician even if damage is not obvious.
Tires deteriorate with age even if they have never or seldom been used. This applies also to the spare tire and tires stored for future use.
REPLACING YOUR TIRES When replacing a tire, use a tire of the same size and construction, and the same or greater maximum load as the originally installed tires. Also, on four-wheel drive models, all the tires must be the same brand and have the same tread patterns.
Using any other size or type of tire may seriously affect handling, ride, speedometer/odometer calibration, ground clearance, and clearance between the body and tires or snow chains.
Check that the maximum load of the replaced tire is greater than 1/2 of the Gross Axle Weight Ratings (GAWR) of either the front axle or the rear axle, whichever is greater. As for the maximum load of the tire, see the load limit at maximum cold tire inflation pressure mentioned on the sidewall of the tire, and as for the Gross Axle Weight Ratings (GAWR), see the Certification Label.
294
For details about the side wall of the tire and the Certification Label, see pages 210 and 213.
CAUTION Observe the following instructions. Otherwise, an accident may occur resulting in death or serious injuries.
-
Do not mix radial, bias belted, or bias-ply tires on your vehicle, as this may cause dangerous handling characteristics resulting in loss of control.
-
Do not use tires other than the manufacturer's recommended size, as this may cause dangerous handling characteristics resulting in loss of control.
-
Four-wheel drive models: Do not use tires of different brands, sizes, construction or tread patterns, as this may cause dangerous handling characteristics resulting in loss of control.
Toyota recommends all four tires, or at least both of the front or rear tires be replaced at a time as a set. See "If you have a flat tire" on page 247 for tire change procedure.
When a tire is replaced, the wheel should always be balanced.
An unbalanced wheel may affect vehicle handling and tire life. Wheels can get out of balance with regular use and should therefore be balanced occasionally.
When replacing a tubeless tire, the air valve should also be replaced with a new one.
Rotating tires

To equalize tire wear and help extend tire life, Toyota recommends that you rotate your tires according to the maintenance schedule. (For scheduled maintenance information, please refer to the "Scheduled Maintenance Guide" or "Owner's Manual Supplement".) However, the most appropriate timing for tire rotation may vary according to your driving habits and road surface conditions.
See "If you have a flat tire" on page 247 in Section 4 for tire change procedure.
295
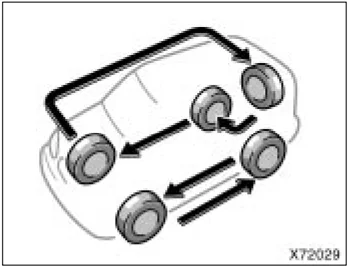
When rotating tires, check for uneven wear and damage. Abnormal wear is usually caused by incorrect tire pressure, improper wheel alignment, out-of- balance wheels, or severe braking. Initial adjustment of the tire pressure warning system is necessary after you have rotated your tires. See “Tire pressure warning system” on page 131 in Section 1-7.
Installing snow tires and chains
WHEN TO USE SNOW TIRES OR CHAINS Snow tires or chains are recommended when driving on snow or ice. On wet or dry roads, conventional tires provide better traction than snow tires.
SNOW TIRE SELECTION If you need snow tires, select tires of the same size, construction and load capacity as the originally installed tires. Also, on four-wheel drive models, all the tires must be the same brand and have the same tread patterns. Do not use tires other than those mentioned above. Do not install studded tires without first checking local regulations for possible restrictions.
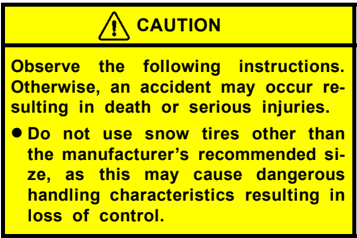
CAUTION Observe the following instructions. Otherwise, an accident may occur resulting in death or serious injuries. • Do not use snow tires other than the manufacturer’s recommended size, as this may cause dangerous handling characteristics resulting in loss of control.
• Four-wheel drive models: Do not use snow tires of different brands, sizes, construction or tread patterns, as this may cause dangerous handling characteristics resulting in loss of control.
SNOW TIRE INSTALLATION Snow tires should be installed on all wheels. Installing snow tires on the front wheels only can lead to an excessive difference in road grip capability between the front and rear tires, which could cause loss of vehicle control. When storing removed tires, you should store them in a cool dry place. Mark the direction of rotation and be sure to install them in the same direction when replacing.
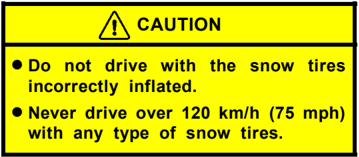
CAUTION • Do not drive with the snow tires incorrectly inflated. • Never drive over 120 km/h (75 mph) with any type of snow tires.
296
TIRE CHAIN SELECTION
Use the tire chains of correct size.
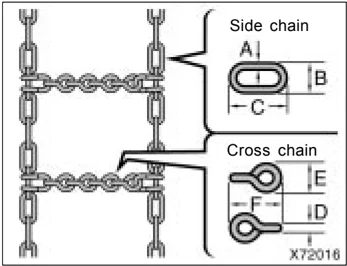
For 215/70R16 and 235/60R16 tires, use the following type chains.
| mm (in.) | ||
|---|---|---|
| A | Diameter of side chain | 3 (0.12) |
| B | Width of side chain | 10 (0.39) |
| C | Length of side chain | 30 (1.18) |
| D | Diameter of cross chain | 4 (0.16) |
| E | Width of cross chain | 14 (0.55) |
| F | Length of cross chain | 25 (0.98) |
Regulations regarding the use of tire chains vary according to location or type of road, so always check local regulations before installing chains.
NOTICE
If the wrong combination of tire and chain is used, the chains could damage the vehicle body.
CHAIN INSTALLATION
Install the chains on the front tires as tightly as possible. Do not use tire chains on the rear tires. Retighten chains after driving 0.5–1.0 km (1/4–1/2 mile).
When installing chains on your tires, carefully follow the instructions of the chain manufacturer.
If wheel covers are used, they will be scratched by the chain band, so remove the covers before putting on the chains.
CAUTION
- Do not exceed 50 km/h (30 mph) or the chain manufacturer’s recommended speed limit, whichever is lower.
- Drive carefully avoiding bumps, holes, and sharp turns, which may cause the vehicle to bounce.
- Avoid sharp turns or locked-wheel braking, as use of chains may adversely affect vehicle handling.
- When driving with chains installed, be sure to drive carefully. Slow down before entering curves to avoid losing control of the vehicle. Otherwise an accident may occur.
297
2005 RAV4 from Sep. ’04 Prod. (OM42570U)
Replacing wheels
WHEN TO REPLACE YOUR WHEELS
If you have wheel damage such as bending, cracks or heavy corrosion, the wheel should be replaced.
If you fail to replace a damaged wheel, the tire may slip off the wheel or cause loss of handling control.
WHEEL SELECTION
When replacing wheels, care should be taken to ensure that the wheels are replaced by ones with the same load capacity, diameter, rim width, and offset. Correct replacement wheels are available at your Toyota dealer.
A wheel of a different size or type may adversely affect handling, wheel and bearing life, brake cooling, speedometer/odometer calibration, stopping ability, headlight aim, bumper height, vehicle ground clearance, and tire or snow chain clearance to the body and chassis.
Replacement with used wheels is not recommended as they may have been subjected to rough treatment or high mileage and could fail without warning. Also, bent wheels which have been straightened may have structural damage and therefore should not be used. Never use an inner tube in a leaking wheel which is designed for a tubeless tire.

Aluminum wheel precautions
- When installing aluminum wheels, check that the wheel nuts are tight after driving your vehicle the first 1600 km (1000 miles).
- If you have rotated, repaired, or changed your tires, check that the wheel nuts are still tight after driving 1600 km (1000 miles).
- When using tire chains, be careful not to damage the aluminum wheels.
- Use only Toyota wheel nuts and wrench designed for your aluminum wheels.
- When balancing your wheels, use only Toyota balance weights or equivalent and a plastic or rubber hammer.
- As with any wheel, periodically check your aluminum wheels for damage. If damaged, replace immediately.
298
SECTION 7-3
DO- IT- YOURSELF MAINTENANCE
Electrical components
- Checking battery condition . . . . . . . . . . . . . . . . . . . . . . . . . . . . . . . . . . . . . . . . . . . . . . . . . . . . . . . . . . . . . . . . . . . . . . . . . . . . . . . . . . . . . . . . . . . . . . . . . . . . . . . . . . . . . . . . . . . . . . . . . . . . . . . . . . . . . . . . . . . . . . . . . . . . . . . . . . . . . . . . . . . . . . . . . . . . . . . . . . . . . . . . . . . . . . . . ........ 300
- Battery recharging precautions . . . . . . . . . . . . . . . . . . . . . . . . . . . . . . . . . . . . . . . . . . . . . . . . . . . . . . . . . . . . . . . . . . . . . . . . . . . . . . . . . . . . . . . . . . . . . . . . . . . . . . . . . . . . . ........ 301
- Checking and replacing fuses . . . . . . . . . . . . . . . . . . . . . . . . . . . . . . . . . . . . . . . . . . . . . . . . . . . . . . . . . . . . . . . . . . . . . . . . . . . . . . . . . . . . . . . . . . . . . . . . . . . . . . . . . . . . . ........

Checking battery condition— —Precautions
CAUTION
BATTERY PRECAUTIONS The battery produces flammable and explosive hydrogen gas. ● Do not cause a spark from the battery with tools. ● Do not smoke or light a match near the battery. The electrolyte contains poisonous and corrosive sulfuric acid. ● Avoid contact with eyes, skin or clothes. ● Never ingest electrolyte. ● Wear protective safety glasses when working near the battery. ● Keep children away from the battery.
EMERGENCY MEASURES ● If electrolyte gets in your eyes, flush your eyes with clean water immediately and get immediate medical attention. If possible, continue to apply water with a sponge or cloth while en route to the medical office.
● If electrolyte gets on your skin, thoroughly wash the contact area. If you feel pain or burning, get medical attention immediately. ● If electrolyte gets on your clothes, there is a possibility of its soaking through to your skin, so immediately take off the exposed clothing and follow the procedure above, if necessary. ● If you accidentally swallow electrolyte, drink a large quantity of water or milk. Follow with milk of magnesia, beaten raw egg or vegetable oil. Then go immediately for emergency help.
—Checking battery exterior

Before checking the battery, remove the battery cover. (See “(c) Jump starting” on page 243 in Section 4.) Check the battery for corroded or loose terminal connections, cracks, or loose hold-down clamp. a. If the battery is corroded, wash it off with a solution of warm water and baking soda. Coat the outside of the terminals with grease to prevent further corrosion. b. If the terminal connections are loose, tighten their clamp nuts—but do not overtighten.
300
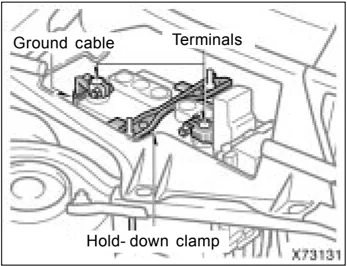
c. Tighten the hold-down clamp only enough to keep the battery firmly in place. Overtightening may damage the battery case.
After checking the battery, reinstall the battery cover.
NOTICE
- Be sure the engine and all accessories are off before performing maintenance.
- When checking the battery, remove the ground cable from the negative terminal (“-” mark) first and reinstall it last.
- Be careful not to cause a short circuit with tools.
- Take care no solution gets into the battery when washing it.
—Checking battery condition
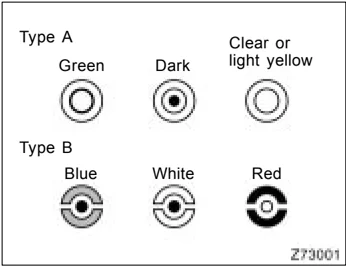
CHECKING BY INDICATOR
Check the battery condition by the indicator color.
| Indicator color | Condition | |
|---|---|---|
| Type A | Type B | |
| Green | Blue | Good |
| Dark | White | Charging necessary. Have battery checked by your Toyota dealer. |
| Clear or light yellow | Red | Have battery checked by your Toyota dealer. |
Battery recharging precautions
During recharging, the battery is producing hydrogen gas.
Therefore, before recharging:
- If recharging with the battery installed on the vehicle, be sure to disconnect the ground cable.
- Be sure the power switch on the recharger is off when connecting the charger cables to the battery and when disconnecting them.
CAUTION
- Always charge the battery in an unconfined area. Do not charge the battery in a garage or closed room where there is not sufficient ventilation.
- Only do a slow charge (5 A or less). Charging at a quicker rate is dangerous. The battery may explode, causing personal injuries.
NOTICE
Never recharge the battery while the engine is running. Also, be sure all accessories are turned off.
301
2005 RAV4 from Sep. ’04 Prod. (OM42570U)
Checking and replacing fuses
 X73078
Type A
 X73102
If the headlights or other electrical components do not work, check the fuses. If any of the fuses are blown, they must be replaced.
See “Fuse locations” on page 279 in Section 7-1 for locations of the fuses.
Turn the ignition switch and inoperative component off. Pull the suspected fuse straight out and check it.
Determine which fuse may be causing the problem. The lid of the fuse box shows the name of the circuit for each fuse. See page 316 in Section 8 for the functions controlled by each circuit.
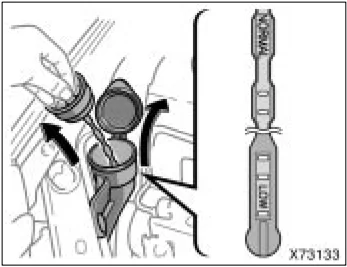
Type A fuses can be pulled out by using the pull-out tool. The location of the pullout tool is shown in the illustration.
If you are not sure whether the fuse has blown, try replacing the suspected fuse with one that you know is good.
If the fuse has blown, push a new fuse into the clip.
Only install a fuse with the amperage rating designated on the fuse box lid.
If you do not have a spare fuse, in an emergency you can pull out the “RADIO” or “A/C” fuse, which may be dispensable for normal driving, and use it if its amperage rating is the same.
If you cannot use one of the same amperage, use one that is lower, but as close to the rating as possible. If the amperage is lower than that specified, the fuse might blow out again but this does not indicate anything wrong. Be sure to get the correct fuse as soon as possible and return the substitute to its original clip.
It is a good idea to purchase a set of spare fuses and keep them in your vehicle for emergencies.
 X73107
Type B
302
If the new fuse immediately blows out, there is a problem with the electrical system. Have your Toyota dealer correct it as soon as possible.
CAUTION Never use a fuse with a higher amperage rating, or any other object, in place of a fuse. This may cause extensive damage and possibly a fire.
Adding washer fluid

If any washer does not work or windshield washer fluid level warning light comes on, the washer tank may be empty. Check the washer fluid level on the level gauge. If the washer fluid level is below “LOW”, add washer fluid.
You may use plain water as washer fluid. However, in cold areas where temperatures range below the freezing point, use washer fluid containing antifreeze. This product is available at your Toyota dealer and most auto parts stores. Follow the manufacturer’s directions for how much to mix with water.
NOTICE Do not use engine antifreeze or any other substitute because it may damage your vehicle’s paint.
303
'05 Rav4_U (L/O 0409)
Replacing light bulbs—
The following illustrations show how to gain access to the bulbs. When replacing a bulb, make sure the ignition switch and light switch are off. Use bulbs with the wattage ratings given in the table.
CAUTION
- To prevent burning yourself, do not replace the light bulbs while they are hot.
- Halogen bulbs have pressurized gas inside and require special handling. They can burst or shatter if scratched or dropped. Hold a bulb only by its plastic or metal case. Do not touch the glass part of a bulb with bare hands.
NOTICE
Only use a bulb of the listed type.
The inside of the lens of exterior lights such as headlights may temporarily fog up when the lens becomes wet in the rain or in a car wash. This is not a problem because the fogging is caused by the temperature difference between the outside and inside of the lens, just like the windshield fogs up in the rain. However, if there is a large drop of water on the inside of the lens, or if there is water pooled inside the light, contact your Toyota dealer.
\begin{tabular}{|l|c|c|c|} \hline Light bulbs & Bulb No. & W & Type \ \hline Headlights & 9003 & 60/55 & A \ Parking and front side marker lights & 168 & 5 & B \ Front turn signal lights & 7440 & 21 & B \ Front fog lights & — & 51 & C \ Rear turn signal lights & 7440 & 21 & B \ Stop/tail and rear side marker lights & 7443 & 21/5 & B \ Back-up lights & 921 & 16 & B \ High mounted stop light & 7440 & 21 & B \ License plate light & 168 & 5 & B \ Interior lights & — & 8 & D \ Personal light & — & 10 & D \ \hline \end{tabular}
A: HB2 halogen bulbs B: Wedge base bulbs C: HB4 halogen bulbs D: Double end bulbs
304
—Headlights
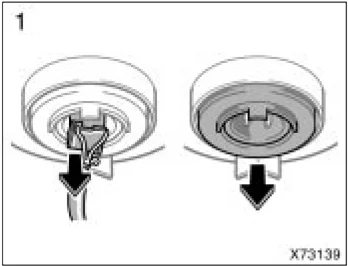
- Open the hood. Unplug the connector. Remove the rubber cover. If the connector is tight, wiggle it.
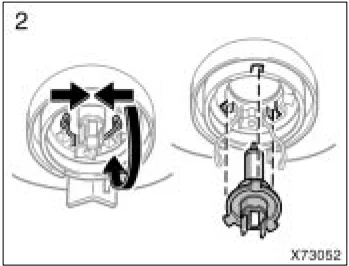
- Release the bulb retaining spring and remove the bulb. Install a new bulb and the bulb retaining spring. To install a bulb, align the tabs of the bulb with the cutouts of the mounting hole.
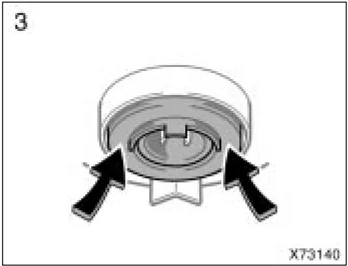
- Install the rubber cover and fit it securely on the boss. Plug in the connector. Make sure the rubber cover fits securely on the bulb base and the mounting body. Aiming is not necessary after replacing the bulb. When aiming adjustment is necessary, contact your Toyota dealer.
305
—Parking and front side marker lights
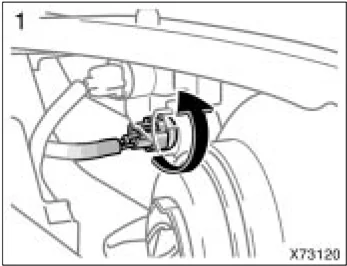
X73120
2
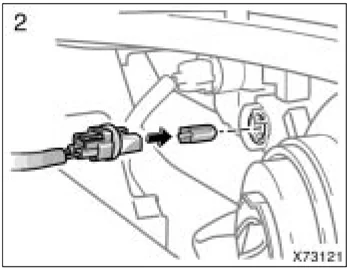
X73121
—Front turn signal lights
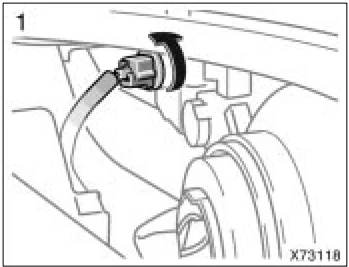
X73118
2
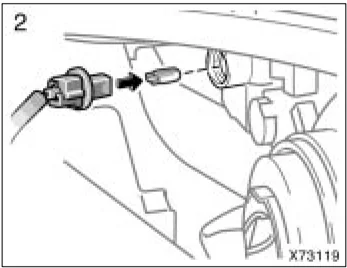
X73119
—Front fog lights
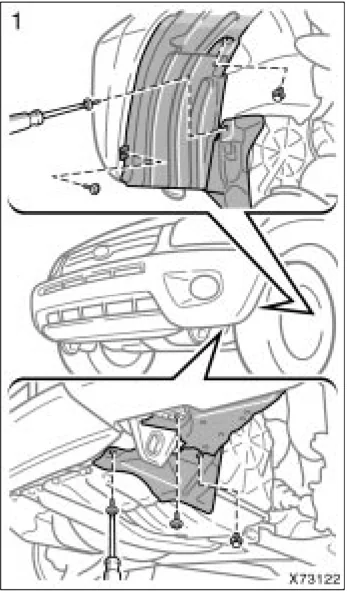
X73122
306
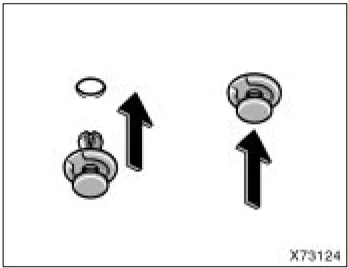
- Remove the bolts and the cover clip. The steps for removing and installing the cover clip is shown in the following illustrations.
 Removing clip
 Installing clip
- Unplug the connector while depressing the lock release.
If the connector is tight, wiggle it.
307
—Rear turn signal, stop/tail, rear side marker and back-up lights
 3
X73128
3. Turn the bulb counterclockwise and remove it.
 4
X73127
4. Install a new bulb and the connector into the mounting hole by turning it clockwise.
 1
X73094
 2
X73116
308
—High mounted stoplight
 3
a
b
C
X73117
a: Stop/tail and rear side marker light
b: Back-up light
c: Rear turn signal light
1 X73082
3 X73084
2 X73112
4 X73113
309
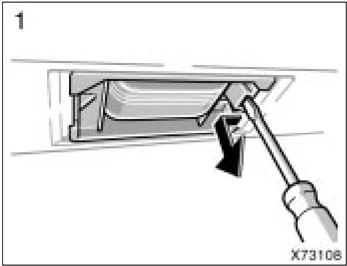
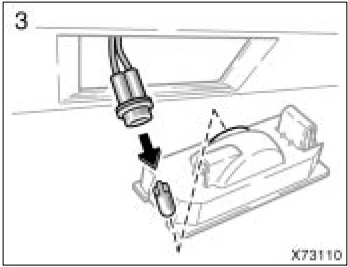
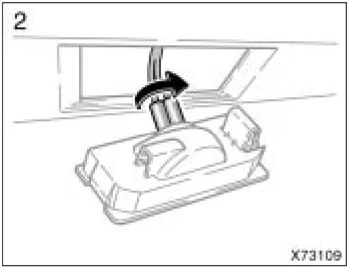
—License plate light
X73108 Use a Flat-bladed screwdriver.
X73109
X73110
310
SECTION 8
SPECIFICATIONS
Specifications
- Dimensions and weights . . . . . . . . . . . . . . . . . . . . . . . . . . . . . . . . . . . . . . . . . . . . . . . . . . . . . . . . . . . . . . . . . . . . . . . . . . . . . . . . . . . . . . . . . . . . . . . . . . . . . . . . . . . . . . . . . . . . . . . . . . . . . . . . . . . . . . . . . . . . . . . . . . . . . . . . . . . . . . . . . . . . . . . . . . . . . . . . . . . . . . . . . . . . . . . . . . . . . . . . . . . . . . . . ........ 312
- Engine . . . . . . . . . . . . . . . . . . . . . . . . . . . . . . . . . . . . . . . . . . . . . . . . . . . . . . . . . . . . . . . . . . . . . . . . . . . . . . . . . . . . . . . . . . . . . . . . . . . . . . . . . . . . . . . . . . . . . . . . ........ 313
- Fuel . . . . . . . . . . . . . . . . . . . . . . . . . . . . . . . . . . . . . . . . . . . . . . . . . . . . . . . . . . . . . . . . . . . . . . . . . . . . . . . . . . . . . . . . . . . . . . . . . . . . . . . . . . . . . . . . . . . . . . . . . . ........
Dimensions and weights
| 215/70R16 tires | 235/60R16 tires | |
|---|---|---|
| Overall length mm (in.) | 4205 (165.6)4210 (165.7)*24215 (165.9)*34255 (167.5)*4 | 4220 (166.1)4225 (166.3)*34255 (167.5)*4 |
| Overall width mm (in.) | 1735 (68.3)1785 (70.3)*5 | 1785 (70.3) |
| Overall height*□ mm (in.) | 1670 (65.7)*61680 (66.1)*71705 (67.1)*6, 81715 (67.5)*7, 8 | 1670 (65.7)1705 (67.1)*8 |
| Wheelbase mm (in.) | 2490 (98.0) | 2490 (98.0) |
| Front tread mm (in.) | 1505 (59.3)*71510 (59.4)*6 | 1525 (60.0) |
| Rear tread mm (in.) | 1495 (58.9)*71500 (59.1)*6 | 1520 (59.8) |
| Vehicle capacity weight (occupants + luggage) kg (lb.) | 345 (761)*7, 9375 (826)*7, 10417 (919)*6, 9447 (985)*6, 10 | 345 (761)*7, 9375 (826)*7, 10417 (919)*6, 9447 (985)*6, 10 |
| Towing capacity (trailer weight + cargo weight) kg (lb.) | 680 (1500) | 680 (1500) |
*1: Unladen vehicle *2: With steel wheel spare tire and half spare tire cover *3: With aluminum wheel spare tire and half spare tire cover *4: With full spare tire cover *5: With over fender *6: Two-wheel drive models *7: Four-wheel drive models *8: With roof rails *9: With automatic transmission *10: With manual transmission
312
Engine
Model:
2AZ-FE
Type:
4 cylinder in line, 4 cycle, gasoline
Bore and stroke, mm (in.):
88.5 × 96.0 (3.48 × 3.78)
Displacement, cm³ (cu. in.):
2362 (144.1)
Fuel
Fuel type:
Unleaded gasoline, Octane Rating 87 (Research Octane Number 91) or higher
Fuel tank capacity, L (gal., Imp. gal.):
56 (14.8, 12.3)
Service specifications
ENGINE
Valve clearance (engine cold), mm (in.):
Intake 0.19—0.29 (0.007—0.011)
Exhaust 0.30—0.40 (0.012—0.016)
Spark plug type:
DENSO SK20R11
NGK IFR6A11
Spark plug gap, mm (in.):
1.1 (0.043)
ENGINE LUBRICATION
Oil capacity (drain and refill), L (qt., Imp. qt.):
With filter 3.8 (4.0, 3.3)
Without filter 3.6 (3.8, 3.2)
“Toyota Genuine Motor Oil” is used in your Toyota vehicle. Use Toyota approved “Toyota Genuine Motor Oil” or equivalent to satisfy the following grade and viscosity.
Oil grade:
API grade SL “Energy-Conserving” or ILSAC multigrade engine oil
313
2005 RAV4 from Sep. ’04 Prod. (OM42570U)
Recommended oil viscosity: SAE 5W-30
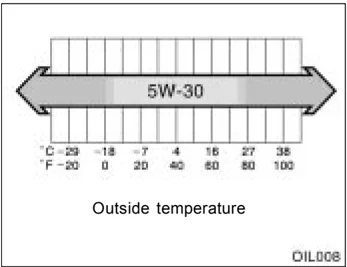
Outside temperature
OIL006
Please contact your Toyota dealer for further details.
COOLING SYSTEM Total capacity, L (qt., Imp. qt.): With manual transaxle 6.6 (7.0, 5.9) With automatic transaxle 6.8 (7.2, 6.0) Coolant type: "Toyota Super Long Life Coolant" is used in your Toyota vehicle at factory fill. In order to avoid technical problems, only use "Toyota Super Long Life Coolant" or similar high quality ethylene glycol based non-silicate, non-amine, non-nitrite, and non-borate coolant with long-life hybrid organic acid technology. (Coolant with long-life hybrid organic acid technology is a combination of low phosphates and organic acids.) Do not use plain water alone. Please contact your Toyota dealer for further details.
BATTERY Open voltage* at 20°C (68°F): 12.6—12.8 V Fully charged 12.2—12.4 V Half charged 11.8—12.0 V Discharged *: Voltage that is checked 20 minutes after the key is removed with all the lights turned off Charging rates: 5 A max.
CLUTCH Pedal free play, mm (in.): 5—15 (0.2—0.6) Fluid type: SAE J1703 or FMVSS No.116 DOT 3
MANUAL TRANSAXLE Oil capacity, L (qt., Imp. qt.): Two-wheel drive models 2.5 (2.6, 2.2) Four-wheel drive models 3.4 (3.6, 3.0) Oil type: Gear oil API GL-4 or GL-5 Recommended oil viscosity: SAE 75W-90
314
AUTOMATIC TRANSAXLE Fluid capacity (drain and refill), L (qt., Imp. qt.): Up to 3.5 (3.7, 3.1) Fluid type: Toyota Genuine ATF Type T-IV Change automatic transmission fluid only as necessary. Generally, it is necessary to change automatic transmission fluid only if your vehicle is driven under one of the Special Operating Conditions listed in your “Scheduled Maintenance Guide” or “Owner’s Manual Supplement”. When changing the automatic transmission fluid, use only “Toyota Genuine ATF Type T-IV” (ATF JWS3309 or NWS6500) to aid in assuring optimum transaxle performance. Notice: Using automatic transmission fluid other than “Toyota Genuine ATF Type T-IV” may cause deterioration in shift quality, locking up of your transmission accompanied by vibration, and ultimately damage the automatic transmission of your vehicle. Please contact your Toyota dealer for further details.
TRANSFER (four-wheel drive models) Oil capacity, L (qt., Imp. qt.): 0.9 (1.0, 0.8) Oil type: Hypoid gear oil API GL-5 Recommended oil viscosity: Above -18°C (0°F) SAE 90 Below -18°C (0°F) SAE 80W or 80W-90
REAR DIFFERENTIAL (four-wheel drive models) Oil capacity, L (qt., Imp. qt.): 0.9 (1.0, 0.8) Oil type: Hypoid gear oil API GL-5 Recommended oil viscosity: Above -18°C (0°F) SAE 90 Below -18°C (0°F) SAE 80W or 80W-90
BRAKES Minimum pedal clearance when depressed with the force of 490 N (50 kgf, 110 lbf) with the engine running, mm (in.): 118 (4.6) Pedal free play, mm (in.): 1—6 (0.04—0.24) Pad wear limit, mm (in.): 1.0 (0.04) Lining wear limit, mm (in.): 1.0 (0.04) Parking brake adjustment when pulled with the force of 196 N (20 kgf, 44 lbf): 6—8 clicks Fluid type: SAE J1703 or FMVSS No.116 DOT 3
STEERING Wheel free play: Less than 30 mm (1.2 in.) Power steering fluid type: Automatic transmission fluid DEXRON®II or III
315
Tires
Tire size: 215/70R16 99S 235/60R16 100H
Cold tire inflation pressure, kPa (kgf/cm² or bar, psi): 200 (2.0, 29)
Wheel size: Steel wheel 16 × 6 1/2J Aluminum Wheel 16 × 7JJ
Wheel nut torque, N·m (kgf·m, ft·lbf): 103 (10.5, 76)
NOTE: For a complete information on tires (e.g. replacing tires or replacing wheels), see “Checking tire inflation pressure” through “Aluminum wheel precautions”, pages 291 through 298 in Section 7- 2.
Fuses
 X80052
Engine compartment
 X80055
Instrument panel
Fuses (type A)
- RADIO 15 A: Audio system
- DOME 10 A: Clock, personal light, interior lights, vanity lights, garage door opener, air conditioning system, wireless remote control system, gauges and meters
- CUT 30 A: “RADIO” and “DOME” fuses
- A/C 5 A: Air conditioning system
- MAIN 30 A: “H- LP RH” and “H- LP LH” fuses
- HAZ 10 A: Emergency flashers
316
- ALT-S 5 A: Charging system
- IGN 15 A: Starting system, multiport fuel injection system/sequential multiport fuel injection system
- EFI3 10 A: Multiport fuel injection system/sequential multiport fuel injection system, emission control system
- EFI2 5 A: Multiport fuel injection system/sequential multiport fuel injection system
- RADIO NO.2 30 A: Audio system
- ABS 2 30 A: Anti-lock brake system, vehicle stability control system, traction control system, brake assist system
- EFI1 20 A: Multiport fuel injection system/sequential multiport fuel injection system, automatic transmission fluid temperature sensor, "EFI2" and "EFI3" fuses
- H-LP RH 15 A: Right-hand headlight
- H-LP LH 15 A: Left-hand headlight
- ETCS 10 A: Electronic throttle control system
- ST 5 A: Starting system
- STOP 10 A: Stop lights, high-mounted stoplight, anti-lock brake system, shift lock control system, multiport fuel injection system/sequential multiport fuel injection system, cruise control system
- CIG 15 A: Cigarette lighter
- POWER OUTLET 15 A: Power outlets
- S-HTR 10 A: Seat heaters
- PANEL 7.5 A: Instrument panel lights, gauges and meters, front fog lights, instrument panel light control, outside rear view mirror defoggers, air conditioning system
- FR FOG 15 A: Front fog lights
- HORN 10 A: Horn
- TAIL 7.5 A: Tail lights, license plate lights
- TAIL&PANEL 15 A: "PANEL" and "TAIL" fuses
- ACC 7.5 A: Audio system, shift lock control system, clock, power rear view mirrors
- DEF 20 A: Rear window defogger
- GAUGE 10 A: Back-up lights, electric cooling fans, air conditioning system, automatic transmission indicator lights, charging system
- OBD 7.5 A: On-board diagnosis system
- IG2 10 A: Discharge warning light, multiport fuel injection system/sequential multiport fuel injection system, starting system, gauges and meters, SRS airbag system
- DOOR 20 A: Power door lock system
- MIR HTR 10 A: Outside rear view mirror defoggers
- RR WIP 15 A: Rear window wiper and washer
- WIP 25 A: Windshield wipers and washer
- ECU IG 10 A: Emergency flashers, gauges and meters, anti-lock brake system, vehicle stability control system, traction control system, SRS airbag system, shift lock control system, cruise control system
Fuses (type B) 37. RDI 30 A: Electric cooling fan 38. CDS 30 A: Electric cooling fan 39. AM2 30 A: Discharge warning light, multiport fuel injection system/sequential multiport fuel injection system, starting system, SRS airbag system, "IG2" fuse
317
- ABS 1 50 A: Anti-lock brake system
- HTR 40 A: Air conditioning system
- F- HTR or H-LP CLN 30 A: No circuit
- PWR 30 A: Electric moon roof, power windows
- AM1 40 A: Power outlets, rear window defogger, "ACC", "CIG", "ECU IG", "GAUGE", "RR WIP", "S-HTR" and "WIP" fuses
318
’05 Rav4_U (L/O 0409)
SECTION 9
REPORTING SAFETY DEFECTS FOR U.S. OWNERS
Reporting safety defects for U.S. owners
- Reporting safety defects for U.S. owners ........ 320
319

Reporting safety defects for U.S. owners
If you believe that your vehicle has a defect which could cause a crash or could cause injury or death, you should immediately inform the National Highway Traffic Safety Administration (NHTSA) in addition to notifying Toyota Motor Sales, U.S.A., Inc. (Toll-free: 1-800-331-4331).
If NHTSA receives similar complaints, it may open an investigation, and if it finds that a safety defect exists in a group of vehicles, it may order a recall and remedy campaign. However, NHTSA cannot become involved in individual problems between you, your dealer, or Toyota Motor Sales, U.S.A., Inc.
To contact NHTSA, you may either call the Auto Safety Hotline toll-free at 1-800-424-9393 (or 366-0123 in Washington, D.C. area) or write to: NHTSA, U.S. Department of Transportation, Washington, D.C. 20590. You can also obtain other information about motor vehicle safety from the Hotline.
320
iU – 3
Quick index
- If a service reminder indicator or warning buzzer comes on ........ 109
- If your vehicle will not start ........ 242
- If your engine stalls while driving ........ 246
- If your vehicle overheats ........ 246
- If you have a flat tire ........ 247
- If your vehicle needs to be towed ........ 258
- Tips for driving during break-in period ........ 199
- How to start the engine ........ 228
- General maintenance ........ 273
- Complete index ........ NO TAG
Gas station information
Fuel type: UNLEADED gasoline, Octane Rating 87 (Research Octane Number 91) or higher See page 199 for detailed information.
Fuel tank capacity: 56 L (14.8 gal., 12.3 Imp. gal.)
Engine oil: API grade SL "Energy-Conserving" or ILSAC multigrade engine oil is recommended. See page 287 for detailed information.
Tire information: See pages 291 through 298. Tire inflation pressure: See page 316.
Publication No. OM42570U Part No. 01999-42570 Printed in Japan 01-0409-00 ☐ i i
You should know as much about the quality and importance of proper maintenance of your new vehicle as the people who built it.
The Toyota authorized Repair Manual tells you how to maintain your vehicle and enables you to correctly perform your own maintenance.
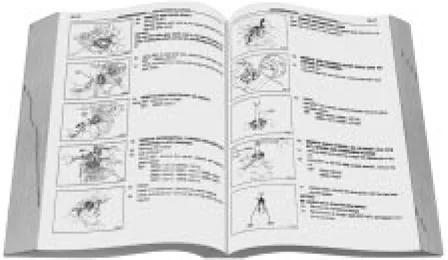
The best way to keep your new vehicle in top running order is to maintain it properly from the moment you drive it off the showroom floor. The Toyota authorized Repair Manual is packed with literally everything you need to know to perform your own maintenance in virtually every area of your new vehicle.
Maintenance procedures for the engine, chassis, body, electrical system, and more, are clearly explained and illustrated.
Periodic maintenance and tune-up
Periodic maintenance and tune- up helps to prevent small problems from growing into larger ones later on. The repair manual outlines exactly what maintenance is required and clearly explains how to do the work yourself step- by- step.
Areas covered include such things as spark plug replacement, valve clearance adjustment and engine oil and filter replacement.
Where to obtain the Repair Manual
The repair manual for RAV4 may be purchased from any Toyota dealer or the Material Distribution Center. To purchase the repair manual, please contact your Toyota dealer or call the Material Distribution Center toll- free at 1- 800- 622- 2033.
WE REALLY CARE ABOUT YOU — PLEASE BUCKLE UP
Toyota has made a special effort to encourage use of seat belts.
Toyota belts are:
- Comfortable
- Easy to use
- Convenient
We encourage you to use your belts every time you drive.

U
表 2