Audio system
Press OK soft key after entering correct code.
The telephone is unlocked. If you have entered an incorrect code, you must enter the correct code.
Switching off the telephone
- Press TEL button for approx. 3 seconds.
PROCESSING appears in the display until the telephone is off. Afterward, PHONE OFF appears in the display.
Adjusting the volume
- Turn rotary control of button during a telephone call.
The volume will increase or decrease depending on the direction turned.
The volume can be adjusted separately for telephone mode and audio mode.
Adjusting sound
- Adjust sound during a telephone call. Sound adjustment (> page 203).
Placing a call
Entering a telephone number and starting the dialing process

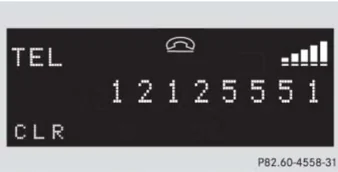
- Enter desired telephone number using buttons 1 to 0.
The number can have up to 32 digits, but only twelve of these are visible in the display.
-
If necessary, correct number entered with the CLR soft key. Press soft key briefly to delete the last digit entered; press soft key and hold to delete the complete number.
-
After correct telephone number has been entered, press button.
If the telephone number has been saved together with a name in the phone book, the name will appear in the display.
Phone book
The numbers stored in the phone book of the mobile telephone can be called up either by name or number.
In addition, incoming calls are stored in the phone book.
232
Audio system
i This is only possible, however, when the call information transmitted includes the number of the person calling. If the telephone number is not transmitted, NO NUMBER will be stored in the phone book.
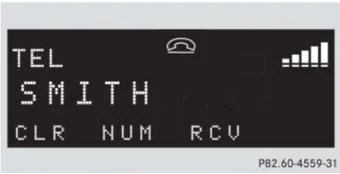
- Searching and calling up phone book entries by name
You can access your mobile telephone's phone book with the audio system. You can access both the main entries and the sub-entries of your phone book.
P82.60-4559-31
▶ Press MEM soft key or press button ▲ or ▼.
▶ Press desired numerical key 2 ABC to 9 WXYZ.
The stored entries are selected according to the alphabetical order of the initial letters (e.g. for S-Schneider, press button 7 PQRS four times).
or
▶ Press and hold button ▲ or ▼.
The system jumps from one initial letter to the next in ascending or descending order.
▶ Press and hold button ▲ or ▼ until desired initial letter has been reached.
or
▶ Press button ▲ or ▼ repeatedly until desired entry has been reached.
The stored entries are selected in alphabetical order with the sub-entries.
i Several sub-entries can be stored for each main entry (name). These entries are marked by a corresponding abbreviation that appears in the upper left-hand corner of the display. The following abbreviations for sub-entries are possible:
CEL = Mobile phone HOM = Home WOR = Work FAX = Fax PAG = Pager TEL = Main
▷▷
233
Audio system
When you have selected a number, press button. The call will be made.
- Viewing the telephone number of a phone book entry
- Search for desired entry.
- Press NUM soft key. The telephone number of the phone book entry appears in the display.
- Returning calls received
P82.60-4467-31
-
Press MEM soft key or press button or .
-
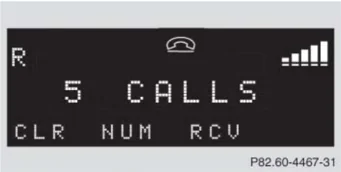
Press RCV soft key (received calls). The number of received calls and then the call last received appear briefly in the display.
-
Select desired telephone number with button or . The letter R and the number of the memory position appear in the upper left-hand corner of the display. The numbers are stored in the order of the calls received.
-
When you have selected a number, press button. The call will be made.
-
Speed dial If you have stored telephone numbers as speed dial numbers in your telephone, you can also enter these with buttons 1 to 0 on the radio unit.
- Press desired button 1 to 0 briefly.
- Press button. The call will be made.
-
Turbo dial If you have stored telephone numbers as turbo dial numbers in your telephone, you can also enter these with buttons 1 to 0 on the radio unit.
- Press desired button 1 to 0 until the call is made.
234
Audio system
Redial
If the number you have dialed is busy, you can again place calls to the last ten telephone numbers dialed using the redial function.
If you have activated the automatic redial function on your mobile telephone, the number of the person being called is automatically redialed after a short waiting period if there is a busy signal. Refer to the separate operating instructions for the mobile telephone.
• Manual redial
P82.60-4621-31
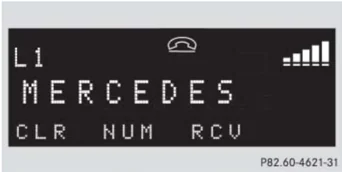
▶ Press button. The telephone number last dialed will appear in the display.
▶ Select desired telephone number with button or . The letter L and the number of the memory position appears in the left-hand corner of the display. The numbers are stored in the order of the calls received.
▶ When you have selected a number, press button. The call will be made.
Accepting an incoming call
If the telephone is active in the background (reception symbol is visible in the display), the audio source is muted when an incoming call is received. A ringing tone can be heard and the caller's telephone number, or the name under which the telephone number has been saved in the telephone book, appears in the display. If the caller's number is not relayed, CALL will appear in the display.
▶ Press button. The call is accepted.
235
Audio system
Muting a call
It is possible to mute a call; the caller is then no longer able to hear you.
- Mute on
- ► Press MUT soft key.
- ► MIC MUTE will appear in the display.
- Mute off
- ► Press MUT soft key again.
Terminating a call
► Press [phone hang-up icon] button.
The current call is terminated and the muted audio source becomes active again.
Accepting a second incoming call
If you receive another call during an already active call, you can accept the second call and switch between the two.
- Accepting a second call
- ► Place new call by entering telephone number manually.
ℹ You will be notified of the second call acoustically, but you will not see this in the display.
You are connected to the second caller; the first caller is kept on hold.
- Switching between calls
- ► Press [phone switch icon] button. This switches between the calls. The non-active call is kept on hold.
- Terminating a call
- ► Press [phone hang-up icon] button. The current call is terminated. The connection to the caller previously kept on hold is also interrupted; however, reconnection is indicated by an acoustic signal.
236
Audio system
Placing a second call
If you wish to place another call during an already active call, you can place the second call and switch between the callers or combine them into one call. Note that this feature is dependent on availability from your mobile phone service provider.
- Placing a second call
- Place a new call by entering telephone number manually.
- Press [button icon] button.
You are connected to the second caller; the first caller is kept on hold.
- Terminating a call
- Press [button icon] button.
The current call is terminated. The connection to the caller previously kept on hold is also interrupted; however, reconnection is indicated by an acoustic signal.
- Combining two calls
- Press [button icon] button.
The calls are combined into one call.
- Terminating a combined call
- Press [button icon] button.
The connection to both callers is terminated.
Emergency calls "911"
The following describes how to dial a "911" emergency call using the audio system head unit when a Mercedes-Benz specified mobile phone* is inserted in the phone cradle*. Unless otherwise specified, the descriptions refer to the audio system head unit.
Consult the separate telephone operating instructions that came with your mobile phone* for information on how to place a "911" emergency call on the mobile phone*.
Warning! The "911" emergency call system is a public service. Using it without due cause is a criminal offense.
237
Audio system
The following conditions must be met for a “911” emergency call:
- Telephone must be switched on.
- The corresponding mobile communications network must be available.
Emergency calls may not be possible with all telephone networks or if certain network services and/or telephone functions are active. Check with your local service providers.
If you cannot make an emergency call, you will have to initiate rescue measures yourself.
GSM network phones
Placing a “911” emergency call using audio head unit with the phone locked
▶ Press TEL button to switch to telephone operation.
PIN? appears in the audio display.
▶ Enter 911 using the number keypad on the audio head unit.
▶ Press OK soft key or button for dialing to begin.
DIALING appears in the audio display while the telephone establishes the connection.
▶ Wait until the emergency call center answers, then describe the emergency.
Placing a “911” emergency call using audio head unit with the phone unlocked
▶ Press TEL button to switch to telephone operation.
▶ Enter 911 using the number keypad on the audio head unit.
▶ Press button for dialing to begin.
DIALING appears in the audio display while the telephone establishes the connection.
▶ Wait until the emergency call center answers, then describe the emergency.
If no SIM card is in the mobile phone, NO SERVICE appears in the audio display. In that case, you only can make an emergency call on the mobile phone itself, without the use of the head unit.
238
Audio system
TDMA/CDMA network phones
Placing a “911” emergency call using audio head unit with the phone locked
▶ Press TEL button to switch to telephone operation.
CODE? appears in the audio display.
▶ Enter 911 using the number keypad on the audio head unit.
▶ Press OK soft key or button for dialing to begin.
DIALING appears in the audio display while the telephone establishes the connection.
▶ Wait until the emergency call center answers, then describe the emergency.
Placing a “911” emergency call using audio head unit with the phone unlocked
▶ Press TEL button to switch to telephone operation.
▶ Enter 911 using the number keypad on the audio head unit.
▶ Press button for dialing to begin.
DIALING appears in the audio display while the telephone establishes the connection.
▶ Wait until the emergency call center answers, then describe the emergency.
239
Power windows
Opening and closing the windows
The side windows are opened and closed electrically. The switches for all the side windows are on the driver’s door. The switches for the respective windows are on the front passenger door and the rear doors.
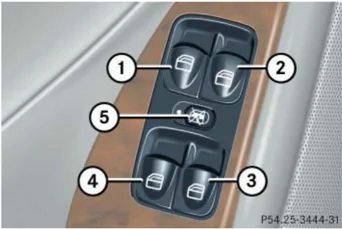
① Left front window ② Right front window ③ Right rear window ④ Left rear window ⑤ Rear window override switch (▷ page 85)
Warning!
When closing the power windows, make sure there is no danger of anyone being harmed by the closing procedure.
The closing of the door windows can be immediately halted by releasing the switch or, if switch was pulled past the resistance point and released, by either pressing or pulling the respective switch.
If the window encounters an obstruction that blocks its path in a circumstance where you pulled the switch past the resistance point and released it to close the window, the automatic reversal function will stop the window and open it slightly.
If the window encounters an obstruction that blocks its path in a circumstance where you are closing the window by pulling and holding the switch, by pressing and holding button [icon] on the SmartKey, or by pressing and holding button [icon] or [icon] on the climate control panel, the automatic reversal function will not operate.
When leaving the vehicle, always remove the SmartKey from the starter switch, take it with you, and lock the vehicle. Do not leave children unattended in the vehicle, or with access to an unlocked vehicle. Unsupervised use of vehicle equipment can cause an accident and/or serious personal injury.
240
Power windows
i You can also open or close the power windows using the SmartKey, see “Summer opening feature” (▷ page 243) and “Convenience closing feature” (▷ page 243).
Depending on current position, the windows may also open or close when the air recirculation button in the control panel of the climate control (▷ page 177) or automatic climate control* (Canada only) (▷ page 187), or the charcoal filter button in the control panel of the automatic climate control* (Canada only) (▷ page 194) is pressed and held.
▶ Switch on the ignition (▷ page 33).
Opening the windows
▶ Press switch ① to ④ to the resistance point.
The corresponding window will move downwards until you release the switch.
Closing the windows
▶ Pull switch ① to ④ to the resistance point.
The corresponding window will move upwards until you release the switch.
Warning!
If you pull and hold the switch up when closing the window, and upward movement of the window is blocked by some obstruction including but not limited to arms, hands, fingers, etc., the automatic reversal will not operate.
Fully opening the windows (Express-open)
▶ Press switch ① to ④ past the resistance point and release.
The corresponding window opens completely.
Fully closing the windows (Express-close)
▶ Pull switch ① to past the resistance point and release.
The corresponding window closes completely.
241
Power windows
! If the upward movement of the window is blocked during the closing procedure, the window will stop and open slightly.
Remove the obstruction, pull the switch again past the resistance point and release.
If the window still does not close when there is no obstruction, then pull and hold the switch again. The side window will then close without the obstruction sensor function.
Warning!
Driver’s door only: If within 5 seconds you again pull the switch past the resistance point and release, the automatic reversal will not function.
Stopping windows
▶ Press or pull respective switch again.
Synchronizing power windows
The power windows must be resynchronized each time
- after the battery has been disconnected or discharged.
- if the power windows cannot be fully opened (Express-open) or closed (Express-close).
▶ Switch on the ignition (▷ page 33).
▶ Pull the power window switches until the side windows are closed.
Hold the switches for approximately 1 second.
The power windows are synchronized.
242
Power windows
Summer opening feature
If the weather is warm, you can ventilate the vehicle before driving off by simultaneously:
• opening the side windows
• opening the tilt/sliding sunroof*
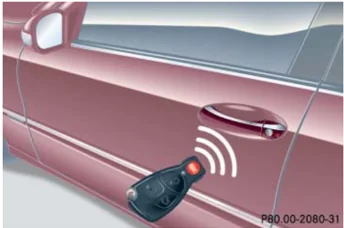
P80.00-2080-31
▶ Aim transmitter eye at the driver's door handle. The SmartKey must be in close proximity to the door handle.
▶ Press and hold button until the windows and the tilt/sliding sunroof* have reached the desired position.
▶ Release button to interrupt procedure.
Convenience closing feature
Warning!
When closing the windows and the tilt/sliding sunroof*, make sure that there is no danger of anyone being harmed by the closing procedure.
If potential danger exists, proceed as follows:
• Release button to stop the closing procedure. To open, press and hold button . To continue the closing procedure after making sure that there is no danger of anyone being harmed by the closing procedure, press and hold button .
▶ Aim transmitter eye at the driver's door handle. The SmartKey must be in close proximity to the door handle.
▶ Press and hold button until the windows and the tilt/sliding sunroof* are completely closed.
▶ Release the button to stop procedure.
Make sure all windows and the tilt/sliding sunroof* are properly closed before leaving the vehicle.
243
Power tilt/sliding sunroof*
Opening and closing the power tilt/sliding sunroof
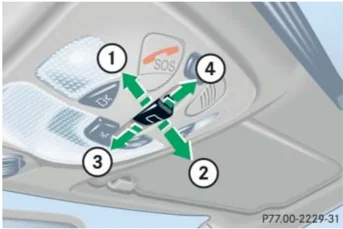
The tilt/sliding sunroof can be opened and closed electrically. The switch for the tilt/sliding sunroof is on the overhead control panel.
P77.00-2229-31
Sunroof switch
① Push up to raise sunroof at rear ② Pull down to lower sunroof at rear ③ Push forward to slide sunroof closed ④ Push back to slide sunroof open
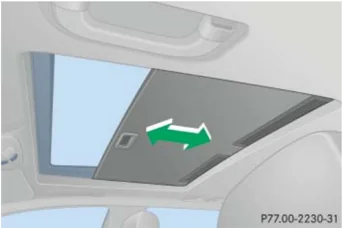
With the sunroof closed or tilted open, a screen can be slid into the roof opening to guard against sun rays. When sliding the sunroof open, the screen will also retract.
P77.00-2230-31
Screen
Warning!
When closing the tilt/sliding sunroof, make sure there is no danger of anyone being harmed by the closing procedure.
The opening/closing procedure of the tilt/sliding sunroof can be immediately halted by releasing the switch or, if the switch was moved past the resistance point and released, by moving the switch in any direction.
The tilt/sliding sunroof is made out of glass. In the event of an accident, the glass may shatter. This may result in an opening in the roof.
In a vehicle rollover, occupants not wearing their seat belts or not wearing them properly may be thrown out of the opening. Such an opening also presents a potential for injury for occupants wearing their seat belts properly as entire body parts or portions of them may protrude from the passenger compartment.
244
Power tilt/sliding sunroof*
When leaving the vehicle, always remove the SmartKey from the starter switch, take it with you, and lock the vehicle. Do not leave children unattended in the vehicle, or with access to an unlocked vehicle. Unsupervised use of vehicle equipment can cause an accident and/or serious personal injury.
! To avoid damaging the seals, do not transport any objects with sharp edges which can stick out of the tilt/sliding sunroof.
Do not open the tilt/sliding sunroof if there is snow or ice on the roof, as this could result in malfunctions.
The tilt/sliding sunroof can be opened or closed manually should an electrical malfunction occur (▷ page 393).
ℹ️ You can also open or close the tilt/sliding sunroof using the SmartKey, see "Summer opening feature" (▷ page 243) and "Convenience closing feature" (▷ page 243).
Depending on current position, the tilt/sliding sunroof may also open or close when the air recirculation button in the control panel of the climate control (▷ page 177) or automatic climate control* (Canada only) (▷ page 192), or the charcoal filter button in the control panel of the automatic climate control* (Canada only) (▷ page 194) is pressed and held.
▶ Switch on the ignition (▷ page 33).
Opening and closing the power tilt/sliding sunroof
▶ To open, close, raise, or lower the tilt/sliding sunroof, move the sunroof switch to resistance point in the required direction of arrows ① to ④.
Release the sunroof switch when the tilt/sliding sunroof has reached the desired position.
Fully opening (Express-open) and closing (Express-close) the power tilt/sliding sunroof
▶ To open or close the tilt/sliding sunroof, move the sunroof switch past the resistance point in the required direction of arrow ① to ④ and release.
The tilt/sliding sunroof opens or closes completely.
245
Power tilt/sliding sunroof*
Stopping the power tilt/sliding sunroof during Express-operation
▶ Move the sunroof switch in any direction.
If the movement of the tilt/sliding sunroof is blocked during the closing procedure, the tilt/sliding sunroof will stop and reopen slightly.
Synchronizing the power tilt/sliding sunroof
The tilt/sliding sunroof must be synchronized
- after the battery has been disconnected or discharged
- after the tilt/sliding sunroof has been closed manually (▷ page 393)
- after a malfunction
- if the tilt/sliding sunroof does not open smoothly
▶ Switch on the ignition (▷ page 33).
▶ Move and hold the sunroof switch in the direction of arrow ① (▷ page 244) until the tilt/sliding sunroof is fully raised at the rear.
Hold the sunroof switch for approximately 1 second.
▶ Check the Express-open feature (▷ page 245).
If the tilt/sliding sunroof opens completely, the tilt/sliding sunroof is synchronized. Otherwise repeat the above steps.
246