Driving systems
▼ Driving systems
The driving system of your vehicle is described on the following pages:
- Cruise control, with which the vehicle can maintain a preset speed.
For information on the BAS, ABS, and ESP® driving systems, see “Driving safety systems” (▷ page 87).
Cruise control
Cruise control automatically maintains the speed you set for your vehicle.
Use of cruise control is recommended for driving at a constant speed for extended periods of time. You can set or resume cruise control at any speed over 20 mph (30 km/h).
The cruise control function is operated by means of the cruise control lever.
The cruise control lever is the uppermost lever on the left-hand side of the steering column (▷ page 22).
Warning!
Cruise control is a convenience system designed to assist the driver during vehicle operation. The driver is and must remain at all times responsible for the vehicle speed and for safe brake operation.
Only use cruise control if the road, traffic and weather conditions make it advisable to travel at a steady speed.
- The use of cruise control can be dangerous on winding roads or in heavy traffic because conditions do not allow safe driving at a steady speed.
- The use of cruise control can be dangerous on slippery roads. Rapid changes in tire traction can result in wheel spin and loss of control.
- Deactivate cruise control when driving in fog.
The “Resume” function should only be operated if the driver is fully aware of the previously set speed and wishes to resume this particular preset speed.
247
Driving systems
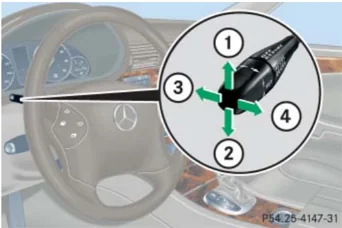
① Sets current or higher speed ② Sets current or lower speed ③ Cancels cruise control ④ Resumes at last set speed
Setting current speed
- Accelerate or decelerate to the desired speed.
- Briefly lift ① or depress ② the cruise control lever. The current speed is set.
- Remove your foot from the accelerator pedal. Cruise control is activated.
On uphill or downhill grades, cruise control may not be able to maintain the set speed. Once the grade eases, the set speed will be resumed.
Canceling cruise control
There are several ways to cancel cruise control:
- Step on the brake pedal. Cruise control is canceled. The last speed set is stored for later use. or
- Briefly push the cruise control lever to position ③. Cruise control is canceled. The last speed set is stored for later use.
Vehicles with automatic transmission: Moving the gear selector lever to position N while driving also cancels cruise control. However, the gear selector lever should not be moved to position N while driving, except to coast when the vehicle is in danger of skidding (e.g. on icy roads).
Vehicles with manual transmission: The set cruise controlled speed is switched off when declutching exceeds 4 seconds during shifting a new gear.
The last stored speed is canceled when you turn off the engine.
248
Driving systems
Setting a higher speed
► Lift cruise control lever to position ① and hold it up until the desired speed is reached.
► Release cruise control lever. The new speed is set.
Depressing the accelerator pedal does not deactivate cruise control. After brief acceleration (e.g. for passing), cruise control will resume the last speed set.
Setting a lower speed
► Depress cruise control lever to position ② and hold it down until the desired speed is reached.
► Release cruise control lever. The new speed is set.
Vehicles with automatic transmission: When you use the cruise control lever to decelerate, the transmission will automatically downshift if the engine’s braking power does not brake the vehicle sufficiently.
Fine adjustment in 1 mph (Canada: 1 km/h) increments
Faster
► Briefly tip cruise control lever in direction of arrow ①.
Slower
► Briefly tip cruise control lever in direction of arrow ②.
Setting to last stored speed “Resume” function)
Warning!
The speed stored in memory should only be set again if prevailing road conditions permit. Possible acceleration or deceleration differences arising from returning to preset speed could cause an accident and/or serious injury to you and others.
► Briefly push cruise control lever to position ④. The cruise control resumes the last set speed.
► Remove your foot from the accelerator pedal.
249
Loading
Roof rack*
Warning! Only use roof racks approved by Mercedes-Benz for your vehicle model to avoid damage to the vehicle. Follow manufacturer's installation instructions.

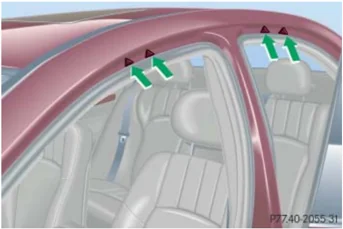
► Mount the roof rack only between the fastening points (see arrows).
► Secure the roof rack according to manufacturer's instructions for installation.
! Load the roof rack in such a way that the vehicle cannot be damaged while driving.
Make sure
- you can fully raise the tilt/sliding sunroof*.
- you can fully open the trunk.
Ski sack* (Canada only)
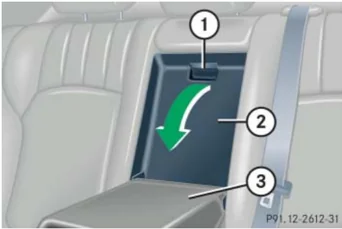
① Handle ② Cover ③ Armrest
Unfolding and loading
► Fold armrest ③ down (arrow).
► Pull handle ① and swing cover ② down.
250
Loading
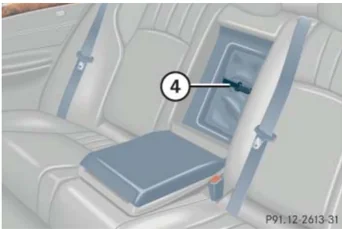
④ Hook and loop fastener ► Unfasten hook and loop fastener ④. ► Pull ski sack into passenger compartment and unfold.
P91.12-2613-31
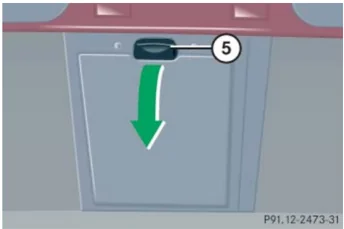
⑤ Button ► Open trunk lid. ► Press button ⑤. The flap opens downward.
P91.12-2473-31
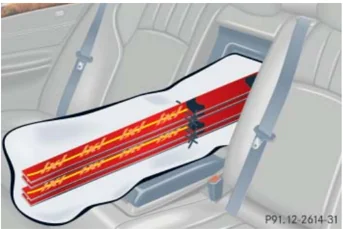
► From trunk, slide skis into ski sack.
P91.12-2614-31
Warning!
The ski sack is designed for up to four pairs of skis. Do not load the ski sack with other objects.
Always fasten the ski sack securely. In an accident, an unfastened ski sack can cause injury to vehicle occupants.
251
Loading
 ⑥ Strap
► Tighten strap ⑥ by pulling at the loose end (arrow) until the skis in the ski sack are tightly secured.
 ⑦ Hook
⑧ Eye
► Connect hook ⑦ to eye ⑧.
Tighten strap by pulling at the loose end (arrow).
Unloading and folding
► Loosen the straps. ► Disconnect hook ⑦ from eye ⑧. ► Unload skis. ► Close flap in trunk. ► Fold and flatten ski sack lengthwise. ► Place folded ski sack inside recess of backrest. ► Fasten hook and loop fastener. ► Close ski sack compartment cover.
252
Loading
Removing the ski sack
You can remove the ski sack for cleaning or drying.
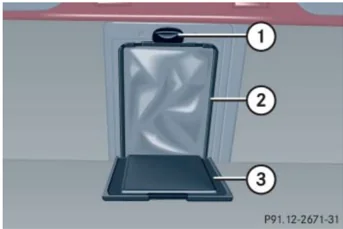
① Button ② Ski sack frame ③ Flap
► Open trunk lid. ► Press button ①. The flap ③ opens downward. ► Press button ① firmly until ski sack frame ② is released. ► Pull ski sack frame ② with ski sack out.
Warning! Never drive vehicle with trunk open while the ski sack is removed. Deadly carbon monoxide (CO) gases may enter vehicle interior, resulting in unconsciousness and death.
To prevent unauthorized persons from accessing the trunk, always close the flap.
Installing the ski sack
Install the ski sack in the reverse order.
► Push ski sack frame ② with ski sack inward until the ski sack frame snaps into place. ► Close flap ③. ► Close trunk lid.
Split rear bench seat*
To expand the cargo area, you can fold down the left and right rear seat backrests. The two sections can be folded down separately.
Warning! When expanding the luggage area, always fold the seat cushions fully forward.
Unless you are transporting cargo, the backrests must remain properly locked in the upright position.
In an accident, during hard braking or sudden maneuvers, loose items will be thrown around inside the vehicle, and cause injury to vehicle occupants unless the items are securely fastened in the vehicle.
Always use the cargo tie down rings* (▷ page 256).
253
Loading
Folding the backrest forward
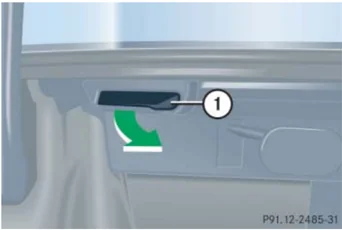
The release handle ① is located in the trunk.
P91.12-2485-31
► Pull release handle ①.
► Fully retract and fold rearward head restraints (▷ page 111).
Returning the backrest to original position
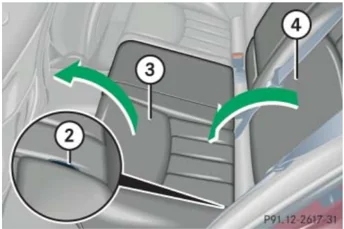
P91.12-2617-31
► Pull release handle ②.
► Fold seat cushion ③ forward.
► Fold backrest ④ forward.
! Always release the seat cushion and fold it forward before folding the seat backrests forward. Otherwise, the backrest covering may be damaged.
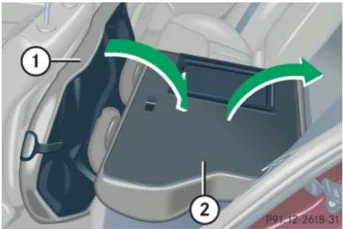
P91.12-2618-31
► Fold backrest ② rearward until it engages.
► Fold seat cushion ① rearward until it locks into position.
254
Loading
 If the backrest is not locked into position, a red indicator ③ will be visible.
► Check for secure locking by pushing and pulling on the backrest.
Warning!
If a red indicator is visible with the backrest up, then the backrest is not properly locked into position.
Always lock backrest in its upright position when rear seat bench is occupied, cargo is being carried in the trunk, or the extended cargo compartment is not in use. Check for secure locking by pushing and pulling on the backrest.
In an accident, during hard braking or sudden maneuvers, loose items will be thrown around inside the vehicle, and cause injury to vehicle occupants unless the items are securely fastened in the vehicle.
To help avoid personal injury during a collision or sudden maneuver, exercise care when transporting cargo.
i To prevent unauthorized persons from access to the trunk, always lock backrest in its upright position.
Loading instructions
 The total load weight including vehicle occupants and luggage/cargo should not exceed the load limit or vehicle capacity weight indicated on the corresponding placard located on the driver's door B-pillar.
The handling characteristics of a fully loaded vehicle depend greatly on the load distribution. It is therefore recommended to load the vehicle according to the illustrations shown, with the heaviest items being placed towards the front of the vehicle.
255
Loading
Always place items being carried against front or rear seat backrests, and fasten them as securely as possible.
The heaviest portion of the cargo should always be kept as low as possible since it influences the handling characteristics of the vehicle.
Warning!
Always fasten items being carried as securely as possible.
In an accident, during hard braking or sudden maneuvers, loose items will be thrown around inside the vehicle and can cause injury to vehicle occupants unless the items are securely fastened in the vehicle.
To help avoid personal injury during a collision or sudden maneuver, exercise care when transporting cargo.
Never drive vehicle with trunk open. Deadly carbon monoxide (CO) gases may enter vehicle interior resulting in unconsciousness and death.
The trunk is the preferred place to carry objects.
The enlarged cargo area should only be used for items which do not fit in the trunk alone.
Cargo tie-down rings*
The four cargo tie-down rings are located in the trunk.
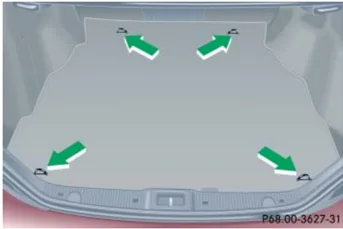
P68.00-3627-31
Cargo tie-down rings
► Carefully secure cargo by applying even load on all rings with rope sufficient strength to hold down the cargo.
Always follow loading instructions (▷ page 255).
256
Useful features
▼ Useful features Storage compartments
Warning! To help avoid personal injury during a collision or sudden maneuver, exercise care when storing objects in the vehicle. Put luggage or cargo in the trunk if possible. Do not pile luggage or cargo higher than the seat backs. Do not place anything on the shelf below the rear window.
Luggage nets cannot secure hard or heavy objects.
Keep compartment lids closed. This will help to prevent stored objects from being thrown about and injuring vehicle occupants during an accident.
Glove box
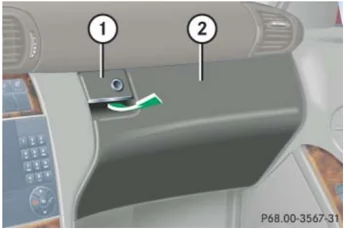
① Glove box lid release ② Glove box
Opening glove box ► Pull glove box lid release ①. The glove box lid opens ② downward.
Closing glove box ► Push glove box lid ② up to close.
Audio system/COMAND* with CD changer*: The CD changer* is located in the glove box.
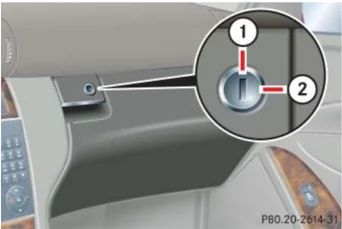
① Unlocking ② Locking
Locking glove box ► Insert mechanical key (▷ page 389) into the glove box lock and turn it to position ②.
Unlocking glove box ► Turn mechanical key in the glove box lock to position ①.
257
Useful features
Armrest storage compartments
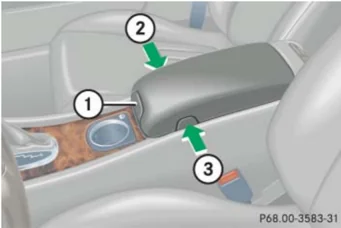
① Handle ② Button, passenger side ③ Button, driver's side
Opening storage compartment ► Pull handle ① and lift armrest.
Closing storage compartment ► Press armrest down until it engages into place.
Opening telephone compartment
► Press button ③ on driver's side or button ② on passenger side and lift armrest.
Closing telephone compartment
► Press armrest down until it engages into place.
Armrest in the rear passenger compartment
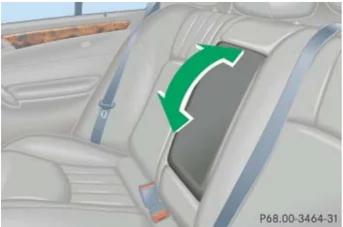
► Pull the top of the armrest out and fold it down.
Parcel net in front passenger footwell (all models, except C 280 4MATIC and C 350 4MATIC)
A small convenience parcel net is located in the front passenger footwell. It is for small and light items, such as road maps, mail, etc.
Warning! The parcel net is intended for storing light-weight items only.
Heavy objects, objects with sharp edges or fragile objects may not be transported in the parcel net. In an accident, during hard braking, or sudden maneuvers, they could be thrown around inside the vehicle and cause injury to vehicle occupants.
The parcel net cannot protect transported goods in the event of an accident.
258
Useful features
Cup holders
Warning!
In order to help prevent spilling liquids on vehicle occupants and/or vehicle equipment, only use containers that fit into the cup holder. Use lids on open containers and do not fill containers to a height where the contents, especially hot liquids, could spill during braking, vehicle maneuvers, or an accident. Liquids spilled on vehicle occupants may cause serious personal injury. Liquids spilled on vehicle equipment may cause damage not covered by the Mercedes-Benz Limited Warranty.
When not in use, keep the cup holder closed. An open cup holder may cause injury to you or others when contacted during braking, vehicle maneuvers, or in an accident.
Keep in mind that objects placed in the cup holder may come loose during braking, vehicle maneuvers, or in an accident and be thrown around in the vehicle interior. Objects thrown around in the vehicle interior may cause an accident and/or serious personal injury.
Cup holders in front of seat armrest
Underneath the swiveling cup holder is another stationary cup holder. You can only use this when the swiveling cup holder is pulled out and completely turned outward.
Sliding out swiveling cup holder
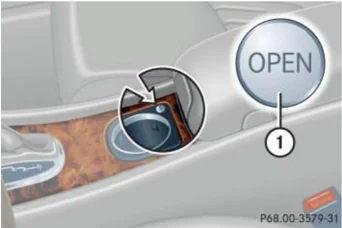
► Push button ①. The cup holder slides upward.
! No objects should be in the swiveling cup holder when the swiveling cup holder is slid upward. Otherwise the swiveling cup holder or the objects could be damaged.
259
Useful features
Turning swiveling cup holder outward
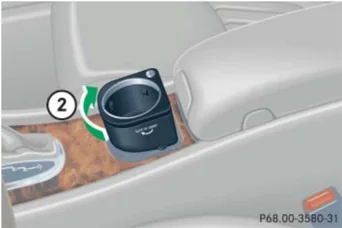
P68.00-3580-31
► Turn the cup holder in direction of arrow ② until it engages. You can now use both cup holders.
Turning swiveling cup holder inward and sliding it in
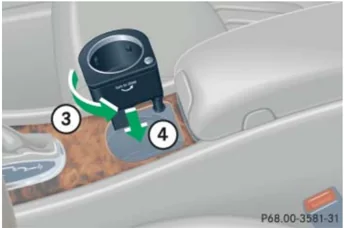
P68.00-3581-31
► Turn the cup holder in direction of arrow ③ until it engages. ► Press the cup holder in direction of arrow ④ until it engages.
! No objects should be in the stationary cup holder when the swiveling cup holder is turned inward and pushed in. Otherwise the swiveling cup holder or the objects could be damaged.
Cup holder in rear seat armrest
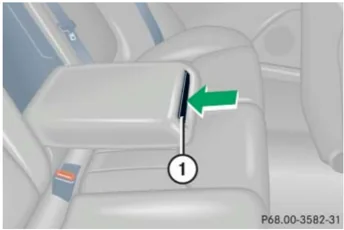
P68.00-3582-31
① Cup holder
Opening cup holder
► Briefly press the front of cup holder ①. The cup holder slides out slightly. ► Pull out the cup holder until it stops.
Closing cup holder
► Slide cup holder back until it engages.
260
Useful features
Ashtrays
Center console ashtray
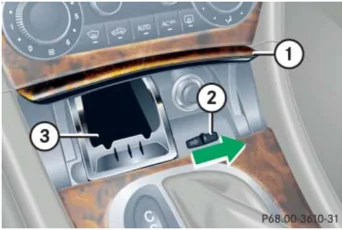
① Cover plate ② Sliding button ③ Ashtray insert
► Briefly press the bottom of cover plate ①. The cover plate opens automatically.
Removing ashtray insert
Warning!
Remove front ashtray only with vehicle standing still. Set the parking brake to secure vehicle from movement. Move gear selector lever to position N (manual transmission: second gear). With gear selector lever in position N (manual transmission: second gear) turn off the engine.
► Secure vehicle from movement by setting the parking brake.
► Move the gear selector lever to position N (manual transmission: second gear). Now you have more room to take out the ashtray insert.
► Push sliding button ② to the right. The ashtray insert ③ slides out slightly.
► Remove the ashtray insert.
Reinstalling ashtray insert
► Push the ashtray insert ③ down into the retainer until it engages.
► Push down cover plate ① to close ashtray. The cover plate engages.
Rear seat ashtray
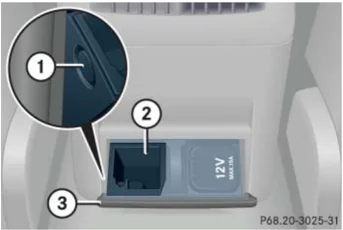
① Button ② Ashtray insert ③ Cover
► Pull at top of cover ③.
261
Useful features
Removing ashtray insert
- Push button ① to disengage ashtray insert ② and remove it.
Reinstalling ashtray insert
- Push the ashtray insert ② down into the retainer until it engages.
- Push at top of cover ③ to close ashtray.
Cigarette lighter
Warning! Never touch the heating element or sides of the lighter; they are extremely hot. Hold the knob only.
When leaving the vehicle, always remove the SmartKey from the starter switch, take it with you, and lock the vehicle. Do not leave children unattended in the vehicle, or with access to an unlocked vehicle. Unsupervised use of vehicle equipment may cause an accident and/or serious personal injury.

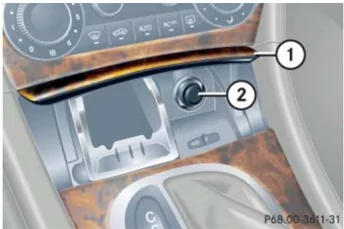
① Cover plate ② Cigarette lighter
-
Briefly press the bottom of cover plate ①. The cover plate opens automatically.
-
Push in cigarette lighter ②. The cigarette lighter will pop out automatically when hot.
-
Switch on the ignition (▷ page 33).
262
Useful features
! The lighter socket can be used to accommodate 12V DC electrical accessories (up to a maximum of 85 W) designed for use with the standard “cigarette lighter” plug type. Keep in mind, however, that connecting accessories to the lighter socket (for example extensive connecting and disconnecting, or using plugs that do not fit properly) can damage the lighter socket. With the socket damaged, the lighter may no longer be able to be placed in the heating (pushed-in) position, or the lighter may pop out too early with the lighter not hot enough.
To help avoid damaging the cigarette lighter socket, we recommend connecting 12V DC electrical accessories designed for use with the standard “cigarette lighter” plug type to the 12V power outlets (▷ page 263) in your vehicle whenever possible.
► Push down cover plate ① to close ashtray. The cover plate engages.
Power outlet
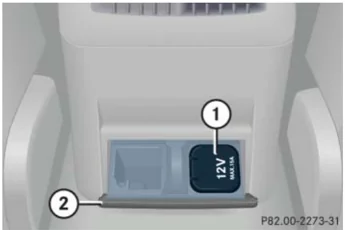
The power outlet is located in the rear passenger compartment.

① Power outlet ② Cover
► Switch on the ignition (▷ page 33). ► Pull at top of cover ②. ► Flip cover ① to the left and insert electrical plug (cigarette lighter type).
i The power outlet can be used to accommodate 12V DC electrical accessories (e.g. air pump, auxiliary lamps) up to a maximum of 180 W.
263
Useful features
Telephone*
Warning!
Never operate radio transmitters equipped with a built-in or attached antenna (i.e. without being connected to an external antenna) from inside the vehicle while the engine is running. Doing so could lead to a malfunction of the vehicle's electronic system, possibly resulting in an accident and personal injury.
Radio transmitters, such as a portable telephone or a citizens band unit, should only be used inside the vehicle if they are connected to an antenna that is installed on the outside of the vehicle.
The external antenna must be approved by Mercedes-Benz. Please contact an authorized Mercedes-Benz Center for information on the installation of an approved external antenna. Refer to the radio transmitter operation instructions regarding use of an external antenna.
264
Warning!
Please do not forget that your primary responsibility is to drive the vehicle. A driver's attention to the road must always be his/her primary focus when driving. For your safety and the safety of others, we recommend that you pull over to a safe location and stop before placing or taking a telephone call.
If you choose to use the telephone¹ while driving, please use the hands-free device and only use the telephone when road, weather and traffic conditions permit. Some jurisdictions prohibit the driver from using a cellular telephone while driving a vehicle.
Only operate the COMAND* (Cockpit Management and Data System) ¹ if road, weather and traffic conditions permit.
Bear in mind that at a speed of just 30 mph (approximately 50 km/h), your vehicle is covering a distance of 44 feet (approximately 14 m) every second.
¹ Observe all legal requirements.
You can take and place telephone calls using the and buttons on the steering wheel. To carry out other telephone functions, use the control system (> page 157).
See separate operating manual for instructions on how to use the telephone.
Useful features
Tele Aid*
! The initial activation of the Tele Aid system may only be performed by completing the subscriber agreement and placing an acquaintance call using the [icon] button. Failure to complete either of these steps will result in a system that is not activated.
If you have any questions regarding activation, please call the Response Center at 1-800-756-9018 (in the USA) or 1-888-923-8367 (in Canada).
Shortly after the completion of your Tele Aid acquaintance call, you will receive a user ID and password. By visiting www.mbusa.com and selecting "Tele Aid" (USA only), you will have access to account information, remote door unlock and more.
The Tele Aid system
(Telematic Alarm Identification on Demand)
The Tele Aid system consists of three types of response:
• automatic and manual emergency • roadside assistance • information
The Tele Aid system is operational providing that the vehicle's battery is charged, properly connected, not damaged and cellular and GPS coverage is available.
The speaker volume of a Tele Aid call can be adjusted when using the volume control on the audio system or COMAND* System or on the multifunction steering wheel. To raise, turn the rotary volume control on audio system or COMAND* System clockwise or press button [+] on the multifunction steering wheel. To lower, turn the rotary volume control on audio system or COMAND* System control counterclockwise or press button [-] on the multifunction steering wheel.
► To activate, press the SOS button, the Roadside Assistance button [icon] or the Information button [icon], depending on the type of response required.
265
Useful features
The SOS button is located in the over-head control panel.
The Roadside Assistance button and the Information button are located below the center armrest cover.
! The Tele Aid system utilizes the cellular network for communication and the GPS (Global Positioning System) satel- lites for vehicle location. If either of these signals are unavailable, the Tele Aid system may not function and if this occurs, assistance must be sum- moned by other means.
When a Tele Aid call has been initiated, the audio system or COMAND* System unit is muted and the selected mode (radio, tape or CD) pauses. The optional cellular phone (if installed) and inserted in cradle switches off. If you must use this phone, we recommend that you use it only with the vehicle at a stand- still in a safe location. Remove the phone from the cradle and place the call. The navigation* system (if en- gaged) will continue to run. The multi- function display in the instrument cluster is available for use, and spoken commands are only available by press- ing the RPT button on audio system or COMAND* System unit. A pop-up win- dow will appear in the audio system or COMAND* System unit display to indi- cate that a Tele Aid call is in progress. After the TeleAid call has ended, the optional cellular phone switches on again. A PIN entry might be necessary.
System self-check
Initially, after switching on ignition, mal- functions are detected and indicated (the indicator lamps in the SOS button, the Roadside Assistance button and the Information button stay on longer than 10 seconds or do not come on). The message Malfunction. Drive to work- shop appears in the multifunction display.
Warning!
If the indicator lamps on the SOS button, on the Roadside Assistance button, and/or on the Information button remain illuminated continuously in red and/or the message Malfunction. Drive to workshop is displayed in the multifunction display after the system self-check, a malfunction in the system has been detected.
If a malfunction is indicated as outlined above, the system may not operate as expected. Have the system checked at the nearest Mercedes-Benz Center as soon as possible.
266
Useful features
Emergency calls
An emergency call is initiated automatically following an accident in which the emergency tensioning devices (ETDs) or air bags deploy.
An emergency call can also be initiated manually by opening the cover next to the interior rear view mirror labeled SOS, then briefly pressing the button located under the cover. See (▷ page 268) for instructions on initiating an emergency call manually.
Once the emergency call is in progress, the indicator lamp on the SOS button will begin to flash. The message Connecting Call appears in the multifunction display. When the connection is established, the message Call connected appears in the multifunction display. All information relevant to the emergency, such as the location of the vehicle (determined by the GPS satellite location system), vehicle model, identification number and color are generated.
A voice connection between the Response Center and the occupants of the vehicle will be established automatically soon after the emergency call has been initiated. The Response Center will attempt to determine more precisely the nature of the accident provided they can speak to an occupant of the vehicle.
The Tele Aid system is available if
- it has been activated and is operational. Activation requires a subscription for monitoring services, connection and cellular air time
- the relevant cellular phone network and GPS signals are available and pass the information on to the response center
i Location of the vehicle on a map is only possible if the vehicle is able to receive signals from the GPS satellite network and pass the information on to the Response Center.
Warning!
If the indicator lamp in the SOS button is flashing continuously and there was no voice connection to the Response Center established, then the Tele Aid system could not initiate an emergency call (e.g. the relevant cellular phone network is not available). The message Call failed appears in the multifunction display for approximately 10 seconds.
Should this occur, assistance must be summoned by other means.
267
Useful features
Initiating an emergency call manually
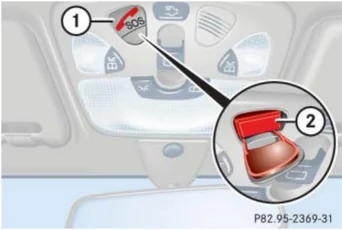
① Cover ② SOS button
- Briefly press on cover ①. The cover will open.
- Press SOS button ② briefly. The indicator lamp in SOS button ② will flash until the emergency call is concluded.
- Wait for a voice connection to the Response Center.
- Close cover ① after the emergency call is concluded.
Warning! If you feel at any way in jeopardy when in the vehicle (e.g. smoke or fire in the vehicle, vehicle in a dangerous road location), please do not wait for voice contact after you have pressed the emergency button. Carefully leave the vehicle and move to a safe loca-tion. The Response Center will automatically contact local emergency officials with the vehicle's approximate location if they re-ceive an automatic SOS signal and cannot make voice contact with the vehicle occu-pants.
Roadside Assistance button The Roadside Assistance button is located below the center armrest cover.
- Open the storage compartment under the center armrest (> page 258).
- Press and hold button (for longer than 2 seconds).
A call to a Mercedes-Benz Roadside Assistance dispatcher will be initiated. The button will flash while the call is in progress. The message Connecting call will appear in the multifunction display.
When the connection is established, the message Call connected appears in the multifunction display. The Tele Aid system will transmit data generating the vehicle identification number, model, color and location (subject to availability of cellular and GPS signals).
268
Useful features
While the call is connected you can change to the navigation menu by pressing NAVI button on the audio system or COMAND* System unit.
A voice connection between the Roadside Assistance dispatcher and the occupants of the vehicle will be established.
Describe the nature of the need for assistance.
The Mercedes-Benz Roadside Assistance dispatcher will either dispatch a qualified Mercedes-Benz technician or arrange to tow your vehicle to the nearest Mercedes-Benz Center. For services such as labor and/or towing, charges may apply. Refer to the Roadside Assistance Manual for more information.
These programs are only available in the USA:
Sign and Drive services: Services such as jump start, a few gallons of fuel or the replacement of a flat tire with the vehicle spare tire are obtainable.
The indicator lamp on the Roadside Assistance button remains illuminated in red for approximately 10 seconds during the system self-check after switching on the ignition (together with the SOS button and the Information button ).
See system self-check (▷ page 266) if the indicator lamp does not come on in red or stays on longer than approximately 10 seconds.
Useful features
If the indicator lamp on the Roadside Assistance button [icon] is flashing continuously and there was no voice connection to the Response Center established, then the Tele Aid system could not initiate a Roadside Assistance call (e.g. the relevant cellular phone network was not available). The message Call failed appears in the multifunction display.
Roadside Assistance calls can be terminated using the [icon] button on the multifunction steering wheel or the END Button on the audio system or COMAND* System.
Information button [icon]
The Information button [icon] is located below the center armrest cover.
- Open the storage compartment under the center armrest (> page 258).
- Press and hold button (for longer than 2 seconds).
A call to the Customer Assistance Center will be initiated. The button will flash while the call is in progress. The message Connecting call will appear in the multifunction display.
When the connection is established, the message Call connected appears in the multifunction display. The Tele Aid system will transmit data generating the vehicle identification number, model, color and location (subject to availability of cellular and GPS signals).
i While the call is connected, you can change to the navigation menu by pressing NAVI button on the audio system or COMAND* System.
A voice connection between the Customer Assistance Center representative and the occupants of the vehicle will be established. Information regarding the operation of your vehicle, the nearest Mercedes-Benz Center or Mercedes-Benz USA products and services is available to you.
For more details concerning the Tele Aid system, please visit www.mbusa.com and use your ID and password (sent to you separately) to learn more (USA only).
270
Useful features
The indicator lamp in the Information button remains illuminated in red for approximately 10 seconds during the system self-check after switching on the ignition (together with the SOS button and the Roadside Assistance button).
See system self-check (▷ page 266) if the indicator lamp does not come on in red or stays on longer than approximately 10 seconds.
If the indicator lamp in the Information button is flashing continuously and there was no voice connection to the Response Center established, then the Tele Aid system could not initiate an Information call (e.g. the relevant cellular phone network is not available). The message Call failed appears in the multifunction display.
Information calls can be terminated using the button on the multi-function steering wheel or the END Button on the audio system or COMAND* System.
If the indicator lamps do not start flashing after pressing one of the buttons or remain illuminated (in red) at any time, the Tele Aid system has detected a malfunction or the service is not currently active, and may not initiate a call. Visit your authorized Mercedes-Benz Center and have the system checked or contact the Response Center at 1-800-756-9018 (in the USA) or 1-888-923-8367 (in Canada) as soon as possible.
Call priority
If other service calls such as a Roadside Assistance call or Information call are active, an Emergency call is still possible. In this case, the Emergency call will take priority and override all other active calls.
The indicator lamp in the respective button flashes until the call is concluded. Emergency calls can only be terminated by a Response Center or Customer Assistance Center representative, whereas Roadside Assistance and Information calls can also be terminated by pressing button on the multifunction steering wheel or using the END button on the audio system or COMAND* System.
271
Useful features
! If the indicator lamp continues to flash or the system does not reset, contact the Response Center at 1-800-756-9018 (in the USA) or 1-888-923-8367 (in Canada), or Mercedes-Benz Customer Assistance at 1-800-FOR-MERCEdes (1-800-367-6372) in the USA or Customer Service at 1-800-387-0100 in Canada.
Remote door unlock
In case you have locked your vehicle unintentionally (e.g. SmartKey inside vehicle), and the reserve SmartKey is not handy:
- Contact the Mercedes-Benz Response Center at 1-800-756-9018 (in the USA) or 1-888-923-8367 (in Canada).
You will be asked to provide your password which you provided when you completed the subscriber agreement.
- Then return to your vehicle and pull the trunk recessed handle for a minimum of 20 seconds until the SOS button is flashing.
The message Connecting call appears in the multifunction display.
As an alternative, you may unlock the vehicle via Internet using the ID and password sent to you shortly after the completion of your acquaintance call.
The Response Center will then unlock your vehicle with the remote door unlocking feature.
i The remote door unlock feature is available if the relevant cellular phone network is available.
The SOS button will flash and the message Connecting call will appear in the multifunction display to indicate receipt of the door unlock command.
Once the vehicle is unlocked, a Response Center specialist may attempt to establish voice contact with the vehicle occupants.
If the tailgate recessed handle was pulled for more than 20 seconds before door unlock authorization was received by the Response Center, you must wait 15 minutes before pulling the tailgate recessed handle again.
272
Useful features
Stolen Vehicle Recovery services
In the event your vehicle was stolen:
-
Report the incident to the police. The police will issue a numbered incident report.
-
Pass this number on to the Mercedes-Benz Response Center along with your password issued to you when you subscribed to the service.
The Response Center will then attempt to covertly contact the vehicle's Tele Aid system. Once the vehicle is located, the Response Center will contact the local law enforcement and you. The vehicle's location will only be provided to law enforcement.
When the anti-theft alarm or the tow-away alarm stays on for more than 30 seconds, a call is initiated automatically to the Response Center. See anti-theft alarm* (▷ page 93) and tow-away alarm* (▷ page 95).
Garage door opener*
The integrated remote control is capable of operating up to three separately controlled devices. It provides a convenient way to replace up to three hand-held remote controls used to operate devices such as garage door openers, gate openers, or other devices compatible with HomeLink® or some other systems.
Before the integrated remote control can be used, it must be programmed to the garage door opener, gate operator or other device you wish to operate. See the following instructions for programming information.
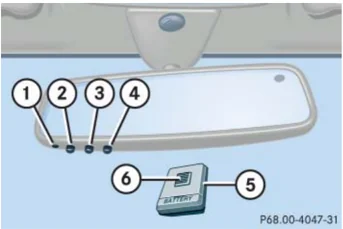
P68.00-4047-31
Interior rear view mirror with integrated remote control
① Indicator lamp
② ③ ④ Signal transmitter button
Needed for programming (not part of vehicle equipment):
⑤ Hand-held remote control of garage door opener, gate operator or other device
⑥ Hand-held remote control button
273
Useful features
Warning!
Before programming the integrated remote control to a garage door opener or gate operator, make sure people and objects are out of the way of the device to prevent potential harm or damage. When programming a garage door opener, the door moves up or down. When programming a gate operator, the gate opens or closes.
Do not use the integrated remote control with any garage door opener that lacks safety stop and reverse features as required by U.S. federal safety standards (this includes any garage door opener model manufactured before April 1, 1982).
A garage door that cannot detect an object – signaling the door to stop and reverse – does not meet current U.S. federal safety standards.
When programming a garage door opener park the vehicle outside the garage.
Do not run the engine while programming the integrated remote control. Inhalation of exhaust gas is hazardous to your health. All exhaust gas contains carbon monoxide, and inhaling it can cause unconsciousness and possible death.
Programming or reprogramming the integrated remote control
Step 1:
- Switch on the ignition (▷ page 33).
Step 2:
- If you have previously programmed an signal transmitter button and wish to retain its programming, proceed to step 3.
If you are programming the integrated remote control for the first time, press and hold the two outer signal transmitter buttons ② and ④ and release them only when the indicator lamp ① begins to flash after approximately 20 seconds (do not hold the button for longer than 30 seconds). This procedure erases any previous settings for all three channels and initializes the memory.
If you later wish to program a second and/or third hand-held transmitter to the remaining two signal transmitter buttons, do not repeat this step and begin directly with step 3.
274
Useful features
Step 3:
- Hold the end of the hand-held remote control ⑤ of the device you wish to train approximately 2 to 5 in (5 to 12 cm) away from the signal transmitter button (②, ③ or ④) to be programmed, while keeping the indicator lamp ① in view.
Step 4:
- Using both hands, simultaneously press the hand-held remote control button ⑥ and the desired signal transmitter button (②, ③ or ④). Do not release the buttons until step 5 is completed.
The indicator lamp ① will flash, first slowly and then rapidly.
i The indicator lamp ① flashes immediately the first time the signal transmitter button is programmed. If this button has already been programmed, the indicator lamp will only start flashing after 20 seconds.
Step 5:
- After the indicator lamp ① changes from a slow to a rapidly flashing light, release the hand-held remote control button and the signal transmitter button.
Step 6:
- Press and hold the just-trained signal transmitter button (②, ③ or ④) and observe the indicator lamp ①.
If the indicator lamp ① stays on constantly, programming is complete and your device should activate when the respective signal transmitter button (②, or ④) is pressed and released.
i If the indicator lamp ① flashes rapidly for about 2 seconds and then turns to a constant light, continue with programming steps 8 through 12 as your garage door opener may be equipped with the "rolling code" feature.
▷▷
275
Useful features
▷▷Step 7: ► To program the remaining two signal transmitter buttons, repeat the steps above starting with step 3.
Rolling code programming
To train a garage door opener (or other rolling code devices) with the rolling code feature, follow these instructions after completing the “Programming” portion (steps 1 through 6) of this text. (A second person may make the following training procedures quicker and easier.)
Step 8: ► Locate “training” button on the garage door opener motor head unit.
Exact location and color of the button may vary by garage door opener brand. Depending on manufacturer, the “training” button may also be referred to as “learn” or “smart” button. If there is difficulty locating the transmitting button, refer to the garage door opener operator’s manual.
Step 9: ► Press the “training” button on the garage door opener motor head unit.
The “training light” is activated.
You have 30 seconds to initiate the following two steps.
Step 10: ► Return to the vehicle and firmly press, hold for 2 seconds and release the programmed signal transmitter button (②, ③ or ④).
Step 11: ► Press, hold for 2 seconds and release same signal transmitter button a second time to complete the training process.
276
Useful features
Some garage door openers (or other rolling code equipped devices) may require you to press, hold for 2 seconds and release the same signal transmitter button a third time to complete the training process.
Step 12:
▶ Confirm the garage door operation by pressing the programmed signal transmitter button (②, ③ or ④).
Step 13:
▶ To program the remaining two signal transmitter buttons, repeat the steps above starting with step 3.
Gate operator/Canadian programming
Canadian radio-frequency laws require transmitter signals to “time-out” (or quit) after several seconds of transmission which may not be long enough for the integrated signal transmitter to pick up the signal during programming. Similar to this Canadian law, some U.S. gate operators are designed to “time-out” in the same manner.
If you live in Canada or if you are having difficulties programming a gate operator (regardless of where you live) by using the programming procedures, replace step 4 with the following:
Step 4:
▶ Press and hold the signal transmitter button (②, ③ or ④). Do not release this button until it has been successfully trained.
▶ While still holding down the signal transmitter button (②, ③ or ④), “cycle” your hand-held remote control button ⑥ as follows: Press and hold button ⑥ for 2 seconds, then release it for 2 seconds, and again press and hold it for 2 seconds. Repeat this sequence on the hand-held remote control until the frequency signal has been learned. Upon successful training, the indicator lamp ① will flash slowly and then rapidly after several seconds.
277
Useful features
▷ Proceed with programming step 5 and step 6 to complete.
Upon completion of programming the integrated remote control, make sure you retain the hand-held remote control that came with the garage door opener, gate operator or other device. You may need it for use in other vehicles, for future programming of an integrated remote control, or simply for continued use as a hand-held remote control to operate the respective device in other situations.
Reprogramming a single signal transmitter button
To program a device using a signal transmitter button previously trained, follow these steps:
- Switch on the ignition (▷ page 33).
- Press and hold the desired signal transmitter button ((2), (3) or (4)). Do not release the button.
- The indicator lamp (1) will begin to flash after 20 seconds. Without releasing the signal transmitter button, proceed with programming starting with step 3.
Operation of integrated remote control
- Switch on the ignition (▷ page 33).
- Select and press the appropriate integrated signal transmitter button ((2), (3) or (4)) to activate the remote controlled device.
The integrated remote control transmitter continues to send the signal as long as the button is pressed – up to 20 seconds.
278
Useful features
Erasing the integrated remote control memory
- Switch on the ignition (▷ page 33).
- Simultaneously press and hold down the outer signal transmitter buttons ② and ④, for approximately 20 seconds, until the indicator lamp ① flashes rapidly. Do not hold for longer than 30 seconds.
The codes of all three channels are erased.
If you sell your vehicle, erase the codes of all three channels.
Programming tips
If you are having difficulty programming the integrated remote control, here are some helpful tips:
-
Check the frequency of the hand-held remote control ⑤ (typically located on the reverse side of the remote). The integrated remote control is compatible with radio-frequency devices operating between 288–399 MHz.
-
Put a new battery in the hand-held remote control ⑤. This will increase the likelihood of the hand-held remote control sending a faster and more accurate signal to the integrated remote control.
-
While performing step 3, hold the hand-held remote control ⑤ at different lengths and angles from the signal transmitter button (②, ③ or ④) you are programming. Attempt varying angles at the distance of 2 to 5 inches (5 to 12 cm) away or the same angle at varying distances.
-
If another hand-held remote control is available for the same device, try the programming steps again using that other hand-held remote control. Make sure new batteries are in the hand-held remote control before beginning the procedure.
-
Straighten the antenna wire from the garage door opener assembly. This may help improve transmitting and/or receiving signals.
Certain types of garage door openers are incompatible with the integrated remote control. If you should experience further difficulties with programming the integrated remote control, contact an authorized Mercedes-Benz Center, or call Mercedes-Benz Customer Assistance Center (in the USA only) at 1-800-FOR-MERCedes, or Customer Service (in Canada) at 1-800-387-0100.
279
Useful features
i USA only: This device complies with Part 15 of the FCC Rules. Operation is subject to the following two conditions: (1) This device may not cause harmful interference, and (2) this device must accept any interference received, including interference that may cause undesired operation. Any unauthorized modification to this device could void the user's authority to operate the equipment.
i Canada only: This device complies with RSS-210 of Industry Canada. Operation is subject to the following two conditions: (1) This device may not cause interference, and (2) this device must accept any interference received, including interference that may cause undesired operation of the device. Any unauthorized modification to this device could void the user's authority to operate the equipment.
280
Operation
The first 1000 miles (1500 km) Driving instructions At the gas station Engine compartment Tires and wheels Winter driving Maintenance Vehicle care
281
Operation
The first 1 000 miles (1 500 km)
In the “Operation” section you will find detailed information on operating, maintaining and caring for your vehicle.
The more cautiously you treat your vehicle during the break-in period, the more satisfied you will be with its performance later on.
- Drive your vehicle during the first 1 000 miles (1 500 km) at varying but moderate vehicle and engine speeds.
- During this period, avoid heavy loads (full throttle driving) and excessive engine speeds (no more than 2/3 of maximum rpm in each gear).
- Shift gears in a timely manner.
- Avoid accelerating by kick-down.
- Do not attempt to slow the vehicle down by shifting to a lower gear using the gear selector lever.
- Select positions 3, 2 or 1 only when driving at moderate speeds (for hill driving).
- Select C as the preferred shift program (\triangleright page 167) for the first 1 000 miles (1 500 km).
After 1 000 miles (1 500 km) you may gradually increase vehicle and engine speeds to the permissible maximum.
All of the above instructions, as may apply to your vehicle type, also apply when driving the first 1 000 miles (1 500 km) after the engine or the rear differential has been replaced.
Always obey applicable speed limits.
282