Good visibility
For information on the windshield wipers, see “Windshield wipers” (▷ page 53).
Headlamp cleaning system*
The button is located on the left side of the dashboard.
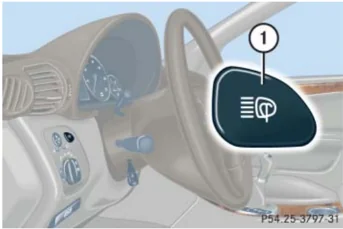
① Headlamp washer button ▶ Switch on the ignition (▷ page 33). ▶ Press button ①. The headlamps are cleaned with a high-pressure water jet.
i The headlamps will automatically be cleaned when you have
- switched on the headlamps and
- operated the windshield wipers with windshield washer fluid 15 times
When you switch off the ignition, the counter resets.
For information on filling up the washer reservoir, see “Windshield washer system and headlamp cleaning system*” (▷ page 303).
Rear view mirrors
For more information on setting the rear view mirrors, see “Mirrors” (▷ page 43).
Interior rear view mirror, antiglare position
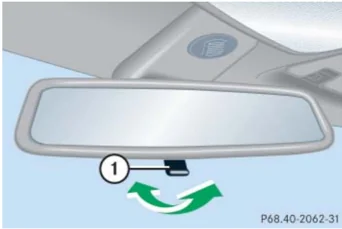
① Lever ▶ Tilt the mirror to the antiglare night position by moving lever ① towards the windshield.
The interior rear view mirror is dimmed.
170
Good visibility
Auto-dimming rear view mirrors*
The reflection brightness of the exterior rear view mirror on the driver’s side and the interior rear view mirror will respond automatically to glare when
- the ignition is switched on and
- incoming light from headlamps falls on the sensor in the interior rear view mirror.
The rear view mirror will not react if
- reverse gear R is engaged
- the interior lighting is turned on
Warning!
The auto-dimming function does not react if incoming light is not aimed directly at sensors in the interior rear view mirror.
The interior rear view mirror and the exterior rear view mirror on the driver’s side do not react, for example, if the rear window sunshade* is in raised position.
Glare can endanger you and others.
! Electrolyte drops coming into contact with the vehicle paint finish can be completely removed only while in the liquid state and by applying plenty of water.
Warning!
In case of an accident, liquid electrolyte may escape from the mirror housing if the mirror glass breaks.
Electrolyte has an irritating effect. Do not allow the liquid to come into contact with eyes, skin, clothing, or respiratory system. In case it does, immediately flush affected area with water, and seek medical help if necessary.
Warning!
Exercise care when using the passen-ger-side exterior rear view mirror. The mirror surface is convex (outwardly curved surface for a wider field of view). Objects in mirror are closer than they appear. Check your interior rear view mirror or glance over your shoulder before changing lanes.
171
Good visibility
Activating exterior rear view mirror parking position*
Follow these steps to activate the mirror parking position so that the passenger-side exterior rear view mirror will be turned downward during parking maneuvers to the stored position.
The buttons are located above the exterior lamp switch.
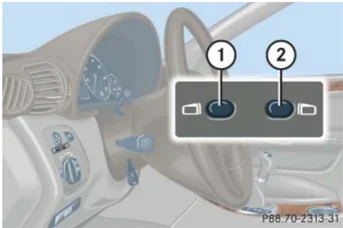
① Driver's side exterior rear view mirror button ② Passenger-side exterior rear view mirror button
▶ Switch on the ignition (▷ page 33). ▶ Store a parking position for the passenger-side exterior rear view mirror (▷ page 117). ▶ Switch the Mirror set, parking aid function in the Convenience submenu of the control system to On (▷ page 154). ▶ Press button ② for the passenger-side exterior rear view mirror. ▶ Place the gear selector lever in reverse gear R.
The passenger-side exterior rear view mirror turns downwards to the stored position.
The passenger-side exterior rear view mirror returns to its previously stored driving position:
- 10 seconds after you put the gear selector lever out of position R
- immediately once your vehicle exceeds a speed of approximately 6 mph (10 km/h)
- immediately when you press button ① for the driver's side exterior rear view mirror
172
Good visibility
Sun visors
The sun visors protect you from sun glare while driving.
Warning!
Do not use the vanity mirror while driving. Keep the mirrors in the sun visors closed while vehicle is in motion. Reflected glare can endanger you and others.
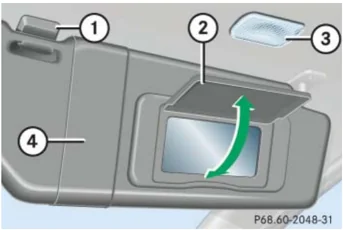
① Mounting ② Mirror cover ③ Mirror lamp ④ Sun visor
► Swing sun visor ④ down when you experience glare.
► To use illuminated mirror, lift up mirror cover ②.
If sun visor ④ is disengaged from mounting ① with mirror cover ② open, mirror lamp ③ will switch off.
If sunlight enters through a side window, close mirror cover ② (if open), disengage sun visor ④ from mounting ① and pivot to the side.
173
Good visibility
Rear window sunshade*
Warning!
When operating the rear window sunshade, make sure there is no danger of anyone being harmed by the raising or lowering procedure.
The raising or lowering procedure can be immediately halted by briefly pressing the switch.
Briefly press switch again to raise or lower the rear window sunshade completely.
Warning!
When leaving the vehicle, always remove the SmartKey from the starter switch, take it with you, and lock the vehicle. Do not leave children unattended in the vehicle, or with access to an unlocked vehicle. Unsupervised use of vehicle equipment can cause an accident and/or serious personal injury.
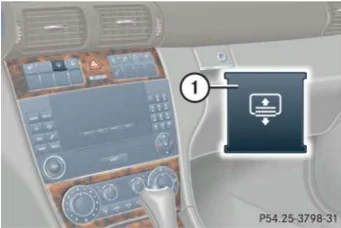
The switch is located in the center console.
 ① Rear window sunshade switch
! Make sure that the movement of the rear window sunshade is not restricted by objects on the rear window shelf. Otherwise, the sunshade or the objects could be damaged.
► Switch on the ignition (▷ page 33).
Always raise or lower the sunshade fully for its support against the window frame.
Raising the sunshade
► Press switch ① briefly.
The sunshade is raised completely.
Stopping the raising procedure
► Press switch ① again.
The sunshade stops.
Lowering the sunshade
► Press switch ① briefly.
The sunshade is lowered completely.
Stopping the lowering procedure
► Press switch ① again.
The sunshade stops.
174
Good visibility
Rear window defroster
The rear window defroster uses a large amount of power. To keep the battery drain to a minimum, switch off the defroster as soon as the rear window is clear.
The defroster is automatically deactivated after approximately 6 to 17 minutes of operation depending on the outside temperature.
Warning! Any accumulation of snow and ice should be removed from the rear window before driving. Visibility could otherwise be impaired, endangering you and others.
Activating
► Press button [icon] or [icon] in the climate control panel (▷ page 177) or automatic climate control panel* (▷ page 187).
The indicator lamp on the button comes on.
Deactivating
► Press button [icon] or [icon] again.
The indicator lamp on the button goes out.
! If the rear window defroster switches off too soon and the indicator lamp starts flashing, this means that too many electrical consumers are operating simultaneously and there is insufficient voltage in the battery. The system responds automatically by deactivating the rear window defroster.
As soon as the battery has sufficient voltage, the rear window defroster automatically turns itself back on.
175
Climate control
176
Climate control
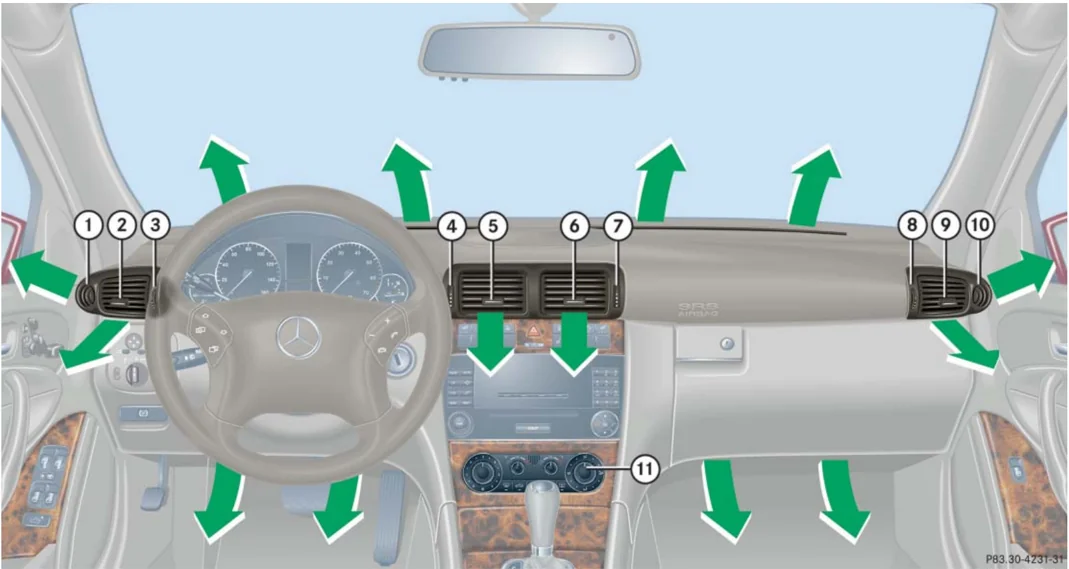
| Item |
|---|
| ① Left side defroster vent, fixed |
| ② Left side air vent, adjustable |
| ③ Thumbwheel for air volume control for left side air vent |
| ④ Thumbwheel for air volume control for left center air vent |
| ⑤ Left center air vent, adjustable |
| ⑥ Right center air vent, adjustable |
| ⑦ Thumbwheel for air volume control for right center air vent |
| ⑧ Thumbwheel for air volume control for right side air vent |
| ⑨ Right side air vent, adjustable |
| ⑩ Right side defroster vent, fixed |
| ⑪ Climate control panel |
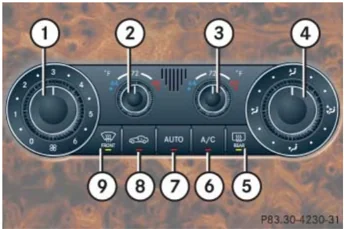
 Climate control panel (USA only)
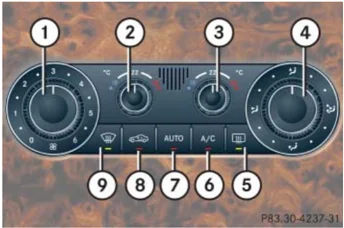
 Climate control panel (Canada only)
i For draft-free ventilation, move the sliders for the air vents ②, ⑤, ⑥, and ⑨ to the middle position.
| Item |
|---|
| ① Air volume control |
| ② Left side temperature control |
| ③ Right side temperature control |
| ④ Air distribution control |
| ⑤ Rear window defroster |
| ⑥ AC cooling on/off |
| ⑦ Air distribution and air volume (automatic mode) |
| ⑧ Air recirculation |
| ⑨ Front defroster |
177
Climate control
The climate control is operational whenever the engine is running. You can operate the climate control system in either the automatic or manual mode. The system cools or heats the interior depending on the selected interior temperature and the current outside temperature.
Warning! When operating the climate control, the air that enters the passenger compartment through the air vents can be very hot or very cold (depending on the set temperature). This may cause burns or frostbite on unprotected skin in the immediate area of the air vents. Always keep sufficient distance between unprotected parts of the body and the air vents. If necessary, use the air distribution control (▷ page 180) to direct the air to air vents in the vehicle interior that are not in the immediate area of unprotected skin.
Nearly all dust particles, pollutants and odors are filtered out before outside air enters the passenger compartment through the air distribution system.
The air conditioning will not engage (no cooling) if the mode A/C is deactivated (▷ page 183).
Warning! Follow the recommended settings for heating and cooling given on the following pages. Otherwise the windows could fog up, impairing visibility and endangering you and others.
Severe conditions (e.g. strong air pollution) may require replacement of the filter before its scheduled interval. A clogged filter will reduce the air volume to the interior.
If the vehicle interior is hot, ventilate the interior before driving off, see "Summer opening feature" (▷ page 243). The climate control will then adjust the interior temperature to the set value much faster.
Keep the air intake grille in front of the windshield free of snow and debris.
Do not obstruct air flow by placing objects on the air flow-through exhaust slots below the rear window.
178
Climate control
Deactivating the climate control system
Deactivating
- Set air volume control ① (▷ page 177) to position 0.
When the climate control system is deactivated, the outside air supply and circulation are also deactivated. Only choose this setting for a short time. Otherwise the windows could fog up.
Reactivating
- Set air volume control ① (▷ page 177) to any speed.
Operating the climate control system in automatic mode
When operating the climate control system in automatic mode, you will only rarely need to adjust the temperature, air volume and air distribution. In automatic mode, cooling with dehumidify is switched on. This function can be switched off if necessary.
Activating
- Press button AUTO (▷ page 177) while the engine is running.
The indicator lamp on the button comes on. The air volume and air distribution are adjusted automatically.
- Use temperature controls ② and ③ (▷ page 177) to separately adjust the air temperature on each side of the passenger compartment.
The temperature of the vehicle interior is adjusted automatically.
Deactivating
- Press button AUTO (▷ page 177) again.
The indicator lamp on the button goes out. The automatic operation of air volume and air distribution switches off.
179
Climate control
Setting the temperature
Use temperature controls ② and ③ (▷ page 177) to separately adjust the air temperature on each side of the passenger compartment. You should raise or lower the temperature setting in small increments, preferably starting at 72°F (22°C). The climate control will adjust to the set temperature as fast as possible.
Increasing
▶ Turn temperature control ② and/or ③ (▷ page 177) slightly clockwise.
The climate control system will correspondingly adjust the interior air temperature.
Decreasing
▶ Turn temperature control ② and/or ③ (▷ page 177) slightly counterclockwise.
The climate control system will correspondingly adjust the interior air temperature.
Adjusting air distribution and volume
Use air distribution control ④ (▷ page 177) to adjust the air distribution. The following symbols are located on the controls:
| Symbol | Function |
|---|---|
| Directs air through the center, side and rear passenger compartment air vents | |
| Directs air to the windshield and the side defroster vents | |
| Directs air into the entire vehicle interior | |
| Directs air to the footwells |
▶ Press button AUTO (▷ page 177).
The indicator lamp on the button goes out. The automatic air distribution is switched off. The air distribution is controlled according to the selected control setting.
▶ Turn air distribution control ④ (▷ page 177) to the desired symbol.
Opening center and side air vents
▶ Turn thumbwheels ③, ④, ⑦ and ⑧ (▷ page 176) upward.
The center air vents ⑤ and ⑥ and side air vents ② and ⑨ are open.
Closing center and side air vents
▶ Turn thumbwheels ③, ④, ⑦ and ⑧ (▷ page 176) downward.
The center air vents ⑤ and ⑥ and side air vents ② and ⑨ are closed.
180
Climate control
Adjusting air volume
Six blower speeds are available.
- Press button AUTO (▷ page 177). The indicator lamp in the button goes out. The automatic air volume control is switched off. The air volume is adjusted according to the currently selected setting.
- Use the air volume control ④ (▷ page 177) to adjust the air volume.
Front defroster
You can use this setting to defrost the windshield, for example if it is iced up. You can also defog the windshield and the side windows.
Keep this setting selected only until the windshield or the side windows are clear again.
Activating
- Press button or (▷ page 177).
The indicator lamp on the button comes on.
The air conditioning switches automatically to the following functions:
- maximum blowing and heating power
- air flows onto the windshield and the front side windows
- the air recirculation mode is switched off
Deactivating
- Press button or (▷ page 177) again. The indicator lamp on the button goes out. Defrosting is turned off.
The cooling remains switched on.
Windshield fogged on the outside
Keep this setting selected only until the windshield is clear again.
- Switch the windshield wipers on (▷ page 53).
- Press button AUTO (▷ page 177). The indicator lamp on the button comes on. Air distribution and air volume are adjusted automatically. If the automatic mode of the climate control is switched off:
- Turn air distribution control ④ to or (▷ page 177).
181
Climate control
Air recirculation mode
Switch to air recirculation mode to prevent unpleasant odors from entering the vehicle from the outside (e.g. before driving through a tunnel). This setting cuts off the intake of outside air and recirculates the air in the passenger compartment.
Warning!
Fogged windows impair visibility, endangering you and others. If the windows begin to fog on the inside, switching off the air recirculation mode immediately should clear interior window fogging. If interior window fogging persists, make sure the air conditioning (▷ page 183) is activated, or press button [icon] or [icon].
Activating
▶ Press button [icon] (▷ page 177). The indicator lamp on the button comes on.
ℹ️ The air recirculation mode is activated automatically at high outside temperatures.
The indicator lamp on button [icon] is not lit when the air recirculation mode is automatically switched on.
A quantity of outside air is added after approximately 30 minutes.
Warning!
Never operate the side windows and the tilt/sliding sunroof* if there is the possibility of anyone being harmed by the closing procedure.
In the event that the closing procedure causes potential danger, the closing of the side windows can be immediately halted by pressing or pulling the respective window switch. The closing of the tilt/sliding sunroof* can be immediately halted by moving the tilt/sliding sunroof* switch in the overhead control panel in any direction.
The closing of the side windows and tilt/sliding sunroof* can be reversed by again pressing and holding the [icon] button.
ℹ️ Press and hold button [icon] for approx. 2 seconds. The side windows and tilt/sliding sunroof* will close. You can release button [icon] once the closing procedure has begun. The windows and tilt/sliding sunroof* continue closing until they are fully closed.
182
Climate control
Deactivating
- Press button (▷ page 177). The indicator lamp on the button goes out.
i The air recirculation mode is deactivated automatically:
- after 5 minutes if the outside temperature is below approximately 41°F (5°C)
- after 5 minutes if the air conditioning is turned off
- after 30 minutes if the outside temperature is above approximately 41°F (5°C)
i Press and hold button for approx. 2 seconds. The side windows and or tilt/sliding sunroof* will return to their previous position. You can release button once the opening procedure has begun. The windows and tilt/sliding sunroof* continue opening until they have reached their previous position.
A window or tilt/sliding sunroof* will only return to its previous position if it has not been moved to another position using the respective window switch or tilt/sliding sunroof* switch after it was closed with button . A window or tilt/sliding sunroof* that was moved will remain in its current position if button is used to re-open the remaining windows or tilt/sliding sunroof*.
Air conditioning
The cooling function, only operational when the engine is running, cools the vehicle interior down to the selected temperature. The cooling function also dehumidifies the air in the vehicle interior, thus preventing the windows from fogging up.
i Condensation may drip out from underneath the vehicle. This is normal and not an indication of a malfunction.
Warning!
If you turn off the cooling function, the vehicle will not be cooled when weather conditions are warm. The windows can fog up more quickly. Window fogging may impair visibility and endanger you and others.
183
Climate control
Deactivating
It is possible to deactivate the air conditioning (cooling) function of the climate control system. The air in the vehicle will then no longer be cooled or dehumidified.
- Press button A/C (▷ page 177).
The indicator lamp on the button goes out.
The cooling function switches off after a short delay.
Activating
Moist air can fog up the windows. You can dehumidify the air with the air conditioning.
- Press button A/C (▷ page 177).
The indicator lamp on the button comes on.
The air conditioning uses the refrigerant R134a. This refrigerant is free of CFCs which are harmful to the ozone layer.
⚠️ If the air conditioning cannot be turned on again, this indicates that the air conditioning is losing refrigerant. The compressor has turned itself off.
Have the air conditioning checked at the nearest authorized Mercedes-Benz Center.
Rear passenger compartment adjustable air vents
The air conditioning for the rear passenger compartment is controlled via the climate control panel (▷ page 177).
ℹ️ The temperature at the center air vents for the rear passenger compartment ① and is the same as at the dashboard center air vents.
184
Climate control
The air vents for the rear passenger compartment are located in the rear center console.
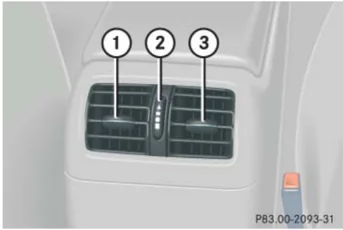
① Left center air vent ② Thumbwheel for air volume control for center air vents ③ Right center air vent
Adjusting air distribution
▶ Push the slide for the left center vent ① or right center vent ③ to the left, right, up, or down.
The air flow is directed in the corresponding direction.
For draft-free ventilation, push slides ① and ③ upward.
Adjusting air volume
▶ Turn thumbwheel ② up or down.
The air volume is increased or decreased.
185