Practical hints
Replacing bulbs
Have the LEDs and bulbs for the following lamps replaced by an authorized Mercedes-Benz Center:
- Additional turn signals in the exterior rear view mirrors
- High mounted brake lamp
- Xenon* lamps
- Front fog lamps
- Front side marker lamps
!
Have the headlamp adjustment checked regularly.
Replacing bulbs for front lamps
Before you start to replace a bulb for a front lamp, do the following first:
- Turn the exterior lamp switch to position 0 (▷ page 118).
- Open the hood (▷ page 297).
Halogen headlamp
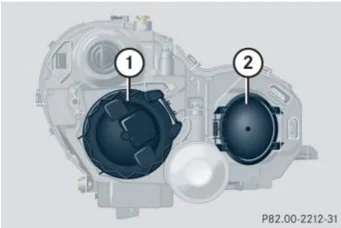
① Housing cover for low beam headlamp ② Housing cover for high beam head-lamp, parking and standing lamp
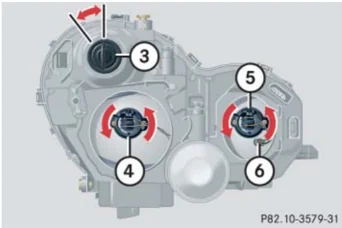
③ Bulb socket for turn signal lamp bulb ④ Bulb socket for low beam bulb ⑤ Bulb socket for high beam bulb ⑥ Bulb socket for parking and standing lamp bulb
400
Practical hints
Replacing bulbs
Low beam bulb
- Press the clamp on housing cover ① and remove it.
- Pull the electrical connector off.
- Turn bulb socket ④ counterclockwise and take out the bulb.
- Insert the new bulb so that its socket locates in the recess of the lamp housing.
- Turn bulb socket ④ clockwise until it engages.
- Plug the electrical connector onto the bulb.
- Align housing cover ① and press until it engages.
High beam bulb
- Press the clamp on housing cover ② and remove it.
- Pull the electrical connector off.
- Turn bulb socket ⑤ counterclockwise and take out the bulb.
- Insert the new bulb so that its socket locates in the recess of the lamp housing.
- Turn bulb socket ⑤ clockwise until it engages.
- Plug the electrical connector onto the bulb.
- Align housing cover ② and press until it engages.
Front turn signal lamp bulb
- Turn bulb socket ③ with the bulb counterclockwise and remove it.
- Press gently onto the bulb and turn it counterclockwise out of bulb socket ③.
- Press new bulb gently into bulb socket ③ and turn clockwise until it engages.
- Place bulb socket ③ back into the lamp and turn it clockwise.
Parking and standing lamp bulb
- Press the clamp on housing cover ② and remove it.
- Pull out bulb socket ⑥ with the bulb.
- Pull the bulb out of bulb socket ⑥.
- Press the new bulb into bulb socket ⑥.
- Press bulb socket ⑥ back into the lamp.
- Align housing cover ② and press until it engages.
401
Practical hints
Replacing bulbs
Bi-Xenon* headlamp
Warning!
Do not remove the cover ① for the Bi-Xenon headlamp. Because of high voltage in Bi-Xenon lamps, it is dangerous to replace the bulb or repair the lamp and its components. We recommend that you have such work done by a qualified technician.
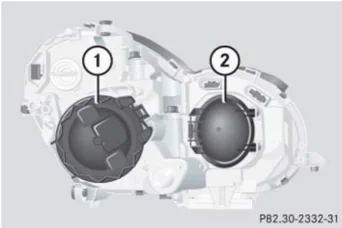
① Housing cover for Bi-Xenon headlamp ② Housing cover for high beam flasher, parking and standing lamp
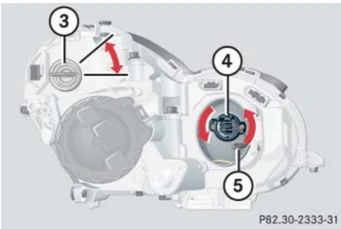
③ Bulb socket for turn signal lamp bulb ④ Bulb socket for high beam flasher bulb ⑤ Bulb socket for parking and standing lamp bulb
High beam flasher bulb
▶ Press the clamp on housing cover ② and remove it.
▶ Pull the electrical connector off.
▶ Turn bulb socket ④ counterclockwise and take out the bulb.
▶ Insert the new bulb so that its socket locates in the recess of the lamp housing.
▶ Turn bulb socket ④ clockwise until it engages.
▶ Plug the electrical connector onto the bulb.
▶ Align housing cover ② and press until it engages.
402
Practical hints
Replacing bulbs
Front turn signal lamp bulb
- Turn bulb socket ③ with the bulb counterclockwise and remove it.
- Press gently onto the bulb and turn it counterclockwise out of bulb socket ③.
- Press new bulb gently into bulb socket ③ and turn clockwise until it engages.
- Place bulb socket ③ back into the lamp and turn it clockwise.
Parking and standing lamp bulb
- Press the clamp on housing cover ② and remove it.
- Pull out bulb socket ⑤ with the bulb.
- Pull the bulb out of bulb socket ⑤.
- Press the new bulb into bulb socket ⑤.
- Press bulb socket ⑤ back into the lamp.
- Align housing cover ② and press until it engages.
Additional turn signal lamp bulbs
The additional turn signal lamps in the exterior rear view mirrors have LEDs. If a malfunction occurs or LEDs fail to function, the entire turn signal unit must be replaced. Have the turn signal unit replaced by an authorized Mercedes-Benz Center.
Front side marker lamp bulbs
Since replacing the side marker lamp bulbs is a technically highly demanding process, we recommend you have the side marker lamp bulbs replaced by an authorized Mercedes-Benz Center.
Replacing bulbs for rear lamps
Before you start to replace a bulb for a rear lamp, do the following first:
- Turn the exterior lamp switch to position 0 (▷ page 118).
- Open the trunk (▷ page 103).
Tail lamp unit
 ① Latch
403
Practical hints
Replacing bulbs
- Fold the corresponding trim panel to the side.
- Turn latch ① to vertical position and remove the bulb carrier.
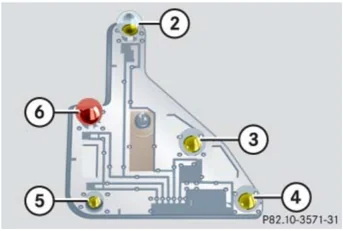
Bulb carrier
② Brake lamp bulb ③ Backup lamp bulb ④ Rear fog lamp (driver’s side only), tail and standing lamp bulb ⑤ Parking and side marker lamp bulb ⑥ Turn signal lamp bulb
- Press gently onto the respective bulb and turn counterclockwise out of its bulb socket.
- Press the new bulb gently into its bulb socket and turn clockwise until it engages.
- Reinstall the bulb carrier and lock it again with latch ①.
- Reinstall the trim panel.
License plate lamp
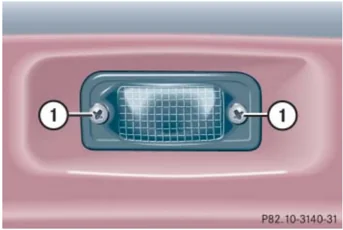
① Screw
- Loosen both screws ①.
- Remove the license plate lamp.
- Replace the bulb.
- Reinstall the license plate lamp.
- Retighten screws ①.
404
Practical hints
Replacing wiper blades
▼ Replacing wiper blades
Removing wiper blades
Warning!
For safety reasons, switch off wipers and remove SmartKey from starter switch before replacing a wiper blade. Otherwise, the wiper motor could suddenly turn on and cause injury.
► Remove SmartKey from starter switch. ► Fold wiper arm forward.
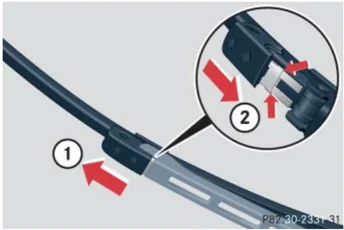
① Unlock ② Lock
► Pull the tab in direction of arrow ① and remove wiper blade.
Installing wiper blades
► Slide the wiper blade into the cutout on the wiper arm (see arrows). ► Slide the tab back in the direction of arrow ② until it audibly engages. ► Fold the wiper arm backward to rest on the windshield. Make sure you hold on to the wiper when folding the wiper arm back.
❗ Never open the hood when the wiper arms are folded forward.
Hold on to the wiper when folding the wiper arm back. If released, the force of the impact from the tensioning spring could crack the windshield.
Do not allow the wiper arms to contact the windshield glass without a wiper blade inserted.
Make certain that the wiper blades are properly installed. Improperly installed wiper blades may cause windshield damage.
For your convenience, we recommend that you have this work carried out by an authorized Mercedes-Benz Center.
405
Practical hints
Flat tire
Warning!
The dimensions of the Minispare wheel are different from those of the road wheels. As a result, the vehicle handling characteristics change when driving with a Minispare wheel mounted. Adapt your driving style accordingly.
The Minispare wheel is for temporary use only. When driving with Minispare wheel mounted, ensure proper tire inflation pressure and do not exceed a vehicle speed of 50 mph (80 km/h).
Drive to the nearest Mercedes-Benz Center as soon as possible to have the Minispare wheel replaced with a regular road wheel.
Never operate the vehicle with more than one Minispare wheel mounted.
Do not switch off the ESP® when a Minispare wheel is mounted.
Preparing the vehicle
▶ Park the vehicle in a safe distance from moving traffic on a hard, flat surface when possible.
▶ Turn on the hazard warning flasher (▷ page 124).
▶ Turn the steering wheel so that the front wheels are in a straight ahead position.
▶ Set the parking brake (▷ page 58).
▶ Move the gear selector lever to P (manual transmission: to first or reverse gear).
▶ Turn off the engine (▷ page 59).
▶ Remove the SmartKey from the starter switch.
▶ Have any passenger exit the vehicle at a safe distance from the roadway.
Open doors only when conditions are safe to do so.
Mounting the Minispare wheel
Preparing the vehicle
Prepare the vehicle as described (▷ page 406).
▶ Take the wheel wrench, the wheel bolts, and the jack out of the trunk (▷ page 383).
▶ Take the Minispare wheel out of the trunk (▷ page 386).
406
Practical hints
Flat tire
Lifting the vehicle
► Prevent the vehicle from rolling away by blocking wheels with wheel chocks or other sizable objects.
One wheel chock is included with the vehicle tool kit (▷ page 383).
When changing wheel on a level surface:
► Place the wheel chock in front of and another sizable object behind the wheel that is diagonally opposite to the wheel being changed.
Always try lifting the vehicle using the jack on a level surface. However, should circumstances require you to do so on a hill, place the wheel chock and the other sizeable object as follows:
► Place wheel chocks and another sizable object on the downhill side blocking both wheels of the axle not being worked on.
Warning!
The jack is designed exclusively for jacking up the vehicle at the jack take-up brackets built into both sides of the vehicle. To help avoid personal injury, use the jack only to lift the vehicle during a wheel change. Never get beneath the vehicle while it is supported by the jack. Keep hands and feet away from the area under the lifted vehicle. Always firmly set parking brake and block wheels before raising vehicle with jack.
Do not disengage parking brake while the vehicle is raised. Be certain that the jack is always vertical (plumb line) when in use, especially on hills. Always try to use the jack on level surface. Make sure the jack arm is fully seated in the jack take-up bracket. Always lower the vehicle onto sufficient capacity jackstands before working under the vehicle.
P40.10-3340-31
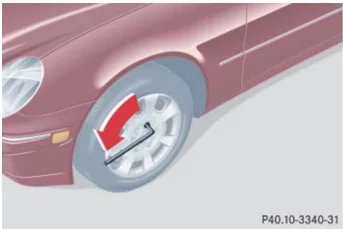
► On wheel to be changed, loosen but do not yet remove the wheel bolts (approximately one full turn with wrench).
407
Practical hints
Flat tire
The jack take-up brackets are located directly behind the front wheel housings and in front of the rear wheel housings.
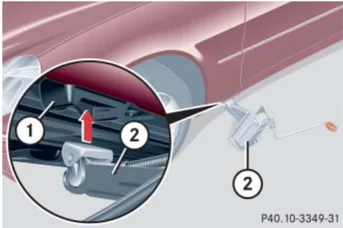
① Take-up bracket ② Jack
► Place jack ② on firm ground.
► Position jack ② under take-up bracket ① so that it is always vertical (plumb-line) as seen from the side, even if the vehicle is parked on an incline.
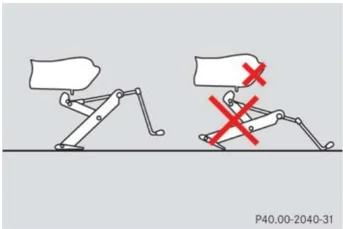
P40.00-2040-31
► Jack up the vehicle until the wheel is a maximum of 1.2 in (3 cm) from the ground. Never start engine while vehicle is raised.
Warning!
The jack is intended only for lifting the vehicle briefly for wheel changes. It is not suited for performing maintenance work under the vehicle.
• Never start the engine when the vehicle is raised.
• Never lie down under the raised vehicle.
Removing the wheel
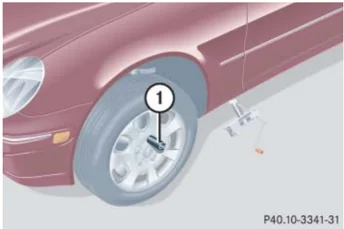
P40.10-3341-31
① Alignment bolt
► Unscrew upper-most wheel bolt and remove.
► Replace this wheel bolt with alignment bolt ① supplied in the tool kit.
► Remove the remaining bolts.
Do not place wheel bolts in sand or dirt. This could result in damage to the bolts and wheel hub threads.
► Remove the wheel.
408
Practical hints
Flat tire
Mounting the spare wheel
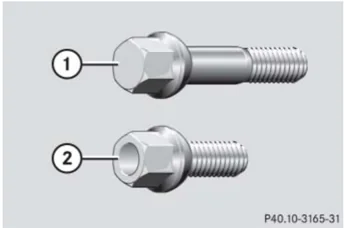
① Wheel bolt for light alloy rims ② Wheel bolt for Minispare wheel (located in trunk with spare wheel)
! Wheel bolts ② must be used when mounting the Minispare wheel or other steel rims. The use of any wheel bolts other than wheel bolts ② for the Minispare wheel will physically damage the vehicle’s brakes.
► Clean contact surfaces of wheel and wheel hub.
! To avoid paint damage, place wheel flat against hub and hold it there while installing first wheel bolt.
Warning! Always replace wheel bolts that are damaged or rusted.
Never apply oil or grease to wheel bolts.
Damaged wheel hub threads should be repaired immediately. Do not continue to drive under these circumstances! Contact an authorized Mercedes-Benz Center or call Roadside Assistance.
Incorrect wheel bolts or improperly tightened wheel bolts can cause the wheel to come off. This could cause an accident. Make sure to use the correct wheel bolts.

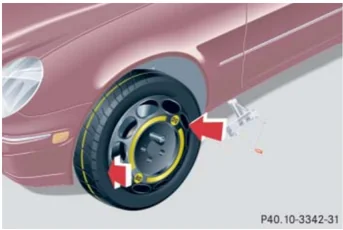
► Guide spare wheel onto the alignment bolt and push it on.
► Insert wheel bolts and tighten them slightly.
409
Practical hints
Flat tire
P40.10-3343-31
► Unscrew the alignment bolt, install last wheel bolt and tighten slightly.
Warning!
Only use genuine equipment Mercedes-Benz wheel bolts. Other wheel bolts may come loose.
Do not tighten the wheel bolts when the vehicle is raised. Otherwise the vehicle could fall off the jack.
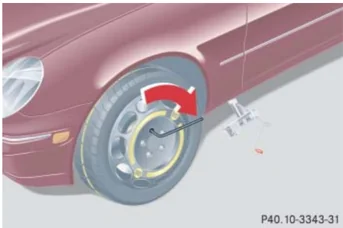
Lowering the vehicle
► Lower vehicle by turning crank counterclockwise until vehicle is resting fully on its own weight.
► Remove the jack.
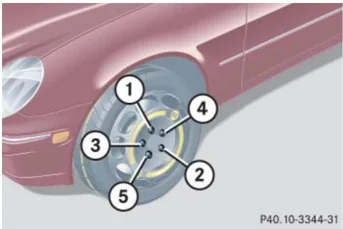
P40.10-3344-31
① - Wheel bolts
► Tighten the five wheel bolts evenly, following the diagonal sequence illustrated (① to ), until all bolts are tight. Observe a tightening torque of 80 lb-ft (110 Nm).
Warning!
Have the tightening torque checked after changing a wheel. The wheels could come loose if they are not tightened to a torque of 80 lb-ft (110 Nm).
Before storing the jack, it should be fully collapsed, with handle folded in (storage position) (▷ page 385).
► Store the jack and the other vehicle tools in the trunk.
410
Practical hints
Flat tire
MOExtended system*
The MOExtended system allows you to continue driving your vehicle even if there is a total loss of pressure in one or more tires.
You may only use the MOExtended system in conjunction with the Run Flat Indicator*.
! The maximum distance in emergency mode depends on the vehicle's load. It is 30 miles (50 km) if the vehicle is partially loaded and 18 miles (30 km) if the vehicle is fully loaded.
The point at which the maximum driving distance begins in emergency mode is when the warning message appears in the multifunction display indicating that there is a loss of tire inflation pressure.
Do not exceed the maximum speed of 50 mph (80 km/h).
Warning!
In emergency mode, your vehicle's driving characteristics are diminished in such situations as:
- driving around curves
- while braking
- while accelerating rapidly
Therefore, your driving style must be adapted accordingly. Avoid abrupt steering and driving maneuvers, as well as driving over obstacles (road curbs, potholes, or off-road areas). This is especially important if the vehicle is heavily loaded.
The emergency driving distance that can be achieved greatly depends on the demands placed on the vehicle. Depending on speed, load, driving maneuvers, road conditions, outside temperature, etc., the distance can be significantly shorter or, if the vehicle is driven cautiously, somewhat longer.
Do not continue driving in emergency mode if
- you notice knocking sounds
- the vehicle starts to shake
- smoke develops and you smell rubber
- ESP® is intervening continuously
- you notice tears on the tire sidewalls
After driving in emergency mode, you must have the rims inspected by an authorized Mercedes-Benz Center to check if they are suitable for further use. The failed tire must be replaced in any case.
i When replacing individual or all tires on the vehicle, make sure only matching tires marked with "MOExtended" are mounted in the size specified for your vehicle (▷ page 432).
411
Practical hints
Battery
The battery is located in the engine compartment on the right hand side.
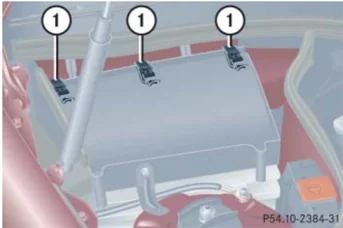
① Clamps
Removing filter box: ▶ Release clamps ①. ▶ Remove filter box.
Installing filter box: ▶ Insert filter box properly. ▶ Secure it with clamps ①.
Warning!
Failure to follow these instructions can result in severe injury or death.
Observe all safety instructions and precautions when handling automotive batteries (> page 302).
Never lean over batteries while connecting, you might get injured.
Battery fluid contains sulfuric acid. Do not allow this fluid to come in contact with eyes, skin or clothing. In case it does, immediately flush affected area with water and seek medical help if necessary.
A battery will also produce hydrogen gas, which is flammable and explosive. Keep flames or sparks away from battery, avoid improper connection of jumper cables, smoking, etc.
Warning!
Do not place metal objects on the battery as this could result in a short circuit.
Use leak-proof battery only to avoid the risk of acid burns in the event of an accident.
❗ Never loosen or detach battery terminal clamps while the engine is running or the SmartKey is in the starter switch. Otherwise the alternator and other electronic components could be severely damaged.
Have the battery checked regularly by an authorized Mercedes-Benz Center.
Refer to Maintenance Booklet for maintenance intervals or contact an authorized Mercedes-Benz Center for further information.
412
Practical hints
Battery
Warning!
With a disconnected battery
- you will no longer be able to turn the SmartKey in the starter switch
- the gear selector lever will remain locked in position P
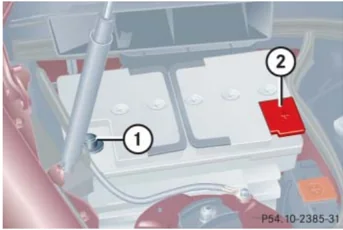
① Negative terminal
② Positive terminal cover
Disconnecting the battery
- Turn off the engine (▷ page 59).
- Turn off all electrical consumers.
- Remove SmartKey from starter switch.
- Open the hood (▷ page 297).
- Remove the filter box (▷ page 412).
- Disconnect the battery negative lead from negative terminal ①.
- Remove cover ② from the positive terminal.
- Disconnect the battery positive lead.
Removing the battery
- Remove the screw-nuts securing the battery.
- Remove the battery bracket.
- Pull out the battery ventilation tube from the battery (depending on battery arrangement in your vehicle model, the ventilation tube is located either on the left or right side of the battery).
- Take out the battery.
413
Practical hints
Battery
Charging and reinstalling the battery
Warning!
Never charge a battery while still installed in the vehicle unless the accessory battery charge unit approved by Mercedes-Benz is being used. Gases may escape during charging and cause explosions that may result in paint damage, corrosion or personal injury.
An accessory battery charge unit specially adapted for Mercedes-Benz vehicles and tested and approved by Mercedes-Benz is available, permitting the charging of the battery in its installed position. Contact an authorized Mercedes-Benz Center for information and availability. Charge battery in accordance with the separate instructions for the accessory battery charger.
► Charge battery in accordance with the instructions of the battery charger manufacturer.
► Reinstall the charged battery. Follow the previously described steps in reverse order.
! The battery, its filler caps and the battery ventilation tube must always be securely installed when the vehicle is in operation.
Reconnecting the battery
► Turn off all electrical consumers.
► Remove SmartKey from starter switch.
► Connect the battery positive lead and fasten its cover ②.
► Connect the battery negative lead.
! NEVER invert the terminal connections!
► Reinstall the filter box (▷ page 412).
The following procedures must be carried out following any interruption of battery power (e.g. due to reconnection):
-
Set the clock (▷ page 145). Vehicles with COMAND*: See COMAND operator's manual.
-
Synchronize side windows (▷ page 242).
-
Synchronize tilt/sliding sunroof* (▷ page 246).
Batteries contain materials that can harm the environment if disposed of improperly. Large 12 volt storage batteries contain lead. Recycling of batteries is the preferred method of disposal. Many states require sellers of batteries to accept old batteries for recycling.
414